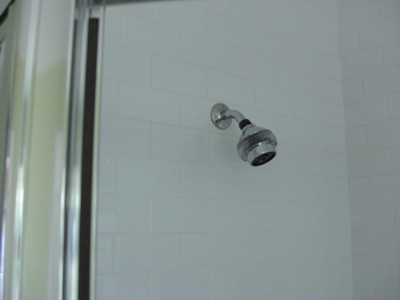
DEAR TIM: I need to fix a leaking shower head. Is it difficult to replace shower heads? At first I was just going to fix the leak, but my wife wants a new shower head. Are there some secret tips you can share that will make it appear as if a master plumber did the job? Alan L., Jackson, TN
DEAR ALAN: I'll never forget my first shower head. I thought to myself that the job appeared simple, and was I ever wrong. I ended up with two leaks, a ruined shower head because I used the wrong tool and my parents banned me from doing experimental plumbing in their home.
Shower heads are like so many other home-improvement projects. It's not that the job is hard, it is that there are just some simple steps you need to take to ensure the job turns out as if a pro did it. In the case of a shower head, your biggest concern should be creating a leak behind the wall where the gooseneck pipe connects to the vertical water-supply pipe that is in the wall.
When you unscrew the existing shower head from the gooseneck pipe, there is a chance you can break the seal where that pipe connects to the water-supply line. The resulting leak can be large or a very sinister slow leak that only produces one or two drops of water with each shower. Either one can cause thousands of dollars of damage over time.
What could possibly be hard about replacing a shower head? If you don't know the tricks, leaks at the head and behind the wall are possible. PHOTO CREDIT: Tim Carter
Perhaps the best advice is to take out the gooseneck pipe as part of the job, and reinstall it with the new shower head. Use a small wire brush to clean the pipe threads. If the treads look corroded, then buy a new gooseneck pipe.
Many years ago the mistake I made when I installed my new shower head and gooseneck pipe is not using a pipe sealant on the gooseneck pipe threads. I was a very young man and had no idea what pipe dope or thread sealant was. If you do not use it, water will stream from the connection like an April shower!
There are at least two popular pipe-thread sealants. One is Teflon tape and another is a thick compound you brush on the male threads of the gooseneck. You need to put this sealant on both ends of the gooseneck pipe. If you fail to do this where you attach the shower head, water will leak from the connection and spray you and the walls inside the shower.
It really pays to use the right tools when replacing a shower head. The mistake I made was using a pipe wrench on the shower head. I didn't realize the fixture was made of chrome-plated brass. The teeth of the wrench ruined the finish on the shower head. If you look at most shower heads, you will discover at least two flat areas that are parallel with one another. These are made for an adjustable wrench that, when tightened correctly, will not mar the finish on the new shower head.
After you install the gooseneck pipe but before you install the new shower head, you should turn on the water in the shower. This will flush out any small debris and excess pipe sealant that may have gotten into the pipe. Failure to do this important step can clog the small flow-restrictor holes that are inside virtually every shower head. It can be a huge task to clean these out if they get clogged.
Don't over tighten the new shower head on the gooseneck pipe. Once it is hand tight, it should only take one complete turn to complete a leak-free connection. If you can't turn it that far, stop and test the connection. You can damage the shower head if you tighten it too much.
Talk to different professional plumbers about pipe-tread sealants and you will get polarized views as if you had entered into a political debate. Some plumbers prefer Teflon tape, while others love the brush-on pipe sealants. I happen to use the brush-on sealant that contains Teflon. That way I can be neutral in one of those discussions.
If you decide to use the Teflon tape, there is a special way to install it on the male threads of the pipe. If you install it wrong, the tape will unwind off the pipe as you turn the pipe into the fitting behind the wall. You may think you have a sealed joint when in fact you have a potential Niagara Falls.
One way to install Teflon tape that has worked for me for years is to use a piece of tape that will wind around the pipe threads three or four times. Hold the end of the pipe that you are wrapping so it is pointing at your face. Wrap the Teflon in a clockwise fashion so the threads are covered. It is that simple.
In this issue of my newsletter I am going to talk about my move to New Hampshire and a few other things that have nothing to do with remodeling or building. This is a very rare occurrence.
I do this at great risk as last week I received a complaint from Joyce who said, "....I signed up for the newsletter to get information about home repair, remodeling, etc. I'm really not interested in learning of your personal vacation plans or your political views....."
Joyce and I emailed back and forth a few times, and I told her that she probably would be best served by unsubscribing. I think she was upset about my comments concerning the carbon-dioxide truck and/or my appearance in front of the Senate and House last week. No worries, as Joyce has made her choice.
The other side of the coin is each week I get increasing numbers of emails from people like you who say the exact opposite. They are tired of newsletters with little or no personality. They love the fact I am willing to open up the doors a bit on my private life as it shows the real me. You and I are very much alike. We both make mistakes, and we have small and large victories each week. I have said it before: nothing makes me happier about working on this newsletter than the feedback you send to me.
What a shame Joyce left. Why? Because once Kathy and I start building our new home in New Hampshire, this newsletter is going to be jammed packed with the trials and tribulations of my own building process. Oh well, life is full of decisions, and Joyce made hers. If you follow Joyce, I'm sorry to see you go.
ICE
I purchased a new 3G iPhone last week. Oh my gosh it's amazing. It has been over a year since I switched from PC computers to a MacBookPro, and my love affair with the Apple platform couldn't be more intense. I have shunned my Treo cell phone treating it as if it's a harlot.
While importing my contacts into the new phone, I set up something I sincerely hope is on your cell phone. The number for Ice. No, not the cold stuff, but the number the police, hospital or EMS should call In Case of Emergency and you can't talk. This contact acronym also comes in handy in case you lose your phone.
In your contact list create a listing titled ICE. Input the number or numbers of who should be called in case you pass out and emergency personnel need to contact a loved one or next of kin. Please don't put this off. Why not do it now as it only takes moments to do?
Congressional Hearings Update
Last week I shared that I was scheduled to testify in front of a Senate Subcommittee that deals with Antitrust issues. The same day I had to testify in front of the House Antitrust Task Force. I was a witness answering questions about the proposed advertising deal between Yahoo! and Google.
I am going to blog about the entire experience, but let me tell you that my opinion of our Federal government has changed. A month ago, I was very cynical about its workings. After last Tuesday, I can say that there is a glimmer of hope. After the House hearing, Congressman Cannon came up to me and told me my testimony made a deep impact on his thinking. He said he very well might call me to get more information.
That made a huge impression on me. Some of our legislators are in Washington with open minds wanting to do the right thing.
All day while I was in the hearings, I felt like I was floating on a cloud. It is hard to believe I was in those rooms and sitting at the witness table shoulder to shoulder with the head counsels from Microsoft, Yahoo! and Google. I can tell you one thing, the folks at Microsoft and ATT are none too happy with what I had to say. You should read my written testimony. A webcast video is available at http://judiciary.senate.gov/hearing.cfm?id=3469. Click on the webcast button. My testimony begins about 34 minutes into the hearing.
New Hampshire - Making a Dream Come True
Thirty-five years ago, I started to dream of owning land in New Hampshire. It all started when I saw a 240-acre tract of land that my then future father-in-law showed me and his family one night after we ate out. This land is in a small village in southwestern Ohio named North Bend. It got its name because this is where the Ohio River's course cuts closest to the North Pole as it journeys from Pittsburgh to the mighty Mississippi River.
The view from this land is stunning. It has a view of the Ohio River that is like none other for hundreds of miles. At one place on the land you can look upstream for about five miles.
Running through this land is a magical creek. I walked that creek countless times in all seasons as I courted Kathy and eventually as her husband. While doing so, I said to myself that I would one day own a large piece of land preferably with a view of water or a creek on it.
Kathy and I got married right out of college, and honeymooned in New England. I had always wanted to go there and so did Kathy. When we arrived in New Hampshire, we were both smitten. The White Mountains, as well as the Lakes Region, took our breath away. There are vistas in these areas that remind me of many places out West. While in New Hampshire, one of the nights before we drifted to sleep we made a pledge that we would live there one day.
But at the end of the honeymoon, we pointed my Ford F-100 pickup truck back west and life got in the way. This happens to many of us. I started my business in Cincinnati, Ohio, and we grew a family there at the same time.
However, we never lost site of the dream. About ten years ago, we took the kids up to New England for a vacation. The love affair with New Hampshire intensified. Kathy and I looked at each other and said, "We have to do it. We have to live here."
Keep in mind that both of us are four-seasons people. We hate the hot, humid summers of Cincinnati and the cold snowless winters. We wanted to live where the dew points are commonly in the upper 50s and snow is on the ground for a good part of winter. Did I mention that Fall is my favorite season?
Three years ago, we were able to finally start looking for land aiming for a final move date of August 2010. You can read all about the land, see some photos and watch a video here.
We intend to break ground for the new house in April, 2009. I have some site work to complete before the snow blows this winter, so I am moving up to New Hampshire now. In fact, as you read this, we should be finishing the drive to the Maria Atwood Inn in Franklin, NH.
This is the bed and breakfast I stay in when I go up there. But this is a sad week as it will be my last time staying in the gorgeous White Mountain room at the top of the steps. On Thursday July 24th, we close and move into the house we will live in while the new one is constructed. Drat it, I just remembered that the only way to get the unbelievable scones Sandi bakes is to stay at the Inn. Hmmmmmmm.................
My plans are to document the new-construction project from start to finish both in columns, photos and video. I will also have a live web camera set up so you can tune in at any time to see the progress. All in all it is going to be very exciting.
I was talking with my kids about this not too long ago trying to share the emotion of setting a goal or making a dream come true. They were not around when the vision happened, but they are witnessing the reality of making a 38-year-old dream come true.
I encourage you to do the same, if you haven't already. Make your dreams come true. In my opinion, we live in the greatest nation in the world. I know some of you will debate me on this, but by gosh the United States of America offers so much to so many. If you want to make something happen here, all that limits you is your diligence and determination.
This week will be hectic for me as I move, but I plan to survive. Please be patient with me during the next month as it is going to be filled with lots of emotions.
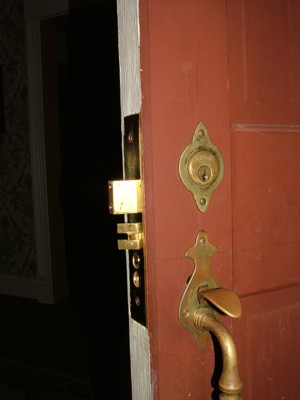
DEAR TIM: Several door locks at my home don't work properly. When I try to extend the deadbolt lock, it will not turn all of the way. Several other regular door locks and deadbolts in my home are hard to turn. All of these deadbolt door locks used to work perfectly years ago. Are they just worn out and I need new door locks, or is it some other issue? Greg B., Carnegie, PA
DEAR GREG: Your deadbolt dilemma is fairly common. There are many reasons why door locks begin to stick and become problematic. Some can be traced to poor workmanship when they were installed, and Mother Nature can place a hex on these pieces of hardware if she gets cranky.
If you have ever had the pleasure to install a regular door lock, a deadbolt or a simple door handle, you will discover that the latch or bolt mechanism moves in and out with a fairly close tolerance. In other words it doesn't wobble much as it moves. Add to this the small opening in the metal keeper plate that is attached to the door jamb and you can see that it is mission critical that the keeper and the latch mate almost perfectly.
The latch of the deadbolt lock needs to line up squarely with the metal keeper plate in the door jamb. PHOTO CREDIT: Tim Carter
It gets even trickier. The mortises that are created in the edge of the door and the one in the door jamb must be cut square and with precision. Sometimes there are moving parts on the deadbolts and locks that can rub the wood if the mortise was not cut large enough or was cut at an angle other than square. You would be shocked to discover that an error as small as just one-sixteenth inch can cause a deadbolt or door lock to bind.
Since you say the locks used to work well, I will assume that they were installed correctly. You need to start an autopsy to see what is the cause of the problems. The first thing I would look at is to determine if the door is warped or if it does not hang square in the frame. Either of these two or a combination of the two will cause a door lock to malfunction.
To see if the lock latch has dropped or raised in relation to the keeper plate in the jamb, I usually extend the latch and slowly allow the door to close so the latch is in contact with the outer edge of the metal keeper plate. Use a pencil to mark on the edge of the keeper plate the top and bottom points of the latch. Open the door and see if these line up with the top and bottom openings of the keeper. If not, you can move the keeper plate or use a rotary-grinding tool to enlarge the keeper. These tools work well and often solve the problem in a minute or less.
But before you turn on the grinder, you can check one or two other things quickly. See if the screws in the door hinges are completely tight. The top hinge is the most important one as the force of gravity pulls at this hinge constantly. Frequently you will discover the hinge screws are not tight by just a half turn. Just tightening the screws may solve the problem.
While you are checking the hinge screws, tighten all of the screws that connect the door locks and deadbolts to the door. Do the same with the keeper plate in the door jamb. Remember, the tolerances in the door locks are tight and if one or more things are loose, all of them combined can lead to the door locks not working.
The issue may be seasonal swelling. This is a very common problem in parts of the country where the summer heat and humidity cause wood doors to swell. Perhaps the top and bottom of your doors were never sealed. You can check the bottom with a mirror, and stand on a ladder to see the top of the door. Wood doors must be sealed to ensure they do not warp or swell.
Door locks and deadbolts can wear out, but only after heavy use for many years. It is possible for an inexpensive lock to fail in a few years. I have door locks in my own home that operate smoothly after 22 years of heavy use. It pays to purchase quality door locks in the beginning.
Sticking locks may just need to be lubricated. Spray lubricants often do a superb job. But keep in mind that the locks are often shipped from the factory with a thick-bodied grease. You can get small amounts of this from a traditional locksmith or a traditional hardware store. You may get lucky at a home center and find some in the sea of products.
Always check the deadbolt action with the door open. The same goes for traditional door locks. If the locks operate with ease, and the latches and bolts fully extend, that tells you the problem is with the alignment of the keeper plate in the door jamb. It could also be that not enough wood was excavated in the door jamb. All of these things need to be checked closely.
Author's Notes
I received this helpful tip from Jeremy Wrenn.
"Good article. In regard to the screws in the top hinge, we often find that the screws that are supplied with the hinge are typically short and only penetrate into the frame. If the door is particularly heavy, the screws often times strip out the wood in the frame and won't hold. We find that getting a screw into the 2x4 framing (usually 2 1/2") behind the hinge can often remedy the problem if that is the case.
With your experience, I'm sure you already are well aware of this, but it may be helpful to mention to the readers as a follow up. It's at least pretty common here in Wake Forest/Raleigh, NC.
How is an overmount stainless steel sink held in place in a countertop? A comparison between two nearly identical sinks will help illustrate the mounting. In this example, the sink can be readily lifted out of the countertop. Yours at home does not lift that easily. On the under side of the sink, there are channels on each side of the sink. The sink will come with small clamps that fit into the channels. Using a screwdriver, you tighten the clamp and it pulls the sink tight to the countertop.
Sounds easy, no problem tightening the clamps. Well, there could be a problem. Most sinks are about 22 inches from front to back. That is pretty standard for most kitchen sinks. But the problem can come from the distance from the front vertical face of the sink tub to the backside of the cabinet front. In this case, there is only about a spacing of one inch! Not much room to get your hand up there with a screwdriver to tighten that clamp. It just will not go.
The other sink in this project only measures 19 inches front to back. This means an extra 1-1/2 inches on the front and back sides to get to those clamps. This makes it easy to install the clamps on the smaller sink.
On the larger or standard sink, you have to install the sink in the countertop before you put the countertop onto the base cabinets. If you forget, you will be ripping the countertop out and starting over.
That's interesting! I am getting ready to install a faucet and you should always read the written instructions. But I have read a lot of them in my career, but most don't have that secret tip that I am going to tell you right now.
Think about this, when should you install the faucet? Before the sink is down in the countertop or after? You can do it both ways, but think about this. The faucet body goes up through the holes in the sink from the bottom. The trim pieces hold the faucet body in place. But on the underside of the sink, there are brass hex nuts that must be tightened so the faucet does not move. When the sink is out of the countertop, you can easily get a channel-lock pliers on the nuts and tighten the nuts very easily.
But image if the sink was down in the countertop. How would you tighten the nuts then? You will have to use a basin wrench. It is a great tool, but it is difficult to get to the nuts once the sink is installed. You have to get down on your knees, round over onto your back and slide into the cabinet. Then the water supply lines might be blocking access to the faucet nuts. You have to work in a tight, restricted area.
So the tip is if possible, install the faucet in the sink before placing it into the countertop. It will save you a lot of time and effort.
It's Monday night July 14, 2008. Ninety minutes ago, I pulled into the hotel parking lot after a 7.5-hour drive from Cincinnati. It was a gorgeous day with blue sky and puffy white clouds. I was by myself, and as such I got to do lots of thinking. I often have random thoughts while driving.
But before I get into those, if you've never driven east across Interstate 68, you should. It's a great highway, and a few miles before it dead ends into Interstate 70 there is a magnificent road cut. My degree is in geology, and if this man-made gorge through a superb syncline doesn't get you interested in structural geology and what had to happen to make the rocks bend the way they did, nothing will. The photo there does not do it justice. I took one and will load it next week.
I also passed a tanker truck early in the drive that was loaded to the brim with carbon dioxide. It could have been headed anywhere, but there was a chance it was going to a soda bottling plant. If you are one who is a believer in the global-warming argument that we are causing the problem, then you better think twice about opening a two-liter bottle of pop or one of the cans of soda. That releases carbon dioxide into the atmosphere. Strange what you think of as you drive!
Late in the afternoon, I also thought about a merit badge I received in Boy Scouts about 43 years ago. Holy Moly, that makes me old! It was my Citizenship of the Nation badge. My scoutmaster would really be proud of me if he knew what I was going to do tomorrow. More on that in a minute.
Trex Decking
I read Forbes magazine cover to cover. It has some good articles. In the most-recent issue, there was a story about Trex decking. If the reporting by Forbes is correct, Trex has been having some issues with quality. It says that Trex has replaced 37,000 decks. Wow!
If you have a Trex deck that was made between say 1999 and 2004, you may want to look closely at the decking. If you suspect issues, contact Trex to see if they will stand behind the warranty. Forbes Trex claims the decking should last 25 years.
Read my past column about composite decks of all types. It is required reading if you are really thinking of using any artificial decking.
Congressional Hearings Again - No Kidding!
Why did I drive 7.5 hours today? As this newsletter is being sent to you, I will be seated testifying in front of the Senate Judiciary Subcommittee that deals with antitrust issues. In the afternoon, I have to do the same thing at the House Antitrust Task Force Subcommittee meeting.
The hearings concern the advertising deal between Google and Yahoo. Yahoo is going to start displaying Google ads on their pages just like I do at my website.
The other witnesses testifying with me are the head counsels of Google, Yahoo and Microsoft. The chief marketing officer of YellowPages.com will also be testifying. Can you believe that a guy that used to eat lunch sitting on overturned drywall buckets not too long ago can sit at the same table as these powerful businessmen? God Bless America is all I can say. We indeed live in the Land of Opportunity.
Next week, I will post the videos of this double-shock performance. You will want to watch this cage fight. I predict the questions asked will be high and tight fastballs. You also need to see the tie I will be wearing. If only the video quality was a little better so you could see the details in the tie. I'll take a high-resolution photo for you of the tie and post that.
Neal's Remodeling in Cincinnati
Last year, Kathy and I remodeled our kitchen. It was tired after 20 years of use, three kids and me playing shot-on-goal with the kids in the main pathway next to the island. Shot-on-goal is the Carter version of indoor soccer with a 6-inch diameter foam ball that has a knitted-yarn covering. I still have one of the balls in the Carter Archives that we used when the kids were small. Ah, the good old days of the ball landing in the skillet - Not! Kathy would get so mad at me!
Anyway, there was no way I was going to try to do this massive job myself as it would take too long. I hired Neal's Remodeling here in Cincinnati. Bob Schmidt, the lead carpenter, did an amazing job with his helpers Dennis and Manfred. Here is a message from Neal's to all who live in or around Cincinnati. If you contact them, please mention you heard it here.
Neal's Design-Remodel has been solving home-improvement needs such as renovating Kitchens, Baths, Lower Levels and Room Additions for 36 years. Over the years, many design, innovation and quality awards have been earned locally and nationally. Most recently Neal's Design Remodel won the 2008 National and Cincinnati Contractor of the Year Award, 2008 Tri-State Family Business of the Year. Please visit Neal's website for more information. Visit our new state-of-the-art design center with over 30 room displays at 7770 East Kemper Road, Cincinnati, Ohio 45249 (513) 489-7700.
If you mention my name, you will get a $750 reduction on the preliminary design fee. That is a great deal, believe me.
Gutter-Guard Video News
I am taping the follow-up gutter-guard video on or before July 17th. Wait until you see it. Do not sign a contract for a gutter guard product until you have watched the video.
Great Travel and Cooking Videos
Two dear friends of mine have been really busy taping videos the past ten months. I would really appreciate it if you would take the time to go watch many of them and rate them while you are there.
This husband-wife team lives in California. Veronica is doing all of these travel videos about the hundreds of cool places to visit in California. Her husband Jason is a real chef, and he has some excellent cooking-tips videos. I have discovered some sweet skills watching his videos.
If you have a YouTube account, it is free and you do not have to upload a video ever, I urge you to subscribe to both of their channels.
Romantic Birthday Card
I have been exchanging emails with Graham Green who is a subscriber to this newsletter. He lives in a remote part of New Zealand. The wonder of the Internet!
Well, all I can tell you is that Graham is one heck of a craftsman and knows how to woo his sweetheart. He makes me look pathetic in the romance department. You have to read this story and see the photos.
Graham, I sure hope our paths cross one day. You really know where your priorities are.
Latest Columns and Videos
I have to get in bed before the congressional cage fight. You do want me to be in top form, right? Well, I will have lots of column and video links for you next week!
Room additions are a popular remodeling job. Unfortunately, with room addition plans there are far more nightmares than success stories. This Checklist maximizes your chances for a happy ending.
My Room Addition Checklist costs just $27.
My Checklist can and will save you heartache and lots of money.
! DELIVERED INSTANTLY !
HOW WOULD YOU LIKE?
A large cost-breakdown table
Instant Download in Adobe PDF File Format
MyRoom Addition Checklist costs just $27.
It is delivered to you the instant your credit is approved in the common PDF format that can be viewed with free Adobe Acrobat Reader software. Click the Adobe graphic just below to download the latest version of this free software. Most computers already have this software installed at the factory. You simply double click the Download URL link in the email that is sent to you and the Checklist automatically opens.
I am so fortunate to have newsletter subscribers that contact me about things they are working on. Here is a fantastic heart-warming love story about this wonderful man who lives way off the beaten path in New Zealand. I hope one day to meet Graham!
Hello Tim,
You mentioned your Dremel in your newsletter and I thought that you might find this project story amusing.
All the Best,
Graham Green, New Zealand
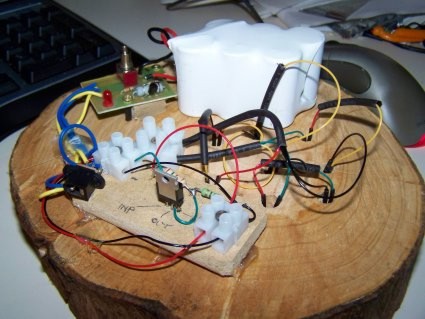
As a complete newbie to hobby electronics, I'm still childishly delighted when something works but when it not merely works but works perfectly to plan; sublime. When it works perfectly and digs me out of a deep, dark hole then, just for good measure, makes someone else happy, now that's what I call the full result.
Here's the story. I'm a cook and handyman living in rural New Zealand about 50 miles from the nearest anything. I only get to go into town about once in six weeks, generally when something has gone wrong and I need some parts or materials. Where I live makes Walton's Mountain look like Las Vegas. Anyhow, there was an unexpectedly early snow at the beginning of May which brought down a small tree which had to be cleaned up.
Cooks - Seagal and Green.
Mr. Stihl the chainsaw and I were beavering away when a black thought entered my mind. Although I had already received a mail order birthday present for her indoors I had no birthday card, and with just five days to go, no prospect of getting her one either. I'm old enough and wise enough to know that the 'no card' option is a sure and certain shortcut to a Spectrum-is-Brown situation, so as I cut away at the tree a cunning plan hatched, so cunning as would be most pleasing to a professor of cunning at the University of Foxbridge. This ingenuity and daring would deliver a home made handicraft birthday card fabricated entirely from trash yet would not compromise my hard man of short order cookery image. I like to think of myself as a cook in the same way that Steven Seagal was a cook in the excellent movie Under Siege. See picture - spooky eh!
The key ingredients of this recipe were: one piece of tree, one broken cordless carpet sweeper, a handful of LEDs and a Dremel.
The tree bit was easy, I cut about a 2 inch thick segment from the upper trunk to form a round about 9 inches in diameter. For the next few nights, I stealthily cooked the round in the cafe oven - very slowly, 24 hours at 100 Celsius. Each day I hid it away from the prying eyes of her indoors, but I couldn't hide the smell. Everything smelt like the inside of a sauna. Whilst not unpleasant, it wasn't the right smell for a cafe. Still, needs must when the devil's at the wheel. I took the bark off with a soft grinding disc and belt sanded the face.
I found a suitable piece of clip art and mucked about with the size until I had a suitable template for carving. Using a carving tip on the Dremel at medium speed, I carved the outline of what I imagined might look a bit like a bunch of flowers. I had looked for something that would feature 8 flowers for reasons that will become clear later. I printed the clip art out and just taped the paper to the wood then just cut through the paper pattern into the wood.
I had a whole bunch of LEDs that I imported from Hong Kong (we have no duty on Chinese stuff here) about six months previously. From everything that I had read, I expected these LEDs to be just cheap and cheerful, I figured that I'd get a lot of failures and early dropouts but not a bit of it. I bought 300 of 5mm LEDs; water clear lens, RGB slow change 5,000 mcd, RGB flash 5,000 mcd, plain white 10,000 mcd and I haven't had a single one fail - at 12 cents NZ a piece including postage - I am made up. I used the RGB slow change ones that gradually cycle through their rainbow. They have a maximum forward voltage of 3.6V, 30mA which fits in very well with the electronics salvaged from the broken cordless carpet sweeper. The sweeper had broken before the battery had been recharged more than 50 times. When I took it apart there was one gear stripped and the pinion was shattered so no hope of reasonable repair (I've still got the motor and it has a lot of torque). The battery pack was a 7.2v NiCd or 6 'C' cells strapped together depending on how you look at it complete with a little charging circuit.
The maximum LED voltage (3.6 volts) divides nicely into the battery voltage so the LEDs are wired in 4 pairs. The battery pack voltage will sag quite quickly so the LEDs wind up running at just about a perfect voltage for quite some time. In fact, I subsequently found that the whole lot run on giving some light for over 5 days on a charge. These RGB slow change LEDs cycle through the primary colours and all the ones in between giving a pretty cool effect.
I treated the wood to some furniture oil and finally finished soldering the 'card' together about 2 a.m. - it worked first time and looked great. So I set it up and went to bed. Let's face it, a lovingly hand crafted card has just got to say more than a shop bought affair and indeed her indoors was tickled pink. So that's my rechargeable, recycled birthday card even the hook up wire is stripped out of old telephone cable (hence the odd colours). Everything is glued down with hot melt or screwed on. Total cost - about $2 plus 10 hours sneaking around.
Back view of LED wiring project.
The picture also shows some additional circuitry that I added later to regulate the voltage as the battery sags. The wood still hasn't split after 2 months in the warm and dry, so I'm quite hopeful that the cooking process may have been successful. In any case, I had to do something because it was just too green to sand down.
I finally finished my laundry-room remodeling job. It was a monumental task. I find working around my house to be therapeutic. Some friends of mine think my time is better spent hiring others to do the work so I can do something more productive. But the truth be told, I actually enjoy many aspects of the work.
The statistics show that a large portion of the public does not do-it-themselves. The last set of numbers I saw indicated that I was in a minority with only 22 percent of the general population in the DIY category.
The painting of this space consumed many hours. I have been systematically changing out the woodwork in my house. When I built it 22 years ago, I could not afford the woodwork my wife and I wanted. But over the years, I saved and little by little we have switched over to authentic custom-made Victorian woodwork in all the rooms.
When you do this, painting becomes a sizable task as you are dealing with bare wood. This means you almost always apply three coats of paint - a sealer/primer and two finish coats, and before that you have to spackle all of the nail holes and caulk all of the cracks to get professional results. Suffice it to say, I have had my fill of painting since this room and hallway had two closets, one window, two exterior doors, a pocket door, two archways and a decent amount of baseboard.
Kathy is happy as can be with the newly-decorated space, and especially likes the new sink. This laundry room - as crazy as this sounds - has three sinks within 10 feet of one another. The first sink is a fiberglass tub I mentioned last week. It is in this little alcove hallway that connects to our garage. Next to our washing machine in the laundry room proper, we have a 10-inch-deep stainless steel sink in a traditional sink-base cabinet that has been there for years. This is great for soaking clothes and rinsing the animal-food dishes.
But Kathy wanted a new set of base cabinets in some previously wasted space. I obliged, and the result was a third stainless-steel sink that was also 10-inches deep to be used exclusively for the animals. Some of the natives in the house didn't much like clothes being mixed with cat food. No matter that the sink was always clean!
This new Elkay sink is a little different. Most standard sinks are 22-inches from front to back. This one is only 19 inches. It's really a convenient size. You don't have to reach as far to get to the faucet, which is also an Elkay model with paddle handles, but the sink can handle large bowls and other things that would never fit in those tiny 15 x 15-inch bar sinks.
Dremel Accessory Kit
Not a week goes by that I don't get a press release or phone call from a company or public-relations company about a new tool. For example, next week the traveling Sears road show is coming to my office to show all the latest things Sears has to offer.
Recently I got a fancy accessories kit to test from Dremel. If you don't have a Dremel tool, you probably should. They are the closest thing you can get that will make you feel like a dentist. I have never checked, but the inventor of the Dremel tool must have been a dentist in a previous life as the Dremel tool reminds me of the drill/tool that dentists use.
The accessory kit I am about to test has 75 different parts. There are cutting and grinding wheels, carving and drill bits, cleaning and polishing wheels, etc. All sorts of extra pads, sanding discs and cut-off wheels are included. They all come in this fancy metal box that would be a proud addition to any workshop. You can find out more here:
I try to share real-life events with you in my newsletter. When I tell you something I have done around my home, it is not a dream. But my latest job has me wishing I was taking a nap. Who wants to clean that baked-on caramelized grease on oven racks? Yuck!
Kathy wanted to clean the double oven, and my part was working on the chrome-plated oven racks while she turned the control knob to Clean. I discovered long ago that spraying oven cleaner on those can be a mistake. I discolored a set of racks in our last house and Kathy was pretty upset. She did not want that to happen with her new oven, so I decided to get out a bottle of my Stain Solver.
Quite by accident a few years ago, I discovered that my Stain Solver oxygen bleach got rid of that brown cooked-on grease you see on the sides of pots and pans. We have a set of pans that has a polished outer finish that you can't scour with an abrasive cleaner, so I decided to soak the pans overnight in my laundry tub with an ample amount of Stain Solver. The next morning the brown grease marks came off with just a little bit of effort. I would say about 90 percent of the grease came off with the first soaking and scrubbing.
Well I am pleased to say that the Stain Solver came through again! I soaked the oven racks overnight, and then scrubbed them with a Dobie Pad. These pads are a sponge wrapped in a nylon fabric that is great for scouring jobs. The nylon will not scratch polished metal. My oven racks look like the day we took the oven out of the shipping box.
I share this as it is but another cleaning chore made easier by oxygen bleach. The next thing I am going to tackle is the stainless-steel cover to my grill. It has that same brown grease staining.
If you are new to the newsletter, this may be the first time you have heard of oxygen bleach. All I can say is that it is just about the greenest cleaning product I know of, and it is color and fabric safe. You just add this powder to water. There are hundreds of things you can safely clean with Stain Solver.
I make this unique product here at AsktheBuilder.com and sell it at:
If you want to try some, use this promo code to get a 20-percent savings:
31july
It should be obvious that the promo code expires very soon (Expired July 31, 2008).
Air Conditioner Tips
Very high temperatures are forecast for many parts of the nation this week. Friends of mine in Southern California are going to melt. Air conditioners will be stressed.
Many people do not realize that air conditioners are carefully sized to match the needed cooling requirements. Think of them as shoes. A unit that is too small will not keep you comfortable. An AC unit that is oversize will short cycle, and you will be cold and clammy.
But many people are not aware that there is a temperature spread that is also considered in the sizing calculations. This means that you select the desired interior temperature and subtract that from a high temperature that is commonly experienced in your area.
However, when weather conditions bring temperatures that are 10 or 15 degrees above normal, your AC unit may not be able to keep you cool. It is not the fault of the equipment, it is Mother Nature. You can help make sure your AC unit is doing its best by ensuring your air filter is clean and the outdoor unit has plenty of air flowing through the coils.
Latest Column and Videos
Here is one of my latest columns loaded to the website:
If you have had the opportunity to read many of my past columns, you know by now that I often try to weave into my stories the physics and chemistry of home improvement, remodeling and building. A simple example of this might be the destructive nature of chlorine bleach. In a nutshell, the active chemical in this bleach is the chlorine ion. Think of it as a high-powered laser-guided 1,000 pound bomb that blasts apart fabric and dye pigment molecules. This is why things cleaned with chlorine bleach fall apart and the color goes away. But I digress......
Last night I had to clean a fiberglass utility tub that is adjacent to my laundry room. This sink really gets abused with cleaning all the things you would never place in a kitchen sink. As I was scrubbing it, the dirt would not come off, and the surface felt gritty.
I thought to myself, "No way this could be hard water deposits." But the dirt was not coming off and my instinct told me it had to be hard water. Hard water deposits can be hundreds of layers thick, and each layer can have dirt in it that is then covered with the next layer of calcium carbonate. That is the primary hard-water deposit most of us have. These form each time the water dries on a surface. You see these water spots on the hood of your car, a pot or a glass that air dries.
Each time I used the sink the water dried on the sides leaving a new layer of rock. Rock you say? Limestone is calcium carbonate.
So if you are busy, distracted, lazy and fail to clean a sink (for years) that is used several times a week, you can have hundreds of ultra-thin layers of deposits each one with some dirt bound into it.
I had a one-gallon bottle of white vinegar next to me and decided to install the drain plug and pour some into the sink as the bottom of the sink had the worst build up. I knew that if the deposits were hard water, the vinegar would help soften them.
White vinegar is simply a weak acid. The hard water deposits are alkaline. Acids react with alkaline compounds and dissolve them into solution.
I came back 30 minutes later and the sink bottom looked like new after a quick scrubbing. To clean the vertical sides of the sink, I simply got some paper towels wet with the vinegar and applied them like wallpaper to the sides of the sink. Suffice it to say the sink looks like the day I installed it. White vinegar does a great job of dissolving hard-water deposits. You just have to be patient with it and let the objects soak for hours if possible.
Angie's List
There is a very cool cooperative service called Angie's List. It is where people like you share stories and recommendations about good contractors. Do you use this service, and what can you tell me about your experiences?
Thumb Injury
Two years ago I was holding a 2x4 that I was hand nailing. Somehow the dang hammer didn't hit the head of the nail square and jumped off striking the base of my thumb where it connects to my wrist. I almost passed out from the pain. I didn't break the bone, but I did damage a tendon that connects out to the end of my thumb.
I had a doctor look at it, and followed his advice to make it heal. The trouble is, it seems to have never completely healed. When I start to use my thumb and stress it, the injury flares up again.
Two days ago it got so painful, I went back to the hospital. There I discovered that this specific injury can became very debilitating if ignored.
I share this story with you in an effort to get you to have chronic pain looked at. Don't try to suck it up and be the tough person. That is usually what I do trying to be stoic. Well, had I done that with this injury, I may never again have golfed, kayaked, or done much of anything that requires you to grip something with your hand. Please visit your doctor when pain does not go away.
My Congressional Testimony
In the last newsletter, I shared that I had been invited to testify in front of a Subcommittee of the US House of Representatives Small Business Committee. My Congressional representative- Steve Chabot - is the Ranking member of this Committee.
In the invitation I was told that I could submit written testimony that would be entered into the permanent record. The purpose of this is to give the witness an opportunity to share all the points he wants to make. You can't assume you will have the time in the hearing to make all of your points. You can read my written testimony if you desire.
The invitation also was very clear saying that I would be expected to deliver an oral summary of my points that was to be no longer than five minutes. You can see that presentation in video format. But before I share that link, I want to set up the scene.
I am pretty embarrassed to say that I don't dress up much. The last suit I bought is at least 15-years old and is a tad tight. My oldest daughter Meghan took me to Romualdo, which is a custom men's shop in Maderia, a suburb of Cincinnati. She selected a navy blazer and a white shirt with French cuffs. For the occasion, my kid's - for the first time in my life - got me some gorgeous ties for Father's Day. I can't remember the last time I was so dressed up, and I must say I felt really good in the new threads! But let me tell you it is really hard to insert a right-side cuff link with a left bum thumb! I almost had to have the front-desk clerk do it for me.
The hearing lasted two hours, but the event is cut up into 19 videos that are on YouTube.com. I am in several of the videos, but #3 in the series is the one where I give my oral opening statement. The Subcommittee is chaired by Congressman Gonzalez, a Democrat from Texas. The ranking member of the Subcommittee is Congressman Westmoreland, a Republican from Georgia. They were the only two present as the hearing started.
My Congressman, Steve Chabot, wanted to personally introduce me, but was running late. Chairman Gonzalez was starting to introduce another witness when Chabot walked into the room. You can hear part of the exchange between the two Congressmen at the start of the video. It is hilarious, especially when you realize Chabot is a Republican and see how he forgets to give thanks to his ally Westmoreland:
If you look to the lower right of the video as it plays on YouTube, you will see a box that is titled "Related Videos". In that box you should see the other 18 videos that make up the hearing. Videos #1 and 2 are the opening statements of Gonzalez and Westmoreland. Videos #4, 5, 6 and 7 are the oral statements of the other witnesses. The question and answer part of the hearing takes place in videos 8 through 18. I am in video #8 and 18, as well as two or three others. Video 19 contains the closing statements of Gonzalez and Westmoreland. You have to watch video 19 to hear what Congressman Westmoreland says. I can see why the people in the 3rd District of Georgia elected this man. He is indeed honest.
I would appreciate it if you would rate my videos when you watch them. It is my understanding you can only rate them if you have a YouTube account. You can get a YouTube account for free and you do not have to upload a video. It takes seconds to create a YouTube account.
I just finished installing new ceramic tile in a shower stall in my laundry room. It came out really swell. It was a very easy job as ceramic-tile installations go.
One of the things that made 95 percent of the tile go in with ease is I did not install the first row on top of the shower base *first*. The first tiles were the second row. I discovered long ago that bathtubs, shower bases, and just about any object that tile rests on is never in the same plane much less level. Tubs frequently are twisted like a helix.
I have a super high-quality level and used it to create a perfectly level line around the three walls. This line was made so that a full tile would fit under the second row and the highest point of the shower base. My base was nearly perfect, and there was only a variance of one-eighth inch.
I nailed strips of very straight lumber to the cement backerboard carefully on this line. The tiles that were installed rested on this lumber. The advantages of doing this ensured the tile would not slide down the wall under gravity, and all of the horizontal grout lines from the bottom to the top were guaranteed to line up perfectly.
Latest Columns and Videos
Here are two of my latest columns and videos loaded to the website:
I am really proud to say that this newsletter has grown in both reputation and size to attract companies that make great products and offer superb services.
In the past I really fell down getting the newsletter out because it was lots of work with no pay. It was easy for me to neglect you as I turned to other tasks that put food on my table.
You will see an ad next week, and if you have a company that wants to advertise, contact me. The rates are very affordable.
Additional Congressional Videos
Below are the additional videos Tim appeared in during his Testimony before the House Subcommittee.
Part #8
Part #10
Part #12
Part #14
Part #18
Part #19
Expert Advice For Your Home
Subscribe to the FREE Ask the Builder newsletter to receive professional advice for your home. Complete the form below and each week you'll get:
DIY Tips
Tool Reviews
Project Guides
Product Discounts, Giveaways & more.
Unsubscribe at any time. We respect your email privacy.

 I have been exchanging emails with Graham Green who is a subscriber to this newsletter. He lives in a remote part of New Zealand. The wonder of the Internet!

 Room additions are a popular remodeling job. Unfortunately, with room addition plans there are far more nightmares than success stories. This Checklist maximizes your chances for a happy ending.