Solar Powered Attic Fan


Solar Powered Attic Fan

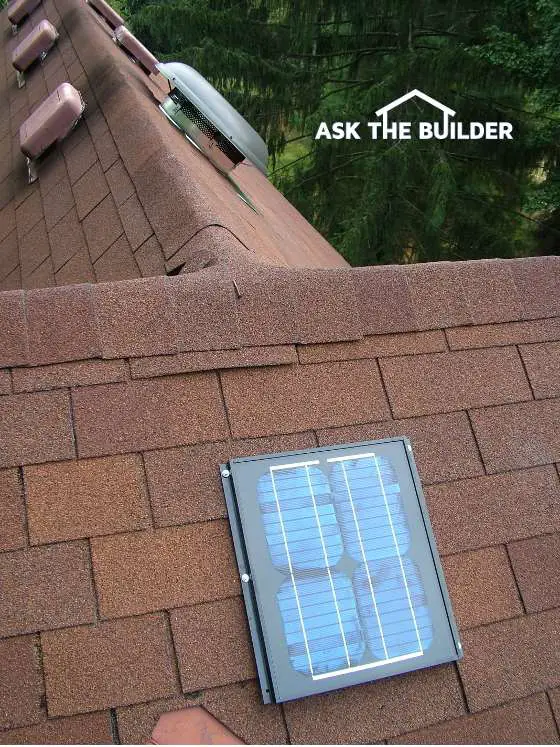
This solar panel produces enough electricity to power a spinning fan in the round ventilator on the roof at the top of the photo. See it? But the fan only works when the panel is basking in sunlight. The fan does not lower the temperature in the attic at all. I feel solar fans are a waste of money. Copyright 2018 Tim Carter

"But after seeing my solar-powered attic fan work, I have a long list of cons."

Solar Powered Attic Fan Checklist

  • fans don't move lots of air
  • fans slow down or stop when most needed
  • there may never be an ROI!

In Tim's July 7, 2019 Newsletter, he ponders on why solar-powered attic fans are, for the most part, hype and a classic case of an emotional fuzzy-feel home improvement purchase in all too many cases.

DEAR TIM: My attic space gets as hot as blue blazes. I saw an advertisement for a solar-powered attic fan and that seems like a great way to remove heat and reduce my carbon footprint.

Do these fans really work, and are they hard to install? Will the fan significantly reduce the temperature inside my attic? What are the pros and cons to these solar attic fans? Brad L., Phoenix, AZ

Related Links

Turbine Vents Best Vents of All

Cool Your Attic FAST - DO NOT SHARE - Secret Info Here

DEAR BRAD: I installed a solar-powered attic fan last year to see how well it would work. The installation went like clockwork.

When is The Best Time to Install the Fan?

I had decided to do the work early in the morning while it was cool on the roof. Within an hour after installing it, the sun hit the solar panel and the fan blades started to spin. It was almost magical to see the solar attic fan work.

You're a pretty clever guy to get the sun to do double duty. It makes perfect sense to make the sun cool your attic space, since it is the source of the problem in the first place.

Free & Fast Bids

CLICK HERE to get FREE & FAST BIDS from local attic fan installers.

Are Solar Attic Fans Really Earth-Friendly?

As for reducing your carbon footprint by not using electricity from a power plant, I can't tell you if the solar fan you might buy will be that environmentally friendly. The manufacturing process used to make your solar fan might actually be quite carbon positive. But in any event, you might be doing the right thing by trying to use a solar-powered fan.

Are There Pros and Cons to Solar Powered Attic Fans?

There are pros and cons to solar-powered attic fans. Here's a list:

  • they work for free using the suns rays
  • they do exhaust some hot air
  • the solar fans do not require the services of an electrician to connect
  • they are also very quiet

What are the Cons?

But after seeing my solar-powered attic fan work, I have a long list of cons:

  • My fan only works when it is getting direct sunlight on the solar panel
  • If a cloud drifts through the sky blocking out the sun, the fan stops spinning immediately
  • As the sun sets, the attic is still hot and my solar fan stops spinning
  • The fan I have moves only 800 cubic feet of air per minute (CFM) when the sun is shining directly on the solar panel

Does the Fan Spin at Different Speeds?

Yes, the solar powered attic fans spin at different speeds.

If the angle of the sun is lower in the sky (morning and late afternoon) or the sun's rays are trying to cut through thin clouds or haze, the fan spins slower moving less air.

The single solar-powered attic fan I have has not lowered the temperature in my attic at all. I took precise before and after temperature readings.

How Much Air Must Move Through the Fan To Cool an Attic?

To significantly reduce the temperature in your attic, you need thousands and thousands of cubic feet per minute (CFM) of air moving through the attic space.
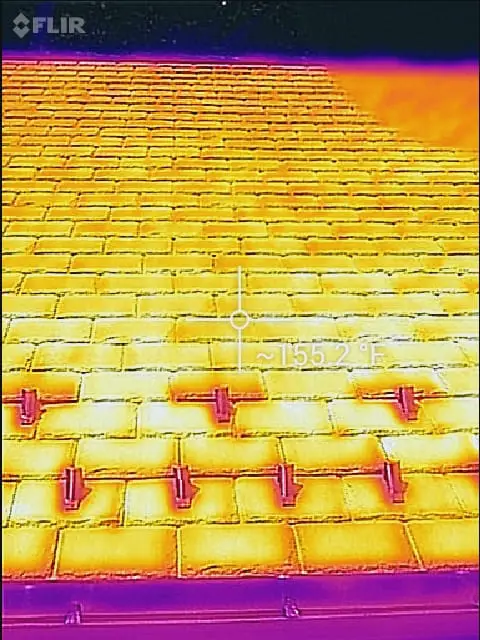
infrared roof photo

This is an infrared photo of my own roof. See the white crosshairs and temperature reading? 155F That's blazing hot and it's possible it can go as high as 170 F. The entire inside of the attic can reach this temperature. Copyright 2018 Tim Carter

What's more, this air needs to continue to move through the attic space after the sun sets to remove the residual heat from the roof framing lumber, roof sheathing, roofing materials, and the attic insulation. Yes, the insulation in your attic gets very hot during the day and then holds that heat long after the sun sets.

Chicken growers know all about this. Chicken farms in any area of the world that gets hot MUST HAVE enormous fans moving tens, perhaps hundreds, of thousands of CFM of air through the growing houses to keep the chickens alive in hot weather.

It's all about moving vast amounts of air in your attic if you want to lower the temperature inside your attic space. Period. Solar-powered fans don't do this.

CLICK HERE to get FREE & FAST BIDS from local attic fan installers.

How Hot is it in an Attic?

Attic temperatures in the summer on a hot day can easily get to 140 F. In late June early July with the sun passing through the least amount of atmosphere in the Northern Hemisphere, an attic could get up to 160 F, or more.

How Many Solar Fans Do I Need to Cool my Attic?

If you are going to go solar, I urge you to by several solar-powered attic fans. You will need them. You may need fifteen or more to move thousands of CFM of air through your attic.

Where Should the Solar Panel be Located?

The solar panel should be located away from the actual fan. In the Northern Hemisphere, you want the solar fan pointing due south.

My solar fan has this neat feature. This allowed me to put my solar fan on the rear portion of my roof so you don't see it from the street, while the solar panel is on the part of my roof that faces due south.

Should the Fans be in Direct Sunlight?

You want the solar panels located on the roof where they will not be shaded by trees, and where they will get direct solar power from Noon until sunset. This is the hottest part of the day, that part where you need the fan blades spinning at full speed.

Do I Have to Cut a Hole in My Roof?

Solar-powered attic fans require a hole to be cut in the roof, possibly two if you purchase one that has the remote-panel location feature. If you do not know how to properly flash these fan housings into the roof shingles, then you should hire a qualified roofer.

It's not hard to do the work, but there are very important steps that must be followed to have a leak-proof installation.

Do These Fans Require Caulk?

When installed properly on a roof with standard asphalt shingles, solar-powered attic fans do not require caulk, roofing cement or any other product to prevent leaks. A great roofer will cut the shingles and lace the fan housing into the shingles so that rain will stay outdoors where it belongs.

How Much Air at a Minimum Needs to Move Through My Attic?

If your attic space is over 1,800 square feet, you will need enough solar fans to move 8,000 CFM. You need that amount of air, if not more, to get any sort of cooling benefit from the fans.

Intense sunlight can create heat faster than one or two small fans can cool an area. If you want to see how to properly cool attic spaces, visit a chicken farm. These farmers use giant fans that move tens of thousands of CFM of air that keep the chickens alive.

CLICK HERE to get FREE & FAST BIDS from local attic fan installers.

Column 676

Chimney Caps

DEAR TIM: This weekend I was up on my roof and I believe I may have discovered why my chimney is so wet when I look at it inside my attic. The cement cap that surrounds the clay flue liners has cracks in it and is in pretty bad shape. Do you think this is the problem? Should I just caulk the cracks and do some mortar repair? What is the best solution to keep my chimney in great shape? Jeff K., Belleville, IL

DEAR JEFF: Your chimney cap is also often called a chimney crown. Just as a crown is the top-most thing on the head of a member of the royal family, a chimney crown is almost always the tallest thing on your home. Because they are up in the air and most people don't regularly climb on their roofs, chimney crowns and caps often are neglected.

You bet the crown might be the cause of the dampness you see inside your attic when you look at the masonry chimney in your attic space. The chimney cap is the roof of your chimney. If it has cracks and holes in it, it will allow copious amounts of water into the inner hidden layers of masonry inside your chimney. This water wants to get out, and it drifts to the sides of the chimney as gravity pulls the water down towards your fireplace.

But water may also be entering your chimney through the actual brick, stone or block. The contact zone between the mortar and the brick, stone or concrete block is a place where water can easily enter a chimney, especially during severe rainstorms where wind is pounding raindrops into the sides of the chimney. You would be shocked how much water can enter a brick chimney or brick wall in this manner, even when you can't see hairline cracks in the mortar.

This cement chimney cap is like most. It is lacking an overhang, and it does not have a flashing beneath the cement mortar. PHOTO CREDIT: Tim Carter

This cement chimney cap is like most. It is lacking an overhang, and it does not have a flashing beneath the cement mortar. PHOTO CREDIT: Tim Carter

Many chimney caps are not built correctly. They should be made, when possible from precast concrete or cut-stone. The openings for the flue liners should be one-inch larger than the actual flue liner so the gap can be caulked. The flue liners expand and contract as they heat up and cool down. This movement will create leak points if cement mortar is troweled up against a clay flue liner.

If your mason insists on pouring or creating a cap in place, it should be steel-reinforced, and have an overhang. The cap should project beyond the face of the brick about 1.5 inches, and there should be a drip groove on the underside of the overhang. This groove prevents water from rolling under the overhang and then down the face of the chimney.

A membrane flashing should also be placed on the last flat level of masonry before the cap is placed. This flashing prevents water from penetrating down into the chimney in the event it makes it past the cap or crown. The flashing should lap up onto the sides of the flue liners and the flashing edge should project out past the face of the brick.

You can purchase some effective restoration products that will allow you to repair and seal your existing chimney cap. Some of these products are a combination of peel-and-stick membrane flashings that cover your existing cap, and then are covered with a special cement-and-sand mixture that bonds well to the membrane. The finished result is attractive, durable and leak-proof if done correctly.

To prevent leaks through the brick face of the chimney, I would suggest applying a silane-siloxane water repellent on the brick. These clear products prevent liquid water from entering the brick and mortar, but allow water vapor to escape. This is very important for those chimneys that experience below-freezing temperatures. If water gets trapped in the brick or mortar, it will expand when freezing weather occurs. This expansion can blast apart well-built chimneys over time.

Be very careful when working on old chimneys. Tall ones, even ones over five feet high, can be very unstable. Years ago I was working on a roof of a home and leaned a ladder against a narrow 8-feet tall chimney. As I climbed the ladder, I thought the ladder was moving. It was, as the old chimney was rocking back and forth. The old mortar between the brick had long ago lost its bond. I carefully backed down the ladder before the chimney tipped over crashing through the roof.

If you are working on a chimney while fuel-burning appliances are in use, be careful of the fumes exiting the flue liners. Toxic carbon monoxide can debilitate you causing you to become ill, lose your balance leading to a fall. If you have little or no experience working on chimneys and roofs, leave this job to a professional chimney sweep. These craftsmen have the tools, nerve and skills to fix your chimney problems. Let them extend the life of your chimney instead of you risking your own for a pile of brick.

Column 675

Brick Steps

DEAR TIM: I need a set of brick steps to take me down to a patio. I have no clue how to build brick steps, and wonder if I might be out of my element. Is it hard to build brick stairs like this, especially ones set in mortar? I have watched masons building brick steps, and it seems that if I take my time, I might be able to succeed. What are the basic things I need to know to survive this project? Pete J., Lexington, KY

DEAR PETE: Building brick steps is not a project I would recommend for a rookie. That doesn't mean I don't think you can do the job, it means that there are several skill sets required to get professional results, especially since you want to lay the brick in cement mortar.

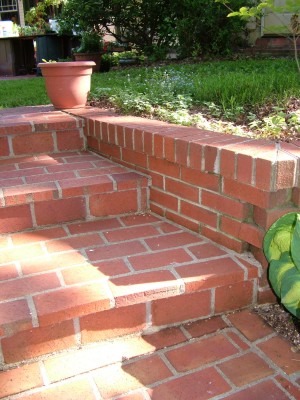
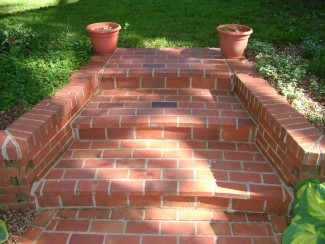
This set of brick steps has been exposed to nearly twenty years of weather. They look as good today as the day they were installed. PHOTO CREDIT: Tim Carter

This set of brick steps has been exposed to nearly twenty years of weather. They look as good today as the day they were installed. PHOTO CREDIT: Tim Carter

 You can do this project with interlocking concrete brick and no mortar if you fail. These brick interlock and are laid on a bed of compacted crushed rock and a thin layer of sand. Special outdoor adhesives can be used to connect the brick at the edge of a step to the brick below that create the vertical risers. I have seen these systems, but I don't feel they produce the look you desire.

There are two sets of nearly identical brick steps at my own home. I built them nearly twenty years ago, and they look as good today as the day I completed them. I used special 1.5-inch-thick paving brick that are designed to be laid horizontally on the ground. These paving brick were fired in the kiln at a high temperature for a significant amount of time. This is why ice, snow and countless freeze-thaw cycles have not deteriorated the brick.

The best way to think of traditional set of brick steps is to think of two sets of steps. There is the set of brick stairs you see, and the one underneath the finished brick. Think of the finished brick as just a facing. If the first set of steps is built correctly, then the brick will cover these much like a pair of jeans covers your legs. If you are able to visualize this, you are going to be able to do this job.

I built the hidden set of steps using concrete block. These block plus the finished brick are very heavy, so to ensure the brick steps would never crack or crumble, I poured a concrete pad that acts as the foundation for the brick steps. This concrete pad was 6-inches thick and had one-half inch steel reinforcing bars spaced at one-foot centers placed in a grid pattern like a crossword puzzle. The steel was placed in the middle of the wet concrete. Take the time to make sure this concrete is poured on compacted ground, and the finished surface of the concrete is level.

The day after I poured the concrete, I started to use different sized concrete block and concrete brick to build the set of steps that had the same width, depth and tread height as the finished brick steps. Using this coarse masonry material allowed me to learn some of the tricks when working with mortar. It is imperative the first set of concrete block steps are level side to side and that the treads tilt forward so water runs down each step to the patio. I engineered in a tilt of one-eighth inch per foot of fall to each tread to achieve good drainage. You don't ever want water to pool on a stair tread.

My finished steps have treads that are about 21.5 inches deep and the risers are 6-inches high. The dimensions worked out this way because I was using brick that measured 4-inches wide by 8-inches long by 1.5 inches thick, and I wanted to keep cuts to a minimum. The only cuts I had to make were the ones at the sides of each tread where the brick steps butted up to small brick retaining walls on either side of the steps. I urge you to make your steps work out so you keep cuts to a minimum.

The mortar I used to hold everything together was just a mixture of fine sand and Portland cement. Do not use traditional brick mortar as it is not really the correct material for installing brick flat on grade. Regular mortar works fine for walls, since water can readily shed to the ground. Portland cement is formulated to withstand ice and snow when mixed, installed and cured properly. I used a blend of three parts sand to one part Portland cement for my mortar.

The 6-inch riser height for each step was simple to create. I placed the brick on its narrow edge so the flat part of the brick created the riser face. The bottom edge of the brick was flush with the back brick of the tread below. The one-half-inch wide mortar joint between the top of the riser brick and the flat tread brick above adds up to 2 inches exactly. You can create a 6.5-inch-high riser if you add a visible mortar joint under the riser brick.

The 21.5-inch deep tread not only looks good, but it is safe and comfortable to walk on. In my opinion, whenever you build steps with risers less than 7.5 inches, you want a deep tread where you take an extra step before you go down to the next tread. The 21.5-inch depth gives you the needed room to take that extra stride.

Column 673

Removing Finish Nails Video

Here is a challenge for your project. You have removed a piece of trim wood or base board and you want to use it again. But the piece of lumber has finish nails in it. How do you get these nails out without damaging the wood? Most people use a hammer and drive the nail out from the back. This can cause the head of the head to tear out chunks of the wood as it is driven out.

The finish nail can be removed with a hammer. Using a newer claw hammer with a nice machined edges on the head, grab the nail from the back side and gently pull it out through the back.

A second method is to use a hack saw. Place the blade as close to the wood on the back side and cut off the exposed part of the nail. The head will stay in the trim piece, but it won't be noticeable.

Third option is to cut a pair of linesman pliers. Normally used by an electrician to cut wire, you grab the nail, from the back side, and roll the pliers to the side. This will pull the nail through the wood.

These methods will allow you to salvage and reuse that piece of trim wood. It will save you money by recycling that trim.

Tool Gift Ideas Video

As the holiday season approaches, there are a lot of great power tools that make great gifts. Here are some ideas for that handy person around your house.

Cordless tools have come a long way. Cordless drills have lots of power, keyless chucks, two speeds and are reversible. Look for the 18 volt or higher models.

There is a cordless circular saw that features a smaller diameter blade, but it is still big enough to tackle most of the projects around your house. Again, 18 volt or larger models should be purchased.

A compound miter box saw makes a great gift. They are very affordable with lots of features.

Smaller gift ideas include a wood rasp. Very handy and inexpensive. Another small item is a scrapper tool with interchangeable blades. One last idea for that socking stuffer is a telescopic magnetic pick up tool. Great when you drop that screw or nut down behind the workbench or down into the heating duct.

Remember, tools - big or small - make great gifts for the do-it-yourself person in your home.

Plumbing Fittings Video

Did you play a little weekend plumber? Now you have a leak right where the supply tube goes into the valve. This is a very common location for a leak. If you are using the old fashion chrome plated soft copper supply tube, this can be the cause of the problem. If the bend is not correct, when the supply tube goes into the valve, there will be a very small crack. This will be the cause of the leak.

As an alternative, try on of the plastic supply tubes. They are very flexible. This makes them self-aligning and they seat properly in the valve. Making a leak free seal very time.

To prevent the leaks, be sure the supply line is seated squarely in the valve.

Electrical Wall Outlets Video

Electrical Wall Outlets

Your project includes drywall and openings for electrical outlets and switches. To make a professional looking job, the ears on the electrical switch or outlet has to be flush with the drywall.

To create this nice tight fit, be sure to blow any dust or debris from the outlet box. Do not make the mistake of just applying drywall mud with a drywall knife. The mud does not have a good support base with this method. A preferred method is to apply some mud between the box and the drywall. Tap it back into the opening. Get the joint compound contacting the plastic box. Then, make your final pass with the drywall knife. This provides a good solid bond for the box. And creates that flat mounting area for the switch or outlet plate.

Fireplace Surrounds Video

Building a new home or remodeling a room with a great old fireplace mantel? And there is a space between the mantle opening and the firebox! What do you use to cover this area? There are several options. Try a natural stone product as a fireplace surround.

In the Tri-state areas, there are marble and stone fabricators that will cut and polish beautiful granite, marble, sandstone, limestone and other natural products. One place is Mees Distributors, Inc. They have over a 120 types of marble and granite in their showroom. They can cut, polish and grind any of the materials to match your specifications. They can even sculpt images or patterns into the stone.

The great thing about marble and granite is they are time tested. They last forever and look beautiful. Check into them on your next fireplace project.

Time Capsules Video

Time Capsules Video

Have you found a treasure in your home? Did an earlier owner or the builder leave some treasures behind the walls. There might be a time capsule in your home. Tim has found old beer bottles from breweries that are no longer in existence; old cigarette packages, old newspaper and even money.

If you are remodeling, why not make your own time capsule! Be sure to include newspapers, drink bottles or cans (be sure to rinse them out), drawings from your kids, trinkets, any thing you think would be interested for someone to find years from now. If possible, try to protect your treasures with plastic bags. It is a great family activity deciding what to include in your capsule.

Once the time capsule has been hidden behind the wall, image the fun someone will have when they find out how thing were way back when.

Drywall Joint Compounds Video

Drywall Joint Compounds

Having trouble getting smooth drywall joints or corners? The secret is having the proper tools and joint compound.

The first tip is to get the right consistency for your drywall mud. You do not want to use it straight out of the bucket. It is too thick. Add some water and mix the compound until it is the consistency of creamy cake icing.

Next, have sure that your dry wall taping knife has been tooled. What does that mean? A new drywall knife can have very sharp corners. These can easily cut the tape as you apply it. Take a file and gently round off the corners of the taping knife.

Start by putting just a little mud on the knife and applying it in the drywall corner. Put the mud on both sides of the corner joint. Then fold the drywall tape in half and place it in the corner. Then gently run your knife down the tape at an angle to remove the excess mud. Do it once; that should be enough.

Doing it too many times will remove too much mud from under the tape and cause the tape to come off down the road.