DEAR TIM: Do you think under cabinet lighting is a smart thing to do in a kitchen? Is it hard to incorporate cabinet lighting into cabinets? Is installing under cabinet lighting something a homeowner can do safely? I'm afraid that modern under cabinet lighting will make my kitchen not match the rest of my home. What would you do? Linda H., Belleville, Ontario CA
DEAR LINDA: Not only is it a good idea to install under cabinet lighting in a kitchen, it makes sense in a wet bar area, a bathroom, a study or any other location where wall cabinets overhang a counter surface. Wall cabinets create a dark shadow area in kitchens and other places where ceiling lights are placed close to the face of the wall cabinets. Under cabinet lights eliminate these shadows, and create abundant light to help you see what you are working on in the kitchen.
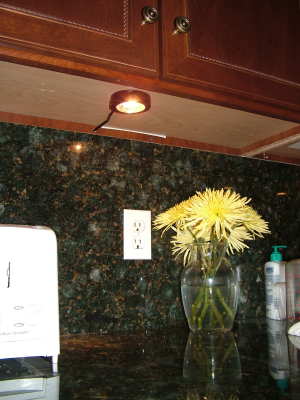
This under cabinet light was installed in less than an hour. It really does a fantastic job of highlighting the granite backsplash and countertop. PHOTO CREDIT: Tim Carter
The way a majority of kitchen cabinets are made makes it very easy to install under cabinet lights. If you poke your head under your wall cabinets, you should see a recessed area that is about 7/8 of an inch in depth. This is the depth of most under cabinet lights, so they do not project beyond the bottom plane of the cabinets. Even if they do, the underside of standard 30-inch-high wall cabinets is well below the line of sight as people stand in your kitchen. This means you will not see the actual light fixtures, but will most certainly see the illumination from the light bulbs.
I prefer to use the low-voltage under cabinet lighting fixtures. They are very simple to install, and can become almost invisible if you are able to pre-wire for the lights during new construction or a remodeling job. A skilled electrician can easily hide the wire and needed transformers in a finished kitchen, so I would not hesitate to add under cabinet lights in a brand new totally finished kitchen.
Low-voltage under cabinet lights often operate on 12 volts of electricity, the same voltage as many older doorbells. You need to install small transformers to convert regular 120-volt household alternating current to 12-volts of direct current. These modern transformers are compact, and can be placed inside of cabinets or in the open in an unfinished basement. They can also be placed in a pantry inside the kitchen. The transformers can be equipped with regular plugs that connect to a regular electrical wall outlet.
You can install these under cabinet lights if you can read directions and follow them. The hardest part is trying to incorporate the way they will be switched on and off. I prefer to make the under cabinet lights come on at the same time as certain other overhead lights turn on in my kitchen. To do this, you have to run a regular 120-volt cable from one of the light fixtures to the transformer or to an outlet that the transformer plugs into. This type of electrical wiring may be beyond the capabilities of most homeowners.
If you have natural stone countertops or plan to have them, under cabinet lighting is a must. Granite and other stone products, as well as copycat composite stone materials, look their best when they are highlighted with direct beams of light. The mineral crystals within the granite sparkle just like a diamond ring does in brilliant sunlight.
While some of the under cabinet lights look modern and some look institutional, I would go for the smaller-diameter round lights that resemble hockey pucks. If you are installing new cabinets that offer accessory trim packages, you can all but hide the lights by adding a thin skin of finished plywood under the cabinet bottoms. Holes can be cut into the plywood and the small lights fit into the wood just like their big brother recessed lights fit into ceilings.
Be sure to use the correct-sized wire for the lights. Many low-voltage light manufacturers sell the correct wire to match the voltage and load of the fixtures.
Be sure to place one under cabinet light for every 30 inches of counter space. You don't want any dead spots or dark shadows along the expanse of countertops in your kitchen.
The size of transformers is very important. Be sure to match the number of under cabinet lights to the transformer. If you have only two low voltage lights to connect, you will be able to use a very small transformer. But as you add more lights to the circuit, the size of the transformer will grow.
Be sure to follow the instructions about air space around the transformers. As a transformer converts regular alternating current to direct low-voltage current, it produces heat. It is very important that this heat is allowed to dissipate from the transformer. If a transformer overheats, there is a real fire danger.
Never hide a transformer in a wall or ceiling space that will get covered with paneling or drywall. The transformers must be in open view so they can be serviced or replaced. Keeping them in the open helps provide the needed ventilation. You can place them above dropped ceilings so long as the ceiling tiles can be removed and the transformer is in plain sight.
Author's Notes:
I received these helpful tips from Gean Tremaine of Q-Tran, Inc. He wrote:
"The wiring is not like doorbell wiring. Low Voltage lighting that operates at 12V or 24V has a lot of current - 10 times that of 120V lighting, current causes wire to burn. So the installer needs to keep that in mind and gauge the wire properly.
The transformer convert the electricity from 120V-12V but it is AC-AC power, the transformer does NOT convert the electricity to DC (direct current).
Certain transformers are UL listed to be recessed into the wall, they need to have an IC rating, but they can achieve this if desired.
Noise is going to be an issue if you dim the lighting, so use a transformer that has been designed for dimming."
Column 654