How to Make a Video

My How to Make a Video has a story behind it. Most videos are made for a reason, but this one was special. My video was produced the second week of October, 2006 as part of an hour-long presentation I had to give in front of an Internet mastermind group to which I belong. Many in this group are very dear friends, and I was trying to get them excited about the new world of Internet video. I decided to act a little silly at times to make them laugh, and laugh they did!

Many in my mastermind group have never been in front of a camera, and I wanted to share some tips that have worked for me over the years. But trying to squeeze years of my own experience into ten minutes does not do the topic justice. That makes sense when you consider that students go to school for four years to learn the basics of the videography business. I just barely scratched the surface of the topic in this short video.

Over the past ten years, I have taped hundreds of short videos for network television. One thing I learned during that time period is good equipment is absolutely a necessity. You and I can debate this till the cows come home, but talk to any professional and they will tell you a good video camera, a professional tripod and a light kit are the basics you need to produce semi-professional results. I also wanted to give my friends, and anyone else who watches the video, a simple primer of what to do and what not to do.

Watch any number of amateur videos on the Internet and you quickly see why a good camera and a tripod are necessary to make semi-professional videos. I know some people are attracted to home-grown videos that have little or no editing, but I think many will agree over time that viewers and businesses that want to market products will be attracted to videos that are more professional.

A tripod is very important. Without a tripod, the video camera can move and shake. Jiggling video is just like static on a radio. Viewers can find the movement bothersome, and this subtle movement can divert attention from the message in your video. If you can't afford a great tripod, set your video camera on a stick or some other device that allows you to hold it as still as possible.

As you watch my video, you might be tempted to think I was given the equipment or paid to say nice things. Not so. I paid for every piece of equipment you see in the video. I bought the equipment based upon recommendations for professionals who are in the video business. Years of working with tools in building and remodeling have taught me that it really pays to work with quality, so I bought good stuff. Here is a list of the equipment I used to film this video and all of the other ones I am doing.

After looking at many video cameras, I picked the Panasonic PV-GS500 because of the great reviews I read online. John Wall, a very good friend of mine who is a professional video producer, told me about this camera. He explained the importance of the good optics as well as the three separate color chips. I am shocked at how clear the images are when you zoom in on an object.

Another professional, Michael Keating, gave me the heads up on my tripod. It is a Bogen 755B video tripod with a Bogen 3130 QR Micro Fluid Head. When you buy a tripod like mine, you actually are buying two separate parts. The legs are one part, and the second part is the actual head which connects the video camera to the tripod legs. There are many different heads as well as types of tripod legs. You can spend four figures quickly if you want a super-professional tripod.

The camera needs to be level when you shoot, and these quick-adjust fluid heads allow you to do that quickly. If you try to use a simplistic still camera tripod, you will struggle to get the camera level.

You need to have exceptional audio. I experimented first with a lower quality wired microphone, but was disappointed in the results. There was lots of electronic hum. So I spent the money and went wireless. It is so nice to have a wireless microphone, and my Sennheiser EW112P-G2 Evolution System gives me near perfect professional audio. This wireless microphone has all sorts of settings that allow you to minimize background noise and produce crystal-clear audio.

The lighting kit with bounce umbrellas was purchased at a local camera shop. The high-intensity halogen bulbs get very hot and produce a brilliant white light. Lighting is everything in video production as well as still photography. You can spend all sorts of time trying to properly light a scene to get the right balance of lights, and minimize or eliminate shadows. Wait till you discover how much time you will spend adjusting and positioning lights!

I wish you the best, and hope you have some fun as you make your own videos. Remember, it is easy to take short cuts. Invest the time and money to make the best videos you can. You will never regret it.
Medicine Cabinets

DEAR TIM: I went to look at medicine cabinets this weekend. All of the bathroom medicine cabinets in my home are beat up and dated. Recessed medicine cabinets seem to be much nicer than surface-mounted ones. How hard is it to install a recessed medicine cabinet? If I purchase mirrored medicine cabinets, will all of the glass make them too heavy? Are there any unpleasant surprises that might spring up on a simple remodeling job like this? Diane H., Sacramento, CA

DEAR DIANE: If you want surprises when it comes to medicine cabinets, wait until you remove one from an old home and see all of the discarded double-edged razor blades that are waiting for you behind the plaster. Those of us who grew up in older homes can still remember the tiny slit in the back of medicine cabinets where razor blades were placed instead of garbage cans. Razor blades in garbage cans can be very dangerous, so medicine cabinet manufacturers of old thought it was a great idea to place the dull blades in a wall cavity where no hands could get cut.

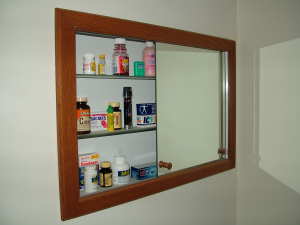
Medicine cabinets still serve the same purpose and tease curious visitors. A recessed cabinet like this one offers a slimmer profile. PHOTO CREDIT: Tim Carter

Medicine cabinets still serve the same purpose and tease curious visitors. A recessed cabinet like this one offers a slimmer profile. PHOTO CREDIT: Tim Carter

I hope you didn't purchase your medicine cabinets yet. If you visited a home center, you only saw a very, very small percentage of the amazing selection of medicine cabinets that are available. As time goes on, I am constantly surprised at how the selection of products gets wider and wider. Years ago, you could maybe pick from 20 or 30 different styles of medicine cabinets. Now there are well over 100.

Who would think you could find a distinctive wood-framed medicine cabinet that would look perfect in a Victorian home? Not only are they available, the woodwork trim around the cabinet looks like it is 120 years old. Even the surface-mounted hardware door latch looks old!

I agree with you that recessed medicine cabinets look better than surface-mounted ones. The surface-mounted cabinets serve a market where cutting into a wall is too expensive or not possible. They also provide instant gratification. If you need a functional medicine cabinet in ten minutes or less, screw a surface-mounted medicine cabinet to the wall and be done with it.

Recessed medicine cabinets are very easy to install if you are building a new home or are involved in a major bathroom remodeling project where the walls will be stripped to the studs and plumbers and electricians are showing up to do other work. If you want to talk about other surprises that await you in bathroom walls, wait until you start to remove the drywall and/or plaster and discover a plumbing vent pipe and/or electric cables feeding bath light fixtures or other rooms right where the recessed opening for the cabinet needs to be.

This is why you never want to cut haphazardly into a bathroom wall thinking you are going to install a recessed medicine cabinet. Always proceed slowly by taking off the drywall and plaster to see what you are up against.

Let's assume there are no pipes, electrical cables or heating ducts in your way. Your challenge will be to create the rough-in opening, or cavity, that the medicine cabinet will nest into. This is very basic carpentry, but can be challenging if the wall happens to be a supporting wall. If you have any doubts whatsoever, contact a seasoned remodeling contractor for advice. Offer to pay this person for his/her time to consult with you for an hour.

You can purchase a mirrored medicine cabinet with no worries. The weight of the glass is only an issue for you as you carry the cabinet from the store to your car and from your car to the bathroom. The weight of the mirrors can easily be supported by the walls. Be sure to use the screws provided by the manufacturer. Just pay attention to the written installation instructions and you will do fine. You must be sure the screws bite into solid framing material so the heavy medicine cabinet does not tip out of the wall cavity.

Many medicine cabinets come equipped with lights. All electrical connections must be done according to the National Electric Code. It is vitally important that any metal parts of the medicine cabinet are grounded, because of the electrocution hazard that is enhanced by the presence of water in the vanity sink.

The installation height of the medicine cabinet is very important. If your family has a mixture of tall and short people, be sure to think about getting a tall mirrored medicine cabinet that all will be able to use without stooping or standing on tip toes as they primp in front of the mirror.

Medicine cabinets don't have to be relegated to bathrooms. There are lots of other places in a home where you might want recessed storage and a handy mirror. You can purchase very affordable medicine cabinets that work great in sewing rooms, hobby areas and even workshops. The smaller cabinets are great places to store small items for any number of projects.

Column 646

Bathroom Lighting

DEAR TIM: Bathroom lighting is my current project, as I have two bathrooms that are being completely remodeled. What bathroom lighting fixtures have you had success with in your jobs? In the largest bathroom, contemporary lighting might interest me. Can I install one of those nifty makeup light and mirror fixtures that I often see in hotel bathrooms, or are those only permitted in commercial buildings? Carol S., Manassas, VA

DEAR CAROL: I don't know if there is a silver bullet when it comes to bathroom lighting and bathroom lighting fixtures. There are many wonderful options, and I think your biggest problem is going to be limiting your selections to just a few. When you visit a real lighting supply house that just sells lighting fixtures, I predict you will develop a mild headache from the mind-numbing task of looking at all of the delightful lighting fixtures.

To make matters worse, most lighting supply houses only display five or 10 percent of the light fixtures that are available. Be prepared to spend hours looking through catalogs that contain thousands of photos of bathroom lighting fixtures.

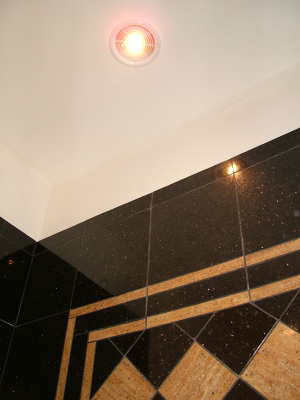
This halogen light is also an intake duct for a remote bathroom fan. The halogen bulb produces a brilliant white light. PHOTO CREDIT: Tim Carter

This halogen light is also an intake duct for a remote bathroom fan. The halogen bulb produces a brilliant white light. PHOTO CREDIT: Tim Carter

The best success stories I can share come from both personal experience, and many of the jobs I have completed over the years. Believe it or not, I am still learning how to best utilize light in bathrooms. New bathroom configurations and layouts create new bathroom lighting opportunities. The trick is to approach each job or bathroom with a new attitude.

The first thing to consider is that you have two lighting sources, and both should be considered. I think that people often underutilize and neglect natural lighting options. Windows, skylights and tubular lights that pipe sunlight into a bathroom should used whenever possible. There is no substitute, in my opinion, for brilliant sunlight streaming into a bathroom space in the morning. It is a wonderful way to start the day. Bathrooms that face away from the sun can benefit from skylights that reflect natural light from the sky and clouds. The same is true for windows, as they will let light in no matter which direction they face.

Artificial bathroom lighting is what most of us are used to. Standard light fixtures that use any number of different types of incandescent light bulbs can be found in tens of thousands of bathrooms across the land. But newer halogen and energy-efficient fluorescent bulbs should be considered, as they create a different palette of color. Be aware that different bulbs produce noticeable color spectrums ranging from a warmish golden hue to a blistering white light as you might experience outdoors at high noon on a cloudless day in the mountains.

The biggest mistake you can make in bathroom lighting is to have too little. My experience has shown that you need 300 watts of incandescent lighting per 50 square feet of bathroom. You can have more, but I think you will discover quickly that more than 8 watts per square foot could be overkill.

A combination of different lighting fixtures almost always produces a magical effect. I call this layering light. In my daughter's bathroom, I installed two recessed halogen lights over the vanity that are operated on a separate switch. Two other recessed lights, one in the center of the room and one over the tub, are operated by a second switch. When just one switch is on, the bathroom has a nice welcoming glow. When both are on, the bathroom lighting is just right for bathing or brushing your teeth.

Indirect bathroom lighting is another trick that many people seem to ignore. This form of lighting forces the builder/remodeler and the electrician to hide the actual light fixture, and bounce light from it onto a wall or a ceiling. Indirect bathroom lighting is ideal if you are going for a dramatic look. It is a great way to highlight wallpaper or decorative elements in a bathroom.

You can do contemporary lighting and switch to a different style in a few years. Almost all electrical lighting fixtures mount to the same electric boxes in walls and ceiling. Plan ahead to make sure you have enough side wall and ceiling clearance for most larger fixtures. Installing those lighted makeup mirrors is easy. They connect to a standard wall electrical box. Be sure the box is firmly attached to a stud or wood blocking in the wall.

Visit model homes on weekends to get real-time bathroom lighting ideas. I also urge you to look at many of the home design and decorating magazines for other ideas of unique bathroom lighting.

Be sure all moving doors in wall cabinets and medicine cabinets are able to operate fully and not hit lighting fixtures. Some lighting fixtures can be mounted too closely to mirrors and cabinets creating huge problems once you discover they are in the way and interfere with you gaining access to a cabinet.

Column 645

Electrical Safety

DEAR TIM: I am a new homeowner and know virtually nothing about electrical safety issues. Not listening to my parents is now coming back to haunt me. What kind of electrical safety program do I need to follow around my new home to stay safe? Are there specific electrical safety requirements I should and should not do? Think of me as a dry sponge ready to soak up all the knowledge you can afford to share. Melinda A., College Station, TX

DEAR MELINDA: You can soak up all the knowledge and water you can handle, but let's agree to keep electricity from finding its way into your body. High voltage electrical current found in just about every residential home is a double-edged sword. It lights our homes when it is dark, allows us to do things with ease by powering tools, appliances and motors and it can help keep us warm. But electricity can be a wicked dragon that is unforgiving if you make a mistake. People die each day from electrical-related accidents or fires.

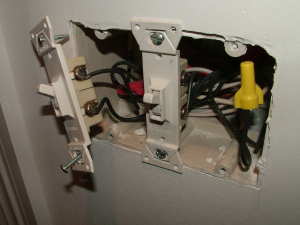
Be sure the screws that secure electrical wires to outlets and switches are tight. PHOTO CREDIT: Tim Carter

Be sure the screws that secure electrical wires to outlets and switches are tight. PHOTO CREDIT: Tim Carter

Electrical safety begins when most people are small children. But it is shocking how much the average person does not know about the electricity found in the average home. I can't serve this topic the justice it deserves in the limited amount of space I have, but I will try to cover what I feel are some of the most important points.

The experts in electricity work each day to help protect us from all sorts of dangers. Much of this knowledge is in the National Electric Code (NEC). These rules and regulations, when followed, allow electricity to be helpful instead of harmful. If you ever do any electrical work in your home, or hire someone else to do it, make sure the work is performed in accordance with the NEC. Electrical inspectors will come to your home for a reasonable fee to ensure the wiring work is installed correctly.

Electrical cables in your home that feed outlets and switches usually contain three separate wires. You should find a black, white and bare copper wire in each cable. The black wire is supposed to be the charged conductor, the white wire is considered the neutral and the bare copper wire is the ground wire. If an exposed energized black wire touches an exposed white wire or ground wire, you get a dead short that will produce a large amount of sparks and a shower of molten metal as the wires become a small arc-welding machine. The circuit breakers or fuses in a circuit panel are designed to turn off the current if this happens. But if they fail, the sparking and arcing can continue. You often see this with downed power lines.

The electrical cables in your home come in different sizes. The common sizes are 14 gauge and 12 gauge. 14 gauge cable is rated for 15 amperes and 12 gauge is rated for 20 amperes of current. The wires within each cable can only carry so much electricity safely. The circuit breakers or fuses in an electrical panel are made to match these same amount of amperes.

If you ever add additional cable or even a new circuit to your home, the cable size must match the circuit breaker or fuse size. If you install a 14 gauge cable on a 20 ampere circuit, the wire can overheat and start a fire long before the circuit breaker or fuse would ever shut off the current flowing through the circuit.

Be very careful when using extension cords. Never run them under a carpet, through an operating window or door or place them where the cable can be cut or damaged. Never use an extension cord as a permanent way to provide power to something. I feel extension cords should just be used to supply temporary power for a short period of time.

Consult with a professional electrician and see what it would take to get your home up to the current code with respect to life-saving devices like ground-fault current interrupters and arc-fault circuit interrupters. These devices can take the place of existing circuit breakers in your electrical panel.

Never remove an older two-prong electrical outlet and install a three-pronged grounded outlet unless you are equipping that outlet with a code-approved ground wire. If you fail to ground the outlet, you are creating a situation where a future homeowner thinks the outlet is grounded.

If you live in an older home, the connections between the wires and the screws on outlets and switches may be loose and dangerous. In my own home I once heard a switch in a bathroom crackling and sizzling. I took the cover plate off and actually saw small electrical arcing that would have caused a fire within hours or days. If you do not feel comfortable checking switches and outlets, hire an electrician to do it for you.

Column 644

Garden Stepping Stones

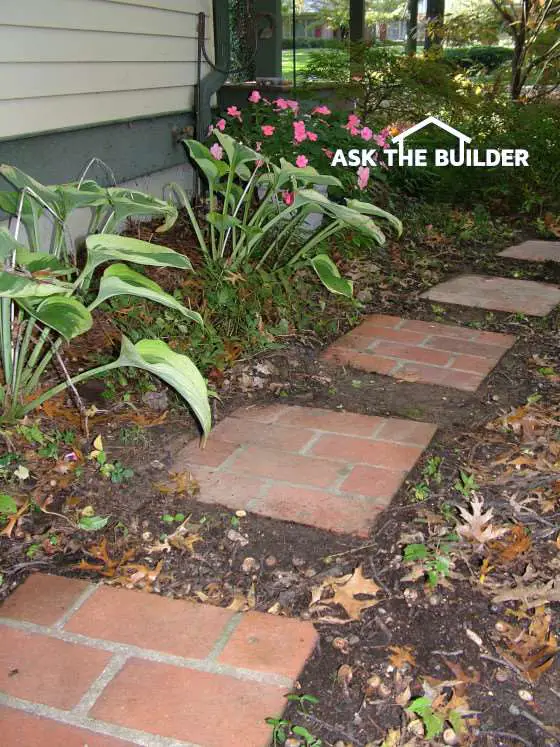
garden stepping stones

These garden stepping stones are more formal. Thin paving brick were cemented to pre-cast concrete pads and sunk into the ground. PHOTO CREDIT: Tim Carter

Garden Stepping Stones

DEAR TIM: Garden stepping stones would prevent me from ruining my shoes each time I walk through my garden after a rain shower. What are my options when it comes to the different types of stones I can use? What size stones are best? Is there a preferred spacing? How does one prevent mud and mulch from covering the stones over time? What tips can you share to minimize the upcoming hard labor? Elizabeth M., Louisville, KY

DEAR ELIZABETH: Isn't it amazing how tranquil a walk in the garden can be? I get great pleasure from walking through and around the different shade gardens my wife has planted. The garden stepping stones she had me install not only add to the beauty of our gardens, but they also keep my shoes dry and mud-free.

The best stepping stones for garden paths are usually flat sedimentary or metamorphic rocks. Limestone, slate, flagstone, and quartzite are some of my favorite rock varieties. Coarse limestone that contains abundant fossils makes for a stepping stone that has superb slip-resistance and natural beauty. You are lucky to have this type of rock near your home. You might be able to get slabs from creek beds or road cuts on a state highway.

Quartzite is a very interesting garden stepping stone as many of them glitter when they are highlighted by sunbeams. When wet, quartzite can produce deep colors that may compliment your plants. This stone is also extremely durable and will wear better than iron.

You can also make your own stepping stones with concrete. Irregular molds and stamping kits allow you to create stepping stones that resemble cobblestones or slate. It is also quite easy to cement thin paving brick to pre-cast concrete slabs. These stepping stones look more formal, but the red brick really blends well with the shades of green found in just about every garden.

The sizing of the stones is fairly critical. A garden stepping stone that is too small offers a small target as you walk through the garden. Stones that are too big tend to overpower the pathway. I have found that garden stepping stones that are roughly 18 inches wide by 14 inches deep are ideal. The stones should be approximately 1 to 1.5 inches thick. They can be thicker, but this just creates more work for you as thicker means heavier.

The spacing of stepping stones is controlled by your gait. You can measure your gait easily by getting the bottom of your feet wet, and then walking on dry pavement. Measure the distance from the center of one footfall to the next. The odds are you will discover the average adult gait is approximately 24 inches. People who are taller with longer legs will have a longer gait.

To keep stepping stones free of mulch and mud, they should be installed so they are higher than the surrounding ground. Rookie gardeners frequently dig shallow holes and plant the stones as they would a plant making the top of the stones level with the surrounding dirt. This locks the stone in place, but also allows the stone to get covered easily with debris.

You can still make the stones look flush with the surface ground by placing dirt around the edges of the stones and then flaring this dirt out into the garden. Each stepping stone will then be a small plateau within the garden. The slope away from each stone will be so gentle you will not see it, but water will not flow up on the stones unless a Biblical storm inundates your garden.

Try not to carry the stones to your garden. Make use of a wheelbarrow or a two-wheeled cart used by deliverymen. Either tool allows you to bring the stones one by one into the garden with ease. I also urge you to wear thick gloves to protect your hands while working with the stones. You can easily pinch your fingers while trying to take stones from a stack.

If you decide to make your own stepping stones using paving brick, build them in place exactly where they will rest in your garden. The combined weight of paving brick, cement mortar and a pre-cast concrete pad for just one stepping stone can easily exceed 125 pounds or more.

Cold weather can cause frost to form in the soil. This may cause the stepping stones to tilt one way or another until such time as the ground thaws. If the stones are out of kilter after the spring thaw, level them by placing sand under the low part of the stone.

Natural stone will rarely require any maintenance. Harder stone like limestone, quartzite and shale will last generations. In fact, they will last thousands of years with little or no wear. Visit a stone supplier to get the widest variety of stones, and be sure to ask about durability and relative hardness. Stones that have a high quartz-mineral content will be harder and will last longer.

Column 643

City and Town Websites

Athens, Ohio  http://www.ci.athens.oh.us/

Oakwood, Ohio   http://www.ci.oakwood.oh.us/

Pittsburgh, PA   http://www.city.pittsburgh.pa.us/

South Lake Tahoe, CA http://www.cityofslt.us/

Laconia, NH http://www.city.laconia.nh.us/

Lawton, OK http://www.cityof.lawton.ok.us/

Modesto CA http://www.ci.modesto.ca.us/

Elko, NV http://www.ci.elko.nv.us/

Preston, ID http://www.prestonidaho.org/

Home Depot and Sandy Fischler Long Beach California

On June 13, 2006, I stopped in at my local Home Depot (HD) in Lakewood, CA (where I have done thousands of dollars worth of past business, and have a long order history in their system) to set up installation for a Whole House Fan. Installation is advertised at Home Depot for $375.00 for install of the fan, electrical connection and wall switch installation included.

The very helpful gentleman at the front counter (I'll get his name when I make my next trip back) picked up the phone and called Installation Services himself to help me get things set up. After being on hold for far too long, he finally got through only to be told by Installation Services that there was no installation of Whole House Fans.

Multiple transfers later, someone tells him there is Installation of Whole House Fans. Another phone transfer tells us there is not. Finally, my wonderful HD staffer goes to his manager and explains the problem. The manager, named Rohan, informs us that the Whole House Fan installation is actually not a part of Installation Services and is a deal cut with a local installer.

Point #1: Management fails to communicate details on installation programs to staff. So, the manager writes up my installation order himself and all seems well. A week goes by and I did not hear from the installer to set up the appointment.

On June 18, 2006 I called Home Depot to find out what was causing the delay. I was put on hold for 10 minutes and forgotten about. I called back again, and finally got someone to pull up the order. Based upon what I was told, it seems the installation order was never faxed to the contractor. The desk person rectified this problem while I was on the line.

Point #2: There was no follow up with the contractor to complete the transaction. The next day, June 19, 2006, I get a voice mail message from Special Services at Home Depot telling me that there is a $50 "measuring fee" that has to be paid for them to come out to my home and inspect to make sure they can do the job. There was never any mention of a "measuring fee" on the in-store signage, the services flyer or by the manager when he input my service order.

I call Home Depot back, and was put on hold for a long time. Finally I hung up in frustration. I then called back a second and then third time. Finally, I spoke to someone who pulls up my order and can't do anything about it except notify the manager.

More time goes by. I go back to Home Depot again on Friday, June 21 to speak to the manager directly. He is not there, and another very helpful young man types in a note about the situation for the manager to deal with.

More days go by and I'm getting more and more displeased. On June 25, 2006 I go back to HD again, to try and find out what is going on. I discovered that phone calls are clearly useless. The manager is again not there, and not going to be for days. The poor guy at Special Services desk finally does the right thing and calls another manager to okay the waive of the $50 "measuring fee", and the order is once again faxed to the contractor for completion.

The guys from United Turbine finally show up to measure for the Whole House Fan on July 8th. They spend maybe 10 minutes looking up in the attic and pronounce the job a "piece of cake." They then tell me to check back with Home Depot on Tuesday July 11th to coordinate the final okay to schedule the install.

When the inspectors for United Turbine were at my house measuring for the job, they told me the company was "very busy right now, it will be a couple of weeks before we get out here." I wasn't happy to hear about this, but there wasn't much I could do about it.

I stop by HD on the appointed day, and they call over to the offices of United Turbine, but it turns out they still haven't input the measurements to give me a QUOTE for the installation. I remind them (HD) that I have already paid for my installation and they seem confused. The guy making the appointments tells me he will get back to me within the next day with the quote.

My bait-and-switch-o-meter is going off like crazy, but I decide to continue to play this out. More days go by. No word from HD or the installer. It has now been four weeks since I paid for the installation and started this process and I still have no Whole House Fan during one of the most brutal heat waves Southern California has seen in years.

On or about July 25, 2006, I went back to Home Depot again to complain about having not heard from United Turbine to schedule the install. The employee at the Special Services desk called United Turbine with me standing there to ask when they were going to complete my install that had been ordered back on June 13.

United Turbine tells the Home Depot staffer that they are "really busy, it will be a couple of weeks." I pitch a major fit, and all the employee of Home Depot can do is give a 10% discount coupon for my next shopping trip, authorized by the manager Rohan.

Today is August 21, 2006 and, SURPRISE, I still have not gotten my fan installed, and I have not heard a peep from United Turbine. I am cancelling the order this week, after having filed Better Business Bureau (BBB) complaints against both Home Depot and United Turbine.

I am no longer a Home Depot shopper. Home Depot corporate called me to check up on my BBB claim. They were not at all helpful and canceled my installation order without making any attempt to keep my business and make things right.

As you can imagine, I am so disgusted that I now drive seven miles out of my way to shop at Lowe's, where I've spent $800 since I swore off Home Depot in July. Home Depot's loss will be Lowe's gain.

For the record, I used to be Home Depot's biggest fan. I even owned stock in the company. I sold my stock last May after a horrible experience with the Home Depot online division (which I won't go into since your focus is on their Home Installation services) and the behavior of Nardelli and his board at the annual shareholders meeting last May.

Outdoor Fountains

DEAR TIM: Outdoor fountains have always put a smile on my face. But what should I look for in outdoor water fountains now that I am ready to install one? I am most interested in outdoor garden fountains and outdoor wall fountains. How do you make sure you get the right pump to provide just enough water flow? Are there any special things I should do when I install my new outdoor fountain? Marie M., Ocean City, NJ

DEAR MARIE: Fountains and outdoor living go together like a hot dog and a bun. My wife and I have had numerous outdoor fountains over the years, and several still work well each year when spring arrives. These garden accents provide us with great visual and audio pleasure when the water falls and splashes.

There are thousands of styles of outdoor fountains made from a multitude of materials. I have used fountains made from concrete, plastic and dense foam. Metal outdoor fountains and ones made with natural stone can be purchased with little effort.

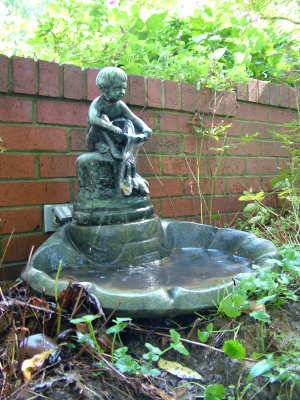
This smaller outdoor fountain is a center point near our lower patio. Its gentle flow of water provides soothing sound, and a great place for birds to get some water. PHOTO CREDIT: Tim Carter

This smaller outdoor fountain is a center point near our lower patio. Its gentle flow of water provides soothing sound, and a great place for birds to get some water. PHOTO CREDIT: Tim Carter

Unless you have an uphill stream on your lot, you are probably going to need electricity to power the recirculating pump that moves the water to the top of the fountain. Once there, it can flow down only to start its journey again and again as the water recirculates. Solar outdoor fountains allow you to use free energy, but remember that you will need batteries to power the pump at night and on cloudy days.

The pumps for fountains are very important. They must be durable, waterproof and sized correctly to match the desired water flow rate. The company that sells the fountain usually provides a pump that is made for the fountain. Many pumps are also equipped with water-flow regulators that allow you to fine tune the water flow once your fountain is set up.

If you live in a cold climate that experiences freezing temperatures, then you need to keep in mind that your outdoor fountain probably needs to be winterized. At the very least, I would consider removing the pump, and bring it indoors where it will not freeze and burst. I would then empty all water from the fountain and either store it a garage or shed or cover it with plastic so it can't refill from rain water or snow melt. Some outdoor fountains can resist freeze-thaw cycles, but others might be damaged. One of the precast concrete fountains I had crumbled in just three years.

Smaller outdoor fountains are easy to install and need little support. Often a level precast-concrete walking-path pad will suffice to give the needed support. But as fountains get larger, not only do they weigh a considerable amount, but so does the water used to fill the fountain. Very large fountains can weigh well over a thousand pounds, maybe more.

These large fountains need a substantial support base made using steel-reinforced concrete. The concrete pad must be perfectly level, and have a foundation that extends below the frost line if you live in a cold climate. Frost heave, in rare occasions, can actually tip over a poorly-supported outdoor fountain. At the very least, frost heave, over time, will make a poorly-built concrete pad unlevel.

If you do not like the look of concrete for the base under your fountain, keep in mind that the concrete can be covered with paving brick or natural stone to give your garden a softer or more pleasing feeling. You can add color pigments to the concrete if you like or buy do-it-yourself stamping kits to add texture while the concrete is getting hard.

Many outdoor fountain pumps require high voltage electric (120 volts or higher) to power the them. Be sure the electric circuit and all outdoor electrical components are installed according to the National Electric Code. Electricity and water make for a lethal mix if the electricity is not treated with the utmost respect. Do not cut corners. Have the work inspected to ensure the safety of you and your loved ones.

Many outdoor fountains are colored with pigments, some of which can fade in the sun over time. When talking with salespeople, ask about color fade. Be sure your fountain comes with a color-fade warranty.

If you would like to use your outdoor fountain during the winter months, and it does drop below freezing where you live, I suggest you look into a heater to help keep the water above the freezing point. I have used a small heater for years in my bird baths that prevents the water from freezing even when the air temperature falls below 0 F. In very cold weather, the water can freeze on the cold surfaces of the fountain and create an ice buildup. Watch for this, and only operate the fountain when the water does not turn to ice.

Be sure to use stainless-steel fasteners when mounting an outdoor wall fountain. Stainless steel will not rust over time as traditional galvanized steel can. Many good hardware stores sell a variety of stainless-steel bolts and anchors.

Column 642

Hardware Store

DEAR TIM: I have a need for both cabinet hardware and door hardware. I visited my local home hardware store and didn't have too much luck. The hardware store had all sorts of traditional nuts, bolts, nails, paint, rope and some of the things I was looking for, but not the variety I desired. I know this sounds crazy, but are there two different types of hardware stores? While we are on the subject, how do you feel about traditional hardware stores as opposed to the giant big-box home-center stores? Where do you shop for the things you need? Annette M., Hawthorne, FL

DEAR ANNETTE: You are not the first, nor will you be the last, person to get confused about the term hardware store. Many years ago, I was also perplexed about why two entirely different businesses had the same name. But once I got deep into the building business, I quickly figured out that there were two totally different types of hardware stores.

The hardware store you visited is more popular and known to many. They typically stock thousands of items that a homeowner needs. Some of these stores are wonderful places to shop, because you can get into and out of them quickly with the exact screw, nail, plumbing fitting, electrical switch, window weatherstripping, etc. that you need. There is rarely a long line of people waiting to check out, although lately the small hardware store I patronize is getting busier by the day as people grow frustrated with the local home centers.

This is a traditional corner hardware store near my home. It is a thriving business for many reasons, not the least of which is fantastic value and service. PHOTO CREDIT: Tim Carter

This is a traditional corner hardware store near my home. It is a thriving business for many reasons, not the least of which is fantastic value and service. PHOTO CREDIT: Tim Carter

The hardware store you were looking for exists in many cities and larger towns. These hardware stores specialize in cabinet hardware, door hardware, door hinges, cabinet knobs, drawer pulls and some have a full line of specialty plumbing fixtures. Many of these items are referred to as hardware by architects, designers, builders and carpenters. I buy my cabinet and door hardware from a magnificent store near my home that has thousands of unique door knobs, hinges, cabinet knobs and every type of hook, latch or accent hardware you might ever install on the inside or outside of a home.

If you do not have a specialty hardware store near you that has the cabinet hardware and door hardware you want, I suggest you get on the Internet. There are many businesses there that also sell a vast amount of high-quality hardware for very fair prices. The merchandise can be shipped to your doorstep, which may help save you valuable travel time.

Unfortunately, changes in the business world are making it harder for parents to imprint in their child's memories the coziness and quaintness of a traditional corner hardware store. I have distinct memories of both sights and smells of a hardware store, and fortunately for me, I still have several of these magical stores within miles of my own home. I will go out of my way to buy from them, so as to help them stay in business.

The giant home center chains have forced some of the weaker, poorly-managed, traditional hardware stores to close, and others to become affiliated with large national chains that give them the purchasing and branding power of the giant home centers. Competition can be a good thing, but sadly some small businesses have suffered.

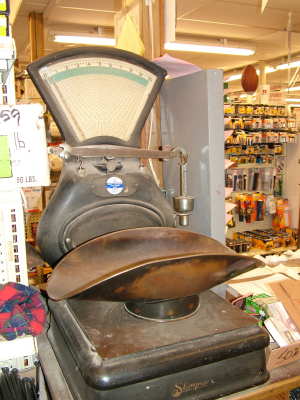
How many tons of nails do you think this scale has weighed in its lifetime? I'll bet the scale is at least 80 years old, maybe more. PHOTO CREDIT: Tim Carter

How many tons of nails do you think this scale has weighed in its lifetime? I'll bet the scale is at least 80 years old, maybe more. PHOTO CREDIT: Tim Carter


But I do also buy products, from time to time, at the big-box home-center stores. The smaller hardware store I visit is not open as many hours as the giant national home centers. If I didn't plan right or have an emergency, I will go to a home center to get what I need. But I must tell you that I do not look forward to going, nor do I relish the thought of dodging fork-lift trucks while I walk deep into a giant store to find one small item that is awash in a sea of products. My frustration is often compounded when I have to wait five or 10 minutes in the checkout line.

Be aware that many older door hardware items are still available. For example, if you want an interior door lock set that is operated with a skeleton key, you can readily buy them. They are exquisite pieces of door hardware. Beefy traditional square-tipped door hinges can also be purchased that will dress up the doors in your home.

Some of the specialty hardware stores carry one-of-a-kind hand-painted knobs for that special cabinet you are going to buy. Each knob matches the others, but there are subtle differences since each one is created by a human instead of a mindless machine.

Artisans also work with metal to make fabulous door and cabinet knobs, back plates and pulls. If you want a truly distinctive look for the cabinets, doors and windows in your home, invest the time to find a specialty hardware supplier in your town. If they can't be found locally, I guarantee you will find them online.

Column 641

Solar Power

Solar power, in my opinion, will solve a majority of our future power problems. Many people I talk to wonder about solar power, and how it works. I am currently using one of the many solar power systems that are available to exhaust hot air from my attic, but more on that very interesting fan in a few moments.

You might wonder if there are distinct advantages and disadvantages of solar power. There are indeed pluses and minuses, but I can tell you it works as friends of mine currently capture the sun's rays and transform this solar power into electricity for their home in Colorado. Their home solar power system produces so much electricity, it allows them to sell electricity back to the local utility company! Yes, their electrical meter sometimes runs backwards. The future for solar energy and residential solar power is as bright as new penny. In fact, I even have a portable solar power radio that my friends think is the coolest thing around.

The reasons solar power is so attractive are simple. The sun is always on, it produces energy very consistently, the solar energy is clean and it is free. Many people don't realize the sun is responsible for a vast majority of all the energy we currently have on our planet. The few exceptions to this are the naturally-occurring radioactive elements that fuel nuclear power plants, gravity which allows flowing water to produce hydro-electric power and the moon's gravity which produces the daily ocean tides. Energy is created in any number of ways from these processes and others to be sure.

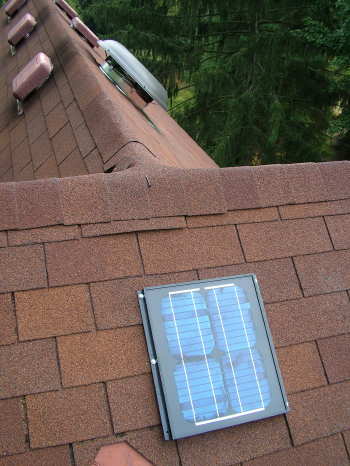
This is the solar panel that produces the electricity to run my attic ventilation fan. You can see the round dome of the fan on the other roof slope. It is different looking from the visible brown static pot vents that do not have fans working to remove the hot air. PHOTO CREDIT: Tim Carter

This is the solar panel that produces the electricity to run my attic ventilation fan. You can see the round dome of the fan on the other roof slope. It is different looking from the visible brown static pot vents that do not have fans working to remove the hot air. PHOTO CREDIT: Tim Carter

Wind energy comes from solar power that is created when the sun heats up different parts of the earth and atmosphere which in turn creates weather systems. Solar energy causes plants to grow which are then transformed into coal, oil, natural gas, propane, etc. by geologic processes. But the trouble with this is that we use up these solar-energy byproducts faster than Mother Nature can make them.

The direct infrared energy of the sun can heat up solid materials like concrete, brick, block, stone or water. Mother Nature is giving us energy each day for free, we just have to discover how to use it more effectively.

My vision of how solar power might work in the future is fairly interesting. Well, I think it is interesting, but my kids think I am crazy. Try to clear your head, and focus your thoughts out into the future. Forget about costs for the moment.

Imagine a series of space stations floating above the earth that have large concave dishes that collect the direct rays of the sun. The parabolic dishes concentrate this solar power into beams of high-powered light, and focus them like laser beams to power plants that reside near the oceans, large rivers or lakes.

If a number of space stations are in Geo-synchronous orbit, the stations that may be in the shadow of the earth get solar power passed to them by the stations that are getting direct rays from the sun. I am confident engineers can figure out a way to get solar energy to the power plants here on earth 24 hours a day no matter if it is dark, raining or snowing. I can see this high-powered beam of light cutting through clouds like a hot knife through butter.

My idea for this system comes from my days as a child. The light beam of solar power I envision is similar to that beam created by a magnifying glass, but much larger. Surely you have used a magnifying glass to start grass, paper or leaves on fire before. The heat from the concentrated rays of sunlight is intense. Tell me I am not the only mischievous kid to do that!

The solar power from the light beam is the heat source for boilers in the power plants. It takes the place of the fuel we now use such as coal, natural gas or nuclear energy. The solar power heats up the water in the boilers of the power plant creating steam which is then used to run turbines that create electricity. But wait, it gets better.

The power plants near the ocean use this energy to boil ocean water. After the steam has run through the turbines, it can be used as low-pressure steam to run manufacturing plants near the power plants. It can even be used to heat homes and businesses that might be near the power facilities.

Once the steam condenses back to water, it is no longer salt water. The solar power has now not only created electricity, but has also created vast amounts of fresh water that can be used for drinking, recreation or manufacturing purposes.

Pure oxygen and hydrogen can then be created from this water by taking the free electricity coming off the generators and injecting the electrical current into the water. Anyone who remembers their high school chemistry class knows that this electrolysis will readily transform the liquid water into pure hydrogen and oxygen.

The hydrogen can be used as fuel for cars and the oxygen can be used for all sorts of things. The best part about burning hydrogen in cars is that it creates clean energy. Once the hydrogen burns it exhausts water vapor which then condenses and turns back into liquid water.

The best part about this fantasy of mine is that we already know how to do everything except get the space stations up there and working. There might also be a small problem with airplanes flying through the light beams. I haven't figured out a fool-proof way to stop airplanes from getting fried by the light beam. That is a job for the engineers, as I am just the idea guy.

But let's dial back into today and see how I am really using solar power, since I don't think my vision of the future will happen in my lifetime, if it even happens that way at all. My ideas may turn out to be impractical or too costly. Someone else may figure out a much better way to use solar power.

I installed a great attic ventilation fan that operates using solar power. The best part about the fan is that the solar panel is not directly attached to the fan. This allows you to place the fan on your roof so it will not be seen from the street and still work. The solar panel is then put in a different location where it is exposed to the maximum amount of solar radiation. People who live above the earth's equator would want the solar panel to face south. People who live below the equator would want the panel to face north.

The solar panel comes with enough wire so it can be 12 feet away from the fan. But the manufacturer tells me the panel can be located up to 100 feet away if you need to separate the fan from the panel. You simply have to splice extra low-voltage wire to the existing wire that is coming out of the solar panel. If you decide to locate the solar panel more than 25 feet from the fan, you must increase the gauge of the wire to account for the voltage drop.

I plan to incorporate solar power into the next home I build. That will be in New Hampshire. There are many sunny days up there, and my house will be built on a magnificent slope that faces south. If you are looking to buy land and want to use solar power, be sure the lot faces the right direction.

Column EM0046