Tool Tip Questions

Please answer the simple questions below to help me build a tool website of which you will be proud! After all, your valuable input will allow me to launch a website that will help many people who want to to get professional results when using tools.

This form was created using the easy tools at Freedback.com.

Don't forget to Click the Submit Form button once you have answered the questions.


Name:
Email Address:
City & State:

What hand or power tools interest you?

My Interests:

What do you find frustrating about tools?

My Frustrations:

Do you have problems using different hand or power tools? Tell me briefly what seems to be the problem.

My Problems:

What power or hand-tool tips or secrets would you like to learn about?

Tips I Need:

Tar and Chip

Belkay Drive is a small no-outlet street that runs off of Belkay Lane in Amberley Village, Ohio. On August 24, 2006, this small street was refinished with the wonderful tar and chip method of paving.

This paving method coats the entire road surface with a waterproof membrane of sticky asphalt cement. A generous amount of small limestone chips are immediately broadcast into the hot tar. The tar grabs onto the stones and holds them in place permanently.

The chips are rolled in place with a steam roller machine. After several weeks, excess stone chips are removed so the surface resembles any other blacktop surface.

The tar and chip method of paving is not new. It is how roads used to be paved. The surface offers excellent traction and is very affordable. The surface can last up to ten years without any care.

Here you can see half of the road complete and the other half just the jet-black hot tar. PHOTO CREDIT: Tim Carter

Here you can see half of the road complete and the other half just the jet-black hot tar. PHOTO CREDIT: Tim Carter


A special attachment for a dump truck allows the perfect amount of limestone chips to fall into the hot tar. PHOTO CREDIT: Tim Carter

A special attachment for a dump truck allows the perfect amount of limestone chips to fall into the hot tar. PHOTO CREDIT: Tim Carter


This is the finished surface. The darker spots are just wet gravel. PHOTO CREDIT: Tim Carter

This is the finished surface. The darker spots are just wet gravel. PHOTO CREDIT: Tim Carter


This is the special truck filled with the hot tar. PHOTO CREDIT: Tim Carter

This is the special truck filled with the hot tar. PHOTO CREDIT: Tim Carter


Window Box

window flower boxes

This window box loaded with soil and plants weighs over 200 pounds. It is anchored directly to the wall studs with heavy-duty stainless steel clips and bolts. CLICK or TAP HERE or the photo to order the exact window box you see above. PHOTO CREDIT: Tim Carter

DEAR TIM: I think window boxes would really dress up the exterior of my home and add beauty. My husband thinks the flower boxes will damage the house, and is discouraging me from doing this. Many houses where I grew up had window boxes, and I never saw any damage. What is your opinion about window boxes? Would you tell people to install or avoid them? What type would you recommend? If you do like them, how would you install them to prevent damage? Robin B. St. Rose, LA

DEAR ROBIN: Guess what? Your husband is partially right. Poorly designed window boxes that are installed incorrectly can damage a house. Maybe he is against the gorgeous flower boxes because he saw houses years ago where the boxes did cause problems. Although my comments may help you persuade him, I am quite sure he will see it your way if you start wearing a sweatshirt around the house like my wife wears. It simply says, "When Mama Ain't Happy, Ain't Nobody Happy".

In all seriousness, you absolutely can install window boxes that will bring you great joy and satisfaction. High-quality window boxes will not damage your home one bit if you follow a few simple steps. If you haven't already figured it out, I love window boxes as does my wife.

Window boxes can really make the exterior of your home attractive. They can add color to a home no matter what the season. My wife changes the look of our large window box four times a year. I love the window box during all seasons, but I really enjoy the fall assortment of hardy frost-resistant flowers mixed with the colorful gourds and pumpkins.

You can make window boxes out of many materials. The boxes need to be rot resistant and strong enough to hold hundreds of pounds of weight. There are lightweight soil mixtures that do not weigh as much as real soil, but even those materials, plus water and the weight of the plants can add up quickly. The window box material must be able to withstand the weight and not sag, bend or break.

If you want to make a traditional wood window box, you should use redwood or cedar. I would be sure to treat the wood on all sides and edges with multiple coats of a water repellant to help the natural rot-resistant chemicals in the lumber. I have seen plastic window boxes that might work for you as well.

But my favorite window box is one made from extruded fiberglass. These magnificent boxes are completely rot proof, exceptionally strong and they are drop-dead gorgeous. The best part about the fiberglass ones I use is they are hung on the wall with special hidden clips. My window boxes seem to float in midair, whereas other window boxes often have visible brackets that support them.

fiberglass window box

This is the exact fiberglass window box I have at my own home. They're indestructible! CLICK or TAP HERE or the photo to order yours.

One of the most important things you need to consider when attaching a window box to your home is water. You must ensure that there is an open pathway behind the window box so water does not get trapped between the box and the house. The fiberglass window boxes I use are engineered so this happens. The special stainless-steel clips that attach to the house and slide up into a channel on the top edge of the box create a wonderful airspace between my house and the box. Rainwater and any spilled water from watering the plants can readily drain from behind the window box.

Be sure that you also use rustproof fasteners like stainless-steel bolts to attach your window boxes to the house. The bolts must embed themselves into exterior wall studs. Remember, the window boxes present an overhead hazard. If they were to ever pull away from the house and fall, they could seriously injure or kill you, a loved one or a visitor. You must make sure you follow all written installation instructions, and use abundant amounts of common sense when installing them.

The fiberglass window boxes I use have another advantage. They can be painted any color you desire, and the paint will not readily peel off. If you use traditional wood to make a window box, you will very likely have severe paint-peeling issues as the water from the planting soil makes it way through the wood. Once the water gets under the paint film, the vapor pressure builds and causes the paint to fail.

If you have a brick or masonry home, I would also recommend that you apply a silane or siloxane water repellant to the masonry surface behind the window boxes. This clear chemical will repel water that will not readily evaporate from behind the window boxes. These chemicals can be applied with an old paint brush to the small area in question. Most dry totally clear, so even if you get some on masonry not covered by the window boxes, you should be fine.

Column 638

Garage Cabinets

DEAR TIM: Because of my tendency to keep too many things, I need garage cabinets. There seems to be an abundance of different garage-storage products, but once I start to price them, I quickly run out of money. What kind of garage cabinets would you suggest for a person who can't afford new, fancy cabinets? Are there things I should avoid? Can I just nail the cabinets to the wall? Kristin, K., Newfields, NH

DEAR KRISTIN: Garage cabinets are absolutely more popular now than I can ever remember. Many building-products manufacturers have started to respond to the marketplace demand of consumers like you. There are many types and styles of garage cabinets, and most of these can really cost a king's ransom once you design a complete solution for your garage. Add to this professional installation, and it takes no time whatsoever to get into four figures.

You have several highly-affordable options, if you want to clean up the clutter in your garage. The first places I would call would be local remodeling contractors, especially ones who specialize in kitchen remodeling. These contractors often have a constant supply of used kitchen cabinets they remove from homes. Frequently these cabinets are in very good condition, and when combined together, they can create a massive wall of cabinetry in a garage.

This garage cabinet was salvaged for free from a remodeling job. It is well-built, and the glass doors let you see what is on the shelves. PHOTO CREDIT: Tim Carter

This garage cabinet was salvaged for free from a remodeling job. It is well-built, and the glass doors let you see what is on the shelves. PHOTO CREDIT: Tim Carter

Keep in mind that most kitchen wall cabinets are made in standard sizes. Often the cabinet box is 12 inches deep, and comes in different widths and heights. This means you can often combine cabinets from different kitchens and they will mate with one another nicely. You can often mix different styles, and the look is not too bad.

To solve garage clutter, don't think your garage has to end up looking like a kitchen. Keep in mind that you can easily stack wall cabinets on top of one another to create a solid wall of storage. Once the cabinets are fastened to one another and then securely fastened to the wall, you have a garage that may become the envy of many neighbors.

If you want open storage shelves, think about removing the doors from salvaged cabinets. There is no need to try to make shelves from scratch.

Used cabinets can sometimes be found at stores that sell recycled home building and remodeling products. We have several such stores in my city, and they offer unbelievably low prices for cabinets in great condition.

Cabinet companies and plumbing-supply stores that sell cabinets often have a dusty corner of a warehouse dedicated to damaged or mistake cabinets. You might be able to get workable cabinets for pennies on the dollar by visiting these stores or putting your name on a call list for when new cabinets are added to the bone yard.

If you can find a remodeler who regularly works on older homes and you are patient, you may get very lucky one day. Every now and then a remodeling job may involve removing old cabinets that were built-into the house. Most of these cabinets are premium quality made from old-growth lumber. Some often come with glass doors and cabinets with drawers and doors.  I know of several houses where cabinets like this were doomed for the dumpster, the most recent one being a film location for a reality-television show.

If you work with old painted cabinets, be careful about the hazards of lead paint. Any cabinets made before 1978 might have lead paint on or in them. Any cabinets that were made and painted before WW II probably have multiple layers of lead paint.  Sanding these cabinets can create toxic lead dust. If you need to refinish them, think about carefully removing the paint with chemical strippers. Be very careful, and follow all recommendations offered at http://www.epa.gov/lead.

Cabinets should never be nailed to a wall. Always use screws to attach cabinets to a wall. The weight of a single large wall cabinet and the things stored inside it can often exceed several hundred pounds. Nails can pull away from a wall without warning, while screws offer tremendous holding power. Be sure the screws penetrate through the cabinet and into solid framing lumber at least 1.5 inches. You will often discover the minimum length for a cabinet screw is 3 inches long.

Another way to locate good, used cabinets is to put the word out to all of your friends, neighbors, relatives and co-workers. I guarantee you one or more of them will know someone who is planning to remodel their kitchen in the near future.

Keep in mind that stained cabinets can be easily painted to make your garage look neat and clean. You do not have to paint the interior of the cabinet, just the exterior surfaces that you see.

Column 637

Wallpaper Borders

wallpaper borders

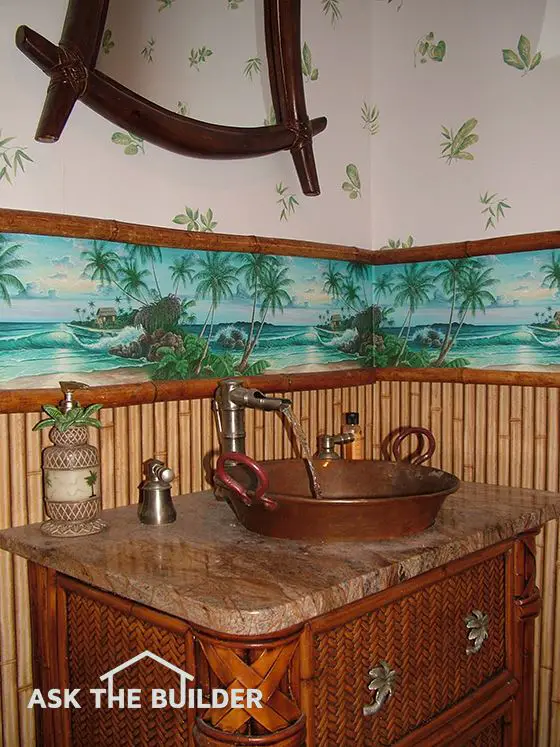
Wallpaper borders like this one with palm trees are magic. This tropical wallpaper border was easy to install. It requires minimal wallpaper-hanging skill to achieve professional results. ©2017 Tim Carter

"Wallpaper borders are a true wallpaper product, but they differ from regular wallpaper in the manner in which they are installed and their relative size."

Wallpaper Borders Checklist

  • Prepasted borders are excellent choices
  • Use clear paste activator instead of water
  • Allow border to book for five or ten minutes
  • Borders can be anywhere on a wall

Wallpaper Borders - Easy to Install & Look Fabulous

Related Links

Wallpaper and Borders on Drywall - DANGER! MUST READ!

What is Home Wallpaper? Confusion Reigns

Borders For Wallpaper

DEAR TIM: It 's time to redecorate several rooms in my home. The high cost of gasoline has put a serious crimp in my budget.

I was thinking of just painting some rooms and adding a wallpaper border for extra flair. Is this a good idea? How hard is it to install wallpaper borders?

Do I need special tools or skills? Will the borders fall off the wall in a few months if I make a mistake? Cher W. Grand Junction, CO

DEAR CHER: Wallpaper borders are a well-kept secret used by many interior decorators that I know. These simple and affordable narrow strips of wallpaper can add color and a theme to an otherwise plain-vanilla room.

Are Wallpaper Borders Like True Wallpaper?

Wallpaper borders are a true wallpaper product, but they differ from regular wallpaper in the manner in which they are installed and their relative size. Traditional wallpaper is hung vertically from the ceiling to the floor. Wallpaper borders are hung horizontally.

Traditional rolls of wallpaper might be 21 inches wide and 20-30 feet long. A wallpaper border might be 20 or 30 feet wide but only 6 to 9 inches high.

But this is perfect sizing since you want the border to dress up your wall surface in the same way as a ribbon adorns a gift box.

Free & Fast Bids

CLICK HERE to get FREE & FAST BIDS from local wallpaper hangers who can install your wallpaper border.

Where are Wallpaper Borders Installed?

A wallpaper border is commonly applied to a wall surface where the wall meets the ceiling. However, I have routinely installed a border about 36 inches high off the floor. Wallpaper borders can also be used to separate two different wallpapers in a room.

For example, my basement bathroom has a tropical-themed border that separates a bamboo wallpaper from a light-colored wallpaper that has tropical plant leaves in its background.

The border brings together two vastly different wallpapers making the three wallpaper products look like they were made for one another.

How Hard is it to Install Borders?

It's very easy to install wallpaper border material. The biggest reason, in my opinion, is that you are working with less material than a large sheet of traditional wallpaper.

Furthermore, when you do have to match the pattern, you are working with a strip of paper often less than a foot tall. This makes matching a breeze.

What Tools are Required to Install Wallpaper Borders?

To install a wallpaper border, you do need all of the same tools one uses for traditional wallpaper. Fortunately, you don't need many tools to wallpaper.

Here's a list that will get you going on this job:

  • retractable razor knife with snap-off blades
  • 4.5 or 6-inch drywall taping knife
  • smoothing brush or plastic smoother
  • 4-foot level
  • grout sponge
  • measuring tape
  • paint roller & pan
  • paint brush

Click the Image Below to get all, or some, of the tools now:

Wallpaper Tools List

CLICK HERE to get all the tools I recommend in one place. It's easy and fast.

Do You Need a Large Table?

It helps to have a large pasting table that serves as a work platform in the event you need to apply a special adhesive or a clear paste activator gel to the back of the border.

What is the Best Border Adhesive?

If you want the border to stay attached to the wall for many years, you must pay very close attention to the type of adhesive you will be using. Some borders come pre-pasted from the factory, but that adhesive may not be suitable if you are installing the border on top of a vinyl-coated wallpaper.

In these cases, you often must use a special adhesive that bonds borders to other wallpaper products. Be sure to follow the manufacturer's written instructions, and use the correct adhesive for your situation.

Will Pre-pasted Border Work on a Painted Wall?

Yes, pre-pasted borders work very well on painted walls.

Since you are applying your border to a painted wall, and you will probably buy a pre-pasted border material, the factory-applied glue will be fine. You can apply water to the border to activate the paste, but I have had far better luck with clear paste-activating gels. These gels are quickly brushed onto the back of the border.

How Do You Hang Borders?

Hanging borders requires the same techniques one would use to hang wallpaper. The biggest mistake often made by rookies is the failure to book the border.

What is Booking and Why is it Important?

Booking is a process where you activate the paste and fold the border so the pasted surface folds back on itself. This process allows the border paper to relax. As the paper relaxes, it swells in size.

You want this swelling to happen on the pasting table while you are working with another piece of the border. If you activate the border paste, and then immediately try to hang the border, you will undoubtedly get all sorts of bubbles and blisters on the border as the border swells on the wall. This swelling action pushes the paper off the wall with each new bubble.

Should Borders Wrap Around Inside Corners?

Avoid the temptation to wrap the border around inside corners where one wall meets another. The border may look good as you install it, but hours later the border may pull away from the corner as the adhesive dries.

Run one piece of wallpaper border around the corner and trim it so there is just 3/16ths inch of border on the next wall. Then match up the pattern and start a new strip of border exactly in the corner. The second piece of border overlaps the small tab of the border from the previous strip on the adjacent wall.

CLICK HERE to get FREE & FAST BIDS from local wallpaper hangers who can install your wallpaper border.

Column 636

New Hampshire Real Estate

New Hampshire has lots of real estate, even though it is a small state. Many people are attracted to New Hampshire because of its excellent location. Anyone who knows anything about real estate knows the three most important aspects of any lot are: location, location and location.

Imagine a place where you could be in the center of majestic mountains within an hour's drive. How about a rural lot where you could drive to one of the largest cities on the East Coast of the USA within two hours? Would you like a secluded building lot where you could drive to the Atlantic Ocean in less than 90 minutes? Well, I know where several are, and they are right next to the land I just purchased.

My wife and I just recently purchased 90 acres in New Hampshire. The land is located in the town of New Hampton. Look at a New Hampshire map, and you will quickly discover that New Hampton is just west of the center of the vortex of the coveted Lakes Region of New Hampshire.

Our lot is part of a seven-lot high-quality subdivision. The other six lots are still available as of the date this article was posted. I was an early-bird buyer, and purchased my lot before the site improvements and utilities were installed. The utilities are now in, and you and I can build as soon as possible if you like.

I have always wanted to own a larger piece of land. This 90 acres is heavily forested, has a gorgeous southern exposure and across the southeast corner of the land you will discover 1,700 linear feet of a pristine brook that runs throughout the year. Believe it or not, this fairy-tail brook has a series of five cascades that fall a combined 300 vertical feet, and they are all located within my property lines. I still can't believe Kathy and I own this special natural wonder.

If you are thinking of buying land or even a house in New Hampshire, I can recommend a superb realtor. The agent I used represented me as the buyer of the land, and he was very professional. I should know, as I am still a licensed real estate broker here in Ohio. If you want me to connect you with this realtor, just click here and fill out the form.

Here is video for you to watch. Be sure to look at the still photos below the video.

Enjoy!


The trees are blocking the steep canyon walls in this section of the brook.


This pothole was cut into solid granite by a whirlpool that swirls during periods of heavy water flow. You can see the rocks at the bottom of the pothole that grind away the rock. Who knows how many hundreds of years it has taken to create this wonder!


This is the upper cascade just west of where the property line crosses the brook. Can you imagine how much water flows over this when it really rains?


This is a typical photo of the brook between the five different waterfalls. How many lots do you know of that have a stream running across it like this?


This photo simply doesn't tell the whole story. The view to the mountains to the south is amazing if you just move to the east about 300 feet. I will get that photo next time!


This view is looking east southeast towards the conservancy land and Carter Mountain.


This is the view you will see looking out the back of the house.

Ceiling Fans

Ceiling fans are a great way to provide both comfort and style to any room of you home, even ones outdoors. I have multiple ceiling fans in my own home, and am thinking of adding more. But I just don't buy any brand, as over the years I have learned that ceiling fans are like many other things. If you want a ceiling fan that will operate quietly and reliably, then you must pay more money when you buy the fan.

Ceiling fans come in different sizes, and this is important to keep in mind depending upon the size of the room you are trying to cool. If the room you are trying to cool is larger, always get a ceiling fan that has a blade span greater than 50 inches.

The way a ceiling fan works is very simple. As we perspire, the heat from our bodies is transferred to the liquid perspiration on the surface of our skin. When a breeze blows across our skin, it evaporates the liquid perspiration. As the liquid sweat turns into water vapor, it takes the heat from your body into the air. This is the exact same mechanism that fuels monster hurricanes. Heat from the ocean water is carried up into the gathering storm as the warm ocean water evaporates. .

This ceiling fan is in a large sun room. PHOTO CREDIT: Roger Henthorn

This ceiling fan is in a large sun room. PHOTO CREDIT: Roger Henthorn

To achieve maximum cooling, a ceiling fan has to move lots of air. The distance the fan is from the ceiling and the tilt or pitch of the fan blades must be optimized. If a ceiling fan is too close to a ceiling, say six inches or less, it can't easily get the needed air to push down towards the floor. Just the same, the fan blades must have a tilt to them so they cut through the air and push it down. Airplane and ship propellers operate the same way. They slice through air or water to push objects that weigh many tons.

Ceiling fans that have a blade pitch of 15 degrees work very well. Those fan manufacturers that take the time to perfectly balance the fan blades and mounting hardware do even better. As the fan blades spin around, they need to be balanced just like a car wheel or a washing machine. If you have ever heard an out-of-balance washing machine rattle when it is in its spin cycle, then you know why it is important to have balanced ceiling-fan blades.

Ceiling fans can save you lots of money on air conditioning costs. If you use a ceiling fan in the early parts of the day before the sun bakes your home, you can get effective cooling in the room you are occupying. There is no reason to air condition the entire home if you are just in one place within your home. A ceiling fan uses only a fraction of the electricity that is required to operate a central air-conditioning system.

A smaller ceiling fan for a kid's bedroom. PHOTO CREDIT: Roger Henthorn

A smaller ceiling fan for a kid's bedroom. PHOTO CREDIT: Roger Henthorn

If your home is well-sealed, the air inside will still have a lower relative humidity from the operation of the air conditioner the day before. This lower level of humidity will help evaporate the sweat from your skin, even if you don't feel yourself perspiring.

I think it is a great idea to install ceiling fans in all bedrooms, kitchens, family rooms, or any room where you might sit to relax or work. I would also place a ceiling fan on a covered screened porch or even a patio that has some type of awning or other cover to keep rain water from falling onto the fan.

Keep in mind that even when a fan is operating at a very slow speed, it can provide enough cooling to keep you very comfortable. The fan does not need to be blasting you with air as if you were in a gale.

Be sure to purchase a ceiling fan that can be operated with a speed control. Many models have built-in micro processors that allow you to set the fan speed from a wall control. What's more, the fan motor can spin in reverse to pull air up from the ground in winter months. This reverse action takes warmer air from a ceiling and distributes it to lower levels in the room.

Column EM0045

Northern Tool

Northern Tool + Equipment is an online business where you can buy tools of just about any type and any brand. Years ago, before the Internet was used for commercial purposes, I used to buy my tools from Northern Tool. Back then, one just used a traditional full-color catalog and a toll-free telephone number to place orders.

One of the power tools I purchased from Northern Tool was a corded one-half inch drill made by Porter Cable. I remember paying $89.00 for this drill back in the late 1980's. This was a lot of money for a drill at the time.

But the moral of the story is that I was buying quality. I still have that drill, and it works just as good as the day it was delivered by the brown UPS truck.

Many of my carpenter friends and subcontractors thought I was nuts for buying tools via mail order. They thought it was crazy to call and send for a tool. My thoughts were about pricing and convenience. The drill was very competitively priced, and I loved how I didn't have to fight a crowd at one of the local stores.

After this positive buying experience, I then purchased a gasoline-powered air compressor from Northern Tool. This larger item was not able to be delivered by UPS, so I had to go pick it up at a freight company. That was a little bit of a hassle, but I got a fantastic deal on the compressor, and it arrived in perfect condition.

There were thousands of people who were buying mail order at the time. It wasn't a new concept, as other major retailers had strong mail-order catalog operations. Heck, L.L. Bean started his successful mail-order business back in the very early 1900's, so you know both mail order and Internet businesses could do well. People love convenience and great pricing.

Column EM0044

Construction Loans

DEAR TIM: My husband and I plan to build a custom home. Since we already own an existing home and need to stay here while the new home is built, how do we pay for the new home? What type of financing do you get that allows you to make payments on your existing home and the new home at the same time? What can we do to minimize the financial pain of owning two homes at one time? Gina M., Park City, UT

DEAR GINA: You need a construction loan to build your new home. This is a common product sold by banks, credit unions and traditional building and loan companies. Bankers and lenders know that building new homes is great for their businesses, so they have developed loan products that takes most of the sting out of borrowing money for a new home.

One of the first things I think you need to get your arms around is the concept that banks, credit unions and other lending institutions sell money just as a grocer sells food. The money you and I borrow when we go to banks is a commodity item your lender gets from other banks, their customers and the Federal Reserve. Just as grocery stores get stocked with fresh food from farmers and other food producers, your lender may need new money each week.

You often need a special construction loan to build a new home. PHOTO CREDIT: Tim Carter

You often need a special construction loan to build a new home. PHOTO CREDIT: Tim Carter

This system allows you and I a slight competitive edge since lending institutions are always trying to sell their supply of money each week or each month. This supply/demand situation forces many lenders to offer competitive rates, terms and loan packages. For this reason, it can really be to your advantage to shop different lenders to see what rates and terms they are offering for new home construction loans.

Traditional construction loans work in this fashion. You borrow a fixed sum of money that you combine with any personal savings and/or equity in your own existing home. The total of all of these monies should be equal to or slightly greater than the total cost of your new home. I suggest a loan package total that is at least five percent greater than the total projected cost of your new home, as there always seem to be cost overruns or surprises that can ding your pocketbook.

As your home is built, the builder will make draws against the loan money. To draw down the loan money, he will have to supply to your lender legal affidavits for all subcontractors and material suppliers that have performed work on your home and/or supplied material up to the time of the draw. The bank then issues checks to these individuals that match the amounts stated on the affidavits.

As soon as this happens, the interest meter starts running on the construction loan. The following month you will have to make an interest payment on the amount of money drawn from your loan account. You continue to make these monthly payments as time progresses. But as the house is built and more money is drawn down, your interest payments grow larger and larger each month.

Once the home is finished and it is time to move in, your construction loan must be converted to a permanent mortgage where you make both interest and principal payments. If you bargained well before you purchased the loan, you will have a competitive interest rate for the life of the loan.

You can minimize your financial risk and pain by selling your existing home before you build the new home. This allows you to cash out of your existing home and have all of the equity at hand. You will have to make rent payments for your temporary living quarters, but see if you can't survive in a smaller apartment for the time it takes to build your home. Find an apartment, if possible, that allows you to rent month-to-month. If you sign a fixed lease and your house is not completed by the time you need to move out of the apartment, you may be in a world of hurt as you have to find very short-term living quarters.

One of the biggest advantages to selling your existing home early in the process is that you can use your equity to fund the initial stages of construction. This will minimize the time you actually use the bank's construction loan money. Furthermore, you may be able to get a better interest rate since you present a lower credit risk to the lender. You also have enormous peace of mind knowing that you don't have to make two mortgage payments after you move into your new home while your existing home sits vacant.

It is vitally important that you talk with your lender about all conditions regarding your construction loan. For example, the lender will want to be assured of a clear title with your land, and furthermore, he will want to be in the first position with regards to lien rights. Since many states have strong protective lien laws that are in place to protect the rights of workers and suppliers, the lender will often insist that no one is allowed to do anything on the land until you have closed on the loan. This means you can't even have the lot staked out by a surveyor for the builder before the loan closing!

Try to shop for a combination loan that only requires one closing. This is a construction loan that is bundled with a permanent financing mortgage. Getting a loan such as this minimizes closing costs, and could save you thousands of dollars in loan fees.

If you want to discover more information about constructions loans and many other types of loans, I suggest you check out a cool website I recently uncovered. Don't let the name of this website fool you. It has scads of information about all types of loans:

www.StudentHomeMortgageLoans.com

Column 635

How to Build a Deck

DEAR TIM: I need to know how to build a deck. What are the most important steps to take?

I live in an area where it snows, and a neighbor told me I have to worry about the frost line. What is that?

As you can tell, I am a rookie and need lots of direction. I am determined to do this job, and just need to be pointed in the right direction. Mary Jo G., Vancouver, WA

DEAR MARY JO: Holy Moly! There is so much to know about how to build a deck, I don't know where to begin. One thing is for sure, I can only scratch the surface in the limited space I have.

Perhaps the most important things to consider are: zoning and deck structure. If you drop the ball in these areas, I feel you will have a disaster on your hands. Finally, do not underestimate the amount of physical labor this project will consume. The framing materials used for decks can be very heavy and cumbersome. If the deck surface is over four feet in the air, then an extra degree of difficulty is added to the job.

Many homes are built in areas that have zoning laws. Since most decks are attached to homes, zoning laws can dramatically affect the overall size and shape of the deck. An interesting loophole might exist in some zoning codes if you design the deck so it does not attach to the house. Be sure to read the code carefully, and ask if you have more or less latitude if the deck is a free-standing structure that is only one inch from your back door.

The building codes that are in force in many parts of the nation look very closely at outdoor decks. Each year decks collapse and injure or kill people. In fact, a serious deck collapse happened in my own city years ago, while a large group of people were having a party to view a fireworks display. The building codes require decks to support loads much greater than standard floors inside residential homes.

deck was built by a novice

This deck was built by a novice with a little coaching from a pro. The homeowner planned it well as the deck is large enough for two separate seating areas. PHOTO CREDIT: Tim Carter

One thing that causes me great concern is the amount of bad advice I see on other websites. For example, one website says to lag bolt a ledger board to the side of the house. This is exactly why the deck collapsed in my town during the fireworks display! Lag bolts do not have the holding power of through bolts. Lag bolts can pull out of the structure and/or have reduced holding power if they are overtightened.

A through bolt is one that penetrates completely through the exterior wall. You then install a washer and a nut on the inside of the house. This method is the strongest possible connection. Also, you must provide spacers between the ledger and the house so water does not get trapped between the ledger board and the house wall. Provide these spacers in addition to flashing that laps over the top of the ledger board.

The deck building codes are stringent because code officials know that large parties with many people are common on decks. Furthermore, the group of people might start dancing which can create a motion that can cause decks to sway. For these reasons and others, you must ensure your deck is designed to code-minimum standards. Diagonal bracing applied to the underside of the floor joists helps minimize sway, as do braces and special metal framing connectors that can be used where deck beams attach to deck support posts. If you are in doubt about any of this, hire a registered architect or structural engineer to provide you with a detailed framing plan.

EB015 Cleaning & Sealing Deck eBoo Cover

The frost line is a distinct depth in your local soil to which frost can be expected to penetrate during the coldest part of any given year. This line is generated from years of historical data, and it can vary widely depending upon weather conditions. For example, the frost depth in my city is 30 inches below the top of the surface. But in the recent decade, there have been winters when the frost maybe penetrated only three inches into the soil. But I remember the horrible years of the late 1970's, when the frost penetrated to over six feet in certain areas of my city.

The importance of the frost line is significant. When water freezes it expands in volume about nine percent. Since most soils retain water, they freeze, expand and almost always lift upwards. Soils against exposed retaining walls also freeze and expand sideways. This expanding soil can tip over retaining walls and lift up structures. The lifting force is extremely powerful. If the lifting force is not equal and consistent at all points, then stress can build up within the deck causing it to twist. This helical motion can cause severe structural damage.

By placing the bottom of deck foundation supports below the frost level, you can rest assured the deck will not move as the ground freezes. Always be sure that vertical concrete piers or columns are dug so the bottom of the hole is wider than the top. This upside-down cone shape helps lock the foundation into the freezing soil just as a dovetail joint works in carpentry.

One of the biggest challenges rookies face in building decks is how to accurately locate any and all foundation piers. The margin for error is very small, and it is important that deck support posts are plumb.

One trick I learned years ago is to simply build just the outer frame of the deck. As it is being built, support the frame up in the air with temporary posts placed at least two to three feet away from the planned vertical support posts. Add extra temporary posts so the deck frame will not collapse as you work beneath it.

Using a level, tape measure and grade-school geometry, you can make this shape level and square. Brace this frame so it doesn't move, and then use a plumb bob to transfer the outer corners of the deck down to the ground. This fool-proof method allows you to precisely locate all foundation piers with a minimum of effort.

Related Column: Deck Material List

Column 634