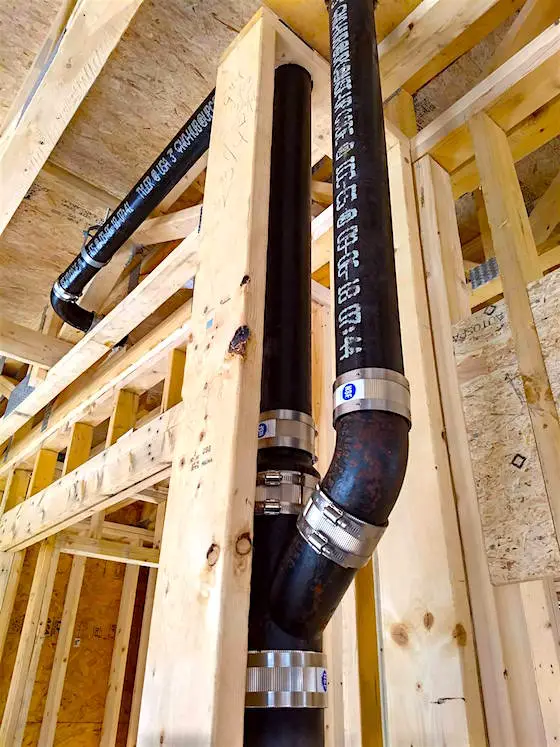
Cast Iron Plumbing Stack | Here's a 4-inch no-hub cast iron plumbing stack that branches off to two different full bathrooms. I installed this in my daughter's Bar Harbor home in 2019. I used cast iron because it's quiet. You can't hear any water rushing down the wall or across the ceiling when someone flushes a toilet. Copyright 2021 Tim Carter
DEAR TIM: I have two large projects I am tackling; a renovation of an existing home and a new home. The local laws permit me to do my own plumbing design and installation for both jobs, so I need some plumbing consulting help. I have done diy plumbing work, but never something on this scale.
I am up for the challenge. What advice do you offer in this situation? Dana Z., Texas City, TX
DEAR DANA: I have a boatload of plumbing consulting advice for you. The best part is if you need help, I can call you on the phone and consult with you about how to install plumbing or answer any plumbing questions.
Most recent customers to order a phone consult: Manu, Alexandria, VA | Patti, Ft. Worth, TX | Warren, Hamilton, OH | Sandra, Bend, OR | Brandon, Rapid City, SD | Alice, Plant City, FL | Loreli, Worcester, MA
CLICK or TAP HERE to order a plumbing phone consult.
Because I have 30-plus years of building and plumbing experience, I think I can give you both a high and low-altitude perspective on what you are about to face. I've been doing plumbing plans consulting for decades and each week I draw plumbing isometric drawings and riser diagrams for homeowners and builders.
To cut to the chase, I think you will get into serious trouble if you try to do both jobs at the same time. If you are able to stagger the jobs so your focus is just on one set of problems, then you very likely will succeed. But be prepared for some mental and physical triage as you will receive some bruises and bumps from going around all of the new learning curves.
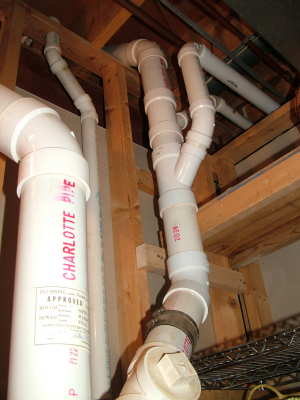
This convoluted assembly of pipes was installed by a licensed master plumber. You may be able to get professional results as a do-it-yourselfer, if you get help from a consulting plumber. PHOTO CREDIT: Tim Carter
Tim, are You a Master Plumber?
For what it is worth, I happen to be a licensed master plumber. This designation was obtained through lots of hard work and formal testing. But the truth be told, you do not always have to be a master plumber to successfully install drainage and supply lines in your projects that will not only pass code, but will also perform flawlessly for many years.
Why are Plumbers Licensed?
Plumbers are licensed because they are responsible for keeping millions of people healthy
To protect public health, good laws are in place in many cities and states. These laws typically cover the installation of plumbing systems where one person is hired by another to do the work. Good plumbing design is critical as serious and deadly diseases can be readily spread if either plumbing drainage or supply lines are improperly installed. This is why plumbing inspections are mandatory, and you must pass them with flying colors.
What Plumbers do Plumbing Consulting?
I offer plumbing consulting services and some other ones do too. CLICK or TAP HERE to get FREE BIDS from local plumbers who will consult with you.
There is a very good chance you will find a plumber who will do plumbing consulting for you. Times are much different than they were years ago when plumbers and other tradespeople jealously guarded their secrets and tips. But some plumbers have seen the light, and know they can sell the knowledge from their brains just as easily as they sell the sweat from their brows.
What Plumbing Tools are Best?
The best plumbing tools are the ones you'll use the most. Here's a partial list. Let's talk tools for starters. You may have shovels and some simple saws that will allow you to work with plastic poly-vinyl chloride (PVC) pipe, but my guess is you do not own a heavy-duty right-angle drill and special bits to bore large-diameter holes through lumber. Yes, they can be rented, but it may make better sense to buy one. Clean cuts on the PVC piping can be made with a standard power miter-box saw.
What Tools are Needed to Work with Copper Water Lines?
When you start to work with water supply lines, you need a different set of tools if you are working with copper tubing. Acetylene torches, numerous tubing cutters and other small tools are needed to install water lines. Suffice it to say that you may find yourself investing hundreds of dollars in new tools to do this work.
Do I Need to Know the Plumbing and Building Codes?
Not only are there plumbing codes to deal with, you must pay very close attention to the regular building code. Do not start boring large holes into structural framing lumber without making sure you are allowed to do so. Cutting joists, notching them or altering any framing lumber can have serious negative consequences. Pay attention to the fire-stopping aspect of the building code as well. You must be sure that all fire stops are maintained between floor levels.
Who Looks at My Plumbing Design?
The actual work to design and install the plumbing piping will need to be looked at by the person you hire to do your plumbing consulting. You need to make sure you understand the three-dimensional drawing of the plumbing system and how it relates to the actual finished piping. The sizes of the actual pipes are critical. The plumbing code covers much, if not all, of this, but the secrets and tips know by your plumbing consultant may help for a better job.
What are Plumbing Best Practices?
Here are some plumbing best practices you may learn as your plumbing consulting moves forward. Never install a hard 90-degree bend underground in a drainage line. The only place you can do this is at the base of a vertical plumbing stack. Even then, it might be better to install two 45-degree bends to create a 90-degree turn.
All horizontal pipes must slope, and I recommend 1/4 inch per foot of fall. This slope produces excellent drainage within the pipe. Provide numerous clean outs in case you do have to get into the system to remove a clog.
To provide great water flow in a normal house, make sure that the water lines feeding a group of fixtures is no less than 3/4 inch in diameter. For example, when you extend both cold and hot water to a bathroom, use 3/4 inch pipe. Once you are at the bathroom, then downsize the pipe to 1/2 inch for each fixture.
Consider installing a wonderful gravity hot-water recirculation loop so that you always have hot water at each fixture the moment you turn on a faucet.
Column 640