Roof Framing Basics

roof framing basics

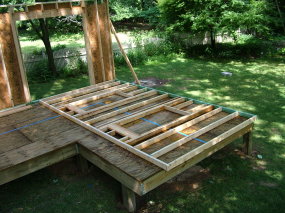
This shed roof has three basic roof-framing components: standard rafters, a hip on the other side and the valley rafter set you see front and center. The sturdy overhangs are also easy to build. PHOTO and FRAMING BY: Tim Carter

DEAR TIM: Many older homes I have been in have wide-open attics, and the roofs were built without modern trusses. Is it still possible to frame a roof the old-fashioned way? Is it hard? What special tools do you need to frame a roof the way old carpenters did it? What other tips can you offer? Jacob N., New Holland, PA

DEAR JACOB: Oh, you bet it is still possible to build roofs the same way carpenters have done for hundreds, or even thousands, of years. This practice is still alive and well; many carpenters who operate under the radar frame roofs this way each and every day. Trusses are wonderful engineering marvels for modern carpentry and production building. Just about any roof shape or design can be framed using trusses. But often it is just as fast and cost-effective to frame a smaller roof using regular lumber, and a few common tools.

The art of roof framing is indeed a craft. There are many nuances and tricks that can take years to master, but simplistic and basic roof framing can be learned in as little as 30 minutes. The trick to simple roof framing is to ensure the wall system that the roof rests upon is level, plumb and square. Square means that all corners are true 90-degree angles. It is possible to create a square layout for the roof framing on top of walls that are not square, but believe me, it is so much better if the rough carpenters take the time to frame the walls so they are square.

Years ago it was not as critical to have the roof perfectly square. Once the roof framing and rafters were in place, they were covered by individual 6-inch-wide or slightly larger pieces of lumber. It was easy to cut the lumber to fit out-of-square rafters. But today, carpenters use large 4-foot by 8-foot sheets of plywood or oriented-strand board to rapidly cover the roof rafters or trusses. If this framing is out of square, it can be a nightmare to fit these large pieces of lumber along the narrow edge of each rafter.

In reality, you need three very simple tools to cut regular roof rafters, hip and valley rafters and the small jack rafters that intersect hips and valleys: a saw, framing square and tape measure. The only two dimensions you need to know to make all of the necessary cuts are the actual pitch of the roof you desire and the overall width of the span that the roof will cover. Simple geometry takes over at this point.

If you look at a modern high-quality framing square, it has a large number of measurements and tables on the tool. These are magic geometric numbers that were calculated years ago and tell you exactly how long to cut certain rafters if you know the roof pitch and the overall width that the roof spans.

Roof pitch refers to the angle of the roof or the amount of its slope. It is commonly defined as the number of vertical inches a roof rises per foot of horizontal run. For example, a building plan may call for a 6 / 12 pitch roof. Pitch is defined as the "steepness" of a slope. You can use numbers to communicate this relationship. In this case what the architect is trying to convey is that he wants the slope of the roof to go up six inches for every 12 inches horizontal run.

Mathematicians look at pitch differently. They take the total rise of the roof and compare it to the total span of the roof and determine the actual ratio. For example, a roof that has a total rise above the exterior wall top plate of 6 feet and a total span of 30 feet would be a 1/5 pitch roof.

The overall width of the building is that measurement where the outside surfaces of two parallel exterior walls end. Carpenters often refer to this as the building line. If you go back in time to when you were sitting in your high-school geometry class, you should be able to quickly visualize this overall-width dimension is nothing more than the bottom line of a triangle. The two roof rafters that slope and eventually rest on the exterior walls represent the other two lines of the triangle.

The framing square used by carpenters is nothing more than a right triangle and when you adjust it on the side of a piece of lumber, it produces two accurate cut lines. A right triangle is one that has a 90-degree angle where two of the lines intersect.

Framing Square

This framing square creates the plumb-and-heel-cut lines. Right now it is set for a 6 / 12 pitch cut. The line on the right will be the plumb cut and the longer line on the left is the heel cut that rests on top of the wall. PHOTO CREDIT: Tim Carter

One of these lines is called the plumb cut. The plumb cut creates a line that is perfectly plumb, and is used where the roof rafter contacts the ridge board at the top of the roof. An additional plumb cut is made near the bottom of the rafter in the notch where the rafter passes over the exterior wall. Plumb cuts are also required where a rafter intersects a hip or valley rafter. The framing square also produces a second cut line called the heel cut. This cut line is made on the rafter where the rafter sits flat on top of the exterior wall.

The tables and numbers on a framing square are accurate, but modern construction calculators really are the tool to use to calculate the length of rafters. These very inexpensive tools do all of the mathematics in the blink of an eye. They also need a minimal amount of data entered to produce extremely accurate dimensions for any type of rafter you might cut.

The trick to becoming comfortable with roof framing is to frame a very small roof at first. For example, just try a simple roof that would sit on a box that measures 2 feet wide by 32 inches long. You will be shocked how simple it is to make perfect cuts so the rafters meet at the top, with no gap whatsoever.

Column 578

Wall Framing Basics

DEAR TIM: I am going to frame some exterior wood walls and don't have a clue where to start. As with anything, I am sure there are some pitfalls to avoid and labor-saving tips that will allow my walls to be perfect or nearly so. Can you give me a quick run down of what I need to know to ensure the job will go smoothly? Patrick G., Racine, WI

DEAR PATRICK: Your question brings back a vivid memory. Years ago I was building a room addition on a house and immediately next door the neighbor started to build his own room addition. He framed his exterior walls in the air and had all sorts of clamps and devices to hold the pieces of wood together as he tried to nail them. It was a comedy of errors and it took him five times longer to do it his way than if he had just mimicked what I was doing with my crew.

The first thing you need to know is that you should use Mother Nature's gravity to your advantage. Frame all of your walls on the ground or the floor surface and then tilt them up once they are finished. Some carpenters go so far as to completely apply the exterior finish siding and trim on the walls before they are tilted up. You need to be a highly-skilled craftsman to make this work, so don't try it for a few years.

The wall on the floor is square and ready for OSB sheathing. The bottom and top plate are exactly the same length. The king studs in the wall are also the same height. Doing this ensures the wall will be square when the diagonal measurements from corner to corner are the same. PHOTO BY: Tim Carter

The wall on the floor is square and ready for OSB sheathing. The bottom and top plate are exactly the same length. The king studs in the wall are also the same height. Doing this ensures the wall will be square when the diagonal measurements from corner to corner are the same. PHOTO BY: Tim Carter

The walls themselves and the floor plan shape they create must be square if you want the next story and / or the roof to go on with no problems. The building term square means that a rectangular or square shape of an object is made up of four 90 degree angles. If you remember your high school geometry, you may recall you can have at least two other objects that also have four sides to them; a rhombus and a trapezoid. You want to avoid these shapes at all costs.

The first thing to do is to create a layout on the ground where the walls will go. Make sure the layout is square. You can use an inexpensive construction calculator to do the math or you can make your own 90 degree angles with common, known math solutions. For example, you can use the tried and tested method of the 3, 4, 5 right-triangle solution. A triangle that has three sides where one is 3 feet long, another is 4 feet and the final leg is 5 feet long creates a right triangle. The intersection of the 3 foot and 4 foot leg create a perfect 90 degree angle.

Any multiples of these dimensions also work; 6, 8, 10 or 12, 16, and 20 are also combinations that yield a perfect 90 degree angle.

When you start to frame your walls, the height of all of the main studs must be exactly the same. Check them as mill-cut studs are by no means always perfect. Recently, I ordered 100 2x4 by 8 feet studs and quickly learned that some in the pile were exactly 8 feet long while others where 96 and 5/16ths long. That is a significant difference.

The top and bottom plates of the walls also need to be the exact same length. After you nail the studs to the plates, you have created a parallelogram that you must now nudge into a perfect square or rectangle with four 90 degree angles at each corner.

To square up the wall once all parts are nailed together, make sure the bottom plate is in a straight line. You can do this by snapping a chalk line on the floor and tapping the bottom plate so that its edge is along this line for its entire length. If the floor is wood, tack the bottom plate to the floor to ensure it stays put along the chalk line.

The last step is to check the diagonal measurements across the wall. Use a helper with this task. If you both attach a tape measure to a corner and then pull across the wall to the opposite diagonal corner, your tapes will create a giant X on the wall. Measure accurately from corner to corner.

At first, each of you will likely have different measurements. Whoever has the longer of the two measurements should take a hammer and tap the end of the top plate towards the other person. This will shorten the long diagonal measurement and make the other measurement start to grow. When both measurements are identical, the wall is perfectly square.

Once the wall is perfectly square, it is time to apply the sheathing. This material comes in 4 x 8 foot sheets and is usually one-half inch thick. You want to apply either OSB, plywood or some other structural material at each corner of the wall. Once this material is nailed in place to the wall studs, the wall will remain square and will not rack under wind or seismic loads. This bracing is a critical framing requirement.

It is far easier to apply this sheathing while the wall is flat on the ground. Resist the temptation to stand the wall up without the sheathing. The wall will be heavier with the sheathing in place, but you can get some help from friends or neighbors to help you tilt the walls into position.

Column 577

Vapor Barriers in Wine Rooms

DEAR TIM: I read your comments in AsktheBuilder about it being absolutely necessary to install a vapor barrier on the warm side of the walls and ceiling of a wine room. I am building a new home with a wine room and there is some disagreement about the need for a vapor barrier. We are using green board walls and mildew resistant paint on the inside. The temperature and humidity control will be a Breezaire.

Please explain why the vapor barrier is so important. The walls of the wine room are inside walls, and not exposed to the exterior of the house. Also, I live in Fresno California, in case climate is an issue. Thanks for your help. Terry L.

DEAR TERRY: There are several dynamics happening in wine rooms. First, the temperature of the space is supposed to be 55-58F. This cool temperature can create condensation on the backsides of the wine room walls *if* they come into contact with humid air whose dew point is at or above that temperature. Here where I live there are many summer days where the dew point is above 57F. So the challenge is to isolate the cool temperature from the humid air that can find its way to that surface. A vapor retarder on the warm side of that wall system will work just as it does inside my own home's exterior walls.

Then you have the issue of the elevated humidity. The wine rooms love relative humidity levels of 55 - 75% relative humidity. That is frighteningly high humidity. If that water vapor escapes from the wine room somehow, it can condense on cooler surfaces in a heartbeat. There are climates where that is possible. Granted, as that air hits warmer air, the water vapor is accepted by the warm air which can hold the water vapor in the vapor state. The trouble is, you want to be sure the water vapor does not condense. So why not take that out of the equation? Why not block the movement of the humid air so it can't get out of the wine room?

Fresno as you well know is in the Central Valley of California. If memory serves me right, your winters are very mild and summers are hot and dry. This being the case, your humid air will constantly be trying to leave the wine cooler to get to the warm air. This would make your humidifier work that much harder to keep the humidity levels high in the cooler. If this hypothesis is correct, it would be to your benefit to trap the humidity in the wine cooler just the same as you are trying to insulate the walls to make it easier to keep the wine room temperature constant.


Author's Notes:

I received this email from Michael P, Cincinnati, OH.  Here's how he helped with his crawl space problem.

"I live in Turpin Hills and wanted to thank you for your advice for sealing a crawl space. This is our third winter in our home and the basement is always much colder than previous basements from other homes. I did as you suggested and put heavy duty, thick plastic on the gravel and put doors on the opening of the crawl space. It's been a few weeks and I can see water droplets forming under the plastic. I may put a second layer of plastic for good measure. The basement is warmer and so is the room above the crawl space. I don't smell the mustiness either. Thanks again for the tip."

Water Heater Anode Rod

Dear Tim: In your response to the writer who asked you about tankless water heaters you mentioned adding a secondary accessory anode rod to the traditional storage tank water heater.How do you do that? Would an installer of the tank know how to do that? And, how do you find the correct one (anode rod)?

After reading your article and many other home forums, I think I've changed my mind about getting a tankless water heater. I've been trying to search for recommendations on the traditional tanks (brands) but have not found sufficient information. Are most of them pretty much the same? Kenmore vs. Whirlpool, etc. ? Thanks, Patricia M., Pacifica, CA.

Dear Patricia: The secondary anode rod is placed in the cold water inlet portion of the heater. When shipped from the factory, the water heater has a plastic dip tube that forces the cold water to the bottom of the tank. This secondary anode rod is shaped just like the dip tube and performs the same function of sending cold water to the bottom of the heater, but it also adds another layer of electric protection to the water heater.

Any plumber worth his salt knows about these extra anode rods. If the person you are working with does not know, that tells you he is a rookie, does not pay attention to updates, and/or does not stay current with changes in the industry.

The water heater manufacturer offers these rods as an accessory. Just buy a heater that offers the accessory rod. Go to a real plumbing supply house to find one, not a home center. The heaters sold at plumbing supply houses are usually very good and for the most part let price be your guide. Better water heaters cost more money as they have better parts.

AsktheBuilder mp3 Radio Show Nov 12 2005

Each title below is a direct link to a downloadable mp3 file. Just click the title if you want to listen. Right click if you want to download into your computer to save and play at a later date.

The Copyright to all radio segments is owned by Tim Carter. I would love to know what you think of these radio segments. Do you like them? Do they help you? Have they saved you money and/or time? Let me know by sending me an email: [email protected]


Tim Elected to Amberley Village Council

Building Wood Shelves

No-Solder Epoxy for Copper Pumbing Pipes

Painting a New Wood Shed

Mystery Condensation Problem

Kim Wagner From The Mansion Reality Show

Interview: Building Your Own Home for Dummies

AsktheBuilder mp3 Radio Show Nov 5 2005

Each title below is a direct link to a downloadable mp3 file. Just click the title if you want to listen. Right click if you want to download into your computer to save and play at a later date.

The Copyright to all radio segments is owned by Tim Carter. I would love to know what you think of these radio segments.Do you like them? Do they help you? Have they saved you money and/or time?Let me know by sending me an email: [email protected]


Google Video News

Basement Waterproofing Observations

Making Two Ceilings the Same Height

Large Blisters on Painted Exterior Cedar Shakes

Five Women and Hair in Bath Drain

Curved Gutters and Asbestos in Zonolite Insulation

Newer Recessed Lights Leaking Cold Air in A-Frame House

AsktheBuilder mp3 Radio Show Oct 29 2005

Each title below is a direct link to a downloadable mp3 file. Just click the title if you want to listen. Right click if you want to download into your computer to save and play at a later date.

The Copyright to all radio segments is owned by Tim Carter. I would love to know what you think of these radio segments. Do you like them? Do they help you? Have they saved you money and/or time? Let me know by sending me an email: [email protected]


Tim Visits Google Headquarters and Google Earth

How Many Turbine Vents Does a House Need?

Concrete Overlay on a Garage Roof

Mechanical Plumbing Vent in an Old House

Water Leak in a Plumbing Vent Pipe

Installing a Used Gas Water Heater

Substituting Sand for Gravel in a French Drain

Metal Pegboard Source

Worn Shingles

Screw Extractors

DEAR TIM: Please advise on how to get the stripped screws out of my plywood shutters. Wilma, the hurricane, has been gone a couple of weeks and I still have boards on my windows! I have an electric drill and most of the screws came out or had enough of the metal head showing to use gripper/vise pliers. The rest of the screws are keeping the boards on the windows and I'm getting stir crazy....Woman with drill and no knowledge, Sheila M...thank you for your help!

DEAR SHEILA: All you need is a screw extractor. These little bits fit into a standard drill. The bit has a hardened steel head and the cutting edges actually bite into the head of the screw as it spins counterclockwise. Once it grabs, the screw starts to magically rotate out of the wood.

Two styles of screw extractors. They dig into the damaged screw head and back the screw out. PHOTO CREDIT: Roger Henthorn

Two styles of screw extractors. They dig into the damaged screw head and back the screw out. PHOTO CREDIT: Roger Henthorn

The screw extractors must be used with a power drill that can go in reverse or spin counter-clockwise. The cutting surfaces of the extractor are made to bite into the head of the screw when they rotate in this direction.

The extractors come as a set and can be found at large retail stores that sell clothes, appliances and have a hardware and paint department. Can you think which store that is? It begins and ends with an "S".

Bouncy and Springy Floors

Dear Tim: I live in a new town house where Trusjoist beams were used in my unheated basement. They were used within code for the span ... 16-17 ft. However in my bedroom the handles on my dresser rattle when I walk across a carpeted floor. I am a normal weight 130 lbs., and am going crazy with this problem.

Truthfully, my builder has made some half baked efforts to correct the problem, even Trusjoist people looked at it. Of course, they're not going to say it's been put up right, but also wrong for my house. Do you have a suggestion? Alice S., Delmar, NY

Dear Alice: There are tens of thousands of people out there like you who suffer from bouncy and springy floors. As crazy as this sounds, the floor may indeed be built completely to code and to the manufacturer's specifications. But that doesn't mean you need to suffer.

Floor joists, whether they be solid wood, engineered lumber like yours or even steel, can deflect or bend under a given amount of weight and a given amount of span. If you take a 2x10 solid lumber floor joist that is spanning 16 feet and place a 94-pound sack of cement in mid span, the floor joist will bend downwards a given distance.

But if you remove the sack of cement and shorten the span down to 8 feet and then place the bag of cement at mid span, the floor joist might not deflect a bit or such a small amount as to be hard to measure.

ATB_Art_NewConstruction_EngineeredWood_BTF_UnderSidebar_120x600

This deflection is allowed and is not unsafe if it falls within limits. The building code and most engineering books allow a 1 in 360 deflection. This means that the floor joist is permitted to deflect 1 unit of measure for every 360 units of the same measure of the span. But keep in mind, this is a minimum standard!

The sad thing is the floor could have been designed to meet a stronger standard - the 1 in 480 deflection standard. This simply means the floor joists needed to be the next size up or even taller for the given span you have. You can sometimes achieve the tougher standard by decreasing the spacing between floor joists. This means instead of placing them 16 inches on center you put them 12 inches on center.

The company that made your floor joists have published booklets for years showing both standards to builders. Your builder chose to use the minimum standard.

The floor can be fixed by placing a new beam at mid span down in the basement. This will make the floor as solid as if it were concrete poured over solid rock.

Removing Foundation Tar

Dear Tim: I am putting in a new patio at my home and had to dig out quite a bit of dirt from around my foundation. Now I have the tar that they used to seal my foundation exposed. What is the easiest and best way to remove the tar so I can paint the foundation that is now exposed? I was told by someone in the store that I would have to peel it off but, that would take forever since it is a pretty large area that needs to be done. Is there a chemical that I can use to remove it? Kim P.

Dear Kim: That dampproofing tar is probably old-fashioned asphalt cement. If so, the only liquids I know that will get it off are volatile and dangerous solvents like paint thinner, gasoline, kerosene, etc. These are all distilled hydrocarbons that can soften the tar. I would not use them as the fire hazard is so extreme.

The first thing I would try is a sandblaster. If you are lucky, a tool rental shop may have a small sandblasting kit that works off of an air compressor used by carpenters. Test it for effectiveness. If it works, then move up to the industrial sandblaster that uses the giant compressor contractors use to power jack hammers.

If this fails, then contact the different foundation dampproofing companies in your area. Tell them you have to remove asphalt cement from a foundation and see if they have a suggestion. After all, they apply the asphalt cement all day and perhaps they make mistakes and spray it where it doesn't belong.