Can you imagine the mess I once came upon when I entered a basement where the dryer had been venting inside for about eight years? There was lint everywhere! It was a huge mess, not to mention an incredible fire hazard. Cotton fibers were everywhere.
The vent had come unhooked from the bottom of the dryer and the homeowner didn't have a clue. They thought the stuff was cobwebs. It was believable as the accumulation was slow and they had grown accustomed to its presence. It freaked me out.
Basement Venting - Easy!
Getting dryer exhaust from a basement is a piece of cake. It usually involves two 90 degree bends and sometimes three. Often there is only 10 to 15 feet of pipe. Many people go the easy route and choose the plastic flexible variety. This tubing does not comply with current code standards. I have always been a smooth metal pipe man myself. It is easy to work with and fits together in a flash. Cutting it with tin snips is also a cinch.
I have found that it is often best to vent fans and dryers through the roof. I urge you to watch this video of mine to see how easy it is to install the correct vent-cap flashing on a roof. Have no fear - if done right you will have no leaks.
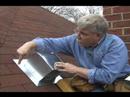
The Vent Cap
Many people are familiar with the wall vent terminal for dryer vents. The inexpensive ones only have an opening that is about 2.5 or 3 inches big at its widest point. These are loser dryer vents. Try to locate those that have a 4 inch opening or use the ones that have the mini-louver doors. These types offer the least air flow resistance.
The wall dryer vents can't be used on a roof location. You must get a roof vent cap that is designed to shed rain water. These vent caps also have great built-in flashings. The best part is that they are inexpensive.
Venting Through a Roof
I have installed quite a few dryers in second and third story rooms. The people always wanted me to vent the dryers through the roof once I gave them the option. It is a little more work but it is not terribly difficult. It is no more work than installing a plumbing vent pipe. The key is to locate it in such a way as it is least visible from the ground. You don't want lint fibers up on the roof to greet your visitors, do you?
Clamps and Tape, Not Screws
When installing pipe between the dryer and the vent cap, use the special large clamps that secure the pipe to the fittings. If you screw metal pipe together, the screws can catch lint over a period of time and actually cause problems.
The seam between metal pipe and fittings should be taped with the foil faced duct tape. This is REAL duct tape, not the imitation stuff you think is duct tape!
You buy foil faced duct tape at HVAC wholesale distributors or places where metal ductwork is sold. It really sticks to metal pipe and the tape is often reinforced. It is the most wonderful tape I have ever used for securing metal pipe. It makes off-the-shelf imitation duct tape look sick.
Insulate the Pipe
If you decide to vent your dryer through the roof, you absolutely must insulate the section of metal pipe that is in a hidden spot where cold temperatures can surround it. Failure to do this will lead to massive condensation and leak problems. If you live in a warm climate, you don't have to insulate the pipe at all.
Be sure to wrap the pipe with at least three inches of fiberglass insulation from where it penetrates the ceiling below all the way up to the underside of the roof. Use the wonderful foil duct tape to secure the insulation and tape the seams completely.
Hanging Pipe
The best way to hang horizontal runs of dryer vent pipe is to use the plastic J hooks designed for four inch smooth, rigid metal pipe. These heavy duty hooks have prepunched holes that allow you to quickly attach them to wood floor joists or any surface that will accept a nail or screw. They are simply the best!
Different Pipes
I have had to use four inch rigid metal pipe on occasion to vent dryers through roofs. I chose this pipe because I could get it in long lengths without a seam. I was able to insert it through a roof hole all the way down to the second floor dryer location.
This type of pipe has a very smooth interior surface that offers minimal resistance to air flow. It is also corrosion resistant.
Current code calls for a smooth, rigid metal dryer duct of at least 4 inches and no longer than 25 feet. Be sure to check your local codes for any additional requirements or restrictions.
Column B228