Levels – Quality and Care

Carpenter's levels have come a long way since the 14th century B.C. Back then the Egyptians had figured out that a weighted string represented a plumb line. Furthermore, they realized that something level was opposed to this plumb line by 90 degrees. Using a simple A frame device, they created highly accurate levels. In fact this design persisted until the middle ages.

Accuracy

Up until a few years ago, I didn't realize that there was such a wide variance in the accuracy of carpenter's levels. Many of my first levels were very inaccurate. The space between the edges of the bubbles and the lines on the vial were huge. You always were guessing if the bubble was centered. I even had a level where the bubble was actually bigger than the space between the two lines.

The accuracy issue, I came to find out, lies in the vials themselves. Not all vials are made the same. The most important requirement of a level is the sensitivity of the vial itself. Federal specifications call for a 45 minute minimum vial sensitivity. The test for vial sensitivity is easy. Put a carpenter's level on a table. Adjust the table or surface till the level reads "level". If you swing one end of the level around like the hands on a clock and the bubble moves, the vial may have poor sensitivity.

Mounting the Vial

The vials are always installed in a holder which is then set into the level. The best levels have their vials either plastered in place or machined into the level body so that the vial holder can't move. Some inexpensive levels have the holder siliconed into place. The silicone can distort if the level changes shape or is stressed.

Marking the Vials

Most level vials are mass produced. The curved glass is not always the same. The amount of fluid in the vial may be off by half a drop or so. This means that the bubble in the vial is not always the same size. We discussed the problems this causes earlier.

It would stand to reason that the best levels would be ones where the vial marking lines actually line up with the edges of the bubble. It is a time consuming process, but the results are well worth it. One manufacturer, Macklanburg-Duncan, does, in fact, go to these lengths to produce a precision tool.

Acrylic Vials

Some levels you may look at have acrylic vials. Starting with a solid block of plastic, the vial manufacturer hollows out the chamber with a precision grinding tool. The hollowed out area is actually shaped like a barrel. The advantage to this is that the bubble will always try to seek the highest part of the vial. Thus, if the grinding was done correctly, the level should read accurately no matter which edge you use. However, once again the grinding process may not be carefully controlled. Vial sensitivity is the key. If the number is available, ask for it. The lower the number falls below 45 minutes the more sensitive it is.

At least one manufacturer, Stabila, offers a lifetime guarantee on their acrylic vials. They claim that the level will maintain an accuracy of 1/32nd of an inch over 6 feet for the life of the level.

Care of Levels

Have you ever seen a contractor's pickup truck with a gun rack in the rear window? Often you may see levels hanging in these racks. What a mistake! Wooden carpenter levels almost always have a predrilled hole at one or both ends. You should hang the level from this hole when not in use. This eliminates stress on the level. Levels in direct sunlight in a closed up truck cab are like being in a sauna!

If you use a level in masonry work, periodically during the day use a damp rag to wipe away mortar and cement particles. Dry the level immediately with a dry rag. Absolutely NEVER immerse the level in a bucket or trough of water to clean it!

Periodically coat the wooden level with a thin film of tung oil for protection. Don't saturate it with oil, as this may also cause it to warp.

Levels are an important tool. Buy a good one, take care of it, and your jobs should be plumb, level, and true. If the Egyptians could build using their primitive, yet effective, tool there is no reason we can't do the same.

Column B126

Wooden and Electronic Levels – Manufacturers

The following companies make either wooden, aluminum, and/or electronic levels. As for the most accurate wooden carpenter's level, my research indicated that only one company in America hand marks the vials so that the edges of the bubble touch the lines exactly. This company is Macklanburg-Duncan. The brand name of their wooden level is American. The glass vials in these levels are protected by glass lenses. I have owned these levels for years. Heck, I didn't even know it when I bought them, that they were so accurate! Remember, when you look at a level, check to see if there is any space (liquid) between the markings on the vial and the bubble. The more space, the greater degree of inaccuracy.

Electronic levels are also becoming popular. Macklanburg Duncan also has a level called the SmartTool. It tells you pitch, degrees, etc. In addition, it has a handy bubble level for those people who are driven crazy by trying to get the object perfectly level or plumb! I suggest you call all of the manufacturers and get information. See which level works best for you.

  • Alltrade
  • Bon Tool Company
  • David White
  • Empire Level Co.
  • Johnson Level & Tool
  • Klein Tools
  • Macklanburg Duncan
  • Marshalltown Co.
  • Stabila
  • Stanley Tools
  • LS Starrett
  • Zircon

Certain companies, like LS Starrett, make a variety of levels with different degrees of accuracy. That is why I suggest you research all the companies to see what they have. Also, some companies offer unique levels such as the split laser carpenter level by the David White Company. If you just invest 20 minutes checking out these companies online, you will not be disappointed with the information you will receive!

Column B126

Make a Simple A – Frame Level

Making a triangular A Frame Level

To make a really first class A frame level, it would help if you had some woodworking talents and equipment. The joints should interlock to make all the pieces of wood be in the same plane. A simple half lap joint at each intersection will work. This means that where each piece overlaps, one half the thickness of each piece of lumber has been removed. If you craft tight joints, the A frame will not move. Take your time and you grandkids will be amazed at your talent. They will tell stories to their kids how you used the device to help set stone blocks on the Great Pyramids!

Looking for a simplistic but highly accurate level? Mother Nature is right all the time. Use her force of gravity and a simple A-frame level to tell you when something is level. The Egyptians used these to build many of their structures. This simple level will give you an accurate, level plane every time as long as you calibrate it accurately from the start and you construct the A frame so it is rigid. If the legs to the frame are able to move, the location of the plumb bob will change!

You start by making the frame. Select a fine grained wood, mahogany if at all possible. If you can build an equilateral (one where all sides are equal length) triangle that's great. The angles are all the same - 60 degrees. Suspend a plumb bob from the top screw. Make a groove in between the pieces of wood so the string is not pinched. The string must not be allowed to get caught in the joint (inaccurate future readings!). Now, set the bottom rail on a perfectly level surface. You can create a level line using a water level setup in some clear plastic tubing. With the bottom rail on the level line, mark the spot on the bottom rail just below the plumb bob tip. Using a square, mark a line across the bottom rail. Take a fine coping saw and make a shallow saw kerf. This is your level reference point. From now on, whenever the A frame is on an object and the plumb bob is above the kerf, BINGO! the surface is level!

Column B126

Professional vs. DIY Power Tools

Professional vs. DIY Power Tools

The odor of a drill burning up is unmistakable. Have you ever been in the near proximity of a lightning strike? The smell of the ozone or the air burning is exactly the same as that of a drill motor singing its swan song. I know because I have burned up drills and been too close to a lightening strike.

Several years ago, I helped a friend build his deck. He insisted upon using his power drill to drill 5/8 inch holes through a treated 2x8. We used a relatively sharp spade bit for the job. His drill didn't have the guts to cut through the wood. The moment you would push against the wood, the drill speed would drop. Within a few minutes I smelled the telltale aroma of an overheated motor armature. I convinced my friend to allow me to get my drill out. Within minutes each and every hole was drilled.

The shocking thing to me was the price my friend had paid for his drill. He indicated that he had spent nearly $50 for his make-believe drill. I, on the other hand, had spent $89 for mine just a few years before. Yes, $40 is a significant amount of money, however, my drill has withstood vast amounts of abuse. It has drilled for hours without fatigue. My friend was also amazed. He thought that my drill had cost in excess of $200. You can bet that he will buy professional tools from now on. Especially when he learned that they do not cost 5 times the amount of the DIY tools.

The Difference

The bottom line is simple. Professional tools are built with better components. The motors, gears, transmissions, plastic housings, even the cords are better in a professional power tool.

I realize there is a market for DIY tools. There will always be a segment in the marketplace for those people who want the least expensive product. On rare occasions I buy this way. If I want a disposable object then I will buy cheap. The big difference with me, and I hope you, is that I don't feel that power tools are disposable! I want a power tool that will deliver power, precision, dependability, etc. This is exactly what you as a homeowner NEED if you are trying to frantically complete a one week project in a weekend!

Where Are They?

Professional quality power tools can be found in your town or city. Virtually every major manufacturer has a distributor in major marketplaces. If not, you can often see these tools displayed at the "big box" retailers. Beware! The "big box" stores do not always stock the full line of pro tools! To see what each manufacturer makes, you must check their web site or get one of their catalogs.

I urge you to go to a "big box" store and compare a professional power tool to a DIY brand. The feel, weight, balance, etc. will be different. Ask for a demonstration. The professional tools will operate more smoothly. There will be much less chatter or vibration.

You can also buy professional power tools through the mail. I have purchased many in this fashion. The service is excellent and the selection can't be beat. Most mail-order stores stock every tool made by the major manufacturers. Pricing is competitive as well. You will get great pricing when buying mail order.

Care and Maintenance

Professional tools can withstand immense amounts of abuse. I have dropped my circular saw and drill from heights in excess of 10 feet. The damage assessment yielded a few minor scratches. I doubt a DIY tool would have survived.

The great tools require no more care or maintenance than you would give to your toy DIY tools. They are not bothered by ordinary saw dust, dirt or masonry dust. You care for professional drills by simply keeping them dry and clean. If you perform a dusty task, try to use some compressed air to blow out the motor cooling ports on the body casing.

Investment Analysis

Are you wondering if it is worth the extra $50 to $75 to pay for a professional tool? That's a good question. To help you study the subject ask these additional questions. What will you spend if you buy a new DIY saw or drill every 5 years? What will it cost you in lost time if your toy drill or saw breaks down in the middle of a project? Will you have to drive to get another tool? Will your DIY tool deliver the precision cut or hole you require? Think before you buy....

Column B164

Tool Use Tips – Circular Saws and Power Drills

Tips on Using Circular Saws and Power Drills

On many occasions, I have seen homeowners use circular saws. In almost every instance, the homeowners were placing themselves in danger. Here are some common problems and ways to avoid injuries:

Cut on the "right" side - Many homeowners cut on the wrong side of the cut line. Here is what I mean. Look at the bottom of most circular saws. They have a wide platen or base plate. The saw blade is not centered in this plate. The widest part of the plate should always rest on the piece of wood which will NOT fall to the ground when the cut is complete. Failure to do this will cause the blade to bind as the cut gets to the end.

Click here to watch a video on circular saw tips.


Dropping the blade "into" wood - This is absolutely one of the most dangerous things you can do. Let's say you want to cut a rectangle or square out of the center of a piece of plywood. You can do it with a circular saw, but it is crazy. You have to retract the ..... Forget it, I'm not going to tell you how to do it. Use a drill and a jigsaw or a reciprocating saw.

Blades - sharp blades produce the best cuts. There are different blades for different purposes. Fine cuts require fine tooth blades. Rough cutting 2x4's will ruin a fine tooth blade. Carbide tipped blades are the only way to go!

Minimizing Chipping - How do you minimize chips when cutting down a door or cutting across the grain of a piece of wood? Well, I draw the cut line with a fine pencil. Then I use a metal straightedge and a sharp razor knife to score the pencil line. I may cut into the wood two or three times with the razor knife. I then make sure the saw blade stays on the 'outfall' (waste piece of wood) side of the line! Cut slowly and continually blow the dust out of the way. If you take your time, you will not produce chips. A belt sander can be used to dress up the edge.

Cutting Circles - Do you make a saw whine and scream when using it? If you are trying to cut a straight line, this noise means you are straying from the line. The blade rubs and screams as it cuts a "circle". To cut the straightest lines, make sure the blade depth is always set for the deepest cut. The blade acts as its own straight-edge in this position. It will tell you by its sound if you are cutting straight.

Did you know you can cut intentional circles with a circular saw? Absolutely! The trick is to set the saw blade depth for just 1/16th inch deeper than the material you are cutting. You will be shocked at how tight a radius you can cut! Try this on a 1/2 inch sheet of plywood if you don't believe me.

Power Drills

Drills are much easier to use than saws. However, you can ruin drill bits and burn up drills if you don't follow some of these tips.

Bits - The smaller the bit diameter, the greater chance you have of snapping it in two. Watch yourself when drilling with any bit smaller than 1/8th inch.

Countersinking - Want to countersink a screw head? They make special, nifty bits just for this purpose. Don't try to do it with two regular drill bits, one larger than the other. When you drill the big hole, it will almost always be too deep or too shallow.

Deep Holes - When drilling a deep hole you must withdraw the bit every inch of depth or so. Why? If you don't, the bit can become jammed by wood shavings still in the hole. This can be a real problem when drilling into masonry with a roto-hammer drill or a regular masonry bit. If too much stress builds up, you can snap the bit and/or put undo stress on the drill.

Drilling Metal - Drilling metal requires sharp drill bits. It also requires much slower speeds. If you are drilling through steel greater than 1/8th inch, I suggest that you squirt oil onto the tip of the drill bit. This will lubricate the cutting tip of the bit and help to keep it cool. If you are drilling a large diameter hole, you may have to drill successively larger holes. You are dreaming if you think you can use a 5/8 inch bit from the start!

Column B164

Ladder Safety Guidelines

There is nothing quite like the inexperience and enthusiasm of youth. I was contacted by an old college buddy named Phil. Phil and I along with my friend John used to paint houses in the summer months as we worked our way through college. My friend Phil mentioned in an email message to me about the day we placed a 40 foot fully extended ladder on top of a 2x10 board that spanned from the ridge of a roof to some concrete block on the sloped part of the roof. I was the only one in the group that was foolish enough to climb to the very top of the ladder - and I mean the top rung. That was insanity. If the ladder company owners, or my Mom, would have seen us, they would have gone crazy!

Dangerous Devices

Ladders are probably in the top three list of most dangerous tools. I would place them right up there with circular saws and razor knives. I imagine that thousands of people each day across the world get injured on a ladder. The number could be higher.

It is my guess that most of the injuries are avoidable. People often are not trained in ladder safety and use. If you are a professional or volunteer fireman, you know what I mean. You can spend hours and hours on training to properly set, climb and descend ladders!

Ladder Abuse

These simple tools - ladders - are often abused. People will leave them out in the weather, drop them, use them as beams, ramps, or scaffold planks. All of these can be detrimental to the ladder's health and that of any person who subsequently uses the ladder.

Another form of abuse is overloading. Even I have been guilty of this. I don't recall ladders being marked for weight capacity when I first got into the construction business. Now many ladders are color coded to help you identify the weight class or "duty" rating of the ladder. Commonly step and extension ladders are divided into four classes: Household, Commercial, Industrial, and Professional.

One manufacturer, Werner Ladder Company, clearly colors their fiberglass ladders for each of these classes. Their Household ladders are an orange-red color. These ladders are constructed to accept loads of no more than 200 lbs. Mind you that includes you, your clothes and the thing(s) you are carrying up the ladder! I can tell you right now that I can't safely get on that ladder in my birthday suit!

The Commercial ladders are a bright yellow. They are rated to carry 225 lbs. The Industrial ladders are a Caribbean Sea blue color. These ladders have evidently been tested for loads up to 250 lbs. The Professional series is black in color and will support 300 lbs. The duty ratings are clearly marked on all ladders no matter if they are constructed of wood, aluminum or fiberglass. Pay attention to this important number, especially if you intend to use an extension ladder in its most extended fashion. When fully extended, an extension ladder is stretched to the limit with regards to strength.

Related Articles: Extension Ladder Sizing, Ladder Safety Tips, Ladder Manufacturers

Column B197

Ladders – Manufacturers

Extension and Step Ladder Manufacturers

There is not an immense amount of competition in ladder manufacturing. The primary reason for this, I believe, is the huge cost of litigating injury claims. Ladder manufacturers are constantly fighting court cases where people sue because they fall off a ladder or a ladder breaks. As you might imagine this does two things. Financially weak companies go out of business. Those left, have to raise prices on the ladder products to cover the out of court settlements and high product liability insurance. There are different types of ladder companies. Some just make step stools. Others make unique multi purpose ladders. Finally, there are the powerhouse companies that make just about any ladder product be it extension, multi-purpose, or step ladder products. Two of the major manufacturers of extension and step ladders are Louisville Ladder Company and Werner Ladder Company. Both have a rich heritage and a fine line of products. I happen to own ladders made by both companies.

  • Bon Tool Company

  • Davidson
  • Falcon Manufacturing
  • Keller Ladders
  • Krause Inc.
  • Louisville Ladder Co.
  • Werner Ladder Company
  • Wing Enterprises, Inc.

Related Articles: Ladder Safety Guidelines, Extension Ladder Sizing, Ladder Safety Tips

Column B197

Extension Ladder Sizing

Extension Ladder Sizing

If you are getting ready to buy an extension ladder, you want the right height ladder to do the job. If you have a multiple story house - say one that is 2 and one half stories, a single extension ladder will not do all jobs. If you buy a ladder to reach to highest point on your house, it will be too long for the short jobs. Buy your short ladder first and see if you can't rent or borrow a tall ladder for the once-in-a-great-while tall jobs.

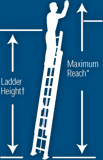
Extension ladders are usually sold in even foot increments, such as a 16, 20 , 24, etc. A 16 foot ladder consists of two 8 foot sections that are mated together. Because an extension ladder needs to overlap, its maximum length when extended is less than the length you thought you bought! The following table should help you see what I mean.

Extension Ladder Sizing Tables

Extension ladders should be 7 to 10 feet longer than the highest support or contact point, which may be the wall or roof line. This will allow enough length for proper setup, overlap of ladder sections, height restrictions of the highest standing level, and where appropriate, the extension of the ladder above the roof line. The highest standing level is four rungs down from the top.

The highest permitted standing level on a stepladder is two steps down from the top. A person standing higher may lose their balance and fall. A person’s maximum safe reaching height is approximately 4' higher than the height of the ladder. For example, a typical person can safely reach an 8' ceiling on a 4' ladder.


Ladder
Height
Maximum
Reach*
Highest Point the
Ladder will touch ++
16' 15' 9' max.
20' 19' 9' to 13'
24' 23' 13' to 17'
28' 27' 17' to 21'
32' 31' 21' to 25'
36' 34' 25' to 28'
40' 37' 28' to 31'

* Assumes a 5'6" person with a vertical 12" reach.
++ Support points for extension ladders reflect section overlap, ladder angle, or 3' extension above roof line.

Sizing Guide table and graphic courtesy of Werner Ladder Company

Related Articles: Ladder Safety Guidelines, Ladder Safety Tips, Ladder Manufacturers

Column B197

Ladder Safety Tips

Ladder Safety Tips

The best thing to do is always inspect your ladder before using it. Check for loose or missing bolts. Look for cracks in rungs or the rails.

New ladders come with instruction labels. I know this sounds crazy, but read them. You might learn something!

Lubricate moving parts with light weight oil.

Store ladders inside when possible. This keeps them in great shape. UV light can harm fiberglass and wood over time!

Check the setup of your ladder before ascending. Make sure all locking mechanisms are indeed locked.

Always check for overhead electrical wires before unloading, carrying, or erecting ladders. This is especially critical at night!

Never place bricks, wood, rocks or any other movable material under ladder legs. Dig out the ground to level ladders or use a leveling leg.

There should always be at least 12 inches of wall on either side of the top of the ladder.

Don't lean out beyond a ladder to reach work. You can change the center of gravity and cause the ladder (and you!) to fall.

Don't climb a closed step ladder. The bottom of the legs are not designed for this purpose. It can and will slide out from the wall.

Set extension ladders at the right angle - 75.5 degrees or a 1/4 ratio. This means set the base of the ladder out from the contact point 1 foot for every 4 feet from the ground to the contact point.

If a ladder is too heavy, get help!

Climb all ladders facing them.

Don't work from ladders if you have a bad head cold. Your balance can be affected by head colds.

Avoid carrying heavy objects up ladders. If can affect your balance and you can overload the ladder.

Don't use ladders as a horizontal beam or scaffold. That is not what they are designed for.

Don't climb the back of a step ladder. Those are not rungs!

Never stand above the 2nd step from the top of a step ladder or the 4th rung from the top of an extension ladder.

Wear shoes with non slip soles. Watch your footing when wet!

Related Articles: Ladder Safety Guidelines, Extension Ladder Sizing, Ladder Manufacturers

Column B197

Garden Tools and Shovels

When I walked into the Garden pavilion area of the National Hardware Show in the summer of 1998, I could not believe the enormous variety of different garden tools that are out there for you. You would need a very large truck to transport a single sample of each shovel, rake, spade, fork, hoe, etc. that I saw. Some were marginal quality, but most of the garden and digging tools I saw were first class.

You Rarely See Them

Retailers, hardware stores, even large home centers only dedicate so much square footage of floor area to certain items. They have to do this to make money. We - the consumers - suffer as a result. I would venture to say that if you go to your local garden tool retailer, you will see MAYBE 1 percent of the shovels, spades, tools , etc. that are available. To prove this point, I just opened the Ames Lawn and Garden Tool catalog. If I did my math correctly, they have nearly 700 products alone. Add these to the thousands of other shovels, spades, etc. out there and you could fill a large store with just shovels and spades!

The Solution

If you want to get specialized shovels, tools, etc. it takes some work. You need to get the product catalogs and then find out if the manufacturer will sell direct to you. There is a good chance that you will be directed to a local distributor who will process your order. The problem with this method is that it can take weeks to make a simple purchase. It is also a lot of work.

D Handles

When you look at shovels and spades pay attention to the handles. Some have a pole handle. These can slip in your hand if you try to rotate the shovel blade for a reason. Certain shovels that I own have D handles. These handles have a small grip that is oriented 90 degrees to the shaft that connects the handle to the shovel blade. The shaft splits as it nears the handle so the small grip has two attachment points. The D handle shovels and spades give you enormous control when digging. Newer models even have a cushioned grip to reduce impact as you drive the shovel into the soil.

Fiberglass Handles

These handles are simply fantastic. They are available in different levels of quality with the more expensive ones being thicker. Some even have a two component shaft giving even more strength. The fiberglass handles, if coupled with a strong steel blade that doesn't bend will give you a shovel that can last 100 years or more.

Currently all of my shovels have wooden handles. If you want to maintain a wooden handle you need to periodically clean it, sand it and re-coat it with urethane or a synthetic resin penetrating water repellent. These coatings keep the wood from drying out. Dried wood handles can fatigue and crack over time.

Hollow vs Solid Backs

Have you been aggravated before when the back of a shovel gets packed with wet mud? This adds weight and is tough to clean out. Certain manufacturers offer shovels with a welded plate in this area. It creates a solid back to the shovel that eliminates clumped and packed mud.

The Cadillacs

Shovels that got my attention were the stainless steel ones and the old fashioned forged spades. The thickness of the steel used in the blades makes a huge difference. I have cracked several regular spades in my time. Spend the extra money and get a better shovel. You will never regret it!

Click on both graphics to watch videos on Shovels. Click on both graphics to watch videos on Shovels.   Click on both graphics to watch videos on Shovels. Click on both graphics to watch videos on Shovels.

Column B258