Cement Siding Manufacturers

Cement Siding Manufacturers

Cement siding is a most interesting product. It has been around for over 100 years, very much like cork flooring. It gained widespread acceptance as many row houses used it to resist "frost, fire & ants." Those claims are so true! I know of 15 houses within three miles that have it on the sides and roofs of the houses. What is mind-boggling is that the material has been in place since 1910 or so! The houses that have it as siding show no signs of blistering or peeling. If this isn't a reason for you to check out all the manufacturers listed below, then I don't know what is!

Based upon research materials sent to me just before writing this bulletin, one of the manufacturers clearly leads the pack in volume. That company is the James Hardie Building Products Company. Their U.S. capacity is approximately 900 million square feet of siding per year. Now mind you I didn't say that bigger is necessarily the best. That kind of production allows them to service demand.

I urge you to research all of the companies listed below. You will (hopefully!) find just what you are looking for. There is a very good chance that you will be able to readily obtain the product through a local lumber yard. Don't count on any of the home center stores... I doubt that they would stock or order it in. However, if you find that I am wrong on this point, don't hesitate to contact me.

  • Cemplank
  • CertainTeed
  • James Hardie Building Products

  • MaxiTile

  • Nichiha

Column B185

Fiber Cement Siding Accessories

Fiber Cement Siding Accessories

If you want to make sure that your fiber cement siding job is as maintenance free as possible then you MUST also call this company. They make specialized high quality vinyl trim pieces that compliment and fit cement siding, soffit pieces, and panels.

  • R. H. Tamlyn & Sons, Inc.

This company is an authorized manufacturer of vinyl trim pieces that fit James Hardie Fiber Cement Products. They have very nifty inside and outside corners, vinyl splicing H-channels, Z Flashings for panels, and very cool continuous soffit ventilation strips that couple with the fiber cement soffit panels.

NOTE: You must have the vinyl trim in place or you may VOID your siding warranty!

Column B185

Fiber Cement Siding Tips

I'll bet you have seen houses that have fiber cement siding or shingles. The best place to see them is in older parts of your town or city or those sub-divisions built in the 1950's or 1960's. The shingles look like large sized armor plating. The houses that are in the older parts of your town may be up to 100 years old. If you are lucky you may spy one that has never been painted. In these instances the shingles will have a multi-colored look upon close inspection. What a cool product! One that has truly passed the test of time.

Installing Fiber Cement

These products are installed in the same manner as any exterior siding product whether it be wood, vinyl or other siding. It is simply nailed to the exterior walls. My initial reaction when I first came into contact with this material is that it would crack when you nailed it. Not so! The older fiber cement that is 100 years old is brittle, but not the newer products. Sure, you can crack it if you hit it hard enough, but you will be surprised how well nails go through it.

Water Barriers

When I drive by certain new home construction sites I often get cold chills. I am shocked to see carpenters install siding products directly over exterior sheathing with NO water barriers between the exterior siding and the plywood, OSB or foam sheathing. This is a huge mistake in my opinion. Even a superior product like fiber cement siding or shingles can allow water to get past a butt joint or where it touches up against doors, windows or corner boards. Water barriers like traditional tar paper or the newer air and water infiltration barriers are a must. Carpenters from generations ago discovered that tar paper absolutely kept wood sheathing dry. I can vouch for this. Many older homes that I took apart in order to add a room had tar paper under the siding that was brittle but it still stopped water! Make sure that a water barrier is part of your installation. I don't care what the building code or the carpenter says!

Cutting Fiber Cement

This is probably the most difficult part of the job. You can use a regular circular saw with a carbide tipped blade, but you better have a dust mask. This method creates lots of dust. The dust will eventually ruin the bearings in the saw, so use an old saw if you must go this route. You can use an electric shears if you want to avoid dust. The tool is primarily used by professionals as it is fairly expensive. It is definitely not a tool to use for just one weekend. There is a good possibility that a tool rental center might have one if you just need it for several days. Check out the web site of Pacific International Tool & Shear for more information about this tool.

Painting

The newer fiber cement panels need to be painted. They don't have the cool built-in color of the 100 year old products. the good news is that these products hold paint exceptionally well. The fiber cement is very dimensionally stable and simply doesn't expand or contract. This means paint will hold on for a very long time. I would paint the product with the new paint I discovered that contains polyurethane. It is Weatherbeater Ultra, sold at Sears. Make sure that the fiber cement siding is nice and clean and dust free before painting.

Fasteners

Always use the best nails when installing fiber cement. If you can find stainless steel nails, use them. If not, go for the hot dipped galvanized nails. Some installers will use nails driven by air nailers. These are galvanized, but most do not perform as well as hot dipped galvanized.

Keep in mind that some fiber cement products can be blind nailed. This is a good thing! Blind nailing is the way most roof shingles are installed. In other words, you don't see the nails. Consider selecting a fiber cement product that can be blind nailed. This will eliminate all sorts of problems you can often have with exposed surface nails. Always read the installation instructions and use the nails that the siding manufacturer says to use.

Column B327

Fiber Cement Siding

Old Styled Fiber Cement Siding

I don't know how many old houses out there have the original fiber cement shingles but my guess would be in the hundreds of thousands. If you were at my house, within 15 minutes I could drive you past houses that have had these durable products in place for nearly 100 years!

Some of the houses have never had one thing done to the exterior. If they were simply cleaned, they would look as they did at the turn of the last century. It makes sense when you think about it as the material is simply thin layers of rock!

So who still makes these old styled shingles? It is a company more know for its roofing than fiber cement products. It is GAF Materials Corporation.

The Three Profiles

These old styled shingles not only match old houses but they look swell for new installations. There are three patterns and they are fairly distinctive from one another.

Purity

This shingle is available in three different bottom edge styles. You can get it with a straight, wavy or thatched bottom edge. All of the shingles measure 24 inches long or wide by 12 inches high. The normal exposure is 11 inches for the straight and wavy bottom and 10.5 inches for the thatched bottom edge.

Profile

This shingle has a straight bottom edge and comes in two sizes: 12 inches high by 24 inches long or 14 5/8 inches high by 32 inches long.

Emphasis

A thicker thatched edge shingle 14 5/8" x 25 5/32".

Column B327

Fiber Cement Manufacturers

Complete Listing of Fiber Cement Manufacturers

Within the past three years, there has been some consolidation within this industry. Some companies have merged with others. The bottom line is that fiber cement products are readily available in most markets and they are usually fairly easy to obtain. My biggest complaint is that some manufacturers do not yet offer a complete package with respect to trim pieces. In other words, when you install siding you often need to deal with inside and outside corners, facia and rake boards, drip cap, soffit terminations, etc. If I were making fiber cement siding, I would want to offer all of these optional pieces and maybe even other decorative trim made from fiber cement. As it stands now, in certain instances you need to substitute wood or vinyl products to complete the exterior installation. This isn't all bad, but you may have some problems with respect to texture differences. Be sure to ask about accessory and trim pieces when you are deciding what product to use.

  • Cemplank
  • Certain Teed
  • GAF Materials
  • James Hardie Building Products
  • MaxiTile
  • Nichiha USA, Inc.

Column B327

Stainless Steel Nails, Screws & Fasteners

stainless steel nails

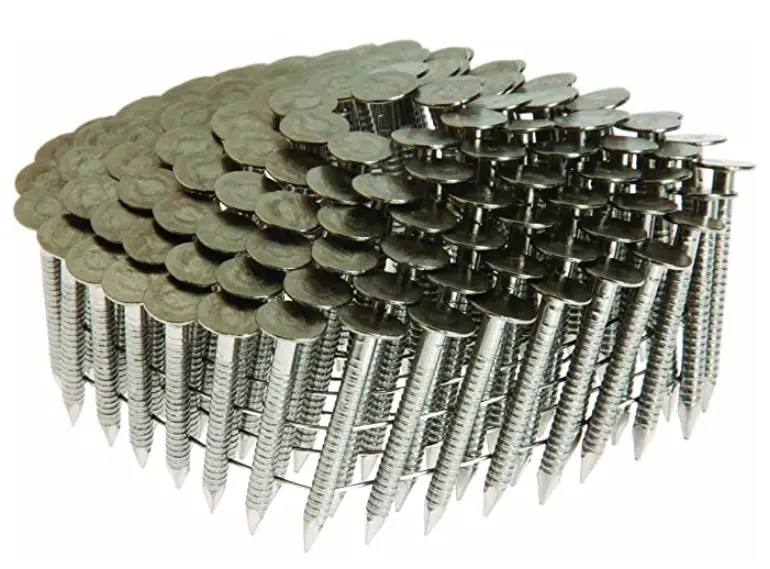
Stainless Steel Nails | These are stainless steel roofing nails. You MUST use these if you live within 20 miles of the sea. CLICK or TAP HERE or the photo if you want to purchase stainless steel nails.

Stainless Steel Nails - The Best You Can Get

Rust is a constant nemesis of many houses. The prolific use of iron and steel in residential home construction is the root of the problem. Iron nails and steel construction components are used for several reasons. Number one, steel is very inexpensive. Number two, steel is very strong. However, iron and steel have a tendency to react unfavorably with water and air. The end result is that orange-brown crust called rust.

Is Rust a Serious Problem?

Rust corrosion can become a serious problem. At first, it simply is a cosmetic problem. Rust stains that appear through paint or run down brickwork are the most common ones. You may have rust stains on your exterior concrete surfaces. However, if left unchecked, steel or iron components can corrode to a point where they lose their structural integrity.

Can Rusty Nails Cause Decks to Collapse?

Yes, inferior nails with a thin coating of zinc begin to rust and corrode on decks. The problem is made worse because of the copper in treated lumber. The copper accelerates the corrosion. CLICK or TAP HERE to read all about the dangers of a deck collapse.

Where Else Can Rust Be a Problem?

The possibilities are endless in many homes. For example, steel reinforcing in concrete can and does rust and corrode. The corrosion actually causes the steel to expand which causes the concrete to crack.

rusty reinforcing steel

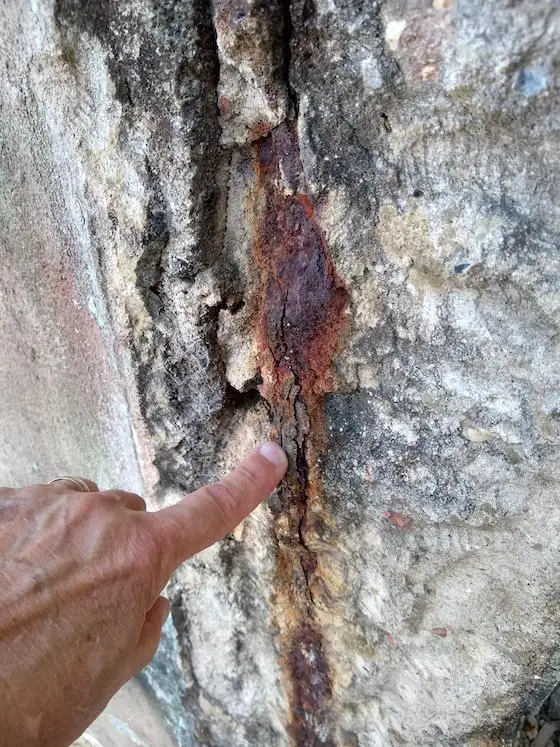
Believe it or not this is all that's left of a steel reinforcing rod. It was encased in concrete just 100 feet from the Atlantic Ocean in Old San Juan, Puerto Rico.

Steel lintels which support brickwork and stonework above windows and doors can readily rust if not adequately protected. Nails, screws, bolts, etc. used in outdoor projects will readily corrode and lose strength. This loss of strength can actually be accelerated if steel or iron products come in contact with chemically treated lumber. The solution is to use a fastener that will not corrode. This is where stainless steel comes into the picture.

Stainless Steel -The Ultimate Metal

Use stainless steel if you never want to worry about rust and corrosion.

Are There Different Types of Stainless Steel?

There are different types of stainless steel, but the most common types are known as #304 and #316.

How Do You Make Stainless Steel?

Stainless steel is an alloy of steel, chromium, and nickel. These basic ingredients are forged together to form a different metal that has greater strength than steel, and excellent corrosion resistance.

Certain harsh chemicals and salt spray can corrode 304 stainless steel. 304 stainless steel has 18 percent chromium content and 8 percent nickel content. As such it is often referred to as 18-8 stainless. 316 stainless steel is the ultimate corrosion resistant alloy. By adding an additional ingredient - molybdenum - to the other ingredients, this form of stainless steel will resist attacks by just about anything you can throw at it.

hot dipped galvanized nails

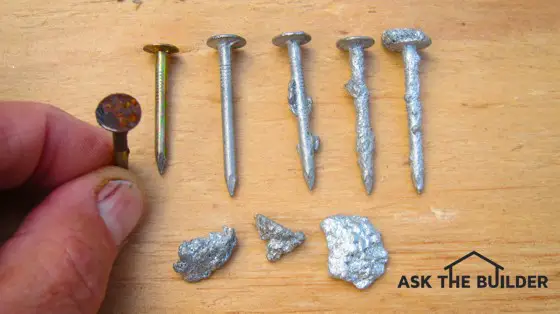
Stainless Steel Nails | The long smooth silver-colored nail that has no chunks of zinc on it is what a stainless-steel nail would look like. All the nails above have been galvanized. The one being held was electro-plated and it’s rusting after just 12 years. Next to it is a new electro-plated nail. The four gray ones are hot-dipped nails, some have a distinctive irregular coating of pure zinc. The irregular ingots are solid zinc. CLICK or TAP HERE to discover all the facts about galvanized nails. Photo Credit: Tim Carter

What Type of Fasteners are Made Using Stainless Steel?

Stainless steel is used to make siding nails, screws, nuts, bolts, etc. In fact, if you know a good welder, you can fashion brackets, joist hangers, etc. from pieces of stainless steel. Not too long ago, I made a double joist hanger for an exterior deck from stainless steel.

stainless steel screws

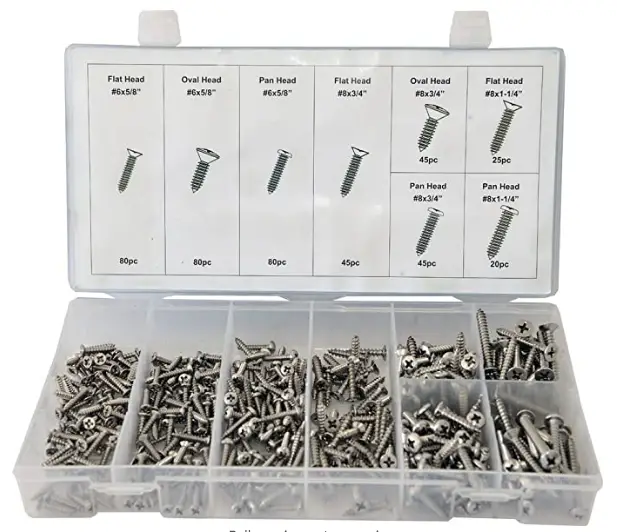
These are just a few of the stainless steel screws you can get. There are countless ones of all types. CLICK or TAP HERE or the PHOTO to discover the exact STAINLESS STEEL SCREW, NAIL, or BOLT you need!

The deck structure was made from redwood and I simply did not want to take a chance with rust making an appearance in several years. Yes, you will pay slightly more for stainless steel hardware, but it will be worth it. You will not have to worry about rust or structural failure caused by rust and corrosion.

Column B363

Stainless Steel Fasteners & Nailing Information

Sources of Literature on Nails and Nailing Practices

Many people think that a nail is a nail. Well, that is not really true. There are many factors that you need to consider when choosing a nail to do a job. For example, the heads of nails are different shapes, the shank or body of the nail may have different configurations or textures for holding power.

Believe it or not, not all nail points are the same. Some are shaped differently so as not to split the wood as the nail is driven.

The California Redwood Association and the Western Red Cedar Lumber Association both offer excellent pamphlets illustrating just how to properly nail exterior siding. It's not as easy as you might think! Check out their web sites!

Manufacturers of Stainless Steel Fasteners & Other Products

  • Anchor Staple & Nail Company

  • Manasquan Premium Fasteners
  • Maze Nails
  • Swan Secure Products

Are you one of the manufacturers listed above? Do you want your company name to be a link to your website? Click here.

Column B363

Installing Wood Siding

Tips for Installing Beveled Wood Siding

The biggest mistake I see carpenters make on a daily basis is the failure to seal wood siding before it is installed. This sealing process is necessary if you want to protect the wood and ensure that the finish (paint or stain) you are applying will last and last. Moisture can easily travel through wood and cause a paint or stain film to peel or blister. The trick is to not allow water to enter in the first place. You do this by painting and staining the complete piece of wood. This means the front, back, and edges. It's easy to do and fast if you set up some saw horses. In most instances, you simply use a sprayer or a paint roller. Glide a brush over the finish side of the wood after you apply the paint to give it a brushed texture. Backpriming is especially important if you are installing redwood, cedar, or any other wood that has a high extractive chemical content.

Felt or Building Paper

The failure to install felt or other water resistant building paper or house wrap beneath wood siding is a huge mistake. These papers are necessary to adequately protect the wood framing members from water damage. Water can easily find its way behind wood sidings. There are hundreds of butt seams in a typical installation. These seams can easily open with normal expansion and contraction allowing water to get behind the siding. When installing the building paper, make sure the first piece overlaps the top of the foundation one inch. All other subsequent pieces should overlap one another at least two inches.

End Cuts

OK, so you backprimed the siding. Now for the fun part of installing! But wait, you have to cut each piece. What now? Well, keep a paint can and brush right next to the miter saw or saw horses. After you are sure the piece is the right length and will fit, paint the end that was cut! Remember, almost invariably this cut exposes end grain. This is where water enters a piece of wood most easily. Sealing these cuts is especially important where siding is cut at an angle as it terminates along the edge of a roof. Water running down the roof or splashing off the shingles can easily saturate these cut ends.

Nailing

Always use the right nails. There are special siding nails which have smaller heads and threaded shanks. The nails must be long enough to go through the siding, sheathing and finally into the wood studs a minimum of 1 1/2 inches. To avoid splitting, always drill pilot holes at the ends of a piece of siding. Never nail through two pieces of siding! Nails should pass just over the top of the piece of siding you just installed.

Column B363

Deck Cleaning / Use Oxygen Bleach – Avoid Damage

! ! ! See Author's Notes at Bottom of Column ! ! !

Start the presses! The raw data from the latest Earlham University study about wood sealer performance has just been received! The final report will take a few weeks to be generated but the visual findings tell the tale. The actual findings were just released to me several months ago on May 2, 2001.

Why are these test results so important? It just so happens that outdoor wood cleaning and sealing is one of the most important topics I have ever covered. I have discovered that homeowners like you are disgusted with the poor performance of the heavily advertised brands you see on TV and those that clutter the shelves of many of the big box home centers that dot the fruited plain.

It takes a lot of work to clean a deck or wood siding and then seal it. It is no wonder that you get upset when the deck or siding turns black, gray or green after six to nine months! Imagine a wood sealer that lasts two to three years! It is possible to get results like that if you choose wisely.

Cleaning First

Before you apply any wood sealer - preferably a penetrating water repellent - the wood needs to be clean. This is a common sense issue. Each and every spring I am amazed at how much disinformation there is out there about this process. Each spring I see magazine and newspaper articles promoting the use of chlorine bleach-based products.

Chlorine bleach is a wonderful sanitizer. If you want to kill germs, use it. If you want to kill the trees and plants around your house, use it. If you want to take the color out of your deck lumber, use it. If you want to accelerate the corrosion of the nails, screws and structural hardware that holds your deck together, use it.

If you want to avoid all of the above problems, use Oxygen bleach to clean your deck! See below for details about oxygen bleach.

The Cleaning Process

I wish I could share with you all the handwritten letters and emails I have received about decks that have been ruined by power washing. This method of cleaning decks is simply a huge mistake in my opinion. It doesn't take a rocket scientist to figure out that wood is soft and can be easily eroded with a high pressure stream. I get calls from professional cleaners all the time telling me I am wrong. They say if you hold the wand just right there is no damage. They are wrong. There is damage, it just may not be visible unless you look closely. What's more, the damage is cumulative. Wash your deck with a power washer year after year and I guarantee that you will see erosion of the light colored areas of the lumber.

I have written a step-by-step deck cleaning tutorial . The photos at this section are not enhanced! Wait till you see the before and after shots. I did the entire thing with oxygen bleach and it is so easy to use. We were working above a valuable rose garden and the rose bushes were not harmed in the least by the oxygen bleach cleaner.

Really Easy

I get reviews every week from people who have used my Stain Solver Oxygen bleach. I started selling oxygen bleach many years ago, when I saw how well it performed. Within the past two weeks, I received test data that shows that my oxygen bleach product works even better than pure oxygen bleach. I know it sounds crazy, but it is true. Mark U. is a satisfied user and told me this:

"Tim, your Stain Solver exceeded our expectations! The deck looks superb! The product was easier to work with than you said it would be."

It is indeed easy. You simply pour the oxygen bleach powder into some warm water, let is dissolve, apply it, let it sit, lightly scrub and rinse!

The trick to cleaning decks with oxygen bleach is to work in the cooler part of the day and to keep the surface of the wood wet with the solution for 15 to 20 minutes. It will foam and bubble and the oxygen is working, not you. Lightly scrub to remove loose and UV damaged wood fibers and rinse with a garden hose. It is that simple! I URGE you to go to my website to view the tutorial!


Author's Notes:

Read Sheryl's comments about using a pressure washer on her deck.

Tim,

"I am going to order some of your Oxygen bleach to clean my wooden deck that is on "the list" this summer. I sure wish I had known about this product before I power washed it two years ago - as I wondered why the wood looked messed up afterwards."

- Sheryl W., State Park, SC


Message from Tim:

Years ago while researching a column about cleaning decks, I discovered the wonders of Oxygen Bleach. It is perhaps the 'greenest' cleaner I know of as it uses oxygen ions to break apart stains, dirt and odor molecules. There are no harsh chemicals, and it works on just about anything that is water washable.

I decided to create my own special blend using ingredients made in the USA. In fact, the raw materials in the active ingredient are food-grade quality registered with the FDA. I call my product Stain Solver. I urge you to use it to help with cleaning your deck or wood. You will be amazed at the results!

Column B378

Oxygen Bleach / Deck – Siding – Multi-Purpose Cleaner

! Oxygen Bleach !

Now, here is one of the best kept secrets out there about oxygen bleach. Go to stores and the clerks and managers look at you like you are crazy! Why? Because it takes years and tens/hundreds of millions of dollars of advertising to build brand awareness of a product.

If you watch TV, you have undoubtedly seen commercials and infomercials about some oxygen bleach products. The trouble with what you see on TV is that the commercials and infomercials are very sensational. There is some smoke and mirrors going on, trust me. Oxygen bleach does all of those things you see and more, but it doesn't do it in seconds like they show you! What's more, the products that are advertised on TV contain a significant amount of filler. In addition, some of the TV products contain the active ingredient oxygen bleach that is NOT made in the USA. The purity and quality of this oxygen bleach may be suspect. If you buy products whose ingredients are NOT made in the USA, you very likely are not getting the best buy for your money.

Just after I published the column about cleaning wood siding, I learned that the most powerful Oxygen bleach available is one that is blended with a precise amount of soda ash. The soda ash boosts the alkalinity of the solution but surprisingly does not raise the pH. This means it is safe to work with and yields the best cleaning results. I now sell Oxygen bleach that is blended to achieve this high standard. I call my product Stain Solver. To the best of my knowledge, I am the only company in the USA that blends it to this precise concentration. What's more, the ingredients in Stain Solver are all made right here in the USA. I have had tens of thousands of people buy it over the years and they are all satisfied.

Stain Solver cleans Cedar SidingBetter Buy???

I have also seen some of my competitors products for sale in grocery stores, warehouse membership clubs and national chain discount stores. They are Oxi-Clean, Oxygen 8, Wolman's Deck Brightener and a product called Timberwash. BUT, do the math before you buy! By the time you calculate the amount of actual oxygen bleach you are getting, your cost to drive to pick it up, your wait in the checkout line and all of the other hassles, you just might be better off buying an oxygen bleach product that has the highest concentration of active ingredient. Most of the competitors have only 70 percent active ingredient. Others have only 65 percent and one of the above has, I am told, just 50 percent!

How Much Do I Need?

People want to know how much to buy. Two pounds of my Oxygen bleach needs to be mixed with 5 gallons of water to get the best wood cleaning results. If you buy another brand, you will need to add more to get similar results.

I find that 5 gallons of oxygen bleach solution will clean 300 to 500 square feet of surface area. People often underestimate the amount of square footage in deck railings. The average railing on a deck contains four square feet of surface area for each linear foot of railing. It sounds unbelievable, but it is true. The bottom line is that the average sized deck that may be 15 feet by 20 feet needs at least 5 pounds of Stain Solver. Most people order 9 pounds just to be on the safe side. Cleaning the wood siding on a house may easily take 18 pounds or more.

You can call us at 513-407-8727 to order if you like, or go to www.stainsolver.com.

Stain Solver Website

Message from Tim:Years ago while researching a column about cleaning decks, I discovered the wonders of Oxygen Bleach. It is perhaps the 'greenest' cleaner I know of as it uses oxygen ions to break apart stains, dirt and odor molecules. There are no harsh chemicals, and it works on just about anything that is water washable.

I decided to create my own special blend using ingredients made in the USA. In fact, the raw materials in the active ingredient are food-grade quality registered with the FDA. I call my product Stain Solver. I urge you to use it to help with cleaning projects. You will be amazed at the results!

Column B378