Gutter Installation Tips

Getting Started

I always like to start with a material list. Simple pictures will help you save money on a gutter job. Draw a separate line indicating each gutter you need to install. Mark how long each gutter will be above or below the line. This allows you to determining how much material you will need. Traditional aluminum gutters come in sizes ranging from 16 to 37 feet in size. The waste piece from one gutter may be enough for a smaller run on the other side. Plan your cuts and waste should be minimal. The pictures will also allow you to easily calculate end caps, outlet tubes, inside and outside miters, pop rivets, etc. Don't forget the special flexible sealant that you must use at each "seam". Don't experiment with silicone or other caulks! Use exactly what the manufacturer recommends!

Cutting Aluminum

I found that a fine tooth hacksaw (24 or more teeth per inch) works just fine. I also use my power miter box saw on occasion. However, the miter box saw sends shrapnel flying. It is dangerous, but fast. If you use sawhorses or other benches, cover them with carpet scraps or old towels. Without this covering you will scratch the prepasted finish. A gutter that goes around a 90 degree angle is made by assembling two pieces that have a 45 degree angle cut.

Assembling Pieces

Aluminum gutters are held together with pop rivets. They are made the same color as the gutter you are installing. End caps, outlet tubes, miter joints, etc. all come with predrilled holes from the factory. You slide these pieces onto (into) the gutter. Using a drill with an 1/8 inch bit, you simply drill through the hole into the gutter. After the first hole is drilled, install a rivet. If you don't do this, subsequent holes may not line up. Drill, then rivet, drill, then rivet.........

Sealants

Leaks are prevented by using the proper number of rivets and the proper sealant. Alcoa's sealant reminds me of liquid rubber. It dries very quickly, is sticky as all get out and stretchhhhhhs. If you get it on your fingers, watch out! You will stick to anything. The sealant is applied after all the riveting is done. You apply the sealant to the INSIDE only of the gutter seams!!!!! Apply a liberal amount as the sealant has a large volume of vehicle. This vehicle evaporates leaving the sealant behind. DON'T spread the sealant with a tool. Just let it flow over the joints. It will look messy, but heck, only the birds can see it. Gutters and accessory pieces must be dry. Wipe the dew off when working in the morning.

Column B132

Membrane Roofing – Avoid Windy Rain and Ice Dam Leaks

The past two winters and summers have made me a believer in water and ice roof membrane products. The people in our coastal areas have been pounded with hurricanes which are accompanied by vast amounts of wind driven rain. Homeowners in the snow belt of the USA were buried with record snowfalls in the winter of 1995-96. These snows create ice dams. The ice dams in turn create rivers of water in houses. Fortunately there is a group of products which can minimize or eliminate entirely leaks caused by these problems.

What are the Membranes?

The membranes which eliminate the roof leaks are simply sheets of modified asphalt. Standard asphalt is mixed with rubber and other proprietary compounds to make it sticky and flexible. This mixture is then applied to a plastic sheet. The plastic sheet allows you to work on top of the product. Without it, you would get stuck on the roof like a fly on fly paper! The membranes are usually about 3 feet wide and come in rolls that contain about 60 to 70 linear feet.

Where Do They Go?

The membranes are installed on areas of a roof that typically can be trouble spots for leaks. Leaks from wind blown rain or ice dams can develop at the lower edge of a roof near the gutters, along the side edges of a roof (rake edge), in valleys where two different roofs intersect, at skylights, other flashing areas (chimneys, plumbing vents, etc.), and at roof slope changes.

The membranes are applied directly to the wood roof deck surface before any felt paper or shingles are applied. That is one reason why they are so sticky. They stick tenaciously to dry, dust free, solid wood.

How Do They Work?

You might ask why one can't simply use heavy 30# felt paper in these same areas to prevent leaks. That would be a fair question. The reason is simple. The nails used to tack shingles penetrate the felt paper. The felt paper does not completely seal around the shaft of the nail. This is where the water starts its journey into your home.

The membranes are different. The thick layer of rubberized asphalt readily coats and seals the shaft of any nails that penetrate the membrane. This is why they stop water. The water which gets under the shingles simply flows over the top of the membrane until it gets to the bottom edge of the roof. There it exits without doing any interior damage.

Are They Worth the Expense?

If you have ever experienced a persistent leak from an ice dam or a leak from wind blown rain, you already know the answer to this question. Ice dam leaks are sinister. Once they start, there is no safe way to stop the leak. It is cold, slick, and dangerous on the roof. I know of a roofer who broke his back trying to break up an ice dam. I can tell you that I would never go up on a roof to beat the ice. Not only is it dangerous, you can cause severe damage to the shingles.

Gale force winds, thunderstorms, and hurricanes can make life interesting while up on a roof as well. I have been there. It is frightening and idiotic to try to stop a leak during a violent storm. 

Oh yes, insurance companies will take care of all your problems you say. You can't be serious! Why go through all of the hassle and problems in doing repair work? You talk about nightmares......!

If you are re-roofing or installing a new roof, give the membranes strong consideration. It is very tough to install them at a later date.

Column B148

Asphalt Shingle Installation Tips

Asphalt Shingle Installation Tips

So, you want to install your own asphalt shingle roof? It isn't that hard, it just takes some planning. You need to think before you work. The first thing you must do is obtain the two publications I mention below. These will help supplement the information on the shingle packs and what I am about to tell you.

New Roofs vs. Old Roofs

The application of many asphalt shingles is the same for an old roof or a new roof. The main difference is that on a re-roof, you need to pay attention to how you start the shingles at the lower edge of the roof. If you copy the exact pattern as the first roof, the new roof may develop waves. Watch for this in the instructions!

Felt Paper and Drip Edges

Do you need to use felt paper? On new roofs the answer is yes. Re-roof jobs do not require it. I prefer to apply the felt as I go if at all possible. If you do the entire roof and the felt gets wet or dew covered, it will wrinkle. These wrinkles can telegraph through thin standard 3 tab shingles! Not only that, if the weather is hot and you walk up a felt covered roof, the felt can and will tear. You will be on the ground before you know what happened. If you apply felt as you go, you can just use a minimum amount of nails. Within minutes hundreds of nails from the shingles will pierce it.

Drip edges are corrosion resistant metal strips that protect the exposed ends of the roof deck at the bottom and sides of the roof. Drip edges go on the bottom of the roof before felt paper is applied. However, they are applied on top of the felt on the side edges of the roof. If you install a roof membrane, it must be installed before any of the drip edge. The membrane actually should lap over onto the gutter board!

Starter Strips - Almost Always Done Wrong!

You do need a row of shingles beneath the first regular row. Why? Because of the knockouts. Those thin lines in shingles are voids. You can see to the shingle below. Well, on the first row, there is no shingle. Well, there is going to be. You have to take a regular shingle and cut off the first 5 inches. This leaves you with the top 7 inches. Don't take a regular shingle and just turn it upside down. This is wrong! I like to allow the shingles to overhang the edge of the drip edge by 1 inch. Do NOT apply the shingles flush! Water, by capillary attraction, will pull its way up the shingle.

Keeping Them Straight

If you use regular 3 tab shingles, the vertical lines are the ones you see from the ground. These are the ones you should concentrate on. I feel the roof looks best if you let it overhang 1 inch on the sides. This means that you need to start your fist shingle 35 inches in from the edge. Shingles usually measure 36 inches wide. Standard 3 tab shingles also step over every 6 inches as you go up the roof. Without this step over, the knockouts of the shingle on the next row would be directly over where you just nailed! Talk about leaks.......

Standard shingles usually have 5 inches of shingles exposed to the weather. A shingle is 12 inches wide. This means that 7 inches is covered by the next row of shingles. The horizontal lines must be chalked as well. But, don't chalk the bottom line of a shingle row. Chalk the top. This way the chalk will be covered. I like to check my alignment of the shingles with the top ridge of the roof every 5 feet or so as you progress up the roof. You want the shingles to be parallel with the ridge. You may have to adjust as you go to keep them parallel.

Flashings, Valleys, and Such

This is where the men are separated from the boys. All those fancy TV shows show you how easy it is to put shingles on. Big deal! The place where roofs leak first 95 percent of the time is at a flashing! Flashings are transition points between something that is a roofing material and something that isn't. For example, a chimney interrupts a roof. The shingles must abut the chimney and interlock with a flashing to prevent water penetration. Tough to do? Yes, but if you obtain a good book (there are few out there - I've looked!) you may be able to figure it out. Flashings must be made from corrosion resistant metal that can be soldered! No aluminum PLEASE!

Don't rely on caulk on a roof either. Caulk is just not a really good roofing material, trust me. Metal flashings laced into shingles have withstood the test of time on many roofs. Do your homework, install them right and you will have a leak-free roof for years.

Roofing Literature

Would you like to obtain excellent pamphlets, booklets and other literature on asphalt roofing? If so, you need to contact:

Asphalt Roofing Manufacturers Association
Public Information Department
1156 - 15th Street, NW., Suite 900
Washington, DC 20005
Tel: 202-207-0917
Fax: 202-223-9741
Web: www.asphaltroofing.org

Two of their many publications are outstanding. Do whatever is necessary to obtain a copy of the following two publications. Call, write or visit their website to find out pricing information for:

Residential Asphalt Roofing Manual
and
Good Application Makes A Good Roof Better.

Column B148

Membrane Roofing Manufacturers

Wind Blown Rain & Ice Dam Membrane Roofing Manufacturers

All of the roof membranes are virtually the same. There are differences in the thickness of the modified asphalt. It can be significant. Some products are 25 mils thick while others can be 40 mils or more. To further confound you, some products are made for different parts of the country. Not every membrane can be installed in the desert Southwest for example. Some cannot be applied to metal roofing or beneath metal roofing. Some thinner ones do not protect against severe ice damming situations.

If you are doing the roofing yourself, another consideration comes into play. The plastic cover sheet can be slippery! Some membranes have special skid resistant surfaces. Look for those so you don't fall!

Sunlight can cause real problems with some membranes. This I don't understand. Don't ask me why the manufacturers can't employ decent ultraviolet blocking ingredients in all of their plastic cover sheets. Some products can be exposed to sunlight for only several days while others can be exposed for several months. It just doesn't make sense to me!

My recommendation to you is to go with as thick a material as you can afford. The more asphalt, the more protection you have around the nail shanks. Check out the following manufacturers and read their product literature. Invest the time reading it, and you will reap HUGE dividends.

  • ALCO-NVC

  • Certainteed
    WinterGuard
  • GAF Building Materials
    Weather Watch Ice & Water Barrier
  • Grace Construction Products, Inc.
    Grace Ice & Water Shield TM
  • Johns Manville
    Sure Grip
  • NEI

  • Tamko

Roofing Literature

Would you like to obtain excellent pamphlets, booklets, and other literature on asphalt roofing? If so, you need to contact:

Asphalt Roofing Manufacturers Association

Two of their many publications are outstanding. Do whatever is necessary to obtain a copy of the following two publications.

  • Residential Asphalt Roofing Manual
  • Good Application Makes a Good Roof Better (FREE!)

Column B148

Gutter Cleaning Tips

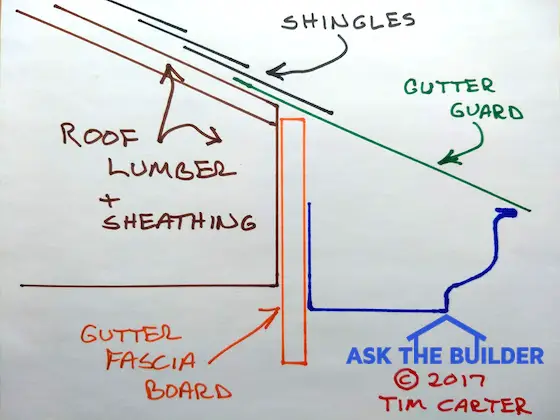
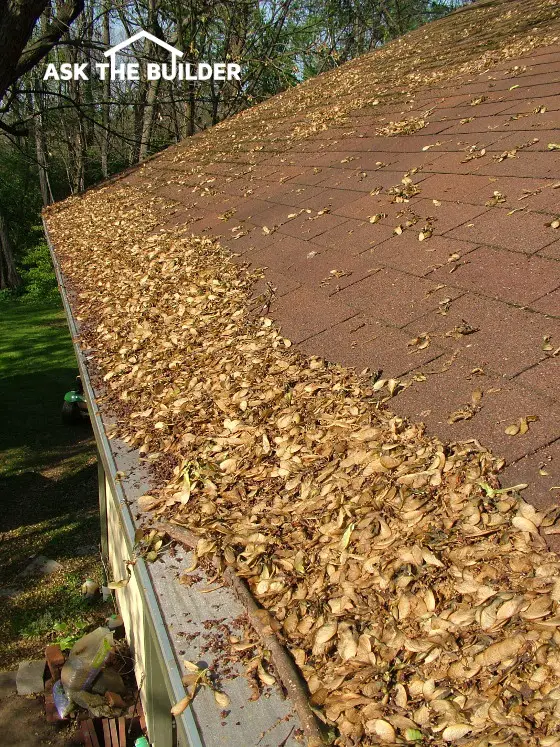
This gutter guard has been undergoing testing for ten months. The maple tree seeds are collecting in this test because the guard was NOT installed correctly by the company. It should be in the same plane as the shingles. See illustration below. Copyright 2018 Tim Carter

Important Author’s Note Update: Since this column was written, I have discovered at least two other gutter guards that sport the micro-mesh filtration screen. Testing of these Micro-mesh guards began early Spring of 2008. The results of the test are in! After 10-years of testing various types, a winner has been declared! Click for the gutter guard I installed on my house - Gutter Guard Test Results.


I am somewhat fortunate. My house has a special low pitched ledge that I built for the exclusive purpose of servicing my gutters. I have a Victorian house that has approximately 550 feet of total gutter footage. I can access my gutters from the roof fairly easily and safely. There are only two places where it gets a little hairy. I make sure I don't have a head cold when up on the roof. Why? Because a head cold can really mess up your balance. Be careful on your roof!

Here's a quick cross section showing how the gutter guard - in green - is in the same plane as the roofing material. The drawing is not to scale. I used to make drawings like this sitting at customers' kitchen tables. Copyright 2018 Tim Carter

Four Times a Year

I have to clean my gutters at least four times a year. It usually takes 1 hour each time. In the late fall, it is miserable work. My hands become numb from handling the cold, wet leaves. You can imagine how I have been interested in the advertised claims of the gutter guard products over the past five years. However, I was always put off by the enormous cost for my roof. I simply couldn't justify a $2,000 plus expense with other things to do around my house. Plus, as I said, I could get to my gutters fairly easily.

During the past two years, I received numerous phone calls and letters about gutter covers. People wanted to know if they worked. I decided to test them for myself after seeing them in a home show in early 1995. I must tell you that I entered the test with negative feelings. I surely would not make a good scientist!

My negative feelings were based upon my home show experience. I saw a nifty setup with water flowing down a roof into a gutter protected by a gutter screen. It was like magic how the water flowed into the gutter. But I knew that my large pine trees could easily defeat the slit where the water went into the gutter. I tested the gutter cover at the home show with tiny "leaves" made from paper. The gutter cover failed.

Testing Criteria

Certain gutter covers are permanently attached to your gutters. I immediately ruled these out from my testing. Why? Because I could see that pine needles and maple tree flower buds would easily get into the gutters. How would you then clean the gutters in 3 - 4 years?

I decided to test gutter screens to see if the holes or slits would trap leaves by their stems. All of the guards worked well. I found only one leaf that got trapped by its stem. That impressed me.

Small Debris and Flow Rates

My testing showed me that stuff - small tree stuff - gets into gutters. This can cause a big problem. Many gutters do not have sufficient pitch that allows them to readily carry this debris to the downspout. A decent pitch is 1/8 inch per foot. If you install this kind of pitch on a gutter, you will readily run out of gutter or facia board, trust me!

If gutters don't have decent pitch, small debris is often left in the bottom of the gutter to collect. The water flowing down to the downspout doesn't really have enough energy to carry the debris with it. In my case, I had a bunch of mush in my gutters. The gutter covers allowed small roof debris to enter and then the water couldn't transport it to the downspout. It was and is a mess!

Plan to Clean

If you live in an area where the trees do not drop springtime debris like buds, flowers, needles, etc., then you are in great shape. You will enjoy gutter guards. If you live in an area like me that has spring time debris, you will eventually have to deal with your gutter covers.

I suggest that you consider a model that allows you to lift it easily and inspect/wash the gutters. Because the debris within the gutter will be small in size, it should readily flow into the downspout without clogging it or the ground level piping. All you will have to do is lift every other gutter cover to rinse down the debris. It should be a breeze if you have a good ladder.

Cleaning Tips

Most ladder / gutter cleaning accidents happen for two reasons. The first is when people set a ladder that can slide along the gutter. The feet of the ladder must be set level. If the ladder is at a slight left or right angle as you climb it, it can quickly slide. Remember as you add weight to the top of the ladder, it acts like an out of balance sledge hammer held in the air! The ladder is the handle and you are the hammer falling towards the ground!

Overreaching is the second problem. Don't lean your body out beyond the ladder. This upsets the balance of you and the ladder. If you insist on reaching further down the gutter to clean, make a push stick. This is just a broom handle with a little block on the end. The block acts like a ram to push leaves and debris farther down the gutter. You can then move the ladder to get this debris or push it even farther. Be safe and take your time!

Column B184

Gutter Protection Test Results

Important Author’s Note Update: Since this column was written, I have discovered at least two other gutter guards that sport the micro-mesh filtration screen. Testing of these Micro-mesh guards began early Spring of 2008. The results of the test are in! After 10-years of testing various types, a winner has been declared! Click for the gutter guard I installed on my house - Gutter Guard Test Results.


Gutter Protection Test Results

OK, so call me a doubting Thomas. Certain building products I can not test scientifically. For example I can't do wind tests on windows. I don't have a lab to do water absorption testing on wood sealants. However, gutter guards are within my capabilities. You simply install them and log the results. The other stuff you have to "trust" manufacturer's claims or get independent results.

I took a chance with my testing. I decided that I would not test any product that required permanent installation to my aluminum gutters. This automatically knocked several major brand aluminum gutter guards out of the picture. The reason I didn't want to test them was based upon my hypothesis that the guards would allow some debris into the gutters. If this was the case, then it would be virtually impossible - or at least highly impractical to clean the gutters at a future time. When I rolled the dice it came up "7". All of the products allowed debris to enter the gutters!

I have listed below the three products I tested. There are many more gutter guards out there. In fact, I suspect that there could be up to 100 fabricators, many located in just a small regional area. I feel that you should look for the characteristics I described in my "Winners" section. Stay away from the losers.........

Stop - Check this out! Hi, it's me Tim Carter.
Do you want a bid on the same gutter guards I used on my home?
Click Here

If you do fill out the form at the MasterShield page, they pay me a very small commission.

LOSERS

  • Benjamin Obdyke
    This gutter guard was a nightmare from the get go. It was difficult to install because of its "accordion" design. This vinyl gutter guard had parallel rows of pleats. At the bottom of the pleats were slits that allowed water to enter the gutters. The accordion design made it very difficult to slide the products up under the gutters. These devices got clogged quickly with the spring debris from by maple and pin oak trees.

  • Nameless Product
    Here is a product I bought at a home center store. This simple vinyl gutter guard had numerous rows of holes in it. The holes were 7/16 inch in diameter. The front of the product had jaws that were at first unrecognizable as such. They were designed so that the device could clamp on the top lip of the gutter. I found it impossible to spread the jaws by hand. Debris was caught by these jaws and eventually caused the guards to sag into the gutter. These guards were the worst performer.

WINNER

  • Amerimax Home Products
    This simple vinyl gutter guard that I purchased at a home center store looked like the loser product with holes in it at first. However it was very different. It had elongated diamond shaped knockouts in it. These knockouts block all but the smallest debris from getting into the gutters but are wide enough to allow you to direct a hose spray into the gutter to flush the mush out every other year. The diamond knockouts were 1/4 inch wide by 1/2 inch long. Open front jaws allowed this flexible guard to quickly and snugly attach to the front gutter lip. It was the shortest gutter guard in the group - only 3 feet long. I found this a huge plus while installing the product. Read the label when installing as it has an up side and a down side. If you can find this one, buy it! Why? This is the overall winning product.

If you do want to limit your gutter cleaning experiences to the spring and summer, then install gutter guards. They all do a great job of keeping big leaves out of gutters.

Gutter Guard Manufacturers

  • Crane Plastics

  • Gutter Armor
  • Gutter Helmet
  • Gutter Topper
  • WaterLoov
  • Leaf Relief
Stop - Check this out! Hi, it's me Tim Carter.
Do you want a bid on the same gutter guards I used on my home?
Click Here

If you do fill out the form at the MasterShield page, they pay me a very small commission.

Column B184

Purchasing Asphalt Shingles

Purchasing Asphalt Shingles

Perhaps the most important thing to look for when shopping for shingles is a passing grade on an independent test. The folks at the American Society of Testing Materials (ASTM) have developed a test for asphalt shingles. The test checks the composition, dimensions and performance of asphalt shingles. One of the key issues is tear resistance from wind and mechanical forces. This is important as you don't want your shingles to tear away from the nails in a wind storm. This test is ASTM D3462, "Standard Specification for Asphalt Shingles Made from Glass Felt and Surfaced with Mineral Granules".

Do not buy any shingle that has not passed this test - plain and simple. This information is readily available in written form from the manufacturers. Those that test, will readily give you the proof. Those that don't, will readily give you excuses.

Column B188

Roofing – Locating a Leak

Locating a roof leak can be a really big undertaking. I have spent days trying to find leaks. On one job, it actually turned out that the roof wasn't leaking at all. The water was actually entering a massive brick chimney. It flowed down inside the chimney and eventually surfaced at some roof rafters. It then traveled along the rafters towards some skylights. Both the homeowner and I were very frustrated. Once we sealed the chimney with a high quality siloxane water repellent, the mysterious roof leak disappeared.

High School Physics

Roof coverings work in conjunction with gravity. Without the pull of gravity dragging water down the roof, most coverings would readily admit water into your house. Keeping this fact in mind will allow you to locate many roof leaks. Always look sideways, diagonally or up-roof from an inside leak location for the source of the leak.

Using a garden hose and a sprinkler will also help you. Always start from the lowest possible leak location and work upwards. NEVER point the hose up-roof! Try to simulate rain from above. Don't use an unrealistic flow of water. It may take upwards of five to 10 minutes for a leak to expose itself, so be patient.

The Most Probable Cause

Close to 90 percent of all roof leaks happen at flashings. Flashings are transitional roofing materials. They connect a roof to something that is not a roof. You will find flashings at chimneys, valleys, where a roof bumps into a wall, skylights, plumbing stacks, etc. When I am called to find a roof leak I always study the flashings before I spend any time looking in the field of shingles.

The reason flashings cause so many problems is that many roofers are like a lost ball in the high weeds when it comes to installing them. They simply do not have a clue how to do it. I have seen metal flashings installed with caulk. I have seen aluminum flashing used in masonry work. Some roofers actually use massive quantities of roofing cement smeared all over the flashings. All of these practices are wrong.

Low Slope = High Leak Potential

Many modern houses have low slope roofs - say four or five in 12 pitch. These roofs are highly susceptible to leaks from wind blown rain. If you have the opportunity to increase the pitch or slope of your roof, do so.

Repairing Roof Leaks

You would be surprised how simple it is to fix many roof leaks. Often it takes a simple piece of metal flashing. You may have to slide it over a hole and up and under the shingle above. Possibly a counterflashing has rusted. Perhaps a solder joint has cracked.

Do not even consider using roofing cement as a permanent roof patching compound. Did you know that it is not even supposed to be exposed to sunlight? Yes, UV rays break it down! Roofing cement is supposed to glue two pieces of shingle or rolled roofing together. It is not "roof icing" as I call it.

Caulk is another temporary roofing material. Don't be tempted to use this material. It works great on interior woodwork and tile, but not roofing materials. Roofs move a lot. Properly installed metal flashings account for this movement.

Look at your roof and flashing systems. Note how they resemble feathers on a bird or fish scales. The shingle above overlaps the flashing or shingle below. If you identify a leak location, form a piece of metal to cover the leak. Then slide the metal up and under the shingles above the hole. In many instances - assuming you are working with small pieces of metal - they will friction fit. There is no need for nails to hold the metal in place.

Column B188

Roof Leak – Ten Most Common Leak Locations

Ten Most Common Roof Leak Locations

Roof leaks are a nuisance for many homeowners. They can be difficult to diagnose - that is a fact. To make matters worse, different weather conditions will produce leaks in different locations.

The vast majority of roof coverings operate using the principal of gravity. This can be a big help in locating a leak source. However, horizontal roof boards can trick you. A leak may actually be eight to 10 feet sideways from where you see the wet ceiling or spot in the attic.

Finding the source of some leaks is easy. Others will require detective work and possibly a garden hose and an inside spotter. If you don't feel comfortable on a roof, you will have to find an honest roofer to assist you. Sometimes this can be as hard as finding the smallest leak! Here are some tips that may help you find a pesky roof leak:

The Field of Shingles

If your roof is older, it is possible that the leak is within the roof field. This means the expanse of shingles, slate, shakes, whatever. If your roof is asphalt, then you can walk around with ease. Other materials such as slate, concrete tile or clay tile may not be so forgiving.

You can crack roofing if you walk on it, so be careful. With regular shingles, look at the tops of the vertical knockouts. Look for missing colored granules. Look for cracks. Possibly a nail has backed itself out of the roof sheathing. Simply take your time and hunt.

Free & Fast Bids

CLICK HERE to get FREE & FAST BIDS from local contractors that will help you find leaks in your roof.

Valleys

A valley is a line where two roof planes intersect. Here in Cincinnati we use a metal flashing in the valleys. Some areas use rolled roofing. Other places simply lace the shingles together. Valleys can be big problems if you do not trim the shingles correctly.

When you trim a shingle for a valley you end up with a chisel point on the end of the shingle. If a second cut is not made to make this point like an arrow point, then water can travel along the top of the shingle and find its way inside your house. The shingle wrapper tells you how to make this simple second cut.

Head Wall Flashings

Some roofs stop at a vertical wall. A metal flashing must be in place to direct water streaming down the wall away from the stopping point of the shingles. This flashing may be behind wood siding or in front of a brick wall. The flashing should extend over the shingles at least three inches.

If the wall is brick or other masonry, the flashing must bend and extend one inch into a mortar joint. Tar, caulk or roofing cement should never be used in conjunction with these materials. If you see them, it is a sign that someone tried to patch a leak!

Wall Step Flashing

Some roof leaks happen at step flashings. You find these flashings where a roof climbs alongside a vertical wall. As each row of shingles is laid, a step flashing is installed over the shingle next to the wall. Part of the flashing turns up on the wall and the other portion gets covered by the next row of shingles.

Look for rust or holes in these flashings. In reality, if all is well, you will be able to see only the smallest portion of these flashings.

CLICK HERE to get FREE & FAST BIDS from local contractors that will help you find leaks in your roof.

Chimneys

These devils are the source of many a leak. Chimneys contain four different types of flashing. All must be right or you will have a leak. Plus, the counterflashing that goes into the brick mortar joint must be right.

A hairline crack above the flashing can allow vast amounts of water to run behind the flashings. Look for soldered corners of flashing that might have broken or have holes. Do not use caulk to repair these flashings!

Plumbing Vent Flashings

Newer vent flashings are a concern of mine. Many of these incorporate a rubber seal with an aluminum flashing. The rubber can fail in as little as 10 to 15 years. Look for cracked rubber around the plumbing pipe.

The flashing should dive up and under the shingles that extend up roof from the middle of the plumbing vent. The bottom half of the flashing should be exposed and actually cover the shingles.

Furnace or B-Vent Flashing

These flashings are basically identical to plumbing vent flashings. However, they sometimes have a metal storm collar. These simply fit tightly around the vertical pipe that exits the roof. If they become loose, the storm collars can cause leaks.

Ice Dam Leaks

Ice dam leaks plague people in the snow belt. These leaks can happen even if everything on your roof is just fine! Ice dams block the natural flow of water down a roof. The water begins to back up under flashings, shingles, tar paper, etc.

Once water begins to flow into the house, it can drip for days. The only means of prevention is to install membranes under the roofing. The membranes won't stop the ice but will stop water leaks if installed properly.

Wind Blown Rain Leaks

Wind driven rain can also be a major problem. Once again, you could actually have a good roof and wind will drive water up and under your roofing materials. The only lines of defense are tar paper and the ice dam membranes.

If you have metal valleys, you may want to hem the edges. This means that the hidden edges of the valley actual have a 180 degree bend. This creates a channel that directs wind blown rain back to the bottom of the valley.

Roofing cement under shingles on the edges of roofs that face the wind are also a good idea. Don't underestimate the power of a 70 mph sustained wind-driven rain.

Non-Roof Leaks !

Sometimes you think you have a roof leak when in fact the roof is fine. Attic condensation is a prime example. High humidity can cause condensation and "rain" to fall in your attic. It can also make the underside of the roof sheathing look wet. You think you have a leak instead.

Chimney crowns can develop cracks. The inside surface of the chimney gets discolored or the plaster bubbles. You think a roof leak is the cause.

Siding can be missing above a roof. This can cause water to enter behind head flashings. Be a good gumshoe and snoop around for the leaks!

CLICK HERE to get FREE & FAST BIDS from local contractors that will help you find leaks in your roof.

Column B188
Membrane Roofing and EPDM Roofing Manufacturers

Major Players in Membranes

The following companies are the major players in the EPDM and membrane roofing. You can call them for information about their products, however it may be a waste of time. Why? This market is really geared to the professional roofing contractor, and NOT to the consumer. The information you will receive may be quite technical and dry. I can assure you it will contain language that is very chemically oriented. The better choice may be just to ask for local roofing suppliers who sell the products. Contact your local distributor for easier to understand facts and costs.

  • Carlisle SynTec

  • Firestone Building Products
  • RoofTop
  • Sta-Fast Roofing Products

Column B200