Retaining Wall Types – Four Primary Ones

tilted retaining wall

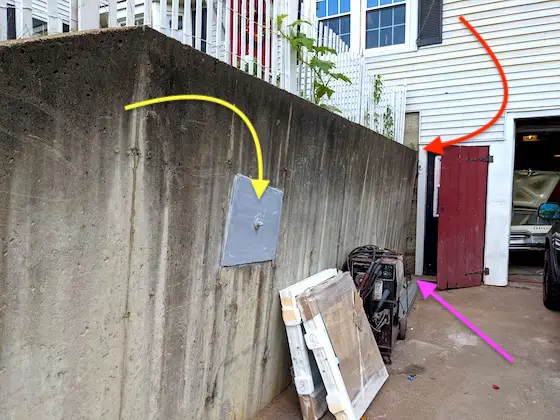
This retaining wall is failing. The top is tilting to the right. It's already moved about 10 inches out of plumb. Note the amount of house foundation exposed between the red arrow tip and the magenta one at the bottom. The yellow arrow points to a gray steel plate was added as the wall started to tip over. It's an attempt to stop or slow the wall from tipping over. The bolt in the center of the plate connects to a thick rod that extends back into the soil behind the wall. There's another plate in the soil at the other end of the buried rod that is acting like a boat anchor. You can only tell if it's working if you start to take measurements up by the tip of the red arrow. Read below WHY the retaining wall FAILED. It's all about levers.

Retaining Wall Types - Tall Walls Can Be Trouble!

Retaining walls require thought and planning just like any other building project. Soil properties, drainage, surcharge loads (additional weight from objects placed on top of the ground above retaining walls such as cars and trucks), height of the wall, bedrock geology, etc. all must be taken into consideration.

It really pays to do your homework, due to the amount of work and cost in building a retaining wall. Many fine publications are available that offer suggestions and design tips in constructing retaining walls. Several are listed at the bottom.

Many of us live in parts of the country that are not so level. The geography and topography can range from slightly rolling to mountainous. Those of us who do live in these regions are quite familiar with retaining walls.

What Do Retaining Walls Do?

Retaining walls allow us to create steps or level areas on a sloped surface. However, if constructed improperly, the forces of nature (gravity, water, etc.) will topple a retaining wall in short order.

Retaining walls have been in use for thousands of years. The Romans used retaining walls to aid in the construction of their famous roads. Many of the castles in Europe incorporated retaining walls into their design.

Hillside rice paddies in Asia have depended on retaining walls for hundreds of years. Trial and error construction methods of the past and advancements in engineering knowledge have indicated that four basic types of retaining walls seem to perform quite well.

What are the Four Types of Retaining Walls?

Gravity Walls

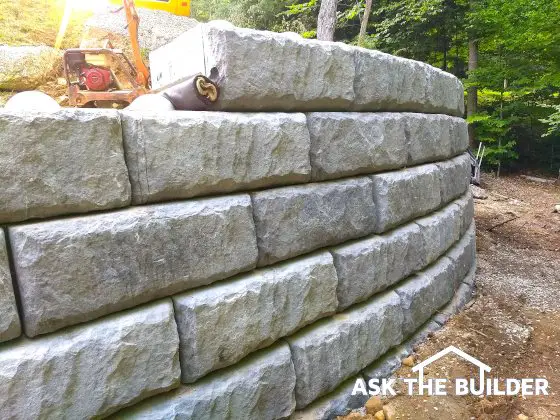
A gravity retaining wall is usually a low height (less than 3 to 4 feet) wall that depends on its own weight or mass to hold back the earth behind it. This goal is achieved by constructing the wall with a volume of material so that when stacked together, the weight and friction of the interlocking material exceeds the forces of the earth behind it.

rock retaining wall

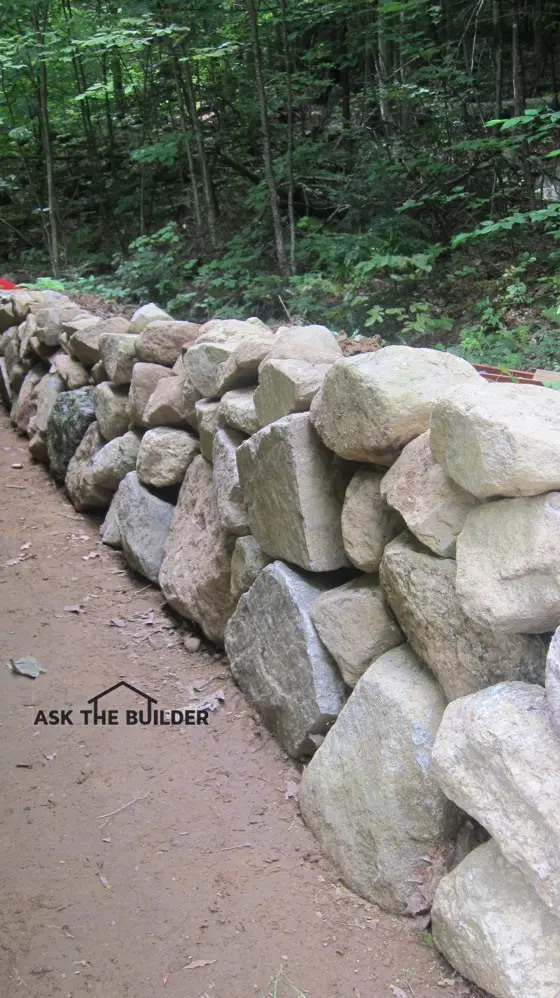
Gravity Retaining Wall - This is a perfect example of a gravity retaining wall. It's about 30 inches tall. Most of this rock wall was built in less than five hours by one person. Some of the larger rocks had to be put in place with a machine. Copyright Tim Carter 2021

The gravity retaining wall is thicker at the base than at the top. Also, note that as the front of the wall gets taller it slants backward. This is often referred to as 'battering'.

This battering effect creates a visual message of strength. Over time, the wall may succumb to the forces of gravity and begin to tilt outward. By battering the wall backward, you extend the visual life of the wall. Retaining walls that appear to be tipping over, indicate faulty construction and impending failure.

Walls that are battered send a visual message that the wall is 'working' and that it is continuing to beat the force of gravity. Gravity walls become very cumbersome to construct as they get higher, because they require vast quantities of materials.

How Thick Should A Gravity Retaining Wall be at its Base?

The thickness of a gravity wall at its base should be one-half to three-fourths its height. So, if you intend to build a wall 4 feet high, the base should be 2 to 3 feet wide. As the wall gets higher, it begins to get thinner.

CLICK HERE to get FREE & FAST BIDS from local masonry contractors who can build your new retaining wall.

Cantilever Walls

A cantilever retaining wall is one that consists of a uniform thickness wall that is tied to a footing. A cantilever wall usually is asked to hold back a significant amount of earth, so it is a good practice to have these walls engineered. A simple example of a cantilever retaining wall is a typical basement wall of a house.

The width of the footing for a cantilever wall is very important. The footing is designed to resist tipping or sliding forces which the earth exerts upon the wall. Also, the wide area of the footer allows the weight of the earth to actually keep the wall from tipping in some instances.

These walls require significant steel reinforcing in both the footer and the wall structures. The steel also has to extend from within the footer up into the wall so that the two pieces actually become one integral unit.

As you can see, this is why these walls need to be designed by structural engineers. If you try to guess yourself at the amount, size and placement of structural steel in this type of wall, you are gambling.

Also, the thickness of both the footer and the wall is extremely critical. Don't be a fool and try to become a weekend engineer. Spend several hundred dollars and get it right the first time!

CLICK THE IMAGE to get an essential guide on building retaining walls for whatever situation you may be dealing with.

Counterfort Retaining Walls

A counterfort retaining wall is very similar to a cantilever wall, except that it has one additional feature. This wall has a triangular shaped wall which connects the top of the wall to the back of the footer.

This added support wall is hidden within the earthen or gravel backfill of the wall. The footer, retaining wall and support wall must be tied to one another with reinforcing steel.

If the structure is poured concrete, often the retaining wall section and the support walls are poured as one unit at the same time. The support walls add a great deal of strength to the retaining wall.

The supports make it virtually impossible for the wall to become detached from the footer. As with cantilever walls, a counterfort wall should be designed by a competent structural engineer.

If you decide to attempt to construct this type of wall without approved plans, you are making a huge mistake. If the wall fails, the cost to remove the failed wall, construct the new one, etc. could be ten times or one hundred or more times the cost of engineering services. Remember, engineers have to eat just like you and me!

Buttressed Retaining Walls

A buttressed retaining wall is basically identical to a counterfort wall except for one thing. The support wall is on the outside of the retaining wall. They are visible. The buttresses add incredible strength to the wall system.

For the retaining wall to fail or tip over, the buttresses would have to be crushed. The buttress concept was widely used in the construction of many cathedrals in Europe.

Because of the height of the cathedral walls, the buttresses helped to stabilize them. They do the exact same thing in a retaining wall. Once again, if you intend to build one of these walls, you must give serious consideration to hiring an engineer.

Situations which demand this type of wall usually have tremendous loads which bear against the walls. The buttresses can often be designed to be decorative in nature and covered with stone or some other material.

Depending upon the overall length of the wall, you may have several buttresses. They can be spaced to create rooms, parking spaces, handball courts or any other functional space. Use your imagination!

CLICK HERE to get FREE & FAST BIDS from local masonry contractors who can build your new retaining wall.

Retaining Walls - Books & Publications

CLICK THE IMAGE to view a wide selection of books and guides on how to build, drain, and design retaining walls.

Retaining Walls are Levers

Think of how a lever works. It's a long pole that you push down or up on one end. In a simple lever situation, the greater the distance between the fulcrum, the pivot point, and the item being lifted or pushed, the LESS force you need to impart on the lever to get the object to move.

Retaining walls are levers. The taller the wall, the less force it takes at the top to push it over. See why you should have paid attention in high school physics class?

If you decide to construct a wall over 3 feet tall, give serious consideration to hiring an engineer to help you in the design of the wall. Many engineers often have designs they have created for other walls in your area. They do not have to start from scratch.

Often they have to perform various simple calculations to ensure that the design will work in your instance. This service may only cost $200 to $500 dollars. That is a small price to pay for a wall that will not fail.

CLICK HERE to get FREE & FAST BIDS from local masonry contractors who can build your new retaining wall.

If you do obtain a plan or design and hire a contractor to perform the work, inspect the work daily to ensure that the wall is being constructed as the engineer intended. Take photographs of the steel before it is covered with concrete.

Document everything! Be careful not to backfill the wall too soon!!! Masonry (block, stone or concrete) walls take a while to develop their strength. Often it takes weeks! Your engineer will tell you when it is safe to fill behind the wall.


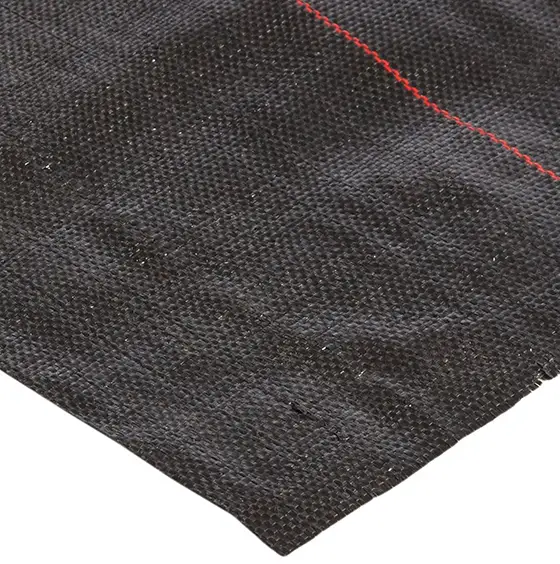
CLICK THE IMAGE to get a woven geotextile that will keep soil in place.

Pay particular attention to drainage behind the wall. All walls should be backfilled with coarse gravel that drains quickly. Water must be able to drain from the back of the wall. Water is extremely heavy.

If water is allowed to collect behind the wall, it just adds additional pressure which may cause the wall to fail!! Be sure to account for water drainage. Install a drain tile behind the wall at its base. Provide holes in the wall to allow water to easily flow to daylight. Do whatever it takes to get water away from the wall.

Column B37

Segmental Retaining Walls

Segmental Retaining Walls

There are many parts of the nation that are blessed with level or slightly sloping ground. Other parts are hilly and mountainous. If you want to make a hilly area flat, you need retaining walls. This simple building practice has been around for thousands of years. Farmers in southeast Asia have incorporated retaining walls for years to grow rice and other staples on hillsides. The retaining walls allow them to create steps or flat areas as they climb a hillside.

We tend to use retaining walls here in the USA to create level play areas, parking areas or terraces in a yard or garden. They can be as simple as a two foot high stacked rock wall or a highly engineered poured concrete wall 40 or 50 feet tall.

Construction Materials

You can build a retaining wall using any solid material. Earth is used as a "retaining wall" or dam to hold back lake water; wooden timbers are used in garden landscaping. Concrete, concrete block and stone are used effectively as common retaining wall materials. The newest and most interesting materials, however, are segmental retaining wall systems. These building materials are individual concrete block masonry units that are made to stack and interlock with one another. They require no mortar to hold them together.

These segmental systems can be used to create a two or three foot wall, or a wall in excess of 25 to 30 feet. They can be installed either by a homeowner or by a professional. However, walls in excess of four feet high should be designed or engineered before installation. Why, you ask? Well, it has something to do with wedges and weight.

The Sliding Wedge

The fill material behind a retaining wall is anything but stable. If it were stable, the wall would be unnecessary! Each backfill material (soil type) has its own angle of declination. This is the angle at which it would normally develop if left to weather. In other words rain and gravity would pull a certain amount of this material down. Retaining wall engineers call this material the sliding wedge. The mass of material gets wider at the top as the height of the wall increases. This means that the higher a retaining wall is, the stronger it must be.

This relationship, however, is not on a one to one basis. In other words, a retaining wall eight feet tall is not just twice as strong as a wall four feet tall. The eight foot wall needs to be four times stronger!

Batter but no Cake.....

Traditional retaining walls and the new segmental walls can be battered. This term refers to a backwards tilt. If you decide to build a retaining wall plumb, you are maximizing the sliding wedge of material behind the wall. If, instead, you tilt the wall back towards the hillside, you reduce the amount of material in the sliding wedge by an amount equal to the degree of tilt.

Segmental wall systems take advantage of this opportunity. In fact, many manufacturers of these products offer you different degrees of batter.

Year Round Material

Segmental wall systems allow year round construction possibilities. We already discussed that mortar is not required between the masonry units. And rarely are thick concrete footers required. The block wall usually rests on a level bed of gravel. These requirements mean that these walls can often be built in the dead of winter. As long as you make sure the ground below the wall is not frozen, you can usually proceed. Traditional materials require special protection so that freezing weather does not harm the poured concrete or mortar between stones or block.

Design Possibilities

Curves, stepped terraces, serpentine walls, steps, waterfront walls and plain old straight walls are a breeze with the new segmental retaining walls. Each manufacturer makes a wide variety of special interlocking blocks that allow you to make just about any shape you desire. Blocks of different colors are sometimes available. This allows you to incorporate a design or colored bands within a wall system.

Weight - BIG Differences

Not all of the segmental blocks weigh the same. This may impact you if you decide to build a wall yourself. Some wall blocks are heavy because they are solid or nearly solid. Other manufacturers use a hollow block that you fill with gravel as you construct each course.

These hollow block are as strong as solid block. The gravel fill, especially angular gravel, actually helps to interlock the blocks with one another. In addition, the gravel inside the block provide a quick way for water to exit the wall system.

Segmental walls are here to stay. These new mortarless systems can work for you. I suggest you give them serious consideration.

Column B128

Segmental Retaining Wall Manufacturers

Segmental Retaining Wall Manufacturers

  • Allan Block
    The Allan Block system incorporates lightweight blocks that are filled with gravel. They are ideal for homeowner projects. They also have a full line of different blocks and systems. The blocks are manufactured by independent distributors to rigid specifications.

  • Anchor Wall Systems
  • Keystone Retaining Wall Systems
    The Keystone system incorporates a more solid block that uses fiberglass pins to interlock the blocks. You can adjust the batter or setback of the wall system by inserting the fiberglass pins into different holes.
  • Loffelstein
    This is the original segmental wall from Europe. It is widely available throughout the USA.
  • RisiStone Retaining Wall Systems
    This is a Canadian product. These blocks interlock using a cast tongue and groove configuration.
  • Versa-Lok
    The Versa-Lok system uses nearly solid block and fiberglass pins.

Column B128

Retaining Walls Construction Tips & Suggestions

precast concrete retaining wall face

Retaining Walls - Construction Tips & Suggestions

Planning

Before you even begin to build or design your retaining wall you need to get a handle on the site, soil conditions, water drainage patterns and final grading. These elements play a critical role in the actual design of the wall system. Make a drawing or sketch of what you have and take it with you to the local company that sells your block system. Numerous 'before' photos of your yard would be of great value as well. Take them from multiple angles so that you can communicate just how your yard looks.

Design

Now is the time to plan exactly where your wall(s) will go. This will allow you to determine the height and the wall's batter as well. Quite possibly you will need to develop terraces to make your plan work.

Most of the manufacturers have great design guides. However, I found Allan Block's to be one of the best. It is available on their web site for free downloading in a PDF file. Most of the other manufacturers also have some type of design guide on their site. Perhaps you will find that the diagrams of one are easier for you to understand. All of the guides offer fine color diagrams and cross sections.

stone retaining wall

Construction

Segmental retaining walls begin at the lowest part of your lot. A trench is required in order to install the gravel base to a sufficient depth. The gravel also is the leveling medium. You install and compact the gravel in a level fashion so that the wall will be level side to side. If the courses of the wall begin to bury themselves into a rising slope, that is no problem. You simply begin a new trench as soon as the first row disappears below grade.

As each course of the wall is installed, you install the gravel backfill and compacted earth. An old mason taught me how to keep the gravel and dirt separated. Simply use a piece of plywood that acts as a form. Position gravel on one side and dirt on the other. After you install the materials level with the top of the block course, lift the plywood up. Compact the materials and start with your next course.

This popular column was shared in the March 29, 2011 AsktheBuilder Newsletter.

Column B128

Lights Dim When AC Comes On

At 11:28 PM on 8/21/2004, Ron Elliot asked me:

DEAR TIM: I built a new home about two years ago. I have the electrical pole next to my barn, not next to the house. The pole has a transformer, meter and a 200 amp service. I had the contractor dig a trench (200 ft) from this pole to the house. This is how the electrical service comes to the house. Each time the air conditioning unit comes on, I notice a slight dip in the lights within the house. The electric company that supplies power says its because the pole is not adjacent to the house. I do not believe this, can you shed any ideas as to why my lights dip when the air conditioning unit kicks in. Thanks.

Ron Elliott


DEAR RON: Air conditioners, refrigerators, freezers, furnaces, etc. that have large motors require enormous amounts of power when the motor first starts to spin up to speed. I am talking huge amounts of energy. Once the motor is spinning, the energy requirement drops way down.

This instantaneous need for motor shaft speed is what causes that momentary dimming of your lights. AC units come equipped with start-up capacitors. These give the motor an electric boost when it first starts up. But over time, these capacitors can get weak and become ineffective. Eventually the power draw can become so enormous, the actual circuit breakers protecting the wiring to the units can pop from the current.

Your air conditioning system may also be overcharged with too much refrigerant. When this happens it puts lots of stress on the compressor and in turn the motor when it tries to get the compressor engine moving.

Relocating the pole would do little to solve the problem. I would ask your AC service man to look to see if your AC unit is overcharged or if it needs new start-up capacitors.

Tim


I received this email on 12/05/05:

DEAR TIM: The answers to this problem can also be that the conductors pulled in by the homeowner are too small to prevent the voltage drop being created over 200 feet. The problem could also be with additional homes having been added to the high voltage lines. That will also cause the dips. If surges get serious enough it can affect modern day electronics.

Eric David
Forensic Electrical Specialist

Whole House Surge Protection

Whole House Surge Protection

Whole house surge protectors that connect to your electric panel are generally tougher to find. The two primary sources are your local utility company and supply houses that sell electrical equipment / supplies to electricians.

I located one manufacturer of these important surge protection devices. They are Panamax. They make a very compact - yet effective - surge protector. They have two versions of the same protector. One has the wire leads that come out the back of the unit and the other has side outlet connection capabilities.

The two devices offer UL 1449 clamping voltages of 500 volts. The total joules available are 1,920. The units have an audible alarm and warning lights. They also offer a $10,000 connected equipment warranty AND a generous labor allowance in the event of catastrophic failure. I have connected one of these units on my electric panel.

Column B235

Surge Protector/Suppressor Protection Guide

Surge Protector/Suppressor Protection Guide

Wait till you study the table below! You already know that if you want protection, you need joules. There is a wide variance in the amount of joules for each surge suppressor. The all important clamping voltage is fairly consistent in many of the models, but the joule rating is all over the map.

Sears has everyone beat hands down. They have an affordable suppressor that has all the bells and whistles AND offers a 2,500 joule rating! It is also affordable with a retail price of $59.99. These suppressors offer the highest protection of all the ones I could readily find. If you can't get a Sears suppressor, the Belkin top-of-the-line model will give you great protection as well.


Surge Suppressor Comparisons
Manufacturer   Model #   Joules   UL 1449 Clamping Volts   Alarms   Connected Equipment Warranty
APC   Power Manager   480   330   Yes   $25,000


APC   Pro 7   320   330   Yes   $10,000


Belkin   F5C895TEL   1,950   330   Yes   Unlimited


Belkin   F5C795 or TEL   1,650   330   Yes   $50,000


Belkin   F5C595 or TEL   905   330   Yes   $15,000


Electricord   H1566-006-WH   1,350   330   Yes   $50,000


Electricord   A-1548-006-BL   800   400   Yes   $15,000


Power Sentry   374   1,020   Not listed   No   $50,000


Power Sentry   177   520   Not listed   No   $25,000


Sears .
#83540 .
2,500 .
330 .
Yes .
$10,000


Column B235

Surge Protector Manufacturers

Surge Protector Manufacturers

Recently, I attended the 1998 National Hardware Show in Chicago, Illinois. I saw numerous surge suppressor vendors displaying product. Most of the suppressors were low powered units. I was shocked to see some of these inadequate units being marketed as OK for computers and such. They simply had way too few joules to do any good. I have listed below just some suppressor manufacturers / sellers (Sears).

You may find a great surge suppressor on a store shelf that I have not listed. You are looking for four things as far as I am concerned: A joule rating near or in excess of 2,000, a UL 1449 clamping voltage of 330 or less, an audible and visible alarm if the suppressor has been exhausted, and a generous, enforceable connected equipment warranty.

You should also read the fine print on many of the packages. Some manufacturers will replace their units if they fail in the field. All you need to do is make a simple phone call. You may need to keep some paperwork. If you are organized, this should be an easy task. Pay attention to the length of the surge suppressor power cord. Some come with a generous length such as 6 or more feet. This can come in very handy. Look for surge suppressors that protect your phone equipment and cable TV equipment as well. Call the following manufacturers and get some literature right now!

  • American Power Conversion (APC)
    877-272-2722
  • Belkin
    800-223-5546
  • Pacific Electricord
    310-532-6600
  • Panamax (Whole House Surge Protector)
    800-472-5555
  • Power Sentry
    800-852-4312
  • Sears
    Simply drive to your local Sears store!

Column B235