Garage Storage Solutions
Shelf Building Tips
Just about every garage I go into is in some state of disarray, especially mine right now. My biggest problem is that I still have way too much construction leftovers in my garage from past jobs. I just can't seem to part with those leftover pieces of pipe, wood trim, and other goodies.... Whenever I get frustrated and throw things out, I usually develop a need for the discarded item within 168 hours....it never fails.
Wasted Space
Stop and think. The average garage is usually the largest room (aside from a basement) in any house. Builders neglect these rooms. Often they build the house and do nothing in the garage except maybe drywall it for firecode purposes. Rarely does a builder install a single shelf or 2x4 cleat to hang even a single rake or shovel. Homeowners move in and pile all of their "garage stuff" alongside the walls. The only storage space is the simple horizontal floor area alongside and in front of the cars.
Garage storage solutions begin by multiplying this "horizontal" space by a factor of 4 or more. This can be done in any number of ways. You can often purchase simple metal shelving units that you assemble. Or, you can choose to construct your own custom shelves from wood. If you decide to use a prefabricated metal unit, ALWAYS attach it near the top to the wall. This will prevent it from toppling over and hurting you, a loved one, or your automobiles.
Building New / Remodeling?
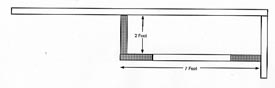
If you are fortunate to be building a new home with an attached garage or are remodeling an existing garage, you have a unique opportunity. All too often, standard garages are built too small. To obtain maximum storage space, a garage with a 16 foot wide door should have at least 5 feet available on either side of the garage door. This means the garage should have an interior side-to-side dimension of at least 26 feet. 28 feet would be even better if you can afford it. The front to back dimension is critical as well. If you have a long sport utility vehicle or a pick-up truck, you need a front-to-back interior dimension of at least 25 feet. Pickup trucks eat up 16 feet of space. If you leave just 1 foot between the garage door and the back bumper, you have 8 feet left to build your storage setup. This is plenty of space as you will end up with about 4 to 5 feet of space between the front bumper and the storage unit. Of course, if you have smaller vehicles, you get bonus space!
Want a really cool idea if you are building a new garage? Make sure the garage ceiling height is 13 feet or slightly greater. If you do this, you can actually build a loft over part of your cars! As long as you are 6 foot tall or less, you will be able to walk under and on top of the loft without hitting your head. You can actually pick up tremendous amounts of storage space with this idea. I guarantee you that my next garage will have a 14 foot high interior ceiling!
Don't Waste Space
Dead air space above stored objects is a waste. As you plan your storage shelves, try to segregate articles that are of similar height. For example, if you store paint cans, car motor oil, garden chemicals, etc. determine the height of the tallest bottle/can. Then allow just 1.5 inches above the tallest object for dead air space. Be sure to account for the thickness of the next shelf or you will end up with only an inch or less of dead space.
Moving Bins - Casters
A very handy idea for storage below waist level is to construct bins or boxes with no fronts that can readily move. You can do this by attaching simple casters to the bottom of these open boxes. When you need an article you can roll out the box rather then get on your hands and knees to retrieve the object. Be sure that the front or the back casters swivel so you can easily direct the bin back to its place.
Remember Erector Sets?
I have a certain amount of my existing shelves built using angle iron that have holes punched at regular intervals. This angle iron measures about 1 and 1/4 inches per leg. The holes are large enough for 3/8 inch bolts. You can use these angle irons to construct your own custom metal shelving. Plywood serves as an excellent shelving material between the standards. The angle irons remind me of the erector set toys I played with as a child. This angle iron can usually be found at electrical supply houses. It is very heavy duty and can only be cut with a hacksaw or a metal abrasive blade. However, for those who want rigid metal systems, I would give it a serious look.
Kitchen Cabinets
Some of the best storage compartments may be available for free! Do you know someone who is discarding older kitchen cabinets? If so, grab them up. The base cabinets can be modified to use as an excellent base for a workbench. Drawer base cabinets are ideal to store gloves, instruction manuals, rope, or other miscellaneous small items.
Wall cabinets, with their 12 inch standard depth, are ideal for storage along the side walls of a garage. You can often place these on a wall and have adequate room to walk along side a car without hitting your head on the cabinet.
Cabinets with doors make a great place to store balls or other sports equipment. Simply place a 4 inch high board across the front of each shelf to keep the balls from rolling onto the ground. A fresh coat of paint will make the exterior of the cabinets look new. Plus, you can store objects on top of the cabinets as well. Secure them to the walls with 3 inch screws.
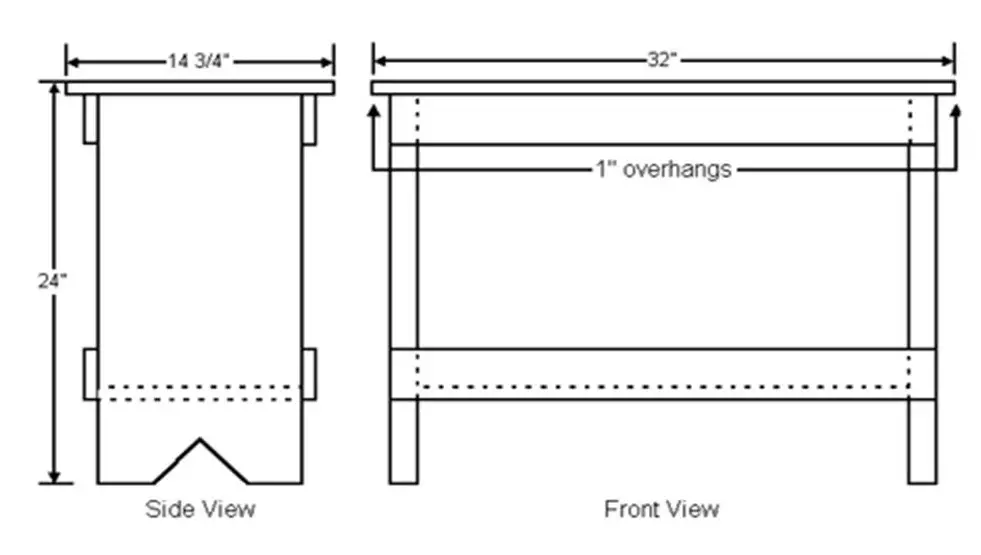
Wall Shelf Illustration
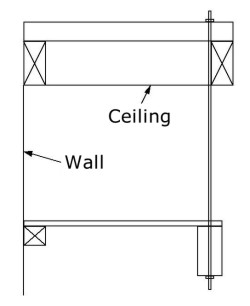
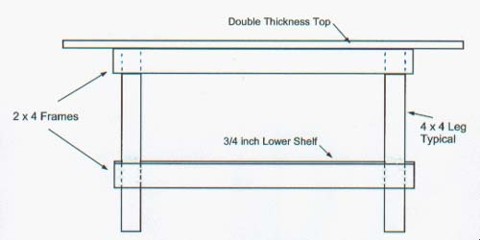
The illustration to the left depicts just one way to create a shelf where head room and walking room beneath the shelf is critical. This is the case in most garages. You need to be able to walk freely under the shelf. Shelf brackets or outer support legs can't be allowed to get in the way. In this example you can see the ceiling joists (marked with X's) on the top side of the finished garage ceiling. A 2x4 block crosses over the joists to accept the 1/4 inch threaded rod. Nuts and washers are provided at each end to hold the shelf in place. They also allow you to easily level the shelf. The shelf itself consists of a 16 inch (or whatever you choose) wide piece of 1/2 or 5/8 inch plywood. A 2x2 cleat is fastened with screws against the wall at each wall stud location. A 2x3 on edge is used at the front edge of the shelf. This keeps the shelf from bowing under loads. The threaded rod simply passes through the middle of the 2x3 at approximately 4 or 6 foot centers.
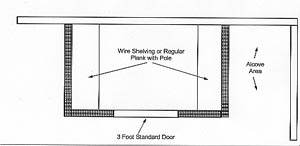
Typical Garage Storage Layout Plan
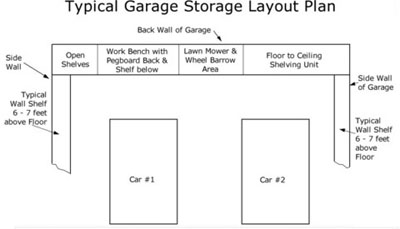
Here is the most basic plan for a typical two car garage. The depth of the storage/workbench setup on the back wall should be a minimum of 24 inches. This allows you to extract 16 lineal feet of countertop or shelving from a standard 4 x 8 foot piece of plywood. The open shelves area to the left of the workbench can be for tall items such as fishing rods or other long objects. Shovels, rakes, brooms and other long handled yard tools can be stored attached to the side walls of the garage under the tall shelves. Ladders can be hung from the ceiling using those very cool bicycle hooks. Install the hooks directly into a ceiling joist or roof truss. Hang the ladders parallel to the storage unit/workbench just in front of the cars. Install extra lighting in the ceiling area very close to the front of the workbench and shelves. If you use fluorescent lights and live in a colder climate, you must get a special fixture so the bulbs are bright.
Column B160