Stuff.... I have WAY too much stuff. In fact, as I write this, I can't even get my vehicles into my garage. Last fall, I salvaged three giant rolls of wall to wall carpet that I intend to use in my basement office and kid's playroom. It is still on the floor of the garage!
There is also a giant pile of woodwork in the center of the garage. We are modifying the interior trim of my house to make it look like an 1890's Victorian farmhouse - the actual exterior architectural style. Add to this, kid's bikes, lawn mowers, table saw, etc. and you can see the problem.
It Was Worse!
When I was still doing construction work on a daily basis, I used to bring home leftover materials and parts from jobs. From past experience, I knew they would come in handy on a future job. Over time, I simply accumulated too much stuff. It got so bad that I couldn't pull my truck into the garage.
Several years ago, I decided to take advantage of my garage's large interior height. The walls of my garage are nearly 11 feet 6 inches tall. I had to build it this tall so that the roof of the garage would not interfere with the adjacent roof over the laundry room. If I had it to do over, I would have built 12 or 14 foot high walls!
Anyway, I constructed in one corner of my garage a wonderful loft that allowed me to take vast quantities of materials, parts, etc. and suspend them up in the air. My loft is nestled in a corner of my garage, although I am planning to extend it along the back wall of the garage much like I have described in the column and this bulletin.
Scads of Space
If you have a garage with only 9 foot high ceilings, you will be able to still make a wonderful loft area. Just look at your current garage and imagine all of the cubic feet of wasted space located over the hoods of your vehicles.
The trick is to place items in the loft that are needed on a seasonal basis. Plan the space so that you don't have to move things back and forth to retrieve something else.
Access to the Loft
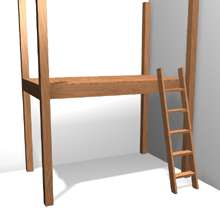
I found a wonderful 10 foot long wooden ladder in perfect condition at a garage sale. I use it to access my loft. It just leans up against one end of my loft. I do not have it permanently attached to the loft since I use the ladder for other things. It would be safer if I did attach it, so keep this in mind for your situation.
I would not use a step ladder to access a loft unless the ladder was taller than the loft. Remember, you are not supposed to stand on the top two rungs of a stepladder. They can be come very unstable and you can fall. This situation becomes even worse when you are carrying some large box up or down the ladder. You have your hands full and your center of gravity is now altered! Avoid step ladders for loft access!
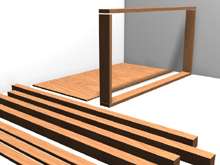
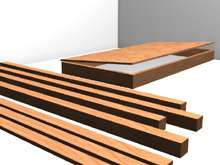
Beams and Joists
Most people have built decks before. It is common for the deck joists to be in the same plane as the deck ledger board at the house. In many instances the other end of the joists rest on top of a beam. I don't suggest you do this for a garage loft as it takes away precious inches of head room beneath the beam. Beams can be in the same plane as joists. You simply use joist hangers at each end of the joist!
Keep in mind that there is the possibility for vast amounts of weight in the loft. Use your existing floors in your house as a guideline for joist sizing and spans. If you decide to build a giant loft, consult with a seasoned carpenter or designer to make sure you have the lumber sized correctly.
When you load objects in the loft, keep heavy things towards the back of the loft. This will help to transfer the load to the ledger board and not the front beam. Distribute loads evenly. Try not to concentrate all of the weight in a small section of the loft. Use common sense.
Remember, you can hang rakes, shovels, hand tools etc. from the joists! Be creative!
Fan Mail
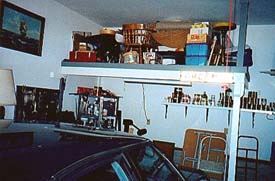
Betty and Don M.'s garage loft.
After my column ran in the many papers across the nation, I received a very nice letter from Betty and Don M. in Bellingham, Washington. They read my column each week in the Bellingham Herald. They were kind enough to write to me and tell me about a nearly identical loft that they built in their own home. They commented that the loft is saving them $50 per month in off site storage fees and that they can easily park both cars in the garage. Betty and Don, thanks so much for sharing your photo and story with all of us!
Companion Articles: A Storage Loft in a Garage, Garage Storage - Loft Material List, Floor Plan for Garage Storage Loft
Column B265