Floor Leveling Compound Manufacturers

concrete floor leveler package

This is a powder you mix with water. It ends up like thin pancake batter. CLICK THE PHOTO to have it DELIVERED TO YOUR HOME.

Floor Leveling Compound

Visit any home center, hardware store or place that sells and installs carpet, vinyl tile or ceramic tile and you will find floor leveling compounds. They are easy to obtain, that's for sure.

All of them are rapid setting. They contain fast setting cements or plaster of Paris type powders that quickly crystallize when you add water. In fact, the hardest thing to get used to is their rapid setting characteristics. Some of them set up within five minutes! This means you must be ready to install them and mix them right where you intend to use them.

I have used many different brands of floor leveling compounds. All have given me great results. I don't think it makes any difference which one you buy. I happen to prefer one made by the Armstrong Company. It is called S-184 Fast-Setting Patch. It is cement-based and is gray once mixed.

One of the things I like about it is that it can be finished as smooth as glass. In about three to five minutes of mixing, it begins to set up and is fairly hard. If you wait an additional five minutes, you can sprinkle a little water on the patch and glide the broad knife across it several times to get it slick as a baby's butt. It takes a little practice but you will master it in no time. The key is to use as little water as possible.

You should be able to get similar results with just about all leveling compounds. Simply read the instructions and follow what they say.

Other leveling compounds:

  • DAP
  • USG
  • Bonsal American makes a leveling compound - Self Leveling Underlayment Series 156.Laticrete International has LatiLevel Self Leveling Underlayment.


Column B365

Floor Leveling Compound / Ceramic Tile

marble floor tile install broken

Floor leveling compound should have been used on this job instead of broken pieces of marble. Can you believe the installer is doing this?? Copyright 2018 Tim Carter

"Before you mix up any compound always use the tools to see how deep the low spots are or how high the humps are."

Floor Leveling Compound Creates Perfect Flooring Jobs

Floor tiles - especially large ones - are very unforgiving if the floor beneath them has humps and dips. The same is true for just about any flooring material. It's best if the floor is in the same plane as is a piece of flat steel or glass laid on a table.

But wood floor systems and poured concrete are rarely in the same plane. Floor joists can have crowns in them that make the floor go up and down in both directions. Concrete is very hard to make perfectly smooth. Professional concrete masons struggle with this on a daily basis!

Related Links

How to Get Hardwood Floors Level

Floor Leveling Compound Brands - Get a Great One

floor leveling compound

This is a great easy-to-use floor leveling compound. You just add water and spread it around. CLICK THE IMAGE to have this delivered to your home.

Free & Fast Bids

CLICK HERE to get FREE & FAST BIDS from local flooring contractors that can install floor leveling compounds.

How Do You Fill in Low Spots?

You can fill in dips and hollow spots in floors and reduce high spots by using cement-based floor leveling compounds. These will bond to both wood and concrete. They mix with water and are easy to apply. The key is practice and making sure you have the right tools.


What Tools Do You Use?

I install floor leveling compounds with my drywall broad knives and my framing square. The body of the framing square is 24 inches long and makes a superb straightedge when you hold it upright.

The drywall knives are perfect tools as well. Applying floor leveling compound is not much different than applying drywall compound over recessed seams. In fact, the challenge is identical. You want the floor leveling compound to just fill the recessed area and not be higher. If it ends up higher you now have created a hump!

Before you mix up any compound always use the tools to see how deep the low spots are or how high the humps are. Use a pencil to outline the areas to be filled. Pay attention to the airspace between the edge of the tools and the floor. This tells you the finished thickness of the material to be added.

Should the Floor Be Dust Free and Damp?

The area to be patched needs to be dust free and slightly damp. Taking the time to do this will yield huge results as the compound will really stick to the floor. Leveling compound failures can almost always be traced to dust or to dry subfloor conditions.

Use a vacuum cleaner to remove dust and a sponge mop to wet the floor. A regular sponge will do just fine to wet the floor. You will need a sponge and bucket of water handy as you install the floor leveling compound so you might as well get it ready now.

CLICK HERE to get FREE & FAST BIDS from local flooring contractors that can install floor leveling compounds.

Should I Mix Small Amounts?

Mix small amounts until you have a feel for how the floor leveling compound works. There is a technique you must use to get professional results.

The floor leveling compounds set quickly! I mean quickly! Use cold water to try to slow it down. This does not always work. I can assure you that using hot water will make them set up even more rapidly if you need instant results.

Can I Add Water After Mixing?

NEVER re-temper or add water to floor leveling compound that has started to set up. This will weaken the final mix as you are tearing apart crystals in the mix that are growing and making it hard. These crystals - once broken - will not grow back. For this reason, it is always better to mix small, one gallon or fewer batches. Mixing up 2 or 3 gallons at once is suicide.

Mix the material so it has the consistency of thin pancake batter. It needs to be able to flow ever so slightly. You don't want it too thick or do you want it like water. If it is too thick it is nearly impossible to work with the tools.

How Do You Clean Up?

Clean everything with warm water and soap. All tools need to be cleaned as soon as you are done. If you use a cement based compound and you don't clean them, they will be almost impossible to clean the next day.

Author's Note: We've received other questions with similar problems or questions. Here's one from Krystina G. of San Sebastian, PR, dealing with floor levelness.

"My husband and I have a homemade completely out of cement and we want to put ceramic tiles throughout our home. The floor is not level and we wanted to know the best way to go on with leveling floors."

CLICK HERE to get FREE & FAST BIDS from local flooring contractors that can install floor leveling compounds.

Column B365

Cutting Ceramic Tile

Cutting Ceramic Tile

Ceramic tile work is really not too hard. I would absolutely say that if you have a standard tub job or a shower to do, a journeyman DIY'r can accomplish it with minimal effort. You don't need expensive tools for the most part and the job can often be finished in one or two days. To get great results you must be able to measure accurately AND have decent hand-eye coordination. If you are sloppy, you better hire a pro.

Tight Tolerances

Standard tile is usually manufactured to very tight specs. One piece is basically an identical match to the previous one. This is necessary so that the grout lines are uniform. This is also why you must be able to measure and cut tile accurately. Grout lines that are not consistent look very bad. They stick out like a sore thumb. When you cut tiles, you have to be within a 1/16th of an inch or you will have problems.

The typical width of a finished grout joint for wall tile is often no larger than 1/8th inch. In fact, it can be slightly smaller. This means that when you cut a tile to butt against another the gap must be no smaller than 1/16th inch - this allows just enough room for caulk or grout. The finished gap should be no larger than 1/8th inch or it will look like the Grand Canyon next to the uniform grout lines between standard tiles within the field.

Cutting Tools

There are several tools to use when cutting or shaping ceramic tile. Tile is much like glass. When you score the glazed surface cleanly and then apply pressure to each side of the tile, it will almost always break quite cleanly on the score mark.

Tile cutters have a carbide wheel just like standard glass cutters. The simple tile cutters have a fence that holds the tile square to the cutting blade. You slide the handle while applying pressure and you get a clean, straight line. Press down on the back of the handle and the tile pops.

Tile cutters will generally only cut down to 5/8 inch wide pieces. If you need a thinner piece you need to cut these with a carbide blade that fits in a hacksaw or use an abrasive saw blade or a diamond wet saw.

Diamond wet saws are the best. They are not really dangerous as they don't have teeth like a wood blade. The tiny pieces of diamond are actually on the sides and edge of the blade. You can cut quickly and accurately with one of these. Don't think of buying one. A decent one costs nearly $1,000.

Making L Cuts

How do you make an L cut that allows you to take a corner out of a tile? You can't score the tile, as if you do try to break just a part of the tile, the rest will break out unevenly.

The trick is to cut one side of the L cut with a saw of your choice. Once you do this, you can then use the regular cutter to make the short score cut and then snap it to complete the cutout.

Circles and Curves

How do you cut circles? You have two choices. You can buy nice - although pricey for onetime use - carbide circle hole saws. You can also buy an inexpensive carbide rod saw that will do the job. The rod saw blade fits into a regular hacksaw frame.

To make the rod saw work, you have to drill a large enough hole in the tile that will allow you to insert the actual blade. Once in the hole, you then attach the rod saw blade to the hacksaw frame.

You need to support the tile firmly as you saw. If you don't, as you near the end of your cut, you will crack the tile. Always slow down the cutting process and use less force as you near the end of your cuts.

The Nippers

There is a coarse tool that will actually bite off pieces of tile. It is called a nippers. The tool has carbide jaws and you simply bite the tile removing jagged chunks. It is a tool that can cut gentle curves in a tile. The final cut surface will not be smooth so this tool is used for cuts that might fit around a toilet flange or other object that will then be covered with a decorative trim. A shower faucet handle is a good example as well. Plumbing faucet handles often have a 1/2 inch trim overhang so you have plenty of room to disguise the jagged tile edge.

Your First Job

If you want your first tile job to be a success and you have $50 to spare, I want you to apply tile to a single 3' x 5' piece of cement board that you set up in your garage. Experiment with the different cutting tools and get a feel for how long the open time of the glue is. Let the tile dry and try to grout it the next day. You will be surprised at how easy it is!

Related Articles:   Ceramic Wall Tile TipsHow To Install Ceramic Tile

Column B226

Cultured Marble Installation

Cultured marble is an interesting material. It is an ancestor to the more modern "solid surfacing" materials that you see in bath and kitchen showrooms. The products are related because both are "cast" much like concrete. They begin as a liquid and end up solid.

Primarily Regional

The cultured marble business is primarily a regional one. There are a few large national companies, but they are by far the minority of manufactures as a whole. It doesn't take a fancy high-tech factory to produce cultured marble. In fact, one operation in Cincinnati, is in an old, run down warehouse. Even in these surroundings, the company can produce a decent product.

Because it is doesn't take too much to enter the business, all sorts of entrepreneurs decide they can make "marble." They simply purchase the molds, materials, and labor and they are off to the races. The problem is that it does take considerable skill to produce a product with consistent high quality. This is where the problem lies.

Bottom Line

The companies that decide to squeeze profits do so by purchasing lower quality raw materials and hiring poorly trained employees. The result is a low quality cultured marble. The sad thing is that it doesn't take too much extra money to make a high quality, long-lasting cultured marble product. Those companies that decide that quality is a primary goal usually have been in business for some time. The losers fall by the wayside.

Installation

Installing cultured marble products is really fairly simple. It is not much different than a postage stamp. You simply glue the sink tops to the base cabinets or the flat wall panels to the shower and bath walls.

Often you need to trim the countertops because a wall may be wavy or a corner is slightly out of square. Cultured marble sands very easily. If you scribe the area that needs to be trimmed off, you can remove the offending marble with a belt sander.

For out of square applications, scribing is simple. Slide the countertop in place without any glue. Try to get the back splash area to fit tightly against the back wall. If the corner is out of square you will see a gap on the side of the top where it meets the wall. Let's say there is a one quarter inch gap at the back corner of the top and the front corner is just kissing the wall. To make the adjustment, you would measure in one quarter inch at the front corner and draw a line to nothing at the rear corner. As you can imagine, if you remove the triangular wedge of material, the top will now slide tightly against the side wall! Nothing to it.

When I say glue the material in place, I mean use an adhesive. I prefer to use 100 percent clear silicone caulk. It is very sticky and will not cause a discoloration on light colored cultured marble products. If you choose to use a dark colored adhesive, you run a grave risk of seeing the adhesive through the cultured marble once the adhesive dries. Don't forget to remove the dust from the back of the marble with rubbing alcohol.

For tub and shower wall panels, be sure to leave a 1/8 inch gap where the marble meets in a corner and where it rests on the tub edge or shower pan edge. This gap is then filled with a color coordinated 100 percent silicone caulk.

Shower wall panels need to be wedged in place with flexible pieces of wood for 24 hours until the adhesive dries. Always place a clean rag between the marble and the sticks to avoid scratches.

After Care

Caring for cultured marble is simple. No abrasive cleaning products can be used. Get in the habit of wiping sink tops off with a hand towel after each use. If hard water stains develop, just spray them with white vinegar. Wait 15 minutes and rub with a soft, damp sponge. To polish the tops, follow the manufacturer's suggestions and use the products they recommend. It is easy if you stay up with it.

Column B218

Cultured Marble Manufacturers

Certified Cultured Marble Manufacturers

The following manufacturers make some cultured marble products that are certified by the International Cast Polymer Alliance (800-414-4272 - www.icpa-hq.org). This list was accurate as of June 2007. It is possible that there are other companies out there that are certified, however, this was all I could find. If a company says they are certified, they should be able to produce a copy of a letter from an independent testing laboratory. If they can't produce the letter, then - in my opinion - they are bluffing.

Not all products from a company may be certified. You have to ask. However, if a company goes to a lot of trouble to have certain products certified, you might expect the same care and pride to go into their other work.

Also, there are other fine cultured marble manufacturers who make high quality stuff that is NOT certified. This happened because of a rift that developed within the International Cast Polymer Alliance years ago. It is a long story. If the company you are buying from has been under the same ownership for 10 years or longer, they most likely have withstood the test of time. Companies that make bad cultured marble simply go out of business.


Are you one of the manufacturers listed on this page? Do you want your company name linked to your website? Click here.


Alabama

  • Birmingham: American Marble Co. 205-328-0384
  • Birmingham: Dixie Cultured Marble Co. 205-942-3004
  • Birmingham: Imperial Marble & Tile 205-252-8982
  • Mobile: Mobile Marble Co. 251-344-6272
  • Montgomery: Cherry Marble Group 334-281-0048

Arizona

  • Flagstaff: American Marble & Stone 928-214-0400
  • Prescott Valley: Mountain Marble Mfg. 928-772-7200
  • Tucson: Advanced Construction Products 520-747-7244
  • Tucson: Tucson Outstanding Products 520-889-5743

California

  • Buena Park: Olympic Marble 714-224-5200 (not certified but in business since 1989)
  • Manteca: Elegant Surfaces 209-823-9388
  • Newark: Tri-City Marble 510-745-9692
  • Pittsburg: Marble Shop, Inc. 925-439-6910
  • Sacramento: Cultured Marble Products 916-929-0266 x104
  • San Diego: Marble Works Of San Diego 619-595-1800
  • San Francisco: Syn-Mar Cultured Marble Inc. 415-285-5995
  • San Leandro: Cultured Marble Products 510-483-1202
  • Santa Clara: Marbled Elegance 408-970-8991

Colorado

  • Denver: Monarch Marble Inc. 303-355-2100

Connecticut

  • Wellington: Syn-Mar Products Inc. 860-872-8505

Florida

  • Boynton Beach: American Marble, Inc. 561-737-4322
  • Clearwater: Magnum Venus Plastech 727-573-2955 x213
  • Ft. Myers: Tropix Marble Co. 239-334-2371
  • Jacksonville: Florida Custom Marble 904-737-4513
  • North Port: The Marble Works 941-429-8500
  • Ocala: Southern Marble Mfg. 352-867-5000
  • Orlando: Southern Marble & Design 407-245-2882
  • South Daytona: Supreme Marble 386-760-3035
  • Titusville: Apollo Marble Products 321-268-0713
  • West Palm Beach: Classic Cultured Marble, Inc. 561-848-4635

Georgia

  • Decatur: Atlanta Marble Mfg, Inc. 404-378-3132 x1101
  • Douglasville: Custom Bath Products 770-920-2424
  • Eatonton: Marble Works Inc. 706-485-3337
  • Gainsville: Mincey Marble Mfg. 770-532-0451
  • Jonesboro: Synmar Inc. 770-478-0770
  • Lawrenceville: Mr. Marble 770-963-8677
  • Norcross: AGCO, Inc. 770-447-6990
  • Savannah: Savannah Marble Co. 912-234-1611
  • Sugar Hill: MTI Whirlpools 770-271-8228
  • Tucker: Bathroom Designs 678-534-0900
  • Warner Robins: Marble Masters Of Middle Georgia 478-929-2766 x301
  • Woodstock: International Marble Industries 770-928-2252 x227

Illinois

  • Arthur: Carotin Brands 217-543-3331
  • Champaign: Creative Marble, Inc. 217-359-7271
  • Fulton: Gateway Marble Products 815-589-4080
  • Millstadt: Custom Marble, Inc. 618-476-1345
  • South Elgin: Marble Works Inc. 847-742-9222

Indiana

  • Elkhart: Gemstone Solid Surfaces 574-294-8899
  • Elwood: Marble House Inc. 765-552-6646 x231
  • Fairland: Marston Products Ltd. 317-835-9000
  • New Albany: Cameo Marble 812-944-5055

Kansas

  • Olathe: Marble Creations Inc. 913-782-6272

Kentucky

  • London: Accent Marble 606-878-6003
  • Murray: Thorton Tile & Marble 270-753-5719

Louisiana

  • Harahan: Plantation Marble 504-733-0536
  • Lake Charles: Southern Marble Specialties 337-478-3430
  • Mandeville: Marble Quarry 985-626-9786
  • Metairie: Barto Marble 504-733-6199
  • Slidell: Gulf States Marble Inc. 985-641-0925

Maryland

  • Baltimore: Marble Designs Ltd. 410-358-7878
  • Mechanicsville: Artistic Marble, LLC 240-925-1698

Massachusetts

  • Ludlow: Roma Marble Inc. 413-583-5017

Michigan

  • Jackson: Zimmer Marble Co. 517-787-1500
  • Mount Pleasant: Americas 989-773-7856
  • Remus: US Marble Inc. 989-561-2293
  • Schoolcraft: Kal-Marble & Granite 269-679-5035

Minnesota

  • Burnsville: Princess Marble 952-746-5700
  • Sauk Rapids: Stone Products Of St. Cloud 320-240-0804
  • Shakopee: Basset Cultured Marble & Granite 952-215-8359

Mississippi

  • Jackson: Builders Marble, Inc. 601-922-5420

Missouri

  • Doniphan: Castle Products & Services 573-996-4110
  • Fenton: Delta Marble 636-677-8029
  • Holden: Master Marble Inc. (MMI) 816-850-4167
  • Jefferson City: Cultured Marble Products 573-893-6601
  • Jefferson City: Mid Mo Surfaces 573-659-8180
  • Lee’s Summit: Tiffany Marble Inc. 816-524-0023
  • North Kansas City: Complete Home Concepts
  • Springfield: Ozarks Cultured Marble 417-831-6330
  • Wentzville: Superior Home Products 636-332-9040 x161

Nebraska

  • Omaha: Roman Marble 402-453-1196

Nevada

  • Las Vegas: Las Vegas Cultured Marble 702-240-0355

New York

  • Avon: Monroe Industries Inc. 585-226-8230
  • Penn Yan: Remee Casting 315-536-3742
  • Sayville: United Marble 631-567-7711

North Carolina

  • Arden: Nova Cultured Marble 828-687-8770
  • Farmville: Carolina Marble Products 252-753-3020
  • Greensboro: Carolina Custom Surfaces 910-299-3030
  • Lillington: Capital Marble Creations, Inc. 910-893-2462
  • Midland: Carolina Counters, Inc. 704-888-4010
  • Midland: Tarheel Marble Co. 704-888-6003
  • Swansboro: National Marble Products 910-326-3005
  • Wallburg: Elite Marble, LLC 336-769-3560
  • Wilmington: Custom Marble Products 910-762-2225

Ohio

  • Cincinnati: Agean Marble Mfg. 513-874-3331
  • Cincinnati: Regency Marble 513-733-3700
  • Columbus: Heritage Marble Of Ohio 614-436-1464
  • Latty: AL-CO Products 419-399-3867
  • Massillon: Tower Industries 330-837-2216

Oregon

  • Grants Pass: Rogue Valley Marble 541-474-4319

Pennsylvania

  • Boyertown: Luicana Industries Inc. 610-367-7923
  • Erie: North Coast Cultured Products 814-833-3857
  • Leola: Marbleon Inc. 717-656-9700
  • Macungie: Lehigh Surfaces 610-966-3484
  • Middleton: Elegant Marble Products 717-939-0373
  • Selinsgrove: Kerrico Corp. 570-374-9831

South Carolina

  • Beauford: Athena Corp. 843-784-2220
  • Cacce: CoMar Products Inc. 803-794-4229
  • Myrtle Beach: Easton Industries 843-448-2354
  • Ware Shoals: Southern Cultured Marble 864-456-2319

South Dakota

  • Sioux Falls: Formatop Co. 605-332-3151
  • Sioux Falls: Sioux Marble 605-582-6464

Tennessee

  • Cordova: Marble Products Inc. 901-386-6167
  • Franklin: American Marble, Inc. 615-790-8944
  • Memphis: Lawrence Tile & Marble 901-345-1975

Texas

  • Alvin: Mainland Custom Marble 281-824-9696
  • Austin: Austin Counter Tops, Inc. 512-835-5100
  • Austin: Custom Quality Marble & Stone 512-282-5680
  • Beaumont: Quality Sales Co. 409-892-8937
  • Georgetown: Austin Marble Co. Inc. 512-930-2116
  • Helotes: Kamal Inc. dba Venetian Marble 210-695-3505
  • Houston: Accent Marble Company 281-448-3696
  • Houston: West U Marble Co. 713-433-2240
  • Lubbock: Venetian Of Lubbock Inc. 806-763-5777
  • Lufkin: Angelina Bath & Custom Marble 936-632-7065
  • Seguin: Marble Masters Of Texas 830-303-7744
  • Willis: R & D Marble Inc. 936-856-6342

Virginia

  • Kenbridge: Virginia Marble 434-676-3204
  • Richmond: Venetian Marble 804-233-6961
  • Virginia Beach: Virginia Beach Marble Co. 757-340-0686

Wisconsin

  • Eau Claire: Surface Designs Inc. 715-834-2628
  • Menomonee Falls: Brandt Molded Marble 262-373-1163
  • Portage: Sta-Care Inc. 608-742-8512

Column B218

Waterproofing Tile Installations

Tubs

Standard bathtubs have a lip on three sides of the tub to capture water. The fourth side is of course the long side that you pass over getting into and out of the tub. Porcelain coated steel tubs have a much higher lip than cast iron tubs. Cast iron tubs have a very slight rise that will capture and divert water back into the tub, however, you must make sure the tub is installed level in both directions.

Capillary Attraction

Have you ever noticed that water can travel up a paper towel or rag that you suspend into a bowl of water? This is caused by capillary attraction. The same thing can happen with cement board or water resistant drywall that is allowed to 'sit' in a puddle of water along a tub edge.

When you install ceramic tile board around a tub you do NOT want it to contact the surface of the tub. I recommend a 1/4 to 3/8 inch space between the bottom of the board and the tub or shower surface. You can caulk this crack if you like with pure silicone caulk.

Tar Paper or Vapor Barriers

What happens if water somehow gets past your cement backer board? You can stop it cold in its tracks and divert it back to the tub or shower basin if you install tar paper or a plastic vapor barrier on the wall studs before you install your ceramic tile backer board. You must make sure that the vapor barrier or tar paper laps into the tub. If you use tar paper make sure that different layers overlap one another like roofing shingles. You don't want water running behind a sheet of tar paper. Don't trim off the excess material until after you have installed the ceramic backer board. Then carefully cut it back so that it is flush with the outer surface of the ceramic backer board. When the tile is installed, the vapor barrier or tar paper will be recessed 1/4 inch from the finished edge.

Caulk ALL Seams BEFORE Tilework

As you install each sheet of ceramic tile backer board, leave a 3/16 or 1/4 inch space between sheets. These cracks will be caulked with 100 percent pure silicone caulk BEFORE you begin to install ceramic tile. I have had great success doing this. If you then decide to tape the joints with thinset and fiberglass tape, you can do so AFTER you have caulked.

If you do tape with thinset, you must be careful NOT to create a hump at the taped seam. Ceramic tile is very unforgiving. The tile will not sit evenly as it crosses the humped area. Add to this the high gloss surface of most ceramic tile and you have a recipe for disaster. The high gloss surface will visually transmit the defect.

Grout is NOT Waterproof

Contrary to popular belief, grout is not waterproof. Water can travel through grout and especially past the contact point between the grout and the ceramic tile.

The joint between the tub and shower must never be filled with grout. This joint should be filled with silicone caulk only. I always grout the tub or shower areas and dig the grout out of this crack while it is still soft. It is very hard to try not to grout it. Caulking the crack before grouting is a huge mistake.

After grout has cured for approximately one week it is a great idea to seal it with a silicone sealant or better yet a silane-siloxane water repellent. Silicone is a film forming sealant that cannot breathe. You can get a great silane-siloxane water repellent from Saver Systems.

Column B199

Vapor Barrier Manufacturers

High Performance Vapor Barriers

The clear plastic poly vapor barriers you see everywhere are not high performance products. Why? They are almost always made from recycled materials. They are almost always a single ply. It is not uncommon for them to have pinholes from the manufacturing process.

High performance vapor barriers are made using two layers of virgin polyethylene. The layers are laminated at right angles to one another to make an incredible barrier. Cost? Often these products cost just 20 to 30 dollars more per roll than regular low performance products.

You find these high performance products at specialty building products stores that sell products to concrete contractors. Look in your Yellow Pages under "Concrete - Supplies / Tools."

  • Raven Industries
    605-336-2750
    VaporBlock® high performance underslab vapor retarder.
  • Sto-Cote Products, Inc.
    800-435-2621

    They make Tu-Tuf.
  • Armtec
    800-265-7622

    Makes Platon, a permanent underslab dampproofing membrane.
  • Cosella-Dorken Products, Inc.
    888-4DELTA4
    Makes DELTA MS Underslab.

In my Shower Pan Liner eBook, I give you all the secrets for a waterproof shower. I must sell 50 of these bad boys a week and I seriously can't remember the last time anyone wanted a refund. You will not find better photos and instructions anywhere.


Author's Notes:

I received this email from Michael P, Cincinnati, OH. Here's how he helped with his crawl space problem.

"I live in Turpin Hills and wanted to thank you for your advice for sealing a crawl space. This is our third winter in our home and the basement is always much colder than previous basements from other homes. I did as you suggested and put heavy duty, thick plastic on the gravel and put doors on the opening of the crawl space. It's been a few weeks and I can see water droplets forming under the plastic. I may put a second layer of plastic for good measure. The basement is warmer and so is the room above the crawl space. I don't smell the mustiness either. Thanks again for the tip."


Column B199

Backer Board Installation

Cement board products are simply wonderful. They are such a simple idea when you stop and think about it. What's more, because of its thickness, you can easily attach these products to wood framing with rust resistant roofing nails or galvanized screws. You don't need fancy drills, anchors and such to work with cement board!

Installing the Cement Board

Probably the hardest part of installing cement board is carrying it from the truck to the room where you will use it. It is somewhat heavy. It is also an abrasive material. If you have good flooring in the vicinity of your workplace you will need to tarp them or cover them well with two layers of red rosin paper. Little pieces of sand and cement paste fall off the edges of the cement board creating a scratch hazard.

Cutting the Backer Board

There are two ways to cut cement board. You can score it with a carbide tipped tool and then snap it like drywall. This always leaves a fairly ragged edge.

If you want a clean edge, you will have to saw it like a piece of plywood. Sawing creates massive quantities of cement dust. You will have to do all sawing outside and use an old circular saw equipped with a masonry blade. Never use a new or good saw. The concrete dust will enter the electrical workings of the saw and ruin them in no time flat. I also urge that you use an approved NIOSH/OSHA dust mask!

Holes for faucets and pipes can be made with a cold chisel. If you score both sides of the material where you intend the hole to be you can end up with a fairly clean hole. Use moderate hammer strokes when hitting the chisel. You can always increase the pounding force if necessary.

Nailing/Screwing The Board

Before you install cement board, it is really important to make sure that the framing lumber is dry. New construction lumber can become saturated if the roof is not put on quickly. The framing lumber can actually have a high moisture content on its own. You need to let the lumber dry out before you cover it with cement board and vapor barriers. If you don't do this, you can trap moisture in the wall cavity. Remodel jobs usually do not have this problem, especially if you are putting cement board on old framing lumber.

Most cement board manufacturers will permit you to use nails or screws to attach the material to framing. If you decide to use screws, make sure you keep the screw heads flush with the cement board surface. If not, they may cause a tile to seat unevenly.

You will find that it is very hard to nail close to the edge of cement boards. As such, try to keep corner studs 3/4 inch out from the corners. If you install them tightly, you will have problems attaching the second sheet into a corner, trust me.

Nail or screw fastenings should be every eight inches on center. Most installers fail to follow this important step. Usually I see nails on 12 inch centers or more!

How High Should it Be?

Ceramic tile is often installed to a height of six feet off the finished floor in many bathrooms. Often the cement board is installed just three feet up from the surface of the tub or shower. I suggest that you take it to within four inches of where the tile will end on all top edges. It should extend to within one inch of all vertical edges of the ceramic tile.

Seams

The manufacturers of the cement boards really want you to tape the joints in similar fashion to taping drywall. You have to use thinset compounds and special fiberglass tape. Standard joint compound and paper tape will not do behind ceramic tile! It will rot and fail. Remember, premixed joint compounds sold in those five gallon buckets are nothing more than water soluble glue and dust. Why do you think they dissolve so easily when wet?

If you do tape the joints as recommended, you may have to really take your time and feather the edges with additional thinset. I'll never forget the first time I did it! As hard as I tried, I ended up with a hump in the wall. Like an idiot, I installed the tile without dealing with the hump. I thought the tile adhesive would smooth it out. Wrong!

Installation Literature

Every manufacturer has great installation literature. I URGE you to ask for it when you purchase the product. Odds are they will not have it handy. I have often found that to be the case in supply houses I deal with.

Most manufacturers will gladly send the installation literature to you. USG happens to have a very comprehensive brochure with excellent illustrations. I believe the James Hardie company has one as well!

Column B199

Ceramic Tile Shower Seat

Ceramic Tile Shower Seat Design

Every customer of mine that has requested a shower seat has not been disappointed. The reason is simple. Shower seats allow you to really enjoy a relaxing aquatic episode.

When I am really tired after working all day, it is a delight to turn on the warm water and sit down. It is totally different than sitting in a tub.

Shower seats also make a great place to store kids' toys, shampoo bottles and hair care enhancement fluids. Seats also make a great place to plant your foot when shaving your legs. How would I know? Well, uhhh.... my wife tells me so! Yeah, that's it!

Design and Construction

When building a traditional ceramic shower, the incorporation of a seat is simple. All that is required is additional floor space.

CLICK HERE to get FREE & FAST BIDS from local ceramic tile contractors.

You can get by with a simple 12 inch deep seat if necessary. This means that a four foot by three foot shower space will work.

The seat is simply framed with regular lumber. The sub-seat is just a piece of 3/4 inch plywood. It is nailed to a mini-wall that creates the front of the seat face. A simple wall cleat on the backwall beneath the plywood supports it from falling.

shower seat


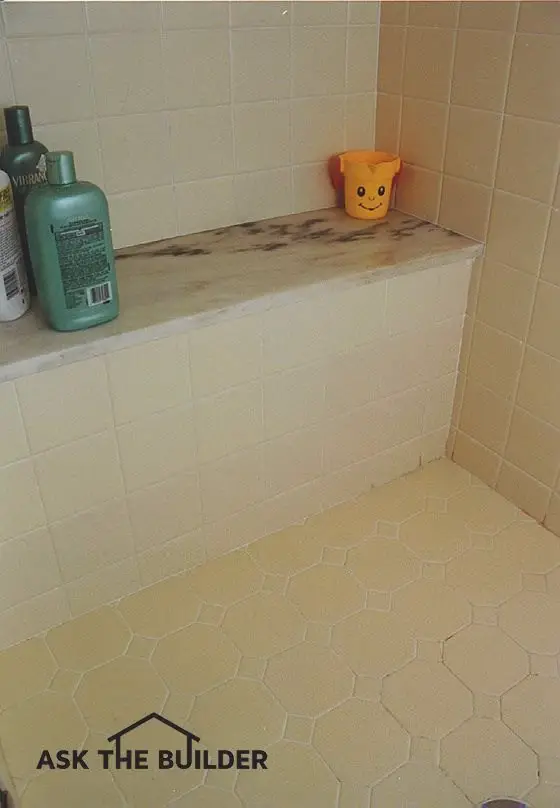
You can also create a very fancy seat by installing a thick piece of marble or granite between the two shower walls. A decorative bracket may have to be incorporated under the seat in case you use a thin piece of stone.

This method will require professional assistance. You will need to make sure the seat is supported properly by the cement board or other hidden stainless steel clips.

Seat Options / Materials

You can build the seat out of any material that is unaffected by water. I happen to prefer marble. Many marble supply houses have scrap pieces that will do just fine for an average seat. All they have to do is make sure it fits and has its front edge polished.

Try to select a marble that compliments or blends with your tile color. If you take your time, you will find a beautiful marble that will become the focal point of the shower.

Be sure to consider small corner shelves or a long narrow shelf five feet off the floor behind/above the seat as well. These small pieces of marble are excellent accents.

If you can afford granite, give it a serious look. A black granite seat in a white tile shower is breathtaking. I know, I have installed several.

Tile Tools

What tools do you need to complete a simple ceramic tile job? Here's a list:

  • tape measure
  • pencil
  • tile cutter
  • nippers
  • a 1/4 by 1/4 inch v-notched trowel
  • a hammer
  • some 6d finish nails
  • 8 lineal feet of straight 1/4 inch wood lattice strip
  • putty knife
  • 3-inch wide-bladed scraper
  • grout sponge
  • rubber grout float
  • several buckets
  • accurate 4 foot level

Click the image below to BUY all, or some, of the tools in the above list.

ceramic tile tools list

CLICK THIS IMAGE NOW TO ORDER ALL THE TOOLS YOU NEED TO DO CERAMIC TILE.

Waterproofing a Seat

If you decide to install a bench seat, you will need to make sure that water does not get behind the seat.

It is easy to waterproof this arrangement. You frame the seat first. Always be sure to calculate the correct height and width for comfort reasons. Use a bucket or standard chair to derive measurements.

CLICK HERE to get FREE & FAST BIDS from local ceramic tile contractors.

Waterproofing is accomplished by using the vinyl membranes that are used beneath ceramic tile floors. Simply purchase and install a continuous sheet from the floor, up the front of the bench over the seat and up the back of the seat wall about six inches.

The membrane is only nailed at the top edges. You will have to penetrate the front bench wall surface with nails when you install the vertical piece of cement board. This is not a problem, as I have yet to develop a leak in my shower after 15 years.

The marble or granite seat simply lays in a thin bed of cement mortar on the vinyl membrane. If you choose to install ceramic tile on the seat, just cut a piece of cement board first and install it as you would the granite or marble. Never nail through the cement board into the wood sub-seat!

Shelves...The Extra Touch

The perfect compliment to a ceramic tile shower or tub area is a set of corner shelves or a long shelf in a U-shaped shower.

These marble trim pieces are usually very inexpensive. For example, I can purchase a four inch wide by 36 inch long piece of white marble for about $15. It makes a great place to store shampoo bottles or a soap dish.

Triangular corner shelves are also attractive. Cut out a template from cardboard and take it to the marble shop. The shelf must fit tightly against the cement board. It is only supported by the 1/4 inch tile. This is plenty of support once all the tile is installed and grouted.

Always try to bargain for the shelves. Often they can be cut from a scrap piece of marble or granite. Check your size before ordering. You want to make sure that it is not too small.

Visit your local ceramic tile store. Look through brochures. You may spy a photo of a shelf, seat or other trim piece that will add function and beauty to your ceramic shower. Don't be too conservative, take a chance!

CLICK HERE to get FREE & FAST BIDS from local ceramic tile contractors.

Related Column: Ceramic Shower Seat

Column B168

Copper Plumbing Alternative – CPVC Manufacturers

Manufacturers of CPVC Piping

The key to making quality CPVC piping lies in the plastic resin. This is the foundation or glue that holds all of the other pipe making materials together. It just so happens that Noveon Inc. has a specialty chemicals division that makes one of the best CPVC resins. In fact, they sell this resin to other CPVC pipe manufacturers.

If you want some excellent information concerning the facts about CPVC piping, read their TempRite CPVC Fact Sheet. As for the other manufacturers, check out their web sites as well. Read their product literature and search their sites for locations of your nearest CPVC distributor.

  • Bow Industrial Corporation

  • Charlotte Pipe & Foundry Co.
  • Cresline Plastic Pipe Co.
  • Nibco
  • Noveon Inc.
  • Thompson Plastics, Inc.

Column B84