Budget Cuts Not For Major Items


The trouble with cutting costs by substituting a lower quality item(s) is that in the long run you can actually spend more money - and lots of it. For example, if you buy a cheap fiberglass tub and shower unit and it falls apart or the finish dulls in 3 to 5 years, imagine the cost to replace it!

The same is true for any major component. If you install a low quality furnace or air conditioner, they might cost you more to operate. They are also fairly expensive to change out in the future.

Think Ease of Installation

If you must trim your budget, look at items that can be replaced in three hours or less. Doorknobs, water heaters, an actual interior door -not the frame, carpeting, etc. If you have to do lots of demolition to replace an item, that tells you it is going to cost lots of money to replace.

New Home Budget – Cutting Costs

Cutting costs can be hard in new construction. I can't tell you how many times I bid jobs and had to deliver bad news to potential customers. I would hand my proposal to people and their faces would turn white. What a miserable position to be in.

Often, the trouble begins in the planning stage. If the architect does not restrain the customer and draw an affordable job, then the homeowners fall in love with the plan. When the numbers come in and the project is 30 percent over budget, dreams become nightmares in an instant.

Maximum Cut

Without sacrificing floor area, the most you can save by cutting quality is just about six percent. Remember you rarely can save much in labor. It takes just about as much time to install a poor quality window as it does a high quality one.

The only place you can really cut money out of a budget is in materials. To complicate things, there are only a few materials you can really look at if you are not changing the size of the house. You can't change the amount of concrete in the foundation. You can't change the amount of framing lumber. You can't change the number of shingles on the roof.

But You Can Change...

But, you could change the style and quality of cabinets. You can go with the least expensive flooring. You can eliminate some or all built-in cabinetry. Consider eliminating any wallpaper. Paint is always cheaper than wallpaper. Want to save money? Then consider an asphalt drive instead of concrete. There are all sorts of places to save some money, but probably not enough to really make a difference.

Alpena Bed And Breakfast Inns

This is going to sound crazy, but bed and breakfast inns are usually regular houses converted to a luxurious place to stay overnight or for a weekend. For some reason, there are lots of these great places to stay in Alpena, Michigan.

There is a website called BandB Finder that lists all of the B & B's in and around this part of northern Michigan.

It may be a great place to spend a summer's day!

Oil Spills on Pavement

oil stain on concrete driveway

It is a wonderful feeling to get emails and letters from readers. They are a signal that folks actually read my columns. This column about removing oil stains from concrete generated a significant amount of traffic. People wanted to share tips and tricks they have used to also get rid of oil stains. It is really encouraging to get positive mail like this from people like you!

Service Stations

The next time you stop to get gasoline for your car look down at the concrete under your car. You may see an oil stain or two. In fact, you will probably see all sorts of oil. From time to time, people filling up with gas will also add oil to their cars. Some people have a better aim then others, and those that don't, leave a mess. Most filling stations have a supply of oil cleanup compound on hand. This is a product that is very similar to kitty litter. You broadcast it over the fresh oil spill and it absorbs it. If you then brush it around, it also cleanses the concrete to a degree. This product can really do a good job on fresh oil spills. Many automotive parts businesses sell this product. It is a good thing to have on hand.

The Alternative

Years ago, my mom taught me a little bit about chemistry. She showed me a relatively safe way to dispose of bacon grease.

If you let hot bacon grease cool, it solidifies. This is really bad on drain lines as the hot grease can cool quickly as you try to transport the grease to the sewer. But you can indefinitely keep the grease a liquid if you emulsify it. You do this by adding liquid soap and water to the warm grease. The soap surrounds small droplets of grease and does not allow it to congeal into a solid.

Car Oils are the Same

The lubricating fluids in a car motor oil, transmission fluid, power steering and brake fluid, etc. are all oils. You can emulsify these exactly like bacon grease. All you need to do is squirt some liquid dish soap on the oil spill and add water from a garden hose. Use a push broom or scrub brush to create the emulsion. It will not take much work at all. Rinse with clear water and the oil should be completely gone. If you do see the rainbow coloration in the water after rinsing you need to add more soap and scrub.

You Have Some Time

Don't panic if a visitor or delivery truck leaves an oil spot. You can get excellent results even if an oil spot is several days old. In fact, I have successfully scrubbed oil spots that were up to 30 days old. Warm water helps lift stubborn spots.

Beware Steel and Pressure

If you are trying to scrub concrete or blacktop, do not use a wire brush. These tools can permanently scar the concrete finish. Pressure washers also can erode concrete finishes. It may not happen the first time but periodic pressure washing sessions can and will erode concrete. You don't believe me? Then go visit the Grand Canyon. Guess what? The Colorado River water simply flows over the rock there. It is not high pressure!

Old Stains

These are the ones everyone has. Parking lots, garages, etc. can develop deep stains from years of neglect and lack of cleaning. The soap and water method works to lift some of the surface oils but it will rarely remove the entire oil deposit.

Concrete can really absorb oil. The oil can penetrate to a depth of one eighth or one quarter inch. Old oil also looses some of its lighter weight components and the oil gets thick. To remove it you almost need to re-liquefy it. This can be done using hydrocarbon based solvents like kerosene, paint thinner, etc. but it is EXTREMELY DANGEROUS. The fumes from these liquids can travel across a garage floor and be ignited by a distant spark. The fumes also can penetrate clothing and even your skin. You can become a human torch if something goes wrong.

If you try to use solvents to help remove the stain you need to ventilate the area and not work with any open flames. Use common sense. You can add small amounts of solvent and allow it to soak into the concrete. Scrub lightly and then blot the black liquid up with paper towels. It is a good idea to burn these paper towels later in the day. Do not just throw them away in the garbage! They can spontaneously combust.

Blacktop Drives

Oil spots on asphalt can only be cleaned with soap and water. Solvents WILL damage and erode the asphalt binder that holds together the sand and gravel components of blacktop.

What's more, oil drips alone will erode the asphalt over time. It takes a few months or years, but believe me, the dripping oil actually softens the asphalt. The key is to keep blacktop well sealed beneath parking areas. Do not over seal. Only apply asphalt sealer every 3 or 4 years or when you can see the actual stone color of the small aggregate. If you apply blacktop sealer every year, it will eventually begin to peel.

Preventative Measures

Is your concrete oil spot free? Do you wish to keep it that way? All you need to do is clean it and let it dry. Then apply any of a number of clear penetrating sealers that simply do not allow oil to soak into the concrete. These products are easy to apply and they are also affordable. If you live in a cold climate, you must pay attention to the label. The air and surface temperature need to be above certain minimums for these to work. Pay attention to these instructions or you may waste lots of time, effort and money.

Silane & Siloxane Concrete Sealants

It is possible to minimize stains on concrete if you make the surface smooth using a steel trowel, but trust me, this is very slippery! I do NOT recommend steel trowel finishes for concrete that has the possibility of getting wet on a regular basis.

The better method is to simply apply a clear sealer or liquid repellent. There are many types available but I feel that those containing silanes and siloxanes are among the best. These chemicals partially fill the pores of the concrete matrix and simply don't let the water and oil molecules pass through and into the concrete. The liquids stay on top of the surface.

Many of these products are available at specialty concrete supply stores. Most major cities and towns have these. Open your Yellow Pages and look under Concrete Supplies. Beware of heavily advertised consumer products. These often contain silicones or other similar chemicals. Avoid these if possible because some of these products are film formers and simply lay on the surface of the concrete. Some of them don't allow the concrete to breath. This is a bad thing especially if you live where the temperature drops below 32F. Water vapor from the soil passes through concrete and the film formers can block this movement resulting in damage to the concrete surface.

The following products are great for minimizing oil stains on concrete:

    • Aquapel / L & M Construction Chemicals
    • Masonry Saver / SaverSystems
    • Protecrete Densifier plus Repeller / Applied Concrete Technology, Inc.

Aquapel and Masonry Saver are sold through distributors and paint stores. Protecrete can be purchased direct from the manufacturer and from various stores. Check on the web sites of all these companies to see if there is a store near you, before you make a mistake and purchase an inferior product.


Concrete Books & Coating Manufacturers

Great Books About Concrete

If you want to learn lots about how concrete should be installed, you must buy a copy of a neat paperback book published by the Portland Cement Association (www.cement.org). It is titled: Design and Control of Concrete Mixtures. This book is a little technical, but it has many very important facts and guidelines that will help you order and place concrete under all sorts of site and weather conditions.

The Portland Cement Association also has another book called The Homeowners Guide to Building With Concrete, Brick and Stone. This swell book contains some great photos, illustrations and numerous tables. It educates you about how to order and work with concrete. The book also shows you how to install brick and stone. It is a must have!

Manufacturers of Clear Coatings for Concrete

Many of the following manufacturers will not be familiar to you. Their products are not commonly sold at most local hardware stores or large home centers. To find quality products, you may have to hunt a little harder and drive just a little farther.

You are looking for the stores that professionals buy from. In many instances, you will find the products listed below at building supply stores where sand, cement and plaster are sold. Brick companies often sell these high quality clear coatings.


Want perfect concrete work? Find a pro by using my Concrete Work (Sidewalks, Driveways, Patios & Steps) Checklist. I offer a 100% Money Back Guarantee.


There are all sorts of products at home centers - many of them advertised nationally - that can hurt concrete in cold climates. These products contain silicones, acrylics or other film-forming chemicals. Films trap water at the surface of the concrete. This water is wicking up from the soil beneath exterior concrete slabs. Silanes and siloxane water repellents allow this water to pass through to the atmosphere.

Once again, beware of products that say they contain acrylics. You may be purchasing a film-forming sealant!

  • BASF Building Systems
    • Enviroseal 20 Silane penetrant
      Enviroseal 40 Silane penetrant
      White Roc W Acrylic Sealant
  • Saver Systems
    • MasonrySaver Silane/Siloxane
  • ChemMasters
    • Anti-Spall 50 Penetrating blend
      Aquanil Plus 40 Silane moisture and water repellent

Install Concrete with Control Joints

Fifteen Point Concrete Checklist

1. The Right Mix - The Portland Cement in concrete is the glue that holds everything together. The more cement that is included when it is mixed, the stronger the concrete will be. Exterior slabs, no matter if they are in Florida or Minnesota, need to be at least a 6 bag mix or a design strength of 4,000 pounds per square inch PSI. This mixture prevents freeze/thaw damage and simply allows concrete to perform superbly for 30 or more years.

A 7-bag mix is better. If you can afford to get 5,000 PSI concrete, do it.

2. Thickness - The minimum thickness of any exterior sidewalk or patio is 4 inches. Driveways should be a minimum of 5 inches. One extra inch of concrete will cost just a little more money, but it will return enormous benefits with respect to strength and durability.

3. Compaction of Base - The soil beneath slabs must be compacted. If slabs pass over trenches that contain uncompacted fill dirt, you can also have problems. All of these areas must be solid. Trenches that pass under driveways and sidewalks can be filled with gravel or some other self-compacting material instead of dirt.

4. Slope - If you live in a cold climate that can experience freezing temperatures, don't install flat slabs outdoors that will get wet! Make sure slabs are sloped so that water does not pond on the surface. Two inches of fall over 20 feet is usually not noticeable. You will think the slab is level.


Want perfect concrete work? Find a pro by using my Concrete Work (Sidewalks, Driveways, Patios & Steps) Checklist. I offer a 100% Money Back Guarantee.


5. Steel - Reinforcing steel is cheap. It is a must to have in all slabs. Use 1/2 inch steel bars if possible and make sure they are a minimum of 1.5 inches up from the bottom of a 4-inch slab. You want the steel bars in the lower third of the slab, but they need to have at least 1.5 inches of concrete under them.

6. No Added Water - Don't add water to the concrete once it arrives at the job site. Don't trowel in bleed water. Don't sprinkle water on the slab as you finish it. All of these things dilute the cement paste glue.

7. The Number of Control Joints - No single slab should be larger than 15 feet on a side. If your driveway is 12 feet wide, then space control joints every 12 feet to make symmetrical slabs.

8. Control Joint Depth - All control joint depths must be a minimum of 1/4 the thickness of the slab. This is non-negotiable.

9. Curing - After the concrete finishing is done, the curing process must start. Cover the slab with plastic sheets or apply a liquid curing compound. This process keeps water in the concrete so that the chemical reaction of hydration can continue. Without this water, the concrete will not reach its design strength.

10. Slump - Avoid ordering exterior slab concrete that is too wet. Wetter concrete that flows like water has a high slump number such as 5 or 6 inches. Four inch slump concrete is perfect, but it requires lots of manpower to place rapidly.

11. Type of Finish - Avoid slick steel trowel finishes for exterior surfaces. They are fine for basements and interior slabs. Garage surfaces should be a moderate steel trowel finish that is slightly abrasive. Drives, sidewalks and patios should have a light broom or wood trowel finish.

12. Sealers - They are not necessary to protect concrete from damage. They can be useful to prevent penetration of oil and other chemicals.

13. Expansion Joints - These are necessary when slabs touch fixed objects like foundations, street curbs, etc.

14. Weather Conditions - Don't pour concrete in extreme hot or cold weather. The ideal conditions are 55 degrees, overcast and high humidity.

15. Observe - If you are hiring out concrete work, try to inspect and watch the work crew. Make sure all of these points are followed or you will have problems. Put these specifications in your contract!


Control Joint Layouts for Driveways

The following two sketches give you an idea of how control joints should look for different residential driveways. The top drawing shows a double wide driveway approaching a two car garage. This is an easy one. The bottom drawing shows a two car garage that has a wide apron served by a single width driveway. Remember that the jointing tools of most concrete finishers will NOT cut the concrete deep enough. The joints need to be sawcut in the center of the joint at the end of the day or the next morning.

 
control joints in garage sketch

Concrete Scaling & Deicing Salts

Concrete Scaling & Deicing Salts

I knew that when I wrote this column and bulletin set that I would upset many a concrete mason. It never fails. What disturbs me the most is not the criticism I receive, but the failure on the part of the contractors to admit their lack of understanding of the subject. Just this morning, I received an email from a concrete contractor. He told me that my column was inaccurate. I wrote back indicating that my facts were derived from the latest scientific data from both the Portland Cement Association and the American Concrete Institute. I then asked him from where he obtained his data. No response!  It makes you wonder what other facts about building and remodeling might be twisted in his head.

Writing this column has allowed me to really educate myself about the products and techniques used in the residential building industry. When I was still pounding a hammer each day, instead of this keyboard, I didn't have time to research facts. I was in the dark about quite a few things. You as a homeowner fight this battle everyday with contractors. Fortunately, the growth of the Internet has made it easy for you and contractors to obtain accurate information very quickly. I hope, for your sake, that you are taking advantage of this wonderful new media form.

Deicing Salt & Concrete

Let's set the record straight. Deicing salts will NOT harm concrete that is made correctly, placed correctly, and finished properly. Those three conditions cover much ground. For example, the concrete contractor at your house may do the job right. However, he may have been sold defective concrete. The likelihood of this is small. However, if you are planning on doing a large outdoor pour, I would give serious consideration to paying several hundred dollars for an insurance policy.

Concrete insurance? Yes. Simply find out if a local testing lab will come out and take several samples of the concrete as it flows from the truck. They will provide you with test reports that will tell you if the concrete was formulated to the right specifications. If it isn't, I'd say you would have a VERY strong argument with the concrete company to replace defective goods!  If you can't afford a test for a small pour then you must make sure you buy the concrete from a reputable company. The biggest company is not always the best.

Deicing Salt Comparison - Qualities

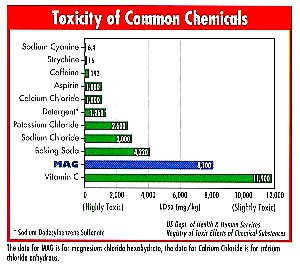
Many people don't realize that there are different deicing salts. The three common deicing salts or compounds (sodium chloride, calcium chloride, and magnesium chloride) do not chemically react with concrete, however, the salt brine solution can react and damage unprotected steel within concrete. The salts can also cause serious corrosion to both wrought iron and aluminum porch railings and posts. Deicing salts should be used sparingly if you have metal objects on or near your slabs or reinforcing steel within your concrete.

Stop - Purchase Deicing Salt eGuide NowGet a 24-page guide right now that answers all your questions about Deicing Salts. Will it RUIN your concrete? Did you know that salt can SERIOUSLY harm you? What about your expensive landscaping? You can have all these answers and more in less than a minute. Buy it NOW.

Concrete Spalling Comparison Study

The National Research Council's Strategic Highway Research Program tested deicing salts to see how they would etch and destroy concrete. The tests were interesting. It appears that magnesium chloride did the least amount of damage. Calcium chloride caused 26 times more damage to the concrete than magnesium chloride. Regular rock salt, sodium chloride, caused an astonishing 63 times more damage. If the tests were accurate, it appears that it may be worth the extra money to purchase and use magnesium chloride.

Fertilizers as Deicers

If you want to really mess up your concrete drives, sidewalks and patios use fertilizers on them. I have listened to some garden show radio talk show people advocate this practice. It is a HUGE mistake! Many common garden and lawn fertilizers will chemically attack concrete. Do not apply these to your concrete in cold weather. In the spring and summer, be sure to rinse these materials from your concrete if you treat lawn areas nearby. Never use a fertilizer that contains ammonium nitrate or ammonium sulfate on concrete!

Water - Friend and Foe

Water is a key ingredient for concrete. When added to the cement, gravel and sand, it begins an irreversible chemical reaction. Crystals begin to grow. These crystals grab onto one another and the sand and gravel particles. Obviously, if you have more cement, you will have more crystals. Concrete which will be subjected to freezing temperatures must have a minimum of 564 pounds of cement for each cubic yard. Note that I said minimum. You can always add more if you want to really increase your chances of survival.

Guess what? You can have plenty of cement once the concrete leaves the plant but still run into a problem. Have you ever had iced tea? Have you ever added sugar to a full glass and get it just right? Then, after drinking half of the tea, a waiter comes and refills the glass. The color of the tea looks the same, but the taste is different. The sugar was diluted by the additional tea. You then add additional sugar to bring it back up to full strength.

If the cement in concrete is its sugar, then adding water to the mix once it has left the plant creates a problem. You dilute the amount of cement in the mix. The concrete becomes weak. The crystals are spaced farther apart.

Water is added to concrete at the job site for two primary reasons: it makes the concrete easier to place and it allows you to have fewer finishers on the jobsite when it comes time to apply the final finish.

Water sprinkled on the top layer of concrete will dilute the amount of cement in the upper layer. This is were it is needed the most to resist freeze/thaw cycles - the actual mechanism which causes spalling.

Slump

One last thing about water and concrete. You can purchase concrete with different amounts of water and cement. Let's say you want the concrete to flow readily at the jobsite. You would order it with a 5 or 6 inch slump. Slump means how many inches the concrete falls when a cone of it is left unsupported. The higher the slump, the more liquid the concrete.

So, if you want a liquid, high strength concrete, you must order it that way from the start. If they make a stiff (low slump number like a 3 or 4 inch) concrete to a given strength and then you add water at the jobsite, you reduce its strength! The added water at the jobsite dilutes the available cement. Low strength means the concrete is more susceptible to failure.

Prevention of Problems

If you want to solve concrete spalling problems, start with good concrete and finishing techniques. If you want to preserve concrete that has yet to deteriorate, apply some great silane/siloxane water repellents. If you have defective concrete, don't give up, it is possible to restore it. That subject was covered in great detail in Builder Bulletin 118.

Before your next concrete job, consider reading more about the topic. There are vast amounts of booklets, papers, etc. written about every aspect of concrete. Don't 'hope' for a good job from the contractor. Take the responsibility on your own shoulders and learn a little more about concrete and the way it is installed. Check out the following literature sources. You will not be disappointed!

Concrete Sealants

What happens if you do everything right and are still worried? You can purchase some excellent water repellents for concrete. Do not purchase film forming sealants. These products usually contain silicone or animal fats or waxes. Purchase a product that contains silanes, siloxanes or a blend of these two chemicals.

Concrete needs to be able to transmit water vapor from the soil into the air. Film forming sealants block this process. Silanes and siloxanes act like the fabric Gortex. Liquid water can't pass by the silanes/siloxanes, but vapor can.

Concrete & Deicing Salt

Deicing Salt Information

Want great information on deicing salts? Simply call the Salt Institute. They will help you understand the facts about salt!

Salt Institute
700 North Fairfax Street
Alexandria, Virginia 22314
703-549-4648
www.saltinstitute.org

Concrete Literature Sources

You can go to any engineering college or the science/engineering department of any public library and be overwhelmed with information and books on concrete. However, if you want to go to the source, the core, of accurate, trusted information, then there are only two places in my opinion.


Stop - Purchase Deicing Salt eGuide NowGet a 24-page guide right now that answers all your questions about Deicing Salts. Will it RUIN your concrete? Did you know that salt can SERIOUSLY harm you? What about your expensive landscaping? You can have all these answers and more in less than a minute. Buy it NOW.


You need to contact either the American Concrete Institute or the Portland Cement Association. Both of these organizations have scientists and huge funding behind them. You will also find great information on the statewide level. Most states have associations of the ready-mix suppliers. These organizations want concrete to be installed correctly just like you. If it fails, they are directly affected. Often these organizations have wonderful booklets, brochures, etc. You can find their addresses / phone numbers by calling your local ready mix supplier. If they don't know the address or who you are talking about, that is a bad sign! Maybe you should keep that fact in mind when you decide to buy concrete!

If you live in a major city, don't hesitate to contact a local engineering testing lab. Major cities have these companies. These are the places that take samples of concrete and test them for strength. Usually they can also point you in the direction of some great concrete literature.

  • Portland Cement Association
    5420 Old Orchard Road
    Skokie, Illinois 60077-1083
    800-868-6733
    www.cement.org 
  • American Concrete Institute
    38800 Country Club Drive
    Farmington Hills, Michigan 48331
    313-532-2600
    www.concrete.org

Concrete Slab Pinning / Pea Fill

Pea Fill

My garage is attached to my house. I have a full basement. When I mean full, I mean full, as the foundation walls are nine feet four inches tall.

When you excavate the hole to place the foundation, you need to over-dig 30 inches beyond the outer face of the foundation. This gives the foundation people the necessary room to work on the concrete forms. But, when the pour is over and the forms are removed, you have a 30 inch trench to fill.

In my garage, I used a product called pea fill. This is a mixture of coarse sand and pea gravel. It is a processed material that you purchase from a sand or gravel pit.

Because of the small granular nature of the product, it is practically self compacting. I simply dumped this material along side my foundation in the garage. Along the nine foot deep wall (the other three walls were only three feet deep) I put in three foot deep layers of fill material.

After installing each three foot lift I would thoroughly saturate the pea fill with water. The water carried small pieces of sand down into the fill which in turn removed any small quantities of air. When the entire garage area was filled and brought to the level I desired, I watered all the fill for several hours.

Needless to say, my garage floor has not settled, tilted or cracked. I know, most of the other builders are unwilling to invest this time. Well, if you are getting ready to build, put it into the contract. So what if it costs $50 to $100 more. You will never regret it.

I highly recommend using this type of fill material in any outdoor location which will be covered with some type of paving material (sidewalks, concrete, blacktop, paving brick, etc.) .


Patios, Porch Stoops & Pins

OK, your builder dumped dirt along side your foundation. Now what do you do? You can still avoid a tilted slab with just 30 minutes of work, a hammer drill and some 16 inch long pieces of 5/8 inch reinforcing rod.

All you (or your builder) needs to do is pin your slab to your foundation. It is so easy to do!

All you need to do is chalk a line along the foundation indicating the top of your finished slab.The locations of the pins need to be marked on the foundation wall. These holes need to be spaced two feet apart and placed below the chalk line so that equal amounts of concrete will be above and below the pin (if the slab is five inches thick, you will drill the hole 2 1/2 inches below your chalk line). The hole diameter is the exact same size as the reinforcing rod pins you intend to use (#4 pins require a 1/2 inch hole, #5 pins require a 5/8 inch hole). Using a heavy (four pound) mini-sledge hammer, pound the pins into the holes. Believe me, if you have drilled the right sized holes it will be a snug fit. If you have the time and inclination, paint the pins with a rust inhibiting paint prior to pounding.

Now all you need to do is install additional reinforcing steel which is tied to the pins. The purpose of this steel is to make miniature beams. The concrete will be supported by the pins at the house and then hopefully span to soil or dirt which was never excavated. This way, when the fill dirt settles beneath the slab, the slab stays in place supported by the pins and steel. If you rely only on the pins for support, the slab will very likely crack at the end of the pins.

WARNING: Do NOT use pins if the slab is structural. That is, if the slab supports the weight of any other thing other than itself, the pins are not sufficient support. You will need to have a structural engineer tell you what to do.

If you have a shallow foundation, say four feet or less, there is a better way to support a slab that is in contact with the foundation. Before the dirt backfill is placed, simply install some four inch concrete blocks on top of the footer along side the foundation. This little ledge is a great support for the slab.