Tell the truth. You’re a brand-new subscriber. It’s often said timing is everything. Welcome, for starters! This might be one of the most unique newsletters I’ve ever sent in the twenty-five years it’s been published. Strap yourself in. I NEED YOUR HELP and that of every subscriber who’s reading this.
You're about to see some secret information I've never shared with you before.
You, though, might have been here for long enough to remember the video I did about bathroom exhaust fans. Do you HATE how noisy and LOUD your fan is?
Yeah, I thought so. CLICK or TAP HERE to see the whisper quiet one I installed in my daughter’s new home. You simply can’t hear it! Scroll down just a bit in the column to watch the video.
FREE BIDS - Local Contractors
CLICK OR TAP HERE to get FREE BIDS from local contractors for ANY PROJECT.
Economics 101
Back in the day, I tried to take an economics class in college and it made my head explode. I dropped it after a week. My oldest daughter went on to double major in economics and public relations. It's pretty obvious she didn't get my math genes!
I do know that the law of supply and demand is real. You may be feeling it when you try to get bids for work.

But have you seen or heard what’s happened to lumber prices? Holy Cow!
Sans Mustache
Phil Mizzi is a virtual friend of mine in Australia. He’s a subscriber I’d love to meet face-to-face. Over the years, Phil has offered me lots of help and suggestions about my Ask the Builder website and I've reciprocated when he's decided to tackle a project.
I’ve had the great fortune to meet quite a few subscribers in person, though, and you may be one.
Back when I was doing lots of traveling for business, I’d try to carve out time to have a meet up no matter what city I was in. They were always tons of fun. I need to do a local one for those here in New Hampshire!
Anyway, Phil reached out to me a few days ago and said:
“...On another topic, at the end of the ride-on-the-lawn-mower video, it panned to your website and what I thought I saw was a Tim without a mustache!! Was that you and when was that?”
Good eye, Phil! Yes, about eleven years ago, my mustache disappeared one afternoon. CLICK or TAP HERE for an amusing story about what a Dad will do for his daughter.
Wait until you see the photo of me on that page. Jeeez, I just may remove it by the time you see this. I HATE that photo!
I NEED Your Help
Is it possible for you to do me a favor? This is a big one.
Please read all of the following and then share your thoughts with me. I’ve never before disclosed this much information in the newsletter and it’s sort of a Pandora’s box.
You have no idea how valuable your input is. Trust me when I say you’ll be helping millions of people.
Each day, I have thousands of people visit AsktheBuilder.com.
Here’s just one report I get. This one shows you exactly what’s happening with one aspect of my website. This report covers the past seven days:
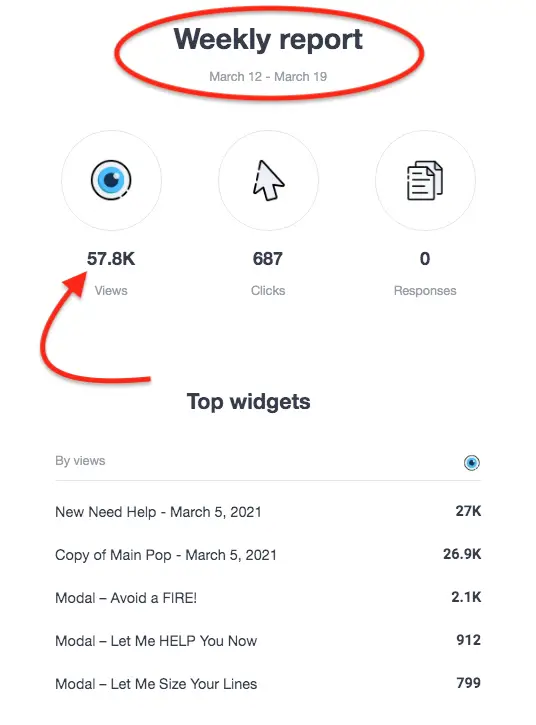
The arrow points to the fact that in the past seven days almost 58,000 folks came to AsktheBuilder.com.
All the visitors had one thing in common.
They’re in pain or at the very least they needed help with some sort of problem.
Perhaps you’ve had it happen to you. Something has gone wrong. Maybe you’ve got an issue with your home or a contractor conflict.
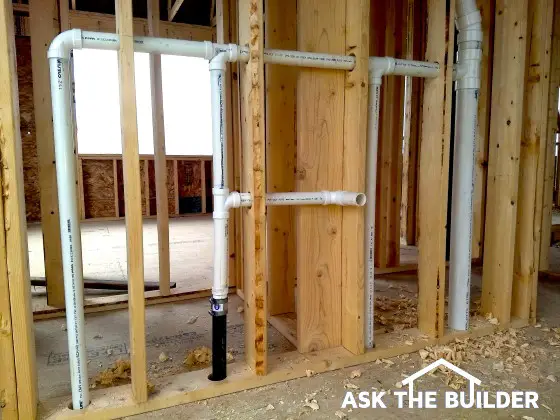
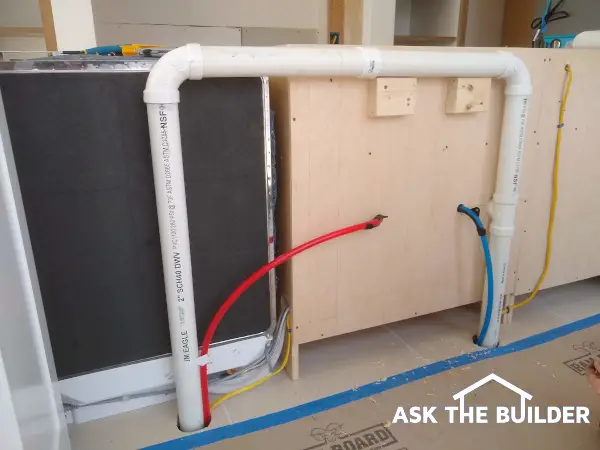
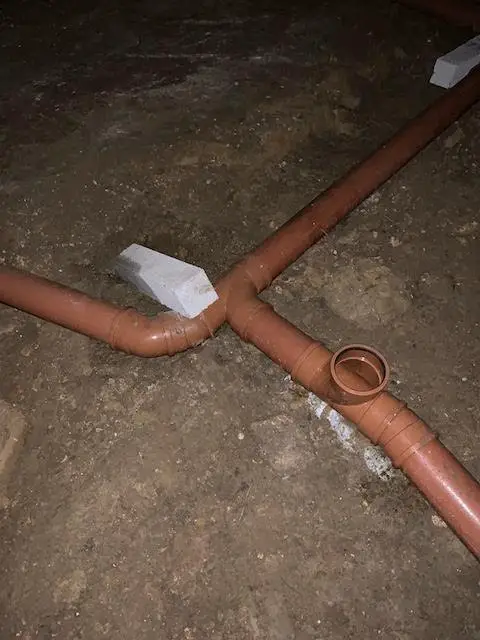
Maybe you’re like Christian from the UK who I heard from this past Thursday. He was frantic because he felt a plumber was putting in the pipes wrong in his room addition.
Christian was right. It was a huge hot mess. You have no idea how many things are wrong looking at all the photos he sent. Here’s but one photo:
I immediately responded to Christian after he sent his photos. It was 7 PM my time, just before dinner, and I felt the need to get him out of his huge mess.
I told him I had been a master plumber since age 29 and that there was so much wrong that it would require a phone call to share what needed to be done. There was just too much to type.
He never responded. Can you believe that? Isn't that insane?
Those pipes were about to be covered with CONCRETE. Tell me how hard it would be to fix them after that happens.
HELP Tim! Throw Me a Life Preserver!
You’re panicked in many cases when you come to AsktheBuilder.com. I know as I've read tens of thousands of your help requests over the years.
You’re often filled with fear.
You do realize that when you’re fearful you make dreadful decisions. You don't think clearly. I see it happening each day.
You need help from an expert - someone you can trust who doesn’t have a dog in the fight, right? I think I pretty much fit the bill as being unbiased since I can't see your house from where I live and I'm not bidding on your job.
As for being an expert, I think the About Page on my website covers that pretty well, but I could be wrong!
But once at my website, things go off the rails faster than orange slices disappear on the sidelines at halftime during a grade-school soccer game.
Startup Failures
I’m aware of no less than three Internet startups that tried their best to SOLVE the above problem. The founders of the startups were acutely aware you needed help from an independent expert.
These startups raised tens of millions of dollars from venture capitalists. They put that money to work trying to solve the conundrum. The investors' money created websites where you could get on the phone with a plumber, carpenter, electrician, roofer, etc. and get help.
Each one of these startups FAILED.
They vaporized. The phones grew cobwebs on them.
The money for each startup dried up.
Why? Help Me Understand.
I’ve been offering a nearly identical phone coaching service for decades.
I’ve completed hundreds and hundreds of phone calls with homeowners like you. Heck, it's possible I've done close to a thousand paid phone calls in the past twenty-two years.
Just two days ago, I solved Steven’s problem in three minutes.
He told me he had spent three days online trying to get an answer as to the SMALLEST size header he could put in a bearing wall in his living room so the floor above wouldn’t collapse.
He loved my answer and thought the call was the best $$$ he’s spent in ages.
A few days ago, Lori wanted to know the exact vinyl cedar shake product I’m going to use on my next house. I answered her in minutes and offered up a few additional tips to make sure the job looks superb.
Josh needed help with his shear wall in a room addition. The list of help calls I've completed is endless.
Now look at that graphic once more:
In the past week, 687 visitors of the 57,800 went to this page on my website where I offered to give them options to solve their problem.
All 57,800 visitors saw this offer to get the help they needed.
Do the math. Just over one percent decided to look into the offer.
Think about that - just one percent.
I want you to CLICK or TAP HERE to see what they saw.
Guess how many who landed at that page filled out the form?
400, 300, 175, ?
Fifty-one. Less than 10 percent.
Why?
Why would 636 people back away from that FREE offer of HELP?
It gets worse.
Within hours, I’d replied to each of those 51 who’d filled out the form.
Most of the problems they had were very COMPLEX. It was impossible to answer them in two or three sentences or with a Yes or No.
I replied telling them how serious the issue was and that it required a short phone call giving them the link to the phone call page.
These homeowners were about to spend tens of thousands of dollars and possibly make a mistake unless they got some expert advice. Remember, they FILLED OUT THE FORM telling me their problem.
Guess how many of the 51 decided to make a small investment in getting that advice??
20, 15, 9, ?
One. One person.
Why? Why only one?
This is where you come in.
Would you do me a favor and take this short survey so I can try to discover why people aren’t willing to invest in an expert’s advice?
The LAST question is perhaps the most important.
Use your magic wand. Tell me exactly what you’d need to know before you’d invest a small amount to get an expert’s advice.
Be reasonable. Keep in mind, I can't come to your home if you want me to help you. Well, actually I can. I do offer that long-distance service.
And if you want the expert to be local to you, keep in mind they need to be compensated for all the travel time to and from your home.
That’s enough for a Sunday.
Thanks for your help!
Tim Carter
Founder - www.AsktheBuilder.com
Get CLEAN - www.StainSolver.com
POTA - www.W3ATB.com
Do It Right, Not Over!
P.S. Please take the Investing in Advice survey. Your answers could end up helping TENS OF MILLIONS of homeowners just like you.