Mortar Mixtures for Tuckpointing - Hydrated Lime is Best
Original Copyright 1998 - Tim Carter ALL RIGHTS RESERVED - Revised 2023
A Blending Experiment
The mortar mix you see used by brick layers today contains two ingredients: hydrated lime and Portland cement. In fact, the Portland cement ratio is quite high. Old brick layers used to mix their own mortar on the site by blending lime with Portland cement. Old houses, say over 100 years, rarely had any Portland cement in the mortar. The bricklayers just used hydrated lime and sand. This is what the Romans used to make their concrete. They also discovered early on to blend volcanic sand that had a very high silica content. They mined this from local volcanos in Italy. It's called pozzolanic deposits if you want to get technical.
How do I know this? My college degree is in geology. Why is it so important to have a high silica content in your mortar or concrete? Silica has a hardness of 7 on the Mohs scale and is a major component of granite. Surely you know how long-lasting granite is, right?
Hydrated lime and Portland cement are available at building supply houses that supply bricklayers. If you look in the Yellow Pages under "Brick - Supplies" you will eventually find a company that sells bags of lime. It is inexpensive and it is white - pure white! Author's Note: The previous sentence shows you how old this article is. What young person even knows what the Yellow Pages are?
Mortar Strength / Self-Healing Properties
Brick walls are constantly on the move. The heat of the sun causes them to expand and contract. If the mortar between the brick is too hard, the brick will crack. Portland cement makes mortar hard. Older brick tend to be softer than today's brick. Thus, old mortar had much less Portland cement than today's mortar. The lime content of the old mortar was very high.
Why is hydrated lime so important? You need to understand how it's made. You also need to recall a bit of your high school chemistry. Hydrated lime is a powder. It's made by taking the extremely durable rock limestone and heating it to a very high temperature. The heat of the fire creates a chemical reaction in the rock. The Romans discovered quite by accident this as they probably had roaring fires that were surrounded by pieces of limestone to contain the fire. Once the fire was out and a rock was crushed, they discovered if you took the powder and mixed it with water, the slurry would get HOT and once it cured it was ROCK again! They simply reversed the chemical reaction.
Lime adds another benefit, one we could use in today's mortars and even concrete. Hydrated lime is somewhat water soluble and reacts with carbon dioxide and water. Small amounts of the hydrated lime remain in the mortar you make. As time goes on, the lime in the brick will can wake up if a small crack develops. The crack allows water and carbon dioxide to enter deep into the mortar. The lime reacts with the water and gas and heals the crack.
This is a fantastic small book sharing exactly how you should use hydrated lime. CLICK THE IMAGE or HERE to have it delivered to your home in days.
The first step in mixing new mortar is to blend Portland cement and lime together. If the mortar is very soft and old, you may choose to blend six parts lime to one part Portland cement. If your mortar is very light in color, be sure to purchase white Portland cement. If the mortar is darker, you may get by with gray Portland cement. Mix a very small batch to begin. I would mix no more than 7 to 8 ounces (by volume) to begin. You then mix two parts sand to one part of the blended lime and cement. Be sure to write down your proportions.
You blend the sand, lime and cement together dry. Then add just enough water to make it wet enough to form into a ball. The color of this mixture should match very closely the color of the existing mortar when it is wet. If not, you need to start over with your lime and cement proportions. Pay attention to the sand proportions too. If the existing mortar has not too much sand visible, you may have to mix 1.5 parts sand to 1 part of the blended lime and cement.
To get a perfect match, you should let the mortar dry for several weeks. Hold the sample next to the existing mortar to see how close you came.
Buildings sometimes settle and cracks develop in the mortar joints. Older mortar will succumb to the elements and simply erode away. This is often the case if water leaks from a gutter or downspout and is allowed to stream over the face of a brick or stone wall.
I have chiseled out many a mortar joint. It is tedious work, plain and simple. If you want excellent results, be prepared to take your time. The brick must not be chipped in the process. You can easily chip brick or stone if you aggressively attack the mortar joint. Hard blows from a hammer will transfer concentrated blasts of energy to the mortar. This energy is often absorbed by the brick. Chips and cracks are common if you hammer too hard. The chiseling action must be directed sideways in the joint, not towards a brick.
Mortar Removal Tips and Techniques
The removal of the old, loose mortar is the most important part of a tuckpointing job. If you cut corners here, you might as well forget about doing the job at all.
There are three ways to tackle the job: hand work with a hammer and chisel; the use of power equipment, or a combination of the two. If you have just a little repointing to do, a hammer and chisel may be the trick. However, if there is a significant amount of work you may combine a grinder or a hammer drill to assist you.
IMPORTANT TIP: Power equipment will permanently damage brick surfaces. You will become fatigued and a drill, power chisel, or a grinder will slip and scar or chip a brick. I only advocate the use of power equipment for small periods of time when you are fresh and alert.
The task of removing mortar by hand is made easier if you choose the correct chisel. Purchase a special brick pointing chisel. It is a small, flat chisel that resembles a miniature, thickened carving knife. The chisel comes to a point and the shaft of the chisel is approximately 1/8 to 3/16 inch thick. This way it can easily fit between two brick.
You need to chisel approximately 3/4 inch deep into the old mortar to enable you to get a good bond with the new mortar. The new mortar needs to be able to have adequate brick surface to adhere to.
If the mortar is old lime mortar, chiseling will be easy. If the mortar is a rich Portland cement mortar you may have to use a roto-hammer with a 1/4 inch bit. Drill straight into the mortar keeping the holes about 1/4 inch apart. This method will allow you to finish the job with the pointing chisel.
Always remove the loose mortar and dust before proceeding. I always squirt out the joints as well with water. The surface of the old joint must be dust and grit free for a good bond.
Matching Mortar Color
Once you have removed all the loose mortar, you still must invest a lot of time for a perfect match. Mortar texture and color must be matched. Color tinting may be involved. It was not uncommon for masons of old to add natural pigments to the fresh mortar mix. Dirt and weathering forces can cause the mortar to have a different appearance than when first installed. This is especially true of horizontal mortar joints, as you will find in brick walkways. My front sidewalk mortar is very dirty, even though it is only eight years old. When I go to repair a joint, I will be forced to scrub the joints clean with my Stain Solver Oxygen Bleach to make sure the repairs will match.
Sand Colors
Look closely at your existing mortar joints. If your house is older you will undoubtedly see lots of sand particles. Notice the different sizes and colors of the individual grains of sand. These small dots of color are responsible for a vast majority of the overall color you see. It is no different than the color photographs you see in the newspaper each day. Those photographs are made up of tiny color dots.
If you want your tuckpointing to match the existing mortar, you must start first with the correct sand. It might not be as hard as you think to locate the sand. The key will be to think about when the house was built and where sand pits were located at that time, not the present locations. Freight, or hauling, is the largest cost when buying sand. That is true today and it was true 100 years ago. For this reason, brick masons try to purchase sand from a convenient source.
Ask the experienced employees at the local brick supply houses and gravel pits where the sandpits of old used to be located. Try to see if there is still sand available from these old pits.
Mortar Analysis
To get a sample of sand from your existing mortar to compare with new sand, you need a little bit of muriatic acid. The acid will dissolve the old lime and cement from the mortar. The net result will be sand in the bottom of the glass or other vessel you choose to use for this simple process.
If you live in a coastal area, where sand often contains sea shells and other calcium carbonate pieces, the acid treatment will not work. The acid will dissolve the sand!
Mix 1 part of acid to 5 parts water in a clear glass if possible. Drop in some of the old crumbling mortar. If the mortar begins to bubble vigorously, that is usually an indication that the mortar contains a high percentage of lime. If there is minimal bubbling, Portland cement may be a majority binder.
In either case, allow the mortar to sit in the acid solution for up to several hours or days. You can redo the experiment after the bubbling stops to make sure the acid has done all its work. When completed, there should just be sand particles in the bottom of the glass. Pour off the acid and get the sand into a paper towel to dry. Once dry, put the sand into a small clear glass or plastic bottle that you can get from your local pharmacist. It's time to go find the new sand. Be sure you look at dry sand samples at the gravel pits and building supply stores. Pay attention to particle size and color.
Installing New Mortar
Once you have found the correct sand, and followed my instructions on how to blend the right amount of lime and cement with the sand, you are ready to point the brick joints. You need two or three simple tools to make this an easy task. Purchase or borrow a regular brick trowel, a small pointing trowel and a tooling jointer. The pointing trowel is simply a thin, rectangular piece of metal that is attached to a wooden handle. They come in different sizes to match the width of the mortar joint. Always use one slightly smaller than the width of the joint. The tooling jointer is simply a tool that creates a profile to match that of your existing joint. Some are concave, others create a V-groove and still others create a line.
You need to dampen the old mortar joint before installing the new mortar. Place mortar on the full sized brick trowel and hold this level with the joint to be filled. Use the small jointing trowel to bulldoze mortar into the joint. Take your time and do not get any mortar on the face of the brick. Strike off any excess mortar and allow the mortar to stiffen before tooling it.
To really match color and texture, you may have to distress the new joint in a month. Acid washing will often create a weathered appearance. Coffee, tea or other colored liquids can add colors to recreate dirt or other stains. Stand back at the street to judge the results of your work.
Message from Tim:
Years ago while researching a column about cleaning decks, I discovered the wonders of Oxygen Bleach. It is perhaps the 'greenest' cleaner I know of as it uses oxygen ions to break apart stains, dirt and odor molecules. There are no harsh chemicals, and it works on just about anything that is water washable.
I decided to create my own special blend using ingredients made in the USA. In fact, the raw materials in the active ingredient are food-grade quality registered with the FDA. I call my product Stain Solver. I urge you to use it to help clean your mortar. You will be amazed at the results!
#7 (rev. 2001) Water Resistance of Brick Masonry - Design and Detailing Part I
#7A (rev. 2001) Water Resistance of Brick Masonry - Materials, Part II
#7B (rev. 2002) Water Resistance of Brick Masonry - Construction and Workmanship, PArt III
#7C (1965) Moisture Control in Brick and Tile Walls - Condensation
#7F (1986) Moisture Resistance of Brick Masonry - Maintenance
#8 Mortars for Brick Masonry
Brick Veneer Wall Flashings and Mortar Netting
There are numerous products that will work as good flashing materials. Where do you find them? Well, it may not be easy. I doubt that you will find them at a large home center. Generally, you must find a large brick supplier in your town that has a full line of brick supplies. If they don't stock the materials they almost always can order them. You can check the manufacturers listed below and ask who distributes their products as well. What ever you do, do not purchase PVC or low density polyethylene garbage bag type plastic.
RKL Building Specialties, Inc. This is a thin copper flashing coated with asphalt.
Carlisle Coatings & Waterproofing They make rubber flashings.
Firestone Building Products Co. As you would expect, rubber flashings - just like their tires!
Grace Construction Products Perm-A-Barrier - a modified asphaltic compound bonded to high density cross laminated polyethylene. Self adhering. This product looks like a winner to me.
Wirebond Fiberweb polyester film and Aqua-Flash® flashing
Cassady Pierce Company Copper and rubberized asphalt flashings
Sandell Manufacturing Co. Copper and rubberized asphalt flashings
York Manufacturing These are copper flashings available in different weights and with different fabrics and compounds. Flexible, just about any flashing for any purpose.
Mortar Net USA A wonderful invention that keeps water flowing!
Masonry Construction - This is a trade publication magazine that appears monthly. It is loaded with excellent articles on masonry. If you go back through past issues you will find numerous articles that speak about brick veneer leakage, flashings, and special mortars. The publishers even sell a book of past articles titled "Flashing in Masonry Construction: Selection, Detailing and Installation."
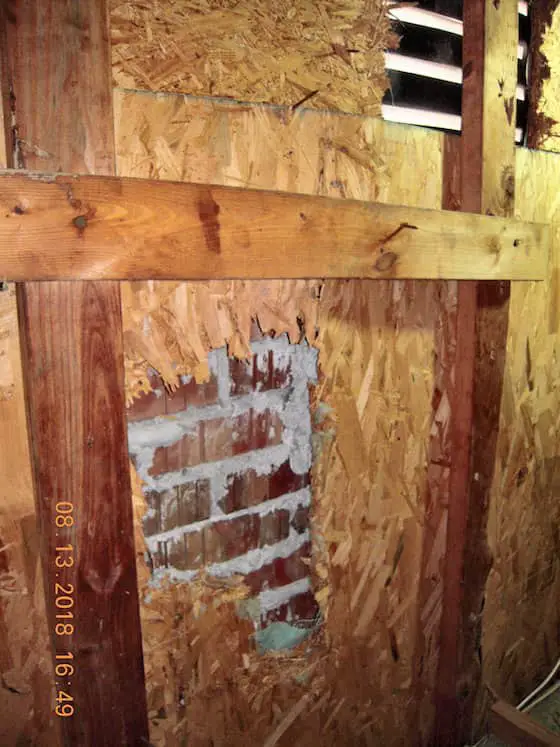
This is what the back of your brick veneer looks like. Note how it often touches up against the wood wall sheathing! This column was SO GOOD that I shared with the 31,000 subscribers who read my November 18, 2018 AsktheBuilder Newsletter. Copyright 2018 Tim Carter
"Water enters brick walls where the mortar contacts the brick. Yes, I know that looks like a solid joint, but we're talking tiny cracks."
Brick Veneer Leaks Checklist
brick veneer has a long history of leaking
hydrated lime mortar is the best one to use
high-quality flashings in the brick capture the water
unclogged weep holes are a must
Brick Veneer Leaks Are A Surprise To Many
The reason I felt that brick construction was waterproof was based on my observations. I had worked in hundreds of older brick homes. None of them had any apparent water damage. I never recall getting a complaint from a homeowner in one of these older homes about water streaming down an interior foundation wall after a moderate rainfall.
There is a big difference between the solid brick houses of 100 years ago and the brick veneer houses of today.
This is a solid brick house. Behind the brick you see on the outside is a layer of 4-inch-thick concrete block or another interlocking row of brick. All you have to do to determine this is to look for the stretcher brick that is laid on end in the different rows. Copyright 2018 Tim Carter
When Were Solid Brick Houses Built?
Brick houses from the turn of the century and even those built during the 1950's where almost always solid masonry construction. That is, the exterior walls were constructed of several layers or wythes of brick. Some older houses that I worked on had brick walls that were 3 rows thick! These walls often measured 14 inches thick.
These older brick walls were massive. They were structural in nature. That is, they were designed to support the floor loads and roof loads of the structure.
New brick construction doesn't even compare. The brick on your new home or the one you might be getting ready to build is simply a facing, a veneer. Rarely are these bricks supporting anything but themselves. The walls are only one brick wide.
Where Does Water Leak Into Brick?
Water enters brick walls where the mortar contacts the brick. Yes, I know that looks like a solid joint, but we're talking tiny cracks. What's more, when you add wind to the rainfall, you can have real problems. Driving rain happens all over the U.S., but some places get driving rainstorms more than others.
Why Don't Solid Brick Houses Leak?
The older solid brick houses didn't experience leakage for two primary reasons. The water had a long way to go and the bond between the brick and mortar didn't have as many tiny cracks. Older brick construction provided an often solid barrier. The water may have to penetrate 12 to 14 inches before it got inside. By this time, the rainstorm may have long since passed.
Was the Brick Mortar Different?
Furthermore, the mortar that was used to hold together the brick years ago is very different than the mortar used today. Years ago the bricklayers blended their own mortars. They would mix sand and hydrated lime to make their mortar.
Some masons might have added Portland cement. A typical mix of this tri-blend might be five parts sand, three parts lime and one part cement.
Does Modern Mortar Contain Lime?
Most modern-day premixed bagged mortars do not have as high a lime content. They tend to have a higher proportion of cement.
This gives the mortar higher strength, but strength is rarely a factor when dealing with a brick veneer. Remember, the brick on a brick veneer home has no structural value. Strength is not a factor.
The lime in a mortar plays a special part. Its presence allows for better bonding qualities, plasticity or workability, moisture content stability and elasticity. These may sound confusing so let me explain.
Lime is a unique compound. In the dry form, it's simply a powdered form of calcium hydroxide. When this dry compound reacts with water and carbon dioxide it begins to crystallize.
This is a fantastic small book sharing exactly how you should use hydrated lime. CLICK THE IMAGE to have it delivered to your home in days.
If enough lime is present in a mortar mix, believe it or not, not all of it gets totally wet when initially mixed. Some of the lime sits around for years deep inside a mortar joint. Then, if a small crack develops, water and air might start to penetrate the brick. The lime gets wet and crystals start to grow. Soon the crack has closed up. This magical property is called autogenous healing. It can stop water leakage big time.
Did Bricklayers Know Brick Leaks?
Commercial builders and bricklayers have known for many years that brick walls are not waterproof. They have developed extensive building practices and products to capture this water and redirect it back to the exterior face of the brick. They use continuous flashings. These flashings work very much like the flashings on the roof of your house. A flashing is simply a barrier material that is unaffected by water.
How Was Brick Knowledge Taught Years Ago?
Years ago, workers who entered the construction trades did so as apprentices. The knowledge of each craft was passed down slowly and methodically. For whatever reason, this practice ended at the end of the 1950s for the most part.
Construction workers today simply don't receive the training like they used to. Knowledge about a trade is either missing or not transmitted. The result is poor performance of products or construction techniques.
A perfect example of this is bricklaying. The connection of knowledge transfer between the commercial bricklayers and the residential bricklayers is broken. Many residential bricklayers (and builders) don't have the foggiest idea why a wall flashing is an integral part of a brick wall.
What is the Worst Brick Flashing?
This is why you see builders and bricklayers use the inexpensive black garbage bag type plastic. This is why the joints where this plastic overlaps are not sealed. This is why there is no flashing above window or door headers and below window and door sills. It is a nightmare. Just ask any homeowner who has a leaking brick house.
You now know that the garbage bag plastic is worthless. It tears easily. It becomes brittle. Some builders (very few) switched to a thicker PVC flashing five to 10 years ago thinking that this would solve the problem. Heck, I used this stuff. Recent studies have shown that this material is not much better than the worthless garbage bag type plastic. The PVC looses its plasticity within five to 10 years and becomes brittle. Brick movement can cause tears.
Are There Great Brick Flashing Materials?
There are good flashing materials available. They cost a little more than the bad flashing materials. They take a little more time to install. But, if done properly, you will have a leak free brick home.
What are the Best Brick Flashings?
Some of the best brick flashings incorporate a very thin piece of copper embedded in an asphalt impregnated mat. Other flashings are high-density cross laminated polyethylene membranes. Some of the materials are modified asphalts with rubber. They all are made so that overlapping joints, inside and outside corner details can be easily sealed.
How Does a Brick Flashing Work?
A brick flashing is designed to intercept, capture, and divert the water flowing down the back of the brick. It redirects the water back out to the front of the wall.
Let's assume that you've put in your perfect flashing. That is only part of the job. Now we need to get the water back from behind the wall. We need to create little tunnels and make sure that the pathways to the tunnels are not blocked.
What Happens to Excess Mortar?
When laying brick, if too much mortar is used, excess mortar can fall behind the wall as the brick is pushed into place. These mortar droppings can't be removed.
This is what the back of your brick veneer looks like. Note how the excess mortar often touches up against the wood wall sheathing! Copyright 2018 Tim Carter
Can A Hidden Mortar Dam Form Behind the Wall?
If enough mortar falls behind the wall, a solid barrier can form. The trapped water then looks for a place to go.
I've seen where this water has built up, entered the frame wall and traveled under a hardwood floor some 10 to 12 inches. The water finds a seam in the subfloor and then drips into the basement. Imagine what will happen to this house in a short period of time!
What are Brick Weep Holes?
Weep holes allow water to escape to the outside of a brick wall. They should be placed as low as possible where a course of brick sits on top of a horizontal barrier (foundation, or a window or door lintel.) These weep holes should be placed every 24 inches.
I would also give serious consideration to a specialty product as well. This product is a plastic netting that fits behind the first several courses of brick immediately behind the weep holes. The netting is cut in such a fashion that it has different horizontal levels. Mortar droppings fall onto these levels and build up. However, the water can move sideways and then fall through the mesh. It hits the flashing and flows uninterrupted through the weep holes.
If you want a leak-free brick home, you must obtain some of the literature I have listed. Also, obtain some of the product literature brochures for clear, crisp illustrations of how these specialized flashings work. A little homework on your part will pay huge dividends.
Many of the following manufacturers will not be familiar to you. Their products are not commonly sold at most local hardware stores or 'giant' home centers. To find quality products, you may have to drive just a little farther and visit the stores that professionals buy from. In many instances, you will find the products below at building supply stores where sand, cement and plaster are sold. Brick companies often sell these high quality clear coatings. Once again, beware of products that say 'water repellent'. You may be purchasing a film forming sealant! If you have questions about a specific product, email me. I have a super detailed list of just about every clear coating made and its chemical makeup. I can tell you if it is a film forming sealant or a penetrant. Don't hesitate to contact me.
Author's Notes:
In August 2001, Joan Kaufenberg of ChemRex Technical Services sent me the following letter.
The EPA regulations that went into effect September 1999 lowered acceptable VOCs for all architectural coatings. There is a wide range of what is acceptable, depending on how the product is classified.
Most companies have reformulated their more popular products to be higher in active ingredient with a lower solvent content, or they have developed a waterbase or waterborne version. In some cases they have kept the same name, which is confusing, or they have added "VOC" after the old name to denote VOC compliance. In other cases, products have simply been dropped.
Descriptions of "water repellent" vs "sealant" vs "sealer" seem to be used interchangeably in the industry. One name more than the other does not necessarily denote a film former or a penetrant. However, we usually use the word "Sealant" to refer to a compound used for caulking--sealants are the higher quality elastomeric urethane, silicone, epoxy or polyurethane products used in expansion and control joints. The term "Sealer" usually refers to a coating or a penetrating product. It can be silane, siloxane, acrylic, urethane, or epoxy (or an inorganic silicate material which is used for hardening and dustproofing a concrete surface).
If customers want to contact us, they can call Customer Service at 800-433-9517 to find out the nearest dealer. Or they can call Technical Service at 800-243-6739 with product/application questions.
Dow Corning Corporation PO Box 994 MIDLAND MI 48686-0994 989-496-7881
BASF Building Systems 889 Valley Park Dr. Shakopee, MN 55379 952-496-6000
Hydrozo Silane Sealers
SaverSystems 800 S. 7th St. Richmond, IN 47374 800-860-6327
Masonry Saver Silane/Siloxane Blend penetrant
Thompsons Company 101 Prospect Ave. NW Cleveland, OH 44115 800-367-6297
Thoro Systems Products 7800 N.W. 38th Street Miami, FL 33166 800-327-1570
Thorosilane Siloxane Penetrant
Are you one of the manufacturers listed above? Do you want your company name to be a link to your website? Click here.
Properties of Various Clear Coatings
Data compiled by the Brick Institute of America 1995
Breathability - Water Vapor Transmission
Ability to Repel Water
Service Life
Film Forming Sealants
Acrylics
Poor
Very Good
5-7 Years
Stearates
Poor
Varies
1 Year
Mineral Gum Waxes
Poor
Good
Varies
Urethanes
Poor
Very Good
1-3 Years
Silicone
Fair
Varies
1 Year
Penetrants
Silanes
Very Good
Very Good
10+ Years
Siloxanes
Very Good
Very Good
10+ Years
Blends
Varies
Varies
Varies
Clear Coatings Literature
Colorless Coatings for Brick Masonry 6A (www.gobrick.com/BIA/technotes/TN6A.pdf) Moisture Resistance of Brick Masonry Maintenance 7F (http://www.brickinfo.org/pdfs/7F.pdf)
Available from:
Brick Institute of America 11490 Commerce Park Drive Reston, VA 22091 http://www.gobrick.com/
Reducing Water Permeance in Masonry Walls & Chimneys (http://www.chimneysaver.com/reducing_water_permeance_in_masonry_walls_and_chimneys.html) by: John Meredith Sweeping April - May 1994 Issue
Sweeping is a trade publication for chimney sweeps. It is possibly available in your library.
Brick, concrete block, stucco and mortar can absorb massive quantities of water. In fact, bricklayers often cover brick and block piles on the jobsite to protect them from rain. The reason is simple. Brick and block have a property referred to as 'suction'. This suction draws water from wet mortar into a brick or a block when it is laid. This, in turn, rapidly stiffens the wet mortar. This stiffening allows the bricklayer to continue to lay row after row of block and brick. If bricks absorb too much water, they can't suck water from the mortar. When this happens, the brick or block 'swims' in the wall.
Like a Sponge (Hum....)
Those of us who live in areas that experience freezing weather can testify to the power of freezing water. Allow water to soak into a brick, let that water freeze, and BINGO, major problems soon develop.
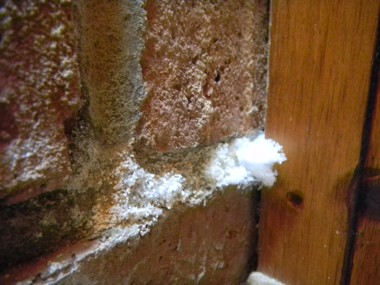
Efflorescence growing in the mortar of a brick fireplace. PHOTO CREDIT: Michael Hannum
Many people have experienced efflorescence (white salt deposits) on brick or block. Efflorescence is made possible by the tiny passageways in brick, block and mortar. Water travels right through a brick and dissolves the salts. These salts deposit on the surface of a brick after the water evaporates.
100 Years Ago
Many people have houses built from reclaimed or 'used' brick. These brick were often fired in low temperature kilns. The outer face each brick would vitrify (get hard), but often the core would remain relatively soft. Some bricks were harder than others depending upon their location within the kiln. It was an inexact science.
New brick are not all the same. Some new brick can be very soft. The clay used to make the brick can be of poor quality. The manufacturer may cut costs by reducing the amount of time the brick spend in the kiln. Quality control may be non-existent.
The point is this, in order to protect your brick structure, you may have to consider using some of the new clear masonry coatings. However, as in all things, there is a big difference between products you may be considering.
Sealers vs. Repellents
During the past 25 years, there has been an explosion of products that can be used to 'seal' masonry surfaces. The problem is, some things should be sealed and others should not.
My Webster's Dictionary defines seal as "a tight and perfect closure (as against the passage of gas or water)". Hmmmmmmmm, do you see the problem? A true sealer will totally block the passage of water. In fact, it will most likely block it no matter which direction it is headed (into or out of the item being sealed).
There are two primary categories of colorless coatings that you might apply to brick or masonry surfaces: film forming sealants and penetrants.
A film forming sealant produces a thin, solid film on the surface. A penetrant, on the other hand, is absorbed into the brick or masonry.
Sealants
Sealants work great if you are trying to coat brick or masonry to prevent absorption of oil, paint (graffiti), chemicals, etc. They also do a fantastic job of keeping water from entering brick or masonry. However, they have serious drawbacks.
Sealants can inhibit, or stop, the ability of a brick or masonry surface to breathe. Because they form a film at the surface of the brick or surface, they stop trapped water or water vapor from escaping into the atmosphere. In colder climates, this can cause brick spalling (flaking) when water, trapped behind the sealant, freezes, expands and fractures the brick or masonry.
Film forming sealants can also trap dirt, discolor, change the color of the masonry or brick, and produce a sheen or gloss when applied.
Sealant Ingredients
Film forming sealants often contain one or more of the following principal ingredients: acrylics, stearates, mineral gum waxes (paraffin), urethanes, and silicone resins. All of these ingredients act like paint when they come into contact with brick or masonry. They simply 'stick' to the surface and form a film. Some sealants are so heavy bodied that they can bridge small hairline cracks.
On a microscopic level, sealants are 'big'. Their large molecular structure does not allow them to penetrate into the small passageways in brick, block, stucco and mortar.
Often the principal ingredients of a sealant are listed on the product label. If you see any of the above things mentioned, you very likely are dealing with a sealant. Don't be fooled by labeling that says 'Sealant - Water Repellent'. Yes, sealers repel water, but you may want a product that breathes.
Penetrants
Penetrating clear coatings are, in almost all instances, the top performer. These products are excellent water repellents. They have a great ability to penetrate deeply, sometimes up to 3/8 inch into a brick or masonry surface.
Penetrants do not form a film on the surface of brick or masonry. Rarely do they change the appearance or color of the surface. They are able to penetrate because of their tiny molecular structure. These products coat the insides of the tiny passageways of the brick and mortar.
The primary ingredients of penetrants are silanes, siloxanes, or a blend of these ingredients. Note that these two ingredients look very similar to silicone. Do not confuse them!
Silanes have a very small molecular structure. They can penetrate deeply into masonry surfaces. Siloxanes have a slightly larger molecular size, but they also penetrate quite well. The interesting thing is that both of these compounds can chemically bond to the silica and alumina minerals often contained in brick, block, stucco and mortar. This bonding property and their ability to penetrate make for long service lives. Often these penetrating compounds can last in excess of ten years!
Be sure to read product labels. If the label doesn't say what it contains, call the manufacturer and ask. Always ask for the technical department when calling.
Over the years, I've seen many different spellings of efflorescence. Here's my growing list: effervesce, effervescence, effervescent, effleresants, effloreflance, efflorescence, efflorressance, effluorescence, eflorescence, eflorescents, ellforesce and ifflorescence.
Jennifer emailed me about a problem with mold in her shower drain pipe. Let her tell you what's going on:
"Help Me Tim!
In my newly constructed bathroom, I can already see mold (black and red mold) growing down inside the white PVC drain pipe of the new shower. Since it's only a couple of months old, I am wondering what happens after years go by.
Did the plumber use the right material when he installed a white PVC pipe for our shower drain? How is someone supposed to get rid of that mold without taking apart the shower drain every month? Thanks!"
Here's my answer to Jennifer:
That mold is normal. It can and should be cleaned. The sides of the pipe leading from the drain strainer down to the trap get covered in a bio-film. This gooey film is made up of soap, shampoo, body oils, bacteria, etc. It is a perfect environment for mold to grow in and on.
Simply take off the chrome ring of the drain strainer and use a bottle brush to clean the sides of the pipe as you run water in the shower. The mold and bio-film will wash off very easily. As for preventative measures, there isn't much you can do. Once you see how easy the mold and bio-film disappears, you will not be concerned.
These website links worked for me when this bulletin was published. Sometimes web pages disappear so if you get an error message make sure the link is exactly as it appears below before you give up.
http://www.aiha.org/ This website is the home of the American Industrial Hygiene Association - 1-703-849-8888. You can find environmental consultants/contractors here.
http://www.cdc.gov/health/mold.html This website is the home for Centers for Disease Control and Prevention (CDC), National Center for Environmental Health Questions and Answers on Stachybotrys chartarum and other molds.
http://www.cal-iaq.org//iaqsheet.htm This fact sheet from the California Department of Health Services provides information to people who have experienced water damage to their home and presents the health concerns related to mold exposure. It also provides general guidelines on mold detection, cleanup & removal of mold contaminated materials.
http://www.ehib.org/html_entity.jsp?bcc=papers&paper_key=FUNGI_INDOOR_1996 This web page from: Health & Environment Digest Vol 10, No. 2, pages 9-12, May/June 1996 titled Fungi & Indoor Air Quality written by Sandra V. McNeel, DVM and Richard A. Kreutzer, MD describes types of molds commonly found indoors in home and offices. Health effects and the physical conditions that encourage their growth are discussed. This article contains a table containing selected important molds found in damp buildings and how to prevent and control mold contamination.
http://www.epa.gov/mold/moldresources.html This website is provided by the EPA on identifying mold, clean-up and prevention. This site also contains links to other sites including the American Red Cross, New York City Department of Health and Occupational Disease Prevention, University of Minnesota, Department of Environmental Health and Safety and the Carpet and Rug Institute.
http://www.epa.gov/iaq/schools/tfs/guideh.html This is another website provided by the EPA and addresses mold and moisture in schools. This site goes into identifying and correcting common mold and moisture problems.
http://aappolicy.aappublications.org/cgi/content/full/pediatrics%3b101/4/712 This webpage is from the AMERICAN ACADEMY OF PEDIATRICS Committee on Environmental Health tells about the toxic effects of indoor molds. This page describes mold, their toxic properties, and the potential for causing toxic respiratory problems in infants. Also gives recommendations for pediatricians to reduce exposure to molds in infants and children.
http://iaq.custhelp.com/cgi-bin/iaq.cfg/php/enduser/std_adp.php?p_faqid=3018 This web page provided by the EPA is about Biological Pollutants in Your Home. This page provides you with information to identify what indoor biological pollution is, whether your home or lifestyle promotes its development and how to control its growth and buildup. Gives a list of questions to ask your doctor to help determine the effects on your health that may be related to biological pollutants in your home. This is a really helpful webpage.
If you want to remove mold in a hurry, it is best to use a solution of chlorine bleach and water. Chlorine bleach is an awesome sanitizer. But chlorine bleach is so harsh it can take the color out of fabrics and actually ruin fabrics. Chlorine fumes are also unpleasant, and can cause distress in people who suffer from asthma. If you make a mistake and mix chlorine bleach with other cleaning products, you can make poisonous chlorine gas!
The alternative is oxygen bleach. Oxygen bleach does a fantastic job of cleaning mold from surfaces and fabrics. My Stain Solver oxygen bleach is blended with soda ash to produce a powder that has maximum cleaning action. Call us at 513-407-8727 to order or visit: www.stainsolver.com
Expert Advice For Your Home
Subscribe to the FREE Ask the Builder newsletter to receive professional advice for your home. Complete the form below and each week you'll get:
DIY Tips
Tool Reviews
Project Guides
Product Discounts, Giveaways & more.
Unsubscribe at any time. We respect your email privacy.