Tile Manufacturers
|
|
Ceiling Grid Options
Want to see a wide variety of ceiling grid options? If so, contact this company. You will be amazed at what is available!
- Chicago Metallic
410-796-8220
|
|
Ceiling Grid Options
Want to see a wide variety of ceiling grid options? If so, contact this company. You will be amazed at what is available!
Layout / Planning the Job
Your finished acoustical ceiling look will live or die at this stage of the game. A poor layout will result in uneven or small border tiles. Both situations are to be avoided at all costs. The use of simple graph paper will allow you to create the ceiling layout on paper before you goof it up in the air. Use readily available 1/4 inch graph paper to make a scale layout of your ceiling. You will be able to see how the borders will appear. The goal is to create borders which are as wide as possible.
Center Lines
The center lines of the ceiling for both width and length may not be the best place for the edges of tile. By placing the center of a row of tiles on the center line, you may produce the widest border along the edge. Use your graph paper and create two possibilities for your ceiling size. See which one produces the widest borders.
Out of Square Ceilings
Is your ceiling out of square? To create the best looking ceiling, you must split the difference of the mistake. How? Well let's say the ceiling is 12 feet wide at one end and 12 feet 2 inches at the other end. On the 12 foot wall make a mark at 6 feet, the exact center of that wall. On the other wall, make a mark at 6 feet 1 inch. Snap a line between the two points. This will produce border tiles which will flare equally. If you were to make the centerline parallel with one of the side walls, one of the border edges would accept all of the mistake. This actually draws attention to the fact that the room is out of square.
Suspended Ceiling Grid Systems
If you are using a grid system to hold up your tile, you start your installation of the grid by installing the wall angle around the room. This is the simple L shaped metal piece. Pay attention to the manufacturer's minimum height restrictions! In other words, if you are using 2 x 4 foot panels, you often must make sure that the bottom of the grid system is 2 to 3 inches below the lowest point in the room. Without this clearance, you can't install the tiles! Don't forget this important step.
The wall angle is simply nailed to the side wall. Never chalk the level installation line at the bottom of the wall angle! Always chalk the line where the top of the angle will end up. Space the nails at 2 foot or less intervals. At inside corners you simply place one wall angle on top of another. Mitered corners look best at outside corners.
Installing the Grid Work
Patience and attention are required at this point. A mistake at this level will cause lots of problems. The trick is to install the main support tees along the centerline AND to install it so the cross tee slots will be in the correct location. In other words, you can't simply put the main tee up anywhere. If you start it wrong, the intersecting cross tees will not be in the right place or worse yet, not in a straight line! I guarantee you that the grid will come with instructions. Read these carefully until you understand them. Then, and only then, proceed!
Hanger Wire
Use the correct size of hanger wire. Residential ceilings can often be installed using 18 gauge wire. Commercial ceilings always require 12 gauge or heavier wire. The wire is attached to screw eye hooks or neat little screws that have a flattened end with a nifty hole made for the wire. I prefer using these. Hanger wire can be lifted off of cup or open hook devices.
Staple or Glued Ceiling Tile Installations
The methods of layout and planning are the same for these systems. However, when you finally decide upon where the starting row begins, you must snap you starting line accounting for the staple flange. If you forget to do this, your border tile may be off by as much as 1/2 inch. Read the instructions closely to avoid this mistake.
Staple or glued tiles always start at one corner of the room. This means that you must pay close attention to your layout plan. It also means that the tiles must be installed square. Your border chalk lines must be square or you will have major problems.
Border tiles can be faced nailed with small headed colored nails. Stay close to the edge so that the finished moldings will cover and hide the nails. Be sure to prefinish your ceiling trim moldings. Finishing them in the air will create a situation where you may get paint or stain on the new tile!
Tiles can be easily cut with a razor knife. Holes for light fixture boxes can be made with a pointed drywall saw. Cut slowly or you may blast away material from the edge of the cut. Use a blade that has fine teeth if possible. Wash your hands frequently to avoid smudges on the face of tiles.
The Root of the Problem
Truss uplift happens because the exposed truss lumber in an attic space absorbs moisture. This acceptance of moisture causes the lumber to swell. The swelling lumber lifts the horizontal bottom chord of the truss causing it to bow upwards in the middle of the truss.
Where does the moisture originate? Are we going into another ice age, with winters that drench us with above average precipitation and humidity? Does this humidity seep into the attic because of the new-fangled soffit and ridge venting? The answers to both questions are maybe. However, the source of the problem, I believe, has nothing to do with outside humidity. The outside weather has been fairly consistent for many years, at least as long as we have been using trusses.
I believe that truss uplift is directly related to the fact that we are building houses with tight windows and doors, superior vapor barrier systems and air infiltration barriers. The moisture that used to leak out around openings and through walls now has only one escape route - the attic.
What To Do?
I certainly am an advocate for building tight houses and saving energy. To do otherwise wastes precious resources for future generations. I feel the solution lies in correctly identifying the problem, and coming up with a workable solution. Fortunately in this case, the solution is easy.
Truss uplift will continue to plague houses. As we use lumber that is younger and less dimensionally stable, the uplift may even intensify! Minimizing interior ceiling and wall damage can be accomplished by simply allowing for the truss movement. In addition, maximizing flow-through air movement in attic spaces will allow moisture absorption into the exposed lumber to be minimized.
Simple Hardware & Blocks
You can purchase simple metal L-brackets specially designed for attaching interior walls to roof trusses. They cost less than 50 cents apiece! It usually takes about 15 seconds on average to install one of these simple clips.
The L-brackets have a short leg about 1.25 inches long that sits on top of the wall. This leg has two holes in it that accept nails. The other leg of the bracket is about 2.5 inches long. It has a slot that runs lengthwise up and down the leg. A nail is driven in the center of the slot. The bracket holds the wall in position while allowing the truss to move up and down freely.
Drywall Hanging 101
To solve interior ceiling problems, drywall hangers must also be educated and part of the team. We know the truss will flex. As such, we can't allow the ceiling drywall to be attached to a truss within 16 inches of any interior wall. What keeps the drywall in position and constantly contacting the top of the wall? You have two options.
If you have scrap 2x6 lumber, you can cut blocks that fit between the trusses and overhang the top plate of the interior 2x4 walls. These blocks are nailed securely to the top of the walls, NOT the trusses. As the trusses move up, the blocks retain and hold the drywall edge flush with the top of the wall plates.
If lumber is too precious on your jobsite, you can use very inexpensive metal clips designed to retain the drywall. These clips cost less than 15 cents apiece and attach with small 8 penny common nails.
Repairing Truss Uplift Problems
If you're building a new house, inspect your trusses. They should not be nailed to a wall using 16 penny nails. If you see nails, they must be pulled and the special truss clips installed in their place. The walls need to be attached to the trusses so that they do not fall over.
When you need to repair trusses in your home, be prepared to be in a very grumpy mood. I just wanted to warn you. You will want to kill the rough carpenters who framed your house. The job is miserable, especially if you try to tackle it in the summer.
Existing House Problems
There are hundreds of thousands of existing houses that suffer from truss uplift. I saw it firsthand, for the first time, six years ago. I did not realize at the time what exactly was happening. I did determine by questioning the homeowner that it was a seasonal problem with cracks being the worst in February.
To achieve the best results, the job must actually occur in two phases. You need to release the trusses from the walls and reattach them with clips in the dead of winter. Then the summer months will find you installing the drywall clips or wood blocks that will hold the ceiling drywall tight to the wall drywall.
In the dead of winter the trusses should be bowed upwards. There should be a small gap between the truss and the top wall plate. If you are lucky, the gap will be large enough to easily slide a hacksaw blade between the pieces of wood. Cut through the nails holding the truss to the wallplate. Be on the lookout on both sides of the truss for electrical wires! An easier method may be to pull out the nails using a special tool called a cat's paw.
Once separated, the trusses need to be reattached to the walls with the special L-brackets. When attaching the truss clips, be sure that you drive the nail through the center of the slot on the leg that points upwards. Don't nail too close to the bottom or top of the slot. In addition, the drywall that is attached to the trusses near the walls needs to be released from the corners where walls meet the ceilings. You can do this by installing the 2x6 blocks in the summer months when the ceiling has settled back into position.
You can now safely install the drywall clips and retention blocks between the trusses. If you try to do all this work in the winter, you may crack the drywall as you beat it down to the top of the walls.
The following winter, nail pops will appear at each interior wall where a truss passes overhead. The nails need to be countersunk into the trusses to complete the job. Use a large, flat nail set to drive the nails up through the drywall into the truss.
If you do not do this, the patching compound you use to deal with the fresh nail pops will be pushed from each nail pop the following summer. As always, the time required to solve a problem far exceeds the time to do the job right in the first place. Fortunately, in this case, the work required is not too difficult. It simply is spread out over a period of months. Be careful working in the attic. Don't fall through to a room below!
If you are a gambling person, you can try to do all of this in the winter months in two weekends. Test an area of the ceiling first to make sure you are not cracking the drywall. If you can do the entire job in one phase, consider yourself lucky.
Truss Uplift Hardware
What's more, both companies make a special little clip that attaches to the top of the interior walls. These clips restrain the drywall and allow it to stay in contact with the wall drywall as the truss moves up and down. I highly recommend that you look at the web sites of both of these companies. You will be amazed at the wonderful metal hangers and brackets they have. These are framing connectors you do not ordinarily see in hardware stores.
Check out the wide variety of metal clips that will make your next home improvement job a breeze. For example, have you struggled with building a sturdy shelf in your garage? If you have exposed 2x4's it is as simple as driving four nails! You will find there are heavy duty shelf brackets made just for this purpose. Workbench building is easy too. There are special brackets that allow you to bang a sturdy workbench together in a few hours!
|
Truss Uplift Literature Resource Materials
The following magazines and associations have a multitude of articles, research papers and press releases concerning truss uplift. The associations will undoubtedly help you, although there may be a fee involved for some of their publications.
Magazine: The Journal of Light Construction
|
Associations:
|
They have a two page document titled Partition Separation Prevention and Solutions, available for free download.
Metal Ceiling Manufacturers
Not all patterns are available through all companies. I guarantee you that you will find interesting, authentic, and attractive products on the web sites. The solid brass and chrome panels will take your breath away.
Be sure to use your imagination when viewing the photos. Think how some wall panels might look in a hall powder room. Imagine ceiling panels that are spaced in-between wood beams in a study ceiling. Do you have a modern trayed (multi-level) ceiling? Imagine using the metal panels on one of the levels or as a border. Remember to keep in mind the scale. If you intend to use the panels for a kitchen backsplash, try to stick with a smaller pattern that will repeat within the 16 to 18 inch area commonly found between countertops and long wall cabinets.
Here are the two manufacturers that make panels from the original dies. They have a huge assortment of products.
The following company created dies of their own to recreate older patterns and some modern ones:
The following two companies are stocking distributors for Shanker Industries panels and trim:
The following company offers 24 unique panels in 6", 12", and 24" styles:
Other ceiling offerings:
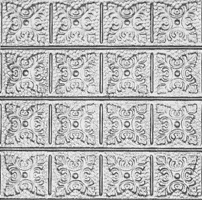
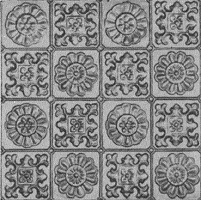
Metal Ceiling Patterns
The following illustrations are examples of some of the intricate patterns that you can purchase. There are literally hundreds of patterns. Some are 100 year old patterns made using the same steel dies from the last century! Some are more modern. Remember that there are all sorts of accessory pieces. You can get different filler patterns, cornice or crown moldings, inside and outside corners, center medallions, etc. If you are the slightest bit creative, you can create a stunning ceiling. The illustrations below are courtesy of the W. F. Norman Corp.
Related Columns
Time Has Stood Still
Based upon the response from people who read my column about metal ceilings, I am convinced that many people thought that the ceiling panels were unavailable. I have to admit that until I did the research for the column, I didn't realize that many of the original dies, used over 100 years ago, were still in use! Two companies are still in business that made the metal panels nearly one hundred years ago. In fact, one of the companies - W. F. Norman - still prints its 1908 catalog! Talk about time standing still in an industry. That surely must take the record here in the United States.
Multiple Uses
The restaurant industry is partially responsible for the renewed interest in metal ceiling and wall panels. Several national chain restaurants use metal ceilings. In fact, I was in one not too long ago that had thousands of square feet of metal ceiling in place. It looked fantastic in the bar area. I was eating dinner at the bar because the regular tables were full. Seriously, you can ask my wife!
I happen to like the metal panels when they are used on wall surfaces. If you choose a pattern that compliments your tastes, you can add a nice touch beneath a dining room chair rail. Metal wall panels also look smart inside of first floor powder rooms or in a basement family room. The facing to a family room bar will really look snazzy with metal wall panels in place. Perhaps the most innovative use is a kitchen counter top backsplash. Several photos show this in the brochures and booklets that I received while doing research for the column and this Bulletin.
Installation Tips
You need to keep in mind that the metal panels are just that. They are primarily steel or in some cases tin plated steel. This means they can rust if exposed to water.
Each manufacturer provides you with detailed painting instructions should you choose a material that requires priming and a finish coat. Always paint both sides of the ceiling panels, trim, cornice, etc. Remember water can come from a roof leak, plumbing leak or an accident from above!
Pay close attention to instructions regarding mill oil removal from the steel. Some steel mills coat rolled steel with an ultra-fine layer of oil. If your panels have this oil, paint will not adhere readily. Don't forget that water based primers can NOT be used to paint bare metal. You can often coat the panels and trim with water based paints once an oil primer has dried.
Attaching Panels and Trim
Metal ceiling panels are attached to furring strips in many instances. The spacing between strips, the shape of the strips, width of the strips, etc. are all a function of the pattern you choose. Each manufacturer gives clear instructions on what to do. Do not bother to install your furring strips until you have selected your material. You could make a big mistake!
Furring strip layout and installation is critical. The metal panels are precise. If you do not center your strips correctly or you install them with humps and dips, you will be able to see these defects when your ceiling is finished. Be sure you take your time with the furring strips!
Suspended Systems
Do you have a standard suspended ceiling in your office or basement? Did you know that many of the metal panels will fit into the grid system without any trimming? In fact, you leave the fiber panels in place to keep the panels from "lifting" when a door is opened.
If you want a really sleek installation you can choose a slimmer grid system or an invisible one. The invisible grid accepts metal panels that have a turned up edge. The metal ceilings that install in this fashion can look seamless if done correctly.
Check out the web sites of the manufacturers listed in this column. You will be amazed at the selection of patterns, trim pieces, accessories, etc. If you choose to use this material, you will not regret it.
Related Column
My daughter's high school has an auction every fall to help raise money for the school. Part of the auction is a raffle for a new home. It is a major event to put it mildly. The items that are auctioned are often donated, but some are made by volunteers, like my lovely wife Kathy.
This year Kathy and another woman ran the craft part of the auction. They made all sorts of items like birdhouses that looked like Santa Claus, special holiday aprons and other things that had stencil patterns on them. After several projects, Kathy got really good at the stencil part. It was amazing to watch her use these stubby stencil paint brushes and the small bottles of squeeze paint.
Perhaps the most interesting thing was watching the transformation. In the early stages, as the first colors are being applied, the pattern looks ho-hum. But once you stand back and add the highlight colors, it looks awesome!
Different Types of Stencils
Craft stencils can be simple or complex. If you visit a craft store that sells stencils, you will see this fairly quickly. The simplest stencils are one part and are just a cutout of the shape of the object. Examples of these are sea shells, rabbits, carrots, fruit, flowers, etc.
The more complex stencils create a realistic look or often a 3-D appearance. For example, our neighbor has a multiple overlay stencil of flowers on her kitchen wall. Different flowers overlap and block the colors of flowers farther back in the pattern - just like in a real garden.
You can get ivy overlay stencils that have the ivy wrapping around a trellis. The overlay stencils are easy to work with and create very nice patterns. They simply take a little more time to work with as you need to let the paint dry from overlay #1 before you proceed to overlay #2. An impatient artist or crafter can create smears!
Shading
When you start to practice stenciling, you will probably make the mistake I made. I put on too much paint. By applying paint in different quantities on different parts of the stencil, you actually create shadowing just like in a real scene or photo. Think of it, there are always light and dark areas on a painting or photo. You do the same thing by dabbing paint on a little lighter or heavier depending upon where you are in the pattern.
Most of the stencil guides come with instructions that give you some hints. The trick is to load just a little paint on the stencil brushes and tap the brush lightly and rapidly onto the surface that is being stenciled. You don't paint back and forth like you do woodwork. You tap the brush straight down onto the wood or paper. It is really easy once you get the hang of it.
Endless Possibilities
If you are going to stencil your countertops, I want you to practice first. Visit a local kitchen or bath shop and find out where they buy their plastic laminate tops. You can also look in the Yellow Pages under "Countertops - Fabricators". You want to visit the fabricator and ask for some sink cutouts or other scrap pieces. Practice your painting and stenciling techniques on numerous pieces of scrap before you tackle the actual countertop.
Continue the Design
Do you really want your kitchen or bathroom to look custom? Consider extending the stencil pattern up a wall or onto the backsplash between the countertop and wall cabinets. If the walls are painted and you don't like the look, simply cover up the stencil attempt with a fresh coat of paint. These types of bold decorating ideas are what separate the humdrum kitchens from those that make it into the magazines!
Protecting the Artwork
No matter what you end up stenciling, you need to protect it so it is easy to clean. Clear urethanes work best. If you have stenciled a wall, then use satin urethane. Countertops require high gloss urethane. Multiple coats protect your investment of time and effort. Put a minimum of 3 coats on countertops and 2 on walls.
Stencil Sources
Probably the first place to look for some stencils is at your local craft store. There are two national chains located in my town. They are Michael's and Franks. Both have a good selection of simple stencils and overlay stencils.
I would also consider going on the Web. I went to one Search Engine and found several stencil companies that have a wide assortment of simple and overlay stencils. One of the companies - Priscille's Stencils - had a very cool construction equipment stencil for a young boy's room!
Simply spend some time on the Web and you will undoubtedly find 10 to 15 stencil companies.
Other Stencil Companies
Here is a list of stencil companies that I was able to gather with my wife's help. All of these companies make stencils that are very cool. Many of the stencils also tell you right on the package what colors to use to duplicate the pattern that you actually see. There is virtually no guess work. You simply need to practice yourself.
Entertainment centers have been around for a long time in one form or another. Years ago, a visit to a furniture store would yield two or three different types of centers that were made to house all sorts of stereo equipment. Your choices going this route were pretty limited.
You could also contract with a custom cabinet builder to construct a center that had all of the bells and whistles. But this path was often taken by the wealthy and those who had just hit the lottery.
The fast growing trend of entertainment as a whole caught the eye of the cabinet companies that for years produced kitchen and bath cabinets. They were already set up to produce stock and semi-custom cabinets. Providing different entertainment center possibilities was not too much of a stretch for them. The result is a huge dividend for ordinary consumers such as you and I. You can visit just about any kitchen cabinet showroom and walk out with a brochure showing you all sorts of entertainment center cabinets. These different components can be mixed and matched to fill just about any alcove or wall space that you wish to dedicate to home entertainment.
The cabinets used in entertainment centers are not much different from regular kitchen cabinets. Well, that isn't entirely true. Some of the cabinets are huge! Take my TV tower for example. The cabinet was so big that I had to cut it into two pieces to get it down my basement steps! Be sure you think about this before you sign a custom order!
How did I cut this cabinet without any visible signs of damage after it was reassembled? Two things worked in my favor: first, the TV tower was 6 inches taller than all of the rest of the cabinets. Who would know if I shortened it by 1/4 inch? Second, the cabinet had nearly full coverage drawers below the TV area. These drawers covered the cabinet frame to such an extent that you can only see 1/8 inch of frame on either side of the drawer front.
My father-in-law, who builds cabinets as a hobby, suggested that I use a router with a brand new 1/4 inch bit to do the job. I built a frame that was attached to the covered sides of the TV tower that the router glided on to keep the cut straight and uniform. The result was perfection. Unless I point out the fine line on the sides of the cabinet, you can't tell where I cut it.
Before you start to install a wide expanse of cabinets like mine, you need to find the highest spot in the floor. Then reference this spot in relation to the TV tower. I found that I had to shim up my TV tower 1/4 inch to make sure that its bottom was level with the highest spot in the floor.
I then installed the TV tower first and worked away from this cabinet going to each corner. One of the things that made assembly simple was that the different cabinets had different depths and heights. This actually makes alignment rather easy.
The only aspect that is critical is to make sure the heights of the side cabinets were in line. This makes installing the decorative crown mold a cinch.
I didn't do the plan for my entertainment center. It was important to me to make sure that the available space was fully utilized and that the look was superb. This is why I made sure a professional designer created the plan for my entertainment center.
I urge you to visit a local cabinet company that just sells cabinetry. They usually have trained planners who have taken many design courses and often are tested before they are granted a certification.
The extra time spent working with a professional will pay off because they know where problems happen and how to maximize a design for your needs.
See photos of my Entertainment Center by CLICKING HERE.
Subscribe to the FREE Ask the Builder newsletter to receive professional advice for your home. Complete the form below and each week you'll get:
Unsubscribe at any time. We respect your email privacy.