DEAR TIM: I am going to be installing some crown molding soon. I think I know how to make the needed cuts, but the regular inside and outside corners once cut and installed look fairly standard to me. Is there a way to make the corners look more interesting? Also, is it necessary to cope the miter joints when doing inside corner cuts? Maggie P., Terre Haute, IN
DEAR MAGGIE: I'll tell you what, in my opinion nothing seems to put that needed finishing touch on a room like crown molding. I am not a designer by any means, but I think crown molding has the same visual effect as does pinstripping on clothes and cars. Our eyes are drawn to those lines and crown molding absolutely creates a distinctive break point where walls meet a ceiling.

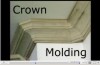
The light-colored triangular piece of crown molding on the outside corner makes all of the difference. You can also see one in the inside corner as well. It only took 10 more minutes to make these extra cuts. PHOTO CREDIT: Tim Carter
I sure hope you do know how to position the molding in your saw to make the necessary cuts. All too often people waste many linear feet of crown molding trying to get the wood to fit perfectly up on the wall.
When my wife Kathy and I got married 30 years ago, we went to New England for our honeymoon. One day, we toured five magnificent houses in Newport, RI. These were mansions built by very wealthy people, and each house had ornate crown moldings in every room. I was just getting into the construction business at that time, but knew enough to recognize the inside and outside corners in those houses were very different from the regular crown molding I had seen back home.
The next time I had to install crown molding, I took some scrap pieces at the end of the day and quickly figured out what those carpenters and master craftsmen had done. The inside and outside corners of the rooms were indeed 90 degree angles, but they didn't turn the corner with two pieces of trim each cut at a 45 degree angle.
Would you like step-by-step photos and instructions that show you how I install crown molding anywhere in a home? If so, you might want my Instant Download Crown Molding eBook.
But, if you want to actually see me install crown molding in all the same places while watching an action-packed interactive DVD that was filmed in High Definition, then you may want my Crown Molding DVD.
There was a third piece of crown molding that cut across the inside and outside corners. Ask my retired geometry teacher and he will tell you I was not the sharpest arrow in the quiver, but I learned enough to know that the sum of the angles of all the cuts in a regular inside or outside corner must equal 90 degrees. Since there are four cuts needed when you use this third piece of trim, this means the saw gets set at 22.5 degrees for each cut.
The only trick you need to know is the small third piece of crown molding is a perfect triangle. The intersection of the two cuts on this small piece of crown molding meets at a perfect point at the bottom on an outside corner and at the top of inside corners. These cuts are very easy to accomplish with a power miter box saw.
On inside corners, you will have to add a second small flat triangular piece of wood that fills the triangular gap created by the crown molding as it cuts across the corner where the two walls meet. This small piece is cut from flat stock of matching lumber.
As for coped crown molding joints, I used to cope regular inside corner cuts years ago when I installed crown molding. I thought it would make for a better fit instead of trying to get the traditional miter joints to fit perfectly. But I quickly discovered that it takes quite a bit of time to cope a perfect joint that looks better than a miter joint. What's more, you still have to cut the actual miter joint on the end of the crown molding to create the line the coping saw follows.
Since you are already making the miter cut, why not just cut the wood at the right angle and eliminate the need to carefully cut the coped joint? In fact, I can now cut and install the four pieces crown molding in an average room in the amount of time it takes another carpenter to install one straight piece of crown and cope the next corner.
Click here to watch the video on easily working with crown molding.
The trick is to go around the room and figure out the exact angle cuts at the ends of the pieces of crown molding. I do this with test pieces of crown molding I have cut at different saw angle settings. The test pieces for both sides of inside corners are cut respectively at 43, 44 and 45 degrees. I then mix and match the pieces until two of them meet perfectly in the corner. It is common to have one side of the corner be a 43 degree cut while the other side is a 44 or 45 degree cut. The same principal works on outside corners but you cut the test pieces at 45, 46 and 47 degrees.
Take my Crown Molding Installation Quiz to see if you really need my Crown Molding Installation eBook. It is an Instant Download product in case you need help right now!
The elegant corners produced by inserting a third small triangular piece of crown molding are well worth it. The extra time needed to produce the pieces is maybe just 5 minutes per corner. Once you cut and assemble the first corner, you will stand back and shake your head in amazement.
Inside corners require you to assemble the pieces in order. You can't install the two long pieces that come into each corner and then expect to cut and install the small triangular piece last. Because the back edges of the cut piece are longer than the front edges, this piece must be put in after the first long piece of crown molding is installed. Outside corners are different. If you so choose, you can install the small triangular piece last.