Smart First Time Buyers Plan Ahead

Garage Planning - House Under Construction

Smart First Time Buyers Plan Ahead

There is a first time for everything. Perhaps one day you may find yourself buying a new home instead of a pre-owned older home. New homes have a tendency to induce buyers into a magical state of acceptance. That smell, that new-finish smell of paint, new lumber and carpet in the models can intoxicate you and seriously impair your rational thought processes. Before you even consider signing a purchase contract, you must stop and think about what your real needs are and how well this new abode will fit the bill.

What should you include in your new home needs?

The first step of this process begins where you live now. Start to make a list of all of the things you like and dislike about your current home, condominium or apartment. This should be developed over weeks and perhaps months, not at a single sitting. You may be very surprised at the small things that make a difference. For example, do you like the way morning or afternoon sun streams into a particular room? Maybe you want the sun to greet you as you eat breakfast. If so, you need to look at new homes or building lots that will allow your breakfast area to face East.

What about room sizing?

Room sizing is a huge issue in many homes. Believe it or not, some model homes are furnished with undersized furniture. The scale of the room and furniture makes it seem to you that the room is large enough when in fact it may be too small to accommodate your current furniture or furniture you plan to buy. Use your current rooms as a benchmark in this exercise. Do you need a larger bedroom? If so, in what direction must it grow? What about your living or family room? Do you need additional seating? Your current rooms talk to you everyday with respect to your usage, you just have to listen to what they are saying.

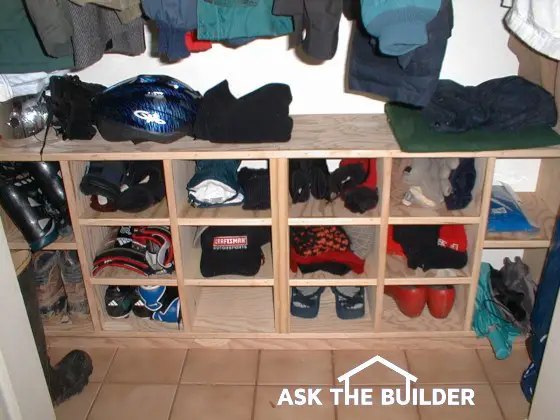
How can you get extra storage?

Storage is becoming a big issue with many people. All too often people look at new homes and forget about storage possibilities. If your new home design incorporates a steep roof pitch, you will have a great opportunity before the home is framed to include special attic trusses that allow you to create an enormous storage area in otherwise wasted space. Similar storage-type trusses can also be ordered for garages. These trusses create a five or six foot tall area that allows you to crouch down and walk on flooring installed within the trusses. Be sure you also include plenty of basement storage shelving. This is all too often overlooked.

Is your garage big enough?

Garages can be deceptive. A totally empty garage often looks enormous. But once you park your car(s), set the trash cans inside, bring in all of the lawn care equipment, bikes, etc. this vast sea of space disappears. Measure your existing garage and determine what the needed size of the new garage should be.

Are your current closets perfect?

Closets can be a sticking point after you move into your new home. Take a very hard look at your existing closet situation in each room. Are any of them perfect? If not, why? Do you have a convenient place to store dirty laundry? Are you tired of bending over to get pairs of shoes? Would you like a bank of cubbies to store sweaters and other frequently-worn clothes? Now is the time to incorporate these desired things. Closet clutter is often caused by poor internal design.

Shoe storage - cubby

Don't forget the exterior of your new home. Is a small family in your future? If so, will the yard yield enough space for both play, gardening and entertainment zones? Be sure that you size patios and decks correctly. All too often these outdoor rooms are half the size they really need to be.

Lastly, be sure to prioritize your desires and wants. Unless you have an unlimited budget, you probably can't afford each and everything you want. Try to determine the things you really need now and include these in your new home. As time passes you often can improve on the go. Buying a new home is supposed to be a happy and joyous event, but all too often it ends up in bitterness and remorse. Thinking before acting can insure a smile on your face just after move-in day!

Column NH027

Preventing Ice Dams – Two Ways To Do It

ice dam on roof

Ice Dam | Here's a photo of the ice dam at Karen's house. This is a photo of a photo. You're probably looking at the roofer's cell phone screen. Photo credit: Anonymous roofer and Karen Bloom

Prevent Ice Dams? Keep Snow Off Your Roof

Here's the truth about ice dams. They are always going to form unless they have no food or fuel. This means you have to remove the snow from your roof.

This is not practical at all. I know as I have lots of roof in New Hampshire.

Related Link

ACCKK! STOP the Ice on my Gutter Guards!

Prevent Leaks From Ice Dams? Yes, That's Easy To Stop

You can stop leaks from ice dams by installing amazing membranes under roofing materials. These membranes stick to the roof sheathing and seal around the shafts of the nails. They are miracle roofing products and I have them on my home. Here's a video of the Grace Ice and Water Shield I have on my house:

Ice dams on roofs can cause water to pour down the inside of exterior walls and gush through ceilings. In almost all instances, all you can do is try to collect the water and call your insurance agent. There's no magical valve you can run and turn off to stop the flow of water. The water continues to flow until the snow and ice melts or the outside temperatures drop enough to re-freeze the liquid water that is backing up under your roofing materials.

Grace Ice Water Shield

I covered the ENTIRE roof of my New Hampshire house with Grace Ice and Water Shield. I never have to worry about a roof leak - EVER. CLICK on the PHOTO to have Grace delivered to your home in days.

How Many Homeowners Get Ice Dam Leaks?

This unfortunate scenario happens to thousands of homeowners each winter. It happened to my next door neighbor eight years ago, just 18 months after I had installed a gorgeous new kitchen for her. The tears in her eyes were flowing as fast as the snow melt dripping through her kitchen lights as she saw her warm and cozy kitchen turn into a rain forest in the middle of winter. Her ice dam leak had nothing to do with my work as the ice dam formed up on the original house roof 12 feet above the kitchen I recreated.

CLICK or TAP HERE to get FREE BIDS from local roofers to install Grace Ice and Water Shield.

When is the Best Time to Stop Ice Dam Leaks?

The best time to stop ice dam leaks is when you're installing a new roof or building a new home.

When building a new home you have a golden opportunity to stop ice dam leaks from making you a statistic. Your builder, rough carpenter and roofer can team up to add small innocuous options to your home that are hidden from view but go a long way to stop water from entering the finished rooms of your new home.

Does Water Backup Under Overlapping Shingles?

Water does back up under shingles if it can't drain by gravity to the ground.

To stop leaks caused by ice dams, it helps to understand how the snow-melt water can leak into the same roof surface that effectively stops rain drops in even the most violent thunderstorm. Study a typical sloped residential roof surface and you will see overlapping layers of asphalt shingles, slate, tile, wood shakes or some other roofing material. So long as water moves down the roof, this overlapping system works. But if water travels backwards up under the overlapping materials, water begins to work its way inside.

Why do ice dams form?

Ice dams form on roofs when the chilled snow melt water flows down the roof surface and re-freezes as it contacts cold shingle, gutter, and flashing surfaces whose temperature is below freezing. As more water flows down the roof the ice buildup gets higher and higher. In some instances the ice dam can grow to be one foot or higher. Liquid water builds up behind the dam and that which does not re-freeze often leaks into your home.

Ice dams can form for all sorts of reasons. Where the roof passes over an exterior wall, attic insulation is often thin. Heat can escape from the house and help to melt snow pack that is up on a roof. Ice dams can even form in the center of a roof if conditions are just right.

What is the Easiest Material to Stop Ice Dam Leaks?

The easiest material to install to prevent water from entering your home is an ice dam membrane that is applied directly to the lower edge of the wood surface of the roof before the shingles or roofing material is installed. The membranes should also be installed at roof valley locations, places where the roof might change pitches and around all penetrations such as skylights, plumbing vents and other roof vents.

These special membranes often contain rubberized asphalts and an inner synthetic membrane that work to seal around all nails that penetrate this membrane as the finish roof is installed. The water from an ice dam will still back up under the roofing materials, but it can't get through the membrane and into your home.

Will a Higher Heel Height on Rafters Help Prevent Ice Dam Leaks?

Yes, increased heel height will help prevent ice dam leaks. This extra height allows for thicker insulation at the corner of the ceiling next to an exterior wall.

Your builder and rough carpenter can help as well by increasing the heel height of the roof rafters or trusses where they pass over exterior walls. A truss or rafter with a high heel allows the insulation contractor to install more insulation without blocking the important flow-through ventilation space between the soffits and attic area. This added insulation helps to stop heat transfer that melts snow. You can also add reflective radiant barrier chips on top of your insulation to stop the flow of heat through the insulation.

Will Larger Overhangs Help Prevent Leaks?

More generous roof overhangs also are a great preventative measure to fight ice dam leaks. The ice dams form out and away from the house and any water that does backup often just drips through the exterior soffit instead of the inside of your home.

Remember, you can't stop ice dams but your builder can do many things to prevent the leaks. You can stop water that accumulates behind these winter menaces from entering your home. Discuss all of your options with your builder before the foundation is poured.

CLICK or TAP HERE to get FREE BIDS from local roofers to install Grace Ice and Water Shield.

Column NH026

A Strong Asphalt Driveway

Asphalt driveway paving like this can be done in your city or town. This is a blacktop driveway near my last home. it's in great shape and you know it's got a solid gravel base under it. © Copyright 2018 Tim Carter

"If you want your new blacktop driveway to look good for many years, you need to make sure the gravel or deep-based asphalt base is one foot wider than the actual finished blacktop surface."

Asphalt Driveway Paving - Smooth and Strong

Asphalt or blacktop driveways are often the pavement one ends up with a new home. They are typically the least expensive paved surface a builder can install. Just because they cost less money by no means are they inferior.

Free & Fast Bids

CLICK HERE to get FREE & FAST BIDS from local blacktop contractors.

How long does blacktop last?

A blacktop drive that is installed with great care can last for 30, or more, years with little effort.

Related Links

Repair Asphalt Drive Cracks - DO NOT SHARE - Secret!

Tips From Pros About Patching Asphalt

Is Blacktop a Hard Surface?

Yes, blacktop is hard because it's simply a layer of rock, sand and asphalt cement binder. As the asphalt oxidizes over time, the surface gets harder.

If you've ever watched a dropped glass shatter on an older blacktop surface you would probably testify that it was as hard as a rock.

What is in Blacktop?

Blacktop, or asphalt driveway paving material, is a matrix of small rock chips, sand and asphalt cement. Many worn asphalt surfaces are anything but black. They almost always look a lighter shade of gray.

The stone chips in the mix create this color. Look closely and you will see small amounts of black in between the stone chips and sand particles. This black is the actual asphalt that cements all of the stone chips and sand together.

Is Blacktop Flexible?

But the real truth of the matter is that asphalt, even older asphalt surfaces, are flexible. Newer asphalt is far more flexible than an older surface because the asphalt still retains many of the lighter hydrocarbon oils that allow the asphalt cement to liquefy at oven temperatures where you would normally bake a cake.

Put a piece of concrete in your oven at this same temperature and you will get a hot rock, not a puddle of smoking goo on the bottom of the oven.

A good gravel base beneath the asphalt is the secret to a long-lasting driveway.

A good gravel base beneath the asphalt is the secret to a long-lasting driveway.

What Makes Blacktop Long-Lasting?

The secret to getting a long-lasting asphalt driveway at your new house that can withstand even heavy truck traffic is the hidden gravel base beneath the smooth ebony surface you and I see as a finished product.

How Thick Should the Gravel Base Be?

The standard gravel base beneath an asphalt driveway serves as the foundation for the pavement. If you install 8 or 10 inches of crushed well-compacted gravel on solid soil, the blacktop finish has a great start at a service life of 30 or more years.

If you don't believe me, come to Cincinnati and I will show you several 30 and even 40-year-old driveways that are still in good shape.

CLICK HERE to get FREE & FAST BIDS from local blacktop contractors.


Get the best-looking asphalt driveway around! Learn what to ask your contractor in my Asphalt/Blacktop/Tar & Chip Installation & Repair Checklist. I offer a 100% Money Back Guarantee.


What is an Affordable Base Material?

Many asphalt paving contractors use crushed gravel because it is the least expensive foundation material. If you want the best underlayment for the blacktop you can have your builder install a deep-base asphalt driveway. This system uses a thick layer of asphalt with larger stones as the base layer. This system is so strong it has been used to build the roadbed under railroad tracks.

What can Ruin the Gravel Base?

Wet soil and weak soil that breaks down in the presence of water can foul the gravel base beneath blacktop surfaces. When this happens, the gravel loses much of its internal strength.

Geotextile fabrics can be laid on top of the soil before gravel is placed. This fabric stops the movement of soil particles into the gravel. The textiles are durable and roll out onto the soil as you might unroll a throw rug.


Would you like to have a gorgeous driveway? How about step-by-step photos and instructions that show you how I had my own tar and chip drive installed? If so, you might want my Instant Download Tar and Chip eBook.


Should the Gravel Be Wider Than the Blacktop?

If you want your new blacktop driveway to look good for many years you need to make sure the gravel or deep-based asphalt base is one foot wider than the actual finished blacktop surface.

All too often the asphalt contractors install the finished blacktop to the edge of the gravel. When visitors drive over the edge of the drive into the grass, they crack off one or two inches of blacktop because it has no support immediately at the edge. The extra six inches of gravel hidden beneath the grass provide this much-needed support.

Should New Blacktop be Sealed?

No, do not seal new blacktop. Resist the temptation to seal your new asphalt driveway.

Lightweight oils in the asphalt need to evaporate into the air. Even under ideal curing conditions where the daytime temperatures are high and nighttime temperatures are balmy, asphalt needs a minimum of 90 days to fully cure and harden.

Remember, this is the minimum amount of time. It is best to let your asphalt driveway cure for 6 or 9 months at the very least, before you think of sealing it.

Sealing a new asphalt driveway before it's time is the kiss of death. The sealer locks in the light-weight hydrocarbon oils that give the asphalt its flexible nature. If this happens, your driveway will be permanently susceptible to imprints from bike kick stands, twisting tires and any concentrated load from a pointed object.

When is the Best Time to Seal Blacktop?

When you do seal the driveway, use a high-quality coal-tar based sealer. These typically should be applied every 3 to 5 years. The driveway should be sealed when either the original black asphalt has worn off the stones or the subsequent coat of sealer has worn off revealing the actual pieces of stone aggregate.

CLICK HERE to get FREE & FAST BIDS from local blacktop contractors.

Column NH025

Remove Clog From Bathroom Sink – Very Easy

sink stopper nut

Remove Clog from bathroom sink | The sink stopper nut is just to the right of the yellow text. You can see the sink stopper control rod angling down from the nut. The tips below are SO GOOD that I shared this column with the 31,000 subscribers who read my November 25, 2020 newsletter. Keep reading to see why!

DEAR TIM: My drain in the bathroom is stopped up. My husband took the trap off under the sink, but the drain is clogged up above that. He cannot figure out how to get the stopper out of the sink, that metal button that you can push down and pull up. Can you tell us how to do this? Christie G., Canton, GA

DEAR CHRISTIE: You're suffering as many people do. What appears to be a somewhat large pipe, the 1 and 1/4 inch diameter tailpiece leaving the bottom of the sink, is actually clogged with parts the day it is installed. The sink stopper and the control rod that allows it to move up and down are all inside this pipe before the first drop of water and any debris starts its journey to your sewer or septic tank.

How do you remove the sink stopper?

To remove the stopper and its control rod, you must remove a round nut that is on the backside of the drain tailpiece pipe. If you get on your side or your back and look under and behind your sink, you will see this round nut. It is often shiny chrome and has small knurls in the nut instead of large hexagonal edges like a nut that goes on a bolt.

CLICK or TAP HERE to get FREE BIDS from local handymen that can fix the clog CHEAPER than a plumber!

Nut Loose - Pull the Control Rod Out

Once the nut is completely loose, pull the stopper control rod out of the back of the tailpiece drain pipe. There will be a round plastic ball attached to the end of this rod.

Bathroom Sink Stopped

Put your head under your bathroom sink and this is what you’ll see. That horizontal chrome rod lifts the sink stopper up. (C) Copyright 2020 Tim Carter

Pull the Stopper Up and Out

Once the control rod is out of the tailpiece, the stopper will pull up from the sink. It will probably have all sorts of bio-organic goo, hair and crud on it, so be prepared to get disgusted. I would wear rubber gloves if you have any open cuts on your hands. This organic mess is loaded with millions of bad bacteria that can cause serious infections.

Remove the biomass from the stopper and clean it. Do the same with the end of the control rod ball and the metal tip sticking out of the end of the plastic ball. All parts need to be clean before you reassemble them.

Clean Sides of Drain Pipe

But before you put everything back together, you should clean the inner walls of the tailpiece that leads from the sink down to the P-trap piping. You can do this quickly with a 1 and 1/2 inch bottle brush and an empty bucket.

bottle brushes

These are typical bottle brushes. You want one that has a diameter of at least 1 and 1/4 inches. A 2-inch diameter one is great for shower drains. CLICK or TAP HERE or THE IMAGE TO BUY THESE NOW.

Use a Bucket to Capture Splash Water

Simply place an empty bucket under the tailpiece and turn on the water in the sink while you move the bottle brush up and down in the drain outlet hole. Be sure to push the bottle brush down as far as you can. You may have to insert the brush from below as well as the top to clean the entire length of the tailpiece.

Cleaning the inside of the tailpiece helps control odors in bathroom sinks. The biofilm buildup that grows on the pipe walls can release odors each time water is run in a sink.

Column 550

Electric Upgrades – It’s the Small Things That Count

Metal Backsplash Outlet

Electric Upgrades | You may want an electric outlet or two in very specific locations in your kitchen. Here's a typical electrical outlet cut through a metal backsplash. Copyright 2018 Tim Carter

Electric Upgrades - It's Not All About 200-Amp Service, Silly!

If you're like the average homeowner, I doubt you will do any deep thinking about electric upgrades. You'll be so busy picking out faucets and siding colors that you'll not give much thought to electrical outlets, switches, and other electrical needs as you plan your new home.

Typically many of these decisions are left to the electrician or the architect. Many electrical outlet locations are mandated by the National Electric Code, but there is usually nothing stopping you from exceeding this wonderful set of rules and guidelines.

CLICK or TAP HERE to get FREE BIDS from local electricians who can add outlets for you.

Where Are the Best Electric Upgrades?

For example, let's talk about the mundane subject of your garage. Sure there will be receptacles in the garage, but are they in the right place and worse yet, will they eventually be hidden by things stacked against the wall? Have you ever worked on a project just outside the garage door on the driveway apron? I'll bet a convenient outdoor receptacle by the garage door would have come in handy. Are you going to have a workbench in the garage? You need perhaps four receptacles in and around this area.

zircon breaker id

Here's a double-duplex outlet. Many don't put these in and it's a big mistake. You can plug four things in one place. The black device with the red LED light is covering two outlets so you know.

Where Should a Bathroom Outlet Be?

Bathrooms are a pet peeve of mine. The power outlets should be immediately adjacent to the spot where appliances will be used. I don't want the hot curler cord stretching across a sink anymore than you do. Think about what you might use in a bathroom and where it will be used. The electrician can almost always put the receptacle where you want it.

Related Link

FIRE DANGER! Beware Extension Cords - Get the RIGHT ONE

Are Christmas Outdoor Outlets Hard to Install?

Christmas outdoor outlets are easy to install. You can have several daisy-chained together so they can come on with the flick of an indoor switch. These make for great electric upgrades.

Do you decorate indoors for the holidays? If so, you want strategically located outlets on top of mantles, next to handrails, and any place where you think you might have light displays or strings of lights. If you think these things through now, you will never have to rely on an extension cord. Do you think I bend over twice a day to plug in and then unplug my Christmas tree lights? No way. I simply flip a wall switch.

Exterior holiday lighting needs multiple outlets as well. Your electrician can put any number of exterior outlets under soffits, hidden in overhangs, and other places that will allow you to minimize the amount of spaghetti extension cords that drape all over your home. Once again, these outdoor lights can be easily operated by an indoor wall switch or two.

CLICK or TAP HERE to get FREE BIDS from local electricians who can add outlets for you.

What About Smart Plugs?

Smart plugs are a great idea. These plugs can be turned on and off via the Internet so long as WiFi is operating in the house and the smart plug can connect to the WiFi. Watch this video about how to water a Christmas tree to see a clever use of a smart plug:


CLICK or TAP HERE for a wide variety of smart plugs.


End Tables and Night Stands Require Careful Measurements

End tables at couches and night stands in bedrooms are also a sore spot with me. I want my outlets centered at the exact table location so that I am not reaching behind a couch or a bed to find an outlet. I also prefer to place these outlets 16 inches above the floor so that the lamp cords can be bundled up behind the piece of furniture. When you do this, no wiring can be seen when you walk around the room.

Can I Install an Outlet in a Floor?

Yes, you can install electric outlets in floors. There are special cover plates made for them. These floor outlets are very useful for houses with open floor plans.

If you have special wiring requirements as I do for a special glass-covered coffee table that has two miniature working model trains under the glass, you may need a floor outlet located directly under a table such as this. Extending an extension cord under a carpet is a very dangerous thing to do. You want to plan now for these highly-specialized electric needs.

Tim's small office desk

Home office needs are also important.

What Are the Best Outlets for a Home Office?

The best outlets for a home office are ones for a computer, phone charger, desk lights, a printer, and a scanner.

Home office needs are also important. I prefer to have my printer and a few other machines up on shelves just above my desk. I can easily reach the printed papers and this frees up desk space. But the electrical outlets need to be high on the wall and behind or next to the machines. Once again, if you plan out where your equipment will be, the electrician can almost always accommodate you.

electric panel wiring for future

Wiring for the future. Think about what might happen in 2100 and beyond.

Circuit Panel Needs Extra Slots

Last but not least, keep in mind your actual circuit breaker panel, the actual wire that feeds each circuit and future wiring. Be sure you have six or even ten empty spots in your panel for future circuit breakers. You may discover that 20 amp circuits throughout the house makes more sense than lower capacity 15 amp circuits.

My own home has all 20 amp circuits wired with 12-gauge wiring. Be sure the electrician installs several blank conduits that allow him or a future electrician to quickly feed wire from the electrical panel up into an attic or a crawl space. You can also install blank conduits into remote walls so that getting a wire to a hard-to-reach location is a breeze.

Column NH024

Save Money Building a Home – Lots of Ways

factory built walls on new house construction

Save Money Building a Home | Save on labor and mistakes using pre-built walls made in a factory. The precision is remarkable. (C) Copyright 2020 Tim Carter

Save Money Building a Home - Many Ways

If you studied Economics in high school or college you might remember the law of supply vs. demand. We experience this law frequently in our lives and the home building industry is by no means immune from it. In fact, there are many building products that see violent price swings even though they are commodity items. Lumber and engineered lumber fall into this group.

Currently, the price of certain lumber products is at or near historic highs. The lumber industry press releases cite all sorts of reasons for the current dilemma. No matter what the reasons are, we consumers have to suck it up and either pay higher prices or decide to wait until prices might drop. For many, waiting is not an option that is on the table.

CLICK or TAP HERE to get FREE BIDS from local builders for your new home.

Can Factory-Built Floors, Walls, and Trusses Save Money?

Factory-built floors, walls, and trusses can save lots of money. The house is built faster saving on labor and it's protected from the weather faster.

Watch these three videos to see what's possible with factory-built components. This is my daughter's new home!

Can changing the height of the ceilings save a lot of money?

Changing the ceiling height in a home can save money. However, the savings may be minimal.

Within the past 24 hours, I received an email from a woman who is stuck in this quagmire. She wants to build her new 2,000 square foot ranch home but is within a fairly tight budget. The original plans called for 9 foot ceilings. These taller ceilings are a very nice touch that adds lots of character to the average home. This woman approached her builder questioning the savings that might be achieved by downsizing to a traditional 8 foot ceiling height.

The response from the builder shocked the woman. He said there would maybe be a $500 savings. She felt much differently and asked me to identify where one can really achieve savings when you downsize a home in this manner. She was hoping for a much larger credit by modifying the ceiling height. This is an interesting problem when you first think about it, but once into the calculation you discover some interesting facts.

CLICK or TAP HERE for Contractor Nightmare stories.

How are the cost savings calculated?

First, there would be savings in lumber. You can easily calculate with a high degree of accuracy the number of vertical studs in a home where the wall studs will be spaced at 16 inches on center. Simply multiply the linear feet of walls by (zero decimal point 75) 0.75 and then add one to the sum.

For example, this woman's home will probably have about 190 linear feet of exterior walls. 190 x.75 + 1 = 143. This same house might have 245 linear feet of interior walls so it would need approximately 185 studs to frame these walls. Currently the cost difference between an 8 foot vs. 9 foot long exterior 2 x 6 wall stud is only 57 cents. The cost difference between 8 foot and 9 foot long 2 x 4 studs is only 28 cents. The total cost savings in wall studs is perhaps only $135.00. That is fairly insignificant amount of money when the house may cost $180,000 overall.

There will also be insignificant savings with respect to the exterior wall sheathing that is nailed to the studs. Keep in mind that the carpenters will not offer any savings to speak of with respect to labor to build the walls. It takes just as much time to handle and nail an 8 foot piece of lumber as it does one that is 9 feet long. The same is true for the large sheets of sheathing. Perhaps they have to use but 4 more nails to secure the larger sheet to the wall studs.

new-home-cost-estimator

This is a very cool software spreadsheet that can help you calculate the cost of your new home. Divide the square footage of the home by the cost to get cost per square foot. CLICK on THE IMAGE ABOVE TO DOWNLOAD THE SOFTWARE.

This woman will save a small amount of money on wall insulation as it is usually priced per square foot. But keep in mind there is only about 190 square feet of insulation being eliminated. This same quantity is true for drywall material, exterior wall coverings, wall paint, etc. Some of these savings translate to interior walls as well, but in many instances there is little savings in labor. If you were painting a room with 8 foot high walls vs. 9 foot high walls, how much time would you really save painting - maybe 5 or 10 minutes per average size room?

How Can You Save The Most Money Building a New Home?

You can save the most money building a new home by making it smaller. Consider cutting out 20 percent, or more, of the floor area if possible.

The footprint needs to shrink. It is also very helpful to make the plan very simplistic. Offset foundation corners, high-pitched complicated roof designs, and lots of windows typically cause construction prices to soar. A simple rectangle house with a low-slope roof will almost always be at the bottom of the price scale. But unfortunately it often is also at the low end of the curb appeal scale as well.

Column NH023

Custom Moldings and Doors Make the House


custom woodwork with mill profile cutter blades

Custom Molding and Doors Make the House | You can get them and the price is so worth it. Those shiny pieces of steel are sharp knives that create the curvy profile on custom molding and trim.

Custom Molding - You Have No Idea How Important It Is

My guess is you've spent more than one or two weekends touring new model homes in various subdivisions. Many savvy builders hire professional interior designers to furnish the model homes so they sizzle more than a hamburger on a hot grill at a weekend picnic. But on move-in day at your new home, you walk into an antiseptic atmosphere as you look at bare painted walls and ceilings.

What makes a house into a custom home?

Custom molding and doors transform a plain-vanilla house into a custom home.

Stop and think for a moment. Have you ever been inside an older custom home - say one that is 100 or 125 years old? Aside from the tall ceilings, there usually were only two other things that made the interior of that house different from your new home.

The old house had smooth plaster walls and ceilings that look identical to your home's smooth drywall surfaces. The old home had hardwood floors just like your new home.

The only differences you can typically find are the woodwork and trim and the interior doors.

CLICK or TAP HERE to get FREE BIDS from local carpenters that can get you custom molding.

Do Carpenters Care About the Doors They Hang?

The finish carpenters who will work in your home don't care for the most part what type of doors they hang. Cutting a miter on a piece of trim to a large degree is the same no matter what the size and profile of the trim happens to be. You can make the inside of your home truly a custom home with a little bit of planning and some added cash. The end result will be dramatic and will put your friends' and neighbors' heads on a swivel when they tour your finished home.

Related Link

Real Custom Woodwork - It's All About Knives

Can you order special customer doors?

Did you know you can order custom solid poplar doors with solid poplar frames for nearly the same price as you might pay for a solid door at a lumber yard or home center. These poplar doors come in styles that you might have never seen before. Sure, you have seen 6 panel doors everywhere. You may have even seen some four panel doors at a particular model home. But have you ever seen a five panel door - one where the panels are turned sideways and stacked on top of one another? The look is very distinctive.

Tim, Where Did you Buy Your Custom Doors?

I purchased the custom doors for my last home from Brycon Wood Products in Canada. If you get yours from there, be sure to tell them "Hello!" and that you discovered them through me.

Can You Get Old Door Locksets?

The hardware for the doors can also add an extra touch. Solid brass hinges with traditional ball tops and bottoms to the hinge pins are readily available. If you want a more Victorian style these same hinges can be outfitted with pointed chimney tips on the ends of the hinge pins. Do you like locks that operate with old-fashioned skeleton keys? Your builder can install these full-mortise locksets. They add tremendous amounts of character to a new home.

kitchen pantry door close up

This is new hardware that looks like old. The latch is mortised into the door. You lock it with a skeleton key! CLICK or TAP HERE or the photo to order one.

How do you find custom wood trim?

You find custom molding and wood trim at a mill that makes them for you.

The wood moldings that frame doors and windows can be made from any wood species with any profile you can dream of. Forget about using those plain vanilla moldings that may be on the builder's selection chart. Visit one or two traditional lumber yards in your area and see what is really possible. In my city, one of these old lumber yards prides itself on the hundreds, yes I said hundreds, of different molding profiles it stocks. And if you don't see what you want, no problem, they will have your one-of-a-kind molding milled for you.

The moldings around windows and doors add depth and character. They allow you to make a statement that will stand the test of time. I liken custom wood moldings to mascara or lip gloss on a woman's face. These wonderful highlights can draw attention to things you might otherwise ignore.

Talk with your builder. Ask him what he thinks will work. Who knows where the discussion may lead. Depending upon his depth of experience you may end up with wainscoting, crown moldings, chair rails and cool decorative wall shelves. All of these subtle additions work together to set your new home well apart from the others in the cul-de-sac.

Column NH022

New Construction Inspections

Walk Through Inspection tools

New Construction Inspections

Just yesterday, I performed an inspection on a brand new home. A Realtor had called me on behalf of her client. Just two days before that a professional home inspector - not to be confused with the city or county building inspector - had looked at the home and suggested that they get a second opinion.

Once at the site, the buyer asked me to point out any and all defects in the brick as well as any other things on the exterior that caught my eye. Within the course of ten minutes, I discovered 15 defects and I had only looked at the front of the home and one side! The realtor and the buyer grew more and more despondent. The realtor saw a commission check dissolving into thin air and the buyer saw the house of his dreams crumble with each word I spoke.

Will an inspector catch all the construction defects?

Finally, in a distinct and angry voice the buyer said to me, "How can all of these defects get past the building inspector? How can builders get away with this type of sub-standard workmanship?" It took me twenty minutes to answer just those two questions. The buyer couldn't believe that there was soil that actually tilted back towards the home. He couldn't believe that the top of the foundation was covered with dirt and mulch in various locations. The lack of flashings under door and window sills and above them as well astounded the buyer.

The first thing I told the buyer was that not all builders build this way. In every city and town there are some dedicated people who treat building as a vocation and a craft. They take immense pride in their work and will not tolerate much less than perfection. I then discussed the economic pressures of building market homes. A builder that constructs twenty houses a year and discovers a way to shave $10,000 in expenses from each one takes $200K directly to the bottom line or his bank account. Never forget Glenn Frey's lyric from Smuggler's Blues, "The lure of easy money has a very strong appeal."

CLICK or TAP HERE to get FREE quotes from local inspection companies.

Does a building permit include on-site inspections?

I then started to discuss the plight of the average city or government building inspector. Although his department is paid a fee when you are issued a building permit, that fee should not be confused with an on-site inspection service where a government representative monitors the construction all day every day. That is unrealistic. If you want that level of service, the cost of the average home might balloon an extra $20,000. Many city or government building inspectors only visit the jobsite 3 or 4 times. There are separate inspectors for plumbing and electric work in certain cities, but not always.

How you make sure your new home is constructed properly?

So just how does the average consumer protect themselves? What can you do to get a new home that will stand the test of time? It is a somewhat complicated process, but it is indeed possible. The first thing you need to do is understand the rules before you throw a skin into the game. In my opinion, here are three of the most important rules of the new home building game:

Rule #1: The Building Code, although a fine document, is a set of MINIMUM standards. A house that just passes code is like a child who comes home with a 70 percent grade on a test.

Rule #2: Great builders are often well hidden. Rarely do they advertise. They don't need to as they almost always have a six-month backlog of work.

Rule #3: Well-constructed homes start with extremely detailed plans and specifications. The plans and specifications are the sole tools you use to communicate everything you want in your home. Never rely on verbal instructions of any type.

How do you find a great builder?

There are perhaps 25 - 50 rules in the game. The one about finding the great builder is simple. If you want a pro, go to where they buy their materials. You might discover a traditional full-service lumber company in your city or town. Stop by there on a weekday around 10:00 a.m. Ask to speak with the general manager or the person who does material take-offs from plans that builders bring to the lumber company.

These two people know the builders who only construct 3 or 4 homes a year. They know the builders who take enormous pride in their work. You can also contact two or three residential architects. These professionals also know the top builders as they need them to build the houses the architects draw. Put on your Columbo trench coat and invest the time to find the pro who's next masterpiece will be your new home.

Column NH021

Building Lot Size – It’s All About Zoning

survey map

Building Lot Size | This is a typical plot plan survey document. You can see the property lines surrounding this building lot size. The pins at all the corners and bends as well as the distances along the property lines are shown by the black dots with the circles around them.  The circles with the black and white targets are test pits dug for septic systems. You can see the symbols as well for marshy lowlands. BEWARE of lots with wetlands! Don't even look at a lot unless you have this in your hands and you can read all the print on the document. Copyright 2020 Tim Carter

Building Lot Size - It's All About Zoning

All too often I discover people focusing their attention on the sticks and bricks of their new home. It makes all the sense in the world to do this. After all, you are going to live in the house and want it to be as perfect as possible. But the land or lot upon which the house will be built is far more important than you might think.

Why is Compass Direction Important?

Compass direction is important because you want to orient your home so it benefits from solar heating and light in the winter months. You also might want to make sure your rear deck is in the shade if you sit out on it in the afternoon. Or, you may want to broil like a lobster in the hot part of the day so you want to be in direct sunlight. Everyone has different desires.

If you build a wonderful home on a poorly situated lot, you may have all sorts of misery down the road. Paint a room the wrong color and that can be changed in an afternoon. But what can you really do to stop acres of water that cascade from ground upslope from your lot? How easy is it to adjust where the sun rises and sets? Actually you can control these things by making important observations when looking for a building lot.

What are the Most Important Things When Picking a Building Lot?

Drainage, compass orientation, trees, location of public utilities, etc. are all very important things to look at when you start to shop for a building lot. Ask anyone who suffers sitting on a west-facing deck and they will tell you they made a mistake. How many people do you know who have swamps in their backyard after every rainfall? Imagine your surprise when a large track hoe shows up in your side yard one year to replace a broken subdivision sewer line? It can and does happen every week somewhere in the USA.

Should you avoid a lot in a valley?

Think twice before you buy a lot in a low spot or valley in the subdivision. There is a good chance the storm and sanitary sewers run in or near the natural low spots of the subdivision. Storms can and do cause backups into these systems. If you are on high ground, you can avoid flooding nightmares.

Use a compass to help select your lot.

hiking compass

This is a great compass to have while looking at lots. As of 2020, it was priced at $16.99. CLICK or TAP HERE or  THE PHOTO now to have it delivered to your home.

If you have an inexpensive compass with you as you scout lots, use it to determine which direction your house will face. Perhaps you want to have morning sun stream into a breakfast area or adjacent sitting room. Perhaps you want to avoid harsh afternoon sun from baking your family room, patio or deck. But on the other hand if you intend to have a swimming pool, you may want afternoon sun to bath the pool area so you can work on that tan all day long. Use the compass to insure you will buy a lot that will work best for your lifestyle.

Consider prevailing wind direction in your lot selection.

Prevailing wind direction may also come into play. You may want to orient your home so the side that has the fewest windows and doors faces north. Even the best windows and doors leak some air so maximize your indoor comfort by orienting your house so these cold blasts do not blow your money into the account of the local utility company.

The prevailing winds in summer months may be different and these can bring vicious sheets of rain that will try to infiltrate any crack or crevice. But on the other hand these same summer winds may be a delight if they blow directly through your screened-in porch. Simply be aware that prevailing winds can and do exist and they can offer both misery and delight.

vinyl siding on new construction

The front of this house faces west. The left side is the garage and faces north. This is the perfect orientation for a house on Mt. Desert Island in Maine because you want minimal exposure to harsh north winds in the winter.  Copyright 2020 Tim Carter

Make sure your house plan works on the lot.

Be careful not to fall in love with a certain house plan before you purchase your lot. Some plans work much better than others on certain lots. If you desire a walkout basement for example, then you need a lot that provides enough fall to make it possible. But a lot with too much fall has you falling off a cliff when you walk through the basement sliding glass door.

Don't try to estimate the slope with your eye. Be sure to consult with the builder and architect and make sure they use a transit or some other instrument to calculate the actual slope where your house will sit.

Finally be sure to investigate all local zoning and subdivision rules and regulations. Certain possessions you own may not be permitted to be stored on your new lot. You may not even be allowed to build an outdoor storage shed. Fences may not even be allowed; if fences are allowed, their height and style may be severely restricted. Spend lots of time studying your lot. It will pay huge dividends.

Column NH020

Select Proper Material for Quiet Plumbing

Cast iron pipe & fittings

Select Proper Material for Quiet Plumbing

If you grew up in an older home, you may not realize that plumbing piping can be quite noisy. I am talking both drain lines as well as water supply lines. Plumbing system noise flies so low that it easily sneaks under the radar screen during the planning and design phase of a new home. The first time noise is detected, often immediately after moving in, it is too late to initiate an easy fix. If you want quiet plumbing, you need to solve the problem as the pipes are being installed.

Why do older homes have quieter plumbing?

One reason why older homes seem to have quieter plumbing is simply the way in which the homes were built. Thick plaster walls are much denser than a one-half inch thick layer of drywall. You don't have to switch from drywall to plaster to have whisper-quiet water and drain lines. The solution is to look at the different material selections for both water supply piping and drain lines.

Let's talk about drain lines first. My guess is that your builder and his plumber are going to use common plastic drain lines inside your new home. I have no trouble with this material so long as it is only used for 50 percent of the plumbing drain line system that is exposed above the concrete basement or slab floor.

What are the components of a residential plumbing drainage system?

There are two halves to a residential plumbing drainage system. One half of the drain piping carries water to the sewage system and the other half supplies air from the roof into the actual drain lines. Each time you flush a toilet or run water in a sink, the water that flows down the pipes pushes air in front of it. This air needs to be replaced or otherwise dangerous vacuums can be created within the piping system. Gurgling water within fixtures is a telltale sign that vacuums are present. These temporary vacuums can suck water from nearby fixture traps as they try to find the needed replacement air. Dry fixture traps allow sewer gas and possibly vermin to enter your home. No one wants this in a brand-new home.

Why is cast iron piping quieter?

If your plumber uses new easy-to-work-with cast iron piping for the one-half of the system that only carries water, you will rarely hear any water flowing across ceilings or cascading down walls. Cast iron piping is denser than plastic and the water that crashes and tumbles down the piping on its way to the sewer has a tough time vibrating dense cast iron. Keep in mind, that sound or noise is produced when something vibrates. You will pay perhaps $200 more per bathroom for this noise-free material, but it is well worth it.

CLICK or TAP HERE to get FREE quotes from local plumbing companies who can help with your plumbing issues.

Water supply piping can also be very noisy. High localized water pressures combined with thin and undersized piping materials are often the cause of whistling and rushing water as faucets and fixtures are used. Faucets themselves can be noisy and they are much harder, if not impossible, to fix. But the water supply piping in your new home is an element that your plumber and builder can control.

What size copper tubing be used for water supply lines?

Many typical residential homes use copper water supply lines. The copper tubing not only comes in different diameters but it also comes in different thicknesses. You want to super size both to insure that you or someone else can continue to sleep while others in the house get up and get ready for the day ahead. How many times have you been escorted out of dreamland by that annoying sound of water running through water pipes? Perhaps many if you live in a typical new home.

What copper tubing has thicker walls?

Be sure your plumber uses type L copper tubing. Most plumbers will use type M copper for water supply lines. The L grade is slightly more expensive but its thicker pipe walls help to dampen vibrations that lead to noise. Larger pipe diameters also are highly effective at stopping noise. If the water pressure in two piping systems is identical, the system that has the larger pipe diameters will be quieter.

Each faucet or valve in your home has a given flow rate when it is fully open. Large diameter pipes can deliver the necessary water to satisfy the flow rate but they do so with lower velocity. Slower moving water within water lines means less turbulence. The turbulence of the water as is rushes through a pipe is what causes the vibrations that lead to sound and noise.

The primary incoming water supply line should be one inch in diameter. Keep it this size until it goes past the water heater and up to the first major bathroom group. All other water supply lines should be 3/4 inch in diameter as they snake through the house delivering water to different fixtures. Your plumber can use one half inch diameter pipe off of the 3/4 inch lines as he delivers water to each individual faucet or fixture. Do not use a one-half inch diameter line to serve more than one fixture if you want whisper-quiet water supply lines.

Column NH019