Welcome to the AsktheBuilder.com Media Center. If you are a member of the press, a public relations person, an advertising representative or you work for a building material manufacturer, this may be a good place for you to start.
My sponsors get results. Why? Because I figured out how Internet advertising works back in 1995. Advertising at AsktheBuilder.com is affordable and it is effective. Click the links to see how your ads can appear in days on AsktheBuilder.com.
Interviews I routinely grant interviews. The fastest and best way to get in touch with me is via e-mail. If an e-mail is sent during normal business hours Eastern Standard Time, I usually will respond within hours. You and I can advance immediately to the interview, if you would be kind enough to describe in great detail what the subject matter of the interview will be.
Press Releases If you want to submit a press release to me about a product and you want me to give it serious consideration, I strongly urge you to take the time to submit it in the AsktheBuilder.com user-friendly format.
AsktheBuilder in Your Newspaper or Magazine Contact Ms. Sheila Donohue, at Tribune Media Services, if you would like my AsktheBuilder weekly column in your newspaper or print vehicle. Sheila is a superb individual and can be reached by phone at 1-800-245-6536 or e-mail at [email protected]
Do you have any idea how many press releases I get each week? Patti, my mail carrier, has let me know a time or two that I better be reading all of the stuff that's giving her a bad case of shoulder arthritis. Handling paper is a hassle, but reading an email and clicking a link to a .PDF and .jpg file is faster.
Which electronic press releases do I look at first? Which ones get my attention? It's easy. If you want me to give your press release serious consideration, then you'll convert your press release into a .PDF file. Don't send me a MS Word file. I'm on a Mac, and they often lose formatting when Gmail opens them as a Google Document.
Press releases that get read by me follow these guidelines to the letter:
A 100-word maximum summary of the press release located at the top of the document. This summary is MISSION CRITICAL. Get my attention here - forget about all of the clever prose. Cut to the chase. Many of us in the press are just as busy as you are. In other words, be sure the summary is above the top fold of my monitor screen. If the summary contains key points that catch my interest, you can bet I'll read the full body of the release.
Color images included in the .PDF file with active links where I can see larger images or high-resolution images. This is not hard to do, and many members of the press would appreciate this time-saving measure.
Send images as attachments if you desire, but watch your file sizes. You can also provide a link where I can download the image(s).
Product samples sent to me for review are never returned. I NEVER write about a product nor feature it in a video unless I test it. If you want me to consider your product, you must send it to me. Use the Ask Tim link above to get my address.
Products sent to be reviewed are tested on a first-come first-served basis. Some product testing can take months to conclude, especially if a job needs to happen where the product can be used and tested. Please understand that there could be as many as fifty or more products ahead of you in the product-testing queue at any given time. I can't guarantee when a product will be tested or reviewed.
Products that pass my testing are almost ALWAYS mentioned in my weekly newsletter. My newsletter is sent to over 100,000 raving subscribers. I provide to the PR firm a report showing the thousands of clicks I send to the product's website within 96 hours of the mention in the newsletter. My subscribers LOVE product reviews in my newsletters.
Ready to submit your press release and products? Proceed to the Press Release Submission page to submit your press release or to the New Tool/Product Submission Form if you have a new tool or product you would like to submit.
If you think I just write my syndicated newspaper column each week and then kick off my shoes and relax (gosh, wouldn't that be the life!), you are dreaming. I do all sorts of other things:
I am now taping five to ten short videos each week. They are loaded to a library at YouTube. Go there and type AsktheBuilder in the search box to see all the videos I have loaded. Be sure to subscribe to my video channel.
If you want me to send you an email each time I load a new video, then go here to sign up for that cool feature!
Each winter I head to the huge International Builders Show to keep up with all of the latest building products and technology. If you want to meet with me at this show, I can often be found at the Press Room early in the day.
It is not uncommon for me to attend at least three or four separate editors conferences sponsored by building products manufacturers during the year. These are great opportunities to get in-depth information about new products long before you see them on store shelves.
I also do public speaking for businesses, associations or any group. My speeches can cover a wide variety of topics. Frequently I am asked to speak about the Internet, consumer marketing, consumer feedback, eCommerce and a host of other topics that I deal with on a day-to-day basis.Contact me if you want me to speak at your next meeting.
Last but not least, I try to write in my Ask Tim Carter blog as often as possible. This blog, just like my AsktheBuilder.com website, has its own RSS feed. The RSS Feed allows me to automatically notify you when I rant or rave about something. What you are clueless about RSS? You better get up to speed and add my feeds to your news aggregator software.
When you live in a city such as Chicago, Minneapolis or even Moosehead, Maine, it can get very cold in the winter. More importantly, it can stay cold. If energy prices are low and you have an efficient furnace in your new home, you might not care if it is 20 below zero. But energy prices can be unpredictable. They may jump 20 or even 30 percent in a short amount of time.
What size - 2x4 or 2x6 walls?
What's worse, it is very difficult to upgrade insulation to the exterior walls of your home once it is built. As you plan a new home, you will come to a fork in the road. Your builder may ask you whether you want 2x4 or 2x6 exterior walls. The first thing you should think about is return on investment since it will cost extra money for the thicker 2 x 6 walls.
There are many ways to make a new home more energy efficient. Hundreds, if not thousands, of books have been written about the topic. But all too often the issue of return on investment is overlooked or glossed over. Many people operate on a tight budget when building a new home. There can be lots of hand wringing over decisions where you can't see an aesthetic result or an immediate economic result. Thicker walls that contain more insulation is absolutely a mundane topic that would fit nicely in this category. But fortunately there is a way to measure a distinct return on your investment for an upgrade to 2 x 6 exterior walls vs. 2x4 exterior walls.
Are 2x6 walls more expensive?
The upgrade to 2x6 exterior walls is easy to understand. These wall require more expensive lumber, added finish lumber for the extension jambs for all windows and doors and the added cost of the thicker wall insulation. It is very easy for this upgrade to exceed $1,000.00 if not more for an average size home. Fortunately, it is a one-time expense that can produce large savings in certain situations.
Several years ago, scientists at the Building Research Council at the University of Illinois put some thought into this subject. The results of their research were very interesting as they established a benchmark that allows a person to quickly determine if upgrading to a thicker exterior wall system is a good idea. Using historical weather data, heating energy costs and the cost of the upgrade, they discovered that if you live in an area that experiences 5,750 or more heating degree days per year, it is a good idea to upgrade to the thicker walls.
What are heating degree days?
Heating degree days are calculated for you by the National Weather Service each day for each city. Annual totals are also readily available for hundreds of cities and towns across the USA. But if you want to do the calculations yourself, it is easy. Simply determine the average temperature for each day. Do this by adding the low and high temperature together and then divide that sum by 2. The result is the average temperature for that day. Subtract that number from 65. The result is the number of heating degree days for that day.
If you do this each day, you will discover that Chicago has approximately 6,500 heating degree days per season, Minneapolis has nearly 8,000 and those in Moosehead, Maine will top 8,500 in an average winter. Obviously it makes sense to build with thicker 2 x 6 exterior walls in these locations.
What are other benefits to thicker walls?
There are some added benefits as well to thicker walls. The greater mass can help deaden sounds. This may be a reason to do it if your home is in an area where the heating degree day total falls below 5,750 or is borderline. If you are trying to re-create the look of an older home, the extension jambs at the windows will help to support the illusion of a Victorian or Colonial home. In my own home, this added space within the extension jambs created a perfect spot to hide my retractable window screens.
You can also work to save energy in your attic no matter which size exterior walls you use. After the insulation is in place, consider installing radiant barrier chips. These highly reflective pieces of material bounce heat back to its source. In the winter months they will send the invisible infrared rays that have leaked into your insulation back down into your living space. In the summer, these magical chips bounce the hot attic infrared energy back outdoors. But never forget that wall thickness is nearly impossible to change once your home is built. Choose wisely and you will never regret it. Choose poorly and you may suffer for a very long time.
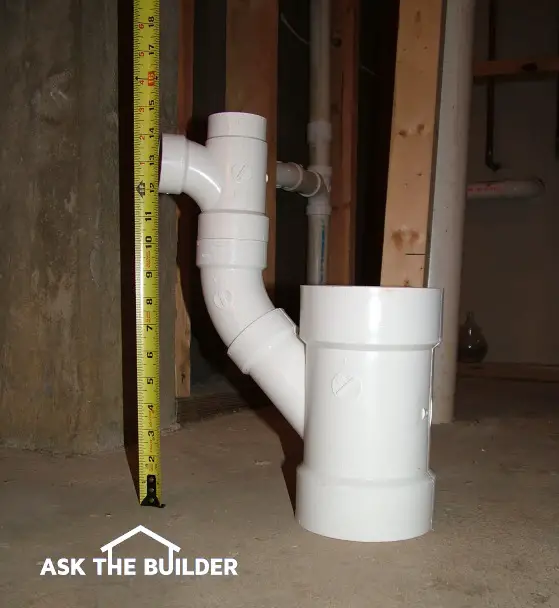
You need to assemble the new drain line fittings without cement to see how high the horizontal branch arm will be. Don't forget to account for the height of the clamp below the large 4x2 wye!
Plumbing Installation
DEAR TIM:My husband refuses to help me install a new basement laundry sink. To make it easy I have found a location immediately adjacent to a vertical plastic plumbing stack. Surely it can't be that hard to cut into the pipe and install the necessary fittings. What is involved and what do I need to do to make sure the work meets the plumbing code? Mary C., Edmond OK
DEAR MARY: What a shame your husband is not a team player. I wonder if he is intimidated by the project. There are indeed some challenges you will face, but it isn't hard to cut into the plastic polyvinyl chloride (PVC) plumbing drain pipe. The hard part is knowing where to make the cuts and making sure the new drainage branch you install is vented properly.
Why are vent pipes needed?
Just about everyone understands how water flows down a plumbing drain pipe, but what is particularly vexing to many is the need for vent pipes. When water flows from a plumbing fixture into a drain pipe, it displaces the air that moments before was in the drainage pipe system. This air must be replaced and vent pipes that extend through the roofs of house are usually the entry point for this needed air.
What happens when a vent pipe is clogged?
If a vent pipe becomes clogged or if vent pipes are improperly installed or sized wrong, the plumbing system may get the needed air by sucking it through the drain of one or more fixtures in a home. If you have ever heard a tub or sink drain gurgle or sputter when you flush a toilet, you are experiencing this siphon phenomenon first hand. When water gets sucked from a fixture trap, sewer gas or vermin in the piping system can easily enter your home. This is very unhealthy.
The first thing you must do is calculate the rough-in height off the basement floor for the center of the horizontal drain pipe that will service this new sink. You do this by temporarily setting the new sink in place and connecting the P-trap to the tailpiece drain pipe that extends from the bottom of the sink. Slide the trap up the tailpiece of the drain as high as possible so that the rough-in height of the trap outlet is as high off the floor as possible. Believe me, you will need every inch you can spare.
You will need three fittings to create the new branch drainage line: a wye, a 45 degree fitting and a tee fitting. A wye is a plumbing fitting that allows a new drain line to branch from a stack at a 45 degree angle. The size of the wye fitting will match the diameter of your existing stack. I am confident it is either a 3 or 4 inch PVC stack. Let's assume it is a 4 inch diameter plumbing stack. In this case, you will need a 4 x 2 wye as I suggest a new 2-inch diameter stack for this new fixture. In addition you will need a 2 inch street 45 fitting and a 2 x 1.5 x 1.5 tee fitting.
The street 45 fitting has a male end and a female end. The male end is inserted into the socket of the wye to create a smaller vertical secondary stack next to your existing stack. The tee fitting sits on top of the 45 degree fitting and creates the entry point for the drain pipe that extends from this new smaller vertical stack to the outlet of the trap under the sink.
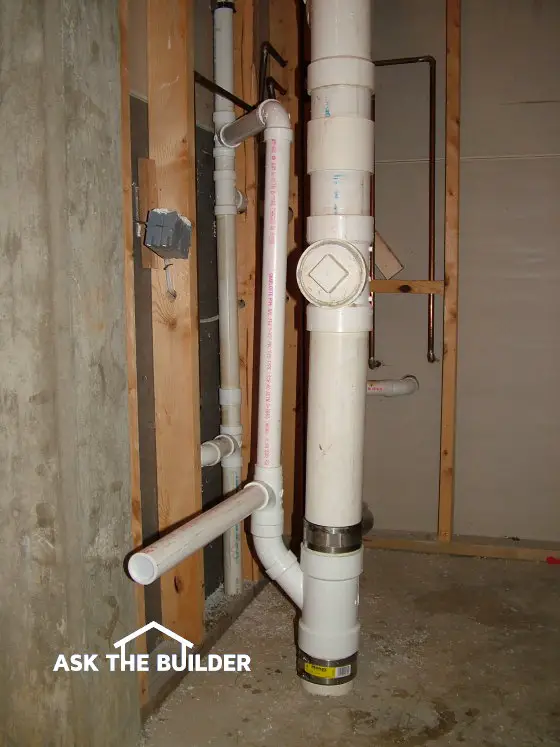
The large diameter pipe did not have the fitting close to the floor when the house was built. The extra drain line was installed to accommodate a basement laundry sink.
The top of the tee fitting is where the vent for this drain begins. A vertical 1.5 inch pipe extend up above the flood level of the sink and continues upward until it connects to another vent pipe. If you can't find a nearby vent pipe, you may have to extend this pipe all the way up to the roof. In some parts of the nation certain plumbing codes do allow mechanical vent pipes that eliminate the need for traditional vent pipes.
Can you do plumbing projects yourself?
Before you get started I urge you to check with your local plumbing inspector. First, you need to know that some cities and states do not allow homeowners to alter the plumbing systems inside their homes. Make sure you are allowed to do this job by yourself and find out about the necessary inspections. It is vitally important that you use all approved fittings, the correct clamps, the proper plastic primers and welding cements and the proper pipe sizes. The plumbing inspector can assist you with this in many instances.
If you are particularly lucky, the inspector will draw a quick diagram or make a copy of a 3-D illustration often found in most plumbing code booklets. This diagram or drawing will show you the proper pipe sizes and what the new piping system should look like once you are finished.
The weight of existing plumbing stack is significant. If this weight is not supported as the vertical stack is being cut, the piping can drop. This movement can place damaging stress on all of the piping components that may lead to leaks.
Temporary blocking and metal pipe straps and clamps can be installed to support the piping. This should be done before any cutting proceeds. The cuts into the drain piping must be square so that the new wye can be inserted with ease. If the cuts are not square, the new wye may not fit or the clamps that provide a positive seal may not fit as designed.
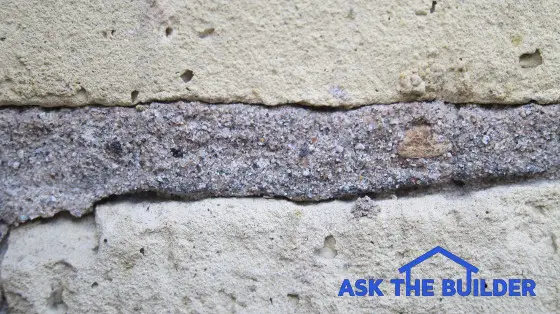
Seal Brick and Mortar | This is a closeup photo of a mortar joint between two layers of brick. Note the tiny cracks where wind-driven water can seep into the wall. (C) Copyright 2018 Tim Carter
DEAR TIM:My brick home and virtually every other brick house in my sub-division leak water when it rains. This water is causing mold growth in our exterior walls. I thought brick walls were supposed to be weatherproof, that is why I specified them. What is wrong? Can the brick be sealed? Does the brick job have to be re-done? Is there a less-expensive alternative? Doug C., Mason, OH
DEAR DOUG: I can't begin to tell you how downcast my mood becomes when I get letters such as yours. In my opinion, there are quite possibly hundreds of thousands of brick veneer homes built in the past 15 or 20 years that are ticking time bombs. Many brick masons and builders do not follow simple and long-established industry standards that would otherwise allow them to construct brick walls that can keep you and your home dry and mold-free.
Do bricks leak during rainstorms?
Yes, brick walls leak during rainstorms. Most of the water enters the wall through tiny cracks in the vertical mortar joints between two brick.
Believe it or not, even the most talented brick masons using the highest level of skill and materials cannot build a brick veneer wall that will stop water infiltration. Brick walls leak water and some leak vast amounts of water during a wind-driven rainstorm. Well over 50 percent of the USA experiences wind pressures of 25 pounds per square foot or greater. Add to this the pounding effect of tens of thousands of raindrops on the side of a brick wall and you have a recipe for disaster.
But that being said by no means lets bricklayers and builders off the hook. The industry has known for years that brick walls leak water and lots of it. The trick is to build a system that:
protects the wood framing of the house from getting wet
collects all water that leaks through the walls
re-directs all of the collected water back to the exterior as quickly as possible
The most troubling thing is that it is very simple to build a brick veneer house that performs exactly as you thought it should. It adds very little extra cost to do so as the house is being constructed.
How do you keep wood framing dry?
Flashings and waterproof membranes help keep wood framing dry.
The builder and bricklayer must work together to install top quality flashings on top of the foundation wall where the first course of brick begins. All inside and outside corners as well as overlap joints must be sealed perfectly. The same flashing material is used where brick passes over the top and under the bottom of all doors and widows. The house framing must be covered with a water membrane such as tar paper or modern water-infiltration barriers. Weep holes that let accumulated water out from behind the brick should be placed on two-foot centers. Special synthetic fabric should be placed behind the first courses of brick. This fabric keeps mortar droppings from clogging the weep holes.
What would it cost to re-install the brick on my home?
But all of this means little to you now unless you decide to remove your existing brick veneer and start over. That is an enormously expensive proposition. I would not be shocked if you received a price of $2.50 PER brick to do such a job. The average house can easily have over 18,000 brick! The cost will be even higher as other exterior building components will undoubtedly be harmed by the processes of demolition and the reinstallation of the brick.
Is there a brick sealer?
The first thing to try is a solvent-based clear silane siloxane masonry sealer. The one below is a great one because it's NOT water-based. Solvent-based sealers penetrate deeper into brick and mortar.
What's the best way to apply brick and mortar sealer?
It's best to have two people apply the sealer. One person is wearing a powerful backpack leaf blower. As the other person sprayes the wall, the person with the blower BLASTS the wall with air to drive the sealer deep into the masonry. The deeper the sealer penetrates, the better protection you'll have.
Be sure to apply MULTIPLE coats of the sealer within minutes of each other. Read the instructions on the label of the product. Once the first coat dries, it will BLOCK the second coat from penetrating into the brick or mortar. You MUST WORK FAST.
This is a magnificent silane - siloxane water repellent that soaks into brick and mortar. CLICK or TAP HERE or THIS IMAGE NOW TO ORDER IT.
Is there another brick sealer product?
There used to be another product, but I'm no longer sure if it's made and I'm now skeptical of the company that used to make it.
But before you begin to demolish your brick walls, I urge you to try an inexpensive yet revolutionary product that appears to be able to absolve the sins of the negligent builders and brick masons. You can purchase via the Internet an elastomeric joint sealant that brushes on the mortar joints in brick, block and stone walls. These are the places where the water gets into the masonry surfaces. The sealant can actually bridge cracks up to one eighth of an inch. It works best if you apply a water based silane / siloxane water repellent just before applying the water based joint sealant.
I applied some of this sealant to my brick chimney. It is very easy to apply. The product is white and has the consistency of vinyl wallpaper paste. But when applied per directions, it dries nearly crystal clear. You can only see something has been applied to the brick wall if you stand close and look at it. If you were to look at my chimney from the street, there is no way you could tell I did anything to it. I urge you to try this product as soon as possible. You must stop the water infiltration immediately if you desire to stop further mold growth.
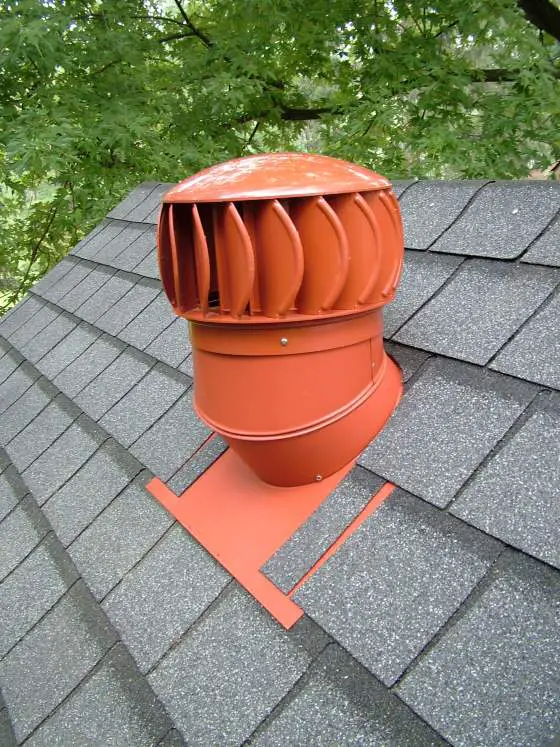
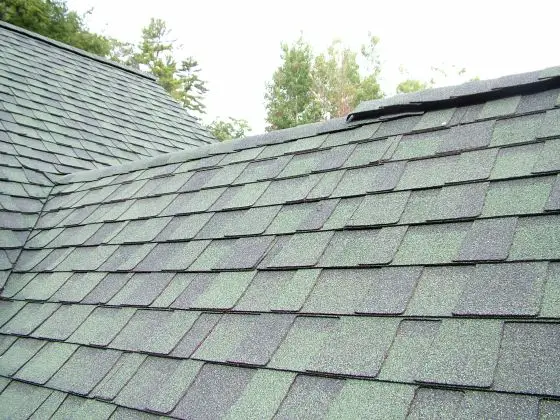
This turbine vent spins with just the slightest breeze. It is but one tool to use when you want superior attic ventilation. PHOTO CREDIT: Tim Carter
DEAR TIM:My wife Ali and I bought an old house 18 months ago. Last winter I noticed condensation and water droplets on the nails that stick through the roof into the attic. At times there was ice and frost on the nails. Boxes stored in the attic were sometimes wet. We had our house resided with vinyl and added two gable vents. Was that a mistake? The house has no vapor retarder between the attic insulation and the second-floor ceiling. Should I install one? What can I do to stop the moisture problem? Brian Z., Kingston, PA
DEAR BRIAN: The water problem is serious but can be easily corrected. Hopefully you have no mildew or wood rot in your attic. If you have dodged these two bullets, consider yourself very lucky. Many people suffer from severe mold and wood rot problems because they simply do not inspect their attic spaces until it is too late.
How do you stop condensation in an attic?
The gable vents you added were a good start, but they are probably not enough. To stop the condensation, you must have a continuous, or nearly continuous, flow of air moving through the attic. This air flow exhausts warmer more humid air that is seeping from your living spaces up into your attic. I happen to believe in abundant and continuous soffit ventilation that allows air to enter at the low portions of the attic space and then exit out the top of the roof through wind-powered turbine vents.
Roof Ridge Vent
Why do roofing nails show condensation first?
The water develops on the roofing nails first because they readily conduct cold. When you see water and ice on the nails, the actual temperature of the nails is at or below the dew point of the air in the attic that is saturated with water vapor. You see this same thing happen in summer months when you place a glass of cold water or a can of cold soda or beer on an outdoor table. If you live anywhere but the Southwest, water droplets usually form on the cold outer surfaces of the glass or can within minutes.
Will a vapor retarder help? Why not?
Adding a vapor retarder on the warm side of the insulation between the attic and the living areas of your home might be a problem. Not only is it difficult to do, but it might also create hidden problems. If cold attic air somehow makes it way through a weak spot in the insulation, it may cause water to condense on the underside of the vapor retarder. Many in the building technologies sector feel vapor retarders are great in wall cavities, but should be avoided in most ceilings.
What is the best way to allow water vapor to escape from the attic?
The better solution is to let the water vapor escape into the attic but quickly escort it to the outside of your home. As I already said, turbine vents coupled with abundant intake air at the soffit level will keep your attic nice and dry.
In addition, be sure you do not have any exhaust air from any fans or dryers emptying into the attic space. Bathroom and kitchen exhaust fans can pump vast amount of water vapor into an attic in a short amount of time. Clothes dryers are even worse. They can pumps gallons of water into an attic space in just an hour or so. All of these fans and appliances must be vented directly to the exterior of your home. Never allow them to exit near the soffit intake vents as the humid air will then be drawn into the attic space without your knowledge.
I prefer to pipe exhaust air through the attic in solid smooth metal pipe. Several fan companies make special roof caps made for venting the humid air outdoors. They are leak-proof if installed correctly.
DEAR TIM: I have a question about insulating the basement ceiling in a house that is only 2-years old. The first floor is made from 2x10s and the cost of fiberglass batts to put in the joists is about $1,000.00. How much benefit would I receive if I only added batts say five feet in from the poured concrete walls all the way around the floor, leaving the middle of the floor space open? Is this worth it? We do not use the basement much, but I am hoping to keep the first floor a little warmer. As for heat supply in the basement, there are only two vents for heat. Bill Bosken, Toledo, Ohio
DEAR BILL: My answer is going to bring tears to the eyes of the insulation salesmen and sales women around the world. You should take that $1,000.00 and buy a superb value stock that might jump up in price 30-50% in the next 6 months. Spending it on insulation between a tempered basement area and a heated first-floor is perhaps one of the poorest investments of capital you can make.
Do insulating a basement ceiling help save heat?
Insulation is designed to slow the transfer of heat. Although I do not have a PhD in thermodynamics, I can tell you the transfer of heat is a non-linear function. This simply means that heat loss is great when the differences between the two temperatures is significant. If the temperature of two objects is fairly close, the warmer object slowly cools to the lower temperature. You can prove this very easily.
Take two 16 penny nails and put them in your oven. Set the temperature to 400F and let the nails get up to that temperature. Take the nails out of the oven (use caution, they will be hot to the touch) and place one in an empty metal cake pan and place it in your freezer. Place the other hot nail in a metal cake pan that you set on your kitchen counter.
Learn the secrets for successfully installing insulation with my Insulation Installation Checklist. I offer a 100% Money Back Guarantee.
After one minute, open the freezer door and quickly touch the nail. I am confident you will be able to touch it without getting burned. Wet your finger tip and then touch the other nail that is sitting on your counter. I'll bet you get a quick hiss of steam as that nail is still quite hot.
This simple experiment should tell you that the heat transfer between your heated first floor which is probably 70-72F and your basement which might be 60F is extremely slow. The amount of energy you would save in fuel costs would be measured in pennies and possibly nickels each heating season, not in dollars. It could take you decades before you break even on the initial investment of $1,000.00 for the fiberglass batts you are thinking of placing in the floor joists.
What's more, you will discover that your basement will become more uncomfortable and colder than it is now. If you do any work down there, you may find yourself adding heat so you can work in relative comfort.
Would insulating the foundation be better?
Because your basement walls are conducting cold into your basement via the cold ground outside, it might be worthwhile to add insulation over your exposed masonry foundation. You can choose to use closed-cell foam or fiberglass if you choose. But be sure you check with your local building department as some insulations that are flammable - such as closed cell foam - must be covered with drywall or other approved material to prevent rapid fire/flame spread.
I would also inspect the juncture between the wood framing and the top of the concrete foundation. Do this on a windy day and try to feel for air leaks. Air infiltration can be a major drain on your heating budget. Pack insulation in any cracks you discover or caulk them to stop air flow.
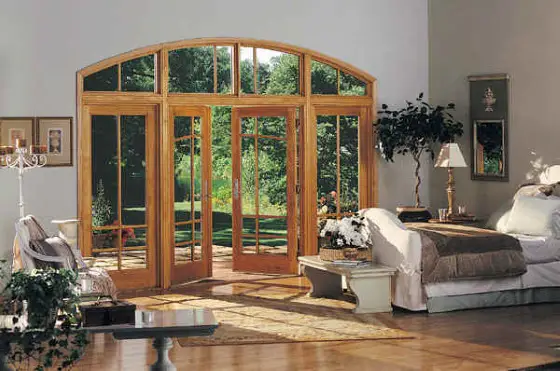
This is a deluxe french door that requires a different installation skill set than a standard french door. But notice how much light a french door can introduce into a room. PHOTO CREDIT: Marvin Windows and Doors
DEAR TIM:My husband and I think we can tackle installing a set of basic French doors in the interior of our 1939 house. These new doors will bring light and a feeling of openness to a small dark bedroom/media room. Our main concern is that the walls are plaster. Can you guide us through the project or is the plaster wall scenario a red flag to have a plaster pro do the installation? We are budget conscious since we will be selling the house in about eight months but think the improvement will be dramatic and pleasing. Angela B. Reed, Portland, OR
DEAR ANGELA: The fact that the interior wall surface is plaster instead of drywall would not stop me for an instant. I can see though, why it might be slightly intimidating for a person who has never worked with plaster. My advice to you is to start this project and not let the presence of the plaster hinder you in any way.
Check the door jamb depth before installing French Doors
The first thing you need to make sure is that the jamb depth of your new French door matches the conditions in your home. The standard jamb depths we use today in most new construction match the framing lumber and the combined thickness of the interior wall finish and the exterior wall sheathing. But I would lay odds that your 1939 home with plaster walls undoubtedly will require a special custom jamb or at the very least modifications to a standard factory jamb.
For example, a new French door might come from the factory with a 4 and 9/16ths inch jamb. This jamb works perfectly in a wall made from standard 2x4s, covered with 1/2 inch drywall and a 1/2 inch thick exterior sheathing board. It is very prudent to have the jamb extend about 1/32nd or 1/16th inch past the interior finished wall surface. Your jamb depth will most likely end up somewhere between 4 and 9/16ths and 6 and 9/16ths inch. Several high-quality door manufacturers can make the exact custom jamb you need.
How do you create the rough door opening?
The next task, once you have the correct door in your possession, is to create the rough opening in the wall. Take a tape measure and determine the unit dimensions of the new door. These dimensions are the actual outer width and height of the door including the jambs but not any brick mold or other trim nailed to the jamb. The unit dimension height is the distance from the bottom of the threshold to the top of the jamb. The unit dimension width is the distance from the outside edge of one side of the door to the other outer edge of the other jamb.
The rough opening you create for the new door should be one inch wider than the unit dimension width of the new door and 5/8 inch higher than the unit dimension height of the door. This extra space gives you the needed wiggle room to shim the door as you make the necessary adjustments that allow the door to operate perfectly. This spacing also allows you to insert insulation that cuts down on air infiltration around the new door.
Will you need a new structural header?
Undoubtedly, a new structural header will need to be installed as part of the creation of the rough opening. Large dimensional lumber such as 2x10's or 2x12's are often used. These in turn rest upon vertical 2x4s or 2x6s that act as columns supporting this wood header beam. These vertical framing members must transfer the weight of the structure above the beam directly to the foundation of the house. You may have to insert solid blocking immediately below the vertical studs and under the floor to create this load pathway to the foundation. If your home is built on a slab, this is of no concern since the outer edges of the slab often are directly connected to the foundation. It is wise to have a structural plan created by a residential structural engineer if you are unsure exactly what to do.
Should a flashing pan be installed?
Before you get ready to position the door, make sure you install a flashing pan. These ingenious devices collect any water that might run down the sides of the door and any water that tries to pass through or roll under the threshold. If the pan is installed correctly, it captures any water and redirects it to the exterior of the house. Believe me, thousands of people suffer mysterious leaks adjacent to their exterior doors during wind-blown rainstorms. These leaks often manifest themselves as puddles inside their home at the corners or the center of the door units. In almost every case a properly installed flashing pan would have prevented this misery.
How do you refinish around the door?
Once the door is in place and secure, it is time to re-plaster. You can buy some blue board drywall that will help you fill the gap between the rough wall studs and the finished wall surface. This blue board drywall has a special paper that inhibits the water from the plaster from softening and harming the gypsum core of the drywall. Do not use regular drywall under plaster.
This blue board drywall can be covered with a coat of rough base plaster that contains some sand and vermiculite. Build this layer up to within 1/8 inch of the finish surface of the adjacent plaster. The following day add the final coat of plaster or dry setting joint compound to make the wall surface match your existing walls. The dry-setting type joint compounds mix easily with water and have the workability of traditional drywall compounds. Once dry, they can be sanded. Traditional white-coat plaster can't be sanded and is not a product to use if you are a plaster rookie!
Concrete Countertops | This sleek bathroom countertop is concrete. Although it appears to be a no-brainer, you would be shocked at how much work and expertise goes into creating a masterpiece.
! Please Read Author's Notes at End of This Column !
DEAR TIM:I am an owner/builder and have been told that concrete countertops might be an economical alternative and would suit the type of house we are building. What are the pros and cons with using concrete as a kitchen or even bathroom countertop? What are the steps one takes to build one? Do you feel the average person can fabricate and install one? Jane Powers, Brisbane, Australia
DEAR JANE: I love concrete because it is such an astounding material. When installed outdoors per industry recommendations and exposed to the full force of Mother Nature, it can last for 40 or more years. Thus it goes without saying that a countertop made from concrete that is indoors where temperatures are almost always 70F might last forever. Well, they can last forever, but you might not like the way one looks after 6 months.
Is installing a concrete countertop a DIY Project?
Let's first talk about the economics of concrete countertops. You have a distinct advantage should you decide to make them as you would be paying yourself, not a professional, for the labor. Many of the materials needed to make the concrete countertops are commodity items and are somewhat inexpensive. One or two bags of Portland cement will often be enough for hundreds of square feet of countertop surface. The sand, small gravel and coloring pigments are very affordable. The most expensive component is often the sealer that is used to help minimize liquids and foods from penetrating into the concrete once it is a functioning surface.
But if you had to pay a person to fabricate and install the concrete countertops, you might have a mild heart attack when you discover how expensive they can be. The lion's share of the expense is in labor. Building a concrete countertop is extremely labor intensive and don't let anyone tell you otherwise.
How do you build a concrete countertop?
There are at least two ways to build these tops. They can be built in a shop and placed on top of the cabinets or they can be poured and finished right on top of the cabinets. In either situation, the forms that have to be built to create the shape of the tops is something akin to finish carpentry. The forms must be perfect, they must be sturdy and they must not fail during the pouring and finishing process. The forms must also come apart easily so as not to damage the fresh and tender concrete once it has hardened.
What are some rookie mistakes?
Perhaps the two biggest places rookies make mistakes are in the fabrication of the forms and the finishing of the concrete. Both are art forms in a manner of speaking. If you think for a moment you will apply a steel-trowel finish that ends up as smooth as glass on your first try, you are dreaming. Once the skill is learned, it is not hard to do, but the problem is getting to that point.
Concrete shrinks as it cures and dries. These internal forces work to rip apart. Sharp 90 degree bends that you often find where countertops change direction or in sink cutouts can be the source of ugly and random shrinkage cracks. Reinforcing steel placed in the thin tops can hold the concrete together so the cracks do not grow much beyond the hairline size. But who wants cracks in a beautiful countertop?
Should a concrete countertop be sealed?
Once the countertop is finished and the forms are off, you need to seal the surface. There can be a significant wait time until you are allowed to apply the sealer. Concrete, even steel-trowel concrete, is an absorbent material. If the concrete is not sealed, liquids, cooking oils and even oil-soaked pizza boxes can cause ugly permanent stains.
But not all sealers perform well over time. Some can scratch, some are heat sensitive and others require periodic application to help keep the protection levels to a maximum. But even still, I have yet to discover a miracle sealer that protects against all possible stains.
Will your concrete countertop look great, like in the magazines?
In my opinion, concrete countertops are one of those things that look great in magazine photos and in museums. If I had one in my own home, my kids would have its surface looking like the concrete pavement of Interstate 75 that passes through my town. In other words, the countertops would work, but they would not look as good as many of the other countertop possibilities I know to exist.
The actual process of mixing, pouring, finishing and curing the concrete is critical. Make one mistake in any of the steps and you can have a failure in the surface. To make matters worse, even if you do everything right, you can still have problems. Building and installing concrete countertops is not unlike spending a night at a casino. You just might get lucky and bring home a winner.
The system that probably makes the most sense is the countertop formed and poured in place. If you try to fabricate the tops in another location and transport them, you might crack the tops as you carry or set them down. Concrete is very heavy and the reality of placing a large slab that is L or U-shaped is not realistic. If you do install the top in pieces, you then have to deal with sealing the seams. It is by no means an easy task to create gorgeous tops that look like ones you see in magazine or book photos.
Author's Notes - November, 2004
This column created a significant response from a few builders who sell concrete countertops in their homes and craftsmen that fabricate concrete countertops. Most of the responses I received were filled with emotion and claims that I did not do proper research to tell the real story. The truth is I did. I contacted two of the top concrete associations in the world for the latest facts and technology about concrete countertops.
Guess what? The concrete countertop fabricators are not passing the latest information back up the food chain to the authoritative voices in the industry such as the Portland Cement Association or the American Concrete Institute.
One fabricator in particular hit the nail on the head. Daryl Lucien, President of FormTops Studio told me how he feels about sharing the latest technology with anyone. He wrote this to me:
".....In as much as I do that, I keep much of what I do proprietary. It's my intellectual property and a key to my competitive advantage in the marketplace. Even my employees sign non-compete/non-disclosure agreements or they don't work. I'll say it again, this is a business with one simple rule ... if it was easy ... everyone would be doing it ... and not making any money."
Column 540
Expert Advice For Your Home
Subscribe to the FREE Ask the Builder newsletter to receive professional advice for your home. Complete the form below and each week you'll get:
DIY Tips
Tool Reviews
Project Guides
Product Discounts, Giveaways & more.
Unsubscribe at any time. We respect your email privacy.