Hardwood Floor Cracks

Hardwood Floor Cracks

QUESTION: We had strip hardwood flooring installed throughout our new home. However, after nine months in the house some large irregular cracks have appeared between some of the pieces. The cracks occur more in the center of the house. I can see the underside of the subfloor from the basement and it looks dry. The floor is also strong, it has no 'bounce' to it. What happened?

ANSWER:  Your description of the problem leads me to believe that you were a victim of edge crush or compression set. If in fact this is your problem, it will not be an easy one to remedy.

Edge crush or compression set occurs when a newly installed hardwood floor absorbs moisture and swells prior to being finished.  Because hardwood floors are installed 'tight' in the first place, any swelling whatsoever can cause the pieces of wood flooring to push up against one another.  This wouldn't be such a problem except for one thing. 

AsktheBuilder Podcast

CLICK this image and listen to the first call on the podcast. I talked to Jill about how to repair wood kitchen flooring, and possibly installing an inlay border as an option. Copyright 2018 Tim Carter

Strip hardwood flooring is manufactured so that the pieces interlock.  Each edge of the flooring has either a tongue or a groove.  However, during the milling process, when each piece of hardwood flooring is shaped, the tongue side is not milled at a 90 degree angle to the face of the flooring that you walk on.  This is done intentionally. 

The tongue edge is milled so that only the top of that piece touches the groove side next to it.  This process permits the wood flooring to be installed tightly even if there are slight imperfections in the subfloor or on the hardwood pieces themselves.

CLICK HERE to get FREE & FAST BIDS from local contractors who can install or repair your hardwood floor.

As with every pro there is always a con.  So to with this.  Since just the top edge of each board is in contact with the next piece, any significant pressure will compress the wood fibers.  These fibers rarely expand back to their original shape and size. 

The hardwood floor manufacturers know that this can occur.  They have developed strict installation guidelines which, when followed, eliminate this problem from happening.

hardwood floor got wet, swelled

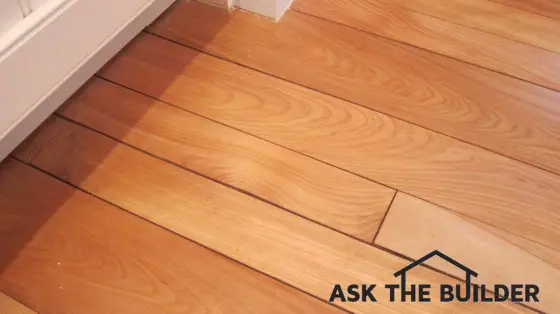
This hardwood floor got wet, swelled, then dried. Cracks are now telling the ugly tale. Photo Credit: Tim Carter

The moisture that caused your flooring to swell could have had many origins.  The wood may have been delivered on a rainy  or snowy day.  The floor could have been installed in damp or humid weather. 

The weather may have been fine, but moisture was introduced by construction activities.  The drywall or plaster may not have been thoroughly dry.  The framing lumber may have had residual moisture from being exposed to rain. 

Painting activities can release large quantities of moisture into the house.  Freshly poured concrete in the basement can also raise the humidity level.

Hardwood Floor Repair Kits
There are all sorts of products to do minor hardwood floor repairs. CLICK THE IMAGE to see ALL of them.

Also, you mentioned that your problem was most severe at the center of your house. My guess is that your furnace and main duct trunk lines lie directly underneath the problem areas. In all likelihood, the ceiling in your basement above these areas is uninsulated.

The heat from the furnace and the ductwork 'cooked' the flooring in these areas and caused them to shrink more than the areas at the edges of the rooms.

You can avoid these problems by making sure the flooring material is dry before installation. Also, the interior of the house must be dry. The floor should be finished as soon as possible after installation. This process seals the wood and makes it very difficult for swelling to occur.

In your case, your only solution may be to fill the cracks with color putty and invest in some decorative area rugs.; Refinishing of the floor will not cause the cracks to disappear.

CLICK HERE to get FREE & FAST BIDS from local contractors who can install or repair your hardwood floor.

Column 027

Superb House Plans

DEAR TIM: My husband and I are getting ready to build. We have come to the conclusion that we need the services of an architect. Our contractor, however, has told us that there can be a wide range in quality of residential house plans. Is this really true? If so, how do you spot a high quality set of house plans? J.W.

DEAR J. W.: I feel that your contractor's statement is extremely valid. Residential house plans, just like many other items, come in varying degrees of quality and detail. The primary reason for this lies in the training that many architects receive as they work towards their degree. A large number of schools that offer architecture degrees base their scholastic programs on commercial architecture.

This approach is very sound, because the vast majority of architecture jobs are in the commercial field. For the most part, architecture students do not concentrate on residential problems in their schooling. However, after graduation, some architects choose to work in the residential field.

Some may work for an experienced residential architect and serve an "apprenticeship." Others may choose to dive in head first and quickly expand their knowledge through the school of hard knocks. In either case, much of the knowledge and expertise is self-taught.

Hands on construction experience can be a tremendous help for those young architects who are willing to make the investment. There is no substitute for this type of training.

CLICK HERE to get FREE & FAST BIDS from local designers who can help you make superb house plans.

As a builder, I feel that house plans should be judged on content, not design. Because the plans often are the primary media by which the homeowner's wishes are transmitted to the builder, they must be accurate and specific. Blueprints without detail leave them to create assumptions. You and I know what happens when you assume something.

High-quality house plans often contain an accurate site plan showing the placement of the building on the real estate. Utility connections and routes are indicated as well as present and finished topography or grading profiles. Floor plans are generally drawn for each level of living space.

These plans are dimensioned accurately and drawn to scale. All windows and doors are indicated as well as the direction in which they open. All interior elevations are drawn showing cabinet layouts, all fixtures, and configuration of any built-in furniture.


How would you like me to build your new home? It's probably impossible for me to fit your job into my schedule, but I will gladly share hundreds of my tricks and building secrets with you and your builder. Check out my New House Specifications.


Exterior elevations showing all detailing and separate mechanical drawings are generally found on high quality blueprints. Electrical plans should never be drawn on the main floor plans. They should have their own page.

Top notch plans have adequate cross sections to depict all structural members. These cross sections are extensively labeled so that all structural items and construction materials are spelled out. Nothing is left to question.

Superb house plants also have window, door, and room finish schedules. These tables clearly indicate what happens in each room. They are extremely important. Written specifications almost always accompany a good set of plans.

These specifications cover general conditions of the project and often spell out specific fixtures which are to be used as a part of the job. High quality blueprints can be worth their weight in gold. They are the key ingredient to a successful job.

CLICK HERE to get FREE & FAST BIDS from local designers who can help you make superb house plans.

Column 028

Prevent Blacktop Cracks From The Start

Prevent Blacktop Cracks

DEAR TIM: My husband and I are going to have a new blacktop driveway installed. I love blacktop, but I dislike the cracks that develop in blacktop. What, if anything, can be done to minimize or eliminate cracking in blacktop? Should I simply install a thicker layer of blacktop? K. C.
DEAR K. C.: Your questions are excellent. If I knew how to eliminate cracks in blacktop, I wouldn't be writing this column. I would be retired and on a beach somewhere in the Caribbean! However, I can tell you what you can do to help to minimize cracking.

I feel the best place to start is to explain just what blacktop is. A grasp of this information will help you better understand blacktop's limitations. Blacktop is a generic term for hot mix asphalt or asphalt concrete. The makeup of asphalt concrete is similar to the makeup of regular concrete in many respects.

Blacktop consists of aggregate and asphalt cement. Concrete consists of aggregate and cement. Both of them derive a great deal of strength from the size and amount of aggregate.

Asphalt cement is a product of the refining process of crude oil. There are different grades of asphalt cement. These grades are based on chemical makeup and viscosity. At or about 80 degrees F, paving grade asphalt is a semisolid. When heated to 300 degrees F it becomes a thin liquid.

CLICK HERE to get FREE & FAST BIDS from local Asphalt Pavers who can install your blacktop driveway.

Asphalt concrete is made by mixing this product with a mixture of dried aggregate. The aggregate becomes coated with the asphalt cement in the mixing process. The entire batch will now stick to itself and just about anything else it touches.


Would you like to have a gorgeous driveway? How about step-by-step photos and instructions that show you how I had my own tar and chip drive installed? If so, you might want my Instant Download Tar and Chip eBook.


This manufacturing process gives blacktop a unique characteristic. Blacktop is somewhat flexible. This flexibility is both an advantage and a disadvantage. The advantage is that it can stretch somewhat without cracking.

Blacktop's disadvantage is that in and of itself, it has very little tensile strength. Blacktop derives the greatest portion of its strength from its base or foundation. Herein, lies the source of a majority of the reasons for crack development in blacktop.

The base for many blacktop driveways is crushed gravel. This base is more often than not applied directly on the soil. The base and the soil have to be able to support the loads which will be placed on it. For the base to attain its maximum strength, it must be placed on compacted soil.

blacktop cracks

CLICK THE IMAGE to repair the cracks in your blacktop that sour your mood.

Furthermore, the base and the soil beneath it must not be allowed to become saturated with water. Water softens the soil and allows the base to move which then allows your blacktop to crack. Poor subsoil drainage can turn the strongest soils into mush. If this mush contaminates the gravel base, the base rapidly looses strength.

Years of research and development have produced some methods which help to solve these problems. Instead of using crushed gravel for a base, a different type of asphalt concrete can be used. This initial layer has very large aggregate which gives it fantastic strength characteristics.

Also, manufacturers have developed geo-tech fabrics which can be laid on the soil before either of the bases are applied. These fabrics prevent soil mush from traveling up into the base, should the soil become over saturated with water.

Crack prevention starts at the beginning of the job. Thickening of the final blacktop layer is not the answer.


Asphalt repair got you down? Save time and money by using my Asphalt/Blacktop/Tar & Chip Installation & Repair Checklist. I offer a 100% Money Back Guarantee.


CLICK HERE to get FREE & FAST BIDS from local Asphalt Pavers who can install your blacktop driveway.

Column 029

Painting New Wood Siding

DEAR TIM: We are in the process of building a new home which will have redwood siding and trim. We are going to paint the new house. The painting contractor mentioned in her quotation that all of the exterior siding, trim, and other wood should be backprimed. What is backpriming? Is it necessary and / or worthwhile? M. S.

DEAR M. S.: As long as you feel that her quotation is in order, give her the job! She is one of the few painters I know of who really is on top of her game. Backpriming is absolutely necessary on redwood. It is also an excellent idea for any exterior wood siding or trim.

Backpriming is really a very simple procedure. It simply means painting the back side and all other hidden edges of a piece of wood. Just think of it as a basic form of plastic shrink wrapping. Very few painters take the time to do this extremely important step.

However, it is not always the painters fault. Builders must allow the painters sufficient time and space to perform this task prior to the installation of the wood by the carpenters.

Backpriming can dramatically extend the life of the initial and all subsequent paint jobs. For this reason alone it should be seriously considered. Backpriming extends the life of a paint job by virtually eliminating the possibilities of paint peeling and blistering.

CLICK HERE to get FREE & FAST BIDS from local painters who can paint your new wood siding.

Here is how it works. Water, for the most part, can easily enter and exit wood. The structure of wood makes this possible. That is how the water from the soil gets up to the leaves while a tree is alive. However, this property is a negative quality when the wood is on your house.

Under normal atmospheric conditions, water wants to evaporate. That is why people hang clothes up to dry. This same thing will happen to a wet piece of wood. If the wood does not have a coating on it, it really isn't a problem.

However, if something gets in the way of the water which is trying to evaporate, the water vapor will simply push it out of the way. This effect can be dramatic with highly flexible latex paints. Evaporation can create a high enough vapor pressure behind the surface of the paint so as to create a bubble not unlike that of bubble gum.

Paints are simply coatings. Many are sold on the basis of their effectiveness in protecting wood from water and the elements. The trick is to use this technology to your advantage. By applying paint to an entire piece of wood, you make it extremely difficult for water to enter the wood in the first place. This process is not as difficult as it sounds.

An advantage to backpriming is that it can be done on the ground and very quickly. If you plan your work, have the weather on your side, and have plenty of room, it goes very quickly. Simply set up some saw horses or a large painting platform and get out the roller or spray equipment.

Rolling or spraying the paint will make fast work out of this process. First, paint the side of each board which will not be seen after it is installed and all edges. Set aside to dry. After the paint is dry, paint the remaining unfinished side.

However, glide a paint brush over this side after you have applied the paint. This will give it the texture of a hand brushed application. Hand brushed finishes tend to look more professional.

I also recommend applying the second coat on the ground as well. By doing this, the painter usually only has to set ladders and scaffolding one time. This is safer and quicker. Finally, don't forget to leave a brush and some paint for the carpenters. Every time they cut a piece of wood, the cut edge must be sealed.

These cuts usually expose the wood's end grain. End grain is the easiest and fastest way for water to enter wood. If this end grain is not sealed, all of your work and effort will be wasted!

You never really appreciate how smooth a painting job can go -- and how much better it can look and how much longer it can last -- until you sit back and watch a pro at work. And even then, you're usually hard-pressed to duplicate your painter's prowess on the next project. This book will change all that. House Painting - Inside and Out is written by two men who are eager to show you what they have learned from years of professional painting experience.

With their help, you can avoid common mistakes, learn everything you need to know to get professional results, and pick up time-saving tricks of the trade along the way. You'll learn how to assess and plan a paint job,choose everything from the right paint to the best brushes, rollers, scrapers, and sanders for your job, professionally prepare every kind of interior and exterior surface, whether you are painting new or old drywall, woodwork, plaster, siding, stucco, aluminum, or vinyl - brush, roll, spray, and touch up all these surfaces, work--and clean up--safely, responsibly, and efficiently. There's even a gallery of great paint jobs to show you what you are capable of. It is published by the Taunton Press, a company with the highest quality standards. I highly recommend this book.

CLICK HERE to get FREE & FAST BIDS from local painters who can paint your new wood siding.

Column 030

Whole House Fan Sizing

DEAR TIM: I have a whole house fan located in the second floor hall ceiling of a house I just purchased. The fan and louvers look new and seem to operate smoothly, but the fan doesn't seem to exhaust very much air. I have seen these fans operate in other houses very effectively. What could be the problem? Laurie B., Beavercreek, OH

DEAR LAURIE: I hate to be the bearer of bad news, but you may have several problems. Fortunately, they are quite simple to diagnose. The effectiveness of a whole house fan depends upon several key setup features. Everything must be just right, or the fan will not operate properly.

Whole house fans are work horses. They are designed to move great quantities of air. That is why they are able to provide comfort during periods of hot weather. The principal by which they operate is extremely simple. During the daytime, the air inside of your house gets hot and stale.

whole house fan

There are a wide variety of fantastic whole house fan products available. CLICK THE IMAGE to see them.

Generally speaking, after sunset the air temperature outside of your house is lower than the air temperature inside. A whole house fan pushes the hot air out of your house and replaces it with the cooler, outside air.

Air movement creates a cooling effect by increasing the rate of evaporation from your skin. The faster that perspiration evaporates, the cooler you will feel. If you can completely replace the air inside of your house every two minutes, you should experience this cooling effect.

CLICK HERE to get FREE & FAST BIDS from local contractors who can install the correct size house fan for your home.

Because houses come in a variety of sizes, whole house fans must be made to accommodate the different volumes of air. The strength or power of a whole house fan is measured by the amount of cubic feet of air per minute (CFM) that it can push. These ratings are commonly in the range of thousands of feet per minute.

There is a simple way to determine the size fan you need for your house. Assuming you have standard eight foot ceilings, simply multiply the total square footage of the finished living space of your house by three.

This number represents the minimum cubic feet per minute that the fan must push. Simply purchase a fan that has a CFM rating equal to or greater than the number you calculated.

There is one other major consideration. These powerful fans must be able to easily push the hot air out of your house. They require openings in the roof or gable ends of an attic space to do this.

If these openings are not large enough, the fan will spin ineffectively. For every 750 CFM that the fan is rated, you need a minimum of one square foot of free open exhaust area. Beware, insect screening placed over these openings can significantly reduce their free exhaust area. Many louvers and roof vents are stamped with a rating of their free open exhaust area.

Now, let's solve your problem. First, check to see if you have the right size fan for your house. Then, check to see if the exhaust areas in your attic are large enough to handle the CFM capacity of the whole house fan. If your fan is belt driven, make sure that the belt is adjusted to the proper tension.

Based upon the model number of your fan, check to see if it is a multi-speed fan or variable speed. Possibly your fan was operating at its lowest speed when you checked it. By the way, did you have several windows or doors open when you turned the fan on? Remember, you have to provide the fan with a readily available and ample supply of replacement air.

Author's Notes

February, 1999

There are new variations on the traditional monster attic fans. You can now purchase quiet dual blade fans that operate at lower CFM rates - up to 1,000 CFM - and still do a very good job of moving air through your home. These fans have insulated doors as well.

CLICK HERE to get FREE & FAST BIDS from local contractors who can install the correct size house fan for your home.

Column 031

Mechanic’s Liens

DEAR TIM: I recently paid my contractor in full for a large remodeling project. Several weeks after paying him, three sub-contractors and two material supply houses filed liens against my property. My attorney has advised me that these liens are in fact valid. Is just doesn't seem fair that I have to pay twice for the work. How could I have avoided this unpleasant situation? E.B.

DEAR E. B.: If it is any consolation, many people have been mired in the same situation as you have described. Fortunately, there are steps that you can take to prevent this from happening to you in the future. The first thing you need to do is to speak with a competent real estate attorney in your state concerning lien law in your state .

Many states have very specific laws regarding the rights of workmen and businesses that offer goods and services to homeowners. Often, these laws allow workmen and businesses the right to place a lien against a piece of real estate.

A lien simply is a matter of public record which states that there may be a valid, unpaid debt against the specific real estate named in the lien. In certain states, a lien can be a very powerful legal instrument.

For the most part, the laws were enacted to help protect honest workmen and material suppliers who, for one reason or another, don't receive payment from a homeowner. In your particular case, the individuals who filed the liens haven't been paid. You paid your contractor, but he, for some reason, decided not to give your money to the sub-contractors and the material suppliers.

CLICK HERE to get FREE & FAST BIDS from local builders who can complete your addition or remodeling project.

This situation is very easy to avoid. However, it takes some work on your part. Because liens can have serious implications, the work is worthwhile.

Prior to the start of a project, ask your contractor to provide you a list of every person or sub-contractor who intends to work on your project. This list should contain the name and address of each person and what task they will be performing.

Also, ask for a list of material suppliers who will be delivering material to your house or job site. Make sure the lists are complete. In other words, if your job involves painting, there better be the name of a painter on the list.

Contractors' & Homeowners' Guide to Mechanics' Liens

Stressed because of liens? CLICK THE IMAGE to get a book that will help you find relief.

Monitor the building process as closely as you can. Introduce yourself to each and every person at your job site. Ask them who they are and what they are doing. Make notes. Compare these notes with your list.

Depending upon the laws in your state, each and every person who works at your house and/or delivers material to your job site has the right to file a lien if they are not paid!

When it is time to make payments to your contractor, obtain a valid, signed, notarized affidavit or materialman's certificate from each and every individual or business who is owed money. These legal instruments are similar to receipts. You must obtain them.

Consider making out your payment checks individually to each person who is owed money. This is a tremendous amount of work, but may keep you out of court. Be sure you make arrangements to do this with your contractor at the beginning of the job.

The best advice is to consult with a competent real estate attorney prior to the start of your job. Ask him or her exactly what documents you should have prior to issuing payments to anyone. Issuing checks to contractors who do not present affidavits can be very risky business!

CLICK HERE to get FREE & FAST BIDS from local builders who can complete your addition or remodeling project.

Column 032

Efflorescence Causes

efflorescence on masonry

Here is classic efflorescence. It may take years for this to disappear.

DEAR TIM: Six months ago a masonry contractor constructed a brick retaining wall in my garden. Two months after he finished, white deposits began to appear in many locations on the face of the brick. The contractor has tried to wash them off with acid but the stains continue to reappear. I think the brick is defective. What if anything can be done? A. M.

DEAR A. M.: You appear to be a victim of efflorescence. Efflorescence is a common problem which can occur with masonry walls. It is a deposit of a soluble salt which was either present in the bricks, mortar, or the backfill material behind the wall. I don't feel that your bricks are defective.

Efflorescence is, for the most part, a visual problem. Very rarely does it cause structural problems. It is not a simple problem to correct. Often, the efflorescence diminishes with time.

The condition can occur on concrete as well as brick or masonry surfaces. Several conditions must occur for efflorescence to appear. The soluble salts must be present in the bricks, mortar, or transported by water into the masonry from another source.

CLICK HERE to get FREE & FAST BIDS from local masonry experts who can help clean or repair your brick and stonework.

You need sufficient water to carry the salts, in solution, to the surface of the masonry. Finally, evaporation must take place. This evaporation cause the salts to come out of solution and be left behind as the salt deposits which you see.

The soluble salts which cause the problem can come from many chemical elements or minerals. Many of these elements can be found in the materials from which bricks are made. Also, the sand which is used in the mortar can have significant quantities of soluble salts.

For this reason, it is always best to use washed sand from a high quality sand and gravel pit. The soluble salts can also be present in the soil behind your wall or the water which was used to mix the mortar.

Efflorescence will in many cases stop on its own. The efflorescence can cease if supply of soluble salt material in the bricks or mortar becomes exhausted.


It can also stop if the source of water which dissolves the soluble salts is cut off. The process can also stop if the water in which the salts are dissolved is prevented from getting to the surface of the masonry.

In your particular case, the location of your wall will make it difficult to quickly stop the process. Because your wall is located in a garden, the supply of water which dissolves the salts and carries them to the surface of the wall will probably be sufficient for a long period of time.

If the back or top of the wall was not treated with a compound which will prevent water penetration, you will have to wait for the supply of salt material to diminish. I have seen cases where it takes several years for the salt deposits to totally disappear.

Efflorescence growing

Efflorescence growing in the mortar of a brick fireplace. Photo Credit: Michael Hannum

Depending upon the soluble salt or salts which are causing the problem, you have several options as to removing the deposits. You can sometimes remove the dried deposits with a stiff brush. Sometimes water will wash the salts from the wall.

Muriatic acid

Muriatic acid is powerful and needs to be treated with lots of respect. CLICK THE IMAGE TO ORDER SOME NOW.

However, this process can sometimes dissolve the salts and cause them to soak back into the wall. You may have to use a very weak solution of muriatic acid. Only attempt this method if you know for a fact that the acid will work effectively on the type of salt present.

Acid solutions can cause severe burns to skin and eyes. If you attempt to try this yourself, be certain to wear complete protective gear. Follow the directions on the acid container explicitly.

Acid washes improperly applied can damage the masonry surface as well. They should only be performed by experienced applicators.

Over the years, I've seen many different spellings of efflorescence. Here's my growing list: effervesce, effervescence, effervescent, effleresants, effloreflance, efflorescence, efflorressance, effluorescence, eflorescence, eflorescents, ellforesce and ifflorescence.

CLICK HERE to get FREE & FAST BIDS from local masonry experts who can help clean or repair your brick and stonework.

Column 033


Fire Sprinklers – Small but Effective

DEAR TIM: We are getting ready to build a new home in an area served by a volunteer fire department. Due to the great distance between our house and the firehouse, I feel that a residential fire sprinkler system will be a good idea. My husband disagrees. He says that smoke detectors are good enough. He also says that sprinklers can create massive water damage. What advice can you offer to settle this disagreement? W.C.

DEAR W. C.: Residential fire sprinklers are one of the best investments you can make in your new home. Resolve not to give in to your husband on this issue. The stakes are too high.

Residential fire sprinklers serve an entirely different function than smoke detectors. Smoke detectors tell you, as long as they are maintained in working order, that a fire is in progress. Sprinklers actually have the capability to extinguish or control a fire until such time as the fire department responds.

In your case, a single sprinkler may have already extinguished the fire before the volunteers have reached your house. Without sprinklers your fire department may arrive just in time to save your foundation. Sprinklers make good sense even if you live across the street from a firehouse.

Residential fire sprinklers have many myths attached to them. One of these is water damage. Many people believe that all sprinklers activate in a fire situation. This simply is not true.

CLICK HERE to get FREE & FAST BIDS from local specialists who can install a sprinkler system to protect your home from fire.

Only the sprinklers in the fire area activate. Sprinkler heads are set to operate as soon as the air temperature surrounding the head reaches a factory set temperature. Many residential sprinklers activate at 160 - 165 degrees F. Some fires generate temperatures like this near the sprinkler heads in as little as 45 seconds.

A standard quick response sprinkler head usually discharges about 13 -18 gallons of water per minute. Studies have shown that a single sprinkler head can extinguish many common residential fires in about four minutes. A wide majority of residential fires only activate one or two sprinkler heads. Early extinguishment of fires also limits smoke and heat damage as well.


Save time and money on your next security or fire alarm installation. Find the pros using my Security & Fire Alarm Installation Checklist. I offer a 100% Money Back Guarantee.


Let's talk about water damage. A fire department responding to a house fire that has been burning without any extinguishing efforts may use several large diameter hoses to begin their fire fighting efforts. Temperatures in the fire area can exceed 1,300 degrees F.

The fire fighters may have to use several 1 3/4 inch diameter hoses set at a flow rate of 150 gallons per minute to extinguish the blaze. They will probably use hundreds, if not thousands, of gallons of water to extinguish the fire. Smoke, heat, water, and steam damage throughout the house can be significant.

Residential Fire Sprinkler Guide

Want more information on the importance and use of Fire Sprinkler systems? CLICK THE IMAGE to get the ultimate guide to Fire Sprinklers.

Many people think that sprinklers are costly. This also is a myth. In many areas of the nation, sprinklers can be installed for about 1 percent of the cost of the home. Virtually every insurance company offers substantial discounts on fire insurance policies if you install a sprinkler system. Savings on insurance premiums can, over a period of time, actually pay for the installation of the system.

Residential sprinkler systems do not require specialized plumbing or water supplies. The sprinklers operate from your standard domestic water source or supply. The design of residential sprinkler heads has also come a long way. Many are quite attractive.

They bear no resemblance whatsoever to those that you may have seen in warehouses or commercial buildings. Some come in polished brass, chrome, or white. Often they project only one half or three quarters of an inch below the finished ceiling materials.

Retrofitting an existing house can be done, but it will be more expensive. Consider installing sprinklers near your heating equipment and in your kitchen area. Statistics confirm that these areas of your home are the most likely place a fire will start. Unfinished basements are also very easy to sprinkler. The easy access to plumbing lines makes it a natural place to begin.

Residential fire sprinklers save lives and property. They also afford great peace of mind. I intend to include them in my next new house. Your failure to include them in yours may cause you to become a grim statistic.

CLICK HERE to get FREE & FAST BIDS from local specialists who can install a sprinkler system to protect your home from fire.

Column 034

Clay Paving Bricks

Clay Paving Bricks

close up paving brick

DEAR TIM: I am getting ready to install a new driveway and several sidewalks. Brick appears to me to be a very attractive material. Will harsh winter weather destroy the brick? What type of brick do you recommend? What installation method do you suggest? Are there alternatives? A. P.

DEAR A. P.: I compliment you on your tastes. Brick driveways are extremely attractive. The colors and textures available today allow you to match your driveway to your exterior color scheme, if you so choose.

Paving bricks are different from regular house bricks. They must pass more stringent testing requirements with respect to compressive strength and cold water absorption.

The Midwest, East Coast, and some Northwestern states require that the bricks must have a minimum compressive strength of 8,000 pounds per square inch. They must also exhibit an absorption rate of cold water less than 8 percent. Areas of the country with milder climates have less stringent requirements.

So long as you choose the correct brick for your part of the country, the weather should not harm it. Bricks were used successfully on many city roads for years before asphalt paving became widespread and popular.

CLICK HERE to get FREE & FAST BIDS from local contractors who can install your brick or stone patio and walkways.

I have had excellent personal experience with brick pavers. I installed brick pavers on a sidewalk and patio 14 years ago. Several years of severe winter weather have not harmed the brick or the mortar joints between them. Snow removal is not a problem as long as you exercise reasonable care.

There are several installation methods. Paving bricks can be installed either with or without mortar. They can be set directly on a sand base, on asphalt, or in a bed of mortar on top of a concrete base. You can install the paving bricks tightly against one another or install mortar between them. There are pros and cons to each method.

Paving bricks installed using a gravel base with a sand setting bed are easy to repair. However, sand sometimes works it way from beneath the bricks. This sand is then tracked into the house. Weed control can become a problem. Paving bricks set in mortar do not have the sand and weed problems. However, they are difficult to repair.

Driveways usually will have heavy car and occasional truck traffic. The base beneath the bricks must be exceptionally strong. You will probably achieve your best results by using an asphalt or concrete base beneath the bricks.

Consult a structural engineer for his or her recommendation as to the thickness of the base for your particular situation. The local brick supplier may also have guidelines available as well.

Portland Cement bag

In need of a durable easy to use Portland Cement. CLICK THE IMAGE to get Portland Cement now.

Should you decide to install the bricks using mortar, consider the following. Avoid using mortar mix that bricklayers commonly use when installing bricks in a wall. Substitute Portland cement for the mortar mix. A rich mixture (2 parts fine sand to 1 part cement) will insure a strong, long lasting bond between the base and the bricks.

Consider looking at interlocking concrete paving bricks. These bricks are made using concrete with small aggregate. They come in a multitude of colors and patterns. These bricks are extremely durable and exhibit many of the same qualities of traditional paving bricks. Give them serious consideration prior to making your final decision.


CLICK HERE to get FREE & FAST BIDS from local contractors who can install your brick or stone patio and walkways.

Column 035

Plumbing Vent Pipes – Can They Be Relocated?

Ultimate Plumbing Guide

Want to know more about Vent Pipes and other plumbing topics. CLICK THE IMAGE to get the comprehensive guide to plumbing.

DEAR TIM: I have two pipes which project through the roof on the front of my house. I have been told that they are plumbing pipes. They are very objectionable. I am getting ready to install a new roof on my house. The pipes are clearly visible in the attic. Are they really necessary? Is it possible to have them moved to the back side of the roof? D. T.

DEAR D. T.: Plumbing vent pipe locations have angered many homeowners. In almost all cases, the frustration and disappointment that homeowners felt could have been avoided.

Plumbing vent pipes are a necessity. They allow your plumbing drainage system to breathe. Their primary function is to equalize pressure in the drainage system every time you run water in a sink, drain a bathtub, or flush a toilet.

In many homes, all of the plumbing fixtures are interconnected to the same drainage system. The system looks very similar to a tree. In fact, certain parts of a plumbing system are called branches. These branches can drain one or more fixtures.

If a drainage system is constructed without vents, strange things begin to happen. For example, you may flush a toilet on the second floor of your house and the kitchen sink drain might begin to make strange sounds. The drain will sound like someone with a giant straw is sucking the water from the trap beneath the sink. In fact, that is exactly what is occurring.

CLICK HERE to get FREE & FAST BIDS from local Plumbers who can install your new fixtures.

This happens for a very simple reason. As the water from the toilet drains down the pipe going to the basement or sewer, it is pushing ahead of it the air that was in the pipe just before you tripped the toilet handle.


This creates a vacuum just behind the water. Because the system is unvented, it searches for the easiest place to replace this air. The vacuum can actually be strong enough to suction the water from a fixture trap.

It is extremely important for the water to remain in the traps below the fixtures. This water seal stops offensive odors and vermin from entering your house.

Plumbing fixture vents solve this problem. Plumbing vents form another type of tree within your house.

For the most part, each plumbing fixture has a vent pipe associated with it. These vent pipes also interconnect in many instances. The termination point for the vent system is the roof of your house. The roof vent pipes are the point where the replacement air enters your plumbing system as a fixture drains water.

The Complete Guide To Plumbing

Need to fix your Vent Pipe or install a water heater? CLICK THE IMAGE to get a complete guide to all your plumbing needs.

These vent pipes have certain requirements with regards to their size and length. They also must be installed in such a manner so as to continually slope toward the drainage lines. Water or debris must not be allowed to collect in vent pipes.

Blocked vent pipes can create a scenario as described above. If one of your existing drains bubbles or gurgles when another fixture is draining, you may have a blocked vent pipe.


Vent pipes, in many instances, can be installed so that they exit the roof where you would find them to be the least objectionable. The plumber merely has to avoid as many sharp bends as possible. Based upon your description, your vents pipes can be easily relocated.

Planning comes into play as well. Architects and designers should consult with plumbers if they intend to place plumbing fixtures on the front half of a house. Many plumbers will gladly discuss what they can and can't do with the vent pipes. This simple step will go a long way in avoiding homeowner disappointment and frustration.

CLICK HERE to get FREE & FAST BIDS from local Plumbers who can install your new fixtures.

Column 036