Water Softeners – The Basics

Water Softeners

Water Softeners - The Basics

DEAR TIM: I'm thinking about adding a water softener to my plumbing system. Just what is hard water? Are there any real benefits to soft water? Are any piping changes necessary? O. S.

DEAR O. S.: You are making a smart move. Soft water makes it easier to clean just about anything. It prevents the buildup of scale in pipes, water heaters, and boilers. The Soviets figured this out in 1910. They were the first to use soft water in electric power plant boilers.

Water from wells, aquifers, rivers, etc. contains dissolved chemical elements. Two of these, calcium and magnesium, cause water to be hard. The higher the amounts of these elements in a given measure of water, the harder the water. Water hardness is measured in grains per gallon. One grain weighs 1/7000th of a pound. Water containing 7 or more grains of these elements per gallon is considered hard.

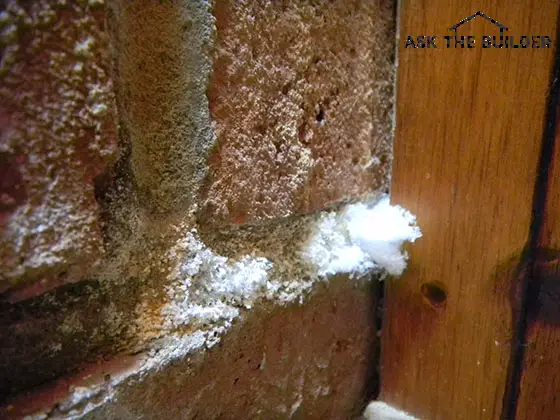
Hard water can cause big problems. When water is heated, the calcium and magnesium decide it's time to get up and leave. They exit the water and begin to form a scale on the inside of pipes, boiler tubes, and hot water heaters. This scale buildup in hot water heaters and boilers can slow down the transfer of heat into the water. This slowdown can raise your fuel bills by as much as 30 percent.

A majority of your laundry problems are also caused by hard water. Hard water interferes with the cleaning action of soaps. Your white clothes turn grey because of unremoved dirt. Colors fade for the same reason. Soft water eliminates mineral deposits commonly found in toilet bowls and on ceramic tile and plumbing fixtures.

You soften water by removing the calcium and magnesium. It reminds me of a game I played as a kid: King of the Mountain. Hard water enters your water softener. It begins to pass through a bunch of tiny resin beads (mountains) that contain sodium. The calcium and magnesium jump out of the water and onto the beads. In the process, the sodium is knocked off into the water.

Eventually, the softener begins to fill with calcium and magnesium. These elements are removed from the softener in a regeneration process. A brine solution containing a high concentration of sodium is injected into the softener. This sodium jumps onto the beads and knocks off the calcium and magnesium. The calcium and magnesium are flushed out of the softener. The softener is now ready to work again.

Because you pay to soften water, you don't want to waste' soft water on your lawn, flowers, and shrubs. So, make sure your plumber pipes outside hose bibs with hard water. However, give serious consideration to installing a soft water hose bib in your garage. Cars rinsed with soft water don't experience water spotting.

Attic Ventilation – Ridge and Soffit Vents

DEAR TIM: Yesterday afternoon, I went up into my attic to retrieve an old book. It was so hot that I became dizzy and almost passed out. The 3 square metal vents in my roof were not clogged. The air was stagnant. Should I improve my attic ventilation? Is it necessary? F. B.

DEAR F. B.: You're lucky you made it out of your attic alive. Had you passed out, it's possible you might not be reading this column. Attic temperatures in non or poorly ventilated attics can soar to 160 degree Fahrenheit. This type of heat harms your body, books, and your house.

Attic ventilation awareness is at an all time high. This awareness, I believe, is a result of the energy savings breakthroughs the home building industry has and continues to experience. Your house, when it was built, probably had state of the art ventilation. Times have changed and so must your ventilation.

Ventilating an attic needs to be done on a continual basis. The temperature and dew point of the air inside your attic needs to be as close as possible to the air on the other side of your roof. Wide differences in either of these numbers can cost you money in repairs or higher heating and cooling bills.

Poor attic ventilation in colder climates can cause frost and condensation to form on the underside of your roof. It can rain inside your attic. I have personally witnessed this phenomena. In hot climates, elevated attic air temperatures cause your air conditioner to work longer and harder. Asphalt shingles, roof boards, and insulation can be damaged by elevated temperatures.

Your photos reveal two major problems. First, you have no lower undereave or soffit ventilation. Secondly, based upon this lack of lower ventilation and the size of your attic (1,025 square feet), you need an additional 17 roof vents to satisfy most current minimum code requirements.

You need flow through ventilation for your attic spaces. Outside air enters your attic space at the bottom edge of your roof. It is exhausted near the top of your roof. These ventilating systems use wind and thermal convection to continually exchange the air in your attic with outside air. On breezy days, wind blowing across the top of your roof creates a partial vacuum which sucks air out of your attic. On days with no wind, hot air, which builds up in your attic, simply floats out of hidden vents located at the top of your roof.

Many continuous ventilation systems are available that are virtually invisible. Upper roof ventilation products can hide beneath your cap shingles. Lower roof ventilation can be achieved either behind or above your gutters. If your roof needs to be replaced soon, your roofer can remove your three metal pot vents, repair the holes, and install these newer continuous ventilation materials. When installed properly, most of these ventilating systems meet or exceed minimum building code requirements and recommendations.

Chimney Crown Repairs

mortar fungus - Efflorescence

Efflorescence growing in the mortar of a brick fireplace. PHOTO CREDIT: Michael Hannum

DEAR TIM: My three year old house has a brick chimney. While performing a routine inspection of my roof, I noticed numerous cracks in the mortar cap on the top of the chimney. Furthermore, the face of some bricks are beginning to flake. Is it possible that water is entering my chimney through the cracks and causing the bricks to flake? Is it normal for this amount of deterioration to occur in such a short amount of time? Was my chimney constructed properly? P. E.

DEAR P. E.: The photos of your chimney tell the tale. You were victimized by a non-professional brick mason. Your chimney crown (mortar cap) has numerous defects. Unless you correct these problems, you can expect further, rapid deterioration of your chimney.

Chimneys are basically very small structures. Just as your house needs a roof to keep water from entering, so to your chimney. Chimney crowns are simply chimney roofs. The crown should slope down from the flue liner. The angle of this slope should be a minimum of 3 inches of fall per foot of run. Flat or low slope crowns can allow water to enter the interior of the chimney. This water can cause efflorescence (white salt deposits on brick surface), brick spalling (the flaking you are experiencing), and the deterioration of the mortar between individual bricks.

All too often, brick masons simply use mortar mix to finish off the top of a chimney. Chimney crowns should be constructed using either pre-cast concrete slabs, cast-in-place steel reinforced concrete, solid stone, or metal. Masonry crown materials should not directly contact the chimney flue liner. This gap should be caulked with a flexible cement stable silicone caulk. The cracks in your crown possibly occurred because the flue liner expanded from the heat of the fires below. This expansion popped your weak mortar cap much like a chick hatching from an egg. Also, excessive shrinkage cracks often develop in cast-in-place chimney crowns that lack adequate reinforcing steel and/or are not cured properly.

I also noticed that your chimney crown does not extend beyond the outer surface of your chimney. A chimney crown should extend a minimum of 2 and 1/2 inches beyond the face of the chimney on all sides. This overhang helps to keep water from running down the chimney face. The bottom of the crown should contain a small kerf (drip). Without the kerf, water can roll underneath the crown and flow down the face of the chimney.

Your photos indicate that your brick mason failed to install a flashing underneath the chimney crown. This flashing is the last line of defense in the war against water. This flashing is placed beneath the chimney crown. When installed properly, it prevents water from entering the interior of your chimney. Use copper, galvanized steel, or stainless steel for this purpose. Do not use aluminum as a flashing material in masonry chimneys. The chemicals in mortar and cement will cause it to corrode.

The deterioration you are experiencing is normal for a poorly constructed chimney crown. When you rebuild your chimney crown properly, it should perform flawlessly well into the next century.

Over the years, I've seen many different spellings of efflorescence. Here's my growing list: effervesce, effervescence, effervescent, effleresants, effloreflance, efflorescence, efflorressance, effluorescence, eflorescence, eflorescents, ellforesce and ifflorescence.

How To Protect Trees During Construction

saving trees

The large beech tree in the right of this photo is as sensitive as the skin of a newborn baby. We didn't allow any trucks or equipment within its drip line.

DEAR TIM: We built our home on a wooded lot 4 years ago. Within the past 6 months over 50 percent of the trees on our lot have died. Several other trees appear unhealthy. I seem to remember that the excess dirt from the excavation was spread around the lot. My builder confirmed this and added that this is a common practice. Could this have caused the problem? Is there anything I could have done to save my trees? R.C.

DEAR R. C.: Your builder should be arraigned and charged with involuntary tree slaughter. The spreading of excess dirt could very likely have been the main factor in the death and sickness of your trees. There is a strong possibility that other construction events hurt your trees as well.

The root systems of trees can be severely damaged by construction activities. Soil compaction is one of the biggest problems. Prior to construction, the undisturbed top soil on your lot contained vast amounts of oxygen. The trees use this oxygen when they extract nutrients from the soil. Excavation equipment, concrete trucks, delivery trucks, even light pickup trucks squeeze this oxygen out of the soil. Soil compaction affects soil moisture content. Rain water is more likely to runoff than be absorbed. Soils containing high amounts of clay compact more readily than sandy soils.

In your case, the extra excavation dirt was the kiss of death. There is no doubt that the soil was compacted beneath the trees, as the loader or dump trucks had to drive beneath the trees to dump the dirt. This extra soil then made it virtually impossible for air and water to get to the buried tree roots.

Shallow trenching and excavating activities can cut into root systems. A majority of tree roots are in the top 2 - 3 feet of soil. Tree root systems serve two primary functions. They provide the nutrients and moisture for the tree and also act as an energy storehouse. Root systems are a two way street. Nutrients and water from the soil are transported by the roots, up through the tree, and into the leaves. The leaves are miniature factories. They transform the nutrients and water into energy, some of which is sent back down the tree into the roots. This energy is used each spring to produce leaves and seeds.

Your soil chemistry may have changed as well. It is possible that some of your trees died because the soil pH level became too alkaline. The most common causes of this result from the washout of concrete trucks and bricklayer's mortar mixers. Burying scrap drywall also can change soil chemistry.

If you could go back in time, you should have hired a certified arborist. This individual would most likely have developed a plan to protect all of your trees before the first shovelful of dirt was turned.

Secure fencing would have been placed around all trees that required protection. Financial penalties could have been included in contracts for any workman who violated a fenced area.

A system of aeration and watering pipes could have been placed beneath the soil which was placed over the tree roots. An arborist could have saved your trees. My wife was smart enough to call one years ago, before we built our house. Every tree on our lot is alive and healthy.

Tim's drive with trees

This is my own home. The large trees were on the lot before I started. They are in perfect health because I listened to Kathy my wife. She insisted we call in a certified arborist to tell us what to do.

Plastic Laminate Countertops

DEAR TIM: It's time to remodel my kitchen. I was thinking of using plastic laminate countertops again. However, my neighbor has plastic laminate cabinets that have numerous chips. Is plastic laminate not as durable now as it has been in the past? Also, can I avoid that ugly brown line at the edges? If I decide to purchase it, how can I keep it looking brand new? A.R.

DEAR A. R.: Don't base your purchasing decision entirely on the condition of your neighbor's cabinets. The chips on your neighbor's cabinets may be a result of abuse. If anything, plastic laminate is quite possibly more durable than at any time in its history.

The decorative plastic laminate on your kitchen and bath countertops was born in another industry in the early 1900's. The first plastic laminate was used as an insulator in the electrical industry. It was a replacement for heavy ceramic insulators.

Plastic laminate is basically a sandwich of plastic coated papers. It is made by combining layers of kraft paper, a decorative paper layer, and a clear surface layer under high temperature and pressure. The color and patterns you see are simply the layer of decorative paper. The clear surface layer protects the decorative paper from abrasion and moisture.

Decorative laminates are available in different thicknesses. The thickness of the final product is usually a function of how many slices of kraft paper are in the sandwich. The greater the number of slices of kraft paper, the higher the product's impact resistance and resilience. Your neighbor's cabinets most likely are covered with a thinner laminate designed for vertical surfaces. Choose the thickest laminate you can find for your new countertops.


Author's Note: I have a wonderful step-by-step eBook that shows you how to get professional results when painting cabinets. It is easy to follow and affordable. Plus, you get the eBook instantly!


That ugly brown line you see on your older laminate tops is simply the layers of kraft paper. Newer laminate edge moldings are available that eliminate this unsightly line. Laminate moldings offer a variety of shapes and profiles. These are applied to the front and side edges of your countertops. You can mix and match different colors, textures and patterns to create your own distinctive countertop. Wood edge moldings in red oak and hard maple are also available.

If you desire the real look of wood and the benefits of plastic laminate, consider using laminate veneers. This is a laminate product that substitutes thin wood veneers for the decorative paper in the laminate sandwich. Some of these laminates are available that allow you to stain and finish the surface to your liking. These laminates can be used to make beautiful cabinets.

Caring for your new laminate countertop is a breeze. The trick is to wipe up spills as fast as possible. Always use a mild liquid or powdered detergent to wash the countertops. Be sure to rinse the surface after cleaning. Some detergent residues can cause permanent surface blemishes if they come into contact with water on the bottom of plates, bowls, or glasses. Finally, while these new laminates are durable, they are not cutting surfaces. Get out that seasoned cutting board for cutlery chores.

Related Column: Ceramic Tile on Laminate

Gas Logs – Vented and Ventless

DEAR TIM: I am considering purchasing a set of gas fireplace logs. My shopping trip left me overwhelmed with decisions. Do they really look like a real wood fire? Some log sets need to be vented, while others do not. How can this be? Can the logs be installed safely in an existing wood burning fireplace? Are there any other considerations? D. P.

DEAR D. P.: Three years ago, I installed a high quality set of vented gas logs for a customer. Just before lighting them, I made fun of their appearance. My comments quickly went up in smoke! I was entranced by the realism of the logs, flames, and the glowing embers. Generally speaking, the vented logs appear more realistic than the ventless gas logs.

The vented gas logs require a flue or a chimney to exhaust the toxic carbon monoxide they produce. Many of these log sets burn gas that passes through sand beneath the logs. Often vermiculite and clumps of rock wool are placed over the sand. These elements produce the highly realistic glowing embers. Vented gas logs also are capable of consuming large amounts of gas. Some can ingest up to 90,000 Btus per hour! Unfortunately, 85 - 90 percent of this energy goes up the chimney. Fireplace dampers must be locked or clamped in the open position at all times.

Ventless gas logs are technological marvels. They have special burner elements that burn gas with minimal carbon monoxide production. Vent free gas logs certified by the American Gas Association (AGA) are equipped with oxygen depletion sensors (ODS). These devices sense when oxygen in the room drops to a certain percentage. If this occurs, the sensor shuts off the supply of gas to the logs. Defective sensors fail in the safe mode. They will not allow gas to pass to the logs.

Ventless gas logs burn less gas than their big brothers. They are only permitted to burn a maximum of 40,000 BTU's per hour. However, since your fireplace flue is closed or non existent, all of this energy is released into your house. During a power outage, these appliances can be used as a temporary heat source.

All gas logs have the capability of producing huge amounts of water vapor. 1.5 gallons of water is produced for every 100,000 BTU's of gas burned. This massive amount of water can condense on cold chimney flue walls and drip into your fireplace. In the case of vent free logs, this water vapor can condense on windows and any other cold surfaces. Should you install these in a newer air-tight home, you may create severe moisture problems in your attic and in exterior wall cavities.

Certain states prohibit the sale and/or use of ventless gas logs: Alaska, California, Massachusetts, Minnesota, Montana, New York, Utah, and Colorado (30 counties permit their use). Certain other municipalities in other states may also prohibit their use. Check with your local building department prior to purchasing your set. Have your chimney professionally inspected and cleaned prior to any installation. Look for the AGA seal on all products. Follow manufacturer's instructions to the letter!

Bathroom and Kitchen Ventilation Fans

DEAR TIM: What appears to be a roof leak has developed in the ceiling of my 5 x 7 foot bathroom. A professional inspection of the roof revealed no problems. I looked into the attic and noticed that the bath ventilation fan pipe simply discharges air near a roof vent. The noisy fan doesn't seem to move that much air. Could this be a problem? How can it be corrected? F.E.

DEAR F. E.: Your bathroom fan is very likely the cause of your wet ceiling. My guess is that this problem became noticeable when the outdoor and attic temperature began to drop. Moist, humid air from bath activities was exhausted into your attic. This water vapor then condensed on the cold surfaces (rafters, roof sheathing, exposed nails) in the attic space. This condensed water dripped onto your ceiling and produced the phantom leak.

Bathroom ventilation is extremely important. Many people think that you need to simply exhaust the steam from hot showers or baths and unpleasant odors. Residual surface moisture on towels, carpeting, wash rags, and shower walls can significantly raise the humidity level in a bathroom after you have dressed and left the house. This moisture can be removed by controlling the bathroom fan with a humidistat rather than a standard on and off switch. The humidistat will automatically turn the fan off when the humidity has dropped to a satisfactory level.

The moist, humid air from bathrooms and kitchens must be ducted to the exterior of a house. This ducting can be achieved through an exterior wall, a soffit or eave, or the roof. Many fan manufacturers make special fittings that allow you to extend ductwork to the exterior of your house.


I have found that it is often best to vent fans and dryers through the roof. I urge you to watch this video of mine to see how easy it is to install the correct vent-cap flashing on a roof. Have no fear - if done right you will have no leaks.

Your existing fan may not be moving enough air for several reasons: it's not sized properly, the exhaust pipe is too long, sized improperly, or is obstructed, or the fan is simply worn out. Many of these things you can check.

Fans are sized depending upon how many cubic feet of air they can move each minute at a given pressure (static pressure). This quantity of air is often expressed as cubic feet per minute (CFM). The Home Ventilating Institute recommends that bathroom air be totally replaced a minimum of 8 times per hour. Kitchens require a minimum of 15 air replacements per hour.

Your bathroom contains 280 cubic feet of air (5x7x8). Using the above recommendation, you need to exhaust 2,240 CF in an hour (280x8). Purchasing a fan with a capacity of 37 CFM will meet this minimum standard (2,240 / 60).

It is vitally important to follow manufacturer's instructions regarding exhaust ducting. If you use the proper size duct pipe, minimize bends, tape all joints, and exhaust your fan to the exterior, you should have a dry ceiling in the future.

Paul had an issue with water dripping from his bathroom fan. Click to read about his issue in the January 10, 2010 Newsletter.

DIY Wood Window Replacement Kits

marvin tilt pak

These window sashes have a vintage look and they can replace older double-hung windows. The windows are custom made to fit the opening and two side jamb liners are sent with the kit. These are Marvin and I've installed hundreds of these in older homes not harming the exterior or interior woodwork trim. Copyright 2019 Tim Carter

DEAR TIM: I live in a beautiful old home that has drafty double hung wood windows. I am really interested in the new high performance windows. However, I don't wish to alter the appearance of my grand old home. Is there a window replacement alternative that will work for me? I have changed window ropes before. Do you think I can install these myself? C.T.

DEAR C.T.: This is your lucky day! Not only is there a wide range of high performance wood products from which to choose, but many of them can also be installed by you. You will need a several standard hand tools and a little patience. I have installed hundreds of these products with great success.

The beauty and architectural integrity of your home will not be compromised. All of the interior and exterior trim around your windows will not be harmed. The only things that need to be removed in most cases are the actual windows themselves and the narrow parting strip between each sash.

Several of the major wood window manufacturers offer replacement kits that are custom made for each of your window openings. As long as your measurements are accurate and your openings are square, you can install many of these products in less than 1 hour.

These replacement kits offer, in almost all cases, all of the same options as you would find in a new window. You have your choice of glass options, different species of wood, authentic divided lites, bare or primed wood, aluminum clad, etc. In fact, you can actually order different options for top and bottom sash. For example, many older homes often had a two pane divided lite window for the top sash and a clear window for the lower sash. You can duplicate your existing sashes in almost every instance.


Buy the right replacement windows with the help of my Window Replacement Checklist. I offer a 100% Money Back Guarantee.


Installation of these products is really quite simple. Virtually all work can be done from inside your home. Because you have successfully replaced broken sash cords, this project should be a no brainer. Gently remove the sash stop moldings that hold the bottom sash in its track. Remove the sashes, parting strip, cut the sash cords and remove the metal pulleys. Now for the fun part.

Most kits have metal clips that hold the new side jambs in place. These vinyl jambs replace the old sash cords and metal weights. The are exactly the same product used in the new windows. These jambs insure a snug fit to eliminate the draft you now feel. Once the clips are in place you simply snap in the new jamb liners and install the new windows. Often the kits require the installation of a small piece of weatherstripping near the top sash.

If you want to really make the job go smoothly, consider finishing the windows (painting & staining) before they are installed. Don't discard the old sashes. Many salvage companies will buy them from you. They often sell them to people who need replacement sashes or who need old glass for historic restoration projects.

Vinyl Siding Information

DEAR TIM: The wood siding on our 70-year-old house needs to be painted, again. I have mentioned to my husband that vinyl siding might be a better alternative. He tells me that the siding will not last more than 10 -15 years. He also would like to paint the house in the original period colors. If I prevail in this decision and the vinyl siding performs poorly, I will never hear the end of it. I need your advice. Would you install vinyl siding? A. D.

DEAR A. D.: What is it worth to you to keep your husband's lips tightly sealed for the rest of his life? If you take the time to select a high-quality vinyl siding, you will have peace and quiet for a very long time. Vinyl siding has come a long way in a very short period of time. It is a great product.

Vinyl siding is a better alternative to painting for any number of reasons. Because of the age of your house, there is a 90 percent chance that there is lead in some of the original paint layers. If you decide to paint your house again, scraping and sanding of the old paint could create toxic lead dust. Paint chips containing lead can contaminate the soil around your house.

To keep a wood siding finish looking like new, it may require repainting every four years or so. Depending upon its size, you may spend in excess of $30,000 in the next 20 years repainting your home. High quality vinyl siding, on the other hand, will require simple periodic cleanings.


Installing vinyl siding on your house? Find the best professionals by using my Vinyl Siding Checklist. I offer a 100% Money Back Guarantee.


Vinyl siding, when installed with half-inch insulation board, can actually help insulate your house. This could produce up to an 11 percent savings annually on your heating bills. You will actually recapture part of the installation cost by using foam insulation beneath new vinyl siding.

The magical performance characteristics of vinyl siding are based in its formulation. All vinyl sidings are made from polyvinyl chloride (PVC) resins. Flexible acrylic resins are often added to make sure the siding doesn't become brittle. Vinyl siding exposed to cold weather, hail storms, or baseballs needs this flexibility.

Ultraviolet (UV) light will break down vinyl siding. Without adequate protection, low-quality vinyl sidings will suffer from severe chalking and color fade. Virtually every vinyl siding has UV inhibitors, but some have more than others. At least one manufacturer has gone a step further. They add an additional layer of sun screen UV protection on the surface of the vinyl.

Recreating the period colors of your house should not be too difficult. Several vinyl-siding manufacturers have developed color coordinated product lines. These products allow you to mix and match different colors, many of which may duplicate your period house colors. Vinyl manufacturers have gone to great detail to recreate period accent pieces such as columns, fancy cut shakes, and dentil moldings. With minimal effort, you can make your Victorian style home look like the grand lady that she is.

Author's Notes:

The Vinyl Siding Institute has a voluntary certification program for vinyl siding manufacturers. Those manufacturers who want to prove to you that they indeed make a quality product now have a mechanism to do just that.

If you want to find out more about the certification program and manufacturers who participate, visit the Vinyl Siding Institute's website.

Light Bulbs and Color Temperature

peace app color bulb

Color Temperature and Light Bulbs | A light bulb can be made to look any color, but even when it seems like it's creating just WHITE light, it can create odd colors in your home.

Color Temperature - The Sun Creates Perfect Color

DEAR TIM: I was recently involved in a dispute between a paint store and a carpet store. We attempted to match expensive wallpaper with carpeting. In the showrooms, everything looked fine. In my house, the colors are not right. The colors even change in daylight. What in the world is going on? The problem is not in the dyes. Could the problem be in my eyes? V. E.

DEAR V. E.: I don't think the problem is in your eyes. Believe it or not, the problem most likely has its source in the light bulbs used at the wallpaper and carpet stores as well as your house. Light bulbs, both fluorescent and incandescent, can affect the color rendition of an object. A simple bulb change at your house may solve this complicated problem.

Light Bulbs Produce Different Colors

Different light bulbs actually produce different colored light. This color is often referred to as the bulb's color temperature. It is actually measured in degrees on the Kelvin (K) scale. Heat an object sufficiently and it will give off light. As the object gets hotter its color will change and imitate a rainbow. First, it glows a cherry red. Further heating causes it to glow orange, yellow, white, and eventually blue. You can demonstrate this, to a degree, with an electric stove burner. You absolutely can see this if you heat a piece of steel in a blacksmith's forge. Steel can go from cherry-red to white-hot just before it melts

Cool and Warm Bulbs

Quite possibly you are familiar with traditional cool white and warm white fluorescent light bulbs. The words cool and warm refer to the feeling that the light produces. The warm fluorescent bulb produces a reddish orange warm light (3,000 degrees K). A cool white fluorescent bulb burns with a bluish tint similar to ice. Its color temperature is very nearly 4,100 degrees K. In comparison, a regular incandescent bulb produces light at 2,750 degrees K. It just so happens that human skin looks best at that color temperature.

Color Changes During the Day

To make matters even more confusing, the color temperature of natural sunlight changes through the day. In the morning and at sunset, natural sunlight is in the 2,500 - 3000 degree K range. That is why the Grand Canyon and fall trees look so brilliant in the morning and afternoon sun. Conversely, at high noon, normal sunlight is very near 6,000 degrees K. That is why evergreen trees (green) and water (blue) look so good in brilliant sunlight.

More Confusion - Color Rendering Index

It gets worse. Two bulbs that burn in the same temperature range can produce yet different colors! This is especially true in fluorescent bulbs. Back in the 1930s, lighting experts created a color rendering index (CRI) to compare how a bulb affects the true color of an object. The scale goes from 0 to 100. Bulbs with a high rating on the scale (80 or above) produce excellent color rendition.

Look at the Bulb Label

Legislation that went into effect November 1, 1995 was created to help you with this color issue. Light bulb manufacturers are now required to produce fluorescent and some common residential reflector incandescent bulbs that meet minimum Federal efficiency and/or CRI requirements.  Look at the bulb labels for information that will allow you to easily determine how well a light bulb will perform. Good luck!