Asphalt Shingle Roof Leak Locations

shingles close up

Asphalt Shingle Roof Leak

DEAR TIM: Eight years ago, I purchased an existing home. I have no idea how old the standard three tab asphalt shingles are. At this point, I do not have any leaks. How can I tell when my asphalt shingles are worn out? Where do leaks on shingles originate? What causes shingles to fail prematurely? Can minor repairs extend the life of my roof? Beverly K. Minneapolis, MN

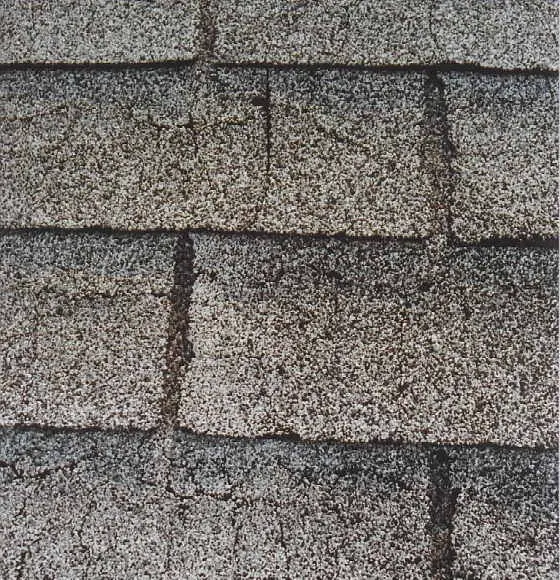
DEAR BEVERLY: It sounds to me that you are already fairly roof savvy. Not many people would know the correct name for their shingled roof. A three tab shingle refers to the common shingle that many people have. Its distinguishing characteristics are vertical slits that are usually 5 inches long between each shingle tab. These vertical lines are usually offset by 6 inches on each course of shingles.


These vertical slits between shingles are the first place I look for deterioration. It is not uncommon for leaks to develop in the top 3 inches of each vertical slit. This area is the weak link in a 3 tab asphalt shingle roof. Because of the way your shingles were designed and overlap, only a single shingle thickness stands between your plaster ceiling and the worst rainfall in this narrow 3 inch part of the slit. A majority of the surface area of your roof has at least two shingle thicknesses protecting you from rain and snow. Some areas of the roof have 3 layers!

The deterioration in this area often manifests itself by missing granules. These are the ceramic color coated pieces of crushed rock that protect the asphalt from the destructive ultraviolet (UV) rays of the sun. If exposed to sunlight, the asphalt within the shingle begins to rapidly deteriorate. I have my own idea as to what causes granule erosion in this narrow slit area. I actually believe it is caused by the force of the water that drips from the shingle above. The granules at the top of each slit receive twice as much energy from the dripping water as the granules just one half inch away on either side of the slit. Over time, this makes a big difference.

You should also look for cracks on the shingle tabs and within each slit. The cracks often happen as the asphalt gets older and loses the oils that give it its flexibility. The oil loss can result from overheating or poor quality asphalt from the get-go. Not all shingle manufacturers use the highest quality asphalt. Shingles can overheat if your roof ventilation is sub-standard or non existent. The presence of soffit ventilation and upper roof ventilation allows cooler air to replace the super-heated air that bakes the underside of the shingles.

If you discover missing granules in the top of the vertical slits, you can extend the life of your roof quite easily. All it takes is a little time and pieces of 40 pound tin that measure 2 inches wide by 5 inches long. It will also help to have a pair of lightweight leather gloves and a wide, flat pry bar.


Avoid repairing roof leaks yourself! Find a professional using my Roofing Replacement / Repair Checklist. I offer a 100% Money Back Guarantee.


Try to work on the roof when it is cooler. You will become less fatigued, and the shingles will be easier to work with. Using the flat pry bar, pry up the corners of the shingle tabs at the bottom of slits that have missing granules. Align the piece of tin so that the 5 inch length is parallel with the 5 inch long vertical slit. Center the tin strip and slide it up under the two shingle tabs on either side of the slit. Continue to slide the tin strip up until the top one half inch disappears under the shingles above. The friction of the shingles will hold the metal strip in place. There is no need for caulk, roofing cement or nails. If you bent the shingle tabs up too much, the sun will most likely flatten them within a couple of days. Do not do this work on a cold roof. You can fracture shingle tabs.

Glass Blocks

glass block window installation

A large window like this needs to be installed one glass block at at time. It's a huge window. Copyright 2018 Tim Carter

DEAR TIM: I am intrigued with glass block. I would like to install this material in my basement windows, a bathroom window and as a room partition. Do you think an average homeowner can successfully tackle projects like this? How can I obtain the highest level of security for ground level windows? Can you offer any installation tips? Susan P., Franklin, PA

DEAR SUSAN: I share your fascination with these unique building blocks. Glass block products are very cool. They seem to be a timeless building material. I have installed glass block windows in 100 year old houses with little harm to the aesthetics. To date, I have not heard a complaint from my past customers concerning their usefulness, utility or durability.

I know that you will be able to handle the basement windows with little or no assistance. Depending upon the type of glass block window you choose, you may be able to do the bathroom window as well. The room partition is a job for a professional.

My guess is that you might actually use a combination of materials for your upcoming projects. Traditional glass block maybe the best choice for your basement window project. You can purchase solid glass block that are extremely difficult to shatter. These solid glass blocks will stop bullets fired from .357 magnum pistols!

Your bathroom window may be an excellent location for the clear or tinted lightweight acrylic block. You can actually get acrylic glass block windows that open and close. These will allow you to get plenty of air into these havens of mold and mildew. The acrylic blocks are available in clear, peach, rose and blue.

Your room partition may end up being constructed with thin glass block or the lightweight acrylic blocks to minimize the weight on your floor. The acrylic block can be ordered in widths and heights up to 9.5 feet in either direction. Traditional glass block will allow you to build large sized partitions as long as your mason installs the necessary hidden reinforcement steel.

Installing glass block panels in a basement window is very simple. The trick is to remove the old window and frame. Many cities and towns have fabrication shops that will make the glass block windows for you. You can specify the style of block and order it with little windows, dryer vents, combustion air inlets and other accessories built right into the block window. Your task is to simply install the entire unit at once.

Once you have got your new basement windows on site, check to make sure they will fit. A one half inch gap between the glass block window and frame is preferred. There is nothing worse than tearing out an existing window only to find out your new window will not work. To complete the installation you will need a bundle of wood shims, a small level, cement mortar, a small trowel and a sponge.

Place two one half inch shims about 3 inches in from the bottom corners on the bottom ledge of the opening. Apply your mortar mix to the bottom of the window ledge. Don't cover the shims with mortar. Tilt the window into position. Insert two shims between the top of the window and the opening. Tap them until they are slightly snug. Use the level to make sure the window is plumb. Check to make sure the gap around the window is uniform and that the window is not twisted in the opening.

Once you are satisfied with the position of the window, install the cement mortar around the sides of the window and the foundation. Once the mortar hardens in about 2 hours you should be able to gently remove the shims without disturbing the mortar or the window. Install mortar in the bottom holes. The top gap will be filled with foam expansion material and silicone caulk. Wipe the glass block with a damp sponge to remove mortar smears.

The Perfect Hideaway – Pocket Doors

pocket door

POCKET DOOR - This is the pocket before it has been fitted with a removable jamb. The pieces of jamb are cut so there is but 3/16ths inch of space between the edge of the jamb and the sliding door. The jambs pieces are screwed to the rough frame with decorative brass screws. This feature allows you to remove the jambs easily in the future.

DEAR TIM: I am considering the use of pocket doors for an upcoming project. However, a neighbor of mine has several problems with their pocket doors. Their doors routinely jump from the track and rub the frame. Is it easy to adjust pocket doors? Is there a restriction to the type of door design one can install? Can you install double pocket doors like the ones in my parents' old house? Ed T., Kittery, ME

DEAR ED: You are very wise to consider the use of pocket doors. They offer many advantages. Pocket doors were very popular at the turn of the 20th century. They enjoyed renewed success in the 1950's. I believe their time has come again! I have installed nearly a hundred smooth operating doors in the past 10 years. Every customer has been delighted. I think your neighbor's pocket door problems can be traced to inferior hardware and possibly some critical installation errors.

New housing and room addition construction prices are rising each day. It is vital to make use of every square foot of finished living space. A regular pivoting hinged door can steal nearly 10 square feet of floor space. They require a wasted area for the storage of the swinging door when it is opened. Paintings or pictures can be hidden behind an open door. Unsightly baseboard or hinge door stops become a necessity to prevent door knob holes in walls. Pocket doors eliminate all of these problems.

The secret to smooth, trouble free pocket doors lies in the frame and hardware used to hang the door. A box shaped track and tricycle hangers with nylon wheels are a must. These items prevent the doors from ever jumping off the track. Thin studs that create the hidden pocket for the door need to be wrapped with steel on three sides. The steel prevents warping of the thin furring strips. This warping may be one of the reasons your neighbor's door rubs when it goes in and out of the pocket. The steel also prevents drywall nails or screws from penetrating through the thin studs. Deeply driven fasteners can scratch the door as it opens and closes.

Quality pocket door hardware allows you to easily make adjustments once the door has been installed and trimmed. In many cases all you have to do is temporarily remove one side of the top door jamb. A good carpenter will install these with small head trim screws. Once the piece of wood is removed, you can gain easy access to the door suspension parts. Often you simply flip a lever and the door will separate from the rollers. Adjustments are made quickly and easily with standard tools. It is entirely possible to complete the entire adjustment process in as little as 10 - 15 minutes.

There is virtually no limit to the type of door design you can install in a pocket door frame. Flush, 6 panel, 15 lite glass, and even frosted or hammered glass full lite doors are possible. Many standard pocket door frames and hardware will support doors that weigh up to 125 pounds. With an optional kit you can install a 200 pound door! Double acting pocket doors are no problem. You simply install two pocket door frames that point at each other. I intend to install this setup in the study of my next Victorian house.

Pocket doors are excellent choices for people who use canes, walkers or wheelchairs. If you install a 36 inch wide pocket door frame with a hidden bumper and a U shaped handicapped door pull, you can achieve a finished opening of just over 32 inches. This will allow easy passage for those individuals who are challenged with swinging doors.

Your painter will need to cooperate during the installation process. All hidden edges and surfaces of the doors must be painted or sealed before the carpenter installs the door into the pocket. High humidity in houses can cause unprotected doors to twist and warp. If you seal the hidden edges and use the best hardware and frame, your pocket doors will be highly coveted by your friends and neighbors!

Trellis

garden arbor trellis

Trellis

DEAR TIM: I would like to construct a simple, yet elegant wood trellis for my garden. What is involved in this project? What wood will yield long life and minimal maintenance? Can an average homeowner successfully complete this project? Charlene D., Sylvester, GA

DEAR CHARLENE: Have you have been talking to my wife, Kathy? I am getting ready to build her a series of trellises for our gardens and patio. A garden arbor or trellis can create or add a unique flair to a deck, patio or even a front porch. They make excellent sun filtering screens that create delightful shadow patterns. I'll bet that you can't build just one!

Trellis structures can range from simple to complex. The most basic trellis can be built by assembling 3 ladder type structures. Two of the ladder sections simply stick vertically from the ground. The third section spans between the two to form the overhead portion of the trellis. The flat "rungs" of each ladder allow your vines and ivy to easily extend into and over the structure. A multi-tiered, partially roofed or pagoda styled trellis can be built as well. These complex styles may challenge a beginner. Start with a simple design for your first project.

A simple design that may suit your needs could consist of two vertical sections that project 7 feet from the ground. The overhead portion can be 8 feet long. All of these sections can be approximately 16 to 18 inches wide. If the vertical sections are spaced 5 feet apart, the top section will overhang each end by 18 inches. This makes for a graceful, cantilevered design. I intend to construct a bench between the two vertical standards. This will give Kathy an excellent vantage point to view the hummingbirds that visit our patio feeders.

I prefer to use redwood or western red cedar for these outdoor projects. Both of these woods contain natural wood preservative chemicals. These chemicals slow wood rot. Wood destroying insects find these chemicals distasteful. Both wood species are available in a variety of grades. I intend to use construction heart and construction common grade for my trellis. The construction heart grade contains some very tight knots. Because it is heartwood, it has a high concentration of natural chemical content. This makes it perfect for the posts that will be buried in the soil. I will use the construction common grade lumber for all of my small cross members and above ground support beams.

The trick for easy installation lies in constructing the trellis in your garage or basement. It is very difficult to build the trellis in place. If you desire minimal maintenance, you need to coat the wood with a clear or pigmented synthetic resin water repellent or paint before you start to cut or fit the lumber. This practice inhibits water from entering the wood where two pieces lap on top of one another. Be sure to coat exposed end grain as you cut and trim the pieces. Stainless steel nails, screws and bolts are the best fasteners to use. If these are not available, then select the highest quality hot dipped galvanized fasteners you can find.

Construct the two ladder sections first. Make sure you let the bottom portions of the posts run wild at least two feet or so. This will allow you to bury the posts into the ground at least 16 inches. The extra 8 inches of length will permit you to make adjustments for sloping ground conditions within your garden. It is important that the top of the two sections are level once installed. If not, the top horizontal section will slope!

After the post holes are completed, fill them with 2 inches of washed gravel. After placing the posts in slightly oversize post holes, place additional washed gravel around the posts instead of soil. The gravel will extend the life of the posts. Moist soil that comes into direct contact with wood promotes wood rot. The top 4 inches of the fill should be crushed gravel. This will lock the post tightly in place.

Water Hammer Pulse – BOOM! It Can Be Loud

water line valves

Water Hammer Pulse | Turning off this ball valve quickly can send a strong pulse of energy - water hammer - through your house.

DEAR TIM: The water pipes in my new home are driving me crazy. Every time the toilet or washing machine shuts off, there is a loud bang. The noise can happen at faucets but is reduced if I shut the water off very slowly. What is happening? Can this problem be solved? Is it expensive to fix? Missy H., Dover TN

DEAR MISSY: You're a victim of water hammer. The source of the problem is abnormally high water pressure in your water system. My guess is that your existing water pressure is 115 pounds per square inch (PSI) or higher. I'll bet you live at the bottom of a hill or near the lowest point of your municipal water system. The volume and weight of the water resting in the water mains above your house creates this high pressure. Some places in my city have main pressures that commonly exceed 150 PSI!

Is High Water Pressure Useful?

High water pressure is wonderful for hosing down driveways or powering lawn sprinklers. However, it wreaks havoc with faucets, valves and water heater pressure valves.

Related Link

More Water Hammer Pulse and Water Hammer Arrestor Tips HERE

What Causes Water Hammer?

Water hammer happens when high-velocity water flow is stopped abruptly. Water is heavy. Water rushing through pipes can have a tremendous amount of potential energy. Think of a moving truck that crashes into a huge concrete wall.

The average house has about 75 pounds of water within the piping system. When you rapidly shut off water to a fixture, the weight of the water crashes against the faucet, valve, or sidewalls of the pipe. This creates vibration and noise within the pipes that you hear as water hammer

How Can You Slow Down Water in Pipes?

You can slow down water velocity in your pipes by up-sizing your water supply lines. In other words, try to run 3/4 inch pipe as close to fixture groups as possible. High pressure combined with significant water demand can cause water velocity to soar through smaller sized one-half inch piping.

pressure-reducing valve

You can barely see this pressure-reducing valve. It's the bell-shaped object close to the ground.

Can a Pressure-Reducing Valve Stop Water Hammer?

Water hammer can sometimes be solved by installing a pressure reducing valve in your water system. This valve will almost always tame the beast within your pipes. The valves are made with a handy adjustable screw that allows you to adjust the pressure on the house side of the water system.

What is the Factory Pressure Setting for Pressure-Reducing Valves?

Factory settings are usually between 50 and 60 PSI. I happen to prefer a setting of 70 PSI. Settings at or near 70 PSI allow you to take vigorous showers.

Is it Hard to Install a Pressure Reducing Valve?

It's not hard to install a pressure reducing valve. They require simple soldering skills.

However, you will need to check with your local plumbing inspector before you proceed. Some states and municipalities will not permit an unlicensed person to cut into or make alterations to the public water supply system. Your household water lines are really part of the public system.

CLICK or TAP HERE to get FREE BIDS from local plumbers who can install the valve for you.

Can Water From My House Flow Backwards into the Water Main?

Under certain conditions (fire engine pumps & water main breaks) water can actually flow from your house into the public water supply.

What Does it Cost to Install a Pressure Reducing Valve?

The cost of installing a pressure reducing valve depends on how much extra piping work you decide to do. Remember that everything on the house side of the valve will operate at the lower pressure. If you desire to maintain the high pressure for your outdoor hose bibs, you will undoubtedly have to install additional water lines from the high-pressure side of the new valve to those things you still want to be served with high pressure. If you're able to perform the work yourself, your cost will be minimal. If you must use a plumber, the cost can easily exceed $500 or more.

Can a Pressure Reducing Valve Cause Problems with my Water Heater?

The installation of a pressure reducing valve can sometimes cause problems with a hot water heater. Certain pressure reducing valves contain a bypass that allows water to flow back into the municipal system. But these bypasses can malfunction. When cold water enters your hot water heater and is subsequently heated, the volume of the water increases. Before the pressure reducing valve was installed, this water actually was pushed back towards the street. If your new valve does not have a bypass or it malfunctions, you can once again be troubled with water hammer.

Will an Expansion Tank Protect my Water Heater?

This problem can be solved by installing a simple expansion tank on top of the cold water inlet into the hot water heater.

tank water heater expansion

You can see the yellow handle of the shutoff valve above the tank. Note the wood blocks. - © 2017 Tim Carter

This tank contains an air chamber that is separated from the water by a rubber bladder. The extra volume of heated water simply causes the bladder to expand within the tank. This expansion tank needs to be sized correctly. Just tell the plumbing supply house the capacity of your hot water heater. They will do the rest!

Author's Notes:

I would like to acknowledge the most helpful input of Ronald L. George, CIPE of Detroit, Michigan, for accurate information that has enhanced this column and the following Builder Bulletin. Ronald provided me with excellent background information and facts concerning the truth about water hammer. My hat is off to you Ronald! Many Thanks!

We've received other questions with similar problems or questions. Here's one from Cheryll K. of Fenton, MO, regarding either the need for a water hammer arrestor or just noisy ductwork.

"We heard an extremely loud "boom" last night at 4:00 a.m. I was already awake when it happened because my son had come in our room about 10 minutes prior to this because of a bad dream. He was still in our room and awake and heard the noise too. The noise woke my husband from a sound sleep.

Anyway, the noise sounded like dropping a dictionary from a second story down onto a hard floor. The weird part ... the sound appeared to come from right under our bed, right in our room. We got up, checked things and could not figure it out. We even checked our mattress and box springs. Is there any chance the noise could have been caused by something structural that happened between the second story floor and the ceiling below it? We don't see any outward signs of damage, but I am looking for an explanation for the noise. Thanks so much!"

Kitchen Design

DEAR TIM: I am designing my new kitchen. A friend told me about some mystical triangle that needs to exist between the sink, cooktop and refrigerator. Is this true? My kitchen measures 10 feet 6 inches by 14 feet. Are there minimum planning standards that will maximize the utility of the kitchen space? Do you think I can include a small sit down eating area in one corner of the space? David K., Santa Cruz CA

DEAR DAVID: The mystical "work" triangle is a reality - make no mistake about it. This concept of linking the major components of a kitchen was developed nearly 50 years ago by the University of Illinois Small Homes Council. Although kitchens in some of today's largest homes would dwarf your kitchen and those in 1950's homes, the basic principal of the work triangle is still valid.

The thinking behind this most basic concept of kitchen design is simple. The sink, refrigerator and the cooktop represent the most used centers of activity in the average kitchen. The efficiency of a worker in the kitchen is drastically reduced if these activity centers are spread far apart. Ideally the distance in a straight line from the front center point of one of these three centers of activity to another should be between 4 and 9 feet. The sum of the three triangle legs should be equal to or less than 26 feet.

All kitchens contain invisible throughways. These are the connecting routes between other rooms and doorways. A collision on these high-speed highways involving a kitchen worker walking with a hot pot of water and an express child or teenager can be disastrous. For this reason, no single leg of the work triangle should cross these invisible pathways.


Avoid flaws and mistakes when planning your new kitchen. Use my Kitchen Remodeling Checklist as your remodel guide. I offer a 100% Money Back Guarantee.


The National Kitchen and Bath Association would consider your kitchen a small one as it contains less than 150 square feet. Detailed studies and design competitions they sponsored allowed them to develop minimum standards regarding cabinetry, drawer space and countertop requirements.

For you to gain the maximum utility from your space, it is suggested that you have a minimum of 13 linear feet of base cabinets. The total length of your wall cabinets should not be less than 12 linear feet. Drawer space is very crucial in kitchens. The total combined width of all drawer fronts should be a minimum of 120 inches. A small kitchen like yours might have an average of 8 drawers. Your final design should contain a minimum of 11 linear feet of open countertop space.

Including a small sit down eating area in your kitchen may be impossible. You will most likely find this out when you draw a simple plan that incorporates all of the before mentioned planning criteria. After you draw the kitchen plan I want you to pencil in the invisible high speed routes. Now draw a 6 foot diameter circle to the same scale as your kitchen plan. If you are using 1/4 inch equals one foot scale, this disc will be 1.5 inches in diameter. This disc represents a 4 foot diameter circular table and the space needed for the chairs around the table.

Place the disc on the plan. It should not cover any of the high speed routes, walls, or be near any of the kitchen cabinet or work areas. The only hope you may have is to include a very small cafe style table that will seat two people. If you want to get the best return on your investment dollars that you are about to spend, I urge you to consult with a Certified Kitchen Designer (CKD). These individuals will help you maximize the function, form and appearance of your new kitchen.

Picket Fence

picket fence

This fence runs for 120 feet along my property line. It makes for a great backdrop for flowers and low bushes.

DEAR TIM: I would like to have a decorative wood picket fence on my property. What are the biggest obstacles one must overcome when building a fence? What kind of lumber should I use? How do you install a fence in a straight line? Paula B., Dry Ridge KY

DEAR PAULA: I surely can understand your desire for a wood fence. My wife and I have one. It was a joy to build. Probably the biggest fan of my fence is my neighbor. She uses the fence as a backdrop for her flower garden. The solid color of the fence does a magnificent job of showing the color of her flowers and plants. You may want to consider extending your fence to your garden area.

What are the obstacles in building a fence?

Rocks, zoning laws and specialized saws are probably going to be your biggest obstacles. Fences can be blown over by strong winds. Certain areas of the country require that fence posts be embedded to minimum depths in the soil. This prevents the fence from being blown over. Rocks can be hard to overcome when digging fence post holes. You may have to use a long iron spud bar to break them while digging.

Check Local Zoning Restrictions

Zoning restrictions can limit the placement, height and type of fence. Some localities make you put the best side of the fence towards your neighbor's property. You should really check your local zoning office before proceeding with your fence construction. Be sure to survey your property line if you are placing the fence on a boundary line. Many a fence has had to be moved because of this oversight!

If you decide to construct a picket fence like mine, you better have access to band, radial arm and miter box saws. I needed all of these to make the decorative cuts on my fence posts and pickets.

How can I save money in building a fence?

You can save money and time if you standardize your fence sections. 12 foot long treated 4x4's can be cut into two equal pieces. Each 6 foot length will create a 4 foot post when buried 2 feet into the ground. Using 8 foot long treated 2x4's for the horizontal beams allows you to standardize this portion of the job as well. Redwood or western red cedar is an excellent fencing material. Locust makes a superb fence post if it is available.

The pickets need only to be 3/4 inch thick. The width of and spacing between pickets will be controlled by your individual design. My wife Kathy chose to use 1 and one half inch wide pickets with a 1 inch space between them. I think she was mad at me that day. She knew it would be nearly impossible to repaint the sides of the pickets at a later date.

I like to dig the fence posts as I build the frame for the fencing. This method insures that I don't make a mistake when laying out the fence posts. There is little room for error if you decide to use standard length material as I did.

How do you lay out the fence post holes?

You start the project by stringing a line an inch away from where you actually want your fence posts. If you build right up to the string and each post accidentally pushes the string, the fence line will wander. By holding the line away from the fence line you can get the fence perfectly straight.

I suggest that you install the fence posts and the horizontal beams first. Be sure the fence posts are plumb. After this is complete, stain, paint or seal this portion of the fence. Precut all of your pickets and pre-stain or pre-paint these as well. Use hot dipped galvanized nails or stainless steel nails to fasten the pickets to the beams. If you are careful, you will only need to do minimal touch-up painting to complete the job.

Where can you get ideas for fences?

If you want to get some swell ideas for fences, then Wooden Fences is a must for you. It contains incredible photos, illustrations and instructions for constructing wooden fences and wooden gates. You will not be disappointed with this book.

This next book contains incredible photos, illustrations and instructions for arbors, pergolas, trellises and just about anything else you can build with wood for your landscape. Wait till you check out the glossy color photographs! They are spectacular. They are crisp, colorful and show you details that are tough to describe with words. You will not be disappointed with this book. You must buy a copy of Landscaping with Wood, a neat paperback book published by Taunton Press.

Author's Note: I received a great email from Jim S., Harrison, OH. Below is his comment regarding fence posts.

"I would like to offer you a suggestion on your comment about fence post setting depth. Fence post should be set below the frost line. You can ask any plumber what the level of the frost line is in any area and that is the minimum level the post should be set. If they are not set below the frost line they will "heave" up as the freeze/thaw cycle occurs. As you drive around you can see fences that are out of line and often it is because the post were not set to the proper depth or in the case of end post not braced properly. In the Cincinnati area, I set post at least 30" in the ground. I grew up on a 320 acre farm outside of Brookville, Indiana (just east of the Brookville Reservoir dam at the top of the hill) and I set hundreds of fence post over the course of my late childhood.

With Regards,"

Fences were shared in my March 4, 2016 AsktheBuilder Newsletter.

Sump Pumps – Basement Guardians

DEAR TIM: My crawl space and basement is prone to flooding during periods of heavy rain. The sump pump sometimes vibrates and fails to work. When it does work it often does not keep up with the incoming water. What might be wrong? Is there a backup system available? What sized pump should work well for an average house? Shelly T., Grosse Point, MI

DEAR SHELLY: Sump pump failures are the bane of many a homeowner. I have seen thousands of dollars worth of damage caused by just 2 to 3 inches of water in a basement. Often the failure of the pump can be traced to simple installation mistakes. High quality sump pumps can operate for years without a major malfunction. I know as I have installed hundreds of them.

The leading cause of failure in most sump pumps tends to be a switching problem. The switch of a sump will often fail to turn on because the pump has shifted inside the sump basin. The float that operates the switch can lodge against the side of the sump basin. Furthermore, it is not uncommon for a piece of debris to interfere with the action of the pump switch. Check to make sure your pump switch and float arm assembly move freely.

The vibrations and inability to pump on occasions can almost always be attributed to pump air-lock. When a sump pumps turns off, the water in the discharge line between the pump and the check valve drains back into the sump. If the pipe between the pump and the check valve is solid, the air in the line will compress the next time the pump tries to empty the sump basin. This compressed air can prevent water from leaving the pump. A 3/16 inch vent hole in the side of the discharge pipe inside the sump solves this problem. Check to see if your discharge line inside the pit has this hole. If it does, make sure it is not clogged.

Your sump basin may be too small. All too often people use a simple 5 gallon bucket as an inexpensive sump basin. This is inadequate. A residential sump basin should have a minimum inner diameter of 18 inches. It should be at least 22 inches deep. Small and narrow sump basins cause switching failures and more frequent pumping cycles.

A sump pump backup system might be a good idea. Often flooding occurs when sump pump needs are the greatest. A soil saturating rain storm may cause a localized power outage. Water flowing into your sump activates the switch, but there is no electricity to pump the water. Powerful battery operated sump pumps solve this problem. These pumps get their power from standard high performance automotive batteries. They come with alarms that tell you if the battery is low or partially discharged.

If you don't like batteries and live where you have city water, you can get a backup pump that operates on regular water pressure. These pumps will usually get you through the emergency until regular power is restored. You may use less than $1.00 worth of water to save thousands of dollars in damage to your belongings.

If your current pump has a 1/3 or one half horsepower rating, you should be OK. Higher horsepower pumps will pump more water. Look for pumps that have cast iron or heavy metal housings. Cast iron can dissipate heat buildup much better than a pump with a plastic or thin metal housing. Remember, price is usually an excellent indicator of quality. Higher priced pumps often have better parts!

Color Replacement Windows – Vinyl + Aluminum!

DEAR TIM: My house desperately needs new replacement windows. They must be maintenance free and colorful. I like vinyl but am disappointed in the limited exterior colors of vinyl windows. Is there an alternative? How do you compare different window brands for overall performance? Will the new windows solve my current condensation problem? Patty D., Grosse Point, MI

DEAR PATTY: Your choice of vinyl windows is excellent. If you purchase a high quality vinyl window, maintenance headaches will be a thing of the past. You are not the first person to be displeased with the limited exterior color variety of vinyl. However, this is your lucky day! You can purchase a replacement window that will offer you the warm feel of vinyl on the inside of your home and unlimited exterior color possibilities.

When vinyl window materials get hot, they can expand and deform. Dark vinyl colors absorb and store the most heat. This quality is good during winter months but high vinyl temperatures in the summer months can cause problems. The stored heat can cause the vinyl frames and sashes to sag under the weight of heavy glass. Because of these potential problems, manufacturers tend to shy away from using dark vinyl colors.

Certain vinyl window companies decided to blend two maintenance free materials together. You can purchase a vinyl window that has an aluminum exterior and a vinyl interior. The aluminum exterior is available in a variety of light and dark colors. Custom colors are also available. Painted aluminum finishes can last 15 years or more with minimal color fade. The aluminum frames are an excellent choice if you live in a high wind area or desire a window that resists forced entry.


Buy the right replacement windows with the help of my Window Replacement Checklist. I offer a 100% Money Back Guarantee.


The interior of vinyl windows has changed as well. You are not limited to merely a white or cream color. Many manufacturers offer a realistic stained wood appearance. Some actually have the texture of wood while others allow you to custom stain the interior vinyl wood grained surface. While window shopping, ask about custom beveled glass. It can add a handsome touch to your home.

Judging quality and performance will require some effort on your part. Recently two independent associations (American Architectural Manufacturers Association - AAMA and the National Wood Window and Door Association NWWDA)) joined together to produce voluntary specifications for vinyl window manufacturers. They developed a standard called the AAMA/NWWDA 101/I.S.2-97. If you purchase a window that is certified to have passed this standard, you are getting a quality window. Windows that meet the AAMA/NWWDA 101/I.S.2-97 standard often have a certification label on the frame.

Another organization is working hard to establish a fair, accurate and credible energy performance rating system for vinyl windows and other window and door products. It is the National Fenestration Rating Council (NFRC). They have developed a label that is similar to the ones we have seen for years on appliances. These new labels will have a single number that will tell you how well the window performs in both cold and hot weather. You will see a number from 1 to 10 in each category. Poor performing windows will have a rating at or near one. The NFRC is currently working out the details to make sure that all types and sizes of windows are tested fairly and accurately. If all goes well, you will begin to see these helpful labels in 1998.

Your condensation problems may not totally disappear with your new windows. Your existing, drafty windows allow dry, cold air to enter your house. This dry air mixes with the humid indoor air and lowers the overall humidity in your house. When your new windows are installed the air infiltration will be significantly reduced. Your indoor humidity will soar. On the coldest winter days this extra humidity just might cause a fog on your new windows. To stop the condensation, simply lower your indoor humidity.

Ladders – All You Need

DEAR TIM: I just moved into my first home. I now realize that several ladders will be a necessity to complete normal maintenance and repair projects. What type and size ladders would you recommend for an average homeowner? What safety tips can you offer? Dan P., Montrose, CO

DEAR DAN: Wow! Do I have some ladder stories for you! Too bad my attorneys won't allow me to tell them to you. I will give you this quick tip: Avoid transporting 40 foot extension ladders on VW bugs. Back in my college house-painting days I almost speared someone in a crosswalk!

There are three primary materials used to make ladders: wood, aluminum, and fiberglass. All have their pros and cons. I happen to own a blend of fiberglass and wood ladders. Wood is the traditional ladder material. These ladders are the heaviest of the three types when you compare similar levels of weight bearing capacity. They can be used with a marginal degree of safety when dealing with electricity as long as they are kept clean and dry. As with any wood, they require periodic maintenance to prevent rot and cracking.

Don't place rocks, bricks, or pieces of wood under one leg to level a ladder.

Don't place rocks, bricks, or pieces of wood under one leg to level a ladder.

Aluminum ladders offer you a high strength, lightweight alternative. However, this ladder material is the last thing you should buy if you intend to work with electrical wires. A fatal shock is a real possibility if either you or the ladder comes into contact with a poorly or uninsulated electrical conductor. Chemicals and salt water environments can also corrode and weaken aluminum ladders.

Fiberglass ladders have become extremely popular. This time tested material will not conduct electricity. It is also very corrosion resistant. Fiberglass ladders are the sweetheart of the ladder industry at this time. They combine the best qualities of aluminum and wood ladders. Fiberglass ladders can last generations with minimal care and maintenance.

Sizing a ladder can require some thought. Depending upon the size of your house you may need several different sized extension ladders to reach all parts of your home. Pay attention when sizing an extension ladder. Because the fly and base section need to overlap, the maximum ladder working length is always less than the actual size of the ladder. A typical 20 foot extension ladder will only extend 17 feet. Don't forget the extra 24 to 30 inches of ladder that needs to extend above a roof or gutter line when you intend to climb and get off the ladder. I own two fiberglass extension ladders. Purchase ladders with D shaped rungs. The flat rung surface is easier on your feet.