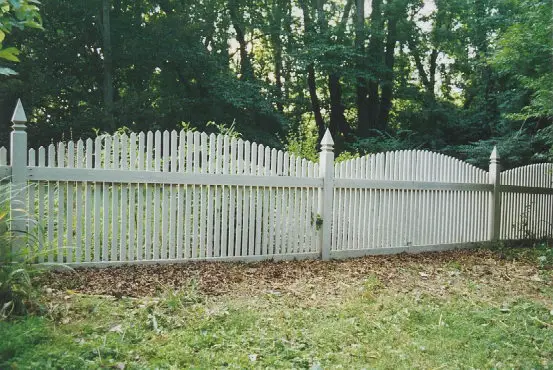
Trellis

garden arbor trellis

Trellis

DEAR TIM: I would like to construct a simple, yet elegant wood trellis for my garden. What is involved in this project? What wood will yield long life and minimal maintenance? Can an average homeowner successfully complete this project? Charlene D., Sylvester, GA

DEAR CHARLENE: Have you have been talking to my wife, Kathy? I am getting ready to build her a series of trellises for our gardens and patio. A garden arbor or trellis can create or add a unique flair to a deck, patio or even a front porch. They make excellent sun filtering screens that create delightful shadow patterns. I'll bet that you can't build just one!

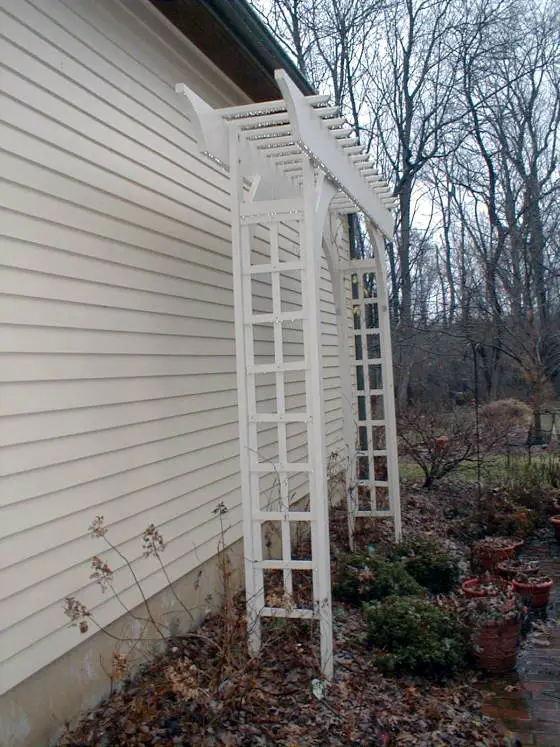
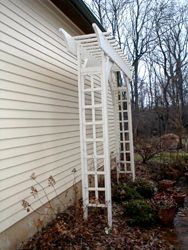
Trellis structures can range from simple to complex. The most basic trellis can be built by assembling 3 ladder type structures. Two of the ladder sections simply stick vertically from the ground. The third section spans between the two to form the overhead portion of the trellis. The flat "rungs" of each ladder allow your vines and ivy to easily extend into and over the structure. A multi-tiered, partially roofed or pagoda styled trellis can be built as well. These complex styles may challenge a beginner. Start with a simple design for your first project.

A simple design that may suit your needs could consist of two vertical sections that project 7 feet from the ground. The overhead portion can be 8 feet long. All of these sections can be approximately 16 to 18 inches wide. If the vertical sections are spaced 5 feet apart, the top section will overhang each end by 18 inches. This makes for a graceful, cantilevered design. I intend to construct a bench between the two vertical standards. This will give Kathy an excellent vantage point to view the hummingbirds that visit our patio feeders.

I prefer to use redwood or western red cedar for these outdoor projects. Both of these woods contain natural wood preservative chemicals. These chemicals slow wood rot. Wood destroying insects find these chemicals distasteful. Both wood species are available in a variety of grades. I intend to use construction heart and construction common grade for my trellis. The construction heart grade contains some very tight knots. Because it is heartwood, it has a high concentration of natural chemical content. This makes it perfect for the posts that will be buried in the soil. I will use the construction common grade lumber for all of my small cross members and above ground support beams.

The trick for easy installation lies in constructing the trellis in your garage or basement. It is very difficult to build the trellis in place. If you desire minimal maintenance, you need to coat the wood with a clear or pigmented synthetic resin water repellent or paint before you start to cut or fit the lumber. This practice inhibits water from entering the wood where two pieces lap on top of one another. Be sure to coat exposed end grain as you cut and trim the pieces. Stainless steel nails, screws and bolts are the best fasteners to use. If these are not available, then select the highest quality hot dipped galvanized fasteners you can find.

Construct the two ladder sections first. Make sure you let the bottom portions of the posts run wild at least two feet or so. This will allow you to bury the posts into the ground at least 16 inches. The extra 8 inches of length will permit you to make adjustments for sloping ground conditions within your garden. It is important that the top of the two sections are level once installed. If not, the top horizontal section will slope!

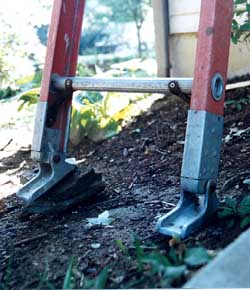
After the post holes are completed, fill them with 2 inches of washed gravel. After placing the posts in slightly oversize post holes, place additional washed gravel around the posts instead of soil. The gravel will extend the life of the posts. Moist soil that comes into direct contact with wood promotes wood rot. The top 4 inches of the fill should be crushed gravel. This will lock the post tightly in place.

Water Hammer Pulse – BOOM! It Can Be Loud

water line valves

Water Hammer Pulse | Turning off this ball valve quickly can send a strong pulse of energy - water hammer - through your house.

DEAR TIM: The water pipes in my new home are driving me crazy. Every time the toilet or washing machine shuts off, there is a loud bang. The noise can happen at faucets but is reduced if I shut the water off very slowly. What is happening? Can this problem be solved? Is it expensive to fix? Missy H., Dover TN

DEAR MISSY: You're a victim of water hammer. The source of the problem is abnormally high water pressure in your water system. My guess is that your existing water pressure is 115 pounds per square inch (PSI) or higher. I'll bet you live at the bottom of a hill or near the lowest point of your municipal water system. The volume and weight of the water resting in the water mains above your house creates this high pressure. Some places in my city have main pressures that commonly exceed 150 PSI!

Is High Water Pressure Useful?

High water pressure is wonderful for hosing down driveways or powering lawn sprinklers. However, it wreaks havoc with faucets, valves and water heater pressure valves.

Related Link

More Water Hammer Pulse and Water Hammer Arrestor Tips HERE

What Causes Water Hammer?

Water hammer happens when high-velocity water flow is stopped abruptly. Water is heavy. Water rushing through pipes can have a tremendous amount of potential energy. Think of a moving truck that crashes into a huge concrete wall.

The average house has about 75 pounds of water within the piping system. When you rapidly shut off water to a fixture, the weight of the water crashes against the faucet, valve, or sidewalls of the pipe. This creates vibration and noise within the pipes that you hear as water hammer

How Can You Slow Down Water in Pipes?

You can slow down water velocity in your pipes by up-sizing your water supply lines. In other words, try to run 3/4 inch pipe as close to fixture groups as possible. High pressure combined with significant water demand can cause water velocity to soar through smaller sized one-half inch piping.

pressure-reducing valve

You can barely see this pressure-reducing valve. It's the bell-shaped object close to the ground.

Can a Pressure-Reducing Valve Stop Water Hammer?

Water hammer can sometimes be solved by installing a pressure reducing valve in your water system. This valve will almost always tame the beast within your pipes. The valves are made with a handy adjustable screw that allows you to adjust the pressure on the house side of the water system.

What is the Factory Pressure Setting for Pressure-Reducing Valves?

Factory settings are usually between 50 and 60 PSI. I happen to prefer a setting of 70 PSI. Settings at or near 70 PSI allow you to take vigorous showers.

Is it Hard to Install a Pressure Reducing Valve?

It's not hard to install a pressure reducing valve. They require simple soldering skills.

However, you will need to check with your local plumbing inspector before you proceed. Some states and municipalities will not permit an unlicensed person to cut into or make alterations to the public water supply system. Your household water lines are really part of the public system.

CLICK or TAP HERE to get FREE BIDS from local plumbers who can install the valve for you.

Can Water From My House Flow Backwards into the Water Main?

Under certain conditions (fire engine pumps & water main breaks) water can actually flow from your house into the public water supply.

What Does it Cost to Install a Pressure Reducing Valve?

The cost of installing a pressure reducing valve depends on how much extra piping work you decide to do. Remember that everything on the house side of the valve will operate at the lower pressure. If you desire to maintain the high pressure for your outdoor hose bibs, you will undoubtedly have to install additional water lines from the high-pressure side of the new valve to those things you still want to be served with high pressure. If you're able to perform the work yourself, your cost will be minimal. If you must use a plumber, the cost can easily exceed $500 or more.

Can a Pressure Reducing Valve Cause Problems with my Water Heater?

The installation of a pressure reducing valve can sometimes cause problems with a hot water heater. Certain pressure reducing valves contain a bypass that allows water to flow back into the municipal system. But these bypasses can malfunction. When cold water enters your hot water heater and is subsequently heated, the volume of the water increases. Before the pressure reducing valve was installed, this water actually was pushed back towards the street. If your new valve does not have a bypass or it malfunctions, you can once again be troubled with water hammer.

Will an Expansion Tank Protect my Water Heater?

This problem can be solved by installing a simple expansion tank on top of the cold water inlet into the hot water heater.

tank water heater expansion

You can see the yellow handle of the shutoff valve above the tank. Note the wood blocks. - © 2017 Tim Carter

This tank contains an air chamber that is separated from the water by a rubber bladder. The extra volume of heated water simply causes the bladder to expand within the tank. This expansion tank needs to be sized correctly. Just tell the plumbing supply house the capacity of your hot water heater. They will do the rest!

Author's Notes:

I would like to acknowledge the most helpful input of Ronald L. George, CIPE of Detroit, Michigan, for accurate information that has enhanced this column and the following Builder Bulletin. Ronald provided me with excellent background information and facts concerning the truth about water hammer. My hat is off to you Ronald! Many Thanks!

We've received other questions with similar problems or questions. Here's one from Cheryll K. of Fenton, MO, regarding either the need for a water hammer arrestor or just noisy ductwork.

"We heard an extremely loud "boom" last night at 4:00 a.m. I was already awake when it happened because my son had come in our room about 10 minutes prior to this because of a bad dream. He was still in our room and awake and heard the noise too. The noise woke my husband from a sound sleep.

Anyway, the noise sounded like dropping a dictionary from a second story down onto a hard floor. The weird part ... the sound appeared to come from right under our bed, right in our room. We got up, checked things and could not figure it out. We even checked our mattress and box springs. Is there any chance the noise could have been caused by something structural that happened between the second story floor and the ceiling below it? We don't see any outward signs of damage, but I am looking for an explanation for the noise. Thanks so much!"

Kitchen Design

DEAR TIM: I am designing my new kitchen. A friend told me about some mystical triangle that needs to exist between the sink, cooktop and refrigerator. Is this true? My kitchen measures 10 feet 6 inches by 14 feet. Are there minimum planning standards that will maximize the utility of the kitchen space? Do you think I can include a small sit down eating area in one corner of the space? David K., Santa Cruz CA

DEAR DAVID: The mystical "work" triangle is a reality - make no mistake about it. This concept of linking the major components of a kitchen was developed nearly 50 years ago by the University of Illinois Small Homes Council. Although kitchens in some of today's largest homes would dwarf your kitchen and those in 1950's homes, the basic principal of the work triangle is still valid.

The thinking behind this most basic concept of kitchen design is simple. The sink, refrigerator and the cooktop represent the most used centers of activity in the average kitchen. The efficiency of a worker in the kitchen is drastically reduced if these activity centers are spread far apart. Ideally the distance in a straight line from the front center point of one of these three centers of activity to another should be between 4 and 9 feet. The sum of the three triangle legs should be equal to or less than 26 feet.

All kitchens contain invisible throughways. These are the connecting routes between other rooms and doorways. A collision on these high-speed highways involving a kitchen worker walking with a hot pot of water and an express child or teenager can be disastrous. For this reason, no single leg of the work triangle should cross these invisible pathways.


Avoid flaws and mistakes when planning your new kitchen. Use my Kitchen Remodeling Checklist as your remodel guide. I offer a 100% Money Back Guarantee.


The National Kitchen and Bath Association would consider your kitchen a small one as it contains less than 150 square feet. Detailed studies and design competitions they sponsored allowed them to develop minimum standards regarding cabinetry, drawer space and countertop requirements.

For you to gain the maximum utility from your space, it is suggested that you have a minimum of 13 linear feet of base cabinets. The total length of your wall cabinets should not be less than 12 linear feet. Drawer space is very crucial in kitchens. The total combined width of all drawer fronts should be a minimum of 120 inches. A small kitchen like yours might have an average of 8 drawers. Your final design should contain a minimum of 11 linear feet of open countertop space.

Including a small sit down eating area in your kitchen may be impossible. You will most likely find this out when you draw a simple plan that incorporates all of the before mentioned planning criteria. After you draw the kitchen plan I want you to pencil in the invisible high speed routes. Now draw a 6 foot diameter circle to the same scale as your kitchen plan. If you are using 1/4 inch equals one foot scale, this disc will be 1.5 inches in diameter. This disc represents a 4 foot diameter circular table and the space needed for the chairs around the table.

Place the disc on the plan. It should not cover any of the high speed routes, walls, or be near any of the kitchen cabinet or work areas. The only hope you may have is to include a very small cafe style table that will seat two people. If you want to get the best return on your investment dollars that you are about to spend, I urge you to consult with a Certified Kitchen Designer (CKD). These individuals will help you maximize the function, form and appearance of your new kitchen.

Picket Fence

picket fence

This fence runs for 120 feet along my property line. It makes for a great backdrop for flowers and low bushes.

DEAR TIM: I would like to have a decorative wood picket fence on my property. What are the biggest obstacles one must overcome when building a fence? What kind of lumber should I use? How do you install a fence in a straight line? Paula B., Dry Ridge KY

DEAR PAULA: I surely can understand your desire for a wood fence. My wife and I have one. It was a joy to build. Probably the biggest fan of my fence is my neighbor. She uses the fence as a backdrop for her flower garden. The solid color of the fence does a magnificent job of showing the color of her flowers and plants. You may want to consider extending your fence to your garden area.

What are the obstacles in building a fence?

Rocks, zoning laws and specialized saws are probably going to be your biggest obstacles. Fences can be blown over by strong winds. Certain areas of the country require that fence posts be embedded to minimum depths in the soil. This prevents the fence from being blown over. Rocks can be hard to overcome when digging fence post holes. You may have to use a long iron spud bar to break them while digging.

Check Local Zoning Restrictions

Zoning restrictions can limit the placement, height and type of fence. Some localities make you put the best side of the fence towards your neighbor's property. You should really check your local zoning office before proceeding with your fence construction. Be sure to survey your property line if you are placing the fence on a boundary line. Many a fence has had to be moved because of this oversight!

If you decide to construct a picket fence like mine, you better have access to band, radial arm and miter box saws. I needed all of these to make the decorative cuts on my fence posts and pickets.

How can I save money in building a fence?

You can save money and time if you standardize your fence sections. 12 foot long treated 4x4's can be cut into two equal pieces. Each 6 foot length will create a 4 foot post when buried 2 feet into the ground. Using 8 foot long treated 2x4's for the horizontal beams allows you to standardize this portion of the job as well. Redwood or western red cedar is an excellent fencing material. Locust makes a superb fence post if it is available.

The pickets need only to be 3/4 inch thick. The width of and spacing between pickets will be controlled by your individual design. My wife Kathy chose to use 1 and one half inch wide pickets with a 1 inch space between them. I think she was mad at me that day. She knew it would be nearly impossible to repaint the sides of the pickets at a later date.

I like to dig the fence posts as I build the frame for the fencing. This method insures that I don't make a mistake when laying out the fence posts. There is little room for error if you decide to use standard length material as I did.

How do you lay out the fence post holes?

You start the project by stringing a line an inch away from where you actually want your fence posts. If you build right up to the string and each post accidentally pushes the string, the fence line will wander. By holding the line away from the fence line you can get the fence perfectly straight.

I suggest that you install the fence posts and the horizontal beams first. Be sure the fence posts are plumb. After this is complete, stain, paint or seal this portion of the fence. Precut all of your pickets and pre-stain or pre-paint these as well. Use hot dipped galvanized nails or stainless steel nails to fasten the pickets to the beams. If you are careful, you will only need to do minimal touch-up painting to complete the job.

Where can you get ideas for fences?

If you want to get some swell ideas for fences, then Wooden Fences is a must for you. It contains incredible photos, illustrations and instructions for constructing wooden fences and wooden gates. You will not be disappointed with this book.

This next book contains incredible photos, illustrations and instructions for arbors, pergolas, trellises and just about anything else you can build with wood for your landscape. Wait till you check out the glossy color photographs! They are spectacular. They are crisp, colorful and show you details that are tough to describe with words. You will not be disappointed with this book. You must buy a copy of Landscaping with Wood, a neat paperback book published by Taunton Press.

Author's Note: I received a great email from Jim S., Harrison, OH. Below is his comment regarding fence posts.

"I would like to offer you a suggestion on your comment about fence post setting depth. Fence post should be set below the frost line. You can ask any plumber what the level of the frost line is in any area and that is the minimum level the post should be set. If they are not set below the frost line they will "heave" up as the freeze/thaw cycle occurs. As you drive around you can see fences that are out of line and often it is because the post were not set to the proper depth or in the case of end post not braced properly. In the Cincinnati area, I set post at least 30" in the ground. I grew up on a 320 acre farm outside of Brookville, Indiana (just east of the Brookville Reservoir dam at the top of the hill) and I set hundreds of fence post over the course of my late childhood.

With Regards,"

Fences were shared in my March 4, 2016 AsktheBuilder Newsletter.

Sump Pumps – Basement Guardians

DEAR TIM: My crawl space and basement is prone to flooding during periods of heavy rain. The sump pump sometimes vibrates and fails to work. When it does work it often does not keep up with the incoming water. What might be wrong? Is there a backup system available? What sized pump should work well for an average house? Shelly T., Grosse Point, MI

DEAR SHELLY: Sump pump failures are the bane of many a homeowner. I have seen thousands of dollars worth of damage caused by just 2 to 3 inches of water in a basement. Often the failure of the pump can be traced to simple installation mistakes. High quality sump pumps can operate for years without a major malfunction. I know as I have installed hundreds of them.

The leading cause of failure in most sump pumps tends to be a switching problem. The switch of a sump will often fail to turn on because the pump has shifted inside the sump basin. The float that operates the switch can lodge against the side of the sump basin. Furthermore, it is not uncommon for a piece of debris to interfere with the action of the pump switch. Check to make sure your pump switch and float arm assembly move freely.

The vibrations and inability to pump on occasions can almost always be attributed to pump air-lock. When a sump pumps turns off, the water in the discharge line between the pump and the check valve drains back into the sump. If the pipe between the pump and the check valve is solid, the air in the line will compress the next time the pump tries to empty the sump basin. This compressed air can prevent water from leaving the pump. A 3/16 inch vent hole in the side of the discharge pipe inside the sump solves this problem. Check to see if your discharge line inside the pit has this hole. If it does, make sure it is not clogged.

Your sump basin may be too small. All too often people use a simple 5 gallon bucket as an inexpensive sump basin. This is inadequate. A residential sump basin should have a minimum inner diameter of 18 inches. It should be at least 22 inches deep. Small and narrow sump basins cause switching failures and more frequent pumping cycles.

A sump pump backup system might be a good idea. Often flooding occurs when sump pump needs are the greatest. A soil saturating rain storm may cause a localized power outage. Water flowing into your sump activates the switch, but there is no electricity to pump the water. Powerful battery operated sump pumps solve this problem. These pumps get their power from standard high performance automotive batteries. They come with alarms that tell you if the battery is low or partially discharged.

If you don't like batteries and live where you have city water, you can get a backup pump that operates on regular water pressure. These pumps will usually get you through the emergency until regular power is restored. You may use less than $1.00 worth of water to save thousands of dollars in damage to your belongings.

If your current pump has a 1/3 or one half horsepower rating, you should be OK. Higher horsepower pumps will pump more water. Look for pumps that have cast iron or heavy metal housings. Cast iron can dissipate heat buildup much better than a pump with a plastic or thin metal housing. Remember, price is usually an excellent indicator of quality. Higher priced pumps often have better parts!

Color Replacement Windows – Vinyl + Aluminum!

DEAR TIM: My house desperately needs new replacement windows. They must be maintenance free and colorful. I like vinyl but am disappointed in the limited exterior colors of vinyl windows. Is there an alternative? How do you compare different window brands for overall performance? Will the new windows solve my current condensation problem? Patty D., Grosse Point, MI

DEAR PATTY: Your choice of vinyl windows is excellent. If you purchase a high quality vinyl window, maintenance headaches will be a thing of the past. You are not the first person to be displeased with the limited exterior color variety of vinyl. However, this is your lucky day! You can purchase a replacement window that will offer you the warm feel of vinyl on the inside of your home and unlimited exterior color possibilities.

When vinyl window materials get hot, they can expand and deform. Dark vinyl colors absorb and store the most heat. This quality is good during winter months but high vinyl temperatures in the summer months can cause problems. The stored heat can cause the vinyl frames and sashes to sag under the weight of heavy glass. Because of these potential problems, manufacturers tend to shy away from using dark vinyl colors.

Certain vinyl window companies decided to blend two maintenance free materials together. You can purchase a vinyl window that has an aluminum exterior and a vinyl interior. The aluminum exterior is available in a variety of light and dark colors. Custom colors are also available. Painted aluminum finishes can last 15 years or more with minimal color fade. The aluminum frames are an excellent choice if you live in a high wind area or desire a window that resists forced entry.


Buy the right replacement windows with the help of my Window Replacement Checklist. I offer a 100% Money Back Guarantee.


The interior of vinyl windows has changed as well. You are not limited to merely a white or cream color. Many manufacturers offer a realistic stained wood appearance. Some actually have the texture of wood while others allow you to custom stain the interior vinyl wood grained surface. While window shopping, ask about custom beveled glass. It can add a handsome touch to your home.

Judging quality and performance will require some effort on your part. Recently two independent associations (American Architectural Manufacturers Association - AAMA and the National Wood Window and Door Association NWWDA)) joined together to produce voluntary specifications for vinyl window manufacturers. They developed a standard called the AAMA/NWWDA 101/I.S.2-97. If you purchase a window that is certified to have passed this standard, you are getting a quality window. Windows that meet the AAMA/NWWDA 101/I.S.2-97 standard often have a certification label on the frame.

Another organization is working hard to establish a fair, accurate and credible energy performance rating system for vinyl windows and other window and door products. It is the National Fenestration Rating Council (NFRC). They have developed a label that is similar to the ones we have seen for years on appliances. These new labels will have a single number that will tell you how well the window performs in both cold and hot weather. You will see a number from 1 to 10 in each category. Poor performing windows will have a rating at or near one. The NFRC is currently working out the details to make sure that all types and sizes of windows are tested fairly and accurately. If all goes well, you will begin to see these helpful labels in 1998.

Your condensation problems may not totally disappear with your new windows. Your existing, drafty windows allow dry, cold air to enter your house. This dry air mixes with the humid indoor air and lowers the overall humidity in your house. When your new windows are installed the air infiltration will be significantly reduced. Your indoor humidity will soar. On the coldest winter days this extra humidity just might cause a fog on your new windows. To stop the condensation, simply lower your indoor humidity.

Ladders – All You Need

DEAR TIM: I just moved into my first home. I now realize that several ladders will be a necessity to complete normal maintenance and repair projects. What type and size ladders would you recommend for an average homeowner? What safety tips can you offer? Dan P., Montrose, CO

DEAR DAN: Wow! Do I have some ladder stories for you! Too bad my attorneys won't allow me to tell them to you. I will give you this quick tip: Avoid transporting 40 foot extension ladders on VW bugs. Back in my college house-painting days I almost speared someone in a crosswalk!

There are three primary materials used to make ladders: wood, aluminum, and fiberglass. All have their pros and cons. I happen to own a blend of fiberglass and wood ladders. Wood is the traditional ladder material. These ladders are the heaviest of the three types when you compare similar levels of weight bearing capacity. They can be used with a marginal degree of safety when dealing with electricity as long as they are kept clean and dry. As with any wood, they require periodic maintenance to prevent rot and cracking.

Don't place rocks, bricks, or pieces of wood under one leg to level a ladder.

Don't place rocks, bricks, or pieces of wood under one leg to level a ladder.

Aluminum ladders offer you a high strength, lightweight alternative. However, this ladder material is the last thing you should buy if you intend to work with electrical wires. A fatal shock is a real possibility if either you or the ladder comes into contact with a poorly or uninsulated electrical conductor. Chemicals and salt water environments can also corrode and weaken aluminum ladders.

Fiberglass ladders have become extremely popular. This time tested material will not conduct electricity. It is also very corrosion resistant. Fiberglass ladders are the sweetheart of the ladder industry at this time. They combine the best qualities of aluminum and wood ladders. Fiberglass ladders can last generations with minimal care and maintenance.

Sizing a ladder can require some thought. Depending upon the size of your house you may need several different sized extension ladders to reach all parts of your home. Pay attention when sizing an extension ladder. Because the fly and base section need to overlap, the maximum ladder working length is always less than the actual size of the ladder. A typical 20 foot extension ladder will only extend 17 feet. Don't forget the extra 24 to 30 inches of ladder that needs to extend above a roof or gutter line when you intend to climb and get off the ladder. I own two fiberglass extension ladders. Purchase ladders with D shaped rungs. The flat rung surface is easier on your feet.

Cement Backer Board

DEAR TIM: We are getting ready to install new ceramic tile in a shower and a bath tub. It appears that there are several materials to use beneath the ceramic tile. Some of the products are specially treated gypsum based drywall. Others are cement boards. Which material is the easiest to work with? Which product is waterproof? Should I be concerned about water vapor if my shower or tub is on an exterior wall? Ursula B., Fremont, NE

DEAR URSULA: The absolute harshest environment inside a home, in my opinion, is a bathroom. Here is the battleground between water and building materials that do not like water. Leaks originating from plumbing fixtures, splashing water, leaks around shower curtains and doors, and vast quantities of water vapor will readily cause regular drywall, wood framing, wood sub-floors, etc. to rot and deteriorate. Ceramic tile and properly mixed grout will not deteriorate when in contact with water. You should absolutely use a tile backer board that is also unaffected by water.

The special gypsum products you refer to are moisture resistant drywall. These products have a water repellent emulsion added to the gypsum core to make them behave better than ordinary drywall in the presence of water. Even the paper that surrounds the gypsum core has water repellents in it. Some other gypsum products have special glass mats and polymer coatings that resist water and water vapor. However, there is a key word missing in all of the product descriptions. That word is waterproof. The specially treated gypsum products will not last forever if they are allowed to get wet.

If you want a backer board for your ceramic tile that will not deteriorate when water gets through your grout, then you better look to the cement board products. Properly mixed concrete or cement board is not harmed by the presence of water. That is why concrete is an excellent outdoor building material. Years ago the tile setters of old mixed and placed wet concrete on the walls of old houses. The ceramic tile was actually cemented to this waterproof substrate. That is why you rarely see a ceramic tile failure in an old house. If you do see a failure, it is often traced to a leak that rotted the wood that was holding up the cement and tile.

There is no doubt that the gypsum based products are the easiest to work with. You cut these with a simple razor knife. However, you pay a price for this convenience. The price may be a complete new tile and backer board installation job within 7 - 10 years. The cement backer boards are heavier and are harder to cut. They also are slightly more expensive. The extra work and cost are an investment. If you follow the instructions provided by the manufacturers and the Tile Council of North America, you very likely will have a permanent ceramic tile installation.

Your vapor barrier concern is very valid. Showers and tub baths produce massive amounts of water vapor. This vapor is concentrated in the bath area. It would be a great idea to incorporate a seamless vapor barrier on the walls of your bathroom if at all possible. This vapor barrier should be applied to the walls after the insulation is in place but before any finish wall materials are attached. Cross laminated high density polyethylene plastics offer the best protection. These materials are slightly more expensive that the regular 4 and 6 mil clear poly vapor barriers most builders use. The high quality vapor barriers can often be found at supply houses that sell concrete supplies to contractors.

Pay particular attention to the installation instructions when installing your tile backer boards. If you decide to go the convenience route, you must not let the gypsum products touch the tub or shower pan. You need to leave a one quarter inch gap. If these products touch the plumbing fixture lip, they can readily wick water into the gypsum core and paper. This will accelerate their eventual deterioration.

Fire and Burglar Safes

DEAR TIM: A friend of mine recently lost many of her valuables in a house fire. Is there a simple way to protect valuable papers, documents and computer diskettes from a house fire and burglars? I have access to an older, small floor safe. Will this be adequate? Where is the best place to install a house safe? Beth S., Huron, SD

DEAR BETH: I know what your friend is going through. Five years ago, I visited a house that had been destroyed by a fire. The wife was home and a painter working in the living room noticed smoke coming from a furnace vent. The house was two blocks from the firehouse. Once notified, the fire department responded immediately. Even though the fire department was applying water to the fire within six minutes of its origin, the family lost nearly all of their possessions! I was shocked at the speed the fire spread and the extent of the damage.

The power and fury of a typical house fire is immensely underestimated by the average person. The National Fire Protection Association has conducted accurate tests involving the growth and temperatures of fires. Did you know that just 3 minutes and 3 seconds after the start of an average living room fire involving a couch, that the temperature 3 feet above the floor within the room is over 500 F? Just 38 seconds later, the temperature in the room is 1,400 F. If you want to protect your possessions from an inferno like this, you will need more than a simple metal box.

To protect paper documents, cash, stocks, and other papers, you need to keep them below a temperature of 450 F. This is the temperature where paper begins to char in the presence of oxygen. There are numerous insulated fire safety storage safes and boxes that can protect valuable papers and documents. Many of these devices have undergone rigorous testing that allows the interior of the storage box to remain below 350 F a minimum of one hour even though the exterior temperature is 1,700 F! Believe it or not, this is the least stringent test.

Computer tapes, diskettes, etc. are much more sensitive. These can be damaged if temperatures exceed 125 F and/or a relative humidity of 80 percent. You can purchase storage boxes and safes that will offer this protection for more than one hour as well.

Protection from burglars is an entirely different issue. Many safes and storage boxes that protect possessions from fire offer little or no protection against a professional burglar. If you want both burglary and fire protection you will probably need to look for a composite body safe. This is a safe that combines thick high quality steel and often concrete in both the walls and door of the safe. These safes need to be very heavy (in excess of 700 lbs.) and not on wheels. Any safe that can be easily rolled or carried will not be burglar proof. The burglar will simply transport it from your home and open it at his leisure!

I would not rely on your old safe. The crude locking mechanisms on safes that are 50 years of age or older can be easily defeated by a seasoned burglar. If your little safe does contain insulation against fire, it is possible that the insulation may have deteriorated.

The location of your safe will be dictated by the type you purchase. A simple fire storage box or safe can usually be placed anywhere in the house. Don't place it in a basement where flooding is a possibility unless the manufacturer warrants that the safe is waterproof as well. Standard wood floor systems may not safely carry the weight of a large composite body safe. These may have to be located on a concrete floor. Small burglar resistive safes need to be well concealed. Some models fit in floor and wall cavities. These can be concealed with a throw rug or behind clothes in a closet. I sure hope burglars don't read this column on a regular basis!

Related Articles: Document Storage Tips, Fire & Burglar Resistant Safes, Safe Purchasing Guidelines, Selecting a Safe

Fabulous Fit Anywhere Fireplaces

DEAR TIM: A new fireplace is in my immediate future. I don't want to ruin the ocean view from my beach front house. Is it true that you can install a gas fireplace under a window without using a vertical chimney? If this is so, can I place the fireplace towards the center of the room? Do the gas fires look real? What else is new with fireplaces? Andy P., Wells Beach, ME

DEAR ANDY: Advancements in technology have touched many building products in the past 25 years. However, in my opinion, the fireplace industry has produced some of the most dynamic and dramatic changes. For example, who would have thought that you could have a gorgeous fireplace without an obnoxious chimney? Guess what? It is possible! That orange glow you will see in the morning directly above the fireplace won't be a reflection of the flames and embers, it will be the sunrise!

My friend Randy and his wife Kit built a new home in the mountains of Colorado. I helped them with their plans. I convinced them to place their fireplace on a wall of windows looking out to the mountains. They thought I was nuts. Well, it worked! You can look out a window just above the fireplace to see the vista.

The fireplaces that do not require traditional chimneys incorporate direct vent technology. These fireplaces do not burn wood. Natural gas or liquid petroleum (LP) gas are used instead. The use of this fuel source allows these highly efficient units to act as primary or secondary heating sources depending upon the size of the area being heated. Some large models have Btu inputs as high as 36,000 and an overall thermal efficiency of 70%. These numbers translate to a toasty warm family room, great room, or living room.

If you have a small cabin or use these fireplaces in a room addition, this type of heat output can easily heat the space with no help from a furnace. You can even purchase a fireplace and air conditioner in the same unit if you choose!

The direct vent technology allows you to place these fireplaces in unique locations. Some models allow you to be 20 feet away from an exterior wall. As you might imagine, this allows you to install a fireplace in rooms and areas that were previously taboo.

Gas powered fireplaces are so realistic that even I am getting ready to purchase one. Technology has also made huge advancements here. You will be amazed at the different types of log sets, wood species, configurations, and glowing embers that are available. You can even purchase a log set that looks like a real campfire. A recent set of gas logs I installed were so realistic that they fooled every person in the room who was viewing the fire. I myself was mesmerized by the fire's realism.

Direct vent fireplaces allow people to install these highly efficient appliances in basements. Newer top vent models allow you to exhaust the fireplace upwards until you can pop the vent outside horizontally above grade. The installation of even the toughest direct vent fireplace can usually be accomplished in one day or less. Compare that to the ordeal of installing a traditional masonry fireplace!

If you happen to be a couch potato, you will love the new remote controls that come with many direct vent fireplaces. These controls allow you to turn the fireplace on and off. Some controls will monitor the room temperature and shut the fireplace off when the room reaches a preset comfort level. The newest control allows you to even adjust the flame height and blower speed much like you adjust the volume on your TV! If you like late night fires, you can even have the fireplace shut itself off.

One of the best advancements in fireplace technology is the sealed combustion chamber. Many direct vent models allow you to enjoy all the benefits of a fire without causing indoor air pollution. The sealed fire chambers get all of the necessary air for fuel combustion from the exterior of the home. Using special dual walled pipe, they simultaneously exhaust 100 percent of all fireplace gases. This feature helps maintain the high level of energy efficiency you most certainly are striving for in that beachfront house.

Related Articles: Interesting Locations for a Direct Vent Gas Fireplace, Direct Vent Gas Fireplaces, Gas Furnace & Direct Vent Manufacturers