Roof Trusses Create Bonus Space

attic truss design

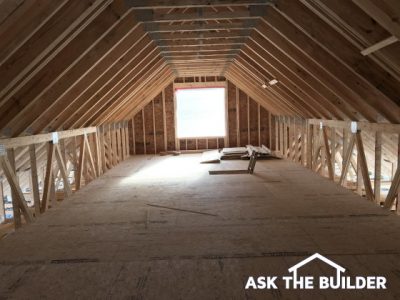
This is an attic space in a new home. Most builders would have used standard trusses and wasted all this space. (C) Copyright 2019 Tim Carter

DEAR TIM: My house was built using steep pitched roof trusses. There is a huge amount of wasted space up in the attic. I intend to add a room up there. Can I easily modify the trusses to create this space or must I tear off the roof and start over? Is there a truss configuration that will allow you to create a room or storage space economically? Phil V., Raleigh, NC

DEAR PHIL: Twelve years ago, I made the same stupid mistake your builder did by using common roof trusses on a steeply pitched roof. After the roof was on and just before the drywall was installed the homeowner brought to my attention the vast amount of useless space in the attic. The next day I noticed a big truss poster on the wall of the lumber company. Much to my surprise there was a special truss with a large box shape inside the center of the truss. I immediately saw that if you used 10 or 15 of these trusses side by side, you could instantly create a giant room.

One of my favorite building tasks is roof framing. There is nothing quite like cutting rafters and watching them fit like a glove. However, the process is very labor intensive. Furthermore, the span of rafters in a common framed system is limited by the size and species of the lumber. Just over four hundred years ago, an Italian architect named Andea Palladio developed the concept of using rigid triangles in trusses. Trusses are a building marvel as they allow lightweight, interconnected framing members to safely carry loads previously reserved for large sized beams.

Maintaining the connection points and the overall design in your trusses is extremely critical in the performance of the truss. Remember that when a truss is loaded each of the pieces of lumber is carrying a load. If you cut or modify any member of a truss without expert engineering supervision, you can cause significant structural damage to the truss and the overall roof structure. Trusses can be modified, but it can be very expensive and time consuming. A residential structural engineer or a local truss fabrication shop will be able to advise you of your options.

If you decide to start over - it may be the cheapest option - the attic truss will magically create the room you are looking for. Depending upon the span of the truss and the slope of the roof, the room within the truss can be enormous. For example, if your truss span is 34 feet and the roof slope is a 12/12 pitch (45 degree angle), the room inside the truss will be 16 feet wide with a full ceiling height of 8 feet. Think how big that space would be if your house was 50 or 60 feet long!

If you just desire storage space in an trussed attic that is also possible. These trusses are often called light storage trusses. Often a rectangular size space is created inside the overall large triangle of the truss. The height of the interior box within the storage truss is usually never over 5 feet high. This prohibits homeowners from attempting to transform the space into a full fledged room. These trusses are ideal for people who want to store boxes, camping gear, seasonal decorations, etc. somewhere other than a garage or basement. Light storage trusses are perfect for houses that have no basements.

The cost of these wonderful space creating trusses is very modest. The prices make me cringe at my mistake. A regular common truss with a 24 foot span and a 10/12 roof pitch with no storage space costs $69 in my market at this time. This same truss framed as a light storage truss costs just $87. If you want a full blown attic truss with a room, the cost of a single truss is just $158.

Had you incorporated a full sized attic truss in your roof, I'll bet you could have created a 15 wide by 30 foot long room for less than $1,350. This slight up-charge is nothing compared to what it will probably cost you to make the modifications. Keep in mind that once the attic truss is in place, no additional rough lumber is required to finish the space. All that is needed is the plywood sub-floor!

Insurance Can Frequently Fix Faulty Work!

DEAR TIM: My house is 3 years old. Recently we discovered a leaking roof, broken shower pan and numerous other defects that were caused by poor workmanship. The roof leak caused a sheet of drywall to fall without warning from the ceiling. It ruined an expensive Oriental carpet and broke my husband's nose. The shower leak caused all sorts of wood rot. The contractor's warranty was for just one year. He says he is not responsible for the damage. Should we hire an attorney and file suit against the builder? How could we have avoided this mess? Pam V., Leland, MI

DEAR PAM: First, I hope your husband is feeling better. The personal injury could have been worse. He might have sustained a serious eye injury. I'm confident that we will get the damage to your house repaired and your rug replaced. As for hiring an attorney, don't pick up the telephone just yet. You just might need one, but hopefully for just a couple of hours.

You must see actual proof that your contractor has insurance and more importantly, what the insurance covers.

You must see actual proof that your contractor has insurance and more importantly, what the insurance covers.

Homeowners often are quick to the draw in these situations. The first instinct is to get involved in an expensive legal battle where often the only winners are the attorneys. You may end up in court over this situation, however, I would not turn down that road just yet. The costs of a full blown legal battle that takes months or years often can exceed the entire cost of the claim against the builder. Remember, you are never guaranteed that you can recover any money from the builder much less your attorney's fees. Alternative dispute resolution such as mediation and arbitration can also yield unsatisfactory results.

Believe it or not there is often a safety net available that contractors and homeowners fail to deploy in situations like yours. This safety net is the Contractor General Liability (CGL) insurance policy. If your contractor had a high quality, comprehensive occurrence form CGL policy in force at the time he constructed your house and has continued to keep the policy current up to the time you make your claim, all of your losses may be covered by the insurance company - even though the builder's warranty has expired! These policies are often available with enhancements that extend coverage should a builder retire or go out of business unexpectedly.

CGL policies are fantastic insurance products. They offer the contractor lots of coverage for his business and almost always personal property and bodily injury damages caused by contractor errors. The coverage limits per occurrence can be substantial. It is not uncommon for a CGL policy to cover damages up to $1,000,000. Damage limits depend upon how much insurance the contractor purchases and the type of work he performs. The cost for a high quality CGL policy is often less than $2 per day! They are available for all types of contractors and sub-contractors.

The cost to repair the actual workmanship errors that caused the damage is rarely covered by the CGL policy. This cost is the responsibility of the contractor. If you or the contractor purchased an extended warranty, you should investigate filing a claim under this coverage for the errors caused by the workmen. However, don't count on this money. Often extended warranties provide very specific protection. If you are considering the purchase of an extended warranty, be sure to read the fine print concerning events that trigger coverage.

If you discover that the contractor did not have a CGL policy, you could have avoided your current dilemma with a simple piece of paper and a phone call. An insurance company will readily supply the contractor with a dated Certificate of Insurance. This piece of paper will often include the CGL policy number, its effective date, coverage limitations, enhancements, and the name and address of the insurance company and agent. Obtain a copy of this certificate from your contractor and confirm that the policy is in place and paid for by calling his agent. If you suspect the contractor might not be around in the future, make sure he has "Discontinued Operations" coverage as well. All contractors and subcontractors who work for you must have this coverage. Don't let them start work until you have a Certificate of Insurance from each contractor in hand. Keep the certificates in your safe deposit box.

If your contractor does have this coverage and you file a claim, you might need the advice of a seasoned, experienced attorney. The insurance company will often require you to sign away future claim rights when they issue payments. Your attorney will make sure that you only give away those rights that are fair and equitable.

Manufactured Homes

DEAR TIM: My wife and I are looking at new housing and are suffering from sticker shock. It appears that we might have to choose to live in a factory built home. We looked at several types and fortunately, some don't appear to be simple boxes. I assume you have constructed nothing but site built homes in your career. Would you feel comfortable living in a factory built home? Are there different types? Phil C., Tyler, TX

DEAR PHIL: It sounds to me like you are unsure with your housing choice. I hope I will be able to help relieve your anxiety. Manufactured or factory built housing is one of the most exciting fields in home construction today. If I am able to convince you to purchase a manufactured home, you will not be alone. 33 percent of the new homes sold in the USA in 1996 were factory built!

This segment of the nation's housing industry is positioned for explosive growth. The nation's largest builders - by volume - are those that build manufactured houses. Many well known national traditional site-builders are beginning to offer manufactured housing in their developments. Erase the image of the single wide or double wide homes perched precariously on concrete blocks from your mind. Numerous manufactured homes available today offer moderate to steeply pitched roofs. Some houses can also be lifted and attached to permanent concrete foundations. Because these houses have to resist the rigors of transportation, they are often stronger than traditional stick built site houses. I would absolutely reside in a new modular manufactured house.

I can see why you were attracted to manufactured housing. When you compare apples to apples with respect to size, materials used, fixtures, etc., it is not uncommon for a manufactured home to cost 20 to 35 percent less than a site built home.

Many of these savings result from the economy of scale implemented in the factory building process. Significant price savings result from materials that are purchased in large quantities and shipped to one location. Controlled, consistent environments within the factories help to hold down costs. There are no weather delays. Labor productivity is high because workers do not work in searing heat or bitter cold. These same conditions minimize and/or eliminate building material damage, waste, theft, and vandalism. All of these savings are passed on to you.

Manufactured houses can also help to minimize your utility bills. It is not uncommon for these houses to have high performance windows, doors, and heating / air conditioning equipment. Manufactured housing of any type must meet the latest building and energy codes. In some instances the houses have to meet the stringent Federal Manufactured Home Construction and Safety Standards code. If this code does not apply, manufactured housing must comply with state, local, or regional building and energy codes.

There are 4 basic types of factory built housing. The manufactured home is one that is constructed completely within the confines of the factory. Most people still refer to these homes as mobile homes although this name is now reserved for any factory built home constructed before June 15, 1976. Modular homes are perhaps the most exciting. These multi-section factory built homes are built to meet local or state codes. The modules or sections are transported to the building site on trucks and assembled like building blocks. This is the type of manufactured home that looks identical to a site built home.

Factory built component houses are also available. A panelized home is very common. These house have their wall and floor assemblies built in a factory. The pieces are connected together at the jobsite. Pre-cut homes represent the most basic form of manufactured housing. The basic building material components are factory cut and transported to the site. These houses require the most on-site labor to construct. Examples of these are log, kit, or dome homes.

If you want to get some swell ideas for timber frame houses, then this book is a must for you. It contains incredible photos, illustrations and instructions for constructing timber framed houses. To purchase it, just click the photo of the book. Get a copy of The Timber - Frame Home, a spectacular hardback book published by Taunton Press.

If you are looking for a good log cabin book with invaluable information on tools and materials, detailed drawings and insightful text then Building the Alaska Log Home is it!. This 175 plus page book is packed full of glossy color photographs and illustrations telling you everything you need to know about building with logs. Designed for the neophyte cabin builder, this book details, step by step, construction of log buildings, complete from turning trees into logs to the first fire in the wood stove. This book will really help you decide if a log cabin is right for you.

Related Column: Modular Homes Surpass Stick Built Homes

Clean Your Closet Clutter

DEAR TIM: Help! I've got too much stuff and am running out of storage space. Not only are my bedroom closets a disaster, but I am also having problems in my kitchen and bathroom pantry, and laundry room. Are the wire shelving systems any good? Are there other storage systems that will maximize my available closet space? Susanne W., Gig Harbor, WA

DEAR SUSANNE: You and I are in the same boat. I am drowning in clutter at my house. The root of my problem is my pack rat character flaw. It never seems to fail that one week after throwing something away, a need develops for that freshly buried item in the landfill! My guess is that if a storage expert visited your house and mine he would quickly determine that well over 50 percent of the space in our closets is poorly used or wasted.

The wire shelving industry has experienced significant growth over the past 15 - 20 years. The coated steel shelving was innovative when first introduced. Because it possesses numerous advantages over the traditional pole and plank shelving, it continues to have growing and wide- spread popularity. Wire shelving comes from the factory pre-finished. There is no need to paint it. The open weave of the shelving provides great ventilation for clothes. Special wall anchors and support brackets allow you to install the shelving with little concern as to wall stud locations. In fact, the installation instructions with many systems tell you to avoid wall studs!

The newer closet storage systems solve clutter problems by creating additional horizontal platforms in closets and pantries. Shirts, blouses, and pants folded over a hanger only need approximately 32 to 36 inches of vertical hanging height. When placed on a traditional pole, all of the space below is wasted. Two distinct levels of wire shelves that have built in continuous rods can be placed in an average closet. This will double your storage space. The lower shelf can be stopped 18 inches shorter than the top shelf. This provides uninterrupted room to hang long garments from the top shelf.

All sorts of accessories are available. You can get special necktie hangers, shoe racks, clothes baskets, belt hooks, and more. All of these items are built to attach easily to the walls and wire shelving components. The wire clothes baskets work similar to file cabinets. The drawers stack on top of one another and they slide in and out on nifty racks. Because they are open wire, you can easily spot the sweater or sweatshirt that you want to wear.

Your kitchen and bath pantries can be transformed with multiple shelves and a door rack. Pantry space is often wasted because the shelves are not spaced properly. Consider installing wire shelves that begin at 29 inches off the floor. Then install shelves at 42, 55, 68, and 81 inches respectively off the floor. Inexpensive wire shelving door racks attach to the backside of the pantry door. When the door is closed, they will not hit the shelves. The racks are perfect for soup cans, aerosol cans, tea boxes, and packaged bags of beans.

You can quickly organize your laundry room by installing a combination of shelving and cabinets over your washer and dryer. I happen to have some inexpensive 30 inch tall kitchen wall cabinets placed on the wall above my machines. The cabinets are perfect for all of the laundry supplies, light bulbs, and miscellaneous household supplies. I intend to install additional wire shelving next to the cabinets. These will be perfect for beach towels, folded laundry, and my box of household rags.

You can also purchase some deluxe closet organizing systems. These consist of melamine cabinets, shelving units, shoe cubes, and drawers. These units can add an elegant touch to any closet, pantry, home office, laundry room, or even a garage workshop. Be sure to consult with a storage expert if you decide to use these units. They will help you maximize the utility and function of these wonderful systems.

Super Glue

super glue

Years ago, you only had a few choices when it came to adhesives. But as with many things, the variety is as varied as faces in a crowd. PHOTO CREDIT: Tim Carter

DEAR TIM: I recently visited a home center in search of some glue for a project. Once in the correct aisle, I was overwhelmed by the assortment of glues, adhesives, cements, and epoxies. Is there a multi-purpose glue that will work for virtually all projects or do I have to buy some of each to successfully glue objects in my home? Are there some really good waterproof glues available for bonding wood together? Do they still use old horses to make glue? Erin P., Boise, ID

DEAR ERIN: I can attest to your dilemma. There are many glues, adhesives,cements, and epoxies. Most, if not all of these products, are excellent when used correctly. Unfortunately, to the best of my knowledge, there is no one "wonder" glue that will work for all of your jobs. Different jobs and objects will require you to use different glues. However, there is one newer glue that is not only strong but will successfully bond, many, many things together. More on that in just a moment.

Glues and adhesives can be simple or complex with respect to makeup. Animal glues are still made today. These simple, yet effective, glues are often made from proteins found on the underside of animal hides. Bones, blood, and other animal byproducts such as milk can even be used. The adhesive experts seem to agree that the discovery of these glues was quite by accident. Early man probably saw how difficult it was to remove dried blood and skins from spears, knives, and other objects.

Most modern glues and adhesives are synthetic. They create a bond in one of two ways. Simple glues such as the white school glue and yellow carpenter's glue bond mechanically to objects. The glue itself actually flows into the pores of the object. This can be a nightmare for wood workers as excess glue can seal surface pores adjacent to a glued joint. The sealed visible wood pores will not accept wood stain! Avoid wiping excess glue from a joint. Let it dry and then sand it off. To minimize this problem, some glue manufacturers actually add small wood fibers to their yellow glues. These wood fibers readily accept the wood stains.

On a microscopic level, the mechanical bond can be very effective. In fact, these inexpensive glues can achieve strengths near 4,000 pounds per square (PSI) inch when used on wood species with a high density. Hard maple is one such wood. To achieve the best bond when using white or yellow glues, the objects being glued need to be very uniform, smooth, and dust free. If there are cracks or voids, the bond will be poor.

Clamping is also vital. Once you have pressed together the two objects being glued, they must be clamped tightly for a period of time. Different glues and adhesives have different clamp times. Failure to clamp the objects will result in a weakened bond.

Other glues rely on specific adhesion bonding. These adhesives react chemically with the object they stick to. Examples of these adhesives are many epoxies. Epoxies are not only very strong, but they are also very selective. You often need special formulations and types to bond certain objects.

The newer urethane glues are quite interesting. They are actually activated by moisture. You can often use these glues on lumber that has up to a 25 percent moisture content. These glues actually foam and expand as they cure. This expansion property helps to fill small voids between the objects being glued. The newer polyurethane glues mechanically bond to masonry, glass, wood, metal, and many plastics. Once dry the urethane glues are highly water resistant. Some are completely waterproof. These glues are probably the most versatile ones you will find. By it in smaller bottles as it can actually set up within the bottle. As you use the glue, the bottle fills with air. Moisture in the air can react with the remaining glue and cause it to spoil.

Construction adhesives in a tube are formulated to bond poorly fitting materials. These glues can easily bridge gaps. However, these adhesives are generally not as strong as the others. They only will achieve 600 PSI strengths. These adhesives are for rough work where clamping is often difficult. They are also very water resistant.

To achieve the best results when using glues, always read the instructions on the label. Follow directions to the letter. It is always preferable to test the glues first before using them. I know this will take you an extra day or so, but it will be worth it!

Related Articles:  Gorilla Glue, Wood Glue

General Contracting 101

DEAR TIM: My wife and I are giving serious thought to building our own home. If we act as the general contractor, we are convinced that we can save a significant amount of money. How can we determine what the house is really going to cost to build? Is there a standard profit and overhead that most builders charge? What can we do to minimize problems and unexpected costs? Tom H., Orlando, FL

DEAR TOM: The first thing you can do to minimize problems is read a few stress management books. You and your wife might also want to check to see if you are allergic to certain common over the counter tension relieving drugs. Do not underestimate the complexity, enormity, and risk of building a new home. How well do you and your wife currently get along? Home building and remodeling projects have wrecked more homes than the most seductive temptress.

You must have excellent plans and a precise cost breakdown if you want a decent chance of surviving your building or remodeling project. Without both, you are doomed.

You must have excellent plans and a precise cost breakdown if you want a decent chance of surviving your building or remodeling project. Without both, you are doomed.

To successfully complete this massive project you are going to need several invaluable tools. Some of the most important of these are time, excellent plans and specifications, a detailed cost breakdown, and patience. Probably the most important of these are the plans and specifications. Without these you will be dead in the water with 3 high speed torpedoes streaking towards you.

Poor quality, incomplete, or inaccurate plans can cause severe problems. The plans are your primary means of communication between you and the sub-contractors. If you assume something is going to be done, you will be wrong in almost all instances. The plans must contain numerous details such as door, window, plumbing fixture, appliances, electrical, and room finish schedules. These tables on the various plan pages identify exactly what items go where, model numbers, sizes, rough openings, etc. The plans should also contain interior elevations of critical rooms such as the bathrooms and kitchens. These elevation drawings illustrate what the room will look like as you face each wall after the job is complete.


How would you like me to build your new home? It's probably impossible for me to fit your job into my schedule, but I will gladly share hundreds of my tricks and building secrets with you and your builder. Check out my New House Specifications.


Problems often crop up every day during a homebuilding job. It is the responsibility of the general contractor to solve these problems. If you rely on a sub-contractor to do this, he or she will resolve the problem to best suit his or her interests - not necessarily yours. Daily visits to the jobsite are a must. Often you will find yourself there for several hours at a time. It is not enough to stop there before or after your work hours. You almost always need to be there while the subs are working.

I am commonly asked how one can identify the cost of a house prior to building. Everyone wants a quick and easy method. There are several methods that can get you close. Take your plans to a local lumberyard. If you give them a week or 10 days, many will give you a detailed cost estimate for all of the rough, exterior, and interior trim lumber. Add to this the cost of all windows and doors and then multiply this sum by 5. This should give you the cost of the home (NOT including the lot) including a reasonable builder's profit and overhead. Because you intend to act as your own general contractor you should subtract approximately 15 percent to get to the actual cost.

You can also visit several market built houses in your area that are similar in quality, style, fixtures, and size to what you intend to build. Determine the square footage of finished living space in the model homes. Subtract from the asking price the cost of the lot, sales commission, and a 15 percent builder's profit. Divide this final number by the square footage. It will give you an approximation of the square foot building costs in your area.

The best and safest approach is to develop an exact cost by breaking the job down into its individual parts. I happen to use a 100-plus item cost breakdown sheet. This list forces me to determine the cost of virtually every item that will be required to complete the home. If you do not use a list like this you could easily forget several important items that will quickly consume your anticipated savings.

Prepare yourself for delays and cost overruns. Because your job represents a one-time job for sub-contractors, they will often give you sub-standard service. If one of their regular general contractors calls them for a favor the night before they are supposed to show up on your job, where do you think they will go in the morning? Because you are not a seasoned builder, some sub-contractors might charge you extra for things that are actually standard fare.

Wood Windows

Certified Window

This wood window in my, well actually Kathy's, sunroom is certified. It was made by one of the top window manufacturers in the world. Photo by: Tim Carter

DEAR TIM: My husband and I are getting ready to select wood windows for our new house. We have visited 5 showrooms and are more confused than ever. How do you really determine who makes the best window? What should we be looking for? The salespeople are very polished and make it sound like their product is superior to all others. If I look at another brochure I think I am going to scream. Help! Kelly D., Bismark, ND

DEAR KELLY: I completely understand your frustration and bewilderment. I used to experience the same sensory overload syndrome when the window salespeople would visit my job sites. Trips to the spectacular showrooms just made things worse. Each window looked fabulous and the illustrated, high quality sales literature was intoxicating. Fortunately, you have come to the marketplace at the right time. There are new industry standards and certification programs that allow you to quickly judge the quality of wood and other window products.

Wood windows have come a long way in the last 25 years. The energy crisis of the 1970's created a movement within the window industry to vastly improve the overall performance of windows. The net result was better weatherstripping that minimizes air and water infiltration, high performance insulated Low E glass, and improved designs that help make windows more energy efficient. As each company introduced a "new and improved" window, the decision process for you, I, and countless other consumers became much more difficult. We had no way of easily measuring how one widow really matched up against another. Thankfully, those days are gone forever.

The American Architectural Manufacturers Association (AAMA) in conjunction with the National Wood Window and Door Association (NWWDA) has just produced a new window manufacturing standard - AAMA/NWWDA 101/I.S.2-97. This is a set of voluntary specifications that wood and other window manufacturers can choose to adopt in the manufacturing process. The specifications create minimum performance standards for factory fabricated windows in the following areas: structural adequacy to withstand wind loads, resistance to water leakage, resistance to air infiltration, and forced entry resistance.

Manufacturers who choose to make wood window products that pass all of these standards and agree to independent inspections are issued a certification letter. They are also permitted to apply a special label to each window. The AAMA or NWWDA inspectors can make surprise visits at any time to remove windows from the factory assembly line. If a window doesn't pass, the manufacturer can lose their certification status.

AAMA and NWWDA also have developed independent certification programs for their members. NWWDA's program is called the Hallmark Certification Program. Windows are tested by an independent third party lab. The weatherstripping is tested at a sustained wind velocity of 25 mph. If more than .3 cubic feet of air per minute per square foot of glass surface area passes through the window, it fails the test. Driving rainstorms are simulated. Windows must remain leak-free during a 15 minute test. The test chamber creates a wind driven rainstorm that produces the equivalent of 8 inches of rain per hour whipped by 34 mph winds. If the windows pass additional load tests the manufacturer is permitted to apply a special NWWDA "Hallmark" or an AAMA gold label directly to the window frame.

A third organization, the National Fenestration Rating Council (NFRC), has developed uniform standards to test the thermal performance of windows. A sticker applied to the glass tells you how well the window performs in cold and warm weather. Currently the stickers show a U - factor. This number is directly related to the R- factor number used by the insulation industry. However, it works in reverse. Small U - factor numbers equal BIG energy savings for you. The NFRC rating program is currently working on a more "user-friendly" label that will display two numbers - one for heating and one for cooling. Look for these new labels later this year.

Be sure that the windows you decide to purchase are certified and have the labels to prove it. Verbal promises from salespeople are not sufficient. Each manufacturer or window distributor can easily provide you with a copy of the certification letter or written documentation from one or more of the organizations that their products are certified. If they can't, I suggest that you get back in your car and find a wood window salesperson that will gladly produce this documentation.

If you are looking for a book with invaluable information on tools and materials, detailed instructions for disassembling and repairing all sorts of wood windows then you need a copy of Working Windows. This 125 page book tells you everything you could ever imagine about repair and restoration of wood windows. It lists all of the types, safe and efficient methods of stripping, refinishing and painting, and some neat troubleshooting guides. This book will really help you. To learn even more about windows, be sure to click the Builder Bulletin link just below!

Author's Notes

The National Wood Window and Door Association (NWWDA) has officially changed their name. They are now known as the Window and Door Manufacturers Association (WDMA).

Related Articles:  NWWDA Certified Windows, Certified NWWDA Manufacturers, Buy Certified Wood Windows, Storing & Installing Wood Windows

Urethane Millwork – Great Looking & Labor Saving

DEAR TIM: My upcoming building project includes extensive ornate exterior trim. The quotation for the carpentry and painting work to install and finish it took my breath away. What can I do to minimize the cost yet still achieve the rich look? Is there an alternative material or molding system? John D., Pittsfield, PA

DEAR JOHN: How do you think I used to feel when I would deliver my carpentry quotes to homeowners for similar work? More than one homeowner asked me if I needed to make a payment on my phantom 70 foot yacht. Certain house designs can require a carpenter to install built up or compound moldings. These require a series of similar cuts and nailing procedures that are time consuming, repetitive, and expensive. Urethane and plastic moldings - an alternative to wood - can help you achieve the elegant look and allow you stay within your budget.

Wood exterior moldings are a fine product. I used them for years on many jobs and even have them on my own home. However, they can become a liability (high maintenance cost) if not installed with great care. Wood moldings that are not pre-painted on all sides, edges, and cut ends can create troublesome paint peeling problems. Wood is also subject to rot and insect infestation. The urethane and plastic moldings are not prone to any of these problems.

The synthetic molding industry got its start approximately 30 years ago. They are truly fascinating products that perform well in extremes of hot or cold. The urethane moldings and trim pieces are made by pouring a liquid that expands and solidifies inside a mold. This process allows intricate profiles to be created. These products can be cut, drilled, trimmed, or sanded with the same tools one uses for wood. Many urethane trim pieces accept any high quality exterior acrylic latex paint. Some require no painting. Certain pieces that come with a special woodgrain texture accept semi-transparent stains for a true wood look.

Plastic moldings and trim are often made using polyethylene and injection molding processes. These products can be colored by adding pigments during the manufacturing process. Certain plastic trim moldings don't like paint. If you decide to use these, you may be permanently locked into an exterior color scheme. Urethane moldings can be painted any color any time.

Using urethane moldings and millwork you can create virtually any architectural look. Victorian, Colonial, Federal styles and more are possible. You can get classic door surrounds with pediments, fluted pilasters, columns, crown and dentil combinations, railings, balusters, louvers, brackets, shutters, arched moldings, etc. Certain molding profiles come with inside and outside corners that eliminate the need for precision mitering. Windows can be trimmed with exquisite moldings that will make your house the talk of the neighborhood. There are hundreds of possibilities.

Labor savings are achieved because urethane millwork often comes in one giant piece. A finish carpenter working in wood might have to assemble three or four pieces of wood to create the exact same look. You will also save money when you purchase urethane millwork. Wood molding prices in my hometown cost between 70 and 100 percent more than similar urethane moldings. Price differences vary regionally. In some areas of the nation urethane and wood products are competitively priced.

If you decide to use the urethane or plastic exterior millwork be sure to use approved fasteners and adhesives. I highly recommend that you use stainless steel nails to attach the molding to your house. These nails will not cause any future rust problems. Occasionally you will have to glue pieces together. Make sure you use the glue or adhesive recommended by the manufacturer. The use of an incompatible glue can cause real problems.

Radiant Floor Heating

DEAR TIM: I am giving serious thought to incorporating a new hydronic radiant heating system into my new home. Is this technology reliable or is it just a fad? Can you install these systems in existing homes? How do you size the system? What are the disadvantages if any? Alicia P., Bennington, VT

DEAR ALICIA: Next winter you are going to be as snug as a bug in a rug. Hydronic radiant heating is not new by any means. It is just a fancy word for any system that uses water to deliver heat. Radiant heating systems have been used for thousands of years. Anyone who has warmed themselves in a cave or a room with a fire has felt the natural warmth of radiant energy. Romans used a primitive radiant heating system to warm public and private baths. Your parents most likely dried their snow packed gloves on top of steam or hot water radiators. Radiant heating is not a fad. It is reliable and simply superb.

There are numerous advantages to using radiant heating. It is a known fact that radiant heating systems produce higher and more consistent comfort levels than a forced air system. Hidden radiant systems that use piping inside of floors, ceilings, and walls permit unlimited design possibilities and furniture arrangements. Certain systems allow you to combine domestic hot water needs for bathing and household cleaning into your heating system. There is no need to buy a separate hot water heater. You can also easily create zones within your house. Electronic controls allow you to send heat to only those portions of the house that you occupy during the course of the day and night.

Even though your new house will have a specific heat loss that can be measured, tests over the years have shown that radiant or hydronically heated houses tend to have lower energy bills. The fans that push heated air in a forced air system pressurize the inside of a house. Heated air in certain instances can actually be pushed out of tiny cracks and holes in exterior walls and ceilings. Forced air systems tend to create layers of heat in rooms. Temperatures between the floor and ceiling can vary by more than 15 degrees. Houses heated with radiant systems tend to have uniform temperatures throughout each room.

If a friend or relative has a chronically cold room or area in their house, they can sometimes use certain radiant systems to make the trouble areas toasty warm. Some hydronic systems allow you to staple flexible piping to the underside of exposed wood floor systems. If the area to be heated is the size of several rooms, the heat source can often be a low cost hot water heater. These same systems can be used to heat entire houses. Other companies make reliable radiant nets that incorporate low temperature electric cables. These can be installed under ceramic tile, slate, or marble floors in bathrooms kitchens or entrance halls.

Hydronic and radiant heating systems are sized just like any heating system. Your heating contractor must do a heat loss calculation. The heating contractor measures the surface area of exterior walls and insulated ceilings, window sizes and glass type, thickness of wall and attic insulation, house orientation, and numerous other factors. These measurements are entered into a computer program that determines the amount of heat your house loses each hour. Based upon these calculations the contractor can select the correct sized boiler or water heater and produce the correct design of the hydronic heat delivery system. Do not underestimate the importance of this procedure. If you install a system that is too small, you will be uncomfortable. A system that is too large will waste energy.

There are few disadvantages to hydronic heating systems. If you require central air conditioning, your overall heating and cooling system equipment cost will be higher since you have to install two delivery systems (piping for the heat and ducts for cooling). You may also find it hard to locate a qualified and knowledgeable installer. Many contractors are resistant to change and may try to talk you out of an hydronic system. Contact various hydronic system manufacturers. Ask them for a list of qualified installers in your area.

Brass Kitchen Faucet

DEAR TIM: Both my plumber and husband have let me down. I am now forced to install a new polished brass kitchen faucet that I am about to purchase. The water supply lines and chrome shut off valves are already in place in the sink cabinet. How do I complete this job with no leaks? How can I protect the brass faucet from tarnishing? My water supply contains chlorine. What can I do to remove the smell and taste from the water? Abby D., Florence, AL

DEAR ABBY: Forget about those two losers. You are going to complete this faucet installation in less than two hours with a few simple tools and accessories, some plumbers putty, and several wrenches. If you pay attention to a few details, you will complete this simple job with absolutely no leaks. Before you proceed, be sure your local plumbing code permits you to install this simple fixture. Some states have stringent codes that do not allow unlicensed people to perform this work.

Brass Faucet

Let's talk about polished brass. You can now purchase new kitchen or bath brass faucets that will never tarnish. The faucets are put into a vacuum chamber and bombarded with molecules of special metals. The result is a thin tarnish free alloy at the surface of the faucet. The finish is very durable and can't be scratched by steel wool.

When you go to select your faucet, look for the ones that have a split finish. These have a mixture of chrome and brass within the faucet. These work well to pull together the chrome trim one often has on appliances and the solid brass cabinet handles found in many kitchens. Check out the new faucet spouts. Many have a higher rise so large pots can be cleaned more easily. Some spouts extend up to 9 inches away from the faucet base.

The easiest way to attach a kitchen faucet to a sink is to do it before the sink is installed in the countertop. If the sink is already installed in the top, you will need to buy an inexpensive basin wrench. This wrench has a swivel head that allows you to tighten the faucet bolts in the narrow area between the back of the sink cabinet and the kitchen sink basin. A regular wrench simply will not fit in this area. Read the instructions and use plumber's putty under the faucet or faucet gasket if called for. The putty fills any gaps and prevents water from flowing under the faucet into the sink cabinet below.

Once the faucet is secure to the sink, you simply connect the water supply lines to the faucet. This is accomplished by using chrome or plastic supply tubes. These supply tubes have different ends depending upon the configuration of the faucet you buy. Purchase the correct tubes and the right length at the same time you purchase the faucet. It is always a good idea to get longer tubes as you can cut them to length back at the jobsite.

The supply tubes are flexible. Hold them into position and bend them as necessary between the faucet and the valve. Always cut them a little long as you can cut off more if necessary. The supply tubes need to connect squarely with the faucet and the chrome shut off valves. If a supply tube connects with the faucet or shut off valve at an angle, you will undoubtedly have a leak.

Tighten the nuts at each end of the supply tube until you feel moderate resistance. Do not over-tighten these nuts. Remove the aerator from the faucet before you turn on the water. This prevents the fine screening from getting clogged by globs of flux, pipe shavings, and sediment. Open the shut off valves slowly one at a time and check for leaks. If a droplet of water forms at one end of the supply tube(s) tighten the nut until the leak stops. Turn the faucet handle to draw water. Once the water runs clear and there are no leaks, reinstall the aerator.

You can purchase a smart looking kitchen faucet that has a hidden chlorine filter in the spout. You simply turn a small knob at the end of the faucet to activate the filtered flow. You only use this filter when you need drinking or cooking water. Turn the knob back to rinse dishes or clean with chlorinated water. If you don't want this filter faucet you can also remove chlorine from water by boiling it for just one minute. If you choose not to boil the water, simply draw the water from the sink and let it sit out overnight. The chlorine will dissipate on its own.

Related Articles: Tarnish Free Brass Faucets, Brass Faucet Manufacturers