Cork Floors are Captivating

cork flooring

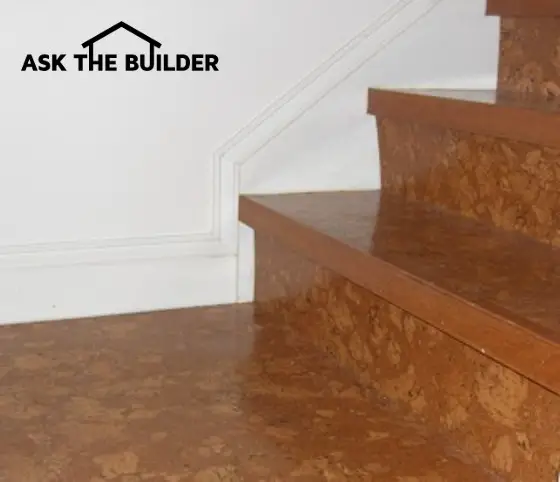
Cork Flooring - The Perfect Floor? These cork flooring planks were used to cover the steps as well as the entire recreation room that’s at the bottom of the staircase. PHOTO CREDIT: Tim Carter

Cork Flooring Wears Like Iron - It Absorbs Sound

DEAR TIM: I am looking for an exciting flooring material for my home. I am not interested in carpet, hardwood or ceramic. I have looked at the new floating floor systems that feature laminate products but they just look like wood and cheap marble. Is there an alternative material? I need a product that is long-lasting, easy to care for, and unique. Can you fill the bill? Stanley - Baker City, OR

DEAR STANLEY: I can tell you who will fill the bill for you my friend. They are the harvesters who strip the bark from the cork trees in several Mediterranean countries. I only wish I could be with you when you visit a store that carries cork flooring. You are not going to believe how attractive and durable cork flooring can be. A friend of mine has had cork flooring in his kitchen for nearly 40 years. It is beautiful!

Cork flooring is very likely the most environmentally friendly material I know of besides wool carpeting. Just like wool, cork is a renewable resource. The bark is stripped from the cork trees approximately every 10 years. The average life span of a cork tree is 150 years. Imagine how much cork can be harvested in that amount of time!

cork flooring

If you desire a flooring product that is not only quiet to walk across but will help muffle room noise, cork must be considered. There are over 100 million air cells or pockets per cubic inch of cork. These built-in shock and sound absorbers make it an excellent sound-deadening material. Perhaps this is one reason cork was used in the main library in my own hometown.

The cork flooring can be purchased in glue-down 12-inch by 12-inch tiles or it can be purchased in planks that feature a tongue and groove interlocking feature. The planks almost all have a fiberboard core and are installed in nearly the same fashion as the new laminate flooring products. You simply glue the edges and tap the pieces together. The cork planks become one giant piece that floats across the subfloor. The square tiles are glued down with conventional adhesives.


Author's Note: If you want a cork floor of your own and want to see how easy it is to install, you should consider buying my Cork Flooring eBook. It has wonderful step-by-step color photos and easy-to-follow directions. I guarantee your satisfaction!


You can purchase cork with factory-applied clear acrylic, urethane, or wax finishes. The acrylic finish is very similar to that used by the pre-finished wood floor companies. Under normal residential use, it can withstand nearly four years of foot traffic. Urethane finishes are the same as you might apply to a traditional hardwood floor. You can renew acrylic or urethane finishes by simply applying a periodic coat of clear floor urethane. Urethane finishes tend to be harder than acrylic finishes.

The cork flooring products come in a variety of patterns and colors. The texture of the flooring is extremely unique. Try to block the image of a bulletin board from your mind. Some cork flooring patterns resemble burled lumber. Other cork products have a speckled appearance. Trust me, it is very smart-looking. The coloration of cork ranges from light to deep brown. It can also be purchased in a brilliant white color.

Cork, because of its closed-cell nature, is unaffected by moisture. However, some cells on the bottom and top of flooring pieces get opened up during the sanding process. Water that enters these open cells can cause cork flooring to discolor and/or expand. If you can avoid floods or massive quantities of standing water, kitchens and bathrooms are excellent places to use cork flooring.

If you decide to use the new laminate flooring materials, be sure to consider using cork underlayment beneath them. This is how the laminate flooring products are installed in Europe. The cork underlayment takes away the hollow sound these floors sometimes exhibit.

The people who own your home 50 - 75 years from now will thank you. Cork can easily last that long. If you don't believe me, just visit the First Congregational Church in Chicago, Illinois. The cork floor you will walk on was installed in 1890!

Fiber Cement Siding – It’s a Serious Contender!

fiber cement siding

Fiber Cement Siding

DEAR TIM: My husband and I are building a new home. The style will blend both clapboard siding and stucco-like panels. Wood rot is a major concern. Vinyl siding does not appeal to me whatsoever. I am looking for an attractive solid material that will not rot and is wind and fire resistant. I grew up in an old home that had a hard weather resistant siding material. Is this material still available? Jill - Manitowac, WI

DEAR JILL: This is your lucky day! Your parent's home was very likely covered with a fiber cement product. The technology is nearly 100 years old. Cement fiber siding products are still manufactured today. New styles, sizes and products will allow you to cover the exterior of your new home with a rot, fire, wind and insect resistant material. Fiber cement siding products represent some of the most exciting exterior products available to homeowners today.

At the turn of the century, a French company was making fiber cement siding and roofing plates that had a unique ability to resist "fire, frost, acid and ants." This material was exported worldwide in vast quantities from Australia to America. There are thousands of 80 and 90 year old homes in my own home town that still have this original material on their exterior walls and roofs. Fiber cement building materials have a proven track record for resisting rot - that is a fact!

Years ago, the fiber cement products incorporated asbestos as the fibers. Soon after it was discovered that asbestos posed a serious health hazard, cellulose was substituted as the fiber material. Portland cement, ground sand, additives and water make up the balance of this wonderful building product.

Fiber cement building products are attractive. You can choose from a variety of clapboard siding styles that have embossed wood grained texture or smooth finish. The siding products come in a multitude of widths that will permit you to have clapboard exposures ranging from 4 inches up to nearly 11 inches. The stucco panels you desire are also available. You can purchase those with a smooth, stucco, or vertical rustic groove appearance. The rustic panels have a wood grained finish with recessed vertical channels spaced at 4 or 8 inch centers. You can even purchase fiber cement soffit panels to finish the underside of your roof overhangs.

The fiber cement products are complimented by numerous weather resistant vinyl trim and ventilation accessories. The trim pieces are used at inside and outside corners, where soffit pieces abut against one another and as a flashing material when the stucco panels abut one another. The vinyl trim pieces are extremely tasteful. They must be used if you want your fiber cement siding and stucco panels to block wind driven rain and snow. The vinyl trim readily accepts paint.

Fiber cement siding planks offer a unique capability. Because of the rigid nature of the product, you can blind nail many of the available sizes. Each clapboard is nailed approximately 1 inch from the top edge. The next overlapping piece hides the nails below. This allows you to produce a siding job free from the polka dot appearance nails cause on many traditional wood sidings.

Your color options are virtually unlimited. 100 percent water based acrylic paint grips cement fiber products exceptionally well. The siding planks and stucco panels also accept stains. Because the cement products do not expand and contract to the extent that wood does, paint rarely peels and blisters.

I intend to use cement fiber siding on the next house I build. Aside from its many positive features, it is competitively priced. Fiber cement siding in my region costs slightly less than the highest quality vinyl siding. Redwood siding costs two and one half times more than fiber cement siding. Fiber cement products are ideal for remodeling or repair jobs as well. I urge you to give it serious consideration.

Author's Notes :

March, 1998

I just received an e-mail from Bev A. in Atlanta, Georgia. She indicated that fiber cement siding in that region "... had a warped look to the exterior when regarded (viewed) from the side." This condition could be an installation defect and/or a workmanship error. The wavy appearance might have been caused by using wall studs that were not crowned properly (all humps pointing the same direction) or using wall studs that had a huge range of crowns or none at all.

She called the manufacturer and was told that the siding had probably not been backprimed. The point is this. Manufacturer's instructions must be followed by the builder. You need to make sure that this happens. Sure, I know you expect the builder to do this, but here is a possible instance of where a builder might have taken a shortcut. The Web now allows you to gather good information about critical aspects of home construction. Take the time and educate yourself and you will be rewarded with a great job! Be careful out there!

August, 2008

Richard Huddle of Wauseon, OH, emailed with this additional information.

"Tim,

I really enjoy your newsletter. I hope you enjoy your new home in New Hampshire.

I am writing regarding the "painting fiber-cement shingles" article in this issue. I am not sure what is meant here by "fiber-cement shingles" but I do know that at one time the fiber used in fiber-cement shingles was asbestos. I work in the asbestos removal industry and see this material regularly. At one time it was manufactured by Johns-Manville and sold under the trade name "Transite". These shingles are very hard and brittle and are textured to resemble a cedar shake shingle. If you flip an loose one with your finger it will ring just like a fine china plate.

As long as the shingles are in good condition they provide excellent protection to the house exterior. Just caution your readers to be sure and DO NOT scrape the shingles with a paint scraper or wire brush. The shingles can be washed with soap and water and scrubbed with a nylon or natural bristle brush. Do not use a power washer since the water pressure may dislodge asbestos fibers. As long as the shingles are maintained with a good coat of paint they pose no hazard and provide additional insulation to your house in addition to being fireproof."

Rick

March, 2010

George had a serious problem with a home inspector. Read about his issues in the March 31, 2010 Newsletter.


The Walk Through Inspection – It’s Work!

Walk Through Inspection

These are some of the tools you will need to do a good walk through inspection of your new home.

DEAR TIM: My mother's new residence will be completed soon. Prior to the transfer of title we must participate in a walk through inspection with the builder. It is our responsibility to point out any defects at this time. How important is this inspection if we have a strong warranty? What types of things should we look for? Bert - St. Cloud, MN

DEAR BERT: Yikes! Do not underestimate the enormity of this very important inspection. The walk through inspection is the benchmark by which all future problems will be judged. Without a complete and thorough written documentation of conditions at the time of the walk through inspection, you may find it difficult to prove if a problem persisted before your "strong" warranty expires. Be prepared to spend a minimum of 3 to 5 hours checking out your mother's new home. It is a wise investment of time. Don't hesitate to take photographs during this inspection. They may be worth their weight in gold at a later date.

The walk through inspection report can be a life saver if for some reason you become entangled in a dispute with your builder at a later time. The written report will demonstrate whether or not the builder addressed problems or defects that you pointed out at the time of the inspection. A thorough inspection may identify major structural problems in their infancy. A small foundation, wall or floor crack that gets progressively larger over a period of time can be mentioned in the report. If a crack is not visible, this should also be mentioned. The report allows you to quantitatively identify movement of structural members. If there is no mention in the report of any condition, it will be your word against the builder's - trust me on this one.

I would begin the inspection inside the residence. Do not become distracted by conversation with the builder or his agent. The inspection should proceed on a room by room basis. Walk over all areas of each room listening for floor squeaks, pops or other rubbing noises. Look for defects in the wall and paint finish. Identify cracks or the lack of cracks in all corners. Open and close all room and closet doors and windows. Be sure the doors and windows latch and lock correctly. Take a mirror with you to make sure the tops and bottoms of all doors and windows have been painted or sealed. Unsealed wood doors can loose their warranty and warp.

While in the bathrooms, operate all plumbing fixtures. Look for leaks under toilets or inside cabinets. Operate the stopper controls in sinks and tubs. Make sure water does not leak past the stoppers. Insure that toilet paper holders, towel bars, and other accessories are secure and in place. Operate all bath fans and heating devices. If you have a whirlpool tub, fill it first and turn it on.

While in the kitchen open and close every cabinet door and drawer. Pay attention to the fit and finish of all cabinet elements. Operate all of the appliances. Dishwashers have been known to leak because of faulty installation! Be sure that the refrigerator door swings the correct way. Check that the counter top is mounted securely by trying to lift it at various locations.

Locate the inspection certificates for the electrical, plumbing and mechanical inspections. Ask for a copy of the Certificate of Occupancy (CO) or its equivalent from the building department. Operate all of the security alarms and/or smoke detectors. Be sure that all of the electric circuit breakers are marked. Plug a tester into all electrical outlets. Operate all switches.

While inspecting outside, look for positive drainage. The ground surrounding the residence must slope away from the house. Six inches of foundation should exist between any soil and any siding materials such as wood, brick or stucco. Operate the garage door. Make sure the mailbox and house numbers are in place. Pay attention to humps in the roof or roofing materials. Identify any cracks or surface defects in sidewalks, patios and driveways.


How would you like a 200-plus item Walk Through Checklist that tells you what to look for as you perform your inspection? Would you be interested if I told you I developed this document and it comes with a 100% Satisfaction Guarantee? Oh, and would you like to have it in your hands less than 3 minutes from now? I can do that too!


Once the inspection is complete agree upon a time frame when all defects will be corrected. Note this on the report. Have the builder sign the inspection report. Provide him with a copy the next day. Withhold as much money as the law and your conscience will permit until all items are completed to your satisfaction. Do not destroy the walk through inspection report! Keep it in your safe deposit box. It may come in handy at a later date.

If, for some reason, you feel uncomfortable about performing this inspection, I suggest that you contact an experienced home inspector These people are used everyday by people who purchase pre-owned houses. They are fully capable of performing a detailed walk through inspection. A professional home inspector will have an up-to-date errors and omission insurance policy. Be sure to ask for a certificate of insurance before you hire your inspector.

Deck Building – Ground Level

Ground Level Deck

Deck Building - Ground Level

DEAR TIM: I have a problem. I want to build a deck close to the ground. In some places the joists will actually touch the soil. I realize that the joists can't just rest on the ground. How do I support them? Should I install a vapor barrier under the deck? What are the best decking fasteners to use? Steve K. Waverly, Iowa

DEAR STEVE: Ground level decks are known to stump many people. Everyone seems to have the image of the beam supported by posts stuck in their head. I have seen people who actually buried a wood beam and posts in the ground to support the deck joists. Guess what? They were on the right track. They simply took the wrong turn.

Deck joists need to have a firm support system not unlike those within your house or on a traditional deck. Beams are used for this purpose. A beam is simply a level or nearly level structural member that will support the joists with minimal or acceptable bending. Beams are most often made from wood, steel, and reinforced concrete. A ground level deck, in my opinion, can be most easily supported by using steel reinforced concrete grade beams.


Building a deck? Make the best decisions with my helpful and thorough Deck Installation & Repair Checklist. I offer a 100% Money Back Guarantee.


You will need a minimum of 2 grade beams, if your deck will not be connected to your house. The beams will be parallel with one another. They can be at the ends of the joists or they can actually be tucked under the edge of the deck for appearance sake. The beams must be at the same height and in the same plane so that the deck is level once finished. It is very wise to consult with a residential structural engineer. This qualified person will tell you exactly what you need.

EB015 Cleaning & Sealing Deck eBoo CoverGrade beam are usually constructed by digging a trench at least 8 inches wide. A beam depth of 10 inches is generally suitable. The bottom of the beam will be supported by the soil. If you live in an area where the soil freezes each winter, you must dig piers at the bottom of the beam trench. The piers can be 10 or 12 inches in diameter and spaced no further apart than 6 feet. The bottom of the piers must extend to the frost depth in your area. Your building department will be able to tell you how deep to dig. Be sure that you flare the bottoms of the pier holes. The flared bottom serves two purposes. It increases the surface area of the pier helping to distribute weight. The flared bottom also makes it very difficult for the frost to heave the beam and the piers.

It is often necessary to use form boards at the top portion of the grade beam. The forms allow you to easily level the beams. The concrete for the piers and the beams is poured at the same time. Once the concrete is poured halfway up the height of the beam you need to install two 5/8 inch diameter steel reinforcing rods. These rods should be placed no closer than 2 inches to the side of each form board. You can immediately cover these rods with the remaining concrete. It is now time to install 8 inch long by one half inch diameter anchor bolts. Place a bolt one foot in from each end of the grade beam. Then install them on 6 foot centers along the length of the beam. Be sure that at least 2 inches sticks up in the air. These bolts will be used to hold down a treated 2 x 6 wood plate. Your joists will be attached with nails to this wood plate.


Message from Tim:

Years ago while researching a column about cleaning decks, I discovered the wonders of Oxygen Bleach. It is perhaps the 'greenest' cleaner I know of as it uses oxygen ions to break apart stains, dirt and odor molecules. There are no harsh chemicals, and it works on just about anything that is water washable.

I decided to create my own special blend using ingredients made in the USA. In fact, the raw materials in the active ingredient are food-grade quality registered with the FDA. I call my product Stain Solver. I urge you to use it to help clean your deck surfaces. You will be amazed at the results!


Do not install a vapor barrier beneath the deck. Rain may collect on the plastic and become a breeding ground for insects. Water vapor from the soil can cause severe cupping of the decking. The underside of the decking boards readily absorb moisture that evaporates from the soil. The drying action of the sun and wind dries the top side of the decking. The dry top and wet bottom of the decking produces the internal wood stresses that cause cupping. To minimize cupping you should seal all sides and edges of the decking before you attach it to the joists. If you can afford to seal the decking on the underside with two coats, do so.

I suggest that you give serious consideration to stainless steel nails or screws for your decking. They cost a little more but they will never rust. Be sure to use nails that are ring or spiral shanked. If you decide to use stainless steel screws, look for ones that have smaller heads and a unique knurled shaft that eliminates the need for drilling pilot holes. This feature will save lots of labor.

Asphalt Shingle Roof Leak Locations

shingles close up

Asphalt Shingle Roof Leak

DEAR TIM: Eight years ago, I purchased an existing home. I have no idea how old the standard three tab asphalt shingles are. At this point, I do not have any leaks. How can I tell when my asphalt shingles are worn out? Where do leaks on shingles originate? What causes shingles to fail prematurely? Can minor repairs extend the life of my roof? Beverly K. Minneapolis, MN

DEAR BEVERLY: It sounds to me that you are already fairly roof savvy. Not many people would know the correct name for their shingled roof. A three tab shingle refers to the common shingle that many people have. Its distinguishing characteristics are vertical slits that are usually 5 inches long between each shingle tab. These vertical lines are usually offset by 6 inches on each course of shingles.


These vertical slits between shingles are the first place I look for deterioration. It is not uncommon for leaks to develop in the top 3 inches of each vertical slit. This area is the weak link in a 3 tab asphalt shingle roof. Because of the way your shingles were designed and overlap, only a single shingle thickness stands between your plaster ceiling and the worst rainfall in this narrow 3 inch part of the slit. A majority of the surface area of your roof has at least two shingle thicknesses protecting you from rain and snow. Some areas of the roof have 3 layers!

The deterioration in this area often manifests itself by missing granules. These are the ceramic color coated pieces of crushed rock that protect the asphalt from the destructive ultraviolet (UV) rays of the sun. If exposed to sunlight, the asphalt within the shingle begins to rapidly deteriorate. I have my own idea as to what causes granule erosion in this narrow slit area. I actually believe it is caused by the force of the water that drips from the shingle above. The granules at the top of each slit receive twice as much energy from the dripping water as the granules just one half inch away on either side of the slit. Over time, this makes a big difference.

You should also look for cracks on the shingle tabs and within each slit. The cracks often happen as the asphalt gets older and loses the oils that give it its flexibility. The oil loss can result from overheating or poor quality asphalt from the get-go. Not all shingle manufacturers use the highest quality asphalt. Shingles can overheat if your roof ventilation is sub-standard or non existent. The presence of soffit ventilation and upper roof ventilation allows cooler air to replace the super-heated air that bakes the underside of the shingles.

If you discover missing granules in the top of the vertical slits, you can extend the life of your roof quite easily. All it takes is a little time and pieces of 40 pound tin that measure 2 inches wide by 5 inches long. It will also help to have a pair of lightweight leather gloves and a wide, flat pry bar.


Avoid repairing roof leaks yourself! Find a professional using my Roofing Replacement / Repair Checklist. I offer a 100% Money Back Guarantee.


Try to work on the roof when it is cooler. You will become less fatigued, and the shingles will be easier to work with. Using the flat pry bar, pry up the corners of the shingle tabs at the bottom of slits that have missing granules. Align the piece of tin so that the 5 inch length is parallel with the 5 inch long vertical slit. Center the tin strip and slide it up under the two shingle tabs on either side of the slit. Continue to slide the tin strip up until the top one half inch disappears under the shingles above. The friction of the shingles will hold the metal strip in place. There is no need for caulk, roofing cement or nails. If you bent the shingle tabs up too much, the sun will most likely flatten them within a couple of days. Do not do this work on a cold roof. You can fracture shingle tabs.

Glass Blocks

glass block window installation

A large window like this needs to be installed one glass block at at time. It's a huge window. Copyright 2018 Tim Carter

DEAR TIM: I am intrigued with glass block. I would like to install this material in my basement windows, a bathroom window and as a room partition. Do you think an average homeowner can successfully tackle projects like this? How can I obtain the highest level of security for ground level windows? Can you offer any installation tips? Susan P., Franklin, PA

DEAR SUSAN: I share your fascination with these unique building blocks. Glass block products are very cool. They seem to be a timeless building material. I have installed glass block windows in 100 year old houses with little harm to the aesthetics. To date, I have not heard a complaint from my past customers concerning their usefulness, utility or durability.

I know that you will be able to handle the basement windows with little or no assistance. Depending upon the type of glass block window you choose, you may be able to do the bathroom window as well. The room partition is a job for a professional.

My guess is that you might actually use a combination of materials for your upcoming projects. Traditional glass block maybe the best choice for your basement window project. You can purchase solid glass block that are extremely difficult to shatter. These solid glass blocks will stop bullets fired from .357 magnum pistols!

Your bathroom window may be an excellent location for the clear or tinted lightweight acrylic block. You can actually get acrylic glass block windows that open and close. These will allow you to get plenty of air into these havens of mold and mildew. The acrylic blocks are available in clear, peach, rose and blue.

Your room partition may end up being constructed with thin glass block or the lightweight acrylic blocks to minimize the weight on your floor. The acrylic block can be ordered in widths and heights up to 9.5 feet in either direction. Traditional glass block will allow you to build large sized partitions as long as your mason installs the necessary hidden reinforcement steel.

Installing glass block panels in a basement window is very simple. The trick is to remove the old window and frame. Many cities and towns have fabrication shops that will make the glass block windows for you. You can specify the style of block and order it with little windows, dryer vents, combustion air inlets and other accessories built right into the block window. Your task is to simply install the entire unit at once.

Once you have got your new basement windows on site, check to make sure they will fit. A one half inch gap between the glass block window and frame is preferred. There is nothing worse than tearing out an existing window only to find out your new window will not work. To complete the installation you will need a bundle of wood shims, a small level, cement mortar, a small trowel and a sponge.

Place two one half inch shims about 3 inches in from the bottom corners on the bottom ledge of the opening. Apply your mortar mix to the bottom of the window ledge. Don't cover the shims with mortar. Tilt the window into position. Insert two shims between the top of the window and the opening. Tap them until they are slightly snug. Use the level to make sure the window is plumb. Check to make sure the gap around the window is uniform and that the window is not twisted in the opening.

Once you are satisfied with the position of the window, install the cement mortar around the sides of the window and the foundation. Once the mortar hardens in about 2 hours you should be able to gently remove the shims without disturbing the mortar or the window. Install mortar in the bottom holes. The top gap will be filled with foam expansion material and silicone caulk. Wipe the glass block with a damp sponge to remove mortar smears.

The Perfect Hideaway – Pocket Doors

pocket door

POCKET DOOR - This is the pocket before it has been fitted with a removable jamb. The pieces of jamb are cut so there is but 3/16ths inch of space between the edge of the jamb and the sliding door. The jambs pieces are screwed to the rough frame with decorative brass screws. This feature allows you to remove the jambs easily in the future.

DEAR TIM: I am considering the use of pocket doors for an upcoming project. However, a neighbor of mine has several problems with their pocket doors. Their doors routinely jump from the track and rub the frame. Is it easy to adjust pocket doors? Is there a restriction to the type of door design one can install? Can you install double pocket doors like the ones in my parents' old house? Ed T., Kittery, ME

DEAR ED: You are very wise to consider the use of pocket doors. They offer many advantages. Pocket doors were very popular at the turn of the 20th century. They enjoyed renewed success in the 1950's. I believe their time has come again! I have installed nearly a hundred smooth operating doors in the past 10 years. Every customer has been delighted. I think your neighbor's pocket door problems can be traced to inferior hardware and possibly some critical installation errors.

New housing and room addition construction prices are rising each day. It is vital to make use of every square foot of finished living space. A regular pivoting hinged door can steal nearly 10 square feet of floor space. They require a wasted area for the storage of the swinging door when it is opened. Paintings or pictures can be hidden behind an open door. Unsightly baseboard or hinge door stops become a necessity to prevent door knob holes in walls. Pocket doors eliminate all of these problems.

The secret to smooth, trouble free pocket doors lies in the frame and hardware used to hang the door. A box shaped track and tricycle hangers with nylon wheels are a must. These items prevent the doors from ever jumping off the track. Thin studs that create the hidden pocket for the door need to be wrapped with steel on three sides. The steel prevents warping of the thin furring strips. This warping may be one of the reasons your neighbor's door rubs when it goes in and out of the pocket. The steel also prevents drywall nails or screws from penetrating through the thin studs. Deeply driven fasteners can scratch the door as it opens and closes.

Quality pocket door hardware allows you to easily make adjustments once the door has been installed and trimmed. In many cases all you have to do is temporarily remove one side of the top door jamb. A good carpenter will install these with small head trim screws. Once the piece of wood is removed, you can gain easy access to the door suspension parts. Often you simply flip a lever and the door will separate from the rollers. Adjustments are made quickly and easily with standard tools. It is entirely possible to complete the entire adjustment process in as little as 10 - 15 minutes.

There is virtually no limit to the type of door design you can install in a pocket door frame. Flush, 6 panel, 15 lite glass, and even frosted or hammered glass full lite doors are possible. Many standard pocket door frames and hardware will support doors that weigh up to 125 pounds. With an optional kit you can install a 200 pound door! Double acting pocket doors are no problem. You simply install two pocket door frames that point at each other. I intend to install this setup in the study of my next Victorian house.

Pocket doors are excellent choices for people who use canes, walkers or wheelchairs. If you install a 36 inch wide pocket door frame with a hidden bumper and a U shaped handicapped door pull, you can achieve a finished opening of just over 32 inches. This will allow easy passage for those individuals who are challenged with swinging doors.

Your painter will need to cooperate during the installation process. All hidden edges and surfaces of the doors must be painted or sealed before the carpenter installs the door into the pocket. High humidity in houses can cause unprotected doors to twist and warp. If you seal the hidden edges and use the best hardware and frame, your pocket doors will be highly coveted by your friends and neighbors!

Trellis

garden arbor trellis

Trellis

DEAR TIM: I would like to construct a simple, yet elegant wood trellis for my garden. What is involved in this project? What wood will yield long life and minimal maintenance? Can an average homeowner successfully complete this project? Charlene D., Sylvester, GA

DEAR CHARLENE: Have you have been talking to my wife, Kathy? I am getting ready to build her a series of trellises for our gardens and patio. A garden arbor or trellis can create or add a unique flair to a deck, patio or even a front porch. They make excellent sun filtering screens that create delightful shadow patterns. I'll bet that you can't build just one!

Trellis structures can range from simple to complex. The most basic trellis can be built by assembling 3 ladder type structures. Two of the ladder sections simply stick vertically from the ground. The third section spans between the two to form the overhead portion of the trellis. The flat "rungs" of each ladder allow your vines and ivy to easily extend into and over the structure. A multi-tiered, partially roofed or pagoda styled trellis can be built as well. These complex styles may challenge a beginner. Start with a simple design for your first project.

A simple design that may suit your needs could consist of two vertical sections that project 7 feet from the ground. The overhead portion can be 8 feet long. All of these sections can be approximately 16 to 18 inches wide. If the vertical sections are spaced 5 feet apart, the top section will overhang each end by 18 inches. This makes for a graceful, cantilevered design. I intend to construct a bench between the two vertical standards. This will give Kathy an excellent vantage point to view the hummingbirds that visit our patio feeders.

I prefer to use redwood or western red cedar for these outdoor projects. Both of these woods contain natural wood preservative chemicals. These chemicals slow wood rot. Wood destroying insects find these chemicals distasteful. Both wood species are available in a variety of grades. I intend to use construction heart and construction common grade for my trellis. The construction heart grade contains some very tight knots. Because it is heartwood, it has a high concentration of natural chemical content. This makes it perfect for the posts that will be buried in the soil. I will use the construction common grade lumber for all of my small cross members and above ground support beams.

The trick for easy installation lies in constructing the trellis in your garage or basement. It is very difficult to build the trellis in place. If you desire minimal maintenance, you need to coat the wood with a clear or pigmented synthetic resin water repellent or paint before you start to cut or fit the lumber. This practice inhibits water from entering the wood where two pieces lap on top of one another. Be sure to coat exposed end grain as you cut and trim the pieces. Stainless steel nails, screws and bolts are the best fasteners to use. If these are not available, then select the highest quality hot dipped galvanized fasteners you can find.

Construct the two ladder sections first. Make sure you let the bottom portions of the posts run wild at least two feet or so. This will allow you to bury the posts into the ground at least 16 inches. The extra 8 inches of length will permit you to make adjustments for sloping ground conditions within your garden. It is important that the top of the two sections are level once installed. If not, the top horizontal section will slope!

After the post holes are completed, fill them with 2 inches of washed gravel. After placing the posts in slightly oversize post holes, place additional washed gravel around the posts instead of soil. The gravel will extend the life of the posts. Moist soil that comes into direct contact with wood promotes wood rot. The top 4 inches of the fill should be crushed gravel. This will lock the post tightly in place.

Water Hammer Pulse – BOOM! It Can Be Loud

water line valves

Water Hammer Pulse | Turning off this ball valve quickly can send a strong pulse of energy - water hammer - through your house.

DEAR TIM: The water pipes in my new home are driving me crazy. Every time the toilet or washing machine shuts off, there is a loud bang. The noise can happen at faucets but is reduced if I shut the water off very slowly. What is happening? Can this problem be solved? Is it expensive to fix? Missy H., Dover TN

DEAR MISSY: You're a victim of water hammer. The source of the problem is abnormally high water pressure in your water system. My guess is that your existing water pressure is 115 pounds per square inch (PSI) or higher. I'll bet you live at the bottom of a hill or near the lowest point of your municipal water system. The volume and weight of the water resting in the water mains above your house creates this high pressure. Some places in my city have main pressures that commonly exceed 150 PSI!

Is High Water Pressure Useful?

High water pressure is wonderful for hosing down driveways or powering lawn sprinklers. However, it wreaks havoc with faucets, valves and water heater pressure valves.

Related Link

More Water Hammer Pulse and Water Hammer Arrestor Tips HERE

What Causes Water Hammer?

Water hammer happens when high-velocity water flow is stopped abruptly. Water is heavy. Water rushing through pipes can have a tremendous amount of potential energy. Think of a moving truck that crashes into a huge concrete wall.

The average house has about 75 pounds of water within the piping system. When you rapidly shut off water to a fixture, the weight of the water crashes against the faucet, valve, or sidewalls of the pipe. This creates vibration and noise within the pipes that you hear as water hammer

How Can You Slow Down Water in Pipes?

You can slow down water velocity in your pipes by up-sizing your water supply lines. In other words, try to run 3/4 inch pipe as close to fixture groups as possible. High pressure combined with significant water demand can cause water velocity to soar through smaller sized one-half inch piping.

pressure-reducing valve

You can barely see this pressure-reducing valve. It's the bell-shaped object close to the ground.

Can a Pressure-Reducing Valve Stop Water Hammer?

Water hammer can sometimes be solved by installing a pressure reducing valve in your water system. This valve will almost always tame the beast within your pipes. The valves are made with a handy adjustable screw that allows you to adjust the pressure on the house side of the water system.

What is the Factory Pressure Setting for Pressure-Reducing Valves?

Factory settings are usually between 50 and 60 PSI. I happen to prefer a setting of 70 PSI. Settings at or near 70 PSI allow you to take vigorous showers.

Is it Hard to Install a Pressure Reducing Valve?

It's not hard to install a pressure reducing valve. They require simple soldering skills.

However, you will need to check with your local plumbing inspector before you proceed. Some states and municipalities will not permit an unlicensed person to cut into or make alterations to the public water supply system. Your household water lines are really part of the public system.

CLICK or TAP HERE to get FREE BIDS from local plumbers who can install the valve for you.

Can Water From My House Flow Backwards into the Water Main?

Under certain conditions (fire engine pumps & water main breaks) water can actually flow from your house into the public water supply.

What Does it Cost to Install a Pressure Reducing Valve?

The cost of installing a pressure reducing valve depends on how much extra piping work you decide to do. Remember that everything on the house side of the valve will operate at the lower pressure. If you desire to maintain the high pressure for your outdoor hose bibs, you will undoubtedly have to install additional water lines from the high-pressure side of the new valve to those things you still want to be served with high pressure. If you're able to perform the work yourself, your cost will be minimal. If you must use a plumber, the cost can easily exceed $500 or more.

Can a Pressure Reducing Valve Cause Problems with my Water Heater?

The installation of a pressure reducing valve can sometimes cause problems with a hot water heater. Certain pressure reducing valves contain a bypass that allows water to flow back into the municipal system. But these bypasses can malfunction. When cold water enters your hot water heater and is subsequently heated, the volume of the water increases. Before the pressure reducing valve was installed, this water actually was pushed back towards the street. If your new valve does not have a bypass or it malfunctions, you can once again be troubled with water hammer.

Will an Expansion Tank Protect my Water Heater?

This problem can be solved by installing a simple expansion tank on top of the cold water inlet into the hot water heater.

tank water heater expansion

You can see the yellow handle of the shutoff valve above the tank. Note the wood blocks. - © 2017 Tim Carter

This tank contains an air chamber that is separated from the water by a rubber bladder. The extra volume of heated water simply causes the bladder to expand within the tank. This expansion tank needs to be sized correctly. Just tell the plumbing supply house the capacity of your hot water heater. They will do the rest!

Author's Notes:

I would like to acknowledge the most helpful input of Ronald L. George, CIPE of Detroit, Michigan, for accurate information that has enhanced this column and the following Builder Bulletin. Ronald provided me with excellent background information and facts concerning the truth about water hammer. My hat is off to you Ronald! Many Thanks!

We've received other questions with similar problems or questions. Here's one from Cheryll K. of Fenton, MO, regarding either the need for a water hammer arrestor or just noisy ductwork.

"We heard an extremely loud "boom" last night at 4:00 a.m. I was already awake when it happened because my son had come in our room about 10 minutes prior to this because of a bad dream. He was still in our room and awake and heard the noise too. The noise woke my husband from a sound sleep.

Anyway, the noise sounded like dropping a dictionary from a second story down onto a hard floor. The weird part ... the sound appeared to come from right under our bed, right in our room. We got up, checked things and could not figure it out. We even checked our mattress and box springs. Is there any chance the noise could have been caused by something structural that happened between the second story floor and the ceiling below it? We don't see any outward signs of damage, but I am looking for an explanation for the noise. Thanks so much!"

Kitchen Design

DEAR TIM: I am designing my new kitchen. A friend told me about some mystical triangle that needs to exist between the sink, cooktop and refrigerator. Is this true? My kitchen measures 10 feet 6 inches by 14 feet. Are there minimum planning standards that will maximize the utility of the kitchen space? Do you think I can include a small sit down eating area in one corner of the space? David K., Santa Cruz CA

DEAR DAVID: The mystical "work" triangle is a reality - make no mistake about it. This concept of linking the major components of a kitchen was developed nearly 50 years ago by the University of Illinois Small Homes Council. Although kitchens in some of today's largest homes would dwarf your kitchen and those in 1950's homes, the basic principal of the work triangle is still valid.

The thinking behind this most basic concept of kitchen design is simple. The sink, refrigerator and the cooktop represent the most used centers of activity in the average kitchen. The efficiency of a worker in the kitchen is drastically reduced if these activity centers are spread far apart. Ideally the distance in a straight line from the front center point of one of these three centers of activity to another should be between 4 and 9 feet. The sum of the three triangle legs should be equal to or less than 26 feet.

All kitchens contain invisible throughways. These are the connecting routes between other rooms and doorways. A collision on these high-speed highways involving a kitchen worker walking with a hot pot of water and an express child or teenager can be disastrous. For this reason, no single leg of the work triangle should cross these invisible pathways.


Avoid flaws and mistakes when planning your new kitchen. Use my Kitchen Remodeling Checklist as your remodel guide. I offer a 100% Money Back Guarantee.


The National Kitchen and Bath Association would consider your kitchen a small one as it contains less than 150 square feet. Detailed studies and design competitions they sponsored allowed them to develop minimum standards regarding cabinetry, drawer space and countertop requirements.

For you to gain the maximum utility from your space, it is suggested that you have a minimum of 13 linear feet of base cabinets. The total length of your wall cabinets should not be less than 12 linear feet. Drawer space is very crucial in kitchens. The total combined width of all drawer fronts should be a minimum of 120 inches. A small kitchen like yours might have an average of 8 drawers. Your final design should contain a minimum of 11 linear feet of open countertop space.

Including a small sit down eating area in your kitchen may be impossible. You will most likely find this out when you draw a simple plan that incorporates all of the before mentioned planning criteria. After you draw the kitchen plan I want you to pencil in the invisible high speed routes. Now draw a 6 foot diameter circle to the same scale as your kitchen plan. If you are using 1/4 inch equals one foot scale, this disc will be 1.5 inches in diameter. This disc represents a 4 foot diameter circular table and the space needed for the chairs around the table.

Place the disc on the plan. It should not cover any of the high speed routes, walls, or be near any of the kitchen cabinet or work areas. The only hope you may have is to include a very small cafe style table that will seat two people. If you want to get the best return on your investment dollars that you are about to spend, I urge you to consult with a Certified Kitchen Designer (CKD). These individuals will help you maximize the function, form and appearance of your new kitchen.