New Countertops with Paint

painted countertops

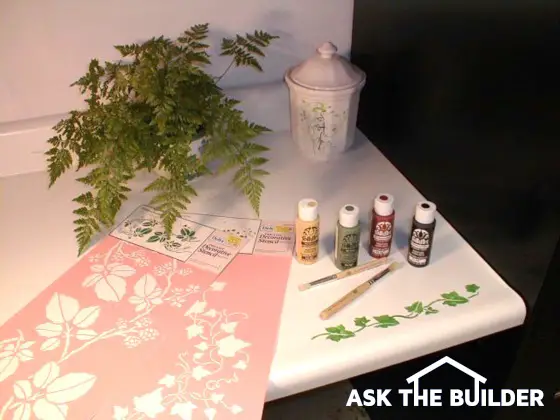
You can buy cool stencils at craft stores. Use the right paints and a little bit of clear water-based urethane, and you are set.

Painting Countertops

DEAR TIM: Our home is 20 years old and the kitchen countertops are plastic laminate, butcher block design, popular in the 70's and early 80's. We would like to redo the worn countertops to a more modern look. We absolutely can't afford to install new tops of any type. Is it possible to create a new, durable surface and not spend more than $75.00 on materials? Ken W., Plano, TX

DEAR KEN: This is your lucky day my friend! You are going to be able to radically change the appearance of those humdrum plastic laminate tops into magnificent works of art in just several days. I know this is going to sound absolutely crazy, but you are going to paint the countertops. This is a job that virtually anyone can do and if you take your time, the tops will be the talk of the town.

Not only are we going to paint the tops, but I suggest you incorporate the extensive use of stencils to create decorative multi-colored patterns that will make your kitchen counter surfaces one-of-a-kind. Stencils are available at many large scale craft stores. You can get ones that create a strand of ivy around the entire counter, fern and regular tree leaves, country kitchen scenes, different fruits, and floral patterns. If you use several colors with the stencils, the finished look will be stunning. Use the stencils on the front edges and vertical back splashes of the countertops if you want to maximize their effect.

If you don't like stenciled patterns then I highly recommend that you think about try a faux finish look. You can use multiple paint colors and different items such as newspaper, sponges, rags, sheet plastic to create textured and dimensional looks within the paint.


Author's Note: I have a wonderful step-by-step eBook that shows you how to get professional results when painting cabinets. It is easy to follow and affordable. Plus, you get the eBook instantly!


The paint in and of itself when applied to a horizontal surface will not be able to withstand the abuse of daily kitchen tasks. It will scuff and scratch easily. To overcome this problem, coat the painted tops with three or four coats of clear floor urethane. Floor urethanes can take enormous amounts of abuse and easily withstand puddles of standing water.

Oil based paints are great for a project like this. They usually cure and harden faster and they have superior adhesion qualities once dry. You can use water based 100 percent acrylic paints, but they would be my second choice. The amount of paint required when using stencils is very little. You might only need 10 or 16 ounces of each color depending upon the size of your counter tops. Craft stores often sell acrylic paints in affordable small squeeze bottles. Custom oil colors may be available at art supply stores.

I need to caution you before you start. This project is going to take you down a one way road. The painting process will be destructive to the plastic laminate surface. But based upon your description of the tops, it sounds like you have nothing to lose and everything to gain.

The plastic laminate tops are superb surfaces to paint. You begin the project by cleaning the tops with soap and water. Remove all traces of dirt, grease and cooking oil. Dry the tops and sand them with a medium grit aluminum oxide sandpaper. Vacuum the dust from the tops and apply your primer coat of paint. Apply the finish coat of paint after the oil primer has completely dried. Allow this second coat to dry. If you are stenciling, now is the time to be creative. Practice stenciling on a painted piece of scrap lumber until you feel comfortable and competent.

Once you have completed your decorative painting and all paints have dried for two days, apply the first coat of clear urethane. Follow the manufacturer's directions with respect to drying times. Sand lightly between coats. To avoid brush strokes in the urethane, thin it slightly. Never exceed the manufacturer's recommendations that are printed on the label.

After you finish this project, you will need to treat the tops with moderate care to preserve the new finish. A cutting board will be mandatory whenever you use a knife and avoid sliding metal cans and other heavy objects across the countertops. Every six months clean the tops, sand them lightly and apply a maintenance coat of clear urethane.

Column 292

Concrete Crack Prevention

concrete cracks

Concrete Crack Prevention

DEAR TIM: We are having a new concrete driveway installed. What can be done to prevent cracks in the new surface? Is it realistic to expect the surface to last for 25 to 30 years with no maintenance? How thick would you pour the drive? Would you install any steel reinforcing? Does the driveway need to be sealed once it is poured? Maria B., Janesville, WI

DEAR MARIA: Concrete is a wonderful driveway surface. If your driveway is installed by a seasoned professional, then your driveway should easily last 30 years. In fact, I have seen concrete driveways in my town that are nearly 50 years old that are still in good condition. Long lasting, crack free concrete does not happen by accident. It must be ordered correctly, installed with great care, finished properly, and cured carefully.

Cracks are to be expected in new concrete. Professional concrete masons realize this fact and take measures to minimize their appearance. Concrete is very strong if you try to squeeze or compress it. But if you try to stretch it or bend it, it usually only exhibits 1/10th the strength that it possesses when you compress it. If the new concrete in your drive is poured over soft, uncompacted soil, your car or a heavy delivery truck will bend and crack the concrete as it passes over the soft spot. This is why concrete needs to be poured on solid, compacted soils.

Concrete also shrinks as it dries and hardens. It can shrink about 1/16th of an inch for every ten feet of length. This shrinkage creates tension within the concrete that tries to tear it apart. Professionals who install concrete driveways install crisp tooled lines in the slabs. These are called control joints. The lines act as pre-weakened stress points that encourage the concrete to crack at these locations. The joints can also be installed as soon as the concrete hardens by using a diamond saw that cuts the line. The control joints must be deep enough to perform their job. The minimum depth of the joint should be 1/4 the thickness of the slab.

Spacing of control joints is critical. Make sure the joints on your driveway are spaced at intervals of 15 feet or less. It is a common practice to make the spacing equal to the width of the driveway. If your driveway slab will have sharp 90 degree corners, control joints should extend from these corners out into the slab. Concrete cracks often radiate from corners, so make sure you discuss the control joint layout with the contractor before the pour begins.

Thicker concrete is a good idea for driveways. I would like to see you install a minimum 5 inch thickness. Often contractors might try to tell you that a 4 inch thickness is sufficient. The cost to upgrade to a 5 inch thickness on an average driveway is chicken feed when you compare it to the total cost of the job. For example, if your driveway measures 720 square feet, a 4 inch thick pour will require 9 cubic yards of concrete. Increasing the thickness to 5 inches requires 11 cubic yards of concrete. The extra two yards of concrete will only cost about $130.00. (1999 pricing - adjust for inflation)

Reinforcing steel is a must in my opinion. Steel is very inexpensive and it helps to strengthen the concrete significantly. Steel will hold cracked slabs together. Without steel, cracks can grow in size and you can get offsets where one part of the slab is higher or lower than an adjacent piece. Steel needs to be placed no more than 2 inches down from the top of the slab for maximum performance.

Concrete that has been ordered with enough cement so that it is a 6 bag mix (564 lbs of cement) or a 4,000 pounds per square inch design strength, contains just enough mix water to give it a 4 inch slump consistency, is finished without the use water, and is moist cured with plastic or with a liquid curing compound should not have to be sealed.

If your concrete driveway is poured correctly, the surface will withstand cold weather, deicing salts, vehicle traffic, basketball games and tricycle road races for many years. Weak concrete that has been ordered and installed improperly needs to be sealed with high quality silane or siloxane water repellents. Do not use film-forming silicone sealers.


Want perfect concrete work? Find a pro by using my Concrete Work (Sidewalks, Driveways, Patios & Steps) Checklist. I offer a 100% Money Back Guarantee.


Author's Notes:

May, 2004

Keep in mind that the above strength rating of 4,000 psi concrete is a minimum standard. There is no reason why you can't order concrete that is 4,500 or even 5,000 psi. It will cost slightly more simply because they are adding more cement per cubic yard. But if you expect the concrete to be subjected to harsh conditions, this extra cement could extend the useful life 25 to even 50 more years!

Column 293

Window Seat

Window Seat

Window Seat

DEAR TIM: I'd really like to have a window seat in my home. I think they're cozy and attractive.

Are there different storage possibilities or configurations? What does it take to build a window seat?

Is it possible to build one on a standard flat wall? Erika N., Seattle, WA

DEAR ERIKA: Why only one?

Multiple Seats Make Cozy Retreats

I think that you should consider building several window seats in different parts of your house. They are excellent multi-purpose fixtures. Not only do they provide extra seating, but they also create lots of useful storage space. In fact, I just talked to my wife about building one in my son's room.

Free & Fast BIDS

CLICK HERE to get FREE & FAST BIDS from local carpenters who can build one or more window seats for you.

Window seats are one part of a home that can change with the seasons. Some people outfit the seat with vibrant upholstered cushions depicting the different seasons of the year or holiday periods.

Some achieve the same effect by using decorative pillows. Because the eye is usually drawn to a window when entering a room, the decorated window seat tends to get immediate attention.

Accessing the storage area beneath a window seat can be accomplished in a number of ways. The first house my wife and I owned had the traditional hinged seat. You flip up the seat and the entire storage area lies before you.

This storage method has some limitations in my opinion. If you need an item that is on the floor or in the lowest part of the storage area, you need to pull everything out to get to it.

The front vertical surface of the seat can be built with swinging cabinet doors or even bi-pass sliding doors. This method of access is not much different than any standard wall or base cabinet. Because window seats are already so low to the ground, you usually only have room for one shelf level. If you decide to place audio or video tapes, disks, or compact disks below a window seat, you can have special shelving dividers built that maximize this type of storage.

I have installed window seats that have drawers beneath them. This configuration offers the least amount of storage space as the drawer body and suspension system use up space that would otherwise be available had cabinet doors or a flip-up lid been used.

Window seat construction can be simple or complex. The simplest window seat is just a bench with no access to the storage space beneath it.

CLICK HERE to get FREE & FAST BIDS from local carpenters who can build one or more window seats for you.

One simply needs to build a simple wall that forms the front face of the seat and then place a piece of plywood on the top of the short wall and the window wall. Complex window seats can be built using specialty hardwood lumbers, exquisite detailing and moldings, and accessories such as built-in indirect lighting and hidden sound system speakers. The possibilities are endless.

Window seats are easy to build if the window is in a small alcove or between two nearby side walls. If you have a plain long flat wall, you can still build a window seat. One option is to install a set of built-in base cabinets with bookshelves above them on either side of the window. Many kitchen cabinet companies make cabinets for this exact purpose. The window seat spans between the two sets of cabinets. The look is stunning.

There are some basic guidelines you should follow with respect to window seat dimensions. Find the most comfortable chair in your home. Model the height and depth of the window seat after this chair. I have found that a finished height of 19 inches off the finished floor is ideal for most window seats. The window seat depth from front to back is also important. Make it too shallow or deep and it can be uncomfortable. The preferred depth should fall somewhere between 17 and 22 inches. If you intend to take an occasional catnap on your window seat, then I suggest you make it 24 inches deep.

If a heating or cooling duct is currently under a window, then simply hire a professional heating or cooling contractor to extend the duct so that it blows the air out the front of the new window seat. You can purchase decorative metal or wood grill covers that will compliment the window seat instead of detracting from it.

CLICK HERE to get FREE & FAST BIDS from local carpenters who can build one or more window seats for you.

Column 295

Toilet Troubles – Catching The Phantom Flusher

toilet repair

Installing the parts you see on the toilet seat will usually silence all but the most possessed of toilets.

DEAR TIM: I am having toilet troubles. Every toilet in my house seems to have a different problem. The second floor toilet fills with water every 4 hours or so without being flushed. The powder room toilet just doesn't flush well. Once flushed, water doesn't seem to leave the bowl area quickly like it did when it was new. The basement toilet moans, groans, and whistles as it fills with water after each flush. Is it time to apply for a loan and call in the plumber? Veronica D., Crown Point, IN

DEAR VERONICA: Don't go to the bank just yet. Believe it or not, each one of those toilet problems can be fixed by a determined homeowner. In fact, I once helped a woman fix a toilet by just giving her simple instructions over the telephone. She succeeded and saved herself some significant money by not calling in a plumber. Keep in mind that a few states have exceedingly restrictive plumbing codes. I know it sounds crazy, but if you live in one of these states, you may not be legally permitted to perform simple repairs on your own toilets. Check your local building department to see if you are permitted to make minor toilet repairs.

Let's start at the top and work down. Your second floor toilet is often referred to as a phantom flusher. You think it has flushed because you here the toilet tank filling with water. No ghosts or goblins flushed the toilet. The ball cock valve in the tank turned itself on because the water level in the tank dropped. This happens because the rubber flapper valve in the bottom of the tank wears out or deforms and doesn't seat properly.

You can test for this problem very easily. Remove any sanitizing products from your toilet that may color the water. Flush the toilet once or twice so the toilet bowl water and tank water are perfectly clear. After the toilet stops running completely, add 10 drops of green food coloring to the toilet tank water. Check the toilet in 30 minutes and see if the water in the toilet bowl has a green tint. If it has, it is time to install a simple flapper valve repair kit. They are sold at virtually every hardware store, plumbing supply house, and home center.

The powder room toilet may have one or more problems. The sluggish flushing could be caused by a partial blockage in the drain line, a blockage within the toilet, or a mineral deposit buildup within the toilet bowl. Take a few moments and thoroughly clean the toilet bowl. Pour a bucket of water rapidly into the bowl. This will evacuate most of the water in the bowl. Wearing rubber gloves, use a sponge to remove the last traces of water from the toilet bowl. Place a small mirror in the bottom of the toilet so that you can see up into the toilet drain pathway. Look for plastic army men, rubber ducks, hair rollers or anything else that may be lodged at the top of the drain passage.
Watch this video on the Flapper Valve.

If you can't see any obstructions, the toilet bowl rim and the syphon jet hole at the bottom of the toilet bowl may be partially clogged with hard water mineral deposits. Remove the toilet tank lid and lay it flat on the floor. Using a large funnel, pour a gallon of white vinegar into the vertical overflow tube in the center of the toilet tank.The vinegar will dissolve hard water deposits in the small holes that are in the underside of the toilet bowl rim and the larger syphon jet hole in the bowl. Use a toothpick and a Popsicle stick in these holes to help loosen hard water scale. In severe cases, you may need to treat the toilet with vinegar several times over a period of days to see an improvement. If not, it is time to call the plumber for this toilet.

The basement toilet complains as it fills because the ball cock valve is probably past its prime. Older valves have a float ball made from plastic or brass. As the water level in the tank rises, the valve starts to slowly close. When the valves get worn, they start to get noisy. Newer toilet fill valves keep the water running at full capacity until the tank is full. These valves are easy to install and are made to fit just about any toilet. Don't be intimidated by toilet repairs. The insides of a toilet tank look confusing, but in reality they are child's play.

Column 297

Hand Tools / Power Tools

Hand tools

Each one of these hand tools will come in handy. I am sure you can identify each one.

DEAR TIM: I am getting ready to move into my first home. I am really excited. But, I just realized that I don't own any tools. My friends and family want to get me started on a tool collection before I move in. What do feel are the most important tools I will need to do a majority of home repairs and improvements? If money were no object, what should I wish for? Ashley W., Danville, VA

DEAR ASHLEY: I remember the euphoria of buying my first home. Your excitement is well deserved and it will be recharged each time you successfully complete a home repair or small home improvement project. You are smart to begin your tool collection now. If you are like most people, you will need tools to do an assortment of projects within the first 24 hours of moving in. My first piece of advice is to buy high quality tools. I have certain tools in my truck and basement that have served me well for nearly 25 years.

Let's talk about your Must-Have tools first. I feel that you should have a new 16 ounce anti-vibration hammer. This type of hammer is designed to absorb shock that can cause arm fatigue and repetitive motion injuries. If you intend to hammer large nails, get a 20 ounce hammer. You will find that an aluminum framing square, retractable razor knife, and a 30 foot tape measure with a 1 inch wide blade will come in very handy.

Next I would like to see you have a 2 foot level. A wide pry bar that works like a traditional crow bar will come in handy for many jobs. A rubber sanding block, adjustable wrench, needle nose pliers and a combination wire cutter / wire stripper will start to round out your hand tool collection.

Be sure to get an assortment of traditional screwdrivers that have both flat head and Phillips tips. A chalk line, professional caulk gun, hacksaw and several putty knives will be needed for many projects.

You absolutely need a power circular saw and a power drill. I have fallen in love with the cordless power tools and really feel the 18 volt models have plenty of power and balance. Many manufacturers offer these two tools in a combination kit that includes a charger and two batteries. Many cordless saws have a 5.5 inch diameter blade that cuts through any 2x material. Many cordless drills have wonderful keyless chucks. You will find that you become very attached to these powerful cordless work-savers.

power tools

Now you are getting into some money. That orange impulse nailer cost $400.00 alone, but it is worth every penny.

When you operate the power tools you will need protective eyeglasses and some foam rubber ear plugs. Certain jobs will require you to get up in the air. A six foot tall step ladder will allow you to tackle many jobs. A tool apron, soft sided tool storage bags, and even a plastic tool caddy on wheels will help you store your tools as you work and protect them when not in use.

If the tool fairy appeared before you and said that you could have every tool you could start to name in the next 60 seconds, here is where I would start (Take a deep breath!)

  • Power miter box saw
  • impulse trim and framing nail gun or a pneumatic nail gun combo kit with hot dog air compressor
  • rotary hammer drill
  • wood rasp
  • cats paw nail puller
  • linesman's pliers
  • coping saw
  • masonry chisels
  • assorted squeeze clamps
  • propane or acetylene torch kit
  • copper tubing cutter
  • 14-inch pipe wrench
  • extension ladder
  • 4 sets of pipe scaffolding
  • socket set and ratchets
  • wet/dry vacuum
  • four foot level
  • stainless steel drywall knives and mud pan
  • pole sander
  • table saw
  • quick release drill bit set
  • power reciprocating saw
  • electronic stud finder
  • pop rivet gun set
  • mason's trowel
  • magnesium concrete hand float
  • wheelbarrow
  • round point shovel
  • square point shovel
  • road broom
  • extension cords
  • belt sander......Bzzzzzzzzz .... Time's Up!

Column 298

Wainscoting – Distinctive Wall Paneling

Wainscoting

Wainscoting | This stuff is so easy to install! Photo courtesy of New England Classic.

DEAR TIM: I am really tired of the plain walls in our dining room. Traditional wood wainscoting seems like it would be a perfect way to give the room character and the walls some relief. Can you apply wainscoting to drywall or plaster walls or do you need to nail it directly to the wood studs. Do you need to be a master carpenter to install it? Is this project a possibility or should I just dream about it? Sara T., Cherry Hill, NJ

DEAR SARA: Wow! Great minds think alike. My wife just decided that I am going to do the same thing to our dining room. I sure hope you two don't get tired of the roof color or the style of kitchen cabinets soon! I must tell you that the raised panel wainscoting idea is a brilliant one. Not only can it be installed in dining rooms, but you can also transform a study, a stairway, a kitchen island, surround a breakfast nook, or just accent one wall in a room. The possibilities are almost endless.

What is Traditional Wainscoting?

Traditional wainscoting found in many older homes is solid wood. It is a system of vertical and horizontal wood members that surround raised or flat wood panels of various styles and sizes. The older systems could only be installed by a carpenter who had a great deal of talent and experience. It is one of the highest forms of finish cabinetry found in a residential home. Fortunately, technology advancements in both materials and manufacturing have made the installation of raised panel wainscoting a job that can be tackled successfully by a person who has some basic tools, is able to follow written instructions, and can use a measuring tape. It is that simple.

How is Modern Wainscoting Different?

Modern wainscoting is a fabulous material. Some types are extremely environmentally friendly. They maximize the use of our precious natural resources. Some modern wainscoting is a combination of thin veneers applied to a dense core of either stable engineered wood or a unique wheatboard core that recycles wheat straw. Cherry, oak, and maple are the natural wood finishes that come with this system. A paint grade is also is available that accepts any standard interior paint. It comes ready to paint from the factory. Both types come ready to assemble from the factory. Only minor trimming at corners is required to fit the pieces together.

This modern method of making wainscoting solves another problem. The solid wood panels used in traditional wainscoting are very susceptible to expansion and contraction caused by changes in humidity. The panels can crack in extreme cases. The engineered products are very stable and should not cause any problems as seasonal swings in humidity occur.

Other modern systems are a blend of solid wood and plywood raised panels covered with hardwood veneers. Walnut, cherry, oak, poplar, and several other wood species can be used. Traditional solid wood systems may be available in your city or town as well. There is a good chance that a woodworking mill is still in business that can easily make the wainscoting components for you. If they do this type of work on a regular basis, they may offer competitive pricing. What's more, they may be able to produce custom profiles on the trim and panels at a small extra charge. Search for these mills under "Woodworking".

If you find that the cost of wainscoting is out of reach at this time, you can create a distinctive wall treatment using simple wood moldings, some glue, and a little time. Visit a lumber yard and purchase several moldings that you can apply to the lower sections of your dining room walls. You should be able to find moldings with interesting profiles that lay flat on the wall. Use a regular miter box and a saw to create proportioned rectangles and squares similar to the raised panels found in wainscoting. The vertical pieces that fall between wall studs can be attached permanently to the wall using a combination of glue and nails driven at an angle through the molding.

Once you have completed all of the rectangles and squares, consider the application of a traditional chair rail molding above these moldings. This final piece of woodwork will set them off perfectly.

Column 299

Avoiding Liens

Avoiding Liens

DEAR TIM: I am building a new home soon. Even though I have the ability to pay for the house myself, I was wondering if it would be a better idea to obtain a loan. Will the bank make sure all of the workers and suppliers get paid so that no liens are filed against my new home? What can the average person do to make sure that every person who works on a project gets paid? Paul W., Woonsocket, RI

DEAR PAUL: A strong economy, impressive gains in the stock market, robust equity in existing homes, and large inheritances allow some people to build new homes without having to borrow funds. I have built several houses for people who were able to open their checkbooks to pay all of the bills. Avoiding legal problems caused by unpaid workers and suppliers is not too difficult, but it does require attention to detail and actually starts during the bid process of the job.


Most lending institutions will not offer you the protection you are looking for. A bank, credit union, or savings and loan simply wants to make sure that the value of the land and the house are equal to or greater than any funds they have paid to others on your behalf. It is possible for a worker or a supplier to file a valid claim against a property even if you have a new home construction loan and the bank's appraiser checks the construction progress before each payment is made.

Protection against liens and other claims starts at the beginning of the job. You should obtain a detailed cost breakdown of the job showing the many different tasks, the cost associated with each of these items, and the name of the sub-contractor or supplier who is providing the goods and the services.

This cost breakdown not only helps you to compare bids from different contractors, but it also becomes the benchmark against which payments are made. For example, if the cost breakdown sheet indicates that the foundation and footing costs $12,500, then the check written to that sub- contractor should not exceed this amount unless authorized written changes were approved by you. In other words, you need to set up a system of checks and balances to make sure that you only pay what you should and that the amount is correct.

Before checks are issued by a lending institution, they almost always require builders, sub- contractors, and suppliers to supply a notarized affidavit, waiver of lien, or release of lien form. These documents are simply legal receipts signed by a company official that give the legal address of the property where the work was done or materials were delivered, the dates that the work was performed or material was delivered, and the amount of money owed for that time period. If the document is executed properly and the notary verifies that the person who signs the document is indeed the company official, then this receipt gives you lots of protection against future claims against the property.

If you live in a larger city or town you can have an affidavit company produce and process the forms for you. These professional services do all of the paperwork and most of them have the highest degree of integrity. They will prepare the affidavits and submit them to you for payment. It is still your responsibility to make sure that the right amount of money is going to the right person. Once you feel all is in order, you write the check to the person or company named on the affidavit.

You also need to perform due diligence. As hard as it may seem, you should visit your job site each day and introduce yourself to the workers. Be cordial and ask them who they are, who they work for. And what they are doing. Write this information down in a journal. When it is time to pay for this aspect of the work, make sure that you see affidavits that have this company name on them. If not, you may be subject to a valid claim of non-payment.

If you decide not to take out a loan, consider making arrangements to issue checks directly to each sub-contractor and material supplier. This gives you a high degree of control as you then know the individual is getting the money. You can also arrange to issue checks that name the builder and the sub-contractor or material supplier. These checks require the signatures of both parties in order to be cashed or deposited. Finally, no one, and I mean no one, gets a check unless they give you an affidavit first!

Column 300

Condensation – Sources and Solutions

gas log fireplace

These gas logs look harmless. But when they are burning, they create vast amounts of water vapor. This vapor goes up my chimney. If you have a vent-free set of gas logs, the water vapor your logs create stays in your home!

DEAR TIM: I recently had siding and new insulated glass windows installed. The place looks great, but now I have mildew growing on my new windows and on the ceilings above a couple of the windows. I have electric baseboard heat which is very dry. We also installed a vent-free fireplace to minimize our use of electric heat. There is more condensation now than ever before. I thought I had it all figured out, but now I am crazy with frustration. Are the windows poor quality? What is the problem? Stacy J., Cambridge, OH

DEAR STACY: Don't admit yourself to the funny farm just yet. The excessive condensation may be traced to several problem areas. The recent home improvements you have completed have drastically altered the dynamics of air movement in and out of your home. In addition, the vent- free fireplace is adding more than heat to your indoor environment. You should be able to stop the condensation on the windows, but the solution may be painful.

Condensation can appear on new windows in just about any part of the nation. If you can get beads of water to form on a cold can of soda or an ice cold glass of tea while inside or outside your home, you can get windows to do the same. Homeowners who live in the South and Southwest can create condensation on the exterior surface of widows if they set their air conditioning too low. Condensation occurs when the temperature of a glass, metal, or any other surface reaches or drops below the dew point of the air in contact with the material.

Condensation, or dew, forms when the cold or cool surface chills the adjacent humid air and the water vapor in that air changes back to liquid water. To make matters worse, the dew point can fluctuate up or down without giving you any real notice. In very cold climates, the interior glass, metal, or plaster surface can get so cold that the condensation turns into ice or frost.

The new siding and windows of your home have probably helped to stop air infiltration into your home. Cold air can hold much less humidity or water vapor than warm air. Before you changed your windows, drier cold or cool air used to leak into your home and mix with the warmer more humid inside air. This lowered the overall relative humidity of the air in your home. Your new windows and siding have actually caused the humidity level to rise in your home because this mixing no longer takes place. Even though the windows may be top quality, the temperature of the inner pane of insulated glass may still reach or drop below the dew point of your interior humid air.

I actually feel the condensation problem is being caused by the new vent-free fireplace. These energy efficient devices keep all of the heat inside since they do not require a chimney, but they pump vast quantities of water vapor into your home as they burn. Water is a by-product of the combustion of natural or propane gas. For every 100,000 Btu's of gas burned, approximately 1.5 gallons of water is created and added to the air inside your home. If you stop using the fireplace for several days, the condensation problem should lessen considerably. Keep in mind that if the outside air temperature rises during this test period, you may be lulled into a false sense of security. Remember, as the outside air temperature rises, so does the surface temperature of the glass, wall, and ceiling surfaces adjacent to outside walls.

The water vapor that is causing the condensation may also be coming from a crawl space. Crawl space soil needs to be completely covered with high performance vapor barriers. Even though the soil inside a crawl space appears dry, it is releasing water vapor into your home 24 hours a day. High performance vapor barriers are made with two cross laminated sheets of high grade virgin polyethylene. They perform much better than standard polyethylene vapor barriers sold at most hardware stores and home centers.

The windows you purchased may also be part of the problem. Not all windows are made the same. Windows that are the least susceptible to condensation at a given dew point are those that pass voluntary manufacturing standards implemented by various organizations and associations. Top quality window manufacturers that submit their products to these independent tests use high performance glass and materials. Look for widows that have certification labels from either AAMA, NFRC, or Energy Star.

Column 301

Window Cleaning

Window Cleaning | Easy to Get Pro Results

  • Don't use blue window cleaner in a spray bottle
  • Use simple water with a small amount of liquid dish soap
  • Use a lambswool or sponge to clean the window
  • Remove water with a rubber squeegee

DEAR TIM: I have had it with cleaning the splattered and dirty windows in my new home. I have tried everything: off the shelf spray cleaners, vinegar and water, and ammonia and water solutions. The results are usually the same. The windows look fine until direct sunlight highlights all of the streaks. Switching from rags to paper towels does not make a difference. What am I doing wrong? There must be a way to get glass perfectly clean. Molly H., Yorba Linda, CA

DEAR MOLLY: As much as I hate to say it, the primary source of your problem is operator error. In addition, the cleaning solutions you are using are not what professionals use. I am convinced that you can get your windows crystal clear and with minimal effort. It may take some practice, but it is possible.

Can You Scratch Window Glass?

window cleaning
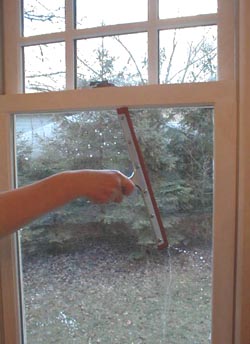
Standard window glass must be treated with care when it is cleaned, especially glass exposed to the harsh new construction environment. Glass is actually relatively soft and it is porous. Cement, paint, urethanes, and sealers can penetrate the surface and stick tenaciously to the glass. Sand from brick mortar and stucco, asphalt shingle granules, heavy dust from an assortment of construction activities can all scratch new glass if one is not careful. The best way to avoid scratches on new glass is to protect it with a plastic covering during construction.

How Do You Clean Construction Splatter?

Windows that have construction splatter on them need to be cleaned with care. A new 3 or 4 inch wide sharp flexible putty knife that has no burrs on the edge when used with flowing water will help you get material off the exterior surfaces of the glass. A mist of soapy water used on interior glass surfaces will help lubricate the surface to help prevent scratches as you gently scrape off any built up deposits.

Why is Blue Spray Window Cleaner Inferior?

When you wash your car, I doubt that you spray it with a solution and then rub this solution with paper towels in a circular motion over the car's painted finish. It's no wonder, as a significant amount of dirt would still be left on the car. Your methods of cleaning your windows simply removed some of the dirt and spread the rest of it around on the surface. To get windows perfectly clean you must remove all of the dirt from the glass.

How Do Pros Clean Glass?

Professional window cleaners get glass clean by doing just that. They used to use a lambswool applicator, but microfiber applicator tools are now the tool of choice for pros.

microfiber window washing tool

The microfiber tool on the right is what you should use to clean your windows. CLICK or TAP HERE or the photo to order one and have it at your home in days.

As they wipe the glass, an enormous amount of the dirt is actually transferred to the sponge. The solution is usually just a mixture of water and a mild soap de-greasing agent. Professionals use squeegees to remove the solution that is left on the glass. The soap in the solution lubricates the glass surface allowing the squeegee to glide across the glass.

What is the Best Squeegee?

To achieve professional results, you need to use the right squeegee. A professional squeegee is often constructed with brass channel that holds a rubber blade.

The rubber often projects past the brass just 1/8 inch or so making it very rigid.

brass squeegee

This is a professional squeegee and it's very affordable. They come in many different widths. CLICK or TAP HERE or the image to have it delivered to your home.

Why Should the Squeegee be Brass?

Brass is used to hold the rubber blade because it is a soft metal that will not scratch glass.

Some hardware stores may carry professional squeegees. You can also try businesses that sell janitorial supplies and equipment. These distributors may also sell concentrated glass cleaning solutions. You can make your own window cleaning solution using liquid dish soap and water.

Click here to watch my video on window cleaning tools.


Should I Hire A Pro?

You may want to consider hiring a professional window cleaner instead of fussing with your windows. They have all of the right tools and equipment that allow them to easily clean windows with minimal effort. The shocking thing to me is the relatively low cost.

Professional window cleaners in my city charge about $2.75 per side to clean an average sized window. Often an average home that has 15 windows can be cleaned for less than $90. When you consider the hassle, danger involved in working on ladders, and the amount of money you spend on paper towels, you may find that calling a professional is a much better way to go.

Column 302

Home Wiring for the Future

electrical panel for the future

You should try to organize as much of your wiring as possible at one location. But be careful, it may be best to separate certain types of wiring to ensure there is no interference caused by the higher voltage wires.

DEAR TIM: I want my new home to be ready for all of the new technology that I feel is just around the corner. What is the best way to prepare a house for electronic technology? Are there special wires that need to be installed before the walls are covered up? Maybe there is no concern as all future appliances and communications will be wireless. What would you do if you were me? Becky P., Euless, TX

DEAR BECKY: I applaud you for your forward thinking! You will never regret getting your house ready for future advancements in home technology. All one has to do is simply look back ten years. Very few people were even remotely concerned about connecting different rooms of their house so that it would become a network. Networking home computers, sound systems, heating and air conditioning equipment, and intercoms are now the buzzwords of both new construction and those of us that live in existing homes.

A connected home is one that has excellent internal structured wiring that allows occupants to gain access to the Internet, telephone, cable TV, satellite TV, etc. in just about any room of the house, including outdoor patios, decks, and pools. The need for structured wiring is clear. Advancements in home entertainment allow high fidelity sound systems to be heard in multiple rooms at the same time. Home security systems can now be easily connected to personal computers and remote monitoring stations. Water, electric and gas utility meters can be read remotely. The list of appliances, house components, and personal communications devices that can be interconnected is growing daily.

Hard wiring solutions appear to be the direction that home technology is headed. Signals that travel through wire are often more reliable and can carry more data faster. They are certainly more secure, as some wireless signals can be captured, stored, and re-broadcast in your absence by pranksters or undesirables who are lurking just beyond your home.

You have certain options available when you wire your new home. The backbone of a connected home that contains structured wiring is a distribution panel that is nearly identical to a traditional electric service panel. This box can be located very near the electric service panel and should have excellent access to the exterior of your home so that service providers can feed their cables into the distribution panel. Certain boxes are made to accommodate multiple service providers.

The absolute minimum wiring you should extend from the distribution box to each bedroom, den, family room, kitchen, home office, etc. is a UTP CAT 5 cable that contains four pairs of twisted wire. This is the new standard wire used to feed telephone equipment. In addition, string a RG-6 coaxial cable to each room. Note that each room should be connected to the distribution box with its own separate cable. Do not loop one cable in between rooms in a series.

If you really want to prepare for the future extend two CAT5 or CAT5e cables into each room. Once this is completed, extend two RG-6 quad shielded coaxial cables into the rooms. This level of wiring will enable you to have a huge pipeline capable of carrying vast quantities of information to and from any activity center within your home. All of the cables have sleek outlet covers and connection plates that attach to walls in your home.

Even though you may wire each room adequately, there is always the possibility that a wiring standard may change in the future. Planning ahead for this possibility is simple. The trick is to install a minimum of three empty two-inch diameter plastic conduits from the distribution box area into the attic of your home. These conduits create pathways behind the walls that allow you to easily distribute future cables and wire. One of the conduits should be reserved for traditional high voltage wiring. Keep this conduit at least 4 feet away from the low voltage and communications wire conduits. This spacing will help minimize or eliminate electromagnetic interference created by high voltage wiring. The ends of the conduit need to be capped to prevent fire from spreading from one part of the house to another.

wiring panel

A structured-wiring panel should be in a convenient location.

Consider adding blank electrical rough-in boxes on exterior walls that have a plastic conduit that extends into an attic or basement. This flexibility will be genuinely appreciated by a future technician who needs to install a computer, modem, TV, or some yet-to-be-invented device on an outside wall. The cost to install the empty box and conduit will be a small fraction of what it will cost to restore the wall surface and baseboard after the frustrated technician works for hours to run the cable!

If you are looking for an great book for installing simple wall lights to running wire in new construction and in existing walls and ceilings, then Wiring a House is the book for you. With its wealth of practical know how this book, written by a master electrician, is sure to become an indispensable reference for anyone who wants a common sense guide to residential electricity. The black and white photos and illustrations featured in this book are clear, crisp and easy to understand. You must buy a copy of Wiring a House, a great hardback book published by Taunton Press.

If you are looking for a book with invaluable information on tools and materials, detailed instructions for how to repair or replace wiring in old buildings and bring them up to code then you need a copy of Old Electrical Wiring. This 400 plus page book tells you everything you could ever imagine about switch layouts, troubleshooting, and design change. It also has an extensive glossary of old wiring terms and slang. Packed with drawings and illustrations, including pictures of old devices, this practical book will tell you whether an old electrical system should be torn out or repaired. This book will really help you.

Here's a complete, full - color guide to all aspects of residential wiring and how to apply them to the wiring of a typical house. Electrical Wiring Residential, is another must have book. It's everything anyone could need to know, from wiring a lighting branch circuit, to installing a service entrance or swimming pool. Loaded with examples, wiring diagrams, spectacular photos and illustrations explaining all the new 1999 NEC requirements thoroughly. This book is easy to read and understand, yet has all the instructions and details needed to perform virtually any residential wiring job properly.

Column 303