Cabins

cabin

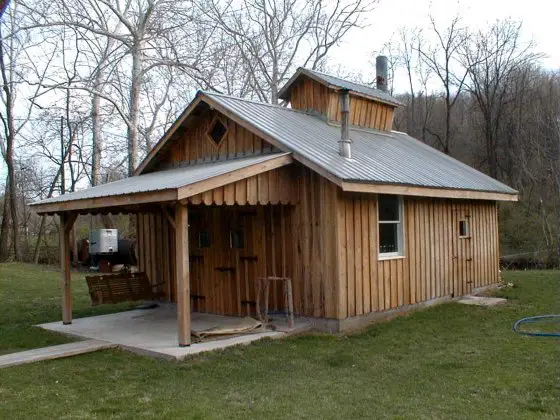
I helped build this unusual cabin-like structure. It is a shed for distilling maple sap into maple syrup. Would you believe it if I told you it was less than seven miles as the crow flies from downtown Cincinnati, OH?

DEAR TIM: I am going to build a cozy cabin on some property I have in the woods. I would like to have a wood stove in it for heating purposes. What is the smallest size you think I can build and have many of the creature comforts I have in my existing home? If you could have the cabin of your dreams, what size would it be and what features would it include? John M., Neenah, WI

DEAR JOHN: Oh, this sounds like a dream project if you ask me! What a delight to be deep in the woods framing this cabin. I have spent time in several different cabins and know what a blissful time you are going to have sitting on its covered porch on those late summer evenings. I'm just about ready to trade some labor for periodic vacation visitation rights.

The biggest design constraint, in my opinion, is the minimum number of people that are possibly going to sleep in this cabin at any given time. Beds or cots take up an enormous amount of floor space when you are talking about small cabin and cottage structures. Don't try to plan for people to sleep on the floor. It is impractical, uncomfortable and can cause enormous traffic flow problems if the person(s) on the floor is still sawing logs while other inhabitants are trying to move around.

If you feel that more than two people are going to sleep in the cabin at a time, then you need to consider building a cabin that has a cozy sleeping loft. The loft space is created easily if the roof of the cabin has a steep pitch of 9 inches of rise for every foot of run (9/12). If you increase the pitch to 12/12, you can almost create a loft that has 8 feet of ceiling height in the center of the loft.

The smallest cabin foot print I feel that is workable is one that is 16 feet wide and 12 feet deep. Add to that a covered front porch that is 16 feet wide and 6 feet deep and you will have a little gem. A small cabin like this will accommodate a standard bed in one corner, a large chair in another corner, and a toilet and shower and kitchenette in the remaining corners. You can place a stove in the center of the cabin for even heating if you want, but its chimney will pass through the center of the sleeping loft. I feel that cabin stoves work best on exterior walls.

Let's see, the cabin of my dreams. I don't want my cabin to be too large because then it isn't a cabin but more like a small house. I feel an ideal size is one that is 20 feet wide by 18 feet deep. It would have a 12/12 roof pitch and nine foot high walls that would provide a very spacious feeling. The sleeping loft would just be above the center core of the cabin so that the underside of the roof was visible along all of the exterior walls. A guardrail wall would surround the loft on 3 sides for privacy and safety purposes. It would easily stop a restless occupant from crashing to the lower floor in the middle of the night.

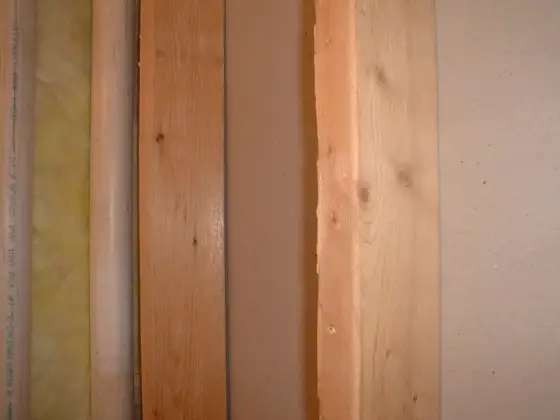
My cabin would be constructed with 2x6 walls and 2x12 floor joists to allow for maximum insulation. I would place a vapor barrier on the bottom side of the joists to make sure the cabin didn't get musty. Since I prefer lots of light, the windows would be a minimum of five feet tall and have very few, if any, mullions in the sashes. When inside, I would want to enjoy as much of the outdoor view as possible. The exterior door would be an insulated steel door with top of the line weatherstripping.

The cabin walls would include an air and water barrier wrap before the siding would be applied. This will help to minimize heat loss which means I would have to split less firewood. The interior walls would be wood covered and stained and sealed so that they are light and airy. I want the interior of the cabin to be bright at night. Keep in mind that most woods develop a patina over time and they naturally darken. A medium colored wood can become dark in less than 10 years. My cabin would have the best wood stove available. It would be equipped with a cooking surface and hopefully have space for an old fashioned Dutch oven. Because of my love of natural light, I would try to include at least 4 skylights. I would make sure that these could open slightly so that they would provide some wonderful up-flow ventilation on those balmy summer days.

Column 313

Carpenter Bees

Carpenter Bees

Look what those devils did to my gutter board! This channel was done by a carpenter bee in just a few days.

DEAR TIM: Every spring my house seems to attract large menacing bees or hornets. They show up out of nowhere and actually drill holes into the sides and other parts of my house. To make it worse, they keep me awake at night with their constant munching and crunching. What can be done to make these pest go away? What is the best way to repair the damage? Is there something I can do to repel these buzzing devils? Marie H., Philpot, KY

DEAR MARIE: I've got news for you. The insects you are talking about don't just stop by each spring, they are probably permanent residents. It sounds to me like you have an infestation of carpenter bees. The small holes that you see in your siding, soffits, window frames, etc. are actually the entryway to the nests where the bees raise their young. These bees love to drill into bare or unpainted softwoods. Redwood, pine, cypress and cedar seem to be their favorite wood species.

Carpenter bees are often confused with their cousins, regular bumble bees. A carpenter bee is usually 2/3 to one inch long and has a shiny black abdomen. A bumble bee is often slightly smaller and has a fuzzy abdomen with yellow markings. Bumble bees can and do sting with a vengeance. Male carpenter bees often frighten people because they fly close to their heads and hover as if they are going to attack. This activity is their only method of defense because Mother Nature failed to equip them with a stinger. Female carpenter bees can sting but they often only do so if you provoke them at or near their nesting sites.

Every spring male and female carpenter bees mate. The females then begin to build nests. They can drill new ones or remodel existing nest chambers from the previous year. The nesting chambers that extend from the entry holes can be extensive ranging from 6 inches to several feet long. The female carpenter bee is actually very resourceful and creates a maze like structure with twists and turns within the wood. There are small dead end branches off the main tunnels where a single egg is laid. The mama bee stores a glob of pollen next to the freshly laid egg. She then seals off this chamber. The baby carpenter bees develop into adults by the end of the summer but stay put in your wood siding, windows, trim, etc. until the following spring when they finally emerge to drill additional holes in your house.

Killing adult carpenter bees is not the best way to solve the problem. By the time you react to the bees presence, they have possibly already laid their eggs. The long term solution is to kill the developing larvae. Professional pest control people have found that blowing an insecticidal dust into the nest chambers seems to work best. If you do this early in the nesting process, the female carpenter bee carries the dust back to each egg site as she deposits the pollen food store for each egg. Look for a dust that contains a 5 percent carbonyl content. Use a sprayer or duster that has a long snout that can inject the dust deep into the wood.

Once the nests have been treated with dust, leave them alone for a week or so. This will allow the female bee plenty of time to distribute the dust within the chambers. Use small corks or pieces of wood dowel rod to fill the entry holes. Glue them in place once you have achieved a tight fit. The presence of freshly drilled holes tells you that new nesting activity is happening and that you must continue to dust the new chambers.

The best preventive measures are to keep susceptible wood painted. Semi-transparent stains are not an effective repellent. People who live in log homes or other wood sided structures that are not painted can apply chemical treatments, but these moisture sensitive chemicals often need to be re-applied every 2 to 4 weeks to prevent carpenter bees from boring into wood. This can be a maintenance headache, but is your only choice if you want the natural look of wood.

Column 314

New Homes

Damper on Duct Work

This heating duct has a damper control lever. Simple things like this are signs of quality construction.

DEAR TIM: My husband and I are at odds. We are having a new home built and I am paranoid about defects in the work that might go undiscovered. My husband seems to think we should just trust the builder to do his job. I want to go to the jobsite and check things out. What should I look for? What components of residential construction can cause major problems at a later date if they aren't done right the first time? How can I avoid squeaky floors? Judy H., Louisville, KY

DEAR JUDY: I'm glad you are alert because I feel your husband is asleep at the wheel on this one. If the ever increasing number of letters and e-mails I get each week are any indication of the state of quality control in residential housing, I am inclined to think you should be at the jobsite on a full time basis. In all fairness to your husband, there are indeed builders out there who do excellent work. They inspect their sub contractors daily and make sure all work is first class. The problem is that these individuals are few and far between.

Construction defects are often caught by building inspectors. But you can't expect these people to be at your jobsite on a daily basis. Workmanship flaws can and do get covered up. Some are honest mistakes while others can be traced to a lack of knowledge and/or are motivated by a lust for extra profit.

Keep in mind that your presence at a jobsite involves danger and risk. You can fall through holes, fall into trenches, have objects fall on your head, etc. Inspections should be scheduled with your builder and negotiated into your contract if necessary. Inspections that take place while workers are on site can be distracting and disruptive. I would suggest you do all inspections after the workers have gone home for the day.

The inspection process should begin on the first day of work. The first mistake to look for involves the finished height of your foundation or building slab. You need to make sure that you have good, positive drainage away from all points along the foundation. This usually means that you need six inches of fall within the first ten feet of dirt that grades away from the foundation. Check for the presence of foundation drain tile and where this pipe discharges its water. Make sure no organic material or scrap wood is used in the backfill around the foundation or slab.

Be sure that a high quality vapor barrier is in place beneath any interior slabs, garage floor slabs, and crawlspaces. Inspect all structural steel angle irons and beams before they are installed. To prevent rust problems at a later date, these items should be completely coated with rust inhibitive primers. Ideally it would be nice to see a coat of finish paint on exterior steel before it is installed.

Inspect plumbing pipes that are attached and/or are next to wood framing members. Look for clamps and supports that allow the pipe to expand and contract. Pipes that can't move easily, can make noise. If you will have forced air heating and cooling carefully inspect the duct work. The branch lines that feed off the main trunk line should have damper controls that allow you to adjust air flow. The main trunk duct line should get smaller in size as branch lines feed from it. If the main trunk line does not get smaller, rooms that are farthest away from the furnace simply do not get enough conditioned air. These problems can be a nightmare to fix once covered up with drywall.

If your home has a brick exterior, check to make sure a high quality flashing is under the first course of brick. This flashing needs to be sealed at all lap joints and interior and exterior corners. Inspect your wall insulation. Look to see if the insulation has been split where electric wires pass through it. If the insulation is just packed over the wires, an air void will remain in the wall. Make sure that the space between the rough framing and the sides of windows and doors is filled completely with softly packed insulation.

If you have a wood sub-floor and roof system look at the underside to make sure all nails have been driven into the floor joists and roof trusses. If you want to avoid future floor squeaks, you might need to do some work on your own. I would install one and five eighths inch long drywall screws on eight inch centers in all areas that will experience foot traffic. This will take several hours to accomplish, but will produce years of peaceful pleasure.

Column 317

Construction Contracts

DEAR TIM: I assume you are not an attorney but my guess is that you have a good grasp of contracts. I am getting ready to enter into a contract with a builder. The scope of the project is very large. Is it really worth all the trouble to get an attorney involved? If so, what are some good points and conditions to include in the contract. I want it to be fair to both parties but I also want to be well protected. Hollis B., Columbus, OH

DEAR HOLLIS: Building contracts come in all types and sizes. I know of large scale projects that were completed to the satisfaction of all parties where the contract was a simple one page document. Contracts represent the core of the mutual understanding between a builder and a homeowner. When you boil a building contract down, it should contain clear, crisp language that explains exactly what you are having built, exactly how much the project will cost, and when the job will be done.

You are correct in your assumption with regards to my lack of a license to practice law. As such, I can not offer legal advice. I can advise you, though, that it is very prudent to hire an attorney to review a contract prior to it being signed by either party. Once a contract has been signed by the parties named in the agreement, it is usually very hard to modify the document. A poorly written contract can cost you thousands and thousands of dollars in problems and heartaches. A consultation with a knowledgeable attorney may only cost you several hundred dollars.

Most contracts with builders contain a deposit clause. Deposits don't need to be large. They simply are a way for you to show that you are serious about going through with the project. If possible try to limit this earnest money to no more than $1,000. It is best if it can be held in an escrow or trust account. Large deposits should absolutely be placed in an interest bearing account.


How would you like me to build your new home? It's probably impossible for me to fit your job into my schedule, but I will gladly share hundreds of my tricks and building secrets with you and your builder. Check out my New House Specifications.


High quality plans and written specifications take much of the pain out of writing a precise contract. If the plans and specifications contain all of the details of what you want built, the contract, for the most part, simply needs to reference them by their date and the number of pages they contain. By doing this, most attorneys will tell you that the plans and specifications become an integral part of the contract.

Rarely do building projects run smoothly. Homeowners often decide to change their minds for any number of reasons. Some changes can be minor and a builder may make them without any objection or change in price. Contracts should include language that defines those change orders that can cause the price of the contract to rise or fall from the stated amount. This is usually done by stating a minimum dollar amount. These are the material changes that must be in writing. To protect yourself, you can also include a price ceiling for changes. Simply include language that states what the sum total of all changes can be.

The contract must also contain language that outlines deadlines. These should cover start and completion deadlines. Be sure to define what completion means. A Certificate of Occupancy certificate that is issued by the building department does not mean your project is finished, not by a long shot. The contract should address a dead end situation in the event the project never gets started. You should be allowed to back out with no loss of money in this situation.

Be sure there is clear language that outlines inspection rights in the event you want a third party to inspect the quantity and quality of the work. Discuss who carries insurance for the project while it is underway. Make sure the language addressing payments is synchronized with the payment schedule your lender will adhere to. Warranty terms need to be discussed as well.

If you are forced to sign a contract without it being reviewed by an attorney, include a simple contingency clause that gives you three to five days to have it reviewed by your legal counsel. If the builder objects to this clause, you definitely have chosen the wrong person to do business with!

Urethane House Paint

Green Door Narrow House

Urethane Paint | Read Tim's October 20, 2019 Newsletter to find out where this house is located. If you want to know how one picks a vibrant color as you see in the yellow and red, you should read my Selecting Exterior Paint Colors column.

Urethane Paint - It's Sticky and It's Fantastic

DEAR TIM: The exterior of my home needs to be painted this year. I would really like to buy a fantastic paint that will last a long time. In your opinion, what is the best exterior water-based paint? What are ideal painting conditions? Bradley G., Worthington, OH

DEAR BRADLEY: It sounds like you and I are in the same boat. I am painting my own home this summer. Fortunately for me, the preliminary work required to prepare my house for paint is minimal. My existing wood siding is in great shape and the previous coating is not peeling. Prep work is actually the most important part of any paint job. Whatever you do, do not take shortcuts as you prepare the surfaces for paint. Extra minutes spent in prep work can add years to the life span of a paint job. Always follow the instructions listed on paint can labels.

Is Paint Just Colored Glue?

Paints are simply glues that contain color. Poor-quality paints contain low-quality ingredients. These inexpensive paints are the ones that typically fail first. Until recently there were just two groups of exterior water-based paint. One type contains vinyl acetate as the glue or resin in the paint. The other group consists of those paints that contain 100 percent acrylic resin. Guess what? There is a new kid on the block. It is an exterior paint that contains both acrylic and water-based polyurethane resins.

urethane house paint

This is a urethane house paint. Look at the label. CLICK or TAP HERE to order it now.

Does Urethane Resin Stick Well to Siding and Trim?

The polyurethane resin or glue in this new exterior paint tenaciously holds onto whatever it contacts. I recently started to paint my own home with this new paint. As usually happens, I tend to get paint splatters on my hands, arms, and legs. In the old days, I could clean off these splatters quite easily at the end of the day with regular soap and water. The first day I used the polyurethane paint, I could not get the paint off my hands! I was in a state of shock, not at the appearance of my hands, but at how incredibly sticky the paint was!


Is the exterior of your house looking drab? Find the professional painters by using my Exterior Painting & Staining Checklist. I offer a 100% Money Back Guarantee.


Why Was Urethane Paint Developed?

The makers of this new paint actually developed it to save homeowners money. The instructions on the label of this new paint clearly state that you do not need to wash down dirty, glossy, or chalky surfaces before you paint. Evidently the polyurethane resin drives through the dirt and chalk and grabs hold of the previously painted surface. The manufacturers feel so strongly about this claim that they supply a lifetime warranty with the paint.

Should I Wash My House With Soap and Water Before Painting?

Yes, you must wash your house with soap and water before painting.

It goes against everything I have been taught and experienced to NOT clean a surface prior to painting. I feel it is always a great idea to do this extra step. If you wash the outside of your home with oxygen bleach and soap and water before you use the polyurethane paint, I can assure you that it will stick like you can't believe. I am washing my house by hand to get the best results. I avoid pressure washing because the process can damage the wood and drive water deep into cracks, holes, and the wood itself.

How Do You Use Oxygen Bleach?

I prefer to mix up oxygen bleach with hot water. Once I add the powder, I stir until it's dissolved and then put it in a hand-pump sprayer.

I then squirt the solution on the dirty surfaces so they are very wet. Keep the surfaces wet with the solution for about 5 or 10 minutes. Then apply the soapy water solution with a softer brush commonly used to clean RVs or the sides of large trucks. This brush is made to clean flat surfaces. Immediately rinse the surfaces with clean water after scrubbing.

How Much Surface Area Do You Clean?

I prefer to clean only 100 square feet of area if working alone. If I have a helper, that person squirts on the oxygen bleach solution and is the rinse person. This allows the scrubber to work constantly making great progress.

What is the Best Air Temperature to Paint?

If at all possible try to paint when the air temperature is between 50 and 85 F. You can actually exceed these limits in some instances and not void the warranty on most paints. Never paint in direct sunlight. Always paint surfaces after the sun has hit them. If you paint a surface and then the sun hits it, the paint can actually develop blisters in a matter of minutes!

Should I Paint in Stormy Weather?

Avoid painting when there is a threat of storms. A driving rain can quickly wash off a water-based paint from a surface causing all sorts of damage to roof areas, driveways, and sidewalks. Overcast days with relative humidity in the 50 percent range are ideal painting days. These weather conditions allow the paint to dry somewhat slowly. The slower dry time gives the paint adequate time to develop a strong chemical and mechanical bond to the surface being painted.

What Urethane Paint Did You Use?

The paint I used in the summer of 2010 to paint my New Hampshire house was Duration available at Sherwin Williams stores. Be SURE to ask for the manager and have her/him show you on the label the paint is made with urethane resin. Since that time, the Duration brand has transitioned to a lower-quality acrylic-resin paint. You now must ask for the Emerald brand as of 2023 OR click the paint can above and buy urethane paint on Amazon.com.

Here's how good the urethane paint looks after thirteen years of harsh winter weather! There's not one place where it's peeled.

urethane paint on fiber cement lap siding big pile of snow

This photo was taken the first week of March of 2023. This is how deep the snow can get at the end of my sidewalk where the snow blower piles it up high. A month later the sun had melted all of this frozen water. I could have built a fantastic snow cave inside this mound! Copyright 2023 Tim Carter

Soundproofing Rooms Solves Noise Problem

Soundproofing Rooms

Soundproofing Rooms

DEAR TIM: I have a problem with unwanted noise in my house. Not only can I hear sound from traffic and trains, but I hear people walking and talking on the different levels of my home. I am thinking of moving and don't want this problem in my new residence. Is there a way to minimize the noise problem in my existing home? If I do move, what can I do to make sure my new place is noise proof? Becky P., Clearwater, FL

DEAR BECKY: Noise problems are a common complaint from home owners, apartment dwellers and condominium owners. A vast majority of builders do not realize that common building practices do little to stop the transmission of noise within a structure. Anyone who has traveled and stayed in a fine resort or hotel knows that soundproofing a room is possible. The trouble is, to do it somewhat economically, it needs to be done as the structure is being built. Solving sound problems after the fact can often be an exercise in futility.


Sound is generated when an object vibrates. This can be a stereo speaker, your vocal cords, or a massive air horn on a train engine. The vibrating object creates sound waves in the air much like a stone creates ripple waves when thrown in a pond. When the sound waves traveling through the air hit our ears, they vibrate tiny bones that stimulate nerves in our brains. We interpret these as noise, music, conversation, etc. depending upon the source.

Soundproof rooms and structures are often built with solid masonry or special acoustically designed walls. When built correctly, these walls block air movement. The physical mass of solid walls is so much greater than a standard residential hollow wall built with 2x4's and drywall, that sound waves striking the wall can't easily cause the wall to vibrate. Typical residential wall and floor systems are simply drums. The drywall and plywood that span the wall studs and floor joists are simply skins stretched over a hollow void. When sound waves strike them, it passes through and vibrates the other side. Air leaks are common where drywall doesn't meet walls studs tightly.

I have solved sound and noise problems within existing homes to a certain degree. The first thing to do is to try to block sound waves that travel through the air. If you are trying to soundproof a bedroom, then you need to install a solid wood or solid core door. Install high quality weatherstripping around the door to block air from leaking around the door. Switching an interior door with a high quality exterior door that has weatherstripping is not a bad idea.

Use a special acoustical caulk that stays flexible for long periods of time to caulk around all doors and windows and where woodwork touches the floor. Imagine the room is going to be filled with water. Use the caulk to plug any possible place where water might leak from the room. Caulk around all electrical boxes as well.

Make sure that stairways and hallways have carpeting and padding if possible. This floor covering helps absorb, to a degree, reflected sound that is traveling from one room to another. Large hanging decorative wall fabrics will also help absorb sound. If you want to really get aggressive, consider adding an additional layer of drywall to walls and ceilings that are in between you and the source of the noise. This drywall increases wall and ceiling mass.

If you are going to build a new residence, it pays to hire an acoustical engineer. These professionals know how to design wall and floor systems that can make your new home as peaceful as possible. These engineers will work with all of the tradespeople to make sure that plumbing pipes, electrical boxes and heating and cooling systems are all installed correctly so that they do not create noise or act as pathways for noise to travel along from room to room.

If you are thinking about buying an existing residence, arrange to do a sound study. Ask to view the residence at different times of day. Early morning as people get ready to go to work might be an awkward time for a meeting, but it is an excellent time to listen for toilets, hair dryers, foot traffic, etc. Late afternoon and early evening are also excellent times as road traffic is heavy at this time. Simply bring a folding chair and sit and listen. You just might be surprised at what you hear!

Column 323

Fences

fence

Chain Link Fences

DEAR TIM: I would like to fence in my two acre lot with durable chain link fencing. When I obtain quotes from fence companies, I want them to be competitive. Are there different grades of material? What is the distance and depth that posts should be set? What about fence height? What else do I need to know to make sure that I get a top quality job? Ed P., Amesbury, MA

DEAR ED: If you want durability, you sure have selected the right material. Chain link fencing is probably the strongest fence you can buy. As for long term durability, the only thing better that immediately comes to mind would be a masonry wall. I personally don't like walls because they tend to create a fortress atmosphere. Modern vinyl coated chain link fencing allows you to still see what is on the other side of your property.

Independent lab testing has shown that not all chain link fences are created equal. They may look identical, but one fence can be far superior than the other. The wire fabric and the metal line posts and top rail come in different thicknesses. Fence salespeople and those in the industry commonly will refer to this thickness as gauge. Funny as it seems, as the gauge number gets smaller, the thickness of the material increases. High quality chain link fencing will often be constructed with fabric that is 11.5 or 11 gauge. The line posts and top rail that keeps these posts straight will have a wall thickness gauge of 15 or 16.

It is best to set the fence posts in concrete. Most residential fences will perform well if the hole diameter is 6 to 8 inches and approximately 24 to 30 inches deep. Deep holes prevent the fence from tipping over when kids try to climb it. Be sure the post holes are as wide at the bottom as they are at the top. This is very important for people who live in cold climates. If the post holes are narrow at the bottom, frost can actually pop the concrete and post out of the ground over time. Fence posts are commonly spaced at 7 to 10 foot intervals.

It is very important to make sure you compare apples to apples when shopping for fencing. A strong fence constructed with thicker materials usually only costs 10 to 15 percent more than a light duty chain link fence. A clever salesperson may show you an attractive low price, but you may be getting a loser fence. Keep in mind that the labor costs are nearly identical no matter what size material is being installed.

Chain link fences come in a variety of heights. The most common ones are 36, 42, 48, 60, and 72 inches. Make sure that your local zoning laws and sub-division covenants allow you to install this type of fencing. It is not uncommon to discover that there are fence height restrictions.

chain link fence

Chain link fences look and perform best when the top of the fence runs parallel with the surface of the ground. If you try to run the fence level, you can end up with holes beneath the fence or portions of the fence will be buried as they pass through high spots on the ground. Professional installers deal with these slope changes by installing terminal posts. These fence posts allow the fencing to rise and fall with the slope of your lot. Rookie fence installers or companies that try to cut corners will often ignore these very important components. Be sure you ask each salesperson where they intend to install these important terminal posts.

Don't forget to ask about the new colored chain link fencing. You can buy vinyl coated fabric that is deep green, black and brown. These fencing material blend in with the surrounding vegetation and landscaping. The fence posts and top rail are also available in colors if you purchase products from a top-flight company.

Column 324

Painting Around Woodwork

Painting Around WoodworkPainting Around Woodwork

DEAR TIM: I have stained oak trim in my home and want to paint the walls an off-white. I have tried using the special blue masking tape to keep the paint off the natural wood trim. No matter what I do, the paint job looks as if an amateur did it. What does one have to do to get crisp paint lines against natural wood trim or even different colored trim? There must be a way! Arthur B., Dearborn Heights, MI

DEAR ARTHUR: You bet there is a way. You need to know a few painting trade secrets, have a special high-quality paintbrush, and possess some decent hand-eye coordination. My guess is that the average person who drinks less than four cups of coffee a day will have a steady enough hand to control the paintbrush.

I have never been a big fan of using masking tape to create a crisp paint line. I have personally seen it used to create the color patterns found on NASCAR race car paint jobs and in the hobby industry, but in residential work many painters simply use skill.

The first thing you need to do is to caulk any small cracks that exist between the back edge of the oak trim and the wall. I prefer to use a siliconized acrylic caulk that is water washable. Take your time and cut the tip of the caulk tube so that the hole through which the caulk flows equals the diameter of a round toothpick. This small hole will allow you to deliver small amounts of caulk into these small cracks.


Is it time to paint your walls? Find the professional painters by using my Interior Painting & Staining Checklist. I offer a 100% Money Back Guarantee.


Apply the caulk in two-foot increments. Once it is applied, strike the fresh caulk with your finger to smooth it out, and immediately wipe the caulked area with a damp sponge to remove excess from the oak trim and the wall surface. It may take repeated strokes with the sponge to achieve this goal. Rinse the sponge as necessary to minimize streaks on the oak woodwork. When you are finished, there should be no caulk on the face or side of the oak trim.

Once the caulk dries you finish the job with a super high-quality paintbrush. Just about every full-service paint store, hardware store, or home center carries deluxe paintbrushes. The paint brushes that professional painters use have the ability to pick up and hold large amounts of paint. The brushes then release this paint in a steady flow. High-quality brushes are usually the most expensive ones you can buy. They are worth every penny.

The most important part of a paintbrush is the stock. All of the bristles in the brush make up the stock. They can be natural bristle or synthetic fibers. The best natural bristle comes from hogs that are raised in China. The color of these bristles is either black, yellow, or gray. Synthetic nylon or polyester fibers come in a range of colors. China bristle brushes are used almost exclusively for oil paints. Synthetic bristles can be used to apply just about any paint.

High-quality brushes have a natural taper when you look at them from the side. The longest bristles will be at the central core of the brush. The shortest bristle in the brush should never end less than one half inch from the tip of the stock. This is very important with respect to paint release and cutting in, the task you are about to do.

stain patio pavers

This is the exact high-quality paint brush I used in the video I did about staining Mexican pavers. The video is just below. Be sure to clean it out frequently and it will last for years. CLICK THE BRUSH NOW to have one delivered to your home.

You also need to purchase a brush that is no wider than 1.5 inches and whose stock has been angle cut at the factory. These brushes are often referred to as sash brushes. The angle-cut sash brush gives you a tremendous advantage when you glide it up next to the oak trim.

Dip the paintbrush into the paint can about one-half inch. There is no need to saturate all of the bristles to cut in against the trim. Gently wipe off the excess paint on both sides of the brush. Make the brush touch the wall one-half inch away from the oak trim. Apply light pressure so the bristles bend slightly and make a gentle curving stroke towards the edge of the oak trim. As you approach the oak, make sure just a few of the bristles in the top half of the brush actually glide up next to the trim. Carefully guide the brush down the edge of the trim for two or three inches and start the process over again to continue. With some practice, you will do just fine.

Column 325

Fiber Cement Siding – Durable and Loves Paint

fiber cement siding

This is a house covered with fiber cement siding. It was built probably in the late 1800s in Laconia NH. It's on Elm Street. That gray siding is fiber cement that could well be over 100 years old. See below for a close-up photo. Copyright 2017 Tim Carter

Fiber Cement Siding TIPS

DEAR TIM: I'm really tired of the ho-hum horizontal lap siding I see on so many new homes today. I'm looking for a unique siding style.

I grew up in an old house that had these tough, thin panels that resembled armor plating. Is this siding still available? What was it and how is it installed? Jenny W., Fresno, CA

DEAR JENNY: I know exactly what you are talking about! There are thousands of homes in my city that sport this incredibly durable siding material. It's simply fiber cement siding.

Related Links

Fiber Cement Installation HACKS

Modern Cement Siding FREEZING Damage!

Fiber Cement Developed in France

The product was developed in France about 100 years ago. In the first place, concrete paving is durable. The French developers modified the concrete making process and produce thin shingles that one could nail to a house.

The good news is that fiber cement siding is alive, well, and flourishing. What's more, several of the 100-year-old patterns are still available.

Free & Fast Bids

CLICK HERE to get FREE & FAST BIDS from local siding contractors who can install cement siding.

Old Fiber Cement Can Be Found In Many Cities

fiber cement siding

This is a closeup shot of thin fiber cement siding on the Laconia, NH house. This siding could well be eighty, or more, years old! Copyright 2017 Tim Carter

I can drive you by existing homes that still have this ancient siding on it. It may be dirty, but it's in excellent condition.

It's important to realize the older siding is still in great shape because the manufacturing process included asbestos fibers in the thin sheets of cement siding. Asbestos is a natural rock product that is unaffected by water.

The Portland cement and fine sand used in the old fiber cement siding are also waterproof. If you're lucky enough to have this old siding on your home or roof, it's the same as having a thin layer of rock protecting you from the elements. It's no wonder it lasts for decades with no wear!

Asbestos in Fiber Cement NOT A Hazard

The asbestos is NOT a hazard in this siding because it's not able to become airborne. It's locked into the Portland cement and sand matrix.

The first thing to remember is you can release asbestos fibers into the air if you cut into the siding creating lots of dust. The asbestos fibers can be contained if you keep water on the siding as you cut.

The water turns the dust into a safe slurry. Bottle the slurry and dispose of responsibly at your local landfill.

Modern Cement Siding

Modern fiber cement siding is a mixture of cement, wood fibers, finely ground sand, additives, and water. It resists, fire, insects, some water, wind, etc.

I have fiber cement siding on my recent home here in New Hampshire and if it soaks up water and freezes, the siding falls apart. I've often wondered why the manufacturers don't use fiberglass instead of the pulpy wood fibers that soak up the water allowing it to freeze and blow up the siding.

You were not far off when you compared the siding to armor plating. Cement siding is very nearly maintenance free. The original shingles developed 100 years ago required no finish.

They had different colored exterior skins. I know of 100-year-old cement siding houses that simply need to be washed to look as good as the day they were built.

CLICK HERE to get FREE & FAST BIDS from local siding contractors who can install cement siding.

Many Old & New Profiles

Fiber cement siding comes in a wide variety of styles. People who like the ho-hum horizontal lap siding that you find boring can find a number of fiber cement products to finish their homes.

The product even comes in large sheets similar to plywood. By all means the shingles you want are by far the most distinctive.

There are three basic types:

  • one with a wavy bottom edge
  • one with a straight bottom edge
  • one with a random notched bottom edge

The random notched edge resembles a thatched wood shingle. All of the shingles have either a combed textured or a wood-grained texture. They are very handsome.

Odd Old Sizes

These old style fiber cement shingles come in very peculiar sizes. The shingles range in height from 12 to 14 and 5/8 inches high and they are either 24, 25 and 3/32, or 32 inches long.

All of them are just under 1/4-inch thick. Not only can they be used for new homes, but they also are made so that they can act as replacement parts for old homes that have broken siding shingles.

They are also excellent materials to use for room additions to old fiber cement sided houses. The owners of those homes end up with an expanded house that matches nearly perfectly with the exterior construction details of the original home.

Easy to Install But Tough to Cut

Fiber cement siding or shingles are easy to install. The new house or room addition needs to be covered with oriented strand board or plywood. This provides a solid nailing surface.

The unique shingles come with factory punched holes that serve as handy alignment guides. It's best to use small headed stainless steel nails as the nail heads are exposed.

Most manufacturers require that asphalt-saturated felt paper or a air and water barrier be used under the siding. Do not use coal tar saturated felt paper.

The oils in this product can stain some fiber cement products. The siding is cut with a saw fitted with an abrasive blade, a snapper, power shears, or it can often be scored and snapped like drywall.

Beware Cutting Dust

The dust created when cutting cement siding is unhealthy. It contains silica. Wear approved dust masks to avoid hurting your lungs.

Paint Loves Cement Siding

Fiber cement shingles and siding can be painted. They hold paint very well because the products do not expand and contract with changes in humidity.

If you buy high-quality paint and follow the recommendations of the siding and paint manufacturers, it's entirely possible that your next paint job will be twenty to twenty-five years from now.

All things considered always wash siding first with soap and water before you attempt to repaint it. You just might be surprised how good it looks!

CLICK HERE to get FREE & FAST BIDS from local siding contractors who can install cement siding.

Column 327

Replace Hollow Core Doors With Solid Wood

kitchen pantry door

This is the door to our kitchen pantry. Look at the next photo to get a close-up view of the raised molding around each raised panel. Now that is a classic detail!

Replacing Hollow Core Doors With Solid Wood

DEAR TIM: I would like to switch out the interior doors in my house. My current doors are hollow core and have a simulated wood grain that I don't care for. The house I grew up in had delightful solid wood doors. I really miss the feel of solid wood doors. Can you still get traditional solid wood doors? If so, what kind of styles and options are available? Tom B. Tampa, FL

DEAR TOM: Welcome to the club! My wife and I also share your feelings about hollow core doors. Hollow core doors are a fantastic product because they allow lumber mills and door manufacturers to efficiently use wood products that used to be wasted. The trouble is these hollow doors are simply not a substitute for a solid wood door.

If you just want the feel of solid wood and the appearance of the door is not too critical, you can buy hollow core styled interior doors that have a solid core. This core is made from engineered wood products that help conserve our wood resources. These are great choices if you wish to help soundproof a bedroom, bathroom, powder room or some other room in a house.

The traditional solid wood doors that were common in houses built 100 or more years ago are still available. Possibly the most popular wood species used is white pine. It is not uncommon to find that these doors have solid wood raised panels. But the structural stiles and rails that make up the vertical and horizontal components that surround the raised panels, can often be different pieces of solid wood that are covered with a high quality veneer skin. Make sure you keep this in mind if you decide to sand a door heavily. Too much sanding will erode the thin veneer.

I recently purchased some gorgeous solid poplar 4 panel doors that look exactly like ones I have refinished in 100 year old Victorian houses. These doors are made from solid pieces of poplar and I had my choice of four different profiles for the raised panels. Different manufacturers have all sorts of door styles to match just about any architectural time period. I had my doors customized for just a small up charge. The door company installed a custom milled piece of molding around each raised panel to give the doors a unique 100 year old look.

To really whet your appetite imagine ordering your new doors and being able to specify that the door company use oak, cherry, maple, mahogany, and knotty pine or several other species. These choices are available and the finished doors will take your breath away.

The cost of the solid wood doors is higher than what you will pay for a hollow core wood door. But you do not need to mortgage the farm to get them. I purchased my customized solid poplar doors with a full 3/4 inch thick solid poplar door jamb for less than $200 apiece. (September 2000)

kitchen pantry door close up

The locksets I put in are authentic as well. They are full-mortise and you use a skeleton key to lock them.

If you really want to make your new doors look like old doors, why not finish them off with authentic hardware as I did? Solid brass square tip hinges are readily available from major hardware manufacturers. Many hinges you find on most modern doors are rounded. This is done because the spinning router bits that are used to create the recessed hinge area simply can't make crisp 90 degree angle corners. You can even purchase accessory kits for the hinges that transform the hinge pins into the old ball style or Victorian chimney style finials.

To complete the transformation, you can also install new high quality old fashioned lock sets that use traditional skeleton keys. This hardware comes with different styled forged solid brass knobs and back plates. You can even get the old fashioned crystal knobs if you like. The total cost for the lock set, back plates and knobs is often less than $90.

Column 328