Shoe Storage

Shoe Storage - Closet Cubby
DEAR TIM: The bottom of my closets are a mess. Shoes, boots and who knows what live down there. I'll bet you provided shoe-storage solutions in the houses you built. How can I solve my messy problem and maximize the floor and wall space under the hanging clothes in my closet? I have seen closet organizers in stores but would prefer a custom solution. Hollis B., Dublin, OH

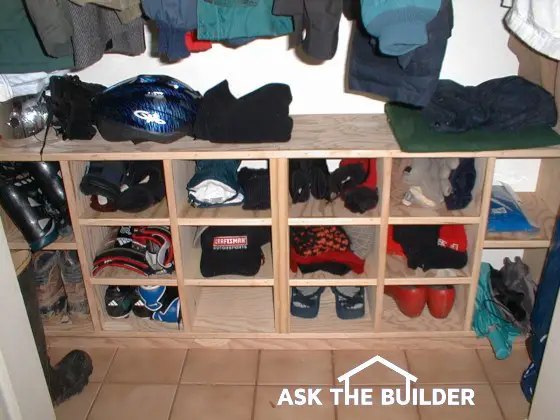
DEAR HOLLIS: I think many people have the same clutter problem that you are dealing with. In fact, I just solved a similar problem in my own mud-room closet. Using scrap plywood and several hours of time, I made a cool shoe storage bin. I have built many closet organizers over the years for customers and finally did one for my wife. As you might imagine she is happy to see the closet floor once again.

I decided long ago that closet storage problems could be solved using the same methodology that can be found in old fashioned roll top desks. The pigeon hole system found in these pieces of furniture maximize the vertical air space that rises above the back surface of the desktop. Expand the size of the pigeon holes for a closet space and you can store just about every hard or soft clothing item that you own. The trick is to make the organizational slots the right size. The goal is to fill the space between the floor and the clothes with as many slots as possible but make them large enough so they can be accessed without banging your knuckles.

Over the years, I have found that a perfect closet cubby hole for shoes is one that is nine inches wide, six inches high and eleven and one half inches deep. These work for all standard shoes and slippers. Work boots, roller blades and other large footwear need a space that is at least ten inches wide and up to twelve inches high. The eleven and one half inch depth works for these but sometimes part of the larger item may project past the front of the organizer.

These closet cubby organizers should not be too tall. In fact, I always try to have the top of my organizer stop about eight inches below the bottom of the hanging clothes. The top of the cubby organizer acts as a shelf for boxes, helmets, or other miscellaneous items. It also saves on material and assembly time.

You need to think ahead when you build these systems. Because a typical closet has a door opening smaller than the inside width of the actual closet, you can't make one large unit and place it in a typical closet. The organizer needs to be two or more pieces that are mated together once inside the closet. The parts can be equal in size or one can be wider than the other. You simply need to make sure you can get each piece inside the closet.

I prefer to use scrap 3/4 inch plywood for these closet cubby systems. You can purchase fir or yellow pine plywood that has one or more good veneer faces. But even if one side is not so good, you will rarely see the imperfections once the cubby holes are filled with shoes, gloves, hats, etc. I use a thin piece of screen stop molding that is 3/4 inch wide by 1/4 inch thick to hide the coarse plywood edge of each divider. These need to be glued and nailed to the plywood edges.

You can use thinner material to make the closet organizer but it requires lots of skill to fasten the pieces together. If you nail into the side of a divider to secure a horizontal shelf piece, your nail may miss the narrow width target. If you own or rent a router, you can use a standard straight bit to create a handy mortise channel for each shelf to fit into the vertical dividers. This is how I assembled my closet cubby organizer.

The beauty of this system is that you can make different modules and stack them next to one another. If you have lots of smaller items to store perhaps one size slot will work for all items. Keep in mind that you must keep the space in front of the organizer free of items for this system to work. The purpose of the closet cubby is to allow you to see what you have and to allow quick and easy access to the items. If you start stacking things in front of the organizer, you will be no better off than you are now.

Related Articles: Closet Organizers, Adding Closet Storage Space, Two Closet Plans - Materials, Two Closet Plans - Build

Column 388

Entertainment Centers

entertainment center

This photo doesn't do my center justice. The camera makes the center look like hobbit furniture. The center is nearly 15 feet wide! That is a cool custom coffee table with two working model trains under the glass top.

DEAR TIM: My television, VCR, stereo receiver and DVD player are a jumbled mess. Add to this my collection of tapes and you can see I need some organizational help. Is it possible to arrange all of these things in a set of beautiful cabinetry without going to the poorhouse? Where does one start? What should I include in this entertainment center? Eric M., Boston, MA

DEAR ERIC: Talk about being at the right place at the right time. I have seen the design emphasis shift to different parts of a home on a fairly regular basis. Recently the home office was in the cross hairs of the design professionals . Before that it was the master bedroom bathroom suite. Years ago it was the family room. One of the current hot spots of interior home design happens to be an entertainment room for those that afford this luxury. For those of us that can't, a wonderful affordable alternative has come of age- the entertainment center.

Many of the cabinet companies that have made kitchen and bathroom cabinets for years saw this trend emerging. These companies decided to expand their cabinet line to offer a multitude of specialty cabinets that you can mix and match to create a highly functional entertainment center that will house all of your electronic gear. The look of these centers is stunning. Just last month I installed a set of factory made cabinets that appear as if they were custom made for my basement space.

In a matter of speaking, my cabinets were custom made. My wife and I selected the style, the wood species- we used real cherry wood- and the stain color. A professional designer who worked for the cabinet retailer developed a plan for us after we supplied her with the width and height of our opening. Because our available space was nearly 14 feet wide, the designer was able to include a huge TV cabinet, tall storage cabinets, drawer bases and bookshelves. If your available space is just eight to ten feet wide, you can create a deluxe center.

Your entertainment center TV cabinet must have fold away pocket doors. These doors open and fold back along the inside of the cabinet. Lesser quality cabinets have traditional doors that open and swing back in front of the other cabinetry next to the TV cabinet. If your VCR, DVD player and cable TV box are in cabinets next to the actual TV, these solid wood doors will block the hand held remote control signals. Glass doors are a must if you decide to place your remote controlled equipment in these areas. Keep in mind that electronic equipment produces heat. This heat can damage the sensitive circuit boards and micro-chips within the equipment. Be sure that air can flow naturally up and over the equipment to cool it off.

entertainment center

A close-up view of the left side of my center that was made by putting together standard factory cabinets and trim!

Look for cabinets that are available in different heights and depths. The primary cabinet is almost always the TV cabinet. It can be as tall as 84 inches and as deep as 29 inches. The cabinets next to the massive TV cabinet are slightly shorter- 789 inches- and only 22 inches deep. This multi-layered design creates depth and makes for a highly interesting appearance. To achieve a total custom look, try to include filler strips that have fluted overlay strips of wood or accent blocks where you can attach decorative rosettes. Roping and other thin decorative overlay wood molding pieces also add character. If at all possible try to include open shelving to display books and other decorative items. Don't forget to include decorative crown molding that will really create that custom look.

There are booby traps you need to avoid. Check and double check again your measurements. The best advice is to have the cabinet designer or a professional installer come to your home to take the measurements. Don't try to fit too many different cabinets in a smaller space. Be careful about designing a cabinet(s) for a particular piece of electronic hardware. Technology changes so rapidly that a newer or replacement model simply may not fit well into the space you created.

I encourage you work with a professional designer. Many cabinet showrooms employ such people. They are trained to take advantage of every option should your situation allow for it. You can help them by providing them with photographs or with pages torn from a magazine that show different entertainment center concepts that appeal to you. To insure that the designer is up to your task, ask for photographs or plans of entertainment centers he/she has designed.

Column 389

Removing Grout

tools to remove grout

These four items will help you. The piece of wood with a fairly crisply cut ends will scrape big pieces of grout. The green scouring pad is great on grout film. The gloves and sponge will help as well.

DEAR TIM: Help! As I watched my ceramic tile floor being grouted it looked fantastic. But after the installer left and the floor dried, there was excess grout on many tiles and a haze over all of the tiles. Is the floor ruined? What can I do to make the floor look perfect? What went wrong? Is there a way to avoid this mess? Theresa B., Avon, OH

DEAR THERESA: More often than not the new tile floor can be made to look like new. But there is a chance that the floor may be ruined. Let's hope and pray the installer did not use an epoxy grout. If he did, the floor might be toast as these grouts aren't called epoxy for nothing! Epoxy grouts are fairly easy to identify before they become a problem. The installer has to mix two separate components to activate the aggressive epoxy adhesive. I would think you might have seen this happen.

The most common grout used for ceramic tile is Portland cement based. There are different types and it is not uncommon to see a fortified grout that contains an additional acrylic water activated adhesive. Liquid additives are also available that enhance standard cement grout. These additives increase the bond and wearability of the grout. They also make it a little tougher, but not impossible, to remove excess grout and the haze that are disfiguring your new floor.

The first thing to do is to respond quickly. As the clock continues to tick, the grout and additives gain strength and get harder and harder to remove. Do not attempt to remove any of the grout or film with a metal scrapper or steel wool. You can permanently scar and damage the tile surface with these tools. I prefer to use solid oak sticks that have crisp squared off edges, nylon or synthetic fiber scouring pads found at almost all grocery or ceramic tile stores, tile grout sponges and vast quantities of fresh clean water to remove the excess grout from the tile.

Use the oak sticks to scrape off excess grout from the tile surface and to remove high grout spots within a grout joint. Vacuum the loose grout as you go. If you leave this grit on the tile surface while you scrub during the next step, you run the risk of scratching the tile surface. If the crisp edges of the oak sticks become dull, simply trim the end of the stick to produce a new edge. Wearing gloves will prevent blisters and minimize the risk of getting splinters from the oak sticks.

Once the excess grout is cleaned from the surface it is time to remove the grout haze. This is accomplished by scrubbing the surface of the tile with the synthetic scouring pads. Apply a generous amount of water to the tile surface and begin to scrub. To test the effectiveness of the pad, work on just two or three tiles. The clean water should rapidly turn to the color of the grout as you scrub with the pad. Use the tile grout sponge to remove the colored water from the surface of the tile. Rinse the tile surface with clear water. Use old rags or a few paper towels to immediately dry the tiles. You should see improvement if not perfection. If so, continue cleaning the rest of the floor. There is a very good chance you will need numerous scouring pads to complete the job.


Restore the "clean" to your grout. Just go to STAIN-SOLVER to see the beautiful, quick results.


This mess could have been prevented. A professional tile setter would never have left the job in this state in the first place. Furthermore, he would have identified the type of tile he was working with before he started to grout. Some tiles are not glazed and/or have very porous surfaces. These tiles need to be sealed first or you can choose to apply a grout release agent over the tile before you grout. These grout release agents prevent stains caused by the grouting process and are a very good idea when the grout color is different from the color of the tile.

Tiles or slate that have a rough or textured surface require special precautions. It can be a nightmare to remove grout and haze after the fact. These products must be grouted with the greatest care to prevent problems. In these instances you should grout slowly and cautiously making sure that all excess grout is removed from the face of the tile or slate.

I know this is going to sound crazy, but try it. Take one gallon of warm water and dissolve a cup of sugar into it. Take this sweet solution and pour it onto excess grout on a floor. If you have wall tile with too much grout, then soak paper towels in the solution and place them on the tile.

Keep the tile wet with the sugar water for at least two hours. After this dwell time is complete, use a nylon scrub pad and scrub a small area. You should see instant results. It may take more than one application of sugar water to completely remove the grout film.

Column 390

Cabinet Painting

painting cabinets

DEAR TIM: My 16-year-old plastic laminate cabinets are a neutral color with colonial blue doors. The are horribly dated. I can't afford new cabinets but must do something. Can I successfully apply crackle paint to them to improve their look? Would this present problems? Do I have other options? Maria D. Cape Coral, FL

DEAR MARIA: Good news! You absolutely can paint those cabinets. If you have a miter saw you can do a little extra finish carpentry before you break out the brush to really enhance the look of your kitchen. Once you are finished, your friends and neighbors will be astonished at what you have accomplished.

The finish on kitchen cabinets needs to be hard and easy to clean. I am concerned about how easy it might be to clean the depressed areas in a crackle finish. Even with multiple coats of clear urethane over the crackle finish, you may have a problem. If the people you live with are fairly neat and clean, then I would move ahead with the crackle concept.

For your information, one of the hardest finish paints you can buy is an epoxy modified alkyd paint. Typically these are available as spray paints. Working with spray products demands a high level of skill. If you decide to use this type of paint for any reason, I suggest you practice first on some other similar surface to see what kind of results you get.

If you do decide to crackle, try to find a crackle kit that uses oil based paints. Often these paints dry with exceptional hardness within 48 hours. This characteristic allows you to reinstall cabinet doors and drawers with minimal fear of the paint finish on these moving parts sticking to the freshly painted fixed cabinet frames.


Author's Note: I have a wonderful step-by-step eBook that shows you how to get professional results when painting cabinets. It is easy to follow and affordable. Plus, you get the eBook instantly!


It is vitally important that you prepare the cabinets properly before starting to paint. You need to clean the cabinets well and slightly roughen up the surface so the paint sticks well. I prefer to use oil based primers as they seem to have superior adhesive qualities. Keep in mind that it is very important to apply the finish paint as soon as the oil primer has cured. The label on the primer often tells you when it is advisable to re-coat. The finish paint will grab and hold better if you apply it as soon as you are allowed to do so.

To achieve professional results you must take the cabinet doors off the frames and remove all hardware including hinges. The drawers need to be removed as well. This allows you to paint the parts of the cabinets independently. For large flat surfaces you can use a small paint roller to apply the paint. Use a high quality brush to apply finish paint strokes after you have spread the paint with the roller.

To really give the paint job added protection, consider applying a non-yellowing clear polyurethane to the painted surfaces once they have dried. I would apply no less than two coats to give you years of trouble free service.

If you desire you can add different small wood moldings to the cabinet doors and drawers and sometimes decorative crown molding to the top of the cabinets. These moldings can dramatically change the look of the cabinets. Visit an old fashioned lumber yard or other retailer that offers a selection of 30 or more molding styles. A raised molding on your flat laminate doors will provide needed relief. A simple miter box with a hand saw is often sufficient to make precision cuts.

Column 391

Compact Fluorescent Light Bulbs

Compact Fluorescent Light Bulb

These crazy looking bulbs work and they save money. If your family leaves on lights like mine does, you will see a big difference in your electric usage should you replace lots of your ordinary bulbs with these.

DEAR TIM: I want to conserve and cut down on my electricity usage. During the winter my interior lights are on for long periods of time. I turn lights off and have started to use standard bulbs that are lower wattage. Now it is so dark and dim I feel like I live in a cave. Are those newer compact fluorescent light bulbs (CFLs) as good as advertised? Will they produce enough light? Joanne O., Wenham, MA

DEAR JOANNE: More people need to think like you do. Not only will lots of money be saved but the planet's natural resources will also be conserved for future generations. People need to be constantly reminded that Mother Nature can not create coal, oil and natural gas as fast as we use it. Much of the electricity we consume is generated using these fossil fuels.

Two things work against us during the winter months. Not only are the nights considerably longer, but most people tend to stay indoors out of the cold weather. It is not uncommon for electricity used for indoor lighting to surge 250 percent or more from what you might use in the summer months. Although it is a great idea to save energy on lighting every day, you get the best return on investment in the dead of winter.

The CFLs really save money. In almost all cases, a CFL bulb will only consume 25 percent of the electricity that is gobbled up by a wasteful standard incandescent bulb. Yet the amazing reality is that this smaller wattage CFL bulb produces the same amount of light as a traditional bulb. The color/glow is also exactly the same, so don't worry that the inside of your home is going to have the harsh look of an office building. The CFLs are designed to produce light that is ideal for the inside of the average home.

To achieve savings that you can really see on your utility bill you need to embark on a program to change as many of your traditional bulbs as quickly as possible. For example, the average living room might have two table lamps, possibly two recessed lights and maybe a ceiling fan light. If you replace all of the bulbs in this one room with CFLs, you could easily save close to $32.00 per year. If you do a quick analysis of the remaining bulbs in your home, you might discover that you can save a whopping $260.00 per year.

Another often overlooked benefit of the CFLs bulbs is that they last typically eight to ten times longer than a standard incandescent bulb. This means that year in and year out you will continue to save enormous amounts of money. In fact, some CFL bulb manufacturers guarantee their bulbs to last a minimum of seven years. Simple math shows that a CFL bulb might pay for itself in just replacement costs alone! Add in the energy savings and you can see why 65 percent of the households in Germany use CFL bulbs throughout their homes.

The CFL bulbs are available in a variety of sizes. Not only can you get ones that replace a standard light bulb, you can also get reflective bulbs that are designed to work in recessed light fixtures. Even tiny CFLs are made for candelabra fixtures. If you live in a warmer climate you can confidently use these bulbs in outdoor applications. Cold air temperatures can affect the startup of the bulbs and some CFLs do not work if the temperature drops below 20F.

When you go to buy CFL bulbs you need to pay attention to the wattage of the bulb. Keep in mind that a 15 watt CFL bulb produces the same amount of light as a 60 watt incandescent bulb. Some manufacturers have wonderful packaging that shows you exactly what type of bulb the CFL is replacing. When you get home and turn your CFLs on, they will react like you do when you first get up in the morning. It takes several seconds for them to get up to full brightness. Don't think that the bulbs are defective. Trust me, you are going to have the brightest cave on the block!

Column 393

Squirrel Proof Birdfeeders

Squirrel Proof Birdfeeders

DEAR TIM: I know you build houses but have any customers asked you to solve outdoor pest problems? I love feeding birds but hate the pesky squirrels who have figured out a way to get on every bird feeder I have tried. Some feeders are squirrel-proof but I don't even want the pests on the feeders in the first place as they scare away the birds. Have you or one of your customers ever had this same problem? Do you have any ideas as I am at my wits end. Celia D., Pine Bluff, AR

DEAR CELIA: Believe it or not I have had requests just like this. In fact, my wife asked me to solve the same problem. She loves to feed outdoor birds and I must admit it is very interesting to see the many birds that are attracted to our different feeders. The squirrels that visit my house must be related to your clan as they have always been able to figure out a way to get on my feeders. I have purchased so many squirrel deflectors and shields I could start a museum. But six months ago I finally devised a 100 percent squirrel proff method of hanging bird feeders.

Squirrels are fascinating little animals. They are so industrious and determined. What's more, they are smart. I have watched them study a situation and try different approaches to solve a problem. The are agile climbers that can scale a smooth metal pipe like you or I would climb a ladder. Knowing this made it clear to me that solving the squirrel problem meant the elimination of poles that held my feeders. I decided to try to hang my feeders from a thin wire that crosses over the back edge of my rear patio.

Over the years, I used to watch squirrels walk across utility wires as we ate lunch at different jobsites. Squirrels could easily traverse a single strand wire with or without insulation. But the average high voltage wire is fairly thick and allows the squirrel's feet to get a decent purchase. I decided to experiment with a very small diameter, but exceptionally strong wire.

One visit to my friendly neighborhood hardware store was all I had to do. Once there I found that they stock 1/16th inch diameter galvanized wire rope and two different types of cable clamps. In addition, I purchased two 1/4 inch diameter open hooks. One hook was placed at a corner of my garage and the other hook was placed in the trunk of a massive pine tree about 35 feet away from the garage. To make sure the suspended wire would not be a hazard to anyone walking under it, I decided to keep it about 12 feet up in the air.

The hardware store had U-shaped cable clamps that matched the wire size I was using. These clamps allow you to create a fixed loop at each end of the wire. The clamp has a small nut on each leg of the U clamp. As you draw them tight it squeezes the clamp tightly so the wire making the loops can't slide back through the clamp. The creation of the two sturdy loops allowed me to hang the wire tightly between the two open hooks. For extra insurance I used two clamps at each end of the wire.

The wire is so strong it easily allows me to suspend five different feeders full of food. I used a different style smaller friction clamp to attach 5 foot long pieces of wire for the feeders. The smaller clamps are activated by a hammer blow that flattens the soft metal clamp. It is important that the bottom of a feeder is a minimum of 5 feet from the ground or any nearby ledge, table, flower pot, etc. that a squirrel could use as a launching pad. I have seen squirrels leap vertically nearly four feet in an attempt to jump to my suspended feeders.

You don't need a garage or a tree(s) to achieve what I did. Simply install two 4x4 posts in the ground that are at minimum of 14 feet from one another. Placing the posts much closer than this will tempt a squirrel to jump from the post to a feeder. The tops of these posts should be at least 10 feet out of the ground. Suspend your wire from the tops of these posts. The squirrels will easily climb the posts in an attempt to get to the feeders but watch with satisfaction as they try and try to walk across the thin wire towards an easy lunch.

Column 394

Glass and Acrylic Blocks Do Many Things

glass block bar

DEAR TIM: I would like to jazz up a home I am renovating. Glass block has really got my attention. It seems like I can use it in numerous places but I wonder if there are limitations. Do you have some cool suggested uses for glass block other than windows? Is the block as easy to install as the television shows portray? I am skeptical to say the least. Mandy O., Riverside, CA

DEAR MANDY: I must compliment you on your choice of building materials. Glass block is indeed a unique building material that seems to blend with many architectural styles. In addition, it is a rare oxymoron building material. It can provide privacy, yet permit enormous amounts of light to pass from room to room or from outdoors to indoors. Don't feel that glass block is limited to renovation and remodeling as it is an excellent building material for new homes too.

Keep in mind that there are two types of clear building blocks: one is indeed made from glass but the other one is lightweight, crystal clear acrylic. The acrylic block is tough and virtually indestructible. Both types offer you tremendous design opportunities.

Two traditional rooms where you often find the greatest use of glass block are the bathroom and the kitchen. Glass block makes for a very contemporary shower stall. One of the coolest uses is to purchase a special molded shower base that has a wide ledge made especially for the waterproof glass block. One of the walls of the walk-in shower stall has a tight curve that eliminates the need for a shower door. It is similar to the entries into restrooms you often see at airports. Glass block can also be used as the support walls beneath a whirlpool tub and as a low wall around a whirlpool if you want to make a cozy retreat to soak in after a hard day at work.

Kitchen islands are a very interesting place to use glass block. You can highlight the block with colored lights to make the glass glow at night. Open shelving can be incorporated into the glass block for a very modern look. If you want, simply install two U-shaped glass block returns at either end of an island for a decorative look. Glass block can support a peninsula bar that is used for chatting or informal eating. If your cabinets are on exterior walls, glass block can be used as the backsplash connector between the countertop and the wall cabinets. They allow sunlight to stream into this otherwise hard to light location.

Combining glass block with a direct vent gas fireplace is another option. You can actually place the fireplace in the middle of a room and use glass block to create bookcases on either side of the fireplace one of which dead ends on an exterior wall. Behind the bookcase that connects to the exterior wall, a chase can be built to hide the necessary intake and exhaust piping for the fireplace.

Consider using glass block to build the guardrail for a balcony. You will need a metal cap to top off the block. This metal cap is securely fastened to the walls to prevent the guardrail from tipping over to the floor below. If you decide to use glass block for this purpose, be sure it is engineered by a professional to insure the highest level of safety.

An interesting use of glass block is at the front door. It is a wonderful material to use as a sidelight(s) adjacent to the front door. The glass permits vast amounts of daylight to enter into the entrance hall. At night, interior light that streams through the block provides a pleasing illuminated frame for your front door.

Use glass block for room partitions, especially if you want to bring exterior light from one room to another. A simple but effective use of glass block is for a basic bookshelf. You can place individual glass blocks apart from one another and lay boards across them. Use different height blocks to accommodate different sized books. If the bookshelf rises above four feet, be sure to use an L bracket or two to connect the shelves to the wall. Tall bookshelves can be unstable and a safety hazard around small children.

Working with glass and acrylic blocks requires a certain level of skill. The manufacturers have developed useful accessories to help lay block level and plumb, but trust me, it is not as easy as it looks on television. If you decide to try it yourself, I suggest you start with a very small project and after you succeed, go to a more difficult one.

Author's Note: We've received other questions with similar problems or questions. Here's one from Lena K. of Rockville, MD, regarding basement replacement windows.

"Our basement windows leak air as well as water when snow melts. The house was built in 1965 and the windows seem to be from that time. They are below the ground level with wells dug out around them. They are set directly into concrete blocks. I looked at different replacement window manufactures and installers, and none of the ones I saw offer specific windows for basements. Do you have any suggestions? (We aren't planning on doing the replacement ourselves). Thank you."

Companion Articles:  Glass Block Installation, Glass Block, Glass Block Manufacturers, Glass Block Greenhouse

Column 395

Little Things Add Up to Save Energy

radiant barrier chips

These chips reflect heat back to its source and help lower my fuel bills in summer and winter.

DEAR TIM: My utility bills are going up and up. I want to save energy in every way possible. There seem to be many differences of opinion as to how to save energy and still be comfortable. What tips give you the biggest bang for your buck? If building a new home, where can I save future energy dollars? What have you done personally to save money on your utility bills? Carol K., Cleveland, OH

DEAR CAROL: I wish the newspaper would give me the entire page for this topic! I will do my best to give you some money saving ideas in the space permitted. Let's get to work.

The first thing to do is look at your actual utility bill(s). Get a feel for what you spend on a daily basis for electricity and any other fuels. Once you do this and consider all of the things in your home that consume energy, you will see that overall energy consumption is actually a bunch of small components that add up each day to a bigger number. When these daily numbers are totaled at the end of a month, it can be a big number. Understanding this will tell you that rarely no one single thing is going to drastically cut your bills. To create a difference you can see in your checkbook, you need to do many things.

Heating and cooling requirements devour large amounts of energy. But beware of falling into the trap of keeping the thermostat turned way down in the winter and suffering while you are home and awake. The time to save considerable money is when you are not at home or are asleep. During the heating season, every degree you go down from 72 F saves three percent over a 24 hour period. A programmable thermostat allows you to automatically achieve this goal and keeps your home comfortable when you are awake and moving about. These affordable devices accomplish the same savings during the cooling season.

How Does the Air Escape? Graphic courtesy of U.S. Department of Energy. From their <em>Energy Savers Tips on Saving Energy & Money at Home</em>.

How Does the Air Escape? Graphic courtesy of U.S. Department of Energy. From their Energy Savers Tips on Saving Energy & Money at Home.

Air leakage around doors and windows can also add up. High performance doors and windows that carry the Energy Star label can save money over time. These products have superb weatherstripping and windows can be purchased with high performance glass that saves even more money. Existing windows and doors that leak air should be repaired to minimize air infiltration.

Older refrigerators, freezers and washing machines can consume vast amounts of energy. Keep refrigerators full of food or fill voids with bottles of water to take up space. Once the bottled water gets cold, it helps keep things cold in the refrigerator each time you open it up and introduce warm air. Use only as much water to wash clothes as necessary. Do full loads of laundry as often as possible.

If building a new home or replacing HVAC equipment, purchase furnaces with the highest energy efficiency rating. Look for air conditioners with a SEEP rating of 12 or higher. Use air infiltration barriers and be sure the seams of this material are taped. Buy professional model water heaters that often have superior foam insulation surrounding the storage tank.

I save money in the following ways: I have programmable thermostats and set back the temperature at least eight degrees when I am gone and sleeping. Many of my traditional incandescent light bulbs are being replaced with new super efficient compact fluorescent bulbs. Last year, a company blew innovative metal foil chips over the insulation in my attic. These chips reflect heat back to its source and help lower my fuel bills in summer and winter. I always buy appliances and electronic equipment that carries the Energy Star label. These devices are designed to save money.

Column 396

Contract Payments

paying contractors

DEAR TIM: You and other people constantly write about how homeowners need to protect themselves from contractors who take their money and perform shoddy work or no work and disappear. What about homeowners who don't pay for work? I have had several customers who nit pick a job to death and withhold tens of thousands of dollars until several small items are completed. I have bills to pay just like everyone else. What is a fair way to solve money problems between homeowners and contractors? Robin S., Kansas City, MO

DEAR ROBIN: Touche! Years ago, I was in a similar situation. I am convinced that hundreds and thousands of homeowners torment contractors for all sorts of reasons. Some of them are legitimate while others are based on past bitter experiences, lack of goodwill, and distrust of contractors as a whole. Unfortunately, there is a small group of very bad homeowners who simply wish to cheat contractors out of money just as there are deceitful contractors who abscond with hard earned homeowner dollars.

When I perform autopsies on these problems, I typically discover a common flaw. The contract between the parties is very vague about the payment terms and conditions. In some instances, wording allows contractors to get too much money in advance. In other instances, homeowners advance money to contractors in a spirit of good faith. Unless these homeowners are working with a contractor who has the highest level of professionalism and honor, the advancement of money before certain things are complete can be a recipe for disaster. The incentive to continue to work at the highest level of efficiency and quality has been removed once the money has been paid.

Contractors routinely present contracts to homeowners that contain loopholes. Imagine language that states, "Payment is due upon completion of work." Well, if I were a homeowner, I could feel justified in holding back the monies if the job were not completely finished. Imagine the nightmare of a job where $100.00 worth of exterior work can't be completed until the spring thaw yet $80,000.00 or more is due upon the total completion of the job. If both parties agree to the terms of a contract, then I maintain that they should abide by what the contract states.

There are countless ways to solve payment problems. Several have worked well for me no matter how large or how small a job might be. One element missing in almost every contract I have seen is a tiebreaker clause. It is wise for the parties to agree up front on an independent inspector who is willing to give a ruling as to the quality and completeness of work. In the event of a dispute between the parties, the inspector issues a written ruling that goes one way or the other.

I have found that it is very effective to state that progress payments are made on given dates for the work that is in place and completed to the satisfaction of the homeowner and/or independent inspector. A job cost breakdown that assigns a fair and real number to each aspect of a job is invaluable for this to happen in a fair way for both parties.

The homeowner has a given amount of time to make the payment after the bill is produced. Since the homeowner knows when monies are due, all inspections would have to be scheduled in advance. This allows the homeowner to feel confident the work is satisfactory as he writes the check to meet the deadline. The contract could contain language allowing the contractor to pull off the job if the money is not paid on time. No contractor really wants to do this for any number of reasons, but it limits the amount of financial exposure to a fixed sum of money. It also gives the contractor some leverage as very few homeowners want their job to be at a standstill.

Set standards in the contract, if possible and reasonable, with respect to work meeting the building code or more importantly set forth manufacturers' specifications. A benchmark of quality must also be established or you may never meet certain homeowner's expectations. The independent inspector may come into play in this event as well.

Column 398

Decorative Wall Shelf in One Hour

DEAR TIM: I have all sorts of interesting knickknacks that I have on standard bookshelves and cases. But I would like to display them on the walls in many rooms of my home. Can you think of a way to make a simple yet elegant shelf that I can use for this purpose? Please keep in mind that some of the shelves need a curb that would stop plates from sliding forward. Oh yes, I am on a tight budget too! Denise H., Kettering, OH

DEAR DENISE: My father in law has a saying that I believe is fitting for this occasion. When the discussion turns to someone who appears to be lucky or successful he often says, "That person happened to be at the bus stop when the bus came by." Well, hop on board and take your seat. I'm driving you to the lumberyard to get some decorative crown molding and a small piece of 1x4 lumber to solve this problem.

french cleat holding shelf

You can't see the cool french cleat that holds this shelf to the wall.

Your problem is multi-faceted. We need to create a ledge approximately two or three inches wide, the face of it needs to be appealing and it needs to have a sturdy and hidden mounting system. Have no fear, I can overcome all of these challenges.

Crown molding works well for this project because it fulfills our first two requirements. The top of most standard crown moldings ends up about two or three inches from the face of a wall when it is installed. The resulting gap is never seen in most instances because the crown molding is tucked tightly against the ceiling in a room. The milled profile of the crown molding creates the decorative relief that will compliment your assortment of knickknacks. If you have different sized knickknacks, you can purchase different sized crown moldings so that the shelf will be in proportion to the articles on display.

Simply cutting a piece of crown molding to length will not work. Each end of the molding needs to be mitered as if it was wrapping around an outside corner in a room. The tiny pieces of crown molding that make the turn and touch the wall at each end are simple triangular pieces of crown molding cut at a 45 degree angle.

To create the necessary flat platform that extends from the top of the crown molding to the wall, you will use the 1x4 lumber. This is actually the most demanding part of the project since the lumber needs to be ripped to a precise width and length and the three edges that contact the back of the crown molding need to be cut at an angle to match the sloped faces of the top rear of the crown molding. Once the shelf is cut and in position, drive small brad nails through the top face of the crown molding into the angled faces of the wood platform.

If you have a table saw or have access to one, you can accomplish this task in a few minutes. The crown molding I prefer to use happens to tilt away from the wall at a 45 degree angle so my cuts on the platform are simple 45 degree matching angles. The angle on the scrap 1x4 doesn't have to be perfect, it simply needs to be enough so that the top of the board is flush with the top of the crown molding. To create the curb for the plate shelves simply cut the shelf a little short in both width and length. As you drop the shelf into position behind the crown molding, the back of the crown molding ends up higher than the shelf.


Click here to watch a video on cutting and working with crown molding.


I hang my crown molding shelves using some extra 1x4 lumber. I cut a piece that is 3/4 inch thick by 3/4 inch high and is about five inches less in length than the overall width of the shelf. I attach the piece of lumber to the wall using screws that penetrate into wall studs. I drop the crown mold shelf assembly onto the wood cleat and then drive small screws through the top of the platform into the 3/4 by 3/4 inch cleat. If you have the proper tools and supplies on hand, you can make one of these shelves in less than an hour.

If you REALLY want to discover how to install Crown Molding, you need my Crown Molding eBook .

Column 399