Stucco Repair / Patching

DEAR TIM: The removal of an old fan left a large hole that needs to be patched in my stucco home. What type of backer board is used to close up the hole? I assume the stucco just sticks to it and all is well. How does one match the existing texture? I also have many different sized cracks to patch. How do I tackle those? Andy N., Apple Valley, CA

DEAR ANDY: Patching stucco so that you don't see the repaired area is as difficult as patching a hole in a piece of fabric using scrap from the original bolt of cloth. It is virtually impossible to do. A stucco mason can create an infinite amount of textures depending upon the materials used to create the stucco and the tools used to finish it. Blending the new texture with the original is a true art and craft. If you succeed in creating the illusion, go out and immediately purchase a lottery ticket!

Stucco Repair

To get fantastic results on your job, I urge you to build several small test boards that are slightly smaller than the size of the existing hole. Practice your technique on these. Once you think you have the texture matched, insert the test panel in the hole and step back 20 or 30 feet to view it. Things tend to look different when viewed from a distance. If your existing stucco is painted, paint the test panel as well.

The repair process begins by simply looking at how your existing stucco was installed. Stucco is applied differently in many parts of the nation. In some localities, tar paper is applied over the wall studs and then wire mesh is nailed to the studs. In other areas, wood sheathing is nailed to the studs before the tar paper and mesh is applied. Look at the exposed edge of the hole to see how your stucco was applied.

To make the repaired area waterproof, you need to remove some of the existing stucco to expose the tar paper beneath the stucco. Remove the stucco slowly and carefully so as not to tear the tar paper. The new tar paper needs to slide up behind the tar paper at the top of the opening. One inch of overlap will work, but two inches would be better. The tar paper overlaps the sides and bottom of the existing opening the same distance. This important detail prevents water that may seep behind the stucco from rotting the wood sheathing and structural wood framing.

Galvanized chicken wire or plastering mesh is then nailed over the tar paper. Use galvanized nails that penetrate 1.5 inches into solid wood. The stucco sticks to this wire mesh, not to the tar paper.

The stucco is applied in either two or three coats. Typically a thin scratch coat is applied to the wire mesh. Once dry, this coat stiffens the wire mesh so the weight of subsequent coats does not create waves in the final finish. The thickness of the second coat depends upon the type of final finish you are trying to copy. If the final finish is very rough, then the second coat must stop just short of any indentations that are created when you apply the final coat. Be sure you use a stucco comb to create grooves in the wet second coat. These lines help bond the final coat to the middle layer of stucco.

Try to work in the cooler part of the day if possible. Be sure to wet the edges of the existing stucco before you apply the second and final coat. These edges must also be dust free. Keep the patched area damp to prevent shrinkage cracks. You can mist the repaired area or tape plastic over it to hold in the moisture. Stucco that dries too quickly can crack and never attain full strength.

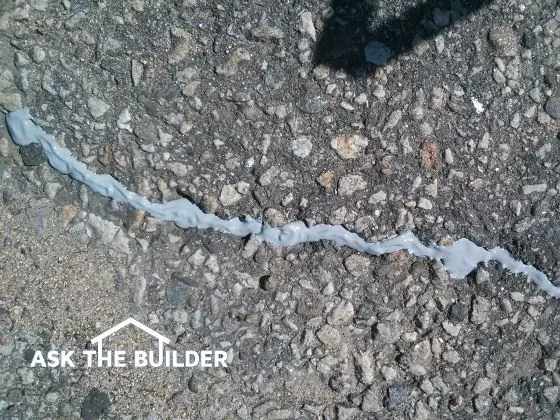
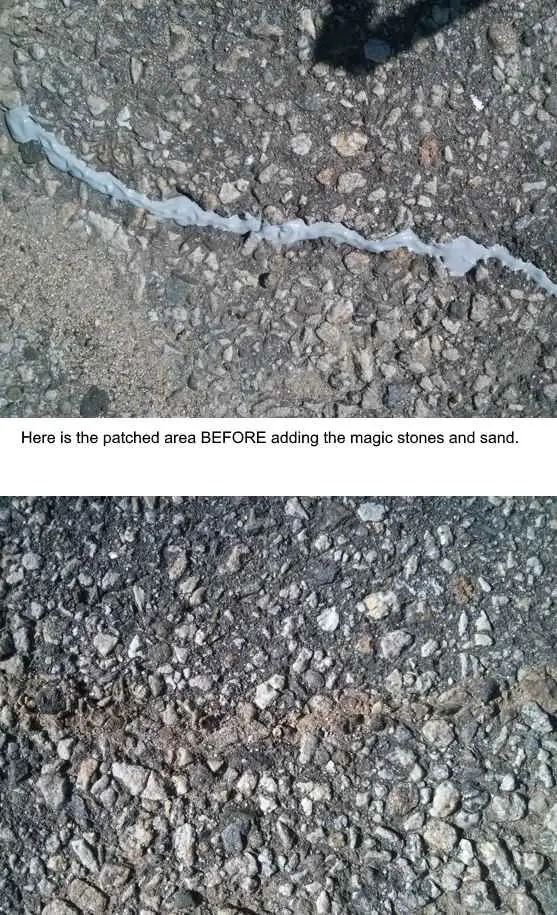
Patching stucco cracks is not too hard, it just requires some patience. Cracks less than an 1/8th inch in width can usually be successfully patched with a high quality siliconized acrylic caulk. Remove all loose debris and dust from the crack. If the crack is deep, apply the caulk at two different times as one thick layer will shrink and cause an unsightly depression. Let the first layer of caulk dry for several days before applying the second coat. Quickly scatter sand that matches the existing finish into the final bead of wet caulk. This will help disguise the crack repair.

Wider cracks can be patched with the cement stucco mixture you created for the hole repair job. These cracks must be undercut for the stucco to hold. Use a grinder or hand-held chisel to make the crack slightly wider at the base than at the surface. This is the same technique dentists use when filling cavities in our teeth. This dovetail design will permanently lock the repair stucco mixture in place.

There is an updated column dealing with Repair Stucco Walls. CLICK HERE to read this column.

Column 423

Ceramic Tile Crack Prevention

DEAR TIM: Cracks are beginning to appear in the floors of our three-month old new home. The tile was laid directly on the concrete slabs that make up the sub-floor of my home. The day after the slabs were poured the concrete block walls were erected. Could this be the cause of the cracks? What could have been done to prevent the cracks? Do the tiles have to be taken up and replaced or is there another solution? John D. Hallandale, FL

DEAR JOHN: Tile loves to be installed over concrete because concrete is such a hard, durable substrate. But concrete does have an Achilles' heel - not only does concrete crack, it wants to crack. As concrete makes the transformation from the liquid state to a rock-hard material, it shrinks ever so slightly. In fact, concrete slabs can shrink 1/16th of an inch for every ten linear feet of distance. This shrinkage creates a significant tension force within the slab.

This tile is cracked. It is a very fine crack, but should be filled with clear epoxy before repainting begins.

This tile is cracked. It is a very fine crack, but should be filled with clear epoxy before repainting begins.

The concrete slab cracking process is very similar to what happens prior to and during an earthquake. As the plates of the earth move, they often get wedged against one another. This stored force is relieved naturally the by-product being a violent earthquake. Similar forces build within the freshly poured concrete slab. As soon as they exceed the strength of the concrete, the slab pops and cracks. Cracks can appear within hours of the concrete pour, but typically you begin to see them within 30 days. I doubt the block laying activity caused the cracks. In all likelihood, they would have happened with or without the concrete blocks.

Ceramic tile is a dense building product just like concrete. Both materials are very strong when you compress them, but they typically only have one tenth the strength when tension forces successfully pull them apart. To make matters worse, cracks that happen in the slab below ceramic tile will often telegraph through the tile because the organic or cement based adhesives make the tile and concrete one monolithic material.

You can prevent cracks in ceramic tile that is laid over concrete in any number of ways. The first thing to do is add steel and fibers to the concrete slab. While these materials will not insure a crack-free slab, they will hold the concrete together such that small harmless hairline cracks occur instead of cracks in excess of 1/8 inch or more. Quality builders will place inexpensive one half inch diameter steel reinforcing bars in the middle of the concrete slab. These bars should be placed in a grid pattern with the bars on two foot centers in both directions. The bars must be supported during the pour so that they end up in the center of the concrete. In addition, the concrete can be ordered with special fibers that will help prevent shrinkage and tension cracks.


Restore the "clean" to your grout. Just go to STAIN-SOLVER to see the beautiful, quick results.


The ceramic tile installer could have also installed crack isolation membranes under the tile. These membranes are available as a liquid coating that is applied over the concrete slab or an actual synthetic fiber fabric. They allow the concrete floor below to move independently of the tile that is laid just above. The membranes work well if there is slight cracking but will not prevent cracks in tile should there be significant structural movement caused by a foundation, soil, or construction defect. These membranes are often sold at ceramic tile specialty stores that cater to real ceramic tile professionals.

Since your home is still within warranty, I would write a letter to the builder informing him of the defect. Hopefully, you have extra tiles left over that are from the same run or batch. If not, try to get some matching replacement tiles immediately. Purchase matching tile grout at the same time. I would wait another six months or so before I would initiate the repair. Additional cracks may appear between now and then and all broken tiles can be replaced at one time. If the grout gets dirty before the repair, it should be cleaned just before the workmen arrive. Doing this will insure that the new grout will match the existing grout perfectly. Dirty colored or white floor tile grout can be successfully cleaned with a solution of oxygen bleach.

Existing floor tile cracks can be patched with clear epoxies. Apply the epoxy carefully and add additional epoxy until the dried epoxy is flush with the tile surface. Using a fine artist's brush, apply oil based paint that matches the color of the tile to the epoxy. Once this dries, use the same brush to apply three coats of clear water-based urethane over the repaired crack. This urethane will protect the paint for several years. Apply additional maintenance coats of urethane every two years.

Message from Tim:

Years ago while researching a column about cleaning decks, I discovered the wonders of Oxygen Bleach. It is perhaps the 'greenest' cleaner I know of as it uses oxygen ions to break apart stains, dirt and odor molecules. There are no harsh chemicals, and it works on just about anything that is water washable.

I decided to create my own special blend using ingredients made in the USA. In fact, the raw materials in the active ingredient are food-grade quality registered with the FDA. I call my product Stain Solver. I urge you to use it to help with cleaning your ceramic tile grout. You will be amazed at the results!

Column 424

Outdoor Rooms Create Extra Living Space

DEAR TIM: My growing family needs more room but a traditional room addition is out of the question. Our budget is very tight and local zoning laws prohibit us from building what we need. My wife quickly rejected my idea of putting the kids up for adoption and has hinted that perhaps I am the one who needs to leave. Surely you have a solution that will keep us together! Brad L., Scottsdale AZ

DEAR BRAD: If I didn't know better, I would bet money that you had a very bad case of cabin fever. Marital counseling is not my forte, but I think the solution to your restlessness is just outside the rear windows of your home. I think you can satisfy the local zoning department and avoid deep debt by simply creating an outdoor room or two in your back yard.

Cast a glance eastward over the Atlantic Ocean and you will discover that this concept is not new by any means. People in Great Britain are experts at transforming an ordinary back yard into a private outdoor room where one can work and relax. You need to think outside the box and develop some patience. Instead of using traditional building materials to create walls and a roof that protect you from the elements and create privacy, you will use plant materials, low walls and fencing, and garden structures that should allow you to pass undetected under the radar of many zoning codes.

Perhaps one of the best kept secrets of the home improvement industry has been the rapid expansion of products that are available for patios, decks and other outdoor spaces. The time spent on decks and patios is increasing because many of the creature comforts found indoors are now available for outdoor use. Some traditional barbecue grills have transformed into actual outdoor stoves and ovens. Fixed counters with faucets, sinks and cabinets are a reality. Retractable awnings, and attractive screened tents can provide shelter from sun, rain and insects.

Creating a comfortable environment outdoors is quite possible. Wood burning or gas appliances can provide you with wonderful radiant warmth if the temperature drops. A simple fire pit will accomplish the same thing and offers the retro feel and aroma of a Boy or Girl Scout campfire. Those who live in hot climates can cool an outdoor space with modern water misting devices. These systems dramatically drop the temperature as the misters broadcast un ultra-fine screen of heat absorbing water.

You do not need to go indoors as the sun sets. Significant advancements in low voltage outdoor lighting allows you to cast a soft glow on surrounding vegetation and garden structures that make up the outdoor room. Specialized task lighting fixtures allow you to work and read with the same comfort as any indoor light fixture.

The key to creating a spectacular outdoor room that will add value to your home begins with planning. Develop an overall plan for what you want and need and begin to build it in stages as your budget allows. Consult with outdoor plant experts and choose vegetation that will create privacy and beauty at the same time. Keep in mind the size of the vegetation as it reaches maturity. The plants must be placed in strategic locations that will not interfere with the function of the room.

Be sure to include water features in the outdoor room. Fountains, small pools, waterfalls, etc. add beauty and will produce a much needed calming force in your life. Do not underestimate the power of bubbling or trickling water. It is a subtle feature that produces pleasing background sounds that add to the overall ambiance of the outdoor room. Water features also attract butterflies and birds. These living creatures will add even more beauty to this new room addition.

Before you get started I suggest that you spend time looking at magazines and websites that feature photographs of completed outdoor rooms. Pay attention to the different features and how different materials and plants compliment one another. Look for patios that have different shapes or secondary smaller patio extensions that could be built in phases. Develop a final plan and pass it by your local zoning department before you start to work. The extra time you spend planning and exploring options will yield enormous dividends down the road.

Column 425

Hanging Wallpaper

DEAR TIM: I tried to install wallpaper after watching a home improvement television episode. I must have missed a few important steps as I have a mess on my hands. There are lots of bubbles and blisters, seams that have puckered and bumps and depressions showing under the paper. What went wrong? Is there an easy way to activate the paste on pre-pasted paper? Is there a way to fix the flaws? Carolyn W., Paramus, NJ

DEAR CAROLYN: Don't you just hate those home improvement television shows? The hosts seem to constantly tell us how easy things are to do.

They smile, rarely have problems and within a span of 30 minutes seemingly impossible jobs are done to perfection. Television is a magical media format.

With the help of background music and an editing machine, hard tasks are made to look easy. Wallpaper hanging is by no means impossible to do, but to get professional results you need to know many things.

Tim installing wallpaper

©2017 Tim Carter

The bubbles, blisters and puckered seams that are plaguing your paper most likely happened because the wallpaper expanded on the wall instead of on the pasting table.

CLICK HERE to get FREE & FAST BIDS from local wallpaper hangers in case you're getting cold feet.

Wallpaper begins to swell and grow in size as soon as you apply paste or activate the dry paste that is on the back of pre-pasted paper.

Professional wallpaper hangers call this process relaxation. The paper needs to relax and expand completely before you hang it.

If you hang it before it relaxes, it continues to expand and grow on the wall. The paper can only move sideways and out from the wall.

The relaxation period usually takes anywhere from five to ten minutes. All you have to do is cut several strips of paper to get started. Paste or activate the paste on the first strip.

As soon as you have completed this, you fold or book the paper. Booking simply means to fold the paper back on itself so that the wet pasted back side of the paper contacts itself. Do not fear, the paper will not stick to itself as adhesive tape might. You will be able to unfold the paper in a short amount of time so it can be hung on the wall.

Set this first strip of paper aside and do the same thing to the second cut strip. If you are a fast hanger, you can get three strips of paper cut and booked. By the time you have finished this, the first strip of paper will be relaxed and ready to hang.

Once you have hung the first piece of paper, cut the next strip and paste it. By doing this, you simply create an inventory of cut and pasted strips of paper that are in different stages of relaxation.

Wallpaper also contracts slightly as it dries. When it does, it can telegraph imperfections that lie just below the paper. Small, harmless grains of hardened paint on the wall will show through. Holes in the wall or small divots may show up as a depression under the taut paper.

CLICK HERE to get FREE & FAST BIDS from local wallpaper hangers in case you're getting cold feet.

Just A Few Tools

Let's get started with the tools. Fortunately, you don't need many tools to wallpaper.

Here's a list that will get you going on this job:

  • retractable razor knife with snap-off blades
  • 4.5 or 6-inch drywall taping knife
  • smoothing brush or plastic smoother
  • 4-foot level
  • grout sponge
  • measuring tape
  • paint roller & pan
  • paint brush

Click the Image Below to get all, or some, of the tools now:

Wallpaper Tools List

CLICK HERE to get all the tools I recommend in one place. It's easy and fast.

Just before applying a special primer/sealer paint that will size the walls, you should look and feel for these imperfections. Use a wide flexible scraper to knock down any small grains or bumps. Use a similar knife and rapid-dry spackling compound to fill in any holes.

The amount of time spent getting the walls perfectly smooth will really pay off. If you are really concerned about humps and depressions showing through the paper, use an exposed light bulb at night against the wall. The light rays glancing off the wall at this shallow angle will readily draw attention to all minor wall defects.

Pre-pasted paper manufacturers talk about using trays of water, putting paper in bathtubs, etc. to activate the paste. I have found all of those methods to be somewhat cumbersome. You can buy a wonderful, powdered product at most wallpaper stores that eliminates the need to get pre-pasted paper wet.

This powder mixes with water and in about 30 minutes creates a clear liquid gel that you easily spread on the back of pre-pasted paper. It is made to activate and maximize the adhesive on the back of the paper. When you use this product in conjunction with properly sized walls, you have plenty of time to adjust paper while it is on the wall.

As much as I hate to say it, I don't think the flaws on your wall can be easily repaired. It is typically impossible to remove and reuse a strip of wallpaper. It simply is too delicate to remove from the wall. You might be able to prick the bubbles and blisters to relieve the air pressure.

Using a small syringe, you can inject them with some water to re-activate dried paste. Use a rolling pin or a small wallpaper roller to try to flatten the paper. The trouble is, there may not be enough room on the wall for all of the paper!

CLICK HERE to get FREE & FAST BIDS from local wallpaper hangers in case you're getting cold feet.

Column 426

DIY Bathroom Plumbing

DEAR TIM: I definitely have a leaking toilet. I have removed the ceiling beneath it and can see an occasional drip of water running down the actual main pipe beneath the toilet. When you go up to the bathroom, the toilet, floor and the walls are bone dry. Is the leak positively originating from the toilet? What could be the problem and the best way to repair it? Is it a realistic do-it-yourself project? Ed P., Essex Junction, VT

DEAR ED: Although I would not bet my life on the source of the leak, I am 99.999 percent sure the source of the leak is a failed seal between the toilet and the toilet flange. The toilet flange is a special drain pipe fitting that allows you to securely connect a toilet to the actual waste piping. The seal between the toilet and the flange could have failed for any number of reasons.

If you look at the underside of a toilet where the water and waste exit the fixture you will see that the china has a shape similar to a crude funnel. The shape of the toilet flange is also like a funnel only it is larger. When mated together properly, the actual china of the toilet fits loosely inside the actual flange. It is a classic male-female connection of sorts.

It is absolutely necessary for this joint to be sealed permanently. Not only does the seal prevent water leaks, but it also prevents harmful and objectionable sewer gas from escaping into your home. There are two ways to make the seal permanent: traditional wax gaskets or a newer seal device that incorporates high grade rubber o-ring seals with an adjustable sliding collar that attaches to the underside of the toilet.

Once you remove your toilet from the flange you will possibly discover that the toilet flange is not at the correct height. It can be either too high or too low with respect to the finish flooring. Being a licensed master plumber, I have learned over the years that the best seal occurs when the top of the toilet flange is one quarter inch higher than the finished flooring. It is also an enormous advantage to have the finish floor level in the area around the toilet. It goes without saying that the top of the toilet flange should also be level.

The toilet flange should also be securely attached to the sub-flooring material. Often this is not the case. Most modern flanges have multiple holes in the outer flange ring. The plumber who installs the flange is supposed to install screws through these holes into the sub-floor below. Do not confuse this task with the function of the actual toilet bolts. The bolts that are used to attach the toilet to the flange will indeed pull the toilet tight against the flange. But if the flange is not secure to the floor, the toilet can still move. Do not rely upon caulk or tile grout between the floor and the toilet to make a toilet like the rock of Gibraltar.

If you discover that the toilet flange is significantly lower than the finished floor surface, you can possibly add flange extenders on top of your existing flange. Not all plumbing inspectors will allow this retrofit. You must make sure that your local plumbing code allows these specialized fittings. These also must be properly sealed so that water and gas can not get between the old flange ring and the new one. If your local code does not permit the use of extenders, the actual piping and flange may have to be re-done. The same is true if the toilet flange is too high.

Working with toilets is not too terribly difficult but there are all sorts of challenges. If you think it is as easy as it is often shown on home improvement television shows, you are in for a surprise! When you disturb an existing toilet you can break the seals between the toilet tank and the toilet bowl. Reconnecting a toilet to the water supply line may also be an adventure. What's more, some plumbing codes and municipalities forbid unlicensed homeowners from working with plumbing drainage and water systems. If you decide to attempt the repair yourself, I sincerely hope you have a second functioning toilet in the home or you feel exceptionally lucky.

Column 428


Concrete Overlays

concrete overlay

Here's a concrete overlay on a small concrete slab. You can see the form boards that allow you to get the top in the same plane. There's a nice coat of cement paint that bonds the new overlay to the old concrete. (C) Copyright 2018 Tim Carter

"In addition, a liquid bonding agent or traditional cement paint can be brushed onto the damp slab immediately prior to pouring the overlay."

Cement Paint & Concrete Overlay Installation Checklist

  • Remove all crumbling concrete and dust
  • Overlay stones no larger than 1/3 thickness of the overlay
  • Use secret cement paint to bond overlay to the old concrete
  • Dampen old concrete slightly before applying the cement paint
  • Cover the overlay with plastic to cure it for 48 hours

DEAR TIM: My concrete sidewalks and driveway look horrible. For some reason, the top 1/8 to 1/4 inch of the finish surface has peeled up in patches.

The contractor I used blames road salt for the damage. Is it possible to patch the concrete with some mixture that will last for a long period of time? If so, how is the task completed? Is this a task that the average person can tackle? Betty G., Ft. Wayne, IN

Related Links

Concrete Resurfacing Tips & Tricks - DO NOT SHARE!

More Concrete Restoration Professional Tips

Concrete Overlay

CLICK this image and listen to the first call on the podcast. I talk to Vic about how he can do a concrete overlay to SAVE thousands of $$$. Copyright 2018 Tim Carter

DEAR BETTY: What a shame! Exterior concrete that is ordered, mixed, installed, finished and cured properly can withstand many, many years of exposure to road salt and freeze and thaw cycles that occur during cold winter months.

Free & Fast Bids

CLICK HERE to get FREE & FAST BIDS from local concrete resurfacing contractors.

Why Does Concrete Spall?

The most common reason for concrete spall is water was sprinkled on the concrete during the finishing process. Extra water could have been added to the entire mix when the truck arrived at the job site.

There are many things that could have gone wrong that most likely caused the concrete wear surface to fail, but the good news is that there is a repair method that will yield long-lasting and beautiful results.

blacktop with car keys

Can a Thin Overlay Be Applied to Concrete?

Residential contractors and large-scale commercial concrete contractors can install a thin overlay on concrete slabs that have damaged surfaces.

The overlay material can be a simple mixture of sand and cement or it can actually be a real concrete mixture that includes small pieces of stone or even large stones depending upon the thickness of the overlay. Cement or concrete overlay thicknesses can range from 1/4 inch thick up to a full 2 inches or more.

How Do You Install a Concrete Overlay?

The secret to success is a combination of ingredients. You must determine that the existing slab is sound. Be sure that the exposed parts of the slab are not crumbling.

Tap the damaged areas moderately with a hammer. If the slab sounds solid and it is difficult to do further damage to the slab with moderate hammer blows, the existing concrete is probably a superb candidate for an overlay.

What is the Best Weather to Install a Concrete Overlay?

Weather conditions also impact the success of the overlay. Cool days with temperatures in the 50 F range are ideal.

It's even better if there is little or no wind and the skies are overcast. Heat, sunlight, and wind cause the overlay mixture to dry too rapidly. Rapid drying makes it harder to work and finish the overlay. These conditions can also cause undesirable plastic shrinkage cracks in the surface of the brand new overlay.

How Do You Achieve the Best Bond?

The overlay mixture will bond permanently to the existing concrete slab, if you make sure the existing slab is clean, dust-free and slightly damp before you apply the overlay.

In addition, a liquid bonding agent or traditional cement paint can be brushed onto the damp slab immediately prior to pouring the overlay. Cement paint is simply a mixture of Portland cement powder and water. Add enough water to the cement and mix it until it is the consistency of regular latex wall paint.

How Much Portland Cement Should be in the Overlay Mix?

It is important that a sufficient amount of cement is added to the overlay mixture so that it will resist freeze-thaw cycles that will occur in the winter months.

Since your overlay material will be mixed most likely in a wheelbarrow or a rented mixer, be sure that you include 1 measure of Portland cement for every 2.5 measures of sand for thin overlays. If you are going to include stones or larger aggregate, then the mixture should be:

  • 3 measures of gravel
  • 2 measures of sand
  • 2 measures of Portland cement

How Do You Apply the Overlay?

The overlay mixture is installed over the existing slab just like the original concrete pour. Form boards are placed alongside the existing slab.

The top of the boards are set so that they create a plane that represents the desired final thickness. Once the overlay material is dumped in between the form boards, a long straightedge board can be used to remove excess overlay mixture. The straightedge board extends over the form boards and is wiggled back and forth to smooth out the overlay.

How Soon Do You Apply the Final Finish?

Depending upon the weather conditions and the moisture content of the overlay mixture, the final finishing process can begin within 10 minutes, or in some cases, up to an hour after the mixture is poured. Be sure to apply a liquid curing compound on the overlay as soon as the final finish is complete.

Is An Overlay a DIY Project?

Overlays can be done by homeowners. The entire project does not have to be completed in one day. You can work on one or two sections each day.

To make sure the final color of the overlay matches, be sure that all of the necessary materials are bought at the same time. Mixing brands of Portland cement and using different sand can cause color differentiation when the materials cure.

Column 429

Insulated Glass Replacement

DEAR TIM: The insulated glass sidelights next to my front door will not come clean. Upon closer inspection I can see that the seal has probably broken. The dirt and film is on the inside of the panes of glass.

Is it possible to install new glass or am I forced to buy a complete new front door unit? Where in the world do you get insulated glass? Georganne G., Hoffman Estates, IL

DEAR GEORGANNE: I wonder if we have the same front door? The same thing happened to me recently. If you do have a similar door design, you are in luck. It is often possible to re-glaze glass doors, sidelights, and windows that have insulated glass. The job is typically not hard but it can be slightly tedious.

new insulated glass panel

The new insulated glass panel is leaning against the green door trim. It was made by a reputable local glass company.

The first thing you need to determine is how the glass was installed in the first place. The wood sidelight frame was undoubtedly milled with a built-in rabbet profile. This milling process creates a recessed area in the frame where the glass rests. Once the glass is in place, small wood trim strips are added on the exterior side of the sidelight. These decorative strips of wood hold the glass in place so that it will not fall out of the frame.

Inspect the exterior of your sidelights and see if you note a small uniform hairline crack about one half inch from the edge of the glass. This may be the edge of the small piece of wood trim. Use a sharp flexible putty knife with a fairly thin blade and try to lightly hammer it into this crack. Once the blade is past any paint or dirt, you may find it plunges into the sidelight frame about three quarters of an inch. This is a good thing as the putty knife is telling you that it has glided past the wood trim and the insulated glass.

The wood strip that holds the glass in place often has a factory-applied water and wind sealant on the side that touches the glass. This sealant can harden over time. If you try to pry the wood strip off too fast, you can crack the trim strip. Gently try to tap the edge of the putty knife blade between the glass and the wood strip. Keep the putty knife blade at a low angle so it is nearly parallel with the surface of the glass. Take your time with this step as it is important to salvage the wood strip in its entirety.

Once the wood strips have been removed you may see some staples or nails that once held the wood strip in place. Use a needle nose pliers to pull these fasteners out of the frame. At this point, you may need some assistance. The only thing holding the glass in place may be friction, some interior glazing compound and possibly paint that has lapped over the inside of the glass panel. In other words, the glass may fall out of the frame without warning. Put on a pair of light leather gloves and ask a helper to gently push against the top of the glass from the inside. If all goes well, the glass will start to tilt out of the frame. The gloves will protect your hands from being cut by a sharp edge on the insulated glass panel.

The replacement glass panel needs to match your existing one in width, height and overall thickness. The glass panel should not fit tightly into the rabbeted frame. There usually is a one eighth inch space between the glass and the wood frame on all four sides of the insulated glass panel. Glass panels that fit too tightly can break if the wood frame expands or contracts from changes in the weather or stress that occurs from house settlement.

The new glass can be ordered from a local glass shop. Building codes dictate that sidelight glass, door glass and other types of windows must have tempered safety glass. Be sure the glass panel you order meets all current building codes. The glass shop will undoubtedly have to order the replacement panels from a special glass company that makes custom tempered glass to size. In my case, I only had to wait one week to get perfect replacement panels. I also ordered my glass with argon gas. This gas helps to deaden noise and it also is more energy efficient.

Column 430

Foundation Cracks

DEAR TIM: The foundation of my 28-year-old home has suddenly shifted resulting in a large crack. Up until this time, the foundation was perfect.

We have obtained three bids to repair the damage. The price range is somewhat close but each suggested different repair methods.

What is the best way to repair a cracked foundation? What can be done to minimize foundation cracks? Pam Martin, Bozeman, MT

DEAR PAM: Fixing foundation cracks is an enormous business. There are many different and specialized solutions for the different types of foundation cracks and problems. Unfortunately, there is no one-size-fits-all solution with respect to this subject. Choosing a repair method that will almost always work often requires the advice of an independent third party. Instead of making three phone calls to contractors, I would have first called a structural engineer that specializes in residential problems.

foundation crack

A seasoned engineer's advice is necessary for several reasons. The actual cause of the foundation failure needs to be identified correctly so that the proper solution is employed. A salesperson from a repair company may just want to sell his product or service even though it may not be the best repair method. Perhaps more importantly, structural repairs that are not engineered properly can actually create stress points on the foundation. These new stress points can sometimes cause secondary structural problems within the foundation at a later date.

Introducing an engineer into the mix creates an additional advantage. Typically, they will develop a one or two page report that contains a drawing or plan. The contractor that is eventually hired must follow this plan to insure that the foundation is repaired properly. In many states, engineers must pass a rigid professional certification test. This testing process helps to insure that the advice they offer is accurate and will work. You do not always get this same assurance from a repair company salesperson or contractor.

Be sure to ask the structural engineer about soil problems. The fact that your crack just happened after 28 years of stability is very suspicious. Many parts of the nation experience moderate to severe droughts from time to time. The loss of water from the soil can cause it to shrink in volume. If the soil shrinkage does not happen at the same rate under the entire foundation, one corner or section may fall farther or quicker than other parts. This creates tension within the foundation. The tension force typically expresses itself as the actual crack.

Depending upon the soil makeup at your house, part of the foundation fix may require that water be injected deep into the soil at different places around the foundation. This added water can often cause the soil to lift the house back up to where it was originally. Foundation cracks can close up significantly just with the addition of this water.

Water can be added in any number of ways. I have found that a powered fence post auger is a wonderful tool that allows you to drill a six-inch diameter hole 4 or 5 feet into the ground. Space these holes about six feet apart around your foundation. The hole can be filled with rounded gravel too within one inch of the surface. Regular rainwater or water provided by a sprinkler or soaker hose finds the gravel quickly. This water flows readily through the gravel and drops deep into the soil that lies near the bottom of the foundation. Once the soil soaks up the water, it often swells back up. To stop this back and forth motion of the soil, try to keep it slightly moist all of the time. By doing this, you can keep the foundation in a constant state of dynamic equilibrium.

If the engineer is in agreement that your soil may be one that does shrink and swell in response to moisture changes, you may want to pursue this water injection method for several months before you begin to employ any other fix to the foundation.

Many foundation problems can be avoided with the addition of extra steel to the concrete footers and actual foundation. The building code requirements for structural steel are minimum requirements. You can increase the size of steel and the number of pieces of steel for very little extra cost in most cases. Once again, a small consulting fee paid to a residential structural engineer during the planning phase can pay huge dividends down the road. Imagine spending less than a thousand dollars up front for a simple consult and extra steel instead of paying many thousands of dollars to repair a weak foundation at a later date.

Column 432

Asphalt Driveway Sealers

Asphalt driveway sealer

Asphalt driveway

This is the characteristic gray color of an asphalt or blacktop drive that's not been sealed. All those smaller white spots are pieces of limestone or possibly granite in the asphalt mix. Copyright 2018 Tim Carter

"Cracks are the cause of asphalt pavement failure.... Spend your time fixing and filling cracks instead of sealing if you want your asphalt to last."

Asphalt Driveway Sealer Checklist

    • Roads are never sealed
    • Cracks should be filled
    • A strong gravel base under the asphalt is the answer
    • Asphalt with a strong gravel base can last decades

Related Links

The Best Way to Repair Cracks in Asphalt - SECRET Information - Do NOT Share

Pro Patching Tips for Asphalt & Blacktop

Free & Fast Bids

CLICK HERE to get FREE & FAST BIDS from local contractors who can fill the cracks in your drive.

DEAR TIM: I was reviewing a quote I received to have my asphalt drive sealed. But it dawned on me that the streets in my community never get sealed. Is sealing an asphalt driveway really necessary? If so, when should they be sealed? Ron P. Westchester, OH

DEAR RON: Touche! I'll bet you were the captain of your high school debate team. With a point such as that, you can definitely win an argument or two. But in this case, I might have a stronger rebuttal point!

Why Are Roads Never Sealed?

There are several reasons why you don't see highway maintenance departments using traditional sealers on roadways. The heavy volume of traffic on the average road would rapidly wear away a surface coating of asphalt sealer.

How are Roads Built?

Roadways are also built differently than the average residential driveway. Roads in cities and towns have a much stronger gravel base than your driveway. This gravel, if done correctly, provides support so the asphalt surface doesn't crack.

What is the Cause of Asphalt Driveway Failure?

Cracks are the cause of asphalt pavement failure. Cracks that extend through the asphalt to the gravel base allow water to enter the gravel base. Spend your time fixing and filling cracks instead of sealing if you want your asphalt to last.

Blacktop Crack Filler

Here is the crack during the repair process. I've injected the crack with a special epoxy that works even if the blacktop is wet. The next step is to press the magic stones and sand into the epoxy to disguise it. Look at after photo below. Copyright 2018 Tim Carter

How is Asphalt or Blacktop Made?

Asphalt or blacktop used to build roads and your driveway is made with just three ingredients:

  • stones of different sizes
  • sand
  • liquid asphalt cement

The asphalt cement is the glue that holds together the gravel and sand particles that actually make the superb driving surface.

Can the Sun Hurt Asphalt Driveways?

Asphalt is damaged by the sun's ultraviolet (UV) rays and oxygen in the air. The UV rays can blast apart the asphalt molecules allowing oxygen in the air to connect to the asphalt.

Oxidation causes the asphalt to become brittle. Brittle asphalt can crack. Cracks allow water to enter the paved surface. This water can freeze in colder climates causing further damage.

asphalt crack patching

Look closely at the two photos. If you get even closer, look at your own asphalt you'll see many sand particles where you see black in my photos. Much of the dark black areas in these photos have lots of sand that can't be seen at the resolution of these photos. Copyright 2018 Tim Carter

How Much Asphalt is Exposed to the Sun's UV Rays?

Not much asphalt is exposed to the sun's rays. The top surface of asphalt, if you look at it closely, is made up almost entirely of the stones and sand. The asphalt is just the tiny black lines or spaces in between each piece of sand or stone.

Sand and stones don't need a coat of sealer because they're naturally resistant to damage from the sun or water.

Does Traffic Wear Away Asphalt?

The traffic on roadways actually wears away the brittle asphalt and exposes fresh asphalt. Furthermore, oil drippings from cars and trucks that get spread over the road surface actually act as a low-grade sealer. But typical residential driveways don't get the traffic that roadways receive.

If Asphalt Driveway Sealer is a Waste, What Should I Do?

The bigger issue for residential asphalt driveways is cracking. Cracks that allow water to penetrate into the gravel base are a far greater threat to the long-term health care of your driveway.

Water that enters the gravel base can then soften the soil under an asphalt drive. If this happens, the weight of the cars going over this soft area can cause the paved surface to crack in even more places.

Is Asphalt or Blacktop Flexible?

Asphalt paving is actually a flexible pavement. The strength of asphalt surfaces comes from strong soils and a strong base material under the finished surface.

Keep in mind that asphalt sealers are simply coatings that paint the asphalt surface. Sealers lay on top of the pavement. If you seal too often, you simply are adding layers of asphalt that can peel off. Asphalt drives should be sealed when you can clearly see the color of the stones that are used to make the asphalt paving.

What is a Strong Stone is Asphalt Mix?

Limestone chips are very strong stone and perfect to make asphalt paving. Left alone to weather, an asphalt driveway obtains a uniform color of gray. There are asphalt drives in my neighborhood that have not been sealed in 15 years.

Tim, Is Your Asphalt Sealed?

My own asphalt drive in New Hampshire as approaching 20 years of age and has never been sealed. It's in great shape other than the few areas where the contractor didn't put in a strong enough gravel base.

Had they been sealed three times in that time period I can't say that the driveway would be in any better condition.

Should I Seal New Blacktop?

Do not seal a brand-new driveway. Fresh asphalt contains light-weight oils that eventually evaporate into the atmosphere. These oils are responsible for the tender nature of fresh asphalt.

As these oils evaporate, the asphalt gets harder and harder. Sealers prevent this evaporation. Seal a new asphalt driveway and it may stay soft forever.

What is the Best Asphalt Driveway Sealer?

The best sealer, in my opinion, is the cheapest one. You want the sealer to wear away in one year or less.

CLICK HERE to get FREE & FAST BIDS from local contractors who can fill your driveway cracks.

Column 435

Ducted Bathroom Fan

roof cap

This roof cap is made to duct bath and kitchen fans. When installed correctly, it is bulletproof. PHOTO CREDIT: Tim Carter

DEAR TIM: The master bath ventilation fan in our ten year old home vents directly into the attic space. There are several rooftop stationary vents and a power attic fan. A severe hailstorm one year ago dented all of the vent covers. The insurance inspector said the roofing and vents were leak-free despite the dents. An inspection in the attic reveals white fuzzy mold on the tops of the rafters at the peak of the roof. Do you think the hail is to blame? What is wrong? Mike T., Chicago, IL

DEAR MIKE: Although some people say I have strong mystic powers, I can't say for a fact that the hailstorm is not to blame. But the chances of the mold being caused by leaks produced by hail is remote at best. The master bathroom fan and any other fans that vent directly into the attic space are pumping vast amounts of humid air and mold spores into the attic space. This moisture is one of the necessary ingredients that is required to support the mold growth and allow it to flourish. Each time you operate the fan, the growing mold gets a new lease on life.

Virtually every model building code requires that ventilation fans be ducted to the exterior of a home. Unfortunately, some builders think that extending a plastic flexible hose from the fan that terminates near a stationary roof vent satisfies this requirement. It may in certain locations but it does not pass the smell test in my book. A pipe that terminates within the attic, even if it is immediately adjacent to a roof vent, can still discharge massive quantities of humidity into the attic space. Exhaust from fans needs to be ducted completely outdoors. It is non-negotiable.

The issue is a serious one for any number of reasons. Because you live in a colder climate, rapid and significant wood rot is a possibility. The humid air that discharges from the fan during the winter months can rapidly condense into liquid water on all of the cold roof framing lumber and the underside of the roof sheathing. The fact that you are seeing the mold at the tips of the roof rafters is consistent with this line of reasoning as warm air rises. I would not be surprised if you actually have wood rot in several of the rafters.


Roof Vent Video thumbnail
I have found that it is often best to vent fans and dryers through the roof. I urge you to watch this video of mine to see how easy it is to install the correct vent-cap flashing on a roof. Have no fear - if done right you will have no leaks.


The first thing you need to do is to stop the introduction of moist air into the attic. Fan manufacturers typically offer termination caps for walls, soffits and roofs. I prefer to ventilate my bathroom fans through the roof. I use a special roof hood that accepts four-inch diameter galvanized metal ventilation pipe. The solid pipe offers the least resistance to the movement of air. Many bath fan manufacturers highly recommend the use of this solid metal piping.

The roof termination cap is typically equipped with a damper that stops cold drafts and snow from blowing back down into the pipe. This damper works hand-in-hand with the small damper that is usually found in the fan itself.

It is vitally important for the metal ducting pipe to be well insulated for its entire length. If you do not do this, you will very likely have water dripping from your fan during the winter months. Uninsulated metal pipe can get very cold when the fan is not in use. As the warm moist air passes through this cold pipe, some of it can turn into liquid water. You may think the roof is leaking when in fact, it is simply condensed water that is running down the inside of the pipe towards the fan cover.

Perhaps the best way to insulate this metal pipe is a spray-foam insulation. These expanding foams can coat the entire pipe and provide the necessary protection to prevent condensation. Wrapping batt insulation around the pipe and taping it may not work. If the tape fails over time because of extremes in temperature, the insulation may fall off or partially expose part of the metal pipe. Be sure to remove any mill oil from the exterior of the pipe before you apply the spray foam insulation. A one inch thick coat of expanded foam over the entire exterior surface of the pipe should be sufficient.

Column 546