Fiber Optic Installation Process

plywood box for fiber optic router

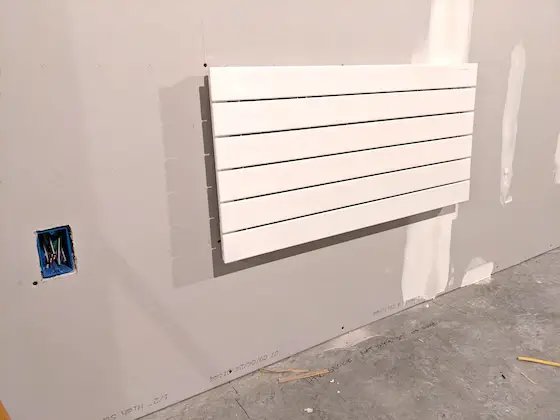
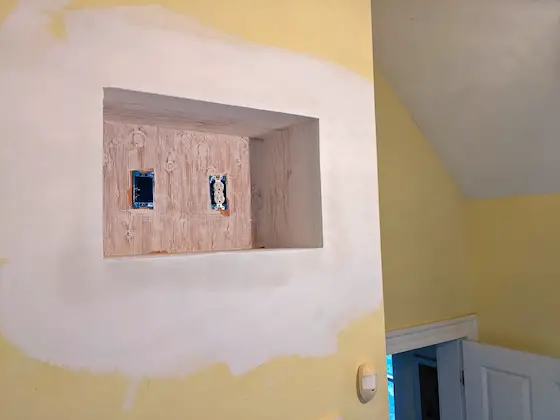
This new alcove, located high up in my central hallway, is where the fiber optic cable terminates inside my home. It will connect to a powerful wireless router that will provide high-speed Internet throughout my entire home. Copyright 2025 Tim Carter

Fiber Optic Installation Process - Router Placement Trick

I’m guessing you log onto the Internet each day. I travel the information superhighway all day long as part of my business. Fiber optic cables have now been extended throughout my small town in New Hampshire, and I’m ecstatic about their arrival. I remember using a 300-baud modem back in the 1980s. It would transmit text via telephone lines at about the same speed as you see headlines crawl at the bottom of your TV screen.

I had to get my house ready for this installation. You may have to do the same thing should you want reliability for years to come. If you’re building a new home, it’s vital you do several things to get ready for this latest technology trend.

Underground utilities serve my house. I didn’t build the current house I live in, and I can assure you I would have planned for the electric, cable TV, and all future underground utilities to enter this house at a more convenient location.

In my case, all of the underground conduits terminate at the far corner of my attached garage. This is the worst possible location. I would have had all the utilities enter the house immediately adjacent to the mechanical room, where my electrical circuit breaker panels are located.

Fiber Optic is Fragile

Fiber optic cable, in my opinion, is more fragile than traditional solid copper coaxial cable. This means it needs to be protected from unintentional abuse years from now. I had to install sixty feet of electrical conduit to serve as the raceway from the distant garage corner to where it makes sense to have the fiber optic cable enter inside my home.

Your fiber optic cable may be one of two sizes. The outer diameter of the more robust cable is about the size of a standard No. 2 pencil. A much smaller cable can also snake its way through your home. It has an outer diameter about the size of a cocktail straw. You can see why this tiny cable requires significant protection from being damaged.

Allow me to share what we did at my son’s home and at my house. Three years ago, my son moved into a brand-new home. It was a speculative home built by a builder for the market. My son is a software engineer, and video gaming is one of his hobbies. He knew that while wireless WiFi is good, a solid Ethernet cable is better if you want the best speed.

Ethernet Cables are Better than WiFi

One weekend, we extended Ethernet cables to four different locations on his main living level. It was easy work because the basement was unfinished. We moved the cable hookup to a future closet space under the stairwell leading to the basement. The wireless WiFi router was also placed in this space.

My son would have installed conduit from this future closet to all the locations if he had been involved in the design of the home. Plastic conduit is easy to work with, and it’s a great DIY project if you're building new. Plan it so you have the fewest long-radius bends in the conduit. One-half-inch conduit is great for the small fiber optic cable.

My situation was quite different. I had a complex conundrum to solve. It was impossible for me to install Ethernet cables to the key rooms in my existing multi-story home. I would have had to chop out lots of drywall to accomplish this. She who must be obeyed would not tolerate this mess!

I decided to install a powerful wireless WiFi router in the wall about 8 feet off the ground above my entrance hall coat closet. This is a great central location. The wireless signal would reach all three levels of my home with ease since the staircases are adjacent to the entrance hall. My open floor plan would ensure a strong signal throughout the main living level.

I had the good fortune to have a vaulted ceiling in my entrance hall. This void space extended over a mudroom that connects the entrance hall to the garage. I was able to snake a conduit from the void space over the entrance hall coat closet to the garage ceiling.

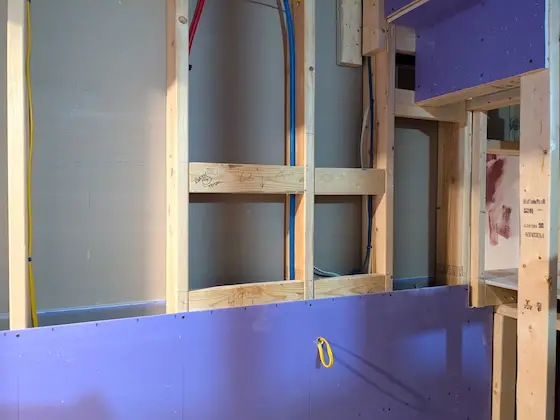
Plywood Box Creates an Alcove in an Hour

I then constructed a box made from 3/4-inch plywood. The box was 24 inches wide, 16 inches tall, and 12 inches deep. I built the box in about 40 minutes. It would have taken hours and hours of painstaking work to create this above the closet using lumber and drywall. Once the plywood is painted, everyone will think it’s drywall.

This open alcove will house the optical network terminal (ONT) and the wireless router. The ONT is a small magic box about the size of a deck of cards.

The wireless WiFi router requires a 120-volt electrical outlet. I decided to power this outlet through a switch that’s next to the closet light switch. This way, I don’t need a ladder to unplug the router to reset its RAM memory from time to time.

Column 1611

Exterior Paint Peeling Repair

porch post base paint peeling

The paint failure at the bottom of this wood post can be traced to the hidden cut edge that is sitting on the treated lumber. The odds are the cut edge is bare wood. Copyright 2025 Tim Carter

Exterior Paint Peeling Repair - Beware of Lead

Do you get frustrated when the expensive exterior paint you use peels, flakes, or cracks in just a few years? You’re not alone. I’m about to survey my thousands of newsletter subscribers. I’m willing to bet you a two-step mocha-chip ice cream sundae that a majority of them suffer as you do.

I’m convinced your disappointment can be traced to several things you might not know about paint. I believe that once you have a grasp of the product, you’ll start to get the same results I get when I paint outdoors.

What would you say if I told you I painted my Cincinnati, Ohio, house 25 years ago, and it looks as good today as it did back then? The paint has not peeled or flaked off. I’m having the exact same result with my current home in New Hampshire. It was last painted fifteen years ago with the best paint I could buy. Allow me to share with you the simple secrets to obtain results like mine.

marvin windows reviews

This is the rear of my Cincinnati Queen Anne Victorian home. This urethane-resin paint was 20 years old when I snapped this photo. Copyright 2025 Tim Carter

It’s essential to know that paint is just colored glue. Paint chemists refer to the glue as resin. There are many different types of glue. For example, the basic white glue kids use in kindergarten is nearly identical to the lowest-quality paint you can buy. You know yellow carpenter’s glue is far superior and as you might surmise, you can get paints that have this better resin base.

Epoxy is very strong, and yes, you can purchase epoxy paint. The only issue is it’s a bit more difficult to work with. Have you ever applied clear urethane to woodwork or furniture? Have you noticed how sticky and durable it is?

Urethane Resin Paint is the Best

That’s the exterior paint that I use - paint that has a urethane resin. It’s water-based and easy to apply and clean up as any water-based exterior paint.

CLICK HERE to shop for great Urethane-Resin house paint.

Your past failures with exterior paint might be traced to any number of shortcuts or mistakes. Allow me to share what I feel might be the most common ones. First and foremost, when was the last time you read and followed the instructions on the label of the paint can? I’d be willing to up my bet that less than 20 percent of homeowners take the time to do this.
Just about every label I’ve read mentions applying the paint to a clean, dry surface. What’s your definition of clean? Would you say your oily filthy body is clean if you stand in a shower under the highest pressure your skin can tolerate for twenty minutes before you towel off?

Pressure Washing is Not the Best

The answer is no. Yet, you may have used a pressure washer the last time you painted something outdoors to clean it. Have you ever used a pressure washer to clean your filthy car holding the wand as close to the surface as you feel comfortable? If you then allowed your car to air dry, you’ll notice there is still a stubborn thin film of dirt on the paint. Your car is not clean after it’s pressure-washed.

To get your body clean in a shower, you probably rub your skin with soap. You might even use a brush or microfiber towel. This mechanical agitation of the surface in conjunction with the soap is what gets your skin clean. You should do the exact same thing with whatever you intend to paint. Special brushes used to clean large RVs are perfect for house cleaning. I have a special one I’ve had for thirty years that does a tremendous job.

Hygroscopic Wood Swells and Shrinks

Wood is the most difficult thing for paint to adhere to. Wood is hygroscopic. This means it changes its shape in response to moisture content. The steel or plastic on your car doesn’t do this. The expansion and contraction of the wood can be greater than what a cheap paint can handle. If so, the paint looses its grip on the wood and peels or flakes.

You can minimize the expansion and contraction of wood by painting all the sides and cut edges of the wood. Imagine shrink-wrapping the wood with paint. I know this is lots of extra work, but it will pay off in spades long-term. It’s especially important to always paint the end grain of wood. This is where water enters into wood with ease.

Pay attention to what the paint label says about the air temperature. It will provide a minimum and maximum temperature range for application. Don’t exceed this! What’s more, follow the sun. Painted surfaces should not be exposed to direct sunlight if at all possible. The paint will dry too quickly. The best days to paint are overcast ones with no or light wind.

Does your label say to use a primer? If so, did you you know that you get the best results by applying the finish paint as soon as the primer is dry to the touch? The finish paint and the primer can chemically bond to one another since the primer has yet to fully cure. Try to do whatever is possible to take advantage of this magic.

Column 1610

Roof Maxx vs. Copper Roof Strips

Roof Maxx™ vs. Copper Roof Strips - Copper is Guaranteed to Keep Your Roof in Great Shape

I've seen quite a few TV commercials for a product called Roof Maxx™.

Have you seen them too?

My 30-year asphalt shingles started to fail in just nine years. Fourteen years after they were installed, this is what my shingles looked like.

sun-damaged asphalt shingles

I was so angry, I researched why asphalt shingles fall apart long before they should.

You can read all about this in my short Roofing Ripoff book.

Many people call me on the phone to ask about Roof Maxx™. They have discovered my Roof Maxx™ review, which I published several years ago.

Below are the rhetorical questions I ask when talking to them on the phone. Most purchase a small PDF file from me that shows how to SLOW the AGING of their asphalt shingle roofs using copper. CLICK HERE to purchase the PDF file.

In my opinion, there's a MUCH BETTER way to prolong the life of asphalt shingles.

I can PROVE THIS CLAIM.

Copper roof strips are guaranteed to slow the aging of your asphalt shingles.

I was the first person in the world to discover that copper ions do a superb job of adding decades of life to asphalt shingles. Look at this photo:

copper stops shingle deterioration

Look at how the small amount of copper that washes down from the roof of the cupola prevents the shingles from aging. The shingles to the right are missing all their granules and are curled like potato chips. Copyright 2025 Tim Carter ALL RIGHTS RESERVED

worn asphalt shingles

Look at how most of the colored granules are missing on the shingles. They are now unprotected from the photons in the ultraviolet light. How can one deny that copper ions extend the life of asphalt shingles after seeing this photo?  Copyright 2025 Tim Carter ALL RIGHTS RESERVED

Do You Ask These Questions?

Roof Maxx™ has not been around for very many years. Where is the actual proof that Roof Maxx™ does as it claims?

The UV rays of the sun are so powerful that they can blast metal ions from lead, zinc, and copper flashings. What do the UV rays do to a plant-based liquid?

Is the liquid used by the Roof Maxx™ contractors concentrated to save on shipping costs? If so, how do you know the applicator is not diluting it too much to increase his/her profits?

How do you know if your asphalt shingles are too far gone and you're wasting your money by squirting a liquid on them?

How do you know if enough of the liquid is being sprayed on your roof?

Do you continue to experience granule loss after the liquid has been sprayed on your shingles? If so, this may mean the liquid is not working.

How to Use Copper to Save Your Roof

Look at how I installed copper roof strips on my daughter's new home:

copper strips on roof ridge

I applied these copper strips to my daughter’s new home five years ago. Invisible atoms of copper wash down onto the shingles each time it rains. This can add 40, or more, years worth of service life to the roof. Copyright 2024 Tim Carter

You can purchase a simple how-to guide from me that shares what copper to buy and how to install it. 

CLICK HERE to get your INSTANT DOWNLOAD.


Hang Heavy Mirror on Drywall

heavy runtal electric wall heater on drywall

Hidden behind this 50-pound expensive wall heater are flat 2x4s nailed between the vertical wall studs. These critical framing members are blocking and ensure the heater never falls to the floor. Copyright 2025 Tim Carter

Hang a Heavy Mirror on Drywall - Blocking is Best

Have you ever struggled attaching heavy objects to a wall or a ceiling? You may employ a stud finder hunting and hoping wall studs are exactly where you need them to be. Some just throw in the towel and count on hollow wall anchors to do the job. You don’t ever have to use those when building a new home or doing remodeling.

The most recent trend over the past decade would be a flat-screen TV. These electronic marvels along with the wall-mounting bracket keep getting larger and heavier. You don’t want to hope they never fall to the ground. Kitchen wall cabinets, heavy mirrors, and paintings are just a few other things that must stay put.

Solid Wood Blocking is Best

Talk to any seasoned finish carpenter and she or he will tell you blocking is your best bet if you never want to rely on hollow wall anchors. Blocking is strategically placed wood, 3/4 of an inch or thicker, that gets covered by the finished wall covering. This wood is secured between vertical wall studs, ceiling joists, or trusses in locations where you know weeks or months from now you’ll be driving mounting screws or lag bolts.

Last year, while working on my son’s large basement remodeling project, we installed all sorts of blocking. In one instance, he wasn’t sure that early in the job the height of shelves would be in two alcoves on either side of his giant flat-screen TV. We solved this problem by installing 4-feet-tall pieces of CDX 3/4-inch-thick plywood.

CDX Plywood Works Well

This plywood was screwed to 2x2 pieces of lumber. The face of the plywood ended up flush with the face of the vertical 2x4s that created the alcoves. Months from now when the shelves are installed he can install nails or screws anywhere on the sides of the alcoves knowing he’ll hit solid wood.

We also installed critical blocking behind all of the electric wall heaters. These heaters each weigh about 50 pounds. They’re expensive and you never want them to fall to the ground. Horizontal 2x4s were nailed in between the vertical 2x4s. We referred to the heater installation instructions for guidance as to the recommended height above the finished floor for the blocking.

Shoot Photos or Videos

Not only did I take photos of the finished blocking with the centerline height above the floor marked on the flat 2x4s, but I also wrote this same information on the concrete slab with a Sharpie permanent marker. It was then child’s play to locate the center of the blocking once it was hidden from view by the drywall.

We used the 3/4-inch plywood trick in a closet under the stairs that lead to the first floor. My son wanted all of the Internet electronics, including the router, modem, and ethernet switch mounted to the wall. We laid all the components on the floor in a logical arrangement so the cables would work and be manageable. This allowed us to place the pieces of plywood exactly where they needed to be.

Our blocking mission didn’t end there, nor should yours! We had to install two rows of flat 2x4 blocking for a very expensive towel warmer in his bathroom. Once again, we didn’t want to guess the correct location. The towel warmer instructions gave a recommended height off the finished floor for the fixture.

Kitchen Cabinets Need Blocking

I’ve sworn like a sailor years ago hunting for wall studs for kitchen wall cabinets. I was determined we’d never have to do that on this job. Wall cabinets are going to be installed on a wall in his small speakeasy. Once again, we installed flat 2x4s at the correct height to match up with the inside rail at the top of the cabinets.

Blocking requires you or your builder to think ahead. This is a small price to pay in the planning phase. It eliminates frustration when it comes time to install things on walls and ceilings.

Here’s what many don’t realize about drywall. Most drywall specifications call for screw spacing to be 16 inches on center for walls. Celling drywall fasteners should be 12 inches on center.

Have you looked at how small the bugle head of a drywall screw is? Do you want to count on that to hold the drywall to the wall when you install a hollow-wall anchor? Yes, there are four screws on each wall stud. But what happens if the drywall hanger overdrives the screws and tears the facing paper? What happens if there’s a leak, the drywall gets wet, and the gypsum core turns to mush at the anchor location?

Don’t forget to take the requisite photographs or videos of the blocking before it gets covered up. Write the centerline heights of the blocking on the face of the wood with a Sharpie.

Column 1609

Soundproofing a Room

interior house wall partially covered with drywall

Soundproofing a Room - This is what a typical interior wall construction looks like. Once the next sheet of drywall is added, the wall is not much different from a bass drum you’d see in a marching band! Copyright 2025 Tim Carter

Soundproofing a Room - It's All About Air

Is your home noisy? Do you wish you didn’t hear things going on in other parts of your house? How about exterior noise? Do you hear sirens, motorcycles, cars, trucks, etc., even when your doors and windows are closed? Believe it or not, there’s quite a bit you can do with an existing home to make it quiet. You can make a new home ultra quiet with attention to many details.

I have a few stories to share that will convince you it’s possible to have a quiet house. About forty years ago, my insurance agent hired me to install replacement windows in his stately brick home. His house was a stone’s throw from a very busy main artery that connected downtown Cincinnati to the posh neighborhood of Hyde Park. Suffice it to say there was a lot of road noise.

High-Quality Replacement Windows

This solid-masonry home was built in the late 1890s. It had traditional up-down sash wood windows. The original windows had no weatherstripping. Some years later, crude brass weatherstripping was added to cut down on cold winter drafts.

The homeowner wanted the new windows to match the existing ones to preserve the architectural integrity of the house. Marvin windows offered a wonderful product at the time where they’d make new sashes to the exact size of the existing ones, and they’d supply new side jamb liners that nested on the sides of the existing window opening once the old sashes were removed. You didn’t have to touch the interior or exterior woodwork.

When I arrived at his house the morning after we had installed many of the windows on the first floor, he said, “Tim, you’re AMAZING! The windows look great, but I wasn’t prepared for how they’ve stopped all the road noise. It’s like a mausoleum inside now. I didn’t think we could ever stop all the noise from the traffic!”

Sound needs air to make it from the source of the sound to your ears. If you shot a gun in a vacuum, you’d not hear a thing. The new windows I installed blocked just about all air pathways between the outside and the inside of his home. His solid masonry walls, by default, were blocking any and all air from the outside from getting inside.

Broadcast Radio Studios

I used to do a two-hour live radio show. The sound engineer taught me one day how he made the radio studios soundproof. Once again, it all starts with air. The actual studio was much like a room within a room. If you took the radio studio and put it in a huge swimming pool, it would float. No water would leak into the studio. Every seam, hole, etc. was sealed with a gasket or with a special acoustic caulk that stays pliable for decades.

The covering on the inside walls of the studio was a different thickness than that on the outside in the hallway. The large glass window looking into the studio was made with multiple panes of glass of different thicknesses. The glass was not parallel like the double-pane windows in your home. All of this detail is what it takes to prevent walls and windows from being first cousins to giant bass drums you hear in a marching band.

My son’s new home is just 500 feet from a very busy freeway in southern New Hampshire. When you’re outdoors, the road traffic noise is so loud during the day you have to talk a little louder than normal. That mind-numbing noise disappears the moment you go inside the house and close the doors and windows.

The builder did an excellent job of sealing each and every air leak. The windows have fantastic weatherstripping just like the Marvin windows I installed all those years ago. Other than that, the wall construction is no different than your home. My son’s house has vinyl siding attached to oriented strand board. The walls are framed with 2x6s, filled with fiberglass insulation, and the interior is just 1/2-inch drywall. It’s proof positive that stopping air leaks is the first step to stopping exterior noise from making it indoors.

Stop All Air Leaks

You can limit interior noise transmission from one room to the next by paying attention to air leaks. The typical interior door is like a colander. Sound passes right around the edges of the door. Install inexpensive felt or foam weatherstripping on the door stop on the sides and top of the door jamb. Install a tight threshold or door sweep to stop air from sneaking under the door.

Remove your electrical outlet and switch cover plates and no doubt there will be a gap between the electric box and the drywall. Caulk that gap and then install a foam gasket under the cover plate.

Air is probably leaking under the bottom plate of the walls. You may be able to seal this by caulking under baseboards. In the worst cases, you can minimize the drum effect by adding an additional layer of drywall on one side of a wall. Sympathetic sound transmission happens when the wall covering on each side of the wall is the same thickness and same material.

Carpets, area rugs, upholstered furniture, and fabric wall decorations go a long way to absorbing sound in rooms. If all else fails, purchase inexpensive silicone ear plugs. I use them each night to sleep like a baby!

Column 1608

Sewage Ejector Pump Problems

sewage ejector pump problems

Sewage Ejector Pump Problems - This is a sewage ejector pump pit before the concrete slab is poured. Imagine what you have to face when the pump fails and 25 gallons of RAW sewage are just under the sealed lid. Copyright 2025 Tim Carter

Sewage Ejector Pump Problems - Nasty Dookie Stew

I’ve shared in a few recent columns how I’m helping my son finish his basement. I’m having a great time building memories for both of us. I made a sign from a scrap piece of drywall a few months ago: Will Work for Food (Good Food). I signed and dated it. I intend to have the sign framed and hope it hangs on the side wall of the speakeasy for decades. Fortunately, my son is a great cook, so I get paid very well.

will work for food sign by tim carter

Here's the infamous sign I hope my son saves for future generations! Copyright 2025 Tim Carter

One of the major challenges in this project is the full bathroom. The building drain exits the house about 4 inches above the concrete floor. A building drain is the main pipe that collects all the liquid and solid waste in your home and transports it to the city sewer or a septic tank.

I drew the required riser diagram to get the plumbing permit for this job. If you need a riser diagram, I love doing them. Go to www.DrawPlumbingPlans.com to read all about these colorful drawings.

dwv riser diagram isometric drawing

This is a small version of a typical drain, waste, and vent (DWV) drawing I produce for homeowners and architects. CLICK HERE to order yours.

I’ve been a master plumber for over four decades. I knew we had a few options to solve this conundrum. Many plumbers and remodelers choose to install a sewage ejection sump under the basement floor. The bathroom waste enters the sealed sump. A special grinder pump purees the waste and paper and forces it up about six feet into the elevated building drain. You have to break into the concrete slab to install a sealed sewage ejection sump. It’s very hard work.

Sewage Ejector Pump Problems

Sewage ejection pits and pumps come with baggage. They require a separate atmospheric vent that supplies replacement air when the pump activates. Every gallon of water pumped out of the sump must be replaced immediately with a gallon of air. Failure to do this will create a vacuum within the sealed sump. This vacuum will begin to suck the new bathroom fixture traps dry in its frantic search for air.

The pumps in these sewage ejection pits have moving parts. I’m sure you know that everything with moving parts eventually fails. Switching out a pump in a pit filled with raw sewage is nasty work. Plumbers get paid a premium to do this. I didn’t want my son dealing with all these issues.

Macerating Toilets Work Too

Another option is to install an above-ground macerating toilet. These operate just like the sewage ejection pits, but the entire setup sits above the concrete basement floor. A shower and sink can also drain into the small tank connected to the toilet. This system is much easier to install than the sewage ejection pump and pit. That said, the pump in the tank will also fail at some point forcing you to deal with the sewage stew.

Gravity is Always the Best Option

We were lucky because the building drain was so close to the floor. I did some math and discovered we could use gravity to drain this bathroom. The plumbing inspector was stunned when she showed up for the rough-piping inspection.

“Where is the sewage ejector pit?” she inquired. “Dawn, I don’t need one. I’ve decided to use a wall-mount toilet and put the shower up on a platform 7.5 inches off the floor.” She shook her head, acting as if she had never seen this setup before, while she marked her inspection form PASSED.

The wall-mount toilet is easy to install. A sturdy steel frame is bolted between two wall studs. The weight of the toilet and a person sitting on it is supported by this frame. When the ceramic tile is on the wall, you’ll never know the frame is there. We designed this bathroom wall to be just four feet from where the building drain exits the house.

I solved the shower problem by building a custom-height treated lumber platform. The top of the platform sports a piece of 3/4-inch-thick treated plywood. This prevents wood rot should a leak develop in the future. Can you imagine how disruptive and expensive it would be to rebuild the platform years from now?

treated lumber platform for a basement shower

This is the actual treated lumber platform I built for my son's shower. Copyright 2025 Tim Carter

I had to craft a custom p-trap for the shower. I used two long-radius 2-inch-diameter 90s with the standard hard 90 that comes with a standard solid-weld p-trap. I used a shower drain fitting that uses a rubber bushing to make a leak-proof seal to the drain pipe. These are easy to install. Be sure to use silicone grease when installing the bushing.

An unfinished storage space allows us full access to the shower valve and drain, the toilet’s steel frame, and the piping for the vanity sink. You should do the same if at all possible. You’ll never regret having easy access to all the plumbing in any bathroom. Decades ago, architects put bedroom closets on the other side of bathrooms. Inside a closet it was common to have a removable access panel to the tub and shower plumbing.

Column 1607

Wood Conditioner Before Stain

staining wood with a rag

Without proper preparation, a dark stain like this can turn out horrible. There are many factors in play that produce pro results. Copyright 2025 Tim Carter

Wood Conditioner Before Stain - It's What Pros Use

How many times have you used a stain to change the appearance of a piece of bare wood that’s inside your home? Did the job turn out like the finish you see on high-end stained cabinets or other furniture? My guess is you weren’t even close. I had the same poor results for at least ten years until I discovered all one needs to know to ensure stained interior woodwork has a professional appearance.

It’s very important to realize that all wood is not the same. The cellular structure of the wood controls, to a very large degree, how easy or hard it is to achieve stunning results when you apply a colored penetrating stain.

Trees are Like Bundles of Cocktail Straws

A live growing tree in the forest is really nothing more than millions of tiny vertical straws bundled together. Imagine taking very tiny cocktail-drink straws and putting a rubber band around them. These tiny tubes are how the sap moves up and down through the tree. Each spring the tree creates thousand of new tubes as the next light-colored spring wood growth band is created. The quantity and inner diameter of the tubes varies with the wood species.

The light-colored wood between the dark stripes of summer wood grain is the spring wood. The tubes in this spring wood soak up stain more readily than the darker denser summer wood grain.

Soft woods like clear white pine soak up stain like a sponge. You can end up with a huge mess of blotchy stained wood in seconds if you don’t know what to do and take all the steps necessary to prevent disaster.

Sand the Wood Until it Resembles Glass

Professionals go to great lengths to sand the bare wood until it resembles glass. You want the wood as smooth as possible before applying stain. This sanding is also a requirement for the final clear finish to be smooth.

You often need to sand in stages using sanding grit that gets smaller and smaller in size. To add even more complexity, not all sandpaper is the same. Aluminum oxide paper self-sharpens as you use it. Red garnet sandpaper gets dull as you slide it back and forth along the wood grain. This may be desirable should you want a silky burnished texture to your wood.

Do you know about wood conditioners? It took me years to discover this wood-staining magic trick. A wood conditioner is a clear liquid you apply to the bare wood just before you apply the stain. The conditioner chokes off the tubes in the wood, preventing too much stain from soaking into the wood.

wood conditioner in a can

Years ago I did a short video for a local TV station showing the dramatic results using a wood conditioner. I used a piece of clear white pine that is a common wood for interior window and door trim.

I sanded the wood and then applied the wood conditioner to just half the length. I allowed it to dry as suggested on the label. I brushed on the dark stain and it looked the same on the entire length of trim. But the moment I took an old towel and wiped off the excess dark liquid stain, the difference was like night and day.

The part where I used the wood conditioner was gorgeous. You could see all of the wood grain. The part that had no conditioner was blotchy, dark, and looked horrible.

You can unknowingly cause a problem that might not appear for several years. The clear finish you apply can change color when subjected to light and lots of ultraviolet light. Oil-based urethanes and varnishes have a tendency to transform to an amber shade over time.

Water-based urethanes often stay crystal clear forever. Do your research and make sure your stained woodwork stays the color you desire for many years.

You can also ruin your stained woodwork by not using the best wood filler to hide the holes created by the nails. I prefer to stain the wood trim and coat it with the clear finish before installing it. I then use a color putty that matches the color of the stained wood. You can blend different shades of the putty to get an exact match.

I often apply the wood putty using a very small dental tool. I make sure the putty is compacted in the hole and flush with the top of the wood. I finish off the job using an artist brush to apply a dot of clear finish to the putty.

Column 1606