Rough-In Plumbing Diagram
Rough-In Plumbing Diagram | You'll need a master plumber to draw a riser diagram like this. CLICK or TAP HERE and I'll draw your rough-in plumbing diagram in just a day or two.
Rough-In Plumbing Diagram TIPS
- Simple 2-D drawing showing drains and vents
- Use an inexpensive 30-60-90 drafting triangle CLICK TO BUY
- Each pipe section must show size for clarity
- WATCH plumbing vent video below!
- CLICK HERE to Get Tim's FREE & FUNNY Newsletter!
Rough-In Plumbing Diagram - I Can Draw One For You - CLICK or TAP HERE!
Please watch this short video:
DEAR TIM: My city allows homeowners to install their own plumbing. But to get the permit I need to supply them with a rough-in plumbing diagram.
What is a plumbing diagram? Can I just do a bathroom plumbing diagram since all I am doing is adding a new bathroom to my home? Is it a good idea to include a bathroom plumbing vent diagram when I submit my paperwork to get my permit? Dave B., Cincinnati, OH
DEAR DAVE: You should count your blessings that you live in a community that allows you to do your own work. Some areas of the nation do not allow owners of single-family homes to do their own work. Plumbing permit help is my specialty because I've been installing plumbing for decades.
I became a master plumber before the age of 30 and used to do all the plumbing work on all my jobs. I loved running drain and vent pipe and especially heavy black iron for natural gas lines. I've tapped my fair share of sewers and lived to tell about it!
It's my opinion that certain homeowners can do better work than some of the plumbers I've seen in my years in the field. If you can install the piping correctly and it meets or exceeds the plumbing code, why shouldn't you be allowed to do the work?
CLICK HERE to get FREE & FAST BIDS from local plumbers who will draw a rough-in drawing for you.
2D Drawing Shows All
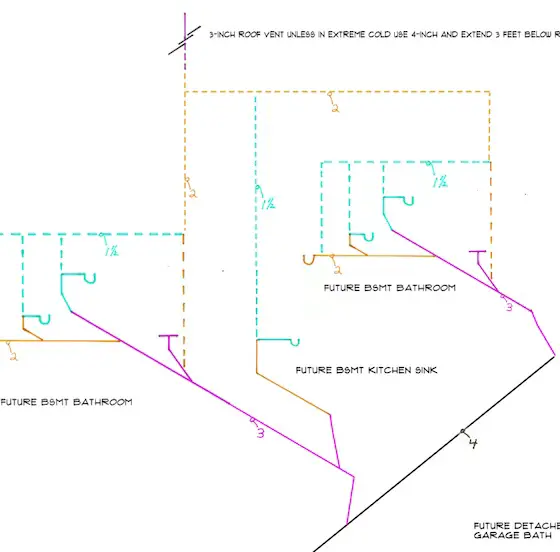
A rough-in plumbing diagram is a simple isometric drawing that illustrates what your drainage and vent lines would look like if they were installed, but all of the other building materials in your house were magically removed. You would see the pipes in three dimensions, and be able to see all of the connections, the pipe sizes, fittings and vent piping.

I'm a master plumber and I drew this in about ten minutes. It shows the fixtures in a bathroom that's being added to an existing home. The solid lines carry water and waste. The dashed lines only carry air and some condensation water. - © 2017 Tim Carter - Master Plumber CLICK the DRAWING if you want to hire Tim to draw your rough-in plumbing diagram.
By drawing the lines that represent each pipe at certain angles, you can make a three-dimensional drawing on a flat piece of paper. Any artist can tell you this is simply a matter of perspective. Imagine looking at your house's plumbing system as you hover in the air and at an angle instead of just looking at your house from the front door. This is what a rough-in plumbing diagram looks like.
CLICK HERE to get FREE & FAST BIDS from local plumbers who will draw a rough-in drawing for you.
Magic Triangle
You create the interesting 3D perspective in the 2D drawing by using a simple 30 - 60 - 90 triangle. These are very inexpensive and do a great job of showing the sloping and intersecting wye fittings as if you were able to see a real plumbing system without all the wood or steel framing in the way.

This is the infamous 30-60-90 triangle. Eventually they'll be collector's items with everyone switching to computer graphics! CLICK THE IMAGE NOW TO BUY ONE. VERY CHEAP
Solve Problems Early
A plumbing diagram is a really useful tool that can save you lots of money and headaches. The drawing communicates to the plumbing inspector that your system will meet the minimum standards of the code. When you apply for your permit, an inspector studies your rough-in plumbing diagram making sure the pipe sizes are correct and that you're using the correct fittings at the places where pipes connect to one another.
For example, let's imagine you think it's okay to install a fitting connecting two drain pipes together at a 90-degree angle, and this pipe is in the ground under a concrete slab. In almost every jurisdiction I know of, this is an illegal connection. You draw this and the plumbing inspector corrects this mistake before you install the pipe and have to rip it out to make the correct connection using two 45-degree bends to make the 90-degree turn.
You should just have to do a bathroom plumbing diagram for your job since you're remodeling. It would be unreasonable for you to have to make a drawing of your entire plumbing system, especially since it's hidden behind the walls.
You'll be expected to show how and where your new drains will connect to your existing plumbing system. This is very important as the new branch line you install must connect to an existing plumbing drain in the right location.
Vents are Dashed Lines
The diagram will absolutely have to include a bathroom plumbing vent diagram. Vent pipes on plumbing diagrams are drawn as dashed lines while pipes that carry water are drawn as solid lines.
Some pipes that are waste lines can be vent lines at the same time. It can get confusing. In the drawing I made above there's an example.

This is a portion of the big diagram above. I made the lines red here to illustrate these two pipes are both drain and vent lines. Read the column copy for explanation. - © 2017 Tim Carter
Look at the slightly enlarged image I cut out of the overall diagram at the top of the page. I've made two lines red.
This section of piping is 3-inch in size and starts at the one end of the wye fitting where the toilet drain pipe also connects. The toilet drain pipe extends from the wye and terminates with the "T"-shaped symbol. The "T" represents the actual toilet flange.
Wet Venting
The red section of piping takes the water waste from the vanity that sits next to the toilet. Since the drain pipe is 3-inches in diameter, there's plenty of space for both water and air to exist if you were to fill the vanity sink with water and pull the drain plug while flushing the toilet at the exact same time. The rushing toilet water would not rob the vanity p-trap of air because it can get plenty of air in the 3-inch pipe.
Some plumbers and inspectors call this wet venting. In other words the toilet has a wet vent because water from the vanity flows through that small section of vent pipe. There are some inspectors that will not allow wet vents. I've never had a problem with one so long as you maintain the size of the vent pipe for the fixture being vented. In this case, the toiled drain is 3 inches so its wet vent needs to be 3 inches.
Once the wet vent terminates at the 3 x 1 1/2 tee fitting where the vanity drain connects, the vent for both the toilet and vanity can be 1 1/2 inches.
You'll need to show how and where your new vent pipe connects to an existing vent pipe or exits the roof as a new separate vent. If you're going to go through the roof with this new vent pipe, be sure it's sized correctly to prevent getting choked with ice. This can happen in your climate in periods of severe cold weather if the pipe exiting the roof is too small a diameter.
Plumbing Vent Video
Watch this video to see some plumbing drain lines, but more importantly, lots of plumbing vent lines.
Call Out Pipe Sizes
Be sure you call out the size of each pipe shown on your rough-in plumbing diagram. Show all changes of direction correctly. If you intend to use a fitting that turns a hard 90-degree angle, show that on your drawing. If you intend to use fittings that turn just 45 degrees, draw that acute angle on the paper. It's not that hard to make a plumbing diagram so long as you can visualize the pipes in your head before you install them.
Study Other Drawings
If you struggle to make your rough-in plumbing diagram, the first thing to do is ask your local plumbing inspector or the plumbing department if they have any sample plumbing diagrams you can study. Once you see how they're drawn, it will make complete sense to you. If they don't offer a free sample, consider purchasing a copy of your local plumbing code. Often the code books have great examples of the isometric rough-in plumbing diagrams.
Use Correct Symbols
When you see a sample rough-in diagram, you'll notice that certain simple symbols are used to indicate the fixtures you will eventually connect to the pipes. Be sure to use these symbols properly so the inspector reviewing your drawing doesn't think you will be connecting your toilet to your bathroom vanity pipe!
To make the drawing, you'll discover that a drafting 30-60-90 plastic triangle will be invaluable. The 30-degree angle side of the triangle is perfect to illustrate pipes that run horizontally with the code-required slope. CLICK HERE NOW to buy one of these dandy plastic triangles. Some computer software also allows you to draw lines at specific angles.
CLICK HERE to get FREE & FAST BIDS from local plumbers who will draw a rough-in drawing for you.
Column 722
Tim built custom homes and did ultra-custom remodeling for 20+ years before launching his Ask the Builder media presence. He was selected as one of the Big 50 by Remodeling magazine in 1993. This award gave birth to Ask the Builder in October 1993. Tim also operates https://DrawPlumbingPlans.com. His @askthebuilder YouTube channel was the first home improvement channel on YouTube.
Best drawing I've seen.one? The 2"before the toilet is for sink and at the end it also serves as vent for both sink and toilet
Nice diagram one ?. R u using the vent for sink and toilet.Is that ok or should a deprecate vent be run for toilet.
Thanks need to know
do the diverter bodies for shower and bathtubs neeed to be in for rough plumbing inspection?
My waste line is 15" below slab.What is the best way to get toilet run down to waste pipe.Should I add 3" PVC down to elbow then to waste.
What is the max length of a 2" shower drain before it needs to be vented ? The 2" drain pipe is directly attached to the main 4" stack that is vented vertically with a 3" dry vent. Is 4 feet of un-vented 2" drain pipe allowed ?
Depends on the code in your area! Talk to your plumbing inspector.
Tim,
I noticed your last post was Dec 14,2014, are you still giving out plumbing advise?
Tom
Yes, I'm still a master plumber. You need to date when something happens. The physical laws governing how plumbing systems function are not changing anytime soon, so my advice above is timeless.
I am disabled and live on a small income, I am converting my garage into a living area and need to know what size pvc I need to use for the toilet, sink and shower.
You have not only shown how to make one but also clearly explained the need for a rough-in plumbing diagram. Though it may seem much easier to go DIY and just cut and connect with older existing pipes, I understand now that it is not that simple and I may be making illegal connections that can get me into further trouble and costs. Since creating a rough-in plumbing diagram is too complicated for me, I think hiring a professional plumber to do the design and rough-in diagram for me would be more convenient and cheaper in the end.