Wood Rot, Roof Overhangs and Concrete Anchors
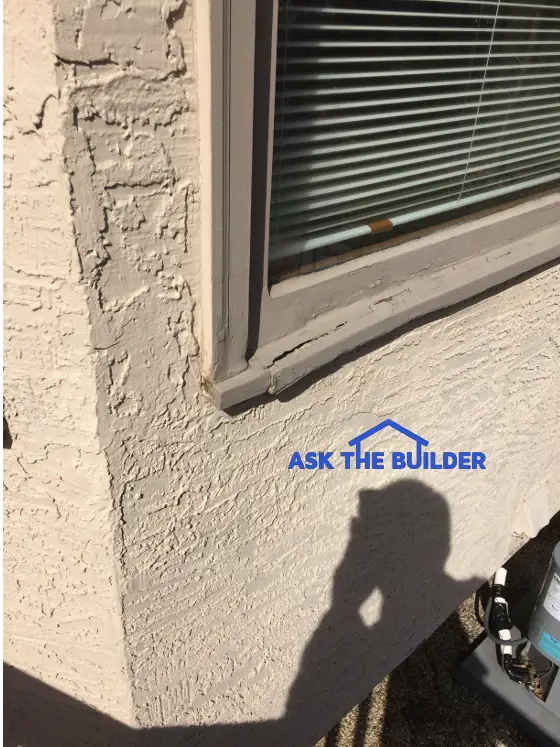
There are two reasons why this wood window sill is rotting. First and foremost, there’s no roof overhang. The second reason is low-quality hybridized lumber was used to build the window sill. (C) Copyright 2018 Tim Carter
Question #1: Tim, the window frame on the back of my house is deteriorating. If you look at the three photos I sent, you’ll see there’s no gutter over this window, but rain diverters up in the shingles. What’s the best way to repair the damage and prevent it in the future? Andy, Westerville, OH
I’ve seen an alarming rise in wood-rot questions like Andy’s. Perhaps it’s happening with your wood windows, exterior house trim, and wood door frames. It’s happening at my own home here in New Hampshire. It’s important to realize I didn’t build the house I live in and would have never used the brand of wood trim that’s all over my house.
Another key point is the lack of roof overhangs on the projecting bay where the problem windows are located at Andy’s house. Roof overhangs are yet another building best practice that are fast becoming myth. All Andy has to do is drive through neighborhoods near him where the houses were built in the early 1900s to see generous roof overhangs.
A roof overhang is not much different than an umbrella. You stay dry using a large umbrella as you walk in the rain because the drip line of the umbrella is a good distance away from your body. Roof overhangs do the same to keep house walls, windows and doors dry except during violent wind-driven rainstorms.
The wood trim on your home may be just like Andy’s. Over the past few decades, there’s been an alarming trend to use hybridized lumber that grows rapidly in the spring. This lighter-colored growth band between the darker summer wood band allows water to soak deep into the wood trim. Fungi spores go along for the ride and the next thing you know your wood is rotting.
You can use two amazing products to repair the wood rot and even rebuild missing wood. The first product is a milky liquid wood hardener that you brush onto the rotted wood. It works best if you apply this to dry wood. After one day you then mix up a heavy-bodied wood epoxy to fill any gaps, holes or large cracks. The epoxy can be sanded, painted and stained.
You can watch a short video how to use the milky liquid and wood epoxy. The video should give you the confidence that you can do this simple repair. I’ve used the products at my own home with great success and feel confident you’ll discover they’re easy to use. Go to: https://www.askthebuilder.com/repair-wood-rot/
Question #2: Tim, I really need your help. I’ve got to attach a piece of 2x4 treated lumber to a concrete block wall. A sidewalk gate will be attached to this piece of wood so it needs to be rock solid. I know the concrete block wall is filled solid with concrete because I watched it being built. How can I install an anchor bolt now in this wall so it never comes out? Teri, Bloomington, IN
You may be in a similar situation as Teri wanting to install a threaded bolt into a concrete slab or perhaps a concrete block wall. Believe me, there are countless anchor designs and products all that may work well.
The good news is you can get a simple hex-headed bolt and three nuts at your local hardware store that will do for you what Teri needs to do at her home. You’ll also need to rent a hammer drill to create a very special hole. The only other thing you’ll need is some easy-to-use concrete epoxy that holds the bolt in place and prevents it from ever being pulled from the concrete or concrete block.
You can borrow a tip from your dentist for this project. The reason the fillings in your teeth don’t come out is because your dentist creates a hole in your tooth that’s wider at the bottom than at the top. You’re going to do the same thing with the hammer drill by drilling into the concrete at different angles as you drill the hole.
I’d want the bolt to be embedded in the concrete at least 1.5 inches. Teri is using a 2x4 which is 1.5 inches thick. She should have about 1 inch sticking past the face of the 2x4 to attach a washer and nut. This means she’ll need a 4-inch-long hex-head bolt. To ensure the bolt doesn’t turn when she’s attaching the wood, she needs to thread on two nuts to within 1/4 inch of the head. Use wrenches to tighten the two nuts against one another.
After the holes are drilled all the dust must be removed from the hole. Don’t blow into it with your mouth! You’ll get a blast of dust in your eyes and be off the the ER. When you’re at the hardware store, get a 2-foot length of 3/8-inch plastic tubing. Insert one end into the hole, bend the tubing to get around the corner and then blow on the other end of the tubing.
Squirt some epoxy onto the end of the bolt that goes into the hole and then add more in the hole so it oozes out when you insert the bolt. Allow the epoxy to cure for 48 hours before attaching anything to the anchor bolt.
If you want to watch a short video showing how to drill the bell-shaped hole into concrete block for a permanent anchor, go to: https://www.askthebuilder.com/how-to-install-an-anchor-in-concrete-block/
Column 1246
Tim built custom homes and did ultra-custom remodeling for 20+ years before launching his Ask the Builder media presence. He was selected as one of the Big 50 by Remodeling magazine in 1993. This award gave birth to Ask the Builder in October 1993. Tim also operates https://DrawPlumbingPlans.com. His @askthebuilder YouTube channel was the first home improvement channel on YouTube.