DXV Fitzgerald Sink Remodel

DXV Fitzgerald Sink - A New Sink Perfect for Restoration Work

Here's the DXV Fitzgerald sink after it was installed. Look below to see how incredible the transformation was. This magnificent period sink was perfect for the ongoing restoration of an early 1900s Craftsman house in southern California owned by one of my best friends. Copyright 2019 Tim Carter

My very good friends Russ and Ann live in a stunning early 1900s Craftsman home in southern California. Russ grew up in the house and he and his wife Ann love each and every inch of it. I've stayed there countless times and look forward to each upcoming visit.

Russ loves old things and is doing painstaking work to restore the house to its original look and feel. Back in the 1970s his mom and dad remodeled the first-floor bathroom installing the latest trend at that time - a stylish wood vanity and a cultured-marble top. The original pedestal sink and faucet were ripped out and taken to a landfill.

This is the first-floor bathroom before work began. At some point in the past, the stunning stained woodwork was painted. Ann spent countless hours stripping the layers of paint to bring it back to its original look. Copyright 2019 Tim Carter
After removing the wretched wood vanity, Russ and Ann discovered they needed to update the failing galvanized iron drain line and water pipes. The plaster suffered as a result. The plaster under the board with the towel was re-attached to the wood lath using a spray foam. Pressure was applied with the horizontal board until the foam cured. Ann watched a few of Kirk Giordano's plaster repair videos on YouTube and completed the entire patch herself never having done plaster work before. She did a magnificent job. Copyright 2019 Tim Carter
Isn't this DXV Fitzgerald sink breathtaking? When you install a period American Standard faucet with the sink, you'd fool all but a few experts into thinking it was original with the house. I love the slightly rounded platform under the center of the faucet. What do you think? Type a comment below.
CLICK or TAP HERE NOW to see how affordable this sink is. I'll bet you guess high!
Copyright 2019 Tim Carter
Admit it now. If you were about to wash your hands at this Fitzgerald sink you'd think it was 100+ years old. Isn't the faucet stunning?
CLICK HERE now if you want to buy this high-quality sink that's made in the USA. Copyright 2019 Tim Carter
Behold the sleek shape and lines of the DXV Fitzgerald pedestal. Didn't Ann do a spectacular job on the plaster patch? CLICK HERE to have the Fitzgerald sink delivered to your doorstep. Copyright 2019 Tim Carter
I think you can see why Russ and Ann chose to use the Fitzgerald sink. They both feel it adds tremendous value to their home. It also makes them feel happy each time they look at it and use it. Ann intends to do some faux painting on the walls. I'll add those photos when available. CLICK HERE to have this Fitzgerald sink delivered to your home in days. It comes in white or a soft biscuit color.

January 22, 2019 AsktheBuilder Newsletter

If you're a new subscriber, I'm glad you're here. If you've been around the block a time or two or three with me, thanks for staying on the list.

The New House Saga

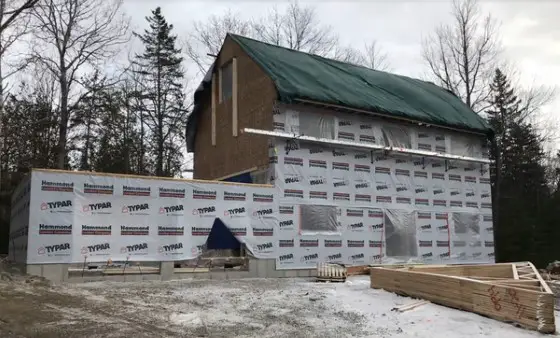
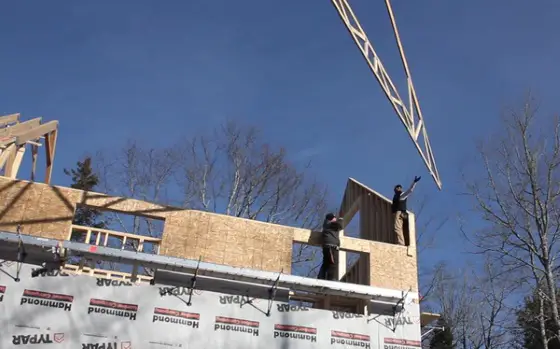
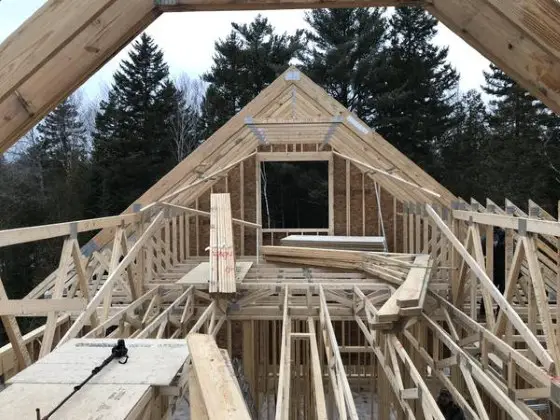
I announced a month or so ago that this newsletter, over the next six months, was going to focus on the construction of my daughter and son-in-law's new home on Mt. Desert Island in Downeast Maine.

Right now the project is temporarily stalled because of the miserable winter weather up there. I've built in the winter in cold climates and it's by no means fun nor is it advised.  

CLICK HERE to read what I have to say about Building in Bad Weather.  

Everything takes more time. Workers are bundled up in heavy clothes, certain tools don't work (pneumatic nailers and hoses FREEZE up), certain products (PEX and vinyl siding) are almost impossible to work with, etc. Snow and ice make for dangerous working conditions.  

You may have been one who asked why in the world the project was launched with winter on the doorstep? Well, there were a number of small delays that added up over the summer and these translated to a lot-clearing date of mid-October.

There's a heightened sense of urgency to get the project done as soon as possible and I'm not going to tell you why just yet. This is why all are trying their best to keep the job moving.
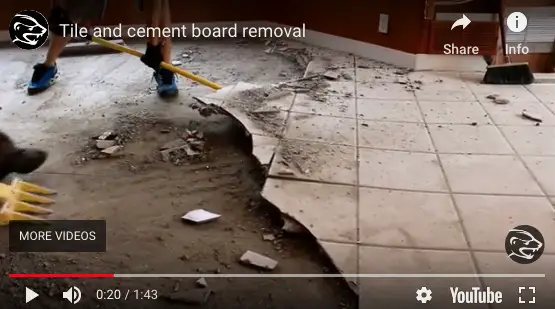
Help ID a Tool  

Can you help me identify the yellow floor-scraper tool used in a video on my website? I've tried to locate it on Amazon, but have been unsuccessful.  

CLICK HERE to watch the video to make sure you're looking at the correct tool.  

Just reply to me with the tool name, the manufacturer, or better yet a link to it on Amazon.com. Thanks in advance.

Regulating Influencers

Do you know what an Influencer is? Do you follow any on different social media platforms? Many PR people in my vertical consider me a home improvement influencer.  

You may want to read this recent article that exposes some of the unethical Influencer practices that are rife out on the Internet.   

If there are other influencers you follow and rely on, I URGE (beg) you to read their disclosure page at their website where they share their belief system and how they make decisions on what wares to ply to you. Don't know that word, ply? Look it up when used as a verb.  

You may want to read a page that's been on my website for many years to see how I make my decisions about what products I tell you about.  

CLICK HERE to read it.  

The Cliffs Notes version is simple. I only tell you about products I'd use myself. I only tape videos about products that are really good.  

In less than two weeks, I'm going to be devoting an entire newsletter to a product that I've used on my jobs for decades. I've used them on the last house I built for my family. I have them in my current house here in New Hampshire.

What is this fantastic product? You'll have to wait and see. When I do share it  with you, there will be lots of links to click. You'll be helping yourself and me when you click those links, believe me.  

I'm going to end with this. I feel we need more integrity in the world. Right now I'm witnessing an alarming trend of degraded ethics, morals, and common decency. Are you seeing it too? Are you troubled by it? What do you think is behind the trends?  

Are you aware that both videos and audio recordings you may see/hear out on the Internet can be completely faked? About fifteen years ago, a talented sound engineer that used to record commercials at the radio station my Ask the Builder two-hour call-in show was on did a demonstration for me one day.  

After recording a commercial or two for my show he handed me a piece of paper with random words and phrases on it. He asked me to speak them into the microphone.  

I did it, he thanked me and I left the recording suite to go about my business.  

A week later he had me come into the production studio and listen to a tape of myself talking. I had never recorded what I heard.  

He CREATED A FAKE RECORDING OF ME USING the words and phrases I spoke for him a week earlier. He did it as a joke just to show me what was possible.  

It was creepy.  

Remember, that was fifteen years ago and we have far better technology now.  

I'm only sharing all this because I want you to realize that there's more and more DANGER out there each day when it comes to what you may be seeing, hearing or reading.  

I'll end with this when it comes to Influencer things you see/hear. A wise attorney that was a fellow councilman in my village back in Ohio shared a saying that relates to this discussion.  

Did you know I was elected to public office twice? Yep, I was a councilman in Amberley Village, Ohio for two terms.  

Lou, the attorney, said one day at a committee meeting, "Tim, a half truth is a WHOLE LIE."  

It hit home with me because I was doing lots of expert witness work at the time and each time I was deposed or put on a witness stand in a courtroom I had to swear: "I promise to tell the truth, the WHOLE truth, and nothing but the truth."

That's why a half-truth is a whole lie. If you don't have all the facts, then you'll make a wrong decision.  

Don't get half-truths told to you by an Influencer.  

Larry's Son - Cracking Drywall and Nail Pops

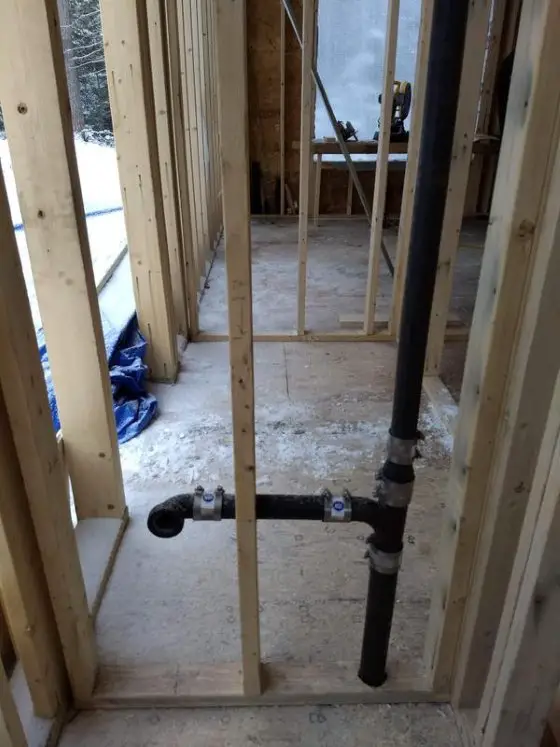
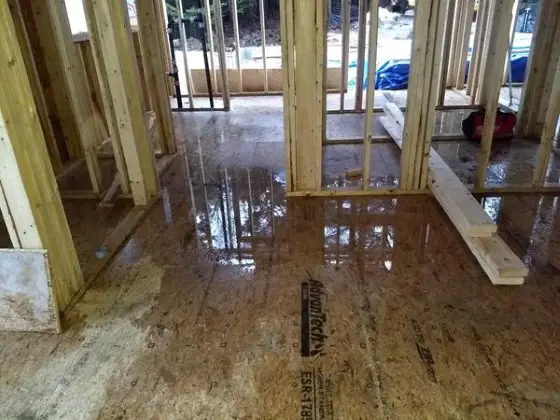
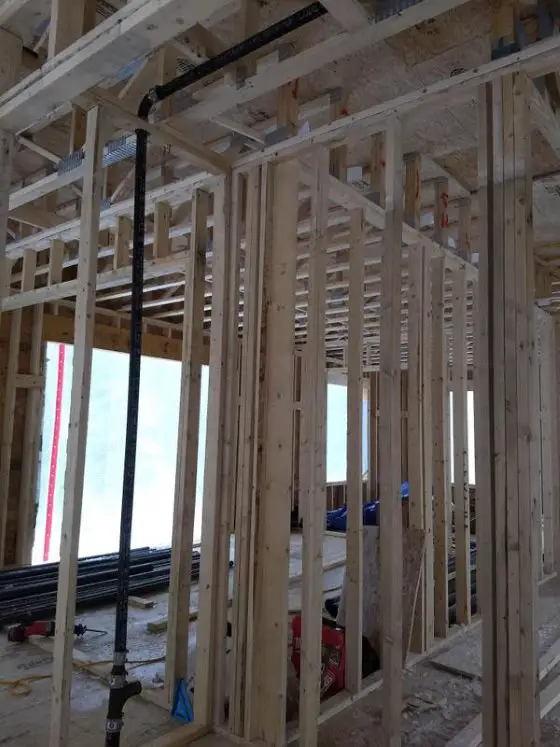
A few days ago Larry left this comment at the bottom of a column at my website about Rain Soaked Framing Lumber:  

"My son's new home was under construction. The builder dragged his feet and didn't put the roof on. The framing was complete. The house sat for weeks exposed to heavy rains. Now the sheetrock is cracking at the seams and screw heads popping. Is the builder liable? Can the bank do anything to help my son to stand behind him?"  

What a dreadful situation. Here are the answers:  

Yes, the builder is liable - assuming Larry's son has a great contract with a reasonable warranty.  

The bank that made the construction loan will undoubtedly do NOTHING to help in the situation. All they care about is Larry's son to make his monthly loan payments.  

I told Larry that he and his son came to me too late. I told him, and it's NOT EASY to type this to a visitor to my website, that he and his son should have done their due diligence BEFORE the house was built and at the very least while it was raining on the unroofed house.  

Asking for help after the defects start to surface is just too late in the game.  

I'm only sharing this with you to try to impress upon you that it's YOUR RESPONSIBILITY to PROTECT your MONEY and your ASSETS.  

Don't assume others think about your things the way you do. That's very foolish.  

Don't be a taken for a chump, a goober, or a dumdum.  

I'd say that's quite enough for a Tuesday where it was -1 F when I woke up!

Tim Carter
Founder - www.AsktheBuilder.com
Mr. Clean Man - www.StainSolver.com
Code is Cool - www.W3ATB.com

Do It Right, Not Over!

Small Greenhouse Foundations and Pipes That Pop

fiberglass greenhouse
This small fiberglass greenhouse really doesn’t require a foundation, but always read the installation instructions to make sure. (C) Copyright 2018 Tim Carter

Small Greenhouse Foundations

Question #1: Hello Tim! My guess is you’re not a gardener, but I do need your help. I’m about to purchase a small greenhouse kit and wonder if there are any special foundation requirements. The manufacturer doesn’t have much to say about this. What’s the best thing to do so I preserve my investment as the small structure costs several thousand dollars? Linda S., Folsom, CA

Linda must have hacked into my floodlight camera that can be viewed from an Internet connection. No doubt she watched my pathetic attempt at growing tomatoes along the edge of my driveway. The gardener in my family is my wife as she has hundreds of orchids spread out in just about every room of our home. She’s mastered the art of getting the many different varieties to bloom, bloom and re-bloom with her tender loving care.

I’m aware of many small greenhouse kits as my wife has had me look at them. There are quite a few designs and they range from simple aluminum-tube frames covered with plastic to small exquisite structures that resemble real greenhouses made with aluminum frames.

While it’s always best to defer to the manufacturer about exactly how to install a product, you’ll never go wrong adding a liberal dose of common sense. The greenhouses that have lots of parts to put together will react much differently to ground movement than the one-piece molded fiberglass or plastic units that are astonishingly stable.

Frost heave is the biggest threat to these small greenhouse kits or even any small pre-fabricated shed you might buy from a home center or dealer. If you live in an area where frost doesn’t penetrate into the soil, you’ve got little to worry about.

Frost heave in the soil can be uneven and that’s where the trouble begins. One side of your new greenhouse kit may lift up 2 inches, or more, and the other side experiences little lift. The structure starts to get twisted and parts may break. The biggest issue with uneven lift is ill-fitting doors and windows or vents that might not open or close properly.

Your local building and zoning code may regulate what you have to do, but often the codes exempt structures that are under a certain square footage. Be sure to check to ensure you’re complying with your local regulations.

At the very least, you may want to construct a simple foundation for the kit using treated lumber that’s allowed to be in contact with the soil. I’d remove the topsoil down about 12 or 18 inches and fill the trench with crushed stone that’s about the size of a grape. Level this gravel and place a treated lumber 4x6 frame on it that the kit will rest upon. Create simple overlap joints at the four corners and use through bolts to interlock the four pieces that make up the square or rectangle.

You need to also be very concerned about wind. Strong winds can blow over one of these kits. Pay very close attention to the instructions about how to tie down the greenhouse or shed so it doesn’t tumble across your yard during the next violent windstorm.

Pipes That Pop

Question #2: Oh Tim, I need your help! Some remodeling was done in my older apartment building and I think it’s going to fall down! Lots of work was done including installing new plumbing drain pipes. The old ones were black metal but the new ones are white plastic. Every morning and night I hear these loud pops and cracks in the walls that never used to happen. It only happens when my neighbor above me is taking a shower or bath. Is the tub and shower going to come crashing down on me? Beth C., Staten Island, NY

Beth’s situation reminds me of what happened at the second house I remodeled forty-four years ago. I removed cast iron drain pipes to a second-floor bathroom and replaced them with new state-of-the-art plastic PVC pipes. I thought I was doing myself a favor.

Being a wet-behind-the-ears builder remodeler I had no idea that the PVC pipes reacted violently to hot water. As soon as anyone started to run hot water in a sink or the shower/tub, I’d hear popping and cracking as the PVC expanded and rubbed against the framing lumber.

After a few minutes, the popping would stop as the PVC pipe reached the same temperature as the water. But after the water stopped flowing, the annoying cracking and popping would return as the PVC pipe cooled back down to the ambient room temperature.

I also started to notice that each time someone flushed a toilet it sounded like there was a waterfall in my wall. Ugh! The noises never happened with the cast iron drains. This is why I’m installing cast iron drain lines in my daughter’s new home. I want her to have a quiet house as does she.

Column 1285

Best Snow Shovel for Seniors

snow shovels for seniors

Each one of these, in my opinion, is the best snow shovels for seniors. The yellow one is excellent for pushing snow like a plow. The blue one is not as wide and has a great scoop shape for lifting smaller amounts of snow. CLICK HERE to have both delivered to your home.

I'm reticent to admit it, but I'm a senior and I have to shovel snow here at my home in central New Hampshire.

I've been experimenting with snow shovels now for ten years and have a few favorites that may be of great interest to you.

It's important to realize that weight is your enemy as a senior. The snow shovel needs to be light and strong. The ones I use above fit that criteria.

How Wide are the Two Shovels?

The yellow Garant shovel is 26 inches wide. It's made from plastic and has a steel blade at the bottom for skimming pavement.

The blue shovel is 19 inches wide and also made from plastic. Both shovels are feather light.

garant shallow shape

Note the shallow curve of the Garant shovel. It matches the curve you see on common plows on pickup trucks. There are no sides as well and snow slides off easily if you try to LIFT it with this tool. This is best for pushing 1 to 3 inches of dry or moderately wet snow. CLICK HERE to get this Garant Yukon similar model.
garant steel blade

The steel blade allows you to scrape everything but snow dust from your pavement. I have TWO of these Garant shovels and the one is seven years older than this one. I used the first one so much I wore off the steel blade! Now just the plastic edge scrapes the snow and it does a great job. CLICK HERE to get a Garant snow shovel.
garant handle

This is an odd handle, but it's wide enough for you to place both hands on it so both of your arms are pushing the snow. Remember, you want to use the smaller blue shovel to LIFT and throw snow. CLICK HERE to get these great snow shovels.
blue full wide

This smaller plastic shovel is just 19 inches wide, but it sports more of a scoop shape and it has small edges or sides that lock the snow onto the scoop so it doesn't fall off as you lift and throw it. This shovel is feather light. CLICK HERE to get one.
blue shape

Note how this curve is more extreme than the yellow Garant shovel. You can also see the side edges that stop the snow from sliding off if you tilt the shovel as you lift it. You'll LOVE this small shovel. CLICK HERE to order one.

January 17, 2019 AsktheBuilder Newsletter

Are you a brand-new subscriber? Welcome! Everyone else, you know I appreciate your continued support, trust, and friendship.  

It's been a busy week here in central New Hampshire. A week ago today I awoke to my worst nightmare. The entire driveway was covered with 1 or 2 inches of ice.  

The day before the third storm in six weeks deposited slushy concrete out of the sky. That's what I call it. Snow so wet it's impossible to move with a snowblower. Snow so heavy it's virtually impossible to shovel it.  

The temperature plummeted overnight and it all froze. You have to come down a hill to my house and one 30-foot-length of the driveway is a 25-percent grade.  

That means the driveway goes up 25 feet in elevation for every 100 feet of horizontal travel. In other words, this section is very steep.  

I wasn't home when the last storm struck. Kathy did her best to clear two paths on the steep section so I didn't slide down into the lake upon my race back from Bar Harbor, Maine.  

Suffice it to say that after 400 pounds of salt, the past three days with temperatures hovering around 32 F, and me out there with special shovels I was able to clear the driveway of all ice. However, the flat section down near the house is a giant glacier. I'll see the blacktop again in April!

Great Keychain LED Flashlight

I received a cool gift this past Christmas. The Olight I1R EOS.

olight-led-flashlight

CLICK HERE to read my review and see more photos.

I GUARANTEE you'll be buying one of these bad boys for your keychain. This tiny little light saved my bacon in the dark crawlspace up in Bar Harbor ten days ago.

Update on Meghan's House

The weather has been brutal up in Bar Harbor, Maine and my daughter and son-in-law's house is struggling to get a roof on it.  

Finally the trusses started to go up two days ago.

second floor trusses going up

CLICK HERE to watch a short video of that truss being guided into place at the south end of the house.  

See the BIG HOLE in the truss? Do you know what that is? It's the outline of a giant open attic space that will be in the house. Once all the trusses are set, there will be a room 43 feet long, 18 feet wide and 8 feet tall!  

Look again at the truss in the photo or video. Do you see how it has a built-in floor truss below the hole to support all the weight of a normal floor?  

Yes, you can have ROOMS up in attics that are built with trusses! You can have spaces in low-slope roofs for storage if there's not enough room to stand.  

CLICK HERE to discover more about Attic Trusses and the closest lumberyard near you that can design exactly what you want.   Look at the following photo of the roof structure and note how the floor trusses switch direction so a FULL-SIZED STAIRCASE can get up into the attic, not one of those flimsy pull-down staircases you see in most homes!  

CLICK HERE to discover how to get a full-sized staircase up into the attic of your home or your next room addition.

attic trusses full-sized staircase

CLICK HERE to get a handle on all things attic trusses. I think you'll not be disappointed in this past column I wrote.  

The BONUS of CLICKING here is you get to see a photo of the desk I work at each day. Go ahead, do it. Wait until you see what's pinned to the ceiling/walls in my office.

Critical Thinking and Common Sense

Quite a few public relations people have my email address. It's their job to reach out to me on behalf of their clients.  

Each winter I get hammered with offers to speak with experts about how to save money on fuel bills. Some of the advice they're purveying is not the best. Yet, I see many of my peers publish the press releases and you may fall prey to the advice.  

CLICK HERE to watch one of my SHORT VIDEOS to see my advice on how to lower your heating bills.

lower heating costs

That's quite enough for today.  

There's a MONSTER snowstorm forecast for my area this Saturday and Sunday. I'll be digging out all day Sunday and should be able to relax to watch the NE Patriots game out in frigid Kansas City.  

If you're a Patriots hater, remember the advice your mom or dad told you years ago:  

If you can't say something NICE about someone/something, don't say anything.

Tim Carter
Founder - www.AsktheBuilder.com
Get Certified Organic CLEAN - www.StainSolver.com
Morse Code is Alive! - www.W3ATB.com  

Do It Right, Not Over!

Olight I1R EOS Keychain Light Review

olight I1R EOS

This is the Olight I1R EOS keychain flashlight. It's very small but quite powerful! This column was SO POPULAR that I shared with the 31,000 subscribers who read my June 14, 2020 newsletter. Copyright 2019 Tim Carter

Olight I1R EOS - Lots of Light in a Small Cylinder

My friend Jim Cluett gave me a Olight I1R EOS keychain flashlight for Christmas. It's already come in handy three times in the past three weeks!

CLICK HERE to order one of these great little flashlights. You'll never regret having this tiny tool on your keychain!

How Small is the Olight LED Keychain Light?

This magnificent aluminum LED light is just 1.5 inches long and 9/16th inch in diameter!

How Do you Turn It On and Off?

You twist the light to turn it on and off. It has a low and high light setting.

olight I1R EOS
The LED is blinding. It's extremely bright. You'll not be disappointed. CLICK HERE or the image to order this light now.

Does it have a Rechargeable Battery?

Yes, the Olight I1R EOS has a tiny rechargeable battery. It comes with a mini USB charging cable.

How Do you Access the USB Charging Port?

You just unscrew the lens part of the Olight to access the micro USB port.

olight I1R EOS
You should be able to see the micro USB charging port just below the aluminum-colored threads. The lens barrel is to the left. CLICK HERE or the photo to have one of these delivered to your house in days.

CLICK HERE to order one of these great little flashlights. You'll never regret having this tiny tool on your keychain!

Clog-Free Kitchen and Bath Drains

kitchen sink stainer and strainer basket

This is a typical kitchen sink strainer and strainer basket. Note the slots and holes in both. (C) Copyright 2019 Tim Carter

Clog-Free Kitchen and Bath Drains

Yesterday, I was perusing a national news website whose headlines more and more are reminding me of the traditional sensational tabloids that might have a story about a lawn being stolen. Being a syndicated newspaper columnist, I find this transition most interesting.

One particular headline caught my eye as it talked about the five things you should NEVER put down your kitchen drain. I’ve been a master plumber since age 29 and have had the very good fortune to replace old kitchen drain lines and unclog newer ones choked with gunk and who-knows-what. I thought I might discover something I didn’t know.

While there were one or two good tips in the article a few of them had me scratching my head wondering if the author had ever cleaned out a residential drain line to a kitchen or bathroom sink. I decided to share with you my experiences with residential drain lines and let you apply your own common sense. Beware, as a few of the images I’m about to render might make you squirm just a bit.

I think it’s best to describe what the inside of drain pipes look like when new and after they’ve been in use for years or decades. New cast iron, copper, galvanized iron, and plastic drain lines all are quite smooth on the inside of the pipe. You want smooth bore pipe so nothing gets snagged.

Unfortunately, a characteristic of older galvanized iron pipe is that it starts to develop a rough inner surface that actually starts to get clogged from small debris that grows hard-water deposits on the inside of the pipe wall. I’ve cut out galvanized iron drain lines from kitchen and bath walls and the entire inside of the pipe is choked off with this hard calcified buildup.

Fortunately, galvanized pipe is rarely used now and it can be found in older homes built between 1900 and the late 1950s. Plastic plumbing drain lines swept the industry by storm in the 1960s and have become the go-to material for almost all residential plumbing drain installations.

I want to briefly discuss the size of pipes and what passes through them with little effort. The drain pipe beneath the toilet in your home is most likely a 3-inch-diameter pipe. Your body, on a regular basis, produces solid cylindrical waste that often might be 1 and 1/4-inches in diameter. You then add paper waste to the toilet bowl, flush it and magically all of this ends up in a septic tank or your city’s sewage treatment plant.

Now think about the lowly kitchen or bathroom sink drain pipe. Just behind the wall of the sink, there’s probably a horizontal 1.5-inch-diameter pipe. Plumbers call this a branch arm. That horizontal pipe in a kitchen should travel no more than 42 inches where it connects to a vertical pipe, a stack, that should be at least 2 inches in diameter. Bathroom sink drains almost always connect to another 1.5-inch-diameter vertical stack instead of a 2-inch one.

Imagine the size of solid material that can pass through the branch arms to the stacks with little effort if enough water is assisting in the process. In other words, a green pea should have no problems passing through a kitchen drain pipe.

Here are some best practices to keep your kitchen and bathroom sink drains clog-free for decades now that you understand how things pass through pipes.

Never allow grease to go down a drain. It solidifies and will clog drain pipes. I set aside used paper towels in my kitchen that are quite clean to sop up liquid grease from cooking pots and pans. These towels are then thrown in the garbage.

Never allow flour and egg mixtures into your kitchen sink drains. Dump as much of this as possible into the garbage. Don’t allow clumps of flour to enter the drain. Fill the kitchen sink with water halfway and wash and emulsify the flour coating on the pans and bowls. Pull the sink stopper and allow this fine slurry to rush down the drain into the main building drain. As crazy as it sounds, flush a nearby toilet to send the slurry on its way to the sewer plant or septic tank.

Keep the basket strainer in your kitchen sink strainer and allow it to capture larger food debris. Dump the debris in the garbage, don’t use your fingers to push it through the slots in the strainer sending it down the drain.

If you use a disposer in your kitchen, fill your sink with water about halfway before you turn on the disposer. Remove the disposer drain cover and turn on the disposer. The giant slug of water will carry the sludge into the main building drain under your home. All too often homeowners turn off the water at the sink too early allowing the kitchen drain pipe to have a liquid slurry laying in the pipes.

Once a month pour a gallon of boiling water down your kitchen and bathroom sink. This hot water can dissolve rogue grease that somehow makes it into the drain and it can dissolve some cosmetics that may be lurking in a bathroom drain.

If you notice a bathroom sink is starting to drain slower and slower, take a few minutes and remove the stopper. The lever that makes your drain stopper go up and down does a great job of capturing hair. It takes only minutes of your time to remove that lever and any debris that’s in the drain tailpiece where the lever operates. There are quite a few videos on YouTube showing you how to easily remove and reinstall this simple part of a bathroom sink.

Once a month pour a bucket of water into your sinks to get as much water as possible flowing down the drain as fast as possible. This is the closest thing you can do as a homeowner to pressure wash the inside of drain lines. Doing this can save you hundreds of dollars that you’d otherwise have to pay a drain-cleaning service should you abuse your drain lines.

Column 1284


January 12, 2019 AsktheBuilder Newsletter

Are you a new subscriber? Welcome!  

All others, thanks for your loyalty and bravery.  

I'm back home in central New Hampshire. Eight days ago, I was helping unload 9,008 pounds of cast iron drain and vent pipe, the fittings, and the most wonderful no-hub rubber couplings that have the stainless steel band clamps.  

You use these special newer couplings to make leakproof joints between the cast iron pipe and fittings. Gone are the days of oakum and molten lead, although I've poured quite a few lead joints in my day.  

If you're a new subscriber, I'm helping to build my daughter and son-in-law's new home on Mt. Desert Island in Downeast Maine.  

Tyler Pipe is partnering with me to help spread the word about why cast iron is such a better product for plumbing drain lines in many applications. CLICK HERE for a partial list of why you might want to install cast iron in at least part of your next home.  

I was able to get about four days of piping work in enduring some wretched conditions. Two of the four days, it was raining and there's not yet a roof on the house. My son-in-law and I were kneeling in puddles of water and water was dripping on us most of the day.

There's a real urgency to get the house done for a reason I'll share in about a month. Suffice it to say everyone wanted to break ground earlier, but it just didn't happen. It was no one's fault, but a series of events kept pushing back the start date.  

It's not ideal to build in the winter, but it's possible.  

Here are just a few photos to show some completed plumbing rough-in work. In case you don't know it, I've been a master plumber since age 29 so I'm enjoying putting in the pipe.  

I'll be taping videos that explain everything to you about the plumbing, but I may not cover a burning question you may have about cast iron drain and vent pipe.

CLICK HERE to ask your question about cast iron and I'll do my best to answer your question when I shoot one of the videos.

wet-floors-meghan new build
plumbing03 meghan new build

You may be wondering, "Tim, does all that standing water on the subfloor hurt it? What about all the wood studs and floor trusses getting wet?"

CLICK HERE to get a handle on how well framing lumber and rain play together. Seriously, CLICK HERE and read this second column so you can sleep at night.  

Asbestos

I know two people, a husband and wife, who died from asbestos exposure. The lung disease is asbestosis.  

Ron was a union plasterer who worked with materials that included asbestos. Judy, I'm sure, hugged Ron each day when he got home from work and ingested the asbestos on his clothes. She also probably ingested more fibers if she did his laundry.  

If you do a little research, you'll discover that those at risk of contracting the disease have had prolonged exposure to asbestos.  

A few days ago a PR person reached out to me about interviewing an expert about asbestos. In his email he said, "I just wanted to follow up and see if you'd like to speak with XXXXX for Asbestos.com, about the dangers of asbestos exposure during home and building remodeling."  

Before getting the PR email, I knew that prolonged exposure was part of the recipe so I wanted to get the expert on the record about when that clock started ticking.  

In other words, when does exposure to asbestos cross the line to being prolonged.  

I responded to the PR person saying I'd like to talk with the advocate, but that my questions would be quite out of the ordinary.  

What I've discovered in my journey through life is that there's always an agenda. Sometimes it's out in the open and other times it's hidden.  

I gave the PR person a partial list of questions I'd ask. Here are a few of them:

Do you have independent case studies showing the minimum amount of exposure that is required to create a significant risk of contracting asbestosis from disturbing asbestos around the typical home?

Will removing a vinyl asbestos tile floor from a house put the average person at risk if the tiles are not pulverized during the demolition?

Who's really at risk of contracting the disease in normal day-to-day building and remodeling?  

Usually PR people get right back - within hours - when interest is shown about their efforts. So far I've heard nothing but crickets which leads me to believe the answers to my questions might not want to see the light of day.

I share all this with you only to let you know that I'm not your typical bobblehead media person that might just throw up some softball questions to an expert. I tend to try to use some common sense and critical thinking when I compose my questions.  

I think you also need to know that I handled my fair share of asbestos in the past 40 years on my jobs. Some was thin asbestos wrap that was on ancient heating pipes connected to gravity furnaces. I always wet it down well and kept it wet while disturbing it.  

I removed lots of VAT, some of it breaking into pieces until I discovered that dry ice is the best way to remove full pieces. You slide a block of dry ice onto each tile and in a second or two they contract enough to pop up off the floor.

Bottom line, I don't have asbestosis and I'm not exhibiting any symptoms. Let's hope the PR person will get back with me next week.  

That's enough for today.  

I'll have more for you next week for sure.  

Tim Carter  

Founder - www.AsktheBuilder.com
Get Certified Organic CLEAN - www.StainSolver.com
Amateur Radio Man - www.W3ATB.com  

Do It Right, Not Over!

Drill a Well and Hardwood Floor Scratches

Mobile Well Drilling Rig

This is a typical mobile well-drilling rig. The giant tower folds down parallel with the ground as it travels on roadways. (C) Copyright 2018 Tim Carter

Drill a Well

QUESTION #1: Tim the Builder, I’ve got a question for you. I live in a big city and am tired of the chlorinated and polluted water that flows through the city water mains. Is it possible to have my own well water as people out in the country have? How does water get into wells and what are the downsides to having your own well, if there are any? Connie M., City Anytown USA

I grew up in a big city in Ohio whose primary water supply was the Ohio River. Any number of chemical factories and giant sewage treatment plants were upstream from my city. The outflow from the sewage treatment plants is disgorged daily into the Ohio River and flowed towards the water plant intake pipes of my hometown.

Growing up I had no idea about all of this and grew accustomed to the taste and smell of the chlorine in the water. I do have a memory of a raging debate many years ago when it was announced that fluoride would be added to the city water supply.

Ten years ago, I moved from that city to a rural part of New Hampshire where I have my own water well. Each house for miles around me has their own private water well. We have natural springs in several towns near me with water spouts and filling platforms. People bring giant ten-gallon containers and fill them with this natural pure water. When I got back to my old city to visit friends, I take my own water with me to drink because the chlorinated water coming from the faucets is now revolting to me.

The simple answer to Connie’s question, and you may have wondered if you can have your own well, is yes. Yes, you probably can drill your own well on your property. You, of course, would have to contact your local building department to see if there are any regulations that must be followed. Some states and cities may still charge you for the water that’s pulled from your land, but that’s a debate for another day.

Water is under the surface of the ground in almost all locations on the planet Earth. My college degree is in geology and I had a focus on hydrogeology - the study of groundwater. The bedrock that’s under the soil cover almost always has cracks and seams in it. Gravity pulls rainwater into this network of interconnected cracks.

It’s important to realize that some locations and valleys are filled with hundreds of feet of sandy gravel. These underground deposits are like giant underground lakes filled with delicious pure water, so pure that bottled water companies locate their plants above these gravel deposits and suck the water out of the ground and put it into bottles that you pay a hefty price for. A water-bottling plant is located just fifteen miles from my current house and it extracts tens of thousands of gallons of water from the bedrock each day.

The issue is it’s not all unicorns and rainbows when it comes to drilled wells in a densely populated area like where you or Connie may live. Industrial pollution from years before could have introduced toxic chemicals that still linger in the groundwater.

Nearby property owners may routinely treat their lawns with toxic weedkillers and unnatural chemicals to have the perfect green lawn. Common sense dictates that these chemicals may leach down into the groundwater. If this happens, your well water could be dangerous to drink.

Drilling a water well can also be expensive. Well drillers commonly charge by the foot and they need to drill down far enough until the well produces a minimum of three to five gallons of water per minute is achieved. Ten or fifteen gallons is preferred. If you’re lucky like my daughter, you’ll get 80 gallons per minute.

The trouble is that in many locations well drilling is mostly chance. I’m reminded of the scenes in the famous 1948 Cary Grant movie Mr. Blandings Builds His Dream Home where the honest well driller couldn’t get enough water flow after drilling many, many feet into the bedrock. He then moved his rig just a few feet away and hit a massive amount of water in no time at all. If you’re lucky and strike a plentiful supply of naturally pure water on your land, you’ll marvel at the taste of the clear elixir!

Hardwood Floor Scratches

QUESTION #2: Tim, I’m in a bind. I won’t name names to protect the guilty, but my gorgeous hardwood floor got scratched. Some of the scratches are just in the clear finish but are visible. Other scratches are deep and extend into the hardwood. I can’t fathom removing all the furniture to have the floors refinished. Can these scratches be repaired and if so, how? Allen W., Wichita, KS

I’ve got good news for you if you share the same exact problem as Allen. Scratches in hardwood floors can be repaired. You don’t have to refinish the floors to restore them to their former luster and shine.

There are numerous DIY methods for disguising shallow scratches that are in the clear coat finish. The method I’ve had the most success with is shoe polish of all things! You can get the paste shoe polish in different colors. One of the colors may be a perfect match or you may have to blend colors to get the exact color you need.

I use a cotton swab and just try to put a tiny spot of the polish on the scratch. Always start with a color that’s lighter than your current floor color. It’s easy to go darker, but tough to reverse the process. Once you get the perfect match, then allow the polish to dry and use other cotton swabs to apply a protective coat of clear urethane over the shoe polish. Be sure to match the same sheen as you currently have on your floor.

Deep scratches require the services of a professional. In almost all cities and large towns, you can discover true artisans that do furniture repair. The top furniture sellers in a city or town use these people all the time. The craftsmen have a magic box they bring to your home with a tiny alcohol lamp, hard lacquers, and other colored materials. They can fill the deep scratches in your hardwood floor, create matching grain and puff onto the floor an aerosol mist such that you’ll never know the floor was ever scratched.

Read about Tim's experiment with hardwood floor scratches in his December 29, 2009 AsktheBuilder News and Tips.

Column 1283