Building on Solid Soil

footing trench topsoil with tree roots not removed

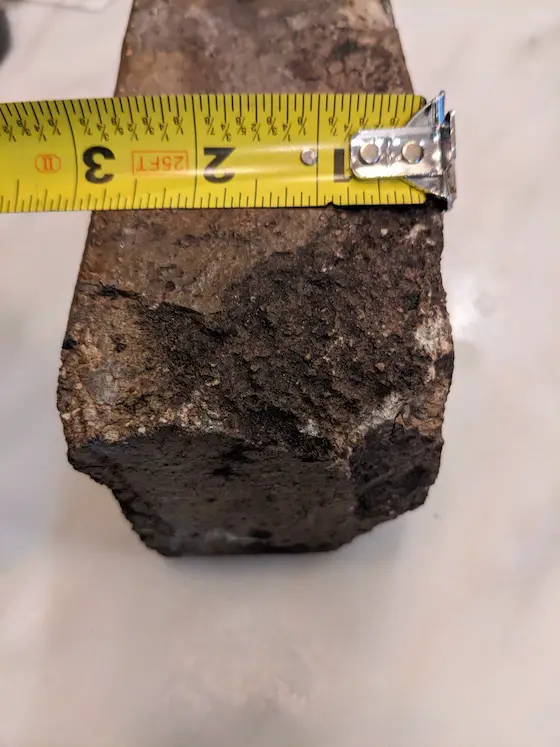
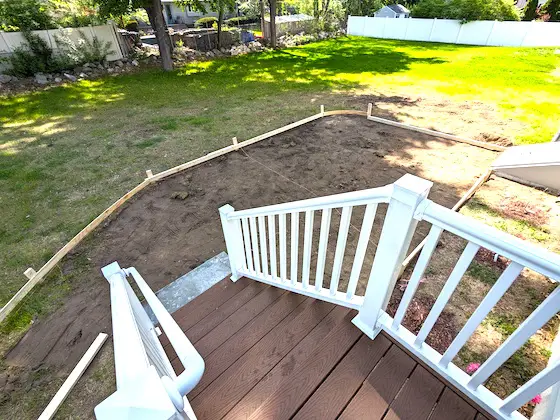
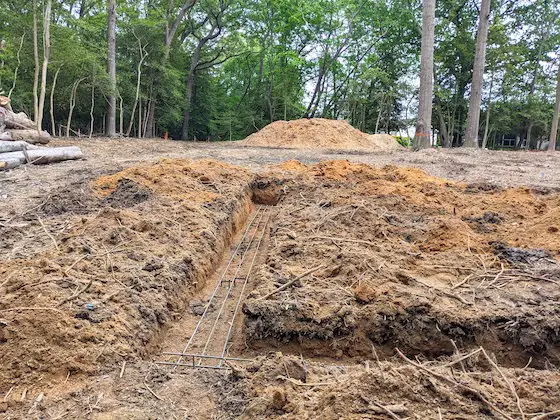
How to Build on Great Soil | The DIYr that dug this footing made several serious mistakes. The biggest one is they didn’t remove all the topsoil and organic material from the center of the building site. Copyright 2023 Tim Carter

Building on Solid Soil - Get a Free Soil Map

My college degree is in geology. At the time I was in school, I had no idea how valuable this knowledge would be once I became a full-time builder. There’s a very good chance I was the only builder in Cincinnati, Ohio that knew soil maps existed and how to interpret them. Watch this video about soil maps.

Cincinnati has a little-known reputation for having the highest per capita amount of houses damaged by landslides. California gets all the ink and headlines in the news when their winter storms cause dramatic images of houses falling into the ocean but Cincinnati is plagued by slow-moving landslides that affect thousands of parcels of land.

A few decades ago, the most expensive retaining wall ever built was completed in Cincinnati at the base of Mt. Adams. I’m not sure this record still stands, but it’s all because of poor soil conditions on many of Cincinnati’s hillsides. I was exposed to this reality while in college and I’ve never forgotten it. You can read a magazine article steeped in political and racial bias about the history of this massive retaining wall here.

mt adams cincinnati I-71 retaining wall

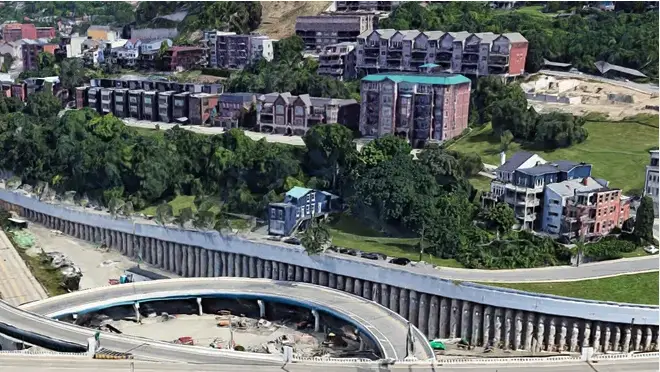
This is an aerial photo of the massive retaining wall at the base of Mt. Adams in Cincinnati. huge steel cables penetrate into the bedrock and are anchored inside a tunnel deep within the earth. Photo credit: Cincinnati Enquirer - Fair Use Doctrine usage

expensive mt adams retaining wall I-71

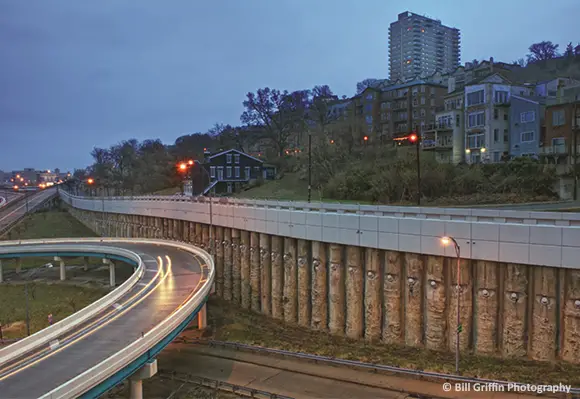
This is a great close-up shot of the massive retaining wall showing the huge concrete piers that penetrate deep into the colluvium at the base of Mt. Adams. Copyright Bill Griffin Photography - Fair Use Doctrine - CLICK HERE for Bill's Instagram page.

Your house has an intimate relationship with the ground. They constantly touch one another. The same is true for any structure built anywhere on the planet that doesn’t float on water. The foundations of all buildings connect to the earth. The ground must be able to support the weight of the building. If it doesn’t, the house will shift later causing all sorts of expensive structural issues such as cracked foundation walls, doors and windows that don’t fit right, and tilted floors.

Years ago I became friends with an intellectual property attorney. He and his wife purchased a lot from a large tract builder. The builder then proceeded to build a large home for my friend. A few years later the attorney called me to come over and look at some disturbing things inside the home. The center of his basement floor had a disturbing huge hump in it. The center I-beam that ran the length of the house was twisted and the 2x4 plate on top of it was only 7/8ths of an inch thick due to being compressed.

A massive crack extended from the foundation up to the roof. It turns out this building lot used to be a deep ravine. The subcontractor who did all the cut-and-fill groundwork made a massive mistake by bulldozing trees and brush into the ravine and then proceeded to cover it up with dirt. My friend’s house was sinking into the ground as the dirt filtered down and filled all the voids around the trees.

When the hole was dug for his foundation, the ground looked fine as the fill had been compacted at the time. You could have only discovered the hidden time bomb had you looked at a topographic map of what the land looked like before the developer purchased it. This map would have shown the ravine that was filled in. Even so, all could have been fine had no organic material been covered over in the ravine. You would have only known this if you would have paid for a geotechnical engineer to come out and do a core sampling of the soil.

Several months ago a visitor to my www.AsktheBuilder.com website asked for advice about pouring footings for a new house he was building. He had purchased a lot that had lots of mature trees on it. He cleared many trees to get ready to build but he failed to remove all of the topsoil that would be under the house.

The photos he sent were deeply disturbing. He had dug the trenches for the footing and got down to the B horizon in the soil where there was no organic material. However, at one corner of the house, he had not dug deep enough and was about to pour the concrete footing on topsoil.

The center of the excavation still had all sorts of topsoil and tree roots in it. He was going to pour the concrete slab on top of this mess! I pointed out all the mistakes I saw and we parted ways. I have no idea if he corrected the mistakes. If not, he’ll pay dearly down the road.

You don’t have to be a geologist to understand a soil map. Almost all counties in the USA have been mapped and you can now obtain these invaluable building aids online for free. You’ll be able to locate your lot on the map with little effort. Once you do this, you can then see what soil is present. The map then tells you all the characteristics of the soil and how suitable it is for building.

Never build anything on topsoil. It contains organic material that can rot and it’s not capable of supporting concentrated loads. Never build on soil that contains tree roots, or vegetation of any kind. If you’re digging in clay-rich soil and experience a rotten egg smell or other offensive odor, it could be rotting organic material in the clay. Invest the money in a consult with a geotechnical engineer if you have the slightest suspicion that the soil is questionable.

Before you purchase a vacant lot, do lots of due diligence. If it’s a new subdivision, obtain the cut-and-fill plan from the developer. Avoid lots that are on fill dirt. Look to buy a lot on an area that was cut as there’s a very good chance the ground on that lot mimics the rock of Gibraltar! That’s a good thing so long as you’re not buying a lot that’s all ledge and solid bedrock that requires blasting! That’s the other extreme of bad soil.

Column 1514

Little Known Deck Building Tips

deck joist diagonal bracing deck beam beam bracing

DIY Deck Building Tips | You don’t often get to see the underbelly of a deck. There are very important structural elements in this photo a DIYr might never incorporate into her/his deck. Copyright 2023 Tim Carter

DIY Deck Building Tips - Prevent Deck Collapse!

Are you about to build a deck yourself? Perhaps you’re going to hire a professional. My guess is you don’t know as much about the process as you should know. Add to the mix the cable TV shows that go on and on and on about how simple it really is.

To be honest, it’s not all that easy to build a great and safe deck. There are countless small tips that you’d probably never know about. I get it. There are lots of small tips about being a doctor, nurse, accountant, forklift driver, and countless other professions that I don’t know about. Allow me to share with you some very important things that just might ensure your new deck doesn’t collapse.

It’s important to realize that decks are not at all different than the floor in your home assuming you don’t live on a concrete slab. Unfortunately, you typically don’t get to see how a floor is framed unless you have an unfinished basement. There you can see the floor joists, possibly ancient cross-bridging, and how the joists are connected to beams and the foundation wall.

One thing most people fail to think about is that a deck is exposed to the weather whereas the floors in your house are immune from the weather if you keep doors and windows closed when it rains. The treated lumber you’re about to buy contains lots of copper. This copper is leached out each time it rains and becomes a corrosive liquid brew when it comes into contact with iron or steel that’s not protected with lots of zinc, chrome, or nickel.

In other words, all of the bolts, screws, nails, joist hangers, framing connectors, etc. that you intend to use must be of the highest quality. Poor-quality electroplated galvanized nails or screws could begin to corrode in just a few years. Double-dipped hot galvanized metal is a smart choice. Stainless steel should be on your radar if you’re building close to a saltwater marine environment. Don’t underestimate this sinister corrosion that starts the day you finish your deck and then it rains.

Think twice about allowing treated lumber to touch the ground or soil. I’ve witnessed treated lumber rated for direct burial rot and be damaged by wood-destroying insects. You want to be able to always see your treated lumber. Use high-quality galvanized post bases that elevate the deck posts up off your concrete piers.

Avoid bolting horizontal beams to the sides of deck posts. When you do this, all of the weight of the deck is concentrated on the tiny surface area of the top of the bolts. It’s far better to use 6x6 posts where you create a notch at the top of the post. The beam sits on the notch and is through bolted to the tongue of the post that extends to the top of the beam. Note I said through bolts, not lag bolts. Through bolts have machine threads and you use a large flat washer and nut to connect the pieces of wood together.

deck post notching

Deck post notching is easy if you use 6x6 treated posts and a builder's level. The beam that supports the deck joists will rest upon the flat area of the notch at the top of each post. Copyright 2023 Tim Carter

The floor in your home resists racking back and forth because the sheets of 3/4-inch subflooring interlock are all nailed to the floor joists. If you use composite decking as I have on my deck, the decking is not screwed to the joists except at the ends. Hidden clips hold the decking to the floor joists.

To prevent racking, you need to install diagonal bracing under the floor joists. I happened to use two 2x6s that extend from the corners of my deck and meet at the center forming a huge letter V under my deck. Where the 2x6s touch the floor joists above, I installed two massive 4-inch-long timber screws with a giant flared head. This bracing method is time-tested and has been used to make house walls stiff to resist side-to-side motion.

Be sure to apply modern tape on top of your deck joists before installing the decking. The tape minimizes water infiltration into the joists where the fasteners connect the decking to the joists. Water that enters alongside the fasteners creates larger and larger cracks over time allowing more water to enter the joist causing premature failure.

Are you struggling how to get your concrete piers in the perfect location? Here’s an old trick a fellow carpenter taught me. Purchase a few long 2x4s that you use to create the shape or outer dimension of the deck. Say your deck will be 12 x 16 feet. Nail the 2x4 lumber together, square it up, and install a few diagonal braces to keep it square. If you’re on a slight hill, install temporary legs to make the top of the 2x4 box level and in the position where your deck will eventually be. Now you can use a plumb bob or level to project down to the ground exactly where your support posts will be. Take the time to calculate where the concrete pier needs to be so the support post is centered on the pier.

If you don’t know how to square up a deck or the simple frame I just described, watch the following video. Don’t worry, your high school math teacher will not spin in her grave. She’ll actually be proud that you figured out a way around that tough algebra.

Column 1513

Hardwood Floor Refinishing

birch hardwood kitchen floor being sanded

Hardwood Floor Refinishing | The old finish on this hardwood floor has been removed near the cabinets. The mind-numbing work of scraping up against the edges remains to be done. A tremendous amount of skill is required to produce a satin-smooth finish. Copyright 2023 Tim Carter

Hardwood Floor Refinishing is Hard Work - Best Done by a Pro

This past week I, along with my beautiful and patient bride of forty-nine years, had to endure the throbbing and nerve-rattling experience of a massive hardwood floor sander grinding off the finish from the birch hardwood in our home. We were huddled in the basement along with our nervous pets as the workmen busied themselves with restoring our floors.

Just over two months ago a chubby mouse gnawed a tiny hole in a PEX water line leading to a second-floor bathroom. The resulting slow leak happened while we slumbered. The water seeped under the hardwood floor in our master bedroom. Since wood is hygroscopic, it swelled and buckled creating multiple ridges like the ice does on Lake Winnipesaukee in the dead of winter. Even though I shut off the water to the bathroom immediately upon discovering the leak, $35,000 worth of damage was caused by the pesky rodent.

I’m sharing this experience with you in case you’ve been lulled into a false sense of security watching the make-believe cable-TV home improvement show hosts that tell you how easy it is to get professional results when refinishing hardwood floors. They’re bald-faced liars that ride on unicorns.

Allow me to share with you nearly fifty years' worth of building experience with respect to all that’s involved when creating a mirror-like finish on hardwood flooring. If, after digesting what I have to say, you decide to still try to tackle the job yourself, for the love of God do it in a small room that can be sacrificed on the altar of obstinance.

The first step in refinishing an existing hardwood floor or sanding virgin hardwood is to do a rough cut with a massive drum sander. These machines weigh well over 100 pounds. They require a velvet touch when operating so you don’t create shallow dips where the machine changes direction as you go backward and forwards.

This massive machine leaves a border of unsanded wood around the edges of the room. A different smaller hand-held disc sander is used to get right up against the edge of woodwork or other objects that stick up from the floor. If you think operating the huge drum sander is hard, wait until you start carving crescents in your hardwood using an edger. It takes hours of practice to become somewhat proficient using this tool.

Years ago it was back-breaking work using an edger. Fortunately, a floor finisher came up with a brilliant invention called an edger dolly. The young man who edged all my floors sat on this wheeled dolly moving all about the rooms in my house. A chest pad is part of the makeup of the dolly. This design allows you to position yourself comfortably in the dolly. You expend all your strength in controlling the edger instead of trying to maintain your balance while using the sander.

The hardest work of all, in my opinion, is using the hand scrapers. These basic tools work just like a straight razor. A barber pulls a razor across your skin to carefully remove hair. The floor finisher pulls this sharp tool across the wood in corners and other places the edger can’t get to. Once again, a scraper in the hands of a novice will damage the wood in seconds. Watch a hand scraper in use here.

You might think at this point you’re ready to apply three coats of the finish. Think again. It’s time to break out the palm sander and a wonderful rotary floor sander to get the wood satin smooth. The palm sander is used along the edges of the room while the rotary sander is used in the wide-open areas of the floor. Watch a large rotary sander here.

The best rotary sanders, in my opinion, have about six small rotating sanding discs that are part of a larger orbiting sander disc. This sander works just like a floor buffing machine that you might have seen a custodian use to polish vinyl tile or terrazzo. You must keep moving back and forth to produce a professional finish. Applying slight tilting pressure with the handle gets the rotary sander to move left or right. It requires some practice so you don’t crash the sander into a nearby wall.

It’s now time to remove all the dust from the hardwood. There are all sorts of ways to do this. Once the dust is gone, you can apply the first coat of sealer. Be sure to use one that will not raise the grain of the wood. After it’s dried, you screen the floor to buff it, remove the dust and then add a second coat of finish.

Some installers stop at the second coat. I prefer three coats of durable finish. Once again, you must lightly screen the second coat of finish. This screening process is how you create the mirror-like finish that’s satin smooth. It’s imperative you remove all dust before you apply the last coat of finish. Go here to see what fresh finish looks like as it's drying.

Avoid the temptation to move furniture and carpets onto the floor the next day. Almost all floor finishes require a minimum of 72 hours of curing time to attain the hardness required to prevent things from sticking to the finish. If you can wait 96 hours, do so. Are you ready to go rent all the tools? I didn’t think so!

Column 1512

427 Silver Street Middleton NH Easement Conundrum

427 Silver Street Middleton NH private pond

This is the private pond on the 90 acres at 427 Silver Street in Middleton, NH. The house is immediately behind me. Copyright 2023 Tim Carter

427 Silver Street Middleton NH - Masterclass in Easements

My wife and I recently made an offer on a 90-acre parcel of land located at 427 Silver Street in Middleton, NH.

It has a very large private 18-acre pond on it. But the parcel of land might also have a title defect.

An Easement to Adjoining 67 Acres

The man who owns the 90 acres also owns a 67-acre parcel immediately north of the 90 acres. The 67-acre parcel is identified as 55 Jordan because it appears Jordan Road to the north ends at the property line.

427 Silver Street Middleton NH plot plan

The red lines outline the two parcels. The top of the image is north. You can see the pond outlined in blue in the lower 90-acre parcel.

The listing realtor shared with us after we made an offer that there was an easement allowing someone to traverse the 90 acres to get to the 67 acres and vice versa.

Property Lines are Infinitely Small

If you remember anything from your high school math classes, you know that there are an infinite number of points on a line between two points. This means that the lines between two different parcels of land is thinner than a thread.

If you look at the above plot plan you can see the two parcels of land and they do adjoin but at the center of the X. To physically traverse from the southern 90 acres to the 67 acres to the north, you'd have to step foot on one or both of the parcels that are east and west of the center of the X.

When asked to show the language describing the actual easements, the listing realtor declined.

We knew then it was time to step away from this purchase.

Blacktop Patching and Sealing Tips

blacktop patch using epoxy and stones

Blacktop Patching - The homeowner repaired a sinking hole in this blacktop drive using epoxy and stones. It’s time to cut it out and install real hot mix asphalt. Copyright 2023 Tim Carter ALL RIGHTS RESERVED

Blacktop Patching and Sealing Tips - Patch Then Wait 90 Days

Who’s not seen asphalt paving? I have to believe you’ve walked across it on your own driveway, crossed public streets, and/or traipsed across parking lots paved with this magic mix of liquid asphalt cement, sand, and small stone chips. The professionals call it asphaltic concrete. It’s an accurate description because regular concrete has stones, sand, Portland cement, and water to activate the cement.

Tar and Chip - The Original Blacktop

Did you know that before hot mix asphalt was invented most paved roads in the USA were created using the hot asphalt liquid cement sprayed on top of compacted gravel? Small stone chips were immediately broadcast on the black coating and compacted to create extremely durable road surfaces. In many rural areas of the USA, this tar-and-chip method of paving is still used on thousands of miles of secondary roads.

This tar and chip method of asphalt paving allows you to introduce color to your driveway depending on the color of the stones you broadcast over the liquid asphalt. I had a medium-brown driveway that used chert road metal from the Meramec River region in Missouri. You could have a red, green, or beige driveway depending on what type of durable chip gravel is available where you live. You can read all about tar and chip driveways and watch videos of the process on my www.AsktheBuilder.com website.

Do you have sunken and cracked places in your blacktop driveway? How about edges where a long crescent-shaped piece of asphalt has cracked or broken away? These defects can almost always be traced to an inferior gravel base under the blacktop. Blacktop itself is a flexible pavement because asphalt itself is a semi-solid material somewhat similar to glass. Glass succumbs to gravity over many years and asphalt can creep and deflect when compressed.

crumbling blacktop

This is crumbling blacktop that needs to be removed and patched with hot mix. The 5-gallon bucket is for scale.

If you want an asphalt driveway to last, the soil under it must be strong and the gravel base must be at least six inches thick. Eight or ten inches would be better. You must use crushed gravel that contains a variety of stone sizes including stone dust. The dust helps knit all the stones together serving the same purpose that sand does in regular concrete.

I’ve experimented in the past with the cold asphalt patching materials you can purchase at hardware or big-box retailers. Once exposed to air, the water surrounding the actual asphalt evaporates and the material does get quite hard. That said, it’s not the same as using the real deal, hot-mix asphalt made at an asphalt plant. Hot mix patching done correctly can produce a patch that lasts for decades assuming the gravel base is deep and compacted.

Patching potholes might be on your list of things to do. If so, do it the same way dentists install a filling in a tooth. Excavate the sides of the pothole so it looks like an upside-down ice cream cone. You want the bottom of the pothole to be bigger than the top. This way when the hot mix becomes solid, it can’t pop out of the hole.

If you’re going to patch larger areas in your drive, try to use a pavement saw to make clean-cut edges. Compact the gravel base and install the blacktop at least 1.5 inches thick. Two inches would be better. Be sure to dust off the sides of the saw-cut blacktop to get as good a bond as you can between the old and new.

saw cut blacktop patch

This is a great example of saw-cutting blacktop to create a nice clean edge. The only thing missing is an asphalt sealant that should be applied over the saw cut much like you tape a drywall seam with mud and paper. Copyright 2023 Tim Carter

The best way to patch potholes and patches up to 4 feet square is to use a contractor who has a special heater that heats up the existing blacktop to the same temperature it comes from the asphalt plant. This way the fresh patching asphalt mix bonds mechanically and chemically with the old asphalt. When done correctly, you can’t even see where the old hole was as there are no saw-cut lines.

Do NOT Seal New Blacktop

Whatever you do, never seal new blacktop or a blacktop patch just after you finish. The asphalt needs to cure for a minimum of 90 to 120 days. The lighter-weight oils in the asphalt need to evaporate allowing the asphalt to get hard. If you seal it before the oils evaporate, the asphalt stays soft for a very long time making it susceptible to damage from motorcycle kickstands, and tires that turn in place.

It's best to wait a few years before sealing new blacktop. If the blacktop is still jet black in appearance, it has plenty of asphalt cement still up at the surface to offer protection. Once the blacktop starts to turn gray where you see the actual color of the stones and sand, then it's time to seal it. Keep in mind the sealers are no more than paint and will wear off again.

Roadways are not sealed because the heavy vehicular traffic would wear off the sealer in a short amount of time.

new blacktop paving next to old faded blacktop

The jet-black asphalt in the cul-de-sac is just weeks old. The light-gray blacktop driveway used to look identical. But years of exposure have allowed the thin asphalt cement coating to wear off the stones and sand. It's time to seal the light-gray driveway. Copyright 2023 Tim Carter ALL RIGHTS RESERVED

If you’re installing a new blacktop drive, the best thing you can do is install the gravel base at least one foot wider than the final blacktop drive. This gives you a 6-inch-wide gravel border around the new blacktop. This shoulder provides the all-important lateral support.

Without this support, if a heavy truck or concentrated load is placed right at the edge of the driveway, you can expect the asphalt to crack as the weight causes the blacktop and gravel beneath to move sideways towards the soft soil.

Column 1511

Why Concrete Pavers Suck

concrete paver sidewalk failure

Why Concrete Pavers Suck | This is a sidewalk built using concrete paver brick. Hours before it was power washed to remove stubborn moss growth. It’s a hot mess. Copyright 2023 Tim Carter ALL RIGHTS RESERVED

Why Concrete Pavers Suck - There are So Many Reasons

It’s really important for businesses to introduce new products. Tens of thousands are introduced each year in the home improvement vertical. Once you’ve had enough trips around the sun, you can spot ones that have lots of sizzle but most likely won’t stand the test of time. I had that feeling forty years ago when I first saw colored concrete paving bricks become the belle of the ball.

It turns out my gut feeling was correct. The evidence is all around you that concrete paving brick can’t lace the boots of true clay paving brick. Here are just a few of the reasons.

You may own hundreds of concrete paving bricks or walk across them at a park or outdoor shopping mall. These bricks come in many different shapes, sizes, and colors. Several years ago my wife wanted an instant outdoor patio and I could only satisfy her desire by using large-format concrete patio stones that came in different sizes. They interlocked in a random Ashlar pattern.

The large pavers I used were made the same way as the concrete brick you may have. Concrete companies mix small stone chips, coarse sand, Portland cement, and dry pigments together with a precise amount of water. The mix is poured into molds to make the brick or larger pavers. They’re cured to gain maximum strength and the colors are rich when the products leave the manufacturing plant. The color you see is created by the ultra-thin pigmented cement paste covering the sand and gravel at the surface.

paving brick cracked in half - comparing aggregate color

I cracked the new paving brick in half. Look at how light-colored the aggregate is! Over time when the red cement paste wears off, the pavers will look different. My traditional clay paving brick patio you see below the POC concrete paver will stay red forever because the red clay is the same color throughout the entire brick. © 2023 Tim Carter ALL RIGHTS RESERVED

concrete paver brick faded color

Here is a close-up shot of a concrete paver brick from my rear sidewalk. Look at the exposed aggregate and note all the different colors. When this brick was new, it had a uniform brown color and a smoother finish at the top. You can verify this by simply removing a brick or two from the sidewalk and turning them over to inspect the underside that has not been exposed to natural or man-made erosion. Twenty harsh New Hampshire winters coupled with no less than two power-washing cleanings show you why these bricks are no match for the solid color of true clay paving brick. Copyright 2023 Tim Carter ALL RIGHTS RESERVED

Use Clay Pavers Not Concrete

Real bricks are made from clay. The clay is cut into the final brick shapes and then fired in a huge kiln. The high-temperature firing process produces a chemical change in the clay creating an artificial rock of sorts. Some clay bricks can be fired so hard they are strong enough to be used as normal street paving. You can see this in the streets of downtown Athens, Ohio.

clay paving brick

This is a real clay paving brick made by the Southern Clay Brick Company. It's 8 and 5/8ths inches long, 4 inches wide, and 3 inches thick. It was salvaged from the Old Brick Road in central Florida very close to the Bunnell-Palm Coast section of the road. Copyright 2023 Tim Carter ALL RIGHTS RESERVED

Clay paving brick doesn’t change color over time. Concrete paving brick fade and change color. That thin-colored cement paste wears off with normal wear and tear or you can blast it off using your power washer. After one or two cleanings, all of a sudden you see the color of the stone chips and sand.

clay paving brick southern brick mfg company

This is the same clay paving brick you see in the above photo. It has a chip on one corner. You can see the solid color of the clay throughout the brick. This brick will not change color over time. Copyright 2023 Tim Carter ALL RIGHTS RESERVED.

Set Bricks on Concrete Not Sand

Another issue with concrete paving bricks is the way they’re set. Almost all are set in a bed of sand. Burrowing animals can and do tunnel through the sand. The bricks can settle, tilt, and look horrible in short order. I know this because it’s happened here at my own home. Here's a video showing an animal burrow under a paving brick sidewalk.

I didn’t build the house I live in and I inherited two concrete paver brick walkways when I bought this home. One walkway looks better than the other, but both no longer are flat as they were the day they were installed.

Weeds and concrete paver bricks are like peanut butter and jelly. You can count on weeds growing up in between the bricks if you live where you get enough water to support the growth. A weed hacker can be used to trim the visible growth but days later the weeds sprout new green growth.

weeds growing in concrete paver bricks

These are normal weeds growing in between the joints of concrete paving bricks. Look at how much aggregate in the concrete is now showing. The bricks look like they're 1000 years old but they've only been in use 20 years. Don't buy them. They SUCK. Copyright 2023 Tim Carter ALL RIGHTS RESERVED

Ants love concrete paving brick. They transport the sand under the brick up to the surface as they create comfy nests under the bricks. You can broom or blow the sand away with little effort, but it’s just another nuisance to deal with.

The gaps between concrete paving bricks are typically filled with fine sand. Some pavers have tiny bumps on the sides so a wider joint between each brick is created once installed. My large-format pavers had this.

Powerwashing RUINS Concrete Pavers

Manufacturers have known for decades that people love to clean their concrete pavers with a power washer. The issue is no matter how careful you are, the high-pressure stream digs out the sand.

The manufacturers responded by inventing polymeric sand. This is just sand that comes with a water-activated adhesive. When I first saw this product, I was skeptical. I simply couldn’t believe that a water-based adhesive could withstand Mother Nature. Once again, my gut instinct was spot on.

I used polymeric sand on the new patio pavers I used to make She Who Must Be Obeyed happy knowing that it was doomed to fail. I followed the instructions to the letter and the sand looked fantastic for two years. Then it slowly succumbed to the harsh New Hampshire winters. I have weeds growing on my patio, some of the sand is missing, and it all needs to be redone.

weeds growing through polymeric sand and concrete pavers

This is the concrete paver patio I built for my lovely wife. The joints between each paver is about 1/8-inch wide. They were filled with polymeric sand. Look at the weeds growing through the sand. It's POC just like concrete pavers.

If you want a trouble-free brick patio, my suggestion is to do what I’m starting to do at my son’s house. We’re installing thin split clay paving brick on a steel-reinforced concrete slab. The space in between each brick will be filled with mortar that will test out at 12,000 pounds per square inch. Soon you’ll read an upcoming column about this project and I’ll share detailed step-by-step videos of the process.

Column 1510

DIY Tool Rental Tips

concrete power buggy pouring concrete

DIY Tool Rental Tips | Years ago it would have taken eight men with wheelbarrows to bring the concrete to the rear of this house. You can rent this machine to transport and dump the concrete exactly where you need it. Copyright 2023 Tim Carter

DIY Tool Rental Tips - You Can Save Thousands of Dollars

I do media scanning each week to keep abreast of all that has to do with building new homes, remodeling existing homes, new tools, financial news, etc. Unless you’re living under a rock and hibernating you’re surely aware that inflation is raging, interest rates are much higher than they had been, and it’s causing you to contemplate tackling projects that two years ago you would have hired out. The good news is you can rent many tools you might not realize exist.

The best news is if you get stuck on a DIY job, I can help you. I do DIY phone coaching. GO HERE to set up the phone or VIDEO call.

Here’s an example of how extreme it’s become. A month ago I was hired by a woman who lives in Florida to be her virtual general contractor for a major house renovation in the deep wilds of central Maine. This energetic woman figured that with me in her back pocket available to do video or voice calls while she’s at the job site, I could help her successfully navigate this project. She stands to save close to $100,000 by my calculations.

The good news is she has at her disposal a plethora of tools and machines she can rent that will help her, and her sub-contractors, complete the project. I want to share just a few of them here to inspire you to jump into a project that you might have backed away from thinking it took too much manpower.

A man lift is one of the most exciting machines that you might rent allowing you to work safely up high. While these are not necessarily new, the capabilities and reach of the machines have significantly improved. Imagine working from a level platform with guardrails 30 feet off the ground. Just a few days ago one-half mile from my house a fireplace contractor used one to install a stainless steel chimney on the roof of a new house. The machine allowed him to do this quickly and most importantly safely.

You can use man lifts to install windows, siding, gutters, paint house exteriors, tuck point brick chimneys, and even re-roof a steep roof that might terrify you. If you hate ladders, you’re going to love man lifts.

Do you have to pour concrete in the back of a house or up a hill? Imagine how hard it is to try to push a wheelbarrow filled with heavy concrete up even a slight grade. Why not rent a power buggy? These are powerful motorized tiny dump trucks. CLICK HERE to watch a power buggy in action. They come in different sizes but a popular one is just over four feet wide and can transport 2,200 pounds of concrete each trip. It has tracks like a bulldozer or tank so it can go just about anywhere. You can use one to transport and dump, gravel, sand, stones, brick, etc. One power buggy can easily replace up to eight men on certain jobs.

Do you need to do plumbing work and you don’t trust your soldering skills? Forget about soldering and use press fittings. You can rent a tool that crimps the exterior of slide-on fittings that create a permanent seal with a rubber O-ring. In the past, you may have taken three minutes to clean, prep, and solder a fitting on copper tubing. That same fitting can now be installed in less than ten seconds using the press tool.

Pipe scaffolding is by no means new. Masons have used it for decades to lay brick and stone on the outside of homes and commercial buildings. It’s caveman simple to assemble. You can get a wide variety of accessories such as staircases, guardrails, leveling feet, wheels for hard smooth surfaces, and working platforms.

I’ve used pipe scaffolding to paint houses as well as new and re-roofing. They allow you to work safely at the lower edge of the roof. These amazing monkey bars work well when it’s time to do rough carpentry. I’ve set up the scaffolding to install ridge beams and roof rafters. I love the stability of pipe scaffolding and it’s very inexpensive to rent a month at a time.

Do you have to break up a worn-out concrete driveway, patio, or sidewalk? Rent an electric jackhammer. These have been around for decades but you may not have known about them. They just need a normal 15-amp 120-volt circuit. These powerful tools can break up thick concrete if that’s what you need to do.

If you need to dig a trench or a hole, you can rent tiny excavators. With just a few minutes of practice using the joystick controls, you’ll be able to dig a trench with fluid movements. Skid-steer loaders have been around for at least five decades. These allow you to move vast amounts of sand and gravel and dig holes in sandy or clay soils. They’re perfect for jobs where you can’t fit a big backhoe or loader.

You can rent miniature stand-behind excavators and loaders too. These can fit in very small backyards and will allow you to dig shallow holes for new patios, sidewalks, or a driveway if need be.

As crazy as this seems, you might want to visit a tool-rental shop or surf their website to see all the tools they have for rent. You may see the perfect tool that will inspire you to become a serious DIY warrior. And remember, I’m a phone call away should you get stuck.

Column 1509

How to Plan the Perfect Patio

concrete patio form boards below steps

How to Plan the Perfect Patio | This is the shape of my son's new patio. The concrete is about to be poured. It appears small, but it's not. Copyright 2023 Tim Carter ALL RIGHTS RESERVED

How to Plan the Perfect Patio - Go Big

Just about fifty years ago I settled into my building career. My lovely wife and I purchased an FHA-repossessed house in Cincinnati, Ohio. I was twenty-two years old and a very wet-behind-the-ears builder. The hard dusty work was extremely rewarding and I recall talking to my bride about how if we were lucky enough to have kids I dreamed of working with them on their homes.

We were fortunate to have three wonderful children and my dream is now 2/3rds fulfilled. Four years ago I helped build my oldest daughter’s home by installing all the plumbing, radiant heating, and electrical wiring in her Mt. Desert Island, Maine house. While he was busy caring for my newborn granddaughter, I was able to create a deep bond with my son-in-law. He helped me for four hours each day never once complaining about the cold, snow, and hard work.

Working on My Son's New Patio

Several days ago I had the enormous pleasure to help my son achieve one of his goals. He purchased a new home last year and quickly discovered how much he missed the stunning red-brick patio he grew up with at our last home. One day last fall his mother and I were visiting and he said, “Dad, I’m finding it’s very hard to get bids for a patio and the prices I’m receiving are in the stratosphere. Do you think you and I could build a patio like we had at home?”

In an instant, I knew how much work it would be, but I didn’t hesitate to say, “Why sure we can. The first step is to discover exactly what you want.” Over the years I’ve performed countless autopsies on projects that didn’t turn out the way the homeowners wanted. In almost all cases, it came down to inadequate thought and planning before the first shovelful of dirt was turned.

Here are a few short 15-second videos showing the patio being poured!

You Must Be Able to Visualize the Patio

You might be like many past customers of mine. God has given all of us different talents and skills and you may lack the ability to see in three dimensions a finished house, room, or even a flat patio. This immediately puts you at a disadvantage. There’s a great chance you’ll not think about how the space will be used and how furniture will create what I call invisible hallways in rooms. There’s a very good chance you’ll underestimate the overall size something needs to be to function properly.

My son doesn’t have this talent so I did with him what I had done for years with past customers. Two months ago as winter slinked away back north across the Canadian border, my wife and I went to our son’s house to start the patio planning process. I was armed with a roll of colored mason’s string, some wood stakes, a 4-pound hammer, and a few tape measures.

What Will You Do on the Patio?

My first question was, “Share with me what would be the ideal weekend gathering you might have with your friends. Who will be here and what would you be doing?” He shared that he’d have four or five friends over, he’d serve smoked brisket from a smoker he had over in the grass, and after they ate they’d play a board game or just sit around engaged in relaxing conversation. He also mentioned he might like to have a small water feature that provided water for birds and created a soothing background ambiance.

This meant the patio had to have room for a table that would seat six people, additional room for his smoker, space for a portable water fountain, a place for two chairs, and maybe a few potted plants around the edge of the patio. It was time to drive stakes and stretch string.

What is the Minimum Patio Size?

Over the years I’ve found that you need a space at least 12 feet by 14 feet for a rectangular table that seats six people. A 12x12 space is required for a 4-foot round table that seats four people. This provides plenty of room to move around the table while people are seated. Think about what happens if you have to get up and go back inside the house for something.

Before we went outside to stake out the patio, we made a fast sketch on paper to get a rough idea for the overall size knowing what he wanted. Using the string and wood stakes, within minutes we had created the outline of the patio. A set of steps from the house leading to the patio controlled the overall design. A small space on one side of the steps was reserved for the smoker and the other side was the much larger seating area.

The overall length of the patio, including the steps, was 29 feet and the width ended up 15 feet. Stretching the string around the wood stakes made the shape come alive for my son. I used smaller stakes and some string to create the actual furniture to show that everything would fit and that there’d be plenty of room to walk across the patio without bumping into anyone.

concrete patio

This is my son's patio. Soon it will be covered with clay paving brick. It measures 15 feet wide and it's just under 30 feet long as it passes under the steps. The area beyond the steps is for his smoker grill.

You can do the same thing by setting patio furniture on your lawn spacing it how you want it. Then put a string around your furniture layout to determine the overall size of the patio. Trust me, that huge patio in your head will shrink in size once you place furniture on it. Always go bigger. You’ll never regret it.

Column 1508

Lithium Battery Fires

laptop tablet drill camera power pack on kitchen island

Lithium Battery Fires | These common items you may have in your home contain lithium batteries that can catch fire and explode. The danger is far greater than you might ever imagine. Copyright 2023 Tim Carter ALL RIGHTS RESERVED

Lithium Battery Fires - The Problem is Very Serious

This might be the most important column I’ve written in my 30-year career as a syndicated columnist. There’s a very high probability you have lithium-ion batteries in your home. They are now as common as ants at a summer picnic. The issue is the batteries can present a significant danger to you and your loved ones. You could have lithium battery fires in your home today or tonight.

Six months ago a home just miles from where I live almost burned down because power tool lithium-ion batteries ignited a fire. Fortunately, no one died or was seriously injured in this fire but lithium batteries are causing death and permanent injuries to many across the USA and the world. That fire caught my attention and I decided to begin to gather information for this column.

PR People Clam Up

Early in my investigation. I reached out to the public relations (PR) person of a major power tool company here in the USA. I’ve dealt with this professional for years and all of my previous requests were answered in a timely manner.

I asked to interview the top battery engineer to try to discover what might have gone wrong at my neighbor’s house. The PR professional ignored my request. I initiated a second request reaching out to a different PR professional from the company. That request was ignored.

I’ve done expert witness work in lawsuits for the past three decades and surmised the corporate attorneys had instructed the PR folks to not engage the press on battery issues. My guess is they have a three-foot-tall stack of lawsuits on their desks and any interaction with me would be discoverable evidence in a lawsuit by a plaintiff.

The power tool -company silence should stun you and cause alarm.

Early in my investigation, I set up a Google Alert using the words “lithium battery fire”. Each morning I receive links to a plethora of stories from around the world about fires caused by these power packs.

google alert screen shot lithium battery fires

Based on the information in these stories, there are quite a few common elements. Many fires happen while the battery is being charged. Many fires are traced to replacement batteries that may or may not carry the Underwriters Laboratories (UL) label. Many fires have mismatched batteries and chargers. In almost all cases, the batteries explode like a miniature bomb igniting nearby combustible materials.

I’ve watched countless videos showing batteries igniting and exploding violently. Get out of your head the image of a scented candle starting a blanket on fire. Replace that with an image of a powerful firework exploding spraying sparks, hot plasma, and flames out like a blowtorch.

Add to this that a lithium battery fire emits extremely toxic fumes. The fire can produce temperatures in excess of 1,000 degrees F in seconds. Nearby combustible materials such as furniture, carpets, bedding, etc. can ignite creating a conflagration in seconds. Look at this graph to show how fast a fire grows in seconds. This is why you should consider installing fire sprinklers wherever lithium batteries are used or stored.

graph of fire growth with and without sprinklers

This graph shows how fast a fire can grow with and without sprinklers. The red arrow points to the fire growth with no sprinkler. The green arrow points to the fire growth with a sprinkler spraying water on the fire. Graph courtesy of Waste360.com - Fair Use Doctrine usage claimed

As I was writing this column, I received my daily summary from Google and there was a video made by the UL Fire Safety Research Institute showing an explosion and fire inside a simulated residential two-car garage. The battery was in thermal runaway where the heat in the battery caused a violent explosion that blew the large garage door out into the driveway!

Fires on Airplanes!!!

Lithium battery fires on airplanes are happening more frequently. It's a SERIOUS ISSUE. Watch this video:

The fire department experts offer up these tips about how you can best protect yourself. Once a battery is charged up, unplug it. Charging a lithium battery creates heat. Avoid overnight unsupervised charging. Never charge a lithium battery in direct sunlight as the sun’s infrared rays can easily heat the battery on its own to over 150 F.

If your battery gets damaged, emits an odor, changes color, or gives off excessive heat, stop using it and do not store it near any combustible materials.

Never throw away a lithium-ion battery in the trash. Garbage truck fires are becoming more common. Fires at trash and recycling transfer stations and facilities are causing millions of dollars in damage.

You can protect yourself by using lots of common sense. Think about what you learned in high school physics class about fires, combustion, oxygen, etc.

First and foremost read and follow the instructions to the letter that come with the tool or product that has one of these batteries. Only charge your lithium batteries when you can observe them. Consider charging the batteries on non-combustible surfaces and far away from combustible materials. Store the batteries where if they ignite, they won't spread the fire to nearby combustibles.

I urge you to set up your own Google Alert. Consider installing a fire sprinkler in the area where you do store your lithium battery tools and garden implements. If a lithium battery does ignite, the sprinkler should do a great job of containing the fire until your firefighters arrive.

Column 1507