Emelinda Nonato Norwegian Dawn Assistant Maitre D | Here's the Dawn tied up at the Royal Navy pier in Bermuda. Copyright 2017 Tim Carter
Norwegian Dawn Assistant Maitre D
The last week of June 2017 found me at sea on the Norwegian cruise liner Dawn as its pointed bow plowed through the deep blue sea heading to Bermuda from Boston, Massachusetts.
It was my first cruise and I was like a kid in a candy store.
Weeks prior to departure I had reached out to the public relations team at Norwegian Cruise Lines (NCL) asking them a few questions about my ham radio.
I informed them the adventure was a mix of work and pleasure as I wanted to write a story about how a cruise liner compares to the homes you and I live in.
That's how I came to meet Emelinda Nonato a few days into the cruise.
Emelinda is a pro. It was very nice of her to allow me to have this photo taken of her and I together inside the Bamboo restaurant.
Emelinda has been working on cruise ships for thirteen years I believe and she's climbed high on the ladder to become an Assistant Maitre D in a few of the fine restaurants on the Dawn.
The NCL public relations team goes out of its way to extend courtesies to members of the media like me. One of them was a very nice invitation to eat breakfast and lunch at a few of the exclusive restaurants on board the ship.
I decided to try breakfast at Moderno Churrascaria. It's an enclosed restaurant in the middle portion of the ship on Deck 13. It's got large windows that overlook the outdoor pool area.
This restaurant is very formal and I'm quite sure the Dawn's Hotel Director, Alain Magnier, puts his A team members in these high-profile assets. The passengers that visit these upscale restaurants on the ship pay to dine here and expect the best service and dining experience.
Yes, that's French press coffee made fresh just for you. Look at the presentation of the fruit for breakfast. It's well worth it to splurge and visit these top-tier restaurants on the Dawn. It's a dining experience you'll never forget. If you're lucky, Linda Giga may come and take your photo while dining! Copyright 2017 Tim Carter
I can tell you I was not disappointed and neither would my close friend Dan Murray who appreciates white tablecloths over plastic forks and foam bowls when dining.
Emelinda was the Maitre D on duty the first morning I dined for breakfast in Moderno Churrascaria. She was professional and made sure my meal was perfect.
Here's the menu I looked at while dining that morning at Moderno Churrascaria. I guarantee you'll get something you like. Want something different? My guess is your waiter and the chef can make it happen! Copyright 2017 Tim Carter
As I was leaving the restaurant that morning I mentioned that I'd be having lunch with the Hotel Director and asked her how to spell his name.
"Oh, you're going to have a great time with Alain," said Emelinda. She kindly corrected my spelling as she saw me write down his name forgetting to add the letter "i".
Little did I know that she'd be on duty that afternoon at Cagney's Steakhouse where I was to have lunch with Alain after my interview with him.
While I can't speak for the official duties of the other assistant maitre d's, Emelinda worked at no less than three of the fine restaurants on board the Dawn. She was kind enough to pose for our photo together while on duty at Bamboo.
I hope when you cruise on the Dawn you'll remember Emelinda and take a few moments to engage her in conversation. Ask her if she remembers the silly old goat with the white hair who asked too many questions!
Here's the Dawn tied up at the Royal Navy pier in Bermuda. Copyright 2017 Tim Carter
Norwegian Dawn Junior Stateroom Steward
The last week of June 2017 I had the most pleasant hotel experience of my life.
I was in a moving hotel, the Norwegian Dawn cruise ship, as she carved her way through the deep blue sea from Boston to Bermuda and then back again.
My stateroom was 9611 and Rene Boy Rapal was my steward.
Here's Rene with his great uniform. I don't think he likes to have his photo taken. No, Rene didn't steal my razor. I hadn't shaved for a few days. You can forget to do that on cruises. Copyright 2017 Dan Murray
This young man was polite, efficient and congenial.
I talked to him early in the cruise and we became instant friends. How did he know that I LOVED to have ice in my room?
Yes, he would automagically fill my stainless steel ice container twice a day.
Because he's a pro, he would memorize the schedule of the passengers in the fourteen staterooms he was in charge of. When I left my cabin early in the morning to walk around or get coffee, he'd make sure he'd clean up, make the bed and have the room perfect by the time I got back. It was magic.
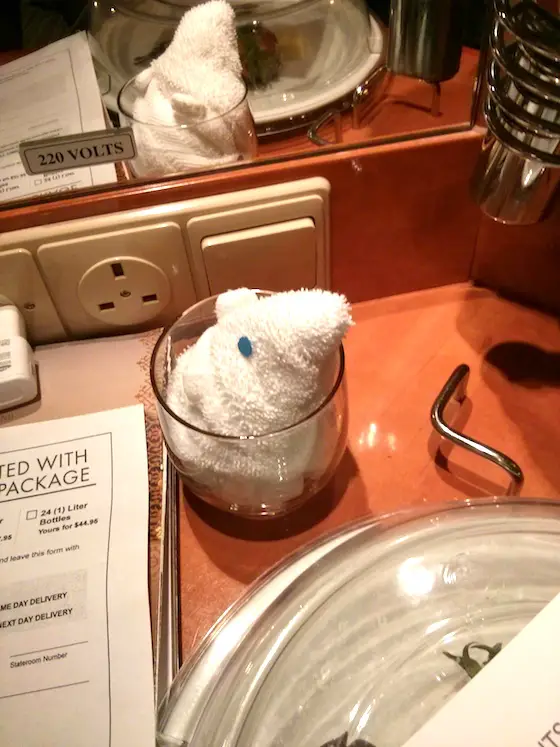
I thoroughly enjoyed the turn-down service Rene performed each night when I was at dinner. When I'd come back to the room some amusing creature made from tightly wound towels would be in my room. I'd never seen anything like it before!
This is what I saw the first night. I'll let you guess what it is. Copyright 2017 Tim Carter
I think this one is pretty obvious. Copyright 2017 Tim Carter
Nice try Rene! It didn't frighten me. 🙂 Copyright 2017 Tim Carter
This one is pretty easy. Copyright 2017 Tim Carter
This funny creature was guarding my bathroom in the stateroom on my final night of the cruise. Great work Rene! Copyright 2017 Tim Carter
Rene was a real pro and I only hope you're lucky enough to meet him if you travel on the Dawn.
Here are just a few of the covers of Fine Homebuilding. They put out two special issues each year, one about amazing houses and the other about dream kitchens and bathrooms. CLICK THE PHOTO to subscribe.
Construction Magazines & Articles
For topics concerning construction, there are many good magazines to read. One is called The Journal of Light Construction. This magazine is an excellent monthly publication directed towards smaller building and remodeling contractors.
However, any homeowner could easily follow each article. The articles are written using non-technical information. They attempt to show different installation techniques and/or how certain products (paints, caulks, shingles, etc.) should be installed.
A similar magazine, Fine Homebuilding, has an almost identical format. Many years ago when I first started to subscribe, issue 28, it focused on unique home building projects and large-scale remodeling projects. The articles are expertly written and edited. The photographs are spectacular.
Fine Homebuilding has gravitated more towards what the Journal of Light Construction has done for years. Now Fine Homebuilding focuses primarily on everyday topics and challenges that the average builder faces.
Certain areas of construction have hundreds of books and articles. Concrete is one of these areas. The Portland Cement Association has a catalog of their publications. There are hundreds of books, pamphlets and videos available. While some are technical, quite a few are written specifically for homeowners.
The associations listed below have excellent literature. Your library has a wealth of books. Your newsstand has or can get numerous magazines.
Building & Remodeling Magazines
Remodeling www.remodeling.hw.net An excellent trade publication. Free subscriptions are available to those in and around the remodeling field. Homeowners can purchase subscriptions as well. An excellent source of new product information and design ideas. Also, inside information on the business aspects of remodeling contracting.
Journal of Light Construction www.jlconline.com An excellent publication if you are an ardent do-it-yourselfer, or want to learn how things are done so that you can make sure you hire the right person.
Fine Homebuilding www.finehomebuilding.com This magazine is considered by many custom builders and remodelers as the ultimate publication. The articles are written by experts in their fields. Often the projects featured can offer you dramatic design ideas. You can always find this publication on my coffee table!
Kitchen & Bath Business www.kbbonline.com Everything you wanted to know about new kitchen and bath products and designs. It is primarily a trade publication available for free. If you wish to subscribe, you can as well. Great magazine if you want to be the first on your block with the "in" cabinets and tops.
Qualified Remodeler
www.qualifiedremodeler.com A trade publication like Remodeling. Can be had for free if you are in the remodeling business. If not, you will have to pay!
Manufacturing & Trade Associations
Following is a partial list of manufacturing and trade associations. Virtually every one listed has an abundance of literature that speaks about their group. For example, the Asphalt Roofing Manufacturers Association has an incredible booklet that shows you just how your roofer should be installing your shingles. The same is true for just about every association listed. I highly recommend that you contact the associations that interest you and request literature. You will not be disappointed.
Association of Home Appliance Manufacturers
National Association of Home Builders
National Kitchen & Bath Association
Kitchen Cabinet Manufacturers Association
Gypsum Association
Portland Cement Association
Window and Door Manufacturers Association
Vinyl Siding Institute
APA - The Engineered Wood Association
Tile Council of America
Carpet and Rug Institute
National Wood Flooring Association
Resilient Floor Covering Institute
Home Ventilating Institute
North American Insulation Manufacturers Association
Here's the Dawn tied up at the Royal Navy pier in Bermuda. Copyright 2017 Tim Carter
Norwegian Dawn Photographer
The last week of June, 2017 I was fortunate enough to be on the Norwegian Dawn. I was invited to go on the cruise by a close friend as a last-minute cancellation had created an empty cabin.
I decided to turn it into a work / pleasure experience and write a story about how cruise ships compare to the average home you and I live in.
It was my first cruise. The ship left Boston harbor at 4 pm on June 23rd and headed to Bermuda.
Everything about the adventure was new to me. I spent my first day exploring the ship and trying to talk to as many crew members as possible.
The first night at dinner is when I first saw Linda Giga. She's a young Dawn crew member hailing from Latvia and was employed on the ship as a professional photographer.
Linda was feeling much better in this photo taken the night before we got back to Boston. Five days earlier she was not feeling so well. Copyright 2017 Alycia Murray
The ship has about five white-tablecloth restaurants and Linda was going table to table taking photographs of the passengers. Norwegian then sells the photographs to the passengers in packages. When you sign up for a cruise, you can pick a photo package as one of your amenities in certain instances.
This is an example of a photo Linda would take at the bottom of the stairs in the Grand Atrium. I'm not an expert, but many families travel together on cruises and they love professional photos of themselves in the moment. Linda would have taken a much better photo making sure everyone was looking at the camera! Copyright 2017 Tim Carter - rookie photographer
Early in the cruise, I think it was Sunday night, I was wandering around the ship after dinner and found Linda in the Grand Atrium.
Here's the curved staircase in the Grand Atrium where I found poor Linda. I'm glad she felt better the next time I saw her. Copyright 2017 Tim Carter
She was on duty near the grand staircase and in great discomfort. Linda was crouched down, and appeared to be staring at the floor although her eyes were closed.
She was rubbing her temples. You didn't have to be a first-year med student to realize she had a monster headache.
Having gone through my wretched kidney stone attack three years prior that required emergency surgery, I knew she was at level 7 on the pain scale. She was avoiding and limiting her required physical activity.
This is a pretty good depiction of the stages of pain. I can tell you that Linda was very close to 7 on the chart. Chart courtesy of Shadowtwin.com or whatever website they stole it from.
I watched Linda for a few moments and couldn't take it any longer. I wanted to do something to help ease her pain. I approached her, she immediately stood up with a smile and I said, "I can see you're suffering. Would you like me to go get you some medicine?"
Linda immediately refused and thanked me for my offer. I believe it took every ounce of energy for her to put on that smile and give the appearance that nothing was wrong.
The next morning, I saw her taking photos at the end of the gangway as passengers got off the ship to enjoy the day on shore in Bermuda.
"Linda, how are you feeling today?"
"Oh, much better. Thanks so much for asking! You're the only passenger that's said anything last night."
"Well, I knew you were hurting and I just wanted to help in any way I could."
She thanked me again and I went to operate my ham radio at a nearby miniature golf course.
The last night of the cruise I saw Linda working in the gallery where passengers could view photos and purchase albums. Her energy and smile were infectious and it was great to see her one last time.
She was kind enough to allow a friend of mine, Alycia Murray, to take the above photo. Linda's great attitude and laugh were one of the highlights of the crew members that I had the pleasure of speaking with while on the ship. Norwegian Cruise Lines is lucky to have her on the Dawn.
Here's one of the decorative mood lights up on deck 13 above the pool. I shot this in Bermuda, but no doubt Linda could do a much much better job. Perhaps one day she'll send me a photo or two of the ship she took. Copyright 2017 Tim Carter
Linda, I hope that you have no more headaches in the future and that all your future cruises are pleasant and filled with good times and great memories!
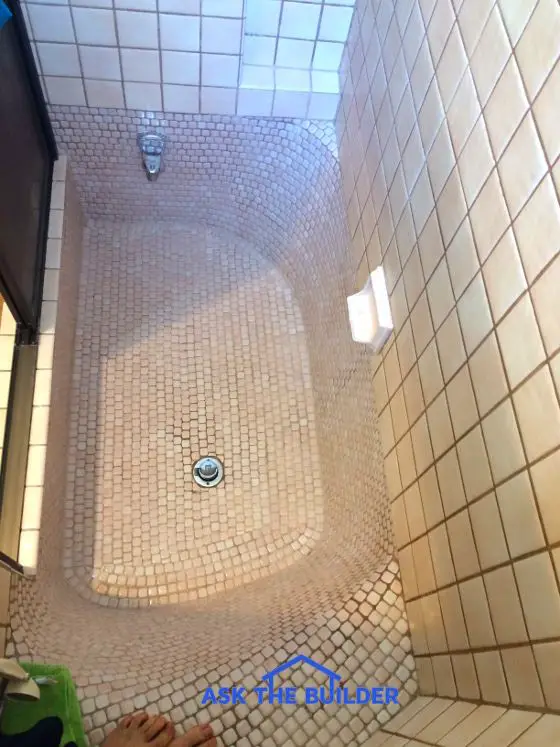
Here's the amazing sunken tub with the mosaic tile. You have no idea how hard it is to build one of these that looks this good! Copyright 2017 Tim Carter
Tub Tile Grout Repair TIPS
Try to repair grout in valuable one-of-a-kind fixtures
DEAR TIM: I’ve got a unique partially sunken tub and shower that’s got a mixture of different tiles. The tub is cast-in-place concrete and was hot-mopped with asphalt to prevent water leaks.
The grout between the mosaic tiles is eroding slowly but the wall tile grout is in very good condition. Is mold causing the tile grout to erode? Will the eroding grout cause leaks? Should I just demolish the tub and shower and start over or is it possible to repair the grout?
How do I stop the mold from growing in this gorgeous tub and shower area? Marie J., Santa Barbara, CA
DEAR MARIE: Oh my goodness! Thanks for the photos you sent in.
Sunken Tub Artwork
Your tub and shower is a work of art! By all means let’s do everything possible to restore it. I cringe at the thought of someone hitting that masterpiece with a sledge hammer to take it out!
Sunken tubs like yours are a dying craft. There are still master tile setters that can form one and then cover it with expert tile work, but each year there are fewer of these talented individuals. There’s a very good chance that your tub and shower could be a major reason someone buys your home in the future.
In certain areas of the nation, there are communities with period homes that are highly sought after. You can make this determination by talking with three of the top-performing realtors in your neighborhood. They’ll tell you what buyers are looking for. Always do this before you consider removing a specialty fixture from your home.
New Grout Is Tedious But Possible
If you’re not experiencing any leaks at this time, then the job is just going to be tedious. The good news is you can re-grout the mosaic tile and make it look brand new. Fortunately there are modern tools you can use that will allow you to get the job done much faster than what it took in the past.
Mold Is Not The Problem
Let’s talk about the grout deterioration first. Mold and mildew are not the cause of the erosion of the grout. The black organic growth is more a nuisance and a cosmetic blemish than anything else. It’s hard to say what’s causing the loss of grout as I don’t know when it started and how fast the deterioration progressed.
Sanded Grout Is Durable
The sanded grout that’s between your mosaic tub tiles is just a mixture of extremely hard fine silica sand and Portland cement. When mixed and finished properly this grout can last for many many decades with no deterioration. It’s possible the grout was defective from day one because a little too much water was used to mix it or the sponge used to smooth the grout joints was too wet.
The grout may have held up for many years but was ever so slowly eroding. When far too much water is used to mix the grout and finish it, the deterioration can happen in months, not years.
Your job is to install new grout in the areas where you see moderate to severe deterioration. The first step in the process is to deep clean the tile grout so you get as close a color match to the grout as possible. I say this assuming you’re not going to re-grout all the tile.
Deep Clean Grout Before Repair
Cleaning tile grout can be a multiple-step project because hard water deposits might be trapping dirt on both the tile and the grout. You remove hard water deposits using regular white vinegar. I prefer to lay paper towels on the lime deposits and saturate them with the white vinegar.
White vinegar is a mild acid and it chemically breaks down the alkaline hard water deposits. Allow the vinegar to work for hours before trying to scrub. It may take multiple applications of the vinegar to remove all the lime and dirt deposits.
Stain Solver is MADE in the USA with USA ingredients that are food-grade quality. CLICK THE IMAGE to order some NOW.
Once this is done, deep clean the grout with Stain Solver. Stain Solver is a certified organic oxygen bleach that penetrates into sanded grout to remove body oils, dirt, mold, mildew, etc.
Stain Solver is a powder you mix with warm water. You saturate the grout with the solution once all the powder is dissolved in the water.
Millions of oxygen bubbles attack dirt, grime, oils, etc. There's no odor and your grout will look like new.
After the grout is clean and dry you can try to obtain a color match. The color of the new grout powder is what it will dry to when just using water to mix it. Don’t add andy milky additives as that can cause blotchy color issues in the new grout.
You need to remove existing grout before you begin to re-grout. Remove a minimum of 1/8-inch of the grout in all areas where you plan to put in new grout. The best tool to use is a modern vibrating multitool that works much like a barber’s clippers.
Multitools are the only thing to use to remove grout. Just take your time. CLICK THE PHOTO to have this tool delivered to your home in days
There are different carbide-tipped blades you can put on the multitool that allow you to carefully remove the grout without damaging the tile.
Work slowly and vacuum up the old grout on a regular basis. Wear a high-performance dust mask to prevent inhaling any silica dust.
Install New Sanded Grout Videos
Watch these four videos to see how to achieve professional results when working with sanded floor or tub grout.
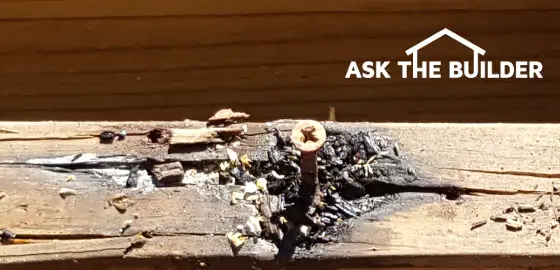
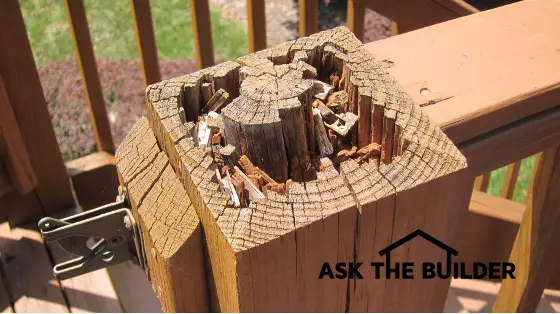
This is a close-up shot of the top of a 2x10 treated wood deck joist. You can clearly see the rot happening around the corroding screw. (C) Copyright 2017 Tim Carter
Treated Wood Rot
DEAR TIM: I’m starting to have some rot issues with my ten-year-old deck. Not only are some of the treated wood decking boards having rot issues, but I’m also noticing that the tops of some of the joists are showing severe rot where the decking screws pass into the tops of the joists. The rot is 2 inches deep in a few of the joists! Is the lumber defective? Are the chemicals in the wood so strong as to cause the rot? What’s going on and is there anything that can be done to prevent it? Lawrence B., Concord, NC
DEAR LAWRENCE: I’ve experienced similar rot with treated lumber I’ve owned. Years ago, I built a treated wood play set for my kids. After fifteen years I got rid of it to build a garden shed for my wife.
I was shocked when I pulled the buried posts from the ground. Even though the lumber was rated for burial and direct contact with the soil, termites had consumed quite a bit of several posts.
Last year, I visited the home of a childhood friend and her treated lumber deck posts had severe rot where the end grain at the top of the posts was exposed to the weather and rain. A month after seeing this rot, I encountered some rot on my own treated lumber deck that I was rebuilding.
About twenty years ago, I was in the center of the vortex of a massive lawsuit between two giant corporations. I had Marvin Windows in my home that were treated with a defective clear wood preservative. While the windows were not made with the same species of wood as your deck, I have first-hand experience in knowing that treatment chemicals can be defective. Suffice it to say, treated wood does rot.
There are many reasons why it can happen. A defective pressure gauge at a treatment plant might be the culprit. The manufacturer of the chemical brew might have made a mistake in its testing procedures and the chemical may not perform as expected. Scientists in labs can and do make mistakes even though they try everything to prevent them. The list of possibilities is endless.
There’s a secondary issue that could be in play. When your deck was built, the carpenter could have unintentionally helped accelerate the rot. Base on the photo you sent to me, it’s quite obvious the top of the joist has a crack in it that extends back to the corroding screw.
This crack no doubt originated when the carpenter drove the screw through the decking into the top of the joist. Without drilling a pilot hole, the twisting screw produces enormous amounts of tension in the lumber as the mass of the screw pushes aside wood fibers.
I’ve never taken the time myself to drill pilot holes and I’ve never heard of a carpenter doing it as it’s so time intensive. I don’t want you to think it was his fault.
The crack may have been very small at the time the deck was built but over time the crack enlarged. This happens when water enters the crack and causes the wood to expand. When the wood dries out, the wood contracts. This back and forth movement can cause the crack to widen. As the crack gets bigger, the water drives deeper into the wood causing even more stress.
If the preservative chemicals didn’t penetrate deeply into the wood, then it stands to reason that the water entering around the screw in your photo can cause the wood to begin to rot.
Treated wood rot has spawned a new category of products to help protect your investment in the treated lumber and all the work to build a deck frame. You need three things to have wood rot: wood, water and fungi that eats the wood. If you take any of the three things away, you stop the rot.
Water is much easier to stop that trying to keep fungi away. Any number of products are available to stop water from entering the treated wood. Last year as part of my deck reconstruction project I applied a special tape on top of my wood joists before I installed the decking. This tape had a butyl rubber adhesive and is designed to seal around the shaft of the screws I used to attach the hidden fasteners for my decking.
You can also purchase rolls of ultra-thin stainless steel that also has the sticky butyl adhesive. Stainless steel is an excellent product to use to cover the tops and end grain of wood joists so that water can’t enter. It’s easy to cut the stainless steel with regular scissors and applying it is no different than using any other tape.
My advice to you is to replace any rotted pieces of treated lumber and then protect the top edge and any hidden end grain of the joists where they may get covered by a band board or butt up against a beam. Do this and you might end up with a deck frame that can last for many decades.
This blacktop is seventeen years old and in very good condition. It’s got larger pieces of stone about the size of large grapes. That’s one reason it’s doing so well. (C) Copyright 2017 Tim Carter
Types of Blacktop Driveways
DEAR TIM: We need to have a new blacktop driveway installed and I thought it was going to be a simple process of comparing quotes. It turns out it’s somewhat confusing. I didn’t know there were different types of blacktop. What’s more, the contractors don’t seem to agree on the best way to prevent cracks along the edge of the driveway. Can you explain why there are different types of blacktop and what might be the best for my situation? Do you have a blacktop drive and what’s it like? Maddie H., Baltimore, MD
DEAR MADDIE: I do have a blacktop driveway at my current home. Prior to that I had a very unique driveway that was the first cousin to blacktop. It was a driveway made with just the liquid asphalt cement and small stone chips. Some call it seal chip and others call it tar and chip. Blacktop is almost always an asphaltic concrete made from liquid asphalt cement, sand and gravel.
If you know much about sand and gravel, then you can start to get your head around how there can be different types of blacktop. The reason there are different blacktop types is because there’s an infinite amount of possible combinations when you consider the different sizes and shapes and colors of sand and gravel.
Highway engineers have a much better handle on this than folks like you and me because they have to construct roadways from asphalt that support heavy trucks. The blacktop mixtures used on an Interstate highway may be just fine for some residential driveways but you’d have to take a number of things into consideration.
For example, let’s talk about my driveway. I live in central New Hampshire and we get lots of snow and ice in the winter. Many driveways here where are not flat. You need excellent traction in both wet and snowy weather.
Fortunately the contractor who installed my driveway before I bought this home used a special mix that has smaller and larger pieces of crushed granite in the mix. The majority of the largest pieces of stone in my driveway are about the size of a large grape. There is an occasional piece of stone that’s about the size of my big toe!
These stones in the mix are by no means smooth. The roughest edges are knocked down, but the stones have a marvelous gripping texture. Over time the smaller pieces of sand and asphalt have eroded between the stones a slight amount. This produces a rougher surface that provides exceptional traction in wet or snowy weather.
But you may want a satin smooth blacktop drive for your mild climate. Many homeowners love smooth-as-silk blacktop. If you’re installing a new driveway and you intend to be at the house for many years, you may want to consider talking to your contractor about installing two separate layers of blacktop to create a driveway that could last decades and decades.
Keep in mind that the gravel base under the blacktop is where the drive gets almost all its strength. You want at least 8 inches of crushed compacted gravel under the blacktop.
You have the option to install one 2-inch layer of blacktop like I have on top of the gravel base. He then would order a different batch of blacktop that only had small stones in it no larger than 3/8 inch in size. He’d put a 1-inch layer of this on top of the first 2 inches. When these smaller stones are combined with medium and some coarse sand in the mix, the final surface after it’s rolled is just about as smooth as you could imagine.
It’s very important for you to see the different types of blacktop that your contractors are proposing. Have them give you addresses of jobs you can go visit. Walk around and look at the finish and the size of the stones you can see in the mix. Decide which one you like best and be sure to have the contractor match it.
To prevent cracking of the blacktop on the edges of the drive, you need to do something most residential contractors never do. The crushed gravel rock base under the driveway needs to be at least 1 foot wider than the actual finished driveway if you want to eliminate cracks.
Most driveway contractors install the gravel base, compact it and then put the blacktop all the way to the edges the gravel. The soil on the sides of the driveway that’s added after the job is done offers no structural strength to a sideways movement. When a heavy vehicle tire is right at the edge of the driveway, the force not only goes down but some of the force also goes sideways.
When the soil can’t oppose this force, the blacktop cracks away. A wider compacted gravel base will provide all the needed support. Roads out in the country have this extended base. You’ll often see wide gravel shoulders on country roads. These are there to keep the pavement in great shape.
To have the best protection against edge cracks the gravel base or shoulder should extend to the same height as the asphalt. Most homeowners would never put up with this look as they want the grass to touch the blacktop. You can put in an attractive edging stone as a compromise. Talk to your contractor and see what thoughts he has.
In just a few days, I leave on the Norwegian Cruise Lines (NCL) Dawn ship for a one-week cruise to Bermuda.
WOOT! I've never been on a cruise before. I've been in contact with the NCL public relations department and they're working with me trying to get me into non-public areas of the ship so I can write a very interesting story for you.
I'm hoping it all works out and I'm allowed to take some fantastic photos. As Kenny Chesney said in his hit song, "Only time will tell, but it ain't talkin'."
Montana Deck Collapse
Each week I'm convinced there are decks that collapse in the USA. Most don't make the national news. If you want to get the statistics, the best place would be insurance companies.
Most homeowners would file a claim with their insurance company in the event of a deck collapse.
Last week there was a fairly large deck collapse in Montana and some of the people on the deck were first responders!
CLICK HERE to read the story about what's known so far.
What's this have to do with you? More than you can ever imagine. I can tell you after reading the following you're going to think about your safety when you stand or sit on a deck that's not yours.
Here's the short list of what you probably don't know about decks and treated lumber:
I'll be on a cruise next week to Bermuda. There won't be a newsletter. I'm going to meet up with one of my subscribers who's there! I'll post a photo if she lets me.
Stain Solver 9-Pound Sale
It's time to make a new huge batch of Stain Solver.
The issue we have is we have to forecast the amount of each size that MIGHT sell moving into the future. It's hard to do it and we've never gotten it right.
To balance out existing inventory, we need to SELL more of the 9-pound size.
Here's a promo code for 10% off that will only work if you purchase a 9-pound or larger size:
Summer1710
This promo code is only good for the next TEN DAYS. It WILL EXPIRE.
In addition to the discount, you also get FREE SHIPPING to any location in the lower 48 contiguous states.
CLICK HERE to place your order. Remember, the promo code only works on the 9-pound size or larger.
New Revised Columns For You
Here are some excellent columns you should look at. Several have GREAT VIDEOS in them.
Here's the tool of the week I feel you should know about. I've been using this Bosch drill now for over a month and LOVE IT.
It's cordless and the 18-volt 6.3 amp/hour battery provides what seems like ENDLESS power! CLICK HERE to discover more about this drill and to get a great price on a full kit.
This is a BEEFY drill and remember it will drill into CONCRETE, GRANITE, wood, and STEEL!
That's enough for today. I've got tons to do before I leave for the cruise on Friday.
DEAR TIM:In just a few weeks, a builder will show up to completely rebuild my deck. The house is only twenty years old and the treated lumber used to build it is rotting away.
The centers of the deck railing posts are crumbling. I thought treated lumber was supposed to last forever. What is the problem?
I religiously applied sealer to the wood thinking that would help, but alas it was just cosmetic. Can you trust treated lumber? Is it possible my deck could have collapsed? Cathy B., Cincinnati, OH
DEAR CATHY: Your dilemma reminds me of past email exchanges I’ve had with builders and companies that swear treated lumber foundations are so much better than poured concrete.
Wonders Of The World = Stone
The go on and on about how the wood is so much more energy efficient. My reply to all these is that the great Wonders of the World are all built with rock and then I go on to mention that it’s possible things can go wrong in the treatment process that cause the wood to rot prematurely.
Preservatives Not Dependable
I’ll also add that I was part of a giant class-action lawsuit a few decades ago involving a major window and door manufacturer and a paint company. The paint company was supplying the window company with a clear wood preservative. The preservative was used to prevent the window and door frames and sashes from rotting.
It didn’t work and it took about eight years to discover the preservative formulation was defective. The dream house I built had these windows with the defective clear wood preservative. Fortunately I was able to negotiate a very fair settlement. The bottom line is that wood rots and many things can go wrong in the treatment process causing premature failure.
I’ll finish with another personal story. About twenty-five years ago, I used treated lumber approved for burial to construct a play set for my kids. The chemical treatment guarantee mentioned that it was formulated to resist termites and other wood-destroying insects.
After about ten years, my kids no longer used the play set and I needed a place for an outdoor Queen Anne Victorian garden shed. When I pulled the 4x4 posts out of the ground, one third of the wood was gone and the termites were feasting away.
I could see the little white insects gorging themselves on the wood.
Treated Lumber Not Perfect
I’m telling you these stories to make a point. Treated lumber is a good product, but you need to realize there’s an element of risk when using it. As with a chain, treated lumber is only as rot proof as its weakest link. Here’s just a partial list of things that can go wrong in the treatment process:
The actual chemicals used in the process could be defective or the wrong concentration is made at the chemical factory. A lab technician doing quality control can make a mistake. If the chemicals are diluted at some point in the process, a human error could cause the solution to be too weak.
If the process involves pressure to drive the chemicals into the wood, the pressure gauge on the vessel could be defective. If the pressure treatment is to last for a specific amount of time, it’s possible the wood is removed too early from the treatment chamber. I could go on and on with other scenarios.
Deck Collapse Due To Rot
There’s no doubt that treated lumber rotting can lead to structural defects that cause decks to collapse. Sometimes these stories make it to the news, but my guess is you’d have to dig deep into insurance industry records to see the extent of treated lumber structural collapse incidents that are the result of rotting wood.
I’m currently rebuilding a large deck on my own home that’s made from treated lumber. Fortunately I’ve not encountered any severe rot in the treated lumber, although I have come across three minor areas where the wood has been compromised. What’s more, I just added a new treated lumber deck to my existing one, so I continue to use the product.
There are quite a few videos out there capturing the moments decks collapse. There are many reasons why the decks fail, but just know you're at risk if you've not inspected the deck before you get on it. These collapses were covered in the June 20, 2017 AsktheBuilder Newsletter.
Joist Tape
I have faith in the product and have taken steps using modern new products to minimize water infiltration into both the new deck and the existing treated lumber. You can purchase new tape that is applied to the top of deck floor joists.
I prefer the tape that comes with the butyl adhesive rather than asphalt-based adhesive. This tape helps to keep the treated lumber dry where the decking lays on top of the joists.
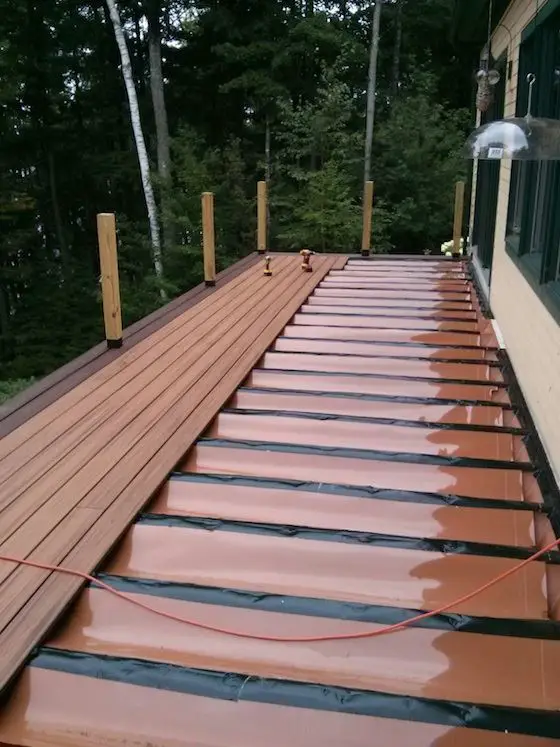
Trex Rain Escape Membrane
You can also install special membrane systems over the entire deck structure before you install the decking. Not only does this system stop all water from touching the treated lumber joists and beams, but it also creates a dry living space under the deck in the event your deck is high enough to walk and sit under.
The Trex Transcend decking is being installed. Just as I say in the video, the Trex RainEscape sits BELOW the decking. Snow and ice don't collect on it, they sit on top of the decking. Photo credit: Tim Carter
I’m just finishing up now installing this membrane system on my large existing deck. The treated lumber will never get wet again and this deck should last for a very long time.
I think the only danger at this point is collapse from extreme snow load. But knowing this is a possibility, I added lots of special timber screws to help make the deck stronger.
Decorative Post Caps
You can also help prevent water from entering the end grain of deck posts and support columns. The open end of timber facing the sky invites water to penetrate deeply into the wood. Install decorative post caps that create a small roof over the tops of exposed deck railing posts. Use the special deck joist tape to cover the vertical exposed tops of any deck posts before you rest a beam on top of them.
Here's but one type of deck post cap. There are MANY styles, some with solar-powered lights in them for decorative night lighting. CLICK THE PHOTO NOW TO HAVE ANY OF THESE DELIVERED TO YOUR HOME NEXT WEEK.
Finally, do periodic inspections of any treated lumber using an ice pick. Poke beams and columns to ensure they’re not getting soft.