Porch Decking

Porch Decking

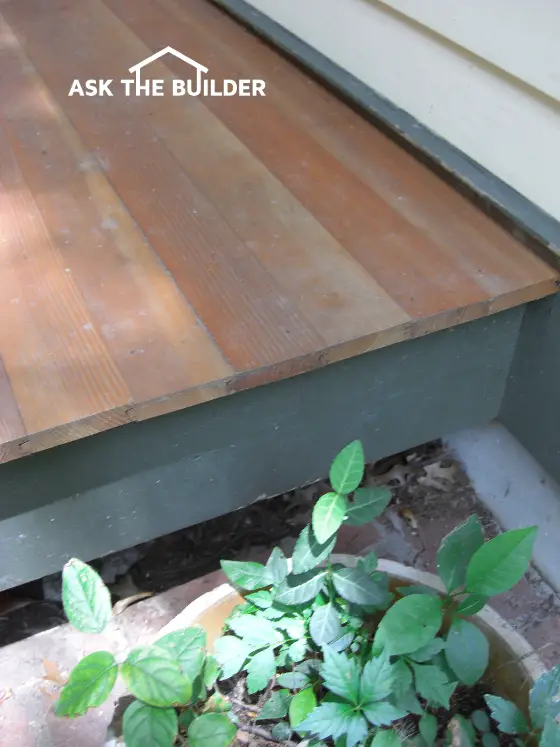
Porch Decking | This is real Douglas Fir porch decking. It’s tongue and groove allowing the nails to be hidden. Copyright 2017 Tim Carter

Porch Decking TIPS

  • Traditional wood porches had special wood
  • Wood was installed at a slant and shed water
  • Use borate chemicals to pre-treat wood before installation
  • Stain all wood on all sides and edges BEFORE installation
  • CLICK HERE to Get Tim's FREE & FUNNY Newsletter!

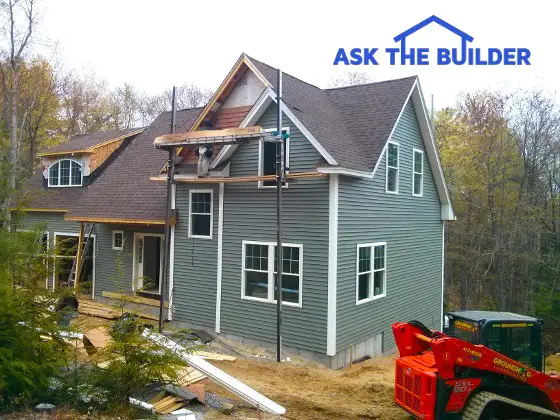
DEAR TIM: I’m restoring an older home that has a patio porch deck. It’s covered, so perhaps it’s just a deck porch.

The wood was painted, but is in bad shape due to neglect. What material would you install if you wanted to maintain the character of the house? I’ve seen composite porch decking, but I’m worried that I could have problems with it and that it just won’t look real.

Are there any great trade secrets you can share about decks and porches? Sara G., Mt. Orab, OH

DEAR SARA: I’m really familiar with porch decks, especially ones made from wood.

All My Houses Had Wood Porch Decks

Every house I’ve owned has had one, and some of the wood is over 100-years old and still in very good condition. There are several reasons why the wood has lasted that long, not the least of which is diligent care on the part of the homeowner.

Classic Look

Wood porch decking is absolutely a classic look. You’ll find it on many a covered porch in older homes out in the country as well as houses in the city. I know for a fact that there are thousands of houses in Cincinnati, OH, which is near you, that have original wood porch decks that are still in use. They may be painted, but it’s still wood.

Wood Porch Installation Tricks

If you study your porch, assuming it was installed correctly when your home was built, you’ll discover that it probably is not level front to back and that the wood strips are installed opposite of the way you might think they should be.

Carpenters well over 100 years ago discovered that even though porches like yours were covered, wind-driven rain would saturate the wood in fierce storms. The quicker that water got off the wood, the better. Installing the wood so that it has a fall of 1/8 inch per foot allowed for excellent drainage.

Free & Fast Bids

CLICK HERE to get FREE & FAST BIDS from local painters who can do all the necessary preparation you need on the wood material BEFORE you install it!

Tongue & Grooves = Drainage Channels

To ensure no water got trapped between the individual pieces of wood decking, the carpenters ran each individual strip of wood perpendicular to the front wall of the house. That way the seams between the pieces of wood acted as natural conduits for the water to drain to the end of the porch at the overhang.

Installing the wood parallel with the front wall of the house creates a dam between pieces of wood that traps the water.

Douglas Fir - Premium Porch Lumber

The wood that I prefer to use for these porch decks is vertical grain Douglas Fir. It can still be found at many traditional lumberyards. The wood that was installed on many of the old porches, and the ones I built, had a tongue and groove profile.

This unique profile is the same used when milling oak for interior hardwood floors. It allows for blind nailing of the strips of wood and adds significantly to the strength of the wood as each strip interlocks with the one on either side of it.

This minimizes or eliminates sag or bounce when you walk on the wood in between the floor joists that support the porch decking. It’s time-tested technology that works.

Generation One Composite #FAIL

EB015 Cleaning & Sealing Deck CoverI tested a composite porch decking that was made to mimic the wood material. It failed miserably.

Composite decking products contain high amounts of plastic. Plastic expands and contracts dramatically when heated. If you don't allow for the decking to move, it can bow, twist or uplift as the material grows in length.

The instructions said to make sure the decking was covered from the sun. That’s pretty impossible to do as the sun can often hit the edges of the decking early and late in the day and as the seasons change with the sun lower in the sky.

In my case, even though the decking was installed per the manufacturer’s specifications, it developed huge humps from the heat expansion of the plastic in the composite product.

CLICK HERE to get FREE & FAST BIDS from local painters who can do all the necessary preparation you need on the wood material BEFORE you install it!

Treat With Borate

If you want your new wood material to last for generations, you have to treat it with borate chemicals before it’s installed. Borate powder is easy to get and it dissolves in hot or warm water with ease.

borate powder

Here's a great borate powder for treating wood. There are many borate suppliers to choose from. CLICK THE PHOTO NOW TO HAVE SOME DELIVERED TO YOUR HOME IN DAYS.

Cut the pieces to the exact length you want and then soak each piece of wood in hot water that contains borate powder.

Let each piece soak under water in a trough for about two minutes. Stack the wood in a shaded area making sure to put wood spacers that resemble paint stirring sticks between layers so the wood can dry.

Wait Two Weeks

Once it’s dried for two weeks, then paint the wood on all edges and surfaces before it’s installed. You can use semi-transparent wood preservatives instead of paint if you want the natural look.

What is the Best Porch Paint?

In case you want to paint the porch, I recommend paints that are specially formulated for outdoor porches. They say so on the label.

urethane porch paint

Here's a great urethane-fortified paint. It comes in three different sheens. NOTE on the label it says it's for porches and floors! It's tough enough to walk on. CLICK THE IMAGE NOW TO have this paint delivered to your home.

Be sure to paint all the wood on all sides and edges, including the tongue and groove before you install the wood. Always paint any cut ends to stop water infiltration into the end grain.

What Primer Should I Use on the Wood?

Read the label of the finish paint you intend to use. They almost always tell you the best primer that's compatible with the finish paint. It's best to apply the finish paint as soon as the primer label says it's safe to recoat. You'll get a better bond between the two paints if you do it this way.

Stain All Sides And Edges

The key is to coat all the surfaces of the decking so that water will have a very difficult time entering the wood. If you don’t pretreat the wood before it’s installed, you’ll never be able to coat all the surfaces.

Hot-Dipped Galvanized Nails

Use double-dipped hot galvanized finish nails to install the wood. These will last for generations, especially if the wood is covered with a roof.

IMPORTANT TIP: If you have to cut a piece of wood that’s been treated or painted, be sure to coat the cut end with the borate solution and then the finish sealant or paint.

If you want to minimize any cupping or warping in the wood, consider installing a vapor barrier on the soil under the porch. This will slow water vapor from pouring into the underside of the wood, even though you’ve treated it.

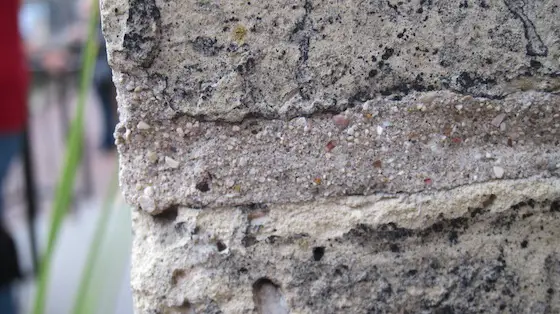
The wood used on many of the old houses had another huge advantage over wood available today. It came from ancient trees whose growth rings were very small.

Porch Decking

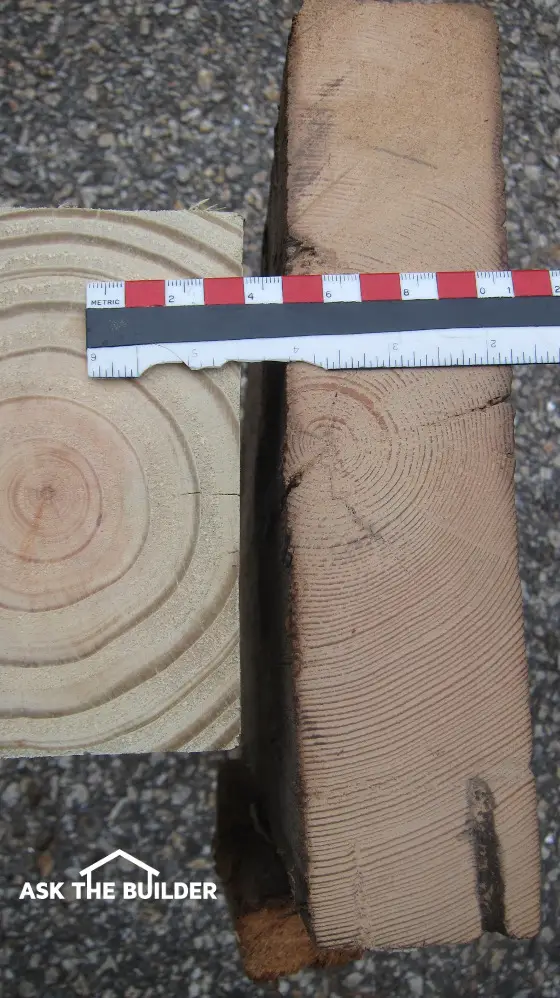
New lumber is nothing like the lumber of old. Look at how wide the lighter-colored spring wood bands are in the timber to the left! (C) Copyright 2017 Tim Carter

As such there was often as much dense summer wood in the lumber as there was the lighter spring wood. Lumber today seems to have a much higher percentage of light spring wood than the dense dark summer wood. Spring wood, because of its open cellular structure, is much more susceptible to rot than the dense summer wood.

This is why it's so very important to treat modern lumber with the borate chemicals. They readily soak into the light-colored spring wood.

CLICK HERE to get FREE & FAST BIDS from local painters who can do all the necessary preparation you need on the wood material BEFORE you install it!

Column 839

Concrete Stain DIY

Concrete Stain around pool

Concrete Stain DIY | The concrete around this swimming pool is two different shades. There are several ways to make it look much better and change the color at the same time. (C) Copyright 2017 Tim Carter

Concrete Stain DIY TIPS

  • Multiple ways to change the color of existing concrete
  • Stains work best on steel-troweled smoother concrete and require diligence
  • Best DIY method is easy-to-use concrete resurfacer products - add pigment for color
  • Stenciling concrete with the resurfacers produces the most dramatic look
  • CLICK HERE to Get Tim's FREE & FUNNY Newsletter!

DEAR TIM: I’ve got an in-ground swimming pool at my home and my wife is not too happy about the concrete deck around the pool. The concrete was poured at different times and it’s cured to three different shades.

She’s asked me what can be done to make the color uniform. Are there any affordable options?

Is this something I can do myself? What are the pitfalls? Mike D., Cincinnati, OH

DEAR MIKE: What’s that old saying? A happy wife means a happy life.

Ground Control - Engage Happiness Machine

Guess what, I’m about to crank up the happiness machine for you and her at the same time. You’re going to have to do a little work, but the end result is going to be stunning and long lasting.

You've Got Options

You’ve got several options to transform your concrete’s appearance. The good news is one of the methods is very DIY friendly. This DIY method even allows you to drastically change the color of the concrete around your pool. My guess is your wife may not have thought about that, but it adds a dimension to the project that could make it the talk of the neighborhood.

Free & Fast Bids

CLICK HERE to get FREE & FAST BIDS from local pros who can resurface your concrete and add COLOR to it!

Concrete Absorbs Liquids

Depending on how concrete is finished, it can have different levels of porosity. Based on the photos you sent me, and because the concrete’s around your pool, you have a somewhat sandy finish that prevents slipping when the concrete is wet.

Sandy Concrete Texture Issues

This sandy texture will work to your benefit if you decide to go with the easiest DIY solution I’ll talk about in a moment.

Stain Concrete Like Wood

But first, let’s talk about staining your concrete. Believe it or not, you can purchase special color stains that are made to soak into concrete. I’ve walked on stained concrete that looks like leather. Any imaginable color is possible. The look and appearance is surreal when it’s done by pros.

Sandy Texture = Darker Colors

The issue with staining sandy porous concrete like you have is that the colors can become very deep and it’s harder to achieve a multi-toned appearance that you’d get with concrete that’s got a surface texture that’s more like glass.

I only mention this to you because you may discover that applying the colored stains solves the problem immediately.

Use Multiple Colors

Because you have distinct joints between the different slabs of concrete surrounding the pool, you can introduce different colors that compliment one another. For example, the inner ring of concrete that touches up against the edge of the pool may be a tropical green color and the outer ring you may want to do in a medium blue. You’re only limited by your imagination.

CLICK HERE to get FREE & FAST BIDS from local pros who can resurface your concrete and add COLOR to it!

Stains Are Not Easy

The concrete stains are tricky to work with and they require you to follow instructions to the letter. If you decide to try this, it’s imperative you do a test on some concrete in another location to see if you like the color. This may require you pouring a new small pad of concrete that has the same texture as what’s around your pool.

DIY Concrete Resurfacing

My guess is you’re going to love your second option. There are concrete resurfacing products you can buy that you mix with water. Once mixed they’re the consistency of applesauce. You simply spread the material on the existing concrete with a large squeegee and then apply a broom finish after waiting a few minutes.

This is an excellent concrete resurfacer. You can add colored dry pigments to change the color to just about anything. CLICK THE PHOTO OF THE BAG NOW TO HAVE THIS DELIVERED TO YOUR HOME IN DAYS.

These resurfacing products add a very thin layer of material onto the existing concrete, perhaps just one sixteenth of an inch. The best part is you can add dry pigments to the mix to create a new colored surface. Reds, browns, greens, blues, golds, oranges, etc. are all possible. You can even create patterns with different colored mixes.

Here are just a few of the many many pigments available. You can blend different pigments to get different shades that you don't see here! CLICK THE IMAGE TO BUY ANY WHITEWASH PIGMENT YOU WANT.

Make A Mural

If you have an artist in the family, this talented person can create a mural on the pool deck using the resurfacing products and multiple colors. The possibilities are endless.

Stenciled Concrete

Your third option is to combine these resurfacing products with stencils. Using stencils and colored pigments in the mix, it’s possible to transform your bland concrete pool deck into a red brick look or even granite cobblestone. You can even get stencils that would transform the pool deck into a rich brown and gold flagstone.

Stenciled and Resurfacing Concrete Videos

Watch these videos to see how to resurface and stencil concrete using the concrete resurfacing products. Wait until you see all the different ways you can make existing concrete look DIFFERENT. WOW!!!


Stenciling Is For Pros

Stenciled concrete is not DIY friendly, but the look is stunning. You may decide this is the best alternative for your pool area and it just requires you to locate a local professional that has lots of experience using stencils.

If you decide to go with the stenciled look, be sure to take the time to visit other jobs the professional has completed. Looking at photographs is not the same as seeing the finished job in person.

Pitfalls

You asked about the pitfalls of the job. If you decide to do the concrete resurfacing yourself, I want you to test this process on a concrete slab other than your pool. You want to get the hang of how to use the product to get perfect results.

Overcast Cooler Days Are Best

Don’t do the resurfacing on hot sunny breezy days. These are the worst possible conditions because the resurfacing compound dries too fast. It’s best to do this work on an overcast day with the temperatures around 60 F. This gives you plenty of time to work with the product and you’ll get the best bond to the existing concrete. Be sure to read all the instructions and follow them with great diligence.

CLICK HERE to get FREE & FAST BIDS from local pros who can resurface your concrete and add COLOR to it!

Column 1201

Concrete Steps Leaking

concrete steps

Concrete Steps Leaking | These concrete steps are leaking where they touch up against the wall. It’s possible to solve the problem, but it’s not easy. This was shared with my readers of the September 27, 2016 AsktheBuilder Newsletter. Copyright 2017 Tim Carter

Concrete Steps Leaking TIPS

DEAR TIM: I live on the upper floor of a converted villa. The access is by a stairway at the side of house.

There's a closed door for garden tools under the stairs. Water is coming in to the garden shed from above and the wall near the stair is damp for about two feet.

The owner below said he has damp internal walls consistent with water getting in from my stairs. I would like to prevent this happening. What can be done to stop the water infiltration, if anything? Isabel H., Glasgow, Scotland UK

DEAR ISABEL: Thanks for reaching out across the ocean for help with your problem. Water, gravity and physics are pretty much the same all around our planet and I’m fairly confident I can help you.

Concrete Is Water Resistant Not Waterproof

I believe the first place to start is to talk about the characteristics of masonry and concrete. Based on the enormous volume of email I receive from both homeowners and builders, I’ve come to believe that many feel that concrete, brick, stone, mortar and other similar materials are waterproof.

The truth is water can pass through many, if not all these materials, albeit at radically different speeds. It’s child’s play for water to pass through tiny hairline cracks and I see those in the amazing high-resolution photo you sent to me.

Free & Fast Bids

CLICK HERE to get FREE & FAST BIDS from local painters - yes painters - who can apply the special epoxy caulk that will solve this problem.

Your Steps Are A Roof

The steps that form the sloped roof for your garden shed are poured against the poured concrete foundation of the villa. This is a very common practice as it would be prohibitively expensive to cast the steps as part of the poured foundation. It’s possible to do this, but not practical.

Driving Rain Cascade

Think of the dynamics that are happening in a moderate to heavy rain storm that has wind as a component. Gallons of water are hitting the stone walls of the villa and cascading down the walls to the hairline cracks where the steps meet the foundation wall. Wind blowing against the wall and steps adds more energy forcing water into the tiniest of openings or cracks.

Since you can’t stop the rain and wind, you’ll need to do your best to stop the water from entering the cracks. It appears to me that someone has already made an attempt to do this by caulking the cracks on the flat stair treads. However, they did not caulk the cracks at the vertical interface where the stair risers touch the foundation walls.

Remove Old Caulk - Start Over

The repair job doesn’t look good to me and I would seriously consider chipping off the caulk and/or whatever material it is. I’d then clean the foundation wall and steps well using a pressure washer. Yes, this is also going to cause water to enter the garden shed, but hopefully it will be the last. You need the surfaces clean so the repair material bonds tenaciously.

Open Up Joint

I’d be very tempted to carefully chisel along the joint between the steps and foundation to open up the gap to at least 3mm or about 1/8 inch. This crack should be about 6 mm or 1/4-inch deep. Be sure to remove all loose material and dust. I’d then caulk it with a concrete epoxy that’s extremely strong and waterproof.

Concrete Epoxy Repair

I’ve used an epoxy with amazing results that’s made by a company called PC Products and it’s available on Amazon.com. CLICK HERE NOW to see and BUY this product.

PC Concrete Cartridge

This is the magic epoxy that fits into a regular caulk gun. I've used it with great success. CLICK THE PHOTO NOW TO HAVE IT DELIVERED TO YOUR HOME.

This epoxy comes many ways, but I prefer for jobs like this to use the caulk tube dispenser that automagically mixes the A and B components.

Masonery Epoxy

Here's the same epoxy but it comes in little jars in case you want to mix it and apply it with a putty knife. CLICK THE PHOTO NOW TO HAVE THIS EPOXY DELIVERED TO YOUR HOME.

Do A Test Application

Before you start to do this repair, I want you to do a test with the epoxy on some small concrete brick that you can buy. Place one against the other so one is taller recreating the relationship you have between the stair tread and foundation wall. The purpose of the test is to refine your caulking skills and to make the caulk match the existing concrete.

Concrete Epoxy Caulk Repair Video

Watch this video to see how to use the concrete epoxy products. Very clever stuff!


Study Sand Color And Size

It’s imperative you study the concrete steps and take a close-up photo. You need to look at the size, color and makeup of the exposed sand grains in the concrete. Your job is to visit a local gravel and sand supplier to find similar, if not exact, sand. When you look at the sand, and I can see it in the photo, you’ll notice black, orange, brown, white and other grains!

Pat Sand Into Fresh Epoxy

You’ll use this sand to hide the stark gray epoxy. The epoxy I prefer comes out somewhat wet and fresh sand will stick to it with no issues. You carefully apply a bead of epoxy and then cover it immediately and completely with the sand. Be careful not to tamp the sand into the epoxy because you could smear it.

Allow the epoxy to harden, this usually takes a few hours, and then sweep off the excess sand from your test bricks. See how it looks and hold it next to the existing steps. You may have to do several attempts to get the exact look and texture you want.

Apply Silane / Siloxane Water Repellent

Once you have all the cracks repaired where water is entering, then you need to apply a top quality silane / siloxane clear water repellent on the concrete steps, landing, foundation wall and the masonry walls of the villa above the garden shed.

penetrating sealer

This is a magnificent silane - siloxane water repellent that soaks into concrete. CLICK THIS IMAGE NOW TO ORDER IT.

This final step will really help stop water from rusting your shovels, rakes, hand tools and whatever else is is the storage area. Good luck to you and please report back your results.

CLICK HERE to get FREE & FAST BIDS from local painters - yes painters - who can apply the special epoxy caulk that will solve this problem.

Column 1163

This product is available from Amazon.com. CLICK HERE to purchase it.

This two-part Masonry Epoxy product is available from Amazon.com. CLICK on IMAGE to purchase it.


Matching Mortar

Matching Mortar

Matching Mortar | The color of the grains of sand makes a huge difference in mortar color once the actual cement paste wears away.

Matching Mortar Tips

DEAR TIM: The mortar between my brick needs to be repaired. I want the patchwork to blend as closely as possible with the existing mortar. Should I use regular pre-mixed mortars that I see on construction sites? What is the best way to assure a color match? Kate, Sarasota, FL

DEAR KATE: Matching mortar color and texture requires patience and persistence. Detective work combined with a little experimentation will yield excellent results. The key to success lies in taking your time. Do not rush into this task.

Believe it or not, the key to a successful color and texture match lies in matching the sand used when mixing the mortar. The sand in mortar accounts for well over 70 percent of the matrix that you see. Brand new brick joints often have a film of lime or cement produced by tooling the joint. This very thin film is eroded with time. Water, wind and pollution constantly work to expose the sand that was used to create the mortar. Take a close look at an older brick wall and you will see what I mean.

How to Determine the Color and Size of the Sand?

To determine the color and particle size of the sand used in your mortar you must do a little destructive work. Try to obtain a cubic inch of mortar from several of your brick joints which require repair. Use a piece of wood to gently grind the mortar pieces into a coarse dust. Avoid the use of a hammer. You do not want to pulverize any of the sand particles. Mix 1 ounce of muriatic acid with 10 ounces of water. Stir in your mortar dust. Within 2 days any and all lime or cement in the mix will have dissolved. The sand will be at the bottom of the container. Use white vinegar instead of acid if your mortar contains crushed sea shells. Do not add water to the vinegar. Use straight from the bottle.

Carefully pour off a majority of the acid bath into a toilet or laundry tub. Be careful not to loose any sand. Add water to your container to dilute the remaining acid. Pour the sand and water mixture slowly into several folded paper towels to capture the sand. Allow the sand to dry. Store it in a closed, clear glass jar.

Where Can I Find Dry Sand Samples?

Visit several gravel and sand pits until you find a sand that matches yours in color and particle size. Be sure to look at dry sand samples! Moisture changes the color of sand. If your house is older, try to ask old bricklayers where sand was purchased and/or mined in your area. Trust me, the older the house, the closer the source of sand. Once you have found a sand or a blend that is close in color and texture, you are ready for further experimentation.

brick mortar

You can clearly see the individual pieces of colored sand in the mortar. Remember, sand particles are just tiny pieces of actual rock. See the white, black, orange, pink and buff pieces of sand? Photo credit: Tim Carter

You can clearly see the colored sand grains in this high-resolution photo. Note how the mortar in this photo is a much darker gray than the white brick photo above. Photo credit: Richard K.

Older mortars often had a much greater amount of lime content than today's pre-mixed mortars. You need to locate a building supply house that sells lime, white cement and grey cement. You will need all three components. Old mortar (70 years older or more ) may require 6 measures of lime to one measure of cement. Lighter mortars probably require the use of white cement instead of grey cement. You may find that you have to blend both cements to get a perfect color match.


Need to repair your masonry? Find a good contractor and learn the secrets of the trade with my Masonry Repair (Chimneys, Stucco & Brickwork) Contractor Hiring Guide and Checklist. I offer a 100% Money Back Guarantee.


Furthermore, if your brick and mortar are old and dirty, you may want to wash the brick before you begin the repair job. If this is not feasible, you may have to age or stain the repair job after it dries to make it appear dirty. The trick to matching color while you are mixing is to get the existing mortar wet. If the wet mixture in your wheelbarrow looks close or identical to the wet old mortar in between the brick, you may have a perfect match when it dries. Do a test batch and let it dry for two weeks to see if your recipe is right. If not, keep trying.

If you are building a new home, save 2 or 3 five gallon buckets of the sand used to mix your mortar. In addition, save a bag of mortar if possible. Wrap and tape it tightly with 2 or 3 plastic garbage bags to seal out water vapor. This pack rat mentality will come in handy if a storm damages your chimney or someone bumps a wall with a car.

Referenced in the September 2, 2016 AsktheBuilder Newsletter.
Column 170

Septic Tank Maintenance

septic tank about to be pumped

Septic Tank Maintenance - This is a septic tank about to be pumped. It’s a best practice to do this every two or three years. Copyright 2024 Tim Carter

Septic Tank Maintenance

This past Saturday, a very good friend of mine was at my house. I call him Yoda, as he is my computer guru. He was helping setup a new computer for me. At lunch, we were talking about a problem he had at work. Mind you, I didn't bring this subject up. An employee had flushed a toilet and water backed up into a floor drain on the warehouse floor. To make a long story short, the septic system had failed.

When the service company arrived, they asked where the septic tank was located. No one knew! The septic system had never been serviced. Oh well, there go this year's Holiday bonuses!

Septic Tanks are as Good as City Sewers

Septic systems suffer from an inferiority complex of sorts. City folk scorn them thinking that they are just one step removed from an outhouse. Nothing could be further from the truth. Septic systems which are designed, installed, and operated properly treat wastewater as well as any municipal sewage system. In fact, some septic systems do a much better job!

Septic systems also receive bad press in response to claims of groundwater pollution. Yes, it can happen. However, many of these instances can be traced to substandard maintenance on the part of the homeowner or bad initial design. The septic tank and drainage field can do its job, you simply need to be a part of the team!

High Upfront Cost - Forty Cents a Day to Maintain (2024 prices)

Septic systems are very cost-effective. Yes, there is a sizable upfront cost to install a complete system. However, once installed periodic inspections and pumping charges should be your only expense.

People who have public sewers pay for these systems. They are taxed monthly or quarterly. Here in Cincinnati, our sewage bills are directly related to our water bills. If you use lots of water, you pay a proportional upcharge for your monthly sewage use. There are no free rides. A simple analysis would show that many homeowners on public sewers might actually pay more on a monthly basis than septic users.

Well-Drained Soil is Key

Septic systems take advantage of the natural cleansing properties of soil. Soil and the microbes it contains can act as an extremely efficient biological eating machine. However, if the soil is waterlogged or has low permeability the wastewater can migrate to another location before it has been converted to a harmless state.

As such, a simple study needs to be completed to evaluate how well your soil drains. Virtually every county in every state has a Board of Health official who performs this task. If they don't perform it, they will direct you to the proper authority, such as the local plumbing inspector. Just about every home building site that has a large enough lot can be adapted for septic use. Hillsides, wetlands, rocky areas, etc. all can be modified for successful septic system installations. The Basic System

Septic systems are really simple when you think about it. Most systems consist of two major components: the septic tank and the drain field.

The tank is a large vessel buried underground. They come in different sizes. The size is directly related to the number of occupants in the house or structure. The tank does two very important jobs. It acts as a settling basin and starts the process of waste decomposition. When you send wastewater towards the tank through your plumbing drainage lines it almost always contains solid particles. These particles can be tiny pieces of dirt, grit, fabric fibers, hair, whiskers, food particles, etc. Some of these can break down naturally and others may never break down.

Septic Tank Video

Watch this video to see a septic tank and special leach field that goes under a roadway!


It is the job of the tank to make sure that these particles no matter how large or how small do not make it into the drain field.

Remember my friend? His company's septic tank was filled to the brim with cast iron shavings from their manufacturing process. Your septic tank might fill up with plastic army men, sand, or dirt if you have my son visit for a while. Get the picture?

Septic Drainfield or Leach Field

The drainfield is a system of perforated pipes that lie near the surface in sand or gravel filled trenches. If you have special site conditions, your drain field may consist of mounds or long interconnected trenches setup for hillsides. In any event, an equal amount of partially treated wastewater from the tank enters the drain field every time you send a slug of water from your house towards the tank.

The drain field must not accept solid particles. If it does, the perforations in the pipes, the sand, gravel, and eventually the soil will clog up. When this happens, the septic system dies. It can no longer function.

If your system is working properly, the partially treated wastewater from the tank slowly enters the ground. Once in the soil, tiny microorganisms and oxygen work to attack any waste particles, bacteria, viruses, etc. that are in the polluted water. As long as the soil is not waterlogged, the soil will purify the wastewater.

Septic systems are a great example of a simple system that works. As long as you understand how they work and keep the tanks free of debris, you will be in good shape. Don't underestimate their ability to safely treat wastewater

Oxygen Works Best

Municipal sewer plants break down sewage using air. They aerate the waste in any number of ways before dumping it in the nearby river or ocean.

You can get pumps with propellers that inject air into your septic tank. Think of this as a giant blender.

You can also just add powdered oxygen bleach to your septic system.

Oxygen bleach has been around for some time but only in the past 10 years has it started to be widely available to consumers like you and me. Previously, it was only used by large commercial and institutional organizations. Ads for oxygen bleach can be seen on cable TV infomercials. You may have noticed it in hardware stores or home centers where it is sold as a deck cleaner. One brand is Wolman's Deck Brightener. The problem with many of these products is they may contain up to 30% fillers that can harm septic systems.

Sizing Requirements for Septic Tanks

Septic tanks must be sized properly. If they are too small bad things will happen to your drain field. Wastewater will flow too quickly into your drain field. If this happens there is a good chance that suspended solid particles will not have had enough time to settle to the bottom of the tank. These particles will eventually clog the drain field.

Proper design of tanks and sizing will permit a two day holding period for wastewater. This is usually enough time for the solid particles to sink to the bottom of the tank.

Septic tank size is a direct function of the number of occupants in a home. This number is generally associated with the number of bedrooms in a house. However, this rule is not always accurate! A 3 bedroom house that has two adults and two kids will send much less water into the tank than a 3 bedroom house that has 2 adults and 6 kids(such households exist)! If you feel that you have or might have more occupants than average, you had better talk with your local board of health officials.

Accepted sizing recommendations usually spell out that you should multiply the number of bedrooms, or rooms used as bedrooms by 150 gallons. Then multiply this by 2. this will give you the minimum capacity for tank size.

Example:

4 bedrooms x 150 = 600 600 x 2 = 1,200 gallons

Standard tanks are usually available in 750; 1,000; 1,200; and 1,500 gallon capacities.

Septic System Do's & Don'ts

The long term health of your septic system is directly related to what you inject into it. If you abuse the system, you will have to have it pumped more frequently or worse yet, it may fail entirely (Remember, my friend!) If you follow some of these do's and don'ts, you should get many, many years of trouble free service from your septic system.

Do's

Determine the location of your septic tank and drain field. It is almost always down slope from your house. Look to see where the main plumbing drain leaves your house.

Have your tank inspected by a qualified service company annually. These inspections will tell you when the tank must be pumped clean of accumulated solid material. Keep the inspection portals and manhole covers at ground level.

If installing a new system, make an accurate map of the tank location and the shape, trench location, and extent of the drain field. Plan for future house expansion. In other words, do not put the tank or the drain field too close to the house. A future room addition may require you to move the tank!

Fix leaky faucets or toilets quickly. Excess water flowing into the system will send solid particles into the drain field! Excess water will flood the soil in the drain field!

Divert water from parking areas, downspouts, sumps, footing drains, etc. away from the drain field. Drain fields must be as dry as possible in order for the soil to naturally cleanse the wastewater.

Don'ts

Avoid introducing any unnecessary solid particle into your plumbing system. This includes things like coffee grinds, nut shells, dental floss, kitty litter, female hygiene products of any kind, cigarette butts, sand, gravel, etc. All of these things will fill the tank prematurely!

Do not plant trees anywhere near the drain field. the roots of trees will naturally migrate to the perforated pipes. These roots will completely clog the pipes! Natural grass cover is the best.

Click here to view Tim's video on Septic Systems.

Click here to view Tim's video on Septic Systems.


Do not park cars, drive over, or allow heavy trucks onto the drain field area. This will compact the soil and cut off the necessary oxygen required to help breakdown the wastewater.

Absolutely do not introduce paints (even latex!!!), solvents (gasoline, thinners, alcohol, etc.), varnishes, grease, cooking oil, pesticides, photographic chemicals, etc. into the septic system. These will kill the natural microbes that breakdown organic solid compounds in your tank!

Garbage disposers are fine but large food particles that pass through a sink strainer are bad. Disposers create a mush that the bacteria in septic tanks can handle. Large solid food particles can turn to sludge before they are broken down.

Avoid using septic tank additives. A healthy septic tank and drain field has everything it needs. The natural bacteria from our human waste gives the tank all the additives that are required. Extra oxygen is just about the only thing you can introduce that may help.

Don't pave over the drain field. Paving materials prevent natural evaporation of moisture. The grass cover mentioned above sucks water from the drain field.

Avoid trying to repair or modify your septic system by yourself. These systems must be designed and engineered by professionals.

!! ALERT ALERT ALERT ALERT !!

Never attempt to inspect a septic tank by yourself! Deadly gases are in the tank. You can pass out in a matter of moments. The person trying to rescue you will do the same. Only qualified septic service people should remove manhole covers. Don't lean over and stick your head in a tank!!!!!


Helpful Literature and Videos

The Small Flows Clearing House, located at West Virginia University, is command central for septic system information. They have an abundant supply of pamphlets, videos, and booklets that will help you design, construct, and maintain a septic system. They also publish a wonderful quarterly newsletter called Pipeline. I suggest you call them and ask them to send you as much free literature as possible. They will also send you an order form for their wonderful videos and books. You will not regret making this call! Tell them you heard it from me! 800-624-8301

Column B117

Attic Fan Installation

This attic fan looks impressive, but it moves less than 1,000 cubic feet of air per minute. It's a solar-powered fan. See the cable poking through the roof? It's connected to the solar panel you can't see. That small amount of air has not lowered my attic temperature. PHOTO CREDIT: Tim Carter
CLICK THE PHOTO TO HAVE TWO OR MORE POWERED ATTIC FANS DELIVERED TO YOUR HOME NEXT WEEK. THE FANS YOU NEED ARE POWERED BY 120 VOLTS AND RUN WHEN YOUR ROOF IS IN THE SHADE AND CONTINUE TO RUN UNTIL THE ATTIC IS COOLED. THEY MOVE FAR MORE AIR THAN A SILLY SOLAR FAN.

Attic Fan Installation Tips

DEAR TIM: I know I need an attic fan to cool my hot attic. But there are many different types of attic fans.

Should I consider a solar attic fan or some other attic exhaust fans? What type of attic fan do you use?

How much air do I need to move through my attic to make a significant difference in the temperature? How important are soffit vents in this system? Pam W., Green Bay, WI

DEAR PAM: Attic fans are an effective tool to use to help lower excessive attic temperatures. As you might imagine, I have used many different types of fans, and have formulated opinions based upon experience and some accurate data I have collected over the years.

Tens Of Thousands Of Feet Of Air

I believe the first thing to realize is that it takes massive amounts of air moving through an attic to create significant cooling. Farmers who raise chickens can attest to this as the buildings and barns that house chickens are usually equipped with massive fans that move tens of thousands of cubic feet per minute (CFM) of air.

Even then, it is almost impossible to drop the temperature to that of the air temperature outdoors.

Free & Fast Bids

CLICK HERE to get FREE & FAST BIDS from local contractors that specialize in installing attic fans.

Intense Infrared Rays

Flir camera roof photo

Here's an infrared camera photo I snapped of my own roof in July. The temperature was 155 F. That's blistering hot. Copyright 2018 Tim Carter

Think of the dynamics of what is happening on a blazing summer day when the sun is pounding relentlessly on your roof. The temperature of the shingles soars.

They can easily approach a temperature of 150 F or possibly more. This heat then transfers to the roof-framing materials.

The trusses, rafters and roof sheathing get very hot. All of these things radiate heat much like the coals of a fire or a hot radiator.

Stored Heat

This stored heat in the roof rafters, trusses, roof sheathing and shingles is released as infrared energy that passes through air and starts to heat up solid objects like the insulation and anything stored in the attic.

To cool these things down, the heat needs to be transferred to something else that can store the heat. The only thing available is the water in the air that is moving through the attic.

Solar Fans Are Useless

I'm currently testing a specific solar attic fan. I have two identical units installed in my attic. The solar panels get sunlight until mid-afternoon. After that point my entire roof is in the shade created by two massive trees.

IMPORTANT TIP: Unfortunately these two fans have not done anything to reduce the attic temperature. The day before I installed them it was a cloudless day and the attic temperature at Noon was 129 F.

When both fans are operating at Noon, the temperature has never been below 128 F. Each fan claims to move 800 CFM of air. The fan blades do spin rapidly, and I have good soffit intakes as well as windows in my attic that allow air to freely enter the attic space.

The fans are NOT MOVING ENOUGH AIR to make a difference.

No Sun = No Movement

The trouble with solar attic fans is they stop working as soon as a cloud blocks the sunlight. On partly-cloudy days, the temperature can be beastly hot, and the fan blades simply stand still for much of the time.

After the sun goes down, the attic can still be stifling hot from all the stored solar energy in the wood of your attic., and there's no hope of air movement since the sun is not powering the fans.

Regular Electricity Is Better

Powered attic fans that get a constant supply of household electric will move lots of air. But you need to have quite a few operating to feel a difference.

Many of these fans are equipped with thermostats so they will turn on and off automatically. This is a handy feature that saves energy.

CLICK HERE to get FREE & FAST BIDS from local contractors that specialize in installing attic fans.

Wind-Powered Turbine Vents

You can install wind-powered turbine vents as well. When the wind blows hard, these fans can exhaust lots of air. But since the performance is tied to the wind speed, you can't count on these to work at peak performance in the hottest part of the day.

This is a standard turbine vent. They come in different colors. Some have external braces. This one you see is Made in the USA. CLICK THE IMAGE TO ORDER ONE OF THESE GREAT TURBINE VENTS.

Great Soffit Vents

You need great soffit vents to supply the attic with all of the replacement air. Powerful fans that are exhausting air from your attic work best when they can get ample amounts of makeup or replacement air from outdoors.

The lack of soffit vents may cause the fans to draw air up from the inside of your home. If you're running air conditioning, this can cost you dearly as your air conditioner will work harder to keep your home comfortable.

Can't Have Too Much

I have come to the conclusion that it is impossible to have too much attic ventilation. But achieving this can be a challenge aesthetically. Many people do not want the surface of their roofs cluttered with fan housings, or twirling vents.

Those people who have experienced hurricanes will be the first to tell you that any hole in a roof is very problematic when the wind starts to howl relentlessly for hours.

No Silver Bullet

There is no silver-bullet solution when it comes to attic fans. There are models that work best in certain parts of the nation and this same fan may do a poor job in another geographic area. Your house may not be sited well for solar or wind-powered solutions.

Those fans that are powered by household electricity probably hold the best promise as they will move tremendous amounts of air and do so until the attic temperature has dropped significantly. Your challenge will be installing enough of them to keep your attic temperature just above the outdoor temperature on the hottest day of the season.

CLICK HERE to get FREE & FAST BIDS from local contractors that specialize in installing attic fans.

Column 734

June 13, 2017 AsktheBuilder Newsletter

I'm in the early stages of a huge project I've been putting off.

Decluttering all the storage areas in my house is my new summer project. Besides getting things in order, a secondary positive benefit is that I get to meet interesting people.

Just this past Sunday morning, I was out on my driveway talking with a fascinating woman who responded to an ad I put in Craigslist. She bought a wonderful white flower box I was selling.

We must have chatted for about 45 minutes, maybe an hour! I post all the bigger things that are hard to ship on Craigslist. When I respond to emails from buyers, they see my signature tags in my email and it's obvious I'm the AsktheBuilder.com guy.

I do that on purpose so I come across as a safe person to deal with and the buyers can check me out. Other sellers can be spooky.

This woman spent some time at my website and she found out about my new Roofing Ripoff  book.

As we battled the pesky mosquitoes, I answered all sorts of questions she had about the book.

I even showed her my proof copy of the paperback and she was blown away by the quality and the high-resolution COLOR photos in the book.

We talked about my discovery how copper strips allow shingles to last decades longer saving you tens of thousands of dollars. But I digress.

You hear lots of bad things about doing deals on Craigslist, but I've never had one bad thing happen. It's a matter of using common sense and by all means if you decide to meet a stranger and don't feel comfortable going to the buyer's location ask to meet at the local police department or take a friend with you.

Many local police departments are creating zones in the parking lot where you meet a Craigslist buyer / seller. The lighting is great and they have video cameras rolling for your protection.

My goal is to sell hundreds of things I no longer want or need. I can stash that cash or spend it on new toys and things that shine and sparkle and now have my attention.

Speaking of sparkling things that get attention, look below for my oldest daughter Meghan's new high-end jewelry. She gave me permission to tell you about the new website!

Start selling some of your clutter and use that money to treat yourself or that special someone to something that sparkles!

David's Cold Patch

A few days ago, I received an email from David via my Ask Tim page on my website. I get MANY emails.

He send this photo:

You may see nothing wrong with this blacktop patch. Trust me, it's a botch job and it was the WRONG WAY to repair what was wrong.

Here's David's email to me:

"I had a bad section of concrete by the junction of my garage and driveway where the weather, rain, cold, etc. had cracked a portion of it maybe two feet wide.

It finally chipped away nearly down to the ground. Got some guys I'd used for other projects to come out and fix it.

I assumed they were going to use concrete so didn't watch. When they were done this is what they did.

They assured me I could back out of the driveway after they left. I did the next day and got tar and little rocks all on my tires which transferred to 'the inside of the garage, got on my feet and consequently would have made it inside on the carpet had I not seen it.

I thought of taking a shovel and just scraping it up as it has not cured like they said three days later and still tacky. It looks awful, in my opinion. Suggestions are certainly appreciated.

BTW - that section they poured the asphalt over was NOT asphalt - it was concrete"

What went wrong? Where did David make his mistake?

  • He failed to specify exactly what he wanted
  • He failed to invest the needed time to research the best repair method for the longest-lasting result
  • He HOPED everything would work out

You hope for things you can't control like the weather and being rescued from a deserted island.

When it comes to your hard-earned money being spent wisely, it's your job to discover the BEST thing you can get for your money.

It's never been easier. Decades ago, you'd have to go to the library. Now information is available via your smart phone, tablet or computer.

You JUST NEED to really do your due diligence because there's LOTS OF BAD INFORMATION out there about how to do home repairs.

I suggest you start with my Search Engine and see what I have to say about a topic.

CLICK HERE and TRY IT OUT.

Meghan's New Jewelry

A week ago, I shared with you a story about my oldest daughter Meghan. If you're a new or newer subscriber you may not know about her.

CLICK HERE to read that story and look at the hand drawing to appreciate what you're about to see.

But if you're a seasoned subscriber, you know her. I've talked about her journey for well over a decade.

Meghan and her husband Brent have finally latched onto something special. Brent's been out in Silicon Valley in CA for the past three years making a huge splash and he's doing quite well with a huge start up.

But behind the scenes for the past five years, Meghan has been putting all her effort into a new custom jewelry business I feel is going to go to the Moon.

So far she's come up with twelve different pieces that fit most budgets if you're looking at high-quality jewelry.

This is NOT costume jewelry that you find at a big box store.

This is high-end jewelry that will become heirlooms, possibly in your family.

Take a look at these photos and CLICK THEM to go to that exact page. Remember, there are twelve different things you can see at Meghan's website and there are different types of gold, chains, etc. I'm not a jewelry expert so I suggest you spend TIME THERE looking around and seeing all the options.

You can even CALL Meghan if you have a question or need help. How many jewelry designers offer that service???


If you can't see images in your device, here are the links:

Heart Leaf Pendant

Quaternity Pendant

Mini Raindrop Pendant

The website is: Murvica.com.

Once there use the small arrow at the right of the images to see all twelve pieces.

Yes, I'm doting on my daughter. I'm allowed to do that.

Be SURE TO READ the About page and the FAQ page.

Let me know what you think about the pieces. I'm so very proud of what she's done.

P.S. Meghan shared a few stories yesterday about a few of the people who got the first pieces.

She said one woman who opened the special custom wrapping and one-of-a-kind packaging cried for fifteen minutes.

They were tears of JOY.

The woman said it was the BEST PRESENT she's ever received in her entire life.

I've held a few of Meghan's pieces in my hand and I'm here to tell you, you're going to be BLOWN AWAY by the quality.

Way to go Meghan and Brent!

Tool of the Week

I've received a spate of emails and you may be one that sent one of them.

Here's the typical message:

"Tim, would you PLEASE feature a tool each issue of the newsletter that you use and LOVE? I know you only use the best ones and I want to start collecting them."

You may have emailed me saying you want gift ideas for family and friends who are just starting out doing DIY.

Here's one of my favorite go-to tools I used just last night!!! It's a marvelous precision needle-nose pliers that comes with built-in wire strippers.

This Klein Tools All-Purpose Pliers is affordable too.

Klein All Purpose Pliers

CLICK HERE to have this high-quality tool delivered to your home in DAYS.

I think you're going to like the tools I start to share. Next up is a new drill I've been using for the past week. WOW is all I can say.

Roofing Ripoff Book

My Roofing Ripoff book is now available as a paperback.

You can get it as a PDF or a Kindle download too.

CLICK HERE to order one.
Roofing Ripoff

That's enough for today.

Go look at Meghan's jewelry. You'll be blown away by the quality and stories there.

Murvica.com

Tim Carter
Founder - www.AsktheBuilder.com

Do It Right, Not Over!

Paying Contractors Up Front

Paying Contractors

Paying Contractor | This small new home has been under construction for over a year. There could be many reasons it’s taking so long and one of them might be the contractor was paid too much money up front. As it turned out, the homeowner did pay too much money to the contractor, the contractor abandoned the job and the homeowner had to declare bankruptcy. It could have all been avoided. (C) Copyright 2017 Tim Carter

"When you pay a contractor money in advance, you hope the contractor is going to show up, do the work right, and not make off with your money."

Paying Contractor Up Front Checklist

  • Moderate or excessive deposits put you at a huge disadvantage
  • Deposits are only required if job has special-order or custom non-returnable materials
  • Contractors don't pay employees, subs or suppliers in advance!
  • Watch How-To-Hire-A-Pro video series below
  • CLICK HERE to Get Tim's FREE & FUNNY Newsletter!

A little over a week ago, I devoted part of my free weekly AsktheBuilder.com newsletter to a polarizing subject. I did this because I had received a spate of emails from homeowners just like you who had hired out work to be done in the spring and the contractors were demanding to be paid a substantial amount of money up front before they did the work. This made many uncomfortable and they reached out to me for advice.

Paying Contractor Video

Please watch this video. It's the first in a four-part series. The other three videos are below.

Don't Hope For Things You Can Control

I wanted to devote this column to that topic and to touch on the second biggest reason your home improvement dollars may go down the proverbial drain. Believe it or not, that situation has the same root cause as the up-front money issue - hope.

When you pay a contractor money in advance, you hope the contractor is going to show up, do the work right and not make off with your money.

Hope is an emotion you employ when you can't control the outcome. Here are examples of things you can hope for:

  • You hope the weather next week will be nice
  • You might hope to get rescued from a deserted island
  • You might hope to win the lottery

Control Your Contractors

Forget about hope when it comes to contractors! You can control your money and when a contractor gets it and you can absolutely ensure that you’ll get top quality work that will stand the test of time.

When I broached the payment issue in my newsletter, I knew I’d make lots of homeowners happy and many of the contractors on my list bristle. Money is a very sensitive topic.

Free & Fast Bids

CLICK HERE to get FREE & FAST BIDS from local general contractors. Be sure to ask them the questions below!

Money Is Your Only Leverage

Here’s what you need to know about paying contractors up front for a job. When you do this, you put yourself at an immediate disadvantage. If your contractor takes off or does poor work, you’ll never ever get all your money back plus attorneys fees should you pursue legal action.

On the other hand, contractors or suppliers can easily place a lien on your home in most states and they’ll get paid when you sell your home as long as the lien doesn’t expire.

Do Some Jobs Require Deposit Money?

Yes, there are jobs where a deposit is normal and required. If your job requires the purchase of non-returnable custom-ordered products, the supplier often asks for a 50-percent deposit. The contractor needs to supply this or you the homeowner can pay it directly to the supplier.

What Should I Ask The Contractor?

But in all other cases, it’s not wise to pay up front money. If a contractor asks you for a deposit like this, be prepared to ask these honest questions:

Mr. Contractor, do you pay your employees in advance?

Do you pay your sub-contractors in advance for the work they do for you?

Do you pay your suppliers in advance or do you have open accounts and are billed monthly?

Do you pay your truck service center in advance before they repair your truck?

Since you don’t pay anyone in advance, why are you asking me to do it?

Why Do Some Contractors Need Deposit Money?

I’ll give you a few reasons: The contractor might be using your money to pay off his last job. Your contractor may be in a cash-bind in his business for any number of reasons. Do you really want to do business with a capital-strapped individual? The contractor may not have credit at local supply houses. Why is that? I could go on and on and on with reasons.

John Hoeh The Bricklayer

When my newsletter is published, an announcement shows up on my AsktheBuilder Facebook page. The bricklayer in Cincinnati, Ohio, that used to do all my jobs saw it and this was his response, “As a contractor, I've always believed I will make you happy to pay me!! Have never asked for a dime up front. Great advice as usual Tim!

CLICK HERE to get FREE & FAST BIDS from local general contractors that have the same attitude as John Hoeh!

Do Professional Contractors Worry About Payments?

John Hoeh, the bricklayer, is a pro.

Professional contractors have no fear that you’ll pay them. They know they’ll satisfy you. They have plenty of cash in their business account. They don’t need your deposit to make payroll that week or to pay for the supplies they need.

How To Hire A Pro Videos

Watch these four videos to ensure you get a pro and the BEST VALUE for your money.

Excuse: Deposits Prevent Cancellations

One of the subscribers to my newsletter is a contractor and he objected to my feelings about up-front money. He said he does it because homeowners back out of his contracts and hire a contractor they find later at a lower price. When I asked him how frequently this happens, he never responded. I found that silence troubling.

Create Specifications To Get Job Done Right

Let’s talk about you hoping the job gets done right. Just two days ago I received an email from a man in Tennessee. He hired some contractor to repair a sunken area in front of his garage door. The homeowner was none too happy with the repair because the sticky asphalt rocks got tracked into his garage by his car tires.

When I did an autopsy on his situation it became painfully obvious the homeowner didn’t spend the time required to discover how to do the job the right way. He just called contractors up, they told them how they’d fix it and the homeowner hoped it would all work out.

Listen to this SHORT five-minute podcast to see how easy it is to ensure things go right for you:

Had this homeowner spent some time online, he’d discover that the settled blacktop needs to be cut out and removed. Depending on the amount of settlement, the cut line might be back as much as 8 feet from the garage door so the driveway has a nice gentle transition to the concrete garage slab.

He’d also have discovered that cold patch blacktop is not really meant for repairs like this. All one had to do was read the label on the bag. Regular hot-mix asphalt put on top of compacted gravel fill was the only way to create a repair that might last twenty or more years.

CLICK HERE to get FREE & FAST BIDS from local general contractors that have the same attitude as John Hoeh!

Related Column:

Contract Payments

Column 1200

Deck Sealer Test Results

Deck Sealer Test Results TIPS

  • Treated wood is destroyed by the sun's UV rays - water causes cracks
  • Cheap deck sealers contain natural oils that are food for mildew and algae
  • WATCH deck cleaning video below for BEST method and cleaner
  • Synthetic resin sealers that penetrate and DO NOT create a film are best
  • CLICK HERE to Get Tim's FREE & FUNNY Newsletter!

I've been using deck sealers for decades. Many failed fast.

I decided to do my own TEST to find the best one.

But before you get to the test results I feel it's important for you to know WHY deck sealers fail.

Once you understand that, you'll be in a better position to get the BEST ONE.

Treated Wood Is Lowest Cost

The number of treated wood decks, fishing piers, play sets, furniture, etc. is growing each year. Untreated wood, as we all know, will readily rot and degrade when exposed to sunlight and water.

I remember twenty years ago when CCA lumber was introduced. It was marketed as the wonder product! Everyone offered a lifetime guarantee.

You could install it and never do another thing. Well, they were wrong. Soon it became apparent that the CCA chemicals did stop wood rot, but did little to inhibit water absorption and degradation by the sun's ultraviolet (UV) rays. You can bet that the coatings (paint) industry was beaming about this failure!

Free & Fast Bids

CLICK HERE to get FREE & FAST BIDS from local companies that will clean and seal your deck.

Linseed, Tung & Vegetable Oil

The coatings industry responded to this need for wood care products by making wood sealants. The chemists at these companies simply adapted technology they had been using for years to create paints and varnishes.

The chemists at the paint companies knew that natural oils such as linseed, tung, paraffin and different vegetable oils can do a superb job of slowing down water absorption in wood. These oils often were mixed with waxes to increase water repellency.

Add a little bit of mineral spirits and you have a wood sealer! Many of the products you see advertised on TV and in print ads use this 20 year old technology.

Natural Oils in Deck Sealers = Food for Algae

Are you one of the people who can't figure out why your deck turns green or black in just six to nine months? Do you use the excuse that your deck is in the shade?

It faces North? Or it is damp? Well guess what? If you have been using one of the old technology sealants or water repellents, it is very likely the fault of the product!

The natural oils and waxes in the deck sealers are actually food for mildew and algae. The coatings people know this.

So the manufacturers add mildewcides and fungicides to the products. They proudly advertise this on the label trying to deflect the blame for your green/black deck problem.

The fact is that if the additives were not present, your deck would look bad in approximately four to six weeks after treatment!

CLICK HERE to get FREE & FAST BIDS from local companies that will clean and seal your deck.

New Synthetic Technology

Certain companies have decided to break new ground. They developed synthetic resins and oils that are not food for mildew and algae.

Furthermore, many of these resins can be mixed with water to minimize air pollution caused by old fashioned mineral spirit products.

The synthetic products will very likely dominate the wood sealant market in the future. It's just a matter of getting the word out.

As with many things, it takes time to build a business and following. It costs money to develop new technology. The old technology wood sealants that use natural oils are inexpensive to manufacture. The raw materials are cheap.

It takes millions and millions of dollars to mount a national advertising campaign. Keep that in mind when you buy a huge national brand.EB015 Cleaning & Sealing Deck Cover

Do you know who is paying for that advertising? You are! Did you know that if the money wasn't given to printers, TV and radio stations that it could be spent on higher quality synthetic resins? It's simple math.

Deck Sealer Test Results

I did an extensive test of top brands of deck sealers.

The results were ASTONISHING. Click here to get access to a FREE PDF file that shows you the Before and After photos of the test.

When to Seal a Deck?

Wood decks of any type should be sealed as soon as possible. Sunlight, rain and snow begin to attack wood immediately.

Wood that absorbs and then looses water through evaporation is subject to large swelling and shrinkage forces. These forces cause the splitting, twisting, checking and warping that happens with your deck.

The sooner you can stop water from getting into the wood the better. If you're building a new deck, it would be absolutely wonderful if you could seal or treat all of the lumber on all surfaces before the deck is constructed. This will take some extra work on your part, however it will pay huge dividends in the long run.

Should I Clean a New Deck?

New decks benefit from cleaning. Even though the wood is new there is sometimes a mill glaze that can inhibit the penetration of sealants.

The wood can also get dirty from transporting it from the mill to the lumberyard to your house. Cleaning new wood is very easy and will give you the absolute best results.

Deck Cleaning Video

Watch this video to see how I clean wood decks. Do NOT use a pressure washer!

Best Wood Deck Cleaner

Oxygen Bleach

Stain Solver is MADE in the USA with USA ingredients that are food-grade quality. CLICK THE IMAGE to order some NOW.

Stain Solver certified organic oxygen bleach is the best deck cleaner out there.

It's a powder you mix with warm water. The oxygen bubbles attack dirt, mildew, algae and sun-damaged sealers.

You apply the solution to dry wood that's cool and in the shade for BEST RESULTS.

You want a standing film of solution on the wood and let it work for 15 minutes before scrubbing and rinsing.

Stain Solver is NON-TOXIC and will not harm you or any vegetation around your deck or dock.


Life Expectancy of Sealers

Will the new synthetic sealers and water repellents last forever? No.

Will they last longer than the natural oil products? Absolutely!

Years ago I applied a product called Defy to my front porch. The surface is in the shade and gets damp. There is no mildew or algae whatsoever after two years.

As a control, I have a side porch that actually faces the same direction and is subject to the same conditions. I cleaned it and my front porch two years ago using oxygen bleach.

On purpose, I did not seal the little side porch. It is now black with mildew! I did this to collect data for this column. I will clean and seal this wood porch this season with Stain Solver. You can bet that I will do it with a synthetic sealer. I will use either Defy or another synthetic sealant. Defy is available in about six different colors.

NOTE FROM TIM CARTER - Founder of AsktheBuilder.com - The following sentence was posted October, 2016: I no longer would apply Defy deck sealer to any exterior wood that I own at my own home. See comments below as to why.

CLICK HERE to get FREE & FAST BIDS from local companies that will clean and seal your deck.

Message from Tim:

Years ago while researching a column about cleaning decks, I discovered the wonders of Oxygen Bleach. It is perhaps the 'greenest' cleaner I know of as it uses oxygen ions to break apart stains, dirt and odor molecules. There are no harsh chemicals, and it works on just about anything that is water washable.

I decided to create my own special blend using ingredients made in the USA. In fact, the raw materials in the active ingredient are food-grade quality registered with the FDA. I call my product Stain Solver. I urge you to use it to help clean your deck surfaces. You will be amazed at the results!

Column B180

June 6, 2017 AsktheBuilder Newsletter

It's June 6th. Two years ago on this day, I was laboring up on my roof in 90+ F heat. The summer of 2015 would turn out to be a wretched HOT season.

I just got back up from letting Lady the dog inside. It's COLD outside and raining!

49 F Are you kidding me?

My boiler might come on before noon!!!

Bermuda Meet Up

Well, the Bermuda Meet Up is happening! Jamie reached out to me and we're going to meet for lunch or an ice cream while I'm in Bermuda.

Do you want to join us? I'll be there from Sunday, June 25th until Tuesday, June 27th.

I got my temporary radio license from Bermuda yesterday so I'll be transmitting from the island all three days as:

VP9/W3ATB

What a thrill it will be to make radio contacts from the middle of the Atlantic Ocean!

Do you live in Bermuda? Do you want to go on the cruise with me to Bermuda? Contact me ASAP!!

Keter Portable Work Table

I started testing a new portable work table over the weekend.

I think I've finally found one that's:

  • affordable
  • strong
  • easy to store and set up
  • REALLY WORKS
  • and more


I've had other work tables in the past that are heavy, they're HARD to set up, and they don't have all the features this one has.

Just a few months ago, I tested one that when set up it wasn't even level! No way was I going to even mention this one to you. It was a POC.

Remember Will Smith saying that about the car in Men in Black? Bwhahahahahahahaah!

Keter engineers did a magnificent job creating this portable work table.

I love the clamps that come with it.

I love the lower storage platform for setting glue and other parts as you work on something.
​​​​​​​
I LOVE how BIG the top surface is.

You'll NOT BE DISAPPOINTED with this portable work table.

CLICK HERE to see more photos and to have it delivered to your home ASAP.

Meghan Carter Update

Every now and then, you may be one that asks about my oldest daughter Meghan.

You can see her skills and magic in many videos on YouTube. Here's one where we used the same set to tape similar videos:


CLICK HERE if you want to watch the video of her transforming that kitchen cabinet.

WARNING: It's normal for a father to dote on his daughter.

I've really got some astonishing news for you about what she's been doing the past few years.

She and her husband Brent got married five years ago and while on their honeymoon in Croatia, they decided to go a different direction.

Meghan has always been artistically talented. At an early age, her drawings would amaze me as well as her constant pursuit of perfection.

If you saw how she wraps presents, sets the table for a party, or decorates anything, you'd be stunned.

She and Brent decided to transform Ask the Decorator into decorating you or your loved one.

Meghan decided to go into custom jewelry design.

For the past five years, she's done homework, laid the foundation and done all that's necessary to design and manufacture the absolute best gold and diamond jewelry that's available. The inspiration and story can be traced back to things they saw in Croatia.

Here's one of Meghan's drawings that's the first step one needs to do to start the manufacturing process. Meghan drew the following by hand, not on some computer CAD program:


The large circles are where diamonds go. The small circles are the prongs that hold the diamonds in place. Everywhere else is 18K gold made in California.

The diamonds aren't just any diamonds. They're the hardest ones in the world and come from a special mine in Australia.

There's lots of controversy about the source of diamonds across the world and who and what gets harmed mining and refining them. Meghan's diamonds are free of all this human and environmental cost and agony.

Some diamonds say they're conflict-free, but they only tell half the story. She'll tell you the whole story about how no one was harmed with her diamonds. Remember always:

A half truth is a whole lie.

I'm sharing this because she and Brent are just days away from launching this custom jewelry business. I told her that I knew for a fact you'd be interested in knowing about it.

Why would you be interested in jewelry?

You may be one of my subscribers who routinely emails me asking about all sorts of unique products that are top quality.

I've seen some of the prototype pieces Meghan and Brent are making and the one you see above in the drawing TOOK MY BREATH AWAY.

And I'm NOT a jewelry guy!!

Bottom Line: If you're looking for a stunning addition to your jewelry box or a gift that will dazzle that special someone in your life, just wait until I can share Meghan and Brent's new website. WOW!

Update: See pictures of these amazing pieces in the June 13, 2017 Newsletter.

Paying a Contractor In Advance

Yesterday, Marie from Massachusetts emailed me. She was none too happy.

You'll read her email in a moment.

But before we go there, I know I have quite a few contractors who are subscribers to this newsletter.

Money is always a touchy subject.

If you're a contractor, I'd like you to read the following column, think about it for a little bit and then write a comment BELOW the column telling your side of the story.

I already know there are wicked homeowners out there that love to not pay. It happened to me once. That's not what this is about. I don't need to hear stories about these loathsome individuals.

If you're a contractor, just make a case why you really feel you need money in advance on a job that does NOT have custom materials involved.

I posted the publication of this column on Facebook about an hour ago, and my bricklayer I used on my jobs in Cincinnati, OH commented within minutes after reading it. BTW, he's the BEST bricklayer and mason I'm aware of in the Greater Cincinnati, OH area.

Here's what John Hoeh said:

"As a contractor, I've always believed I will make you happy to pay me!! Have never asked for a dime up front. Great advice as usual Tim!"

CLICK HERE to read the column. If you're a homeowner and have feelings or a story to tell, leave a COMMENT as well!

Revised Columns For You

Here's a list of recently revised columns. I think many will HELP YOU.

Concrete Finish Options

Brick Wall Leakage REPAIR

How To Drill Through Steel - GREAT LINK to BEST drill bits here!!!!

Ugly BLACK Stains On Your Roof - How to STOP Them!

Whole House & Attic Fans - Which is the BEST?????

That's enough for today.

I'll be back on Friday for sure.

Tim Carter
Founder - www.AsktheBuilder.com

Do It Right, Not Over!