Good morning! It's an unusual late spring here in central New Hampshire. I'll be wearing a jacket to church this morning! Monday and Tuesday are forecast to be 55 F and rainy!
Come on Mother Nature!!! Give us a break. It's time for 75 F and sun!
Photo Gallery Eye Candy
I need you to click the following links and look at some very fascinating doors that use LE Johnson hardware to allow them to slid sideways.
You're going to be STUNNED by what you see and I guarantee you'll get some inspiration.
After you click the links, I'll have a few questions for you to answer and I'm quite sure you'll get a smile on your face. If not, I want to hear from you.
It's important that you click each of these following links:
I need to know. Did you click the two buttons that said not to click them?
Why???
Thanks for clicking the photo links above.
If you're a new subscriber I do this on occasion to introduce you to stunning new products and to provide you with INSPIRATION to help you create the perfect dream home you desire.
Some people are very creative with their decorating and combining different materials.
That's what you should have seen in the photos above.
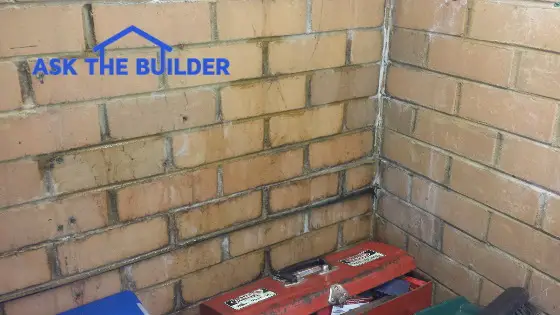
DEAR TIM:There's an area in our garage that's leaking water. The water is coming from the brick wall which is causing a small amount of flooding when heavy rain.
Outside there are steps that lean against the this wall. It appears there has been some concrete or some form of elastic that has been used to patch this issue by the previous owners.
What can we do to stop the leakage and if we decide we can't do the work ourselves, who would have the best skills to complete the job? Goran L., Liverpool, New South Wales, Australia
DEAR GORAN: I'm sorry to see you've got this leakage problem, but it's comforting to know that gravity and physics work the same down under in Australia as it does here in North America! With that in mind, I'm confident I can help you achieve a nice dry garage.
Negative Drainage
Based on your description, there are at least two dynamics in play here. First, you say that the steps are leaning towards the outer wall. This means that water is being directed right at the wall. I happen to call this negative drainage.
This is unacceptable and must be changed. You have no hope for success if the contact point between the steps and brick wall is like a small river valley where the water flows when it rains.
The second issue you're dealing with could be wind-driven rain assuming this wall is open to the weather and rain does hit the wall. Rain showers are often not the problem.
Brick walls take on water in powerful gusty rainstorms. When rain blows against brick walls like the golfing-in-the-lightning-storm scene in the funny movie Caddyshack, water can pour through a brick wall like it enters a sinking ship.
Raindrops Like A Hammer
The best way to visualize how water would get through a seemingly solid masonry wall is to think about how nails are hammered into wood. Each time you strike a nail with a hammer, it penetrates deeper into the wood. Think of each raindrop that strikes a brick-wall mortar joint as both a hammer and a nail.
Weight Of Water Is Significant
When the first drop hits the mortar, it soaks in just a bit. When the second drop hits where the first one did, it pushes the first raindrop water a little farther into the mortar.
Each successive pounding raindrop pushes the one before it deeper into the wall. Before long, you have water streaming down the inner side of the brick wall just as you show in your photograph.
Step One - Positive Drainage
Here's how I'd solve your problem. I'm going to assume you have some sturdy concrete steps that can't be lifted so they tilt away from the wall. If this is the case, then you're going to have to do a wedge-shaped overlay of concrete and cement stucco mix to make each stair tread slope away from the brick wall with a minimum one-eighth-inch fall per foot.
The overlay mixture where it's over 3/4-inch thick must contain small pieces of stone no larger than a green pea that you'd eat for dinner. As the wedge of overlay gets thinner, use just very coarse sand in the mix. At it's thinnest point, the sand should be quite fine.
Add plenty of Portland cement to the mix so it bonds well with the existing concrete. When you're mixing in the gravel, add three parts gravel, two parts sand and two parts Portland cement. When you're not using any stone, just mix two parts sand to one part Portland cement.
Be sure the concrete steps are clean and just before applying the overlay mixture, spritz the concrete with clear water to get it damp and then paint on a layer of cement paint. Cement paint is just a mixture of Portland cement and water that is blended to the consistency of regular paint.
Concrete Repair & Cement Paint Videos
Watch these three videos to see how to mix up the repair compounds.
Concave Shape - No Pooling
Where the overlay contacts the brick wall, I'd add a little extra to give it a concave shape like the inside of a shallow bowl. This means the overlay mixture laps up onto the brick for about three-quarters of an inch. You create this so the water running down the steps in a storm never contacts the brick wall.
Curing Compound For Permanent Repair
As soon as you finish the surface of the overlay so it looks good, spray it with a concrete curing compound so it dries slowly. This is very important so the overlay never separates from the older concrete.
This is a typical concrete curing compound. They're liquid you spray or roll onto stiff concrete. CLICK THE PHOTO TO SEE A VARIETY OF THESE AMAZING LIQUID PLASTIC MATERIALS. THEY DRY CLEAR.
Step Two - Repair Mortar & Sealant
The second phase of the repair job is inspecting the outer mortar joints for missing mortar. Be sure the mortar joints between the brick are in great shape and repair as necessary.
Once you have the mortar in great shape, apply a silane-siloxane brick water repellent to the entire brick wall. Pay close attention to the written instructions with respect to air temperature and the amount of water repellent to apply.
This is a magnificent silane - siloxane water repellent that soaks into concrete. CLICK THIS IMAGE NOW TO ORDER IT.
Some products require two coats but the second coat must be applied within a few minutes of the first coat. If the instructions say this, be sure you follow these instructions to the letter.
The reason for this is simple. If the first coat dries, it repels the second coat! Remember, the sealant is much like the raindrops and you need it to penetrate as deep as possible into the mortar joints to prevent water from entering your garage.
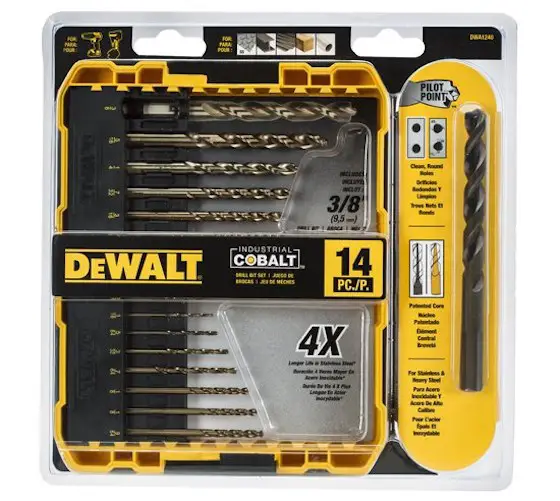
Drilling steel or metal is harder than drilling wood. If you don't know how to drill steel, you can dull your drill bits quickly. Be sure to use a drill bit designed for steel, such as a cobalt bit. Wood drill bits have a special point that were not work with metal.
Use a little oil on the steel to lubricate and cool the drill bit. Heat will dull the drill bit rapidly. Drilling in steel requires a slower drill speed. Too fast and more heat is generated.
Place a block of wood under the steel workpiece. This will allow the drill bit to go into the wood, instead of dulling the bit on a piece of concrete.
As long as you have the proper sharp bit, a little oil and a variable speed drill, you can drill through steel or sheet metal without damaging the drill bit.
Here are some amazing bits that will drill through steel or any metal. Remember, go SLOW!
These are great cobalt drill bits for metal. Always get cobalt. CLICK THE PHOTO NOW FOR A VARIETY OF COBALT BITS. YOU'LL HAVE THEM AT YOUR HOUSE IN DAYS.
Author's Note:
I received the following tip from John Gibbs of Ontario, Canada. Based on his years of experience as a tool and die maker, John provides this excellent tip.
"Hi, I am a retired 71 year old tool and die maker ... worked at my trade for 53 years.
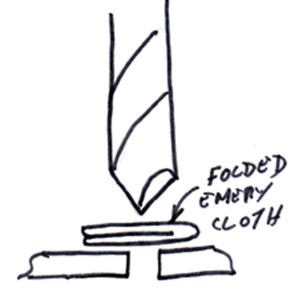
I recently saw the video on how to drill through steel. It was very good. But if you needed to enlarge that hole, then the larger drill bit will often vibrate and produce a chatter which gives a terrible 5 or 6 sided edge instead of a smooth accurate edge to the hole.
The solution is to simply use a piece of emery cloth. Fold about a 1 X 2 inch piece of emery cloth in half, with the smooth side on the OUTSIDE, to avoid scratching the work piece. Place it over the hole to be enlarged, place the drill bit on the emery cloth over the hole and begin drilling. It will automatically center itself. The emery cloth will let the drill bit through smooth and easy, and produces a beautiful smooth edge without a trace of chatter.
Works every time. This is a tip I learned as an apprentice in England. I hope that you find this interesting. It's one of the best tips I was ever taught. Would make a nice little 2 minute video probably."
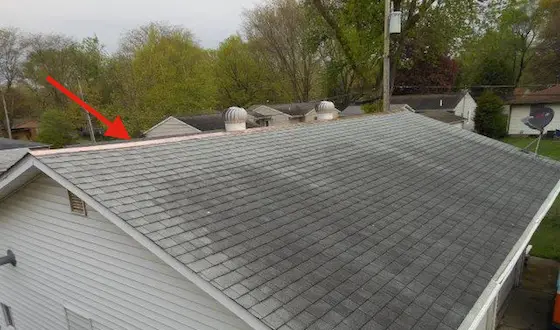
Much of this roof is covered with black cyanobacteria streaks. But two areas are not because of the metal that washes onto the roof each time it rains. Photo credit: Tim Carter
DEAR TIM:My newer roof is turning black. It's got ugly black streaks that look like someone poured used motor oil on my roof. What's causing the problem?
Are the shingles defective? Is there a way to clean my roof and salvage it?
Once clean, is there a way to prevent the ugly stains? Carly S., Chilmark, MA
Ugly But No Harm
But don't worry, your roof will go bad long before the cyanobacteria, Gloeocapsa magma, stops gorging itself on the tasty shingles. The black stains are merely the dead cells of the tiny pesky microscopic creature. The algae doesn't hurt the shingles. It's just unsightly.
Water & Limestone = Blech!
The algae thrives in humid climates like yours. If you travel to just about any part of the USA that gets a fair amount of rainfall, you'll observe quite a few roofs sporting these horrid black streaks. Many houses have lots of roof visible from the ground so your pain is shared grief by many homeowners just like you.
The cause of the black streaks is quite an interesting story. Years ago shingles were made with felt paper as the base material. One of the ingredients of the felt paper was cotton. Cotton scraps from clothing factories were given or sold to shingle manufacturers.
The primary material was coarse wood fibers much like cardboard. The issue was this mat could only run through the shingle plant at about 300 feet per minute. Any faster and the paper would tear.
This is the cover of my Roofing Ripoff book. I cover in GREAT DETAIL in this book how shingles used to be made so there was NO STAINING or deterioration. CLICK THE IMAGE NOW TO ORDER IT.
Two Changes At Once
But in the 1970s there was an explosion of new synthetic fibers, like polyester, that started to flood into the clothing market. This meant fewer cotton scraps so the roofing product manufacturers had to scramble for a replacement material for the felt-paper base mat that made up the foundation of a typical shingle.
Fiberglass is what came to the rescue. A smaller Midwest shingle manufacturer decided to try to use fiberglass as a base mat and quickly discovered that the mill rollers could crank up to about 900 feet per minute without tearing. That's a HUGE INCREASE in productivity.
I clearly remember early in my career when fiberglass shingles hit the market. They were marketed as a revolutionary product, but the manufacturers were only telling part of the story.
Not Enough Weight
The manufacturers quickly discovered they had a problem using fiberglass. The thin mats wouldn't absorb enough asphalt to meet the minimum requirements of weight per square. It was decided the best way to add weight was to boost the amount of powdered limestone mixed with the liquid asphalt.
Powdered limestone had been used for decades before the 1970s, but in smaller amounts. It was needed to make the shingles stiffer so they could be handled on a warm day. Without the limestone, the shingles were like holding a cooked fettuccini noodle!
It worked. The shingles got up to weight much like a prize fighter.
However, the scientists at the shingle manufacturers didn't look around at limestone buildings down in the southern part of the USA. Most of them had black streaks.
If the scientists did look, they must have assumed it was dirt. It wasn't. It was our friend Gloeocapsa magma. It turns out this cyanobacteria loves to eat limestone.
Possible Defect
Your shingles may be defective, I just recently had to replace my own 30-year-guarantee asphalt shingles that only lasted 12 years, but believe me the roof algae is not the cause of deteriorating shingles or granule loss.
I wrote a revealing expose' book called Roofing Ripoff that tells the truth about why asphalt shingles don't last as long as they used to and they stain faster.
Clean With Ease
Stain Solver is MADE in the USA with USA ingredients that are food-grade quality. CLICK THE IMAGE to order some NOW.
The good news is you can clean your roof and make it look like new. I've had great success using Stain Solver oxygen bleach.
IMPORTANT TIP: Do NOT use chlorine bleach as it will kill any vegetation that it comes into contact with around your home.
Watch the following video showing exactly how to use Stain Solver to clean algae from asphalt shingles.
Work in the morning in the cool part of the day.
The longer you let the Stain Solver soak and foam on the shingles, the LESS you have to scrub.
Clean Asphalt Shingles Video
The key is working on an overcast day with cool temperatures. If the shingles are HOT, the solution will evaporate before it can do any good.
Copper Coated Granules
A few decades after the new fiberglass shingles were brought to market and roofs started to turn black the manufacturers came out with a cure. They noticed that some roofs, or parts of them, were NOT turning black.
Anyplace above the roof where there was copper or zinc, the roof looked great. Copper produced better results than zinc.
This is nothing new as it's been known for hundreds of years that copper is a natural biocide. This is why copper plating was put on the hulls of many wooden clipper ships and warships to prevent barnacle growth that increased drag on the ships' hulls.
Copper is a great flashing material for roofs and each time it rains some of the copper atoms erode away and wash onto the roof killing the cyanobacteria.
Not Enough Though
You can purchase shingles that have copper in the colored granules, but some manufacturers skimp on the amount and there's not enough copper to give great results. I know as I had an asphalt shingle with algae-protection granules on my own garden shed that turned black within two years.
Install Copper Strips At Ridge
The best thing to do is to install strips of copper high up on your roof at the ridge line.
The black stains on this roof will disappear soon. This homeowner JUST INSTALLED the copper strip you can barely see at the peak of his roof. The red arrow points to it.
I'd leave at least 6 inches of copper exposed to ensure the black roof stains never appear again. The copper will weather quickly to a gorgeous nut-brown color adding a distinctive touch to your home.
I hope you had a great past week. I've been crazy busy!
Lots of news to share and a new look for me!
Surprise news too!
Bermuda Meet Up
Two days ago, I got a text from my very close friend Dan:
"How would you like to go to Bermuda on a cruise? Cancellation has created an empty cabin. It's yours if you want. Completely FREE."
Here's the ship:
I've NEVER BEEN on a cruise! My answer was an immediate, "YES!"
So what are you doing three weeks from today? The Norwegian cruise ship Dawn leaves Boston at 4 pm on June 23rd and gets back just after sunrise the following Friday June 30th.
Be IMPULSIVE! Let's have a party! Come with me on the cruise!
Book the cruise and let's do an Ask the Builder Meet Up on the high seas or the beaches of Bermuda!
The cruise packages are not too bad. CLICK HERE to see what I mean.
I do NOT get a commission or anything from Norwegian Cruise Lines. I'm just inviting you to come and relax on this magnificent vessel.
If you live in Bermuda, get in touch with me so we can get together. If you book the cruise, ABSOLUTELY get in touch with me so we can meet on the ship.
New Look
I've been putting off getting an eye exam for a few years. No reason other than pushing it off.
BIG MISTAKE!!! I'm STUNNED how clear things are now. My entire visual experience is so much better.
My eyes are fine but I didn't realize my eyes had changed and I wasn't seeing as CLEARLY as I could with new glasses.
If you've not had an eye exam in the past two years, SCHEDULE ONE!
My youngest daughter Kelly had gotten some glasses online from Warby Parker and I liked the look. I decided to move away from my old-man wire rims to a different frame. I think it makes me look smarter. Kathy HATES them.
Oh well! What do you think? Sorry my eyes are in the shade from the bright sun.
Here's a photo of the table after I rinsed it off. The reason the center of the table is bent is simple. It's an ingenious design where the table extension folds up and tucks under the other two sections should you want the table smaller.
Whole house fans - This is not one. This is an attic fan but can also be called a powered attic ventilator (PAV). They are often visible on the outside of a house either on the roof or on a side wall of an attic gable. Whole-house fans are located inside homes. Both perform entirely different functions. Copyright 2018 Tim Carter
"A whole-house fan is a fixture that is often located in the ceiling of a home. In rare occasions, they can be located in a wall."
Whole House & Attic Fan Checklist
Whole house fans cool you AND your attic
Attic fans only cool the attic - AVOID solar attic fans!
Both fans need lots of NET FREE AREA to push out hot air
For best cooling, you need both types of fan in your home
DEAR TIM:What's the difference between a whole-house fan and an attic fan? Which is the best one to have in a home?
What's the best way to cool a home using these fans? Can either of these fans cause problems? Renee H., Littleton, CO
DEAR RENEE: Whole-house fans and attic fans are as different as apples and watermelons.
What's the Difference Between a Whole House and Attic Fan?
Both fans move air just as apples and watermelons are both fruit, but the similarities end there.
What are Whole-House Fans?
A whole-house fan is a fixture that is often located in the ceiling of a home. In rare occasions, they can be located in a wall.
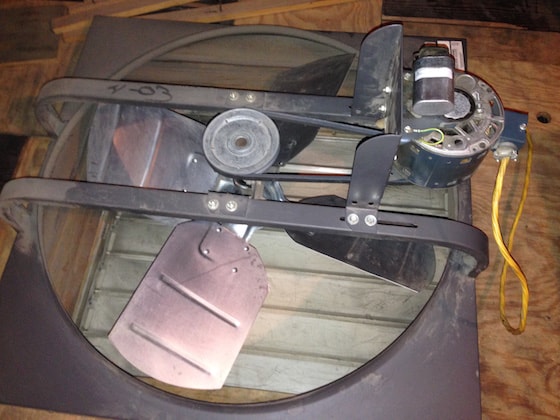
It turns out the motor was the issue! Copyright 2018 Tim Carter
Where are Whole House Fans Located?
A whole house fan might be in a hallway or some other central location of the home. The fan is always located on the highest ceiling or wall and oriented so that it blows air directly into an attic space.
This is a typical whole house fan. It can be set horizontally as you see here or vertically in a side wall. CLICK THE PHOTO NOW TO SEE ALL THE DIFFERENT TYPES YOU CAN HAVE DELIVERED TO YOUR HOME IN DAYS.
The whole-house fans cool you because they pull air through open windows and doors in your home. The breeze in a house can be significant depending on how many windows you open and where they are in relationship to the fan.
A typical whole-house fan moves vast amounts of air. The blades of the fan can be large, and they can have significant pitch so they can move thousands of cubic feet of air per minute.
Turn one of these bad boys on inside an average-sized ranch home that has 2,400 square feet of finished floor space, and you can replace every bit of stale, hot inside air with cooler outside air in less than five minutes.
Do They Push Air Through an Attic?
These fans are designed to pull air through a house and exhaust the air by pushing it through an attic space. Since you live in an area that has low humidity, they are superb and highly efficient cooling devices.
They work best when they are operated in the early evening or night hours as outdoor temperatures start to nosedive and the inside air temperature of a house is still high. As outdoor humidity rises, the cooling effect from whole-house fans drops.
What are Attic Fans?
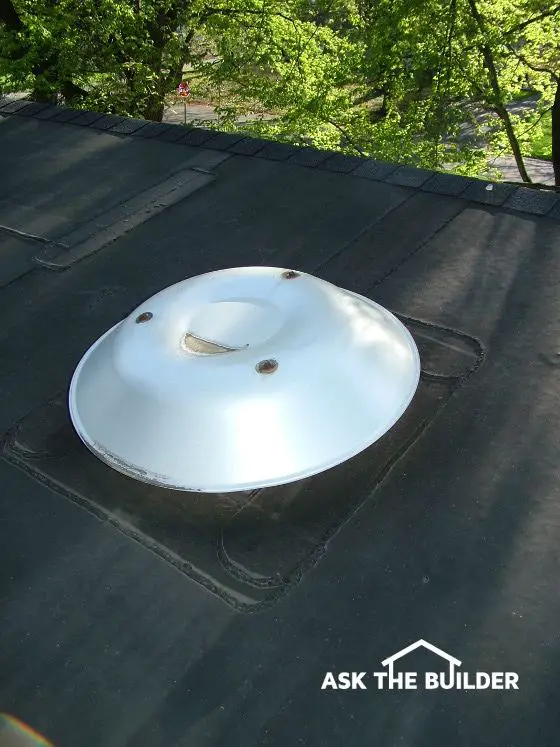
An attic fan is completely different. These are smaller fans designed to move hundreds of cubic feet of air per minute out of your attic area only. These are mounted to the surface of your roof in most cases looking like a small space ship has landed on your home.
This is a typical attic fan. It just mounts up on your roof. You need to run 120-volt electric to it to power it. Do NOT get the solar-powered fans. They're WORTHLESS as they don't move air when you really need it late in the day. CLICK THE PHOTO NOW TO SEE ALL THE DIFFERENT TYPES OF ATTIC FANS SO YOU CAN HAVE ONE OR TWO DELIVERED TO YOUR HOME IN DAYS.
In some cases, the fans can be mounted INSIDE your attic on a vertical gable wall. You then see a louvered vent in your gable wall.
Do Attic Fans Move Air Through a House?
No, these fans are not supposed to move air through your home. They only move air through an attic space above where you are.
The cooling principle here is simple: If you replace the extreme hot air inside an attic that might be 140-160F with air that is 85-95F, the inside of your home should also be cooler.
How Long Does it Take To Cool the Attic?
The issue is it can take many many hours before the attic lumber and insulation cools enough that you might feel a difference down inside your home.
The heat gain from extremely hot ceilings adjacent to hot attics can stress air-conditioning systems, and push them to the limits of their ability to cool a home.
Where do the Fans Exhaust the Air?
For both fans to work properly, they need to easily exhaust the air to the outdoors. The attic fans do this by default, as you typically have to cut an opening in the roof or a side wall of an attic to mount the fan. When installing a whole-house fan, you need to install several static pot vents in the roof that allow air to get out.
You can also install very large gable vents if your home design permits this. The whole-house fans come with instructions that tell you how much NET FREE SPACE of ventilation you need so the fan works properly.
The attic fans also need lots of intake air vents along the lower edges of the roof. Continuous soffit venting is the best and the air from the outdoors needs to be able to easily enter the lower reaches of the attic where the roof passes over the outside walls of the house.
Since most attic fans are located high up on a roof, this design allows for excellent cross ventilation of the entire attic space.
Can Attic Fans Can Rob Air From Home?
If you don't provide enough intake air vents for attic fans, they can draw air from inside your home. This happens because the moving blades of the fan create a partial vacuum.
It's not a good idea to send cool air from the inside of your home up into an attic, since you are paying good money to cool inside air with an air conditioner.
Do Whole House Fans Need Lots of Vent Space?
Whole-house fans also need plenty of exhaust air vents through the roof or through side gable walls of attics. Each whole-house fan manufacturer tells you for each size fan how much net-free area of exhaust ventilation the fan requires to work properly. If you don't provide this exhaust ventilation area, the fan blades will spin, but not move the maximum amount of air.
Do Both Fans Remove Hot Attic Air?
Whole-house fans serve double duty as they remove hot air from the attic as they work. But you do not necessarily want the whole-house fan operating in the middle of the day as your attic heats up.
IMPORTANT TIP: For this reason, it makes sense to have both types of fans in a house. They operate at different times of day and night, since they are designed for two different purposes.
Whole-house fans work so well, they are often equipped with timers. If you operate one all night long, you might need to sleep with blankets. They often can cool a house to a comfortable temperature in just several hours.
What Windows Should Be Open With a Whole House Fan?
You can get concentrated cooling with a whole-house fan by opening the windows in selected rooms. As the fan operates, it creates a comfortable breeze in the rooms with open windows.
Should You Close Fireplace Dampers?
Be sure you do open windows before you turn on a whole-house fan. If you don't and you have a fireplace with ashes in it, you will create an ash storm as air is sucked down the chimney and rushes across the dry fireplace ashes.
The dirty ashes are then broadcast through the house as they are sucked towards the whole-house fan. How do I know this? It's the voice of experience talking.
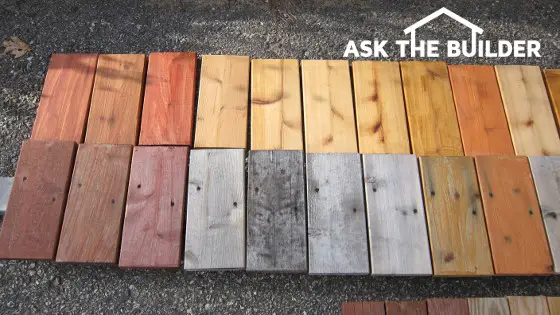
Here are the side-by-side before and after wood samples. The faded pieces of wood were out in the weather for only six months. CLICK THE PHOTO ABOVE to see all of the Before and After Photos of the deck sealers. Copyright 2017 Tim Carter
Failed Deck Sealer TIPS
Deck sealers and stains fail in just a few years
Sun's UV light blasts apart the resins or glue in the sealer
Darker stains tend to last longer, but it's not a guarantee
DEAR TIM:I put my wood deck to bed for the season about a month ago. Suffice it to say I was really upset.
Back in the spring, I went to great lengths to clean the deck and reseal it. I purchased an expensive semi-transparent sealer that did have a small amount of pigment in it.
However, after several months the wood started to gray and then the mildew set in. Now I have to start over when spring arrives. This time I want to do it right.
What advice can you offer when purchasing wood deck sealers? Brandy S., Albany, GA
DEAR BRANDY: This is no consolation, but you're in a large group of consumers that are deeply disappointed with the performance of certain deck sealers.
My Own Failed Sealers
I've been interested in this topic for years, both as a contractor and a homeowner. I've also been on the short end of the stick several times as sealers have failed on my own wood deck surfaces.
Wide Variety Creates Confusion
Wood deck sealers come in all flavors. There are water-based sealants as well as a few oil-based products. Some are heavily pigmented while others have just a hint of pigment. Many homeowners love the look of the lightly pigmented products as they tend to really show off the wood's natural color.
The trouble is these nearly clear sealers and water repellents are ill-equipped, for the most part, to deal with the harsh ultraviolet (UV) rays of the sun. Five percent of the sun's UV rays contain active photons.
These high-energy particles are like miniature cruise missiles. Whatever they hit, they destroy. They're so powerful they can break the atomic bonds of certain metals like copper and zinc. You can imagine that a deck sealer resin is no match for these powerful photons.
Sun & Skin Analogy
The best analogy I can offer up is what happens to me every spring.
Without fail, I go outdoors on the first balmy spring day and shed my shirt that's been on all winter. I really enjoy the warmth of the infrared rays of the sun on my pasty white skin that's been hidden all winter from any sunlight.
While I'm basking like a seal on a rock, the invisible UV rays are causing sunburn.
You can prevent sunburn by using a sunscreen lotion. The pigments and other nano particles in wood sealers act to block damaging UV rays. They can't stop it, but some sealers can slow down the damage.
More Pigment Is Better
However, lightly pigmented wood sealers simply don't have enough pigment to block the UV rays of the sun that turn wood gray in color. Heavily pigmented sealers and water repellents that are deep in color are akin to applying a sunscreen to your deck that might have a SPF value of 100 or higher!
My Own Huge Test
This past year I decided to do an extensive side-by-side test of about sixteen different wood sealers. Some were heavily pigmented and others were nearly clear. I carefully followed the instructions with regards to cleaning the wood and applying the products.
Furthermore, I created two sets of wood samples. Each set contained treated lumber wood and cedar. Both sets were sealed at the same time inside a garage out of the sun. The samples were allowed to dry.
Control Pieces In The Dark
One set never left the garage. Once dry, I boxed up one set and set them aside so they could be the control samples. The other set was attached to pieces of wood to simulate how they would be applied to a real deck.
These samples were then taken down to my boat dock where they are punished by the sun from sunrise until mid-afternoon. I can't think of a better way to test deck sealers than a dock setting where the wood has no place to hide from the sun.
Dock Stain Videos
I taped the following two videos two years BEFORE I did the extensive deck sealer test. I just wanted to show you how wide-open it is down at the dock.
Some Failed Within A Month!
The shocking thing, and you'll not be surprised based on your experience, is that I started to see failure in some of the finishes within a month. What's more, the sealers and water repellents on the cedar performed worse than those same sealers applied to pieces of treated lumber.
Severe Mold & Mildew
Some of the cedar samples developed severe mold and mildew even though they were inches away from the treated lumber samples. I suspect the copper used to make the treated lumber rot resistant was leaching through the sealers. Copper is a natural biocide.
Medium & Dark Pigments Performance
The sealers that have medium to dark pigment are doing the best so far. My test has only been going on for seven months, so I'll have more data as we approach summer. But suffice it to say that the lightly pigmented products on cedar have already failed my test.
This is a reliable hot water recirculating pump you can install on top of your water heater. The weird threaded fitting goes under the sink that's farthest away from the pump.CLICK THE IMAGE NOW TO ORDER THIS PUMP.
"To get instant hot water as you often find at hotels and other institutions, you need to have a loop in the piping system that circulates hot water back to the water heater."
Hot Water Recirculating Pump TIPS
Loop needed to get cold water back to the heater
Can be created easily under a sink - See Below
WATCH my Video about Recirculating Pumps BELOW
Gravity loops work great but must be done in a new home or large remodel
DEAR TIM:I believe I need a recirculating pump. It takes about 30 seconds for hot water to reach my shower each morning. It's frustrating to wait that long.
Is it possible to have hot water within a second or two after I turn on the valve? I have seen different recirculating systems that promise hot water instantly and they talk about huge energy and water savings.
Is this true? Is there a way to get hot water using simple gravity instead of a pump? Chad G., Birmingham, AL
Can a DIYer Install a Hot Water Recirculating Pump?
A DIYer probably doesn't have the skills needed to install a hot water recirculating pump.
Keep in mind that the work to achieve your goal is not something the average do-it-yourselfer can tackle. If you've not worked with water supply lines, you could get into trouble fast with a water leak.
What's more, certain cities and states have strict regulations with respect to modifications made to water supply systems that are connected to public water systems. Be sure to call your local plumbing inspector before you cut into your piping system.
Clean water is a valuable natural resource and it should not be wasted. The trouble is, in many localities, water might be a very cheap commodity. When prices are low, people tend to waste. The trend is for higher and higher water and sewer bills if you get water from a city or county supplier.
I grew up in Cincinnati, Ohio and the Cincinnati Water Works constantly ratchets up the cost of water. In Cincinnati, your sewer bill depends on how much water you buy, so if you water a lawn or plants, you pay more even though you're not allowing that water to go into the sewer system.
You have to add in the cost of your sewer bill when you try to calculate what water is really costing you. Don't forget to do this.
For example, a cubic foot of water used to cost me just a little over 1.6 cents. Once again, it's a moving target so you have to look at your water bill and see what you pay per cubic foot. Don't forget to take into account your sewer bill.
How Much Water is Wasted Waiting for the Hot Water?
There is a very good possibility that you waste less than a tenth of a cubic foot of water each morning. To prove this, assume that there is 25 linear feet of three quarter inch piping between your shower faucet and water heater.
Do the math and you will find out that there is just .076 cubic feet of water inside the water pipe. When I was paying just 1.6 cents per cubic foot of water, to waste one dollar's worth of water, I'd have to take over 800 showers.
How Do You Get Instant Hot Water?
You need to have a loop in the piping system that circulates hot water back to the water heater to get instant hot water as you often find at hotels and other institutions.
Most houses do not have a dedicated loop as the hot water pipe typically dead ends at the plumbing fixture that is farthest away from the heater.
Can A Recirculating Loop Be Added to an Existing Home?
It's possible to install an effective return loop in single-story houses that have a basement or crawl space where the water supply pipes are visible below the floor joists. Two-story houses make this task nearly impossible, as the piping system is typically hidden in the walls of the home.
Yes, it's very easy and inexpensive to add the return loop leg in new construction.
If you're building a new home or doing a major remodel where you can expose the water lines going to the second floor, you can install the second half of the return loop in less than four hours in many cases.
The alternative to a hot-water piping loop is to use the existing cold water line to a sink as the return leg of a loop.
But, you don't have to install a return loop if you choose to use a modern recirculating pump system. These products employ a nifty temperature actuated bypass valve that connects the cold and hot water supply lines at the fixture that is farthest away from the water heater.
The bypass valve uses the cold water line as the return loop back to the water heater.
Are All Recirculating Pump Systems the Same?
Not all recirculating pump systems are the same. One system places the pump under the sink at the farthest fixture. You have to push a button to start the pump.
The trouble with this system is that you still have to wait for hot water. What's more, this pump needs high voltage electric to operate. It can be a huge challenge to install an outlet under a sink.
Another system activates a remote pump that can be near the water heater. The trouble with this system is that it pumps water through the system whenever the temperature drops at the activation valve. This system wastes energy dollars as it pumps hot water while you sleep and are away.
What Does the Best Recirculating Pump System Have?
Perhaps the best pump system is one that has a temperature controlled bypass valve under the farthest fixture sink and a timer on a pump that can be conveniently located adjacent to the water heater.
The timer can be set to go on and off at 15-minute intervals depending upon when you feel you need hot water at the fixtures. CLICK HERE to see this great pump with a timer.
The pump is equipped with a handy extension cord that can be plugged into a convenience outlet near the pump. There is no water waste with this pump and it also minimizes energy waste since it only sends hot water into the water supply lines during the programmed times.
Can I Just Install a Gravity Hot-Water Loop?
Gravity hot water recirculating loops that do not require a pump can sometimes be installed after a house is built. They will only work when the water heater is below the water supply lines in a basement or crawl space. This system requires that the hot water line return back to the heater after it services the farthest fixture.
How Much of the Piping Needs to be Insulated?
The entire hot water pipe, plus the return piping must be well insulated for the loop to work. The last 15 feet of the return line must not have insulation on it for the convection to happen.
Modern water heaters have a pesky rubber flapper on the hot water outlet pipe and sometimes the incoming cold water inlet. These must be cut out or a large hole drilled in it. If you don't do this, the hot water can't float up through the gravity loop.
The rubber flapper works well when water pressure forces it open when you call for hot water. But it will not open if water is trying to gently float up the pipe.
Best House Windows: These are Marvin double-hung windows in a new home. It's a Queen Anne Victorian house Tim Carter built in 1986 but it looks like it was constructed in 1890. Copyright 2020 Tim Carter
Best House Windows TIPS
Buy windows with the AAMA Gold Label - simply the best
Look for the NFRC energy-rating label - study it closely
AAMA gold label is attached to the side of the window - not visible after install!
A higher price is a secondary barometer of quality
You may not realize it, but the windows in your home are the weakest link when it comes to energy efficiency. This is why you should strive to get the best windows when you go to build your new home.
If you’re remodeling, you should look for the best replacement windows for your home. But in the long run, it’s more than energy efficiency at stake. You should also want a window that will not fall apart in ten or twenty years.
Old Up-Down Sashes
When I first got into the construction business, I worked exclusively on older homes in Cincinnati, Ohio. There were tens of thousands of old homes that had simple up-down sash wood windows.
These were very common windows in houses built in the late 1800s and early 1900s. To this day, thousands of these wood windows are in use and in great shape. The primary reason is the lumber used to build them was old-growth timber that had tight wood grain with lots of dense summerwood in them. Homeowners over the years cared for them and painted them regularly. It’s possible to have windows that last generations.
Maintenance-Free New Standard
In my lifetime, I’ve seen a huge shift away from maintenance. Newer materials have become available that have practically eliminated the need to paint windows. Perhaps you’re on the hunt for the best vinyl windows for your home. Vinyl is indeed an attractive material as it never needs paint, it doesn’t rot, and it’s easy to clean. My own home in New Hampshire has vinyl-coated windows.
If you want the best windows for your home, no matter if they’re wood, vinyl, fiberglass, aluminum, or a combination of these materials, you can get them. But the first thing to do is to temper what the window salesman says and stick to the facts. There are two primary independent testing associations that should act as your North Star as you shop for the best window.
AAMA Gold Label
The best new windows and the best replacement windows are ones that have been certified by the American Architectural Manufacturers Association (AAMA) and the National Fenestration Rating Council (NFRC). AAMA is the golden standard as they test the actual quality of the materials used to make the window and how those materials are assembled.
Their testing is rigorous and random. Once a manufacturer has a window certified, they have to sign a contract with AAMA that allows AAMA to come to the factory unannounced so they can take a window from the assembly line to test. That total transparency works in your favor as the manufacturer constantly must be producing quality windows.
The best AAMA certification is their Gold Label program. CLICK HERE to discover more about this topic.
NFRC = Energy Efficiency Focus
The NFRC focuses more on energy efficiency, so they do testing for air infiltration, R-values of the glass and assembly, etc.
IMPORTANT TIP: To get the best windows possible, you need both certifications. Be aware that the AAMA certification is a special label usually found on the side of the window frame. You can’t see it after the window’s installed.
The NFRC label can be misleading. They’ll install the label on windows that meet their minimum standards, but some windows are much better at saving energy than others.
This means you have to be able to interpret the numbers and values you see on the special label. They provide a guide, but it’ll be up to you to determine what the highest values are in the marketplace.
Higher Price = Better Quality Usually
If you’re looking for the best wood windows, not only look for the two labels, but use price as a barometer. The best windows will typically cost more.
This isn’t always true, but you can shop feature for feature and see what you discover. More often than not, the higher-priced window will be better. Be sure to factor in support after the sale. That’s really important.
Beware High-Pressure Sales Tactics
When it comes to the best vinyl replacement windows, be very careful of the sales pitches you might get from a person who visits your home.
Don’t fall for any Jedi mind tricks, and ask for written verification that the windows you’re being pitched have the AAMA and NFRC certifications.
The salesman may say Yes, but you want to see the letters from the two associations that prove the manufacturer indeed has up-to-date certification. Get it in writing. Remember that you can contact each association to verify that a manufacturer is indeed certified and in good standing.