Old vs New Construction

Old vs New Construction

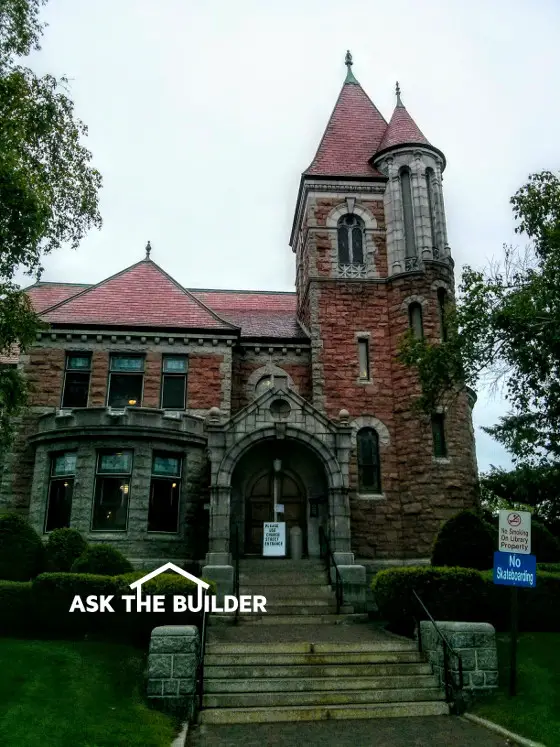
Laconia's Public Library. Copyright 2017 Tim Carter

Old vs New Construction TIPS

  • Complex question - not easy to answer in limited space
  • Many old materials superior to modern substitutes
  • Workers today not as dedicated to quality
  • Regulations, laws, wage packages put downward pressure on quality
  • CLICK HERE to Get Tim's FREE & FUNNY Newsletter!

Less than two hours ago, I was having breakfast with a reporter from our local daily newspaper, The Laconia Daily Sun. It’s a wonderful small newspaper published in central New Hampshire. He was preparing a story about my new book Roofing Ripoff and asked me a fascinating question, “Are new homes built better than older homes?”

Complex Question - More Complex Answer!

Ten minutes later, I still hadn’t finished my answer. It’s a complex question and the answer requires lots of thought and examples. As I drove home from the interview I thought, “This would make a very good column topic.”

I could probably write a small book about this question so please understand this tiny column will not do the topic justice. Let’s get started.

Break Down Question

You need to break the question down into at least three parts to get to the answer. I maintain you need to look at the labor aspect, the materials and the overarching economics of the building industry to drive towards the correct answer.

Always Substandard Construction

Let’s start off by saying that years ago you could absolutely find poorly built homes. There were some builders and contractors back then that did bad work and the houses have since decayed.

I have no proof or data to back it up, but I have a feeling that low-quality contractors didn't last long years ago.

Free & Fast Bids

CLICK HERE to get FREE & FAST BIDS from local builders. Visit their work and judge their quality.

High Quality Is Everywhere

I can also take you to downtown Laconia, NH and show you a building that’s right next to the old train station. It’s our public library. (See photo above.) This magnificent stone structure is in excellent condition and it’s now approaching 120 years in age. It was built to last. Great magnificent buildings like this are in abundance in smaller towns and larger cities all over the USA. They might be homes or public buildings.

There are many older homes still in magnificent shape that are not as extravagant as the Laconia Public Library and they might be built with a mixture of stone, wood and stucco.

Growing Poor Quality Trend

It’s my guess my email Inbox would be considered by a PhD mathematician to be a statistically relevant sampling of the problems most homeowners face here in the USA. I get vast amounts of emails from homeowners who suffer from poor workmanship. I’d venture to say that today’s workforce in the residential construction industry, as a whole, is not as concerned about quality as the craftsmen from 150 years ago.

Vocation vs. Job

Back then many workers considered what they did a vocation. They made it a career choice and took lots of pride in what they did. Today it seems that many workers treat what they do each day as a job. There’s a vast difference between a vocation and a job.

Old vs New Materials

Let’s touch for a moment on materials. Look at the end of a piece of dimensional lumber like a 2 x 10 and note the width of the growth rings of the tree. You may shrug your shoulders. But those of us who have decades of remodeling experience can tell you that the lumber used in older homes was very much different than what you can get today.

I have pieces of old lumber taken from buildings built in the late 1800s. The light-colored growth rings that represent the wood added to the tree in the spring of each year are much narrower than those from modern trees.

Old vs New Construction

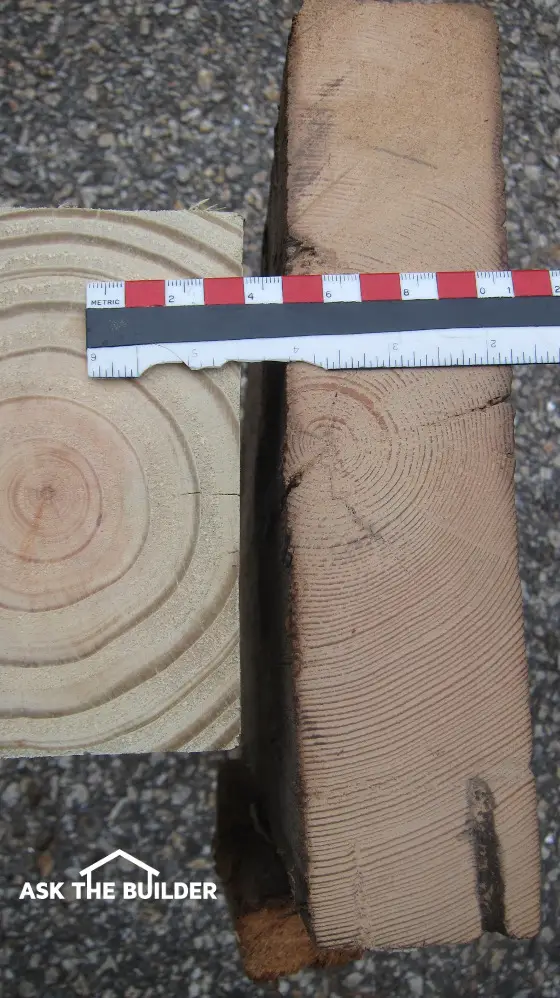
New lumber is nothing like the lumber of old. Look at how wide the lighter-colored spring wood bands are in the timber to the left! (C) Copyright 2017 Tim Carter

The percentage of darker bands, summer wood, to lighter bands - spring wood in older lumber is almost equal. Today there’s much more spring wood in the hybridized lumber grown by the timber companies. Dark summer wood is more rot resistant and it’s stronger.

CLICK HERE to get FREE & FAST BIDS from local builders. Visit their work and judge their quality.

Plaster vs. Drywall

The reporter and I talked about plaster. You can take your fingernail and press on a modern wall made from drywall and create a depression. Try it. Forget about doing that to an older plaster wall.

A properly mixed plaster with a white lime finish coat has a compressive strength that approaches 3,000 pounds per square inch. In other words it’s rock-like material not something similar to cardboard.

Cast Iron Drains vs. PVC

I’ve been a master plumber since age 28. While there are many positive qualities to modern PVC drain pipes, I’ll take cast iron all day long.

Cast iron is soundproof, it’s fireproof and it’s much stronger. When you flush a toilet and the water cascades down a cast iron stack, you don’t hear Niagara Falls in your walls as you do with modern PVC pipe.

Great Modern Materials And Tools

Please don’t misunderstand me. There are many modern materials that are far superior to the materials of old.

We have better tools today that make us more productive and more accurate. But you need to have them in the hands of the people that are interested in producing the best product.

Complicated Economics

The overall economic issue is far harder to discuss and digest for us mere mortals who aren’t trained economists. The ever-rising standard of living here in the USA has put intense pressure on trying to keep the labor costs of building in check.

Regulations, laws, benefit packages, etc. that didn’t exist one hundred years ago add to the cost of building. To keep a job affordable something has to give. You can imagine what that might be.

High Quality Can Be Had

Fortunately if you have the budget and the time, you can build a home today that will last for centuries. It doesn’t have to be the Biltmore or some other extreme mansion.

There are still some builders and craftsmen that still know how to take available high-quality materials and create a home that will be far better than the baseline standard home I see being constructed today.

CLICK HERE to get FREE & FAST BIDS from local builders. Visit their work and judge their quality.

Column 1198

Outdoor Lighting Tips

Outdoor Lighting Tips

Outdoor lighting is a huge topic.

Think of all the different types of outdoor lights you could have:

  • post lamp at driveway
  • porch lights
  • spot lights
  • low-voltage patio or deck lighting
  • landscape highlight lighting
  • Christmas or other seasonal holiday lighting

A book could be written about each of those areas there's so much to cover.

Free & Fast Bids

CLICK HERE to get FREE & FAST BIDS from local electricians who can help you with any outdoor lighting projects or troubleshooting.

Post Lamps

Post lamps are very handy. They can help guide people to your home when it's dark outside.

Consider getting one that incorporates a powered outlet to it so you can add extra Christmas lights to decorate the post lamp.

 outdoor post lights

This is but one of HUNDREDS of different outdoor post lights. Every style, finish, etc. is available. CLICK THE PHOTO NOW TO SEE ALL OF THEM AND HAVE ONE AT YOUR HOME NEXT WEEK.

Porch Lights

You can get wall-mounted sconces or if you have a covered porch, you can install a light or two in the ceiling.

These same fixtures work well beside a garage door or on a shed.

If your front door is distinctive and you have a grand entrance, it's usually best to put a light on each side of the door.

wall sconce fixture

Here's a wall sconce fixture next to a garage door. It would work next to any door. There are HUNDREDS of styles and finishes. CLICK THE PHOTO NOW TO SEE THEM ALL AND HAVE ONE OR MORE DELIVERED TO YOUR HOME NEXT WEEK.

Spot Lights

These are handy lights that work like the lights at an outdoor football or baseball field. They're designed to illuminate a LARGE area.

You can use them for security or you can use them to play sports outside your home at night.

I love the newer ones that have motion detection, a built-in video camera, a speaker and an alarm! You can TALK to people that are walking outside your home no matter if you're inside or 3,000 miles away as the video and audio portion work through the Internet and your smart phone.

Low-Voltage Patio or Deck Lights

While many of these are advertised as DIY friendly, they're not.

There's much to understand about how these systems work and how to run the direct-current cables so you don't overload the network you've set up.

If you're a serious DIYr, then you may have good luck. Start with a small project and cut your teeth on that before starting a massive project.

If you're doing a giant install around a new patio, you'll want to plan ahead and install underground conduits to make installing the lights so much easier.

CLICK HERE to get FREE & FAST BIDS from local electricians who can help you with any outdoor lighting projects or troubleshooting.

Landscape Up Lighting

While the use of up lighting to highlight trees in your yard is dramatic, it adds to light pollution in the area and it could upset your neighbors.

I urge you to read up on the Dark Skies project and be sensitive to outdoor lighting and how it affects others before you embark on some massive up-lighting project at your home.

Seasonal Outdoor Lighting

If you make a habit of installing outdoor seasonal lighting of any type, you might consider installing several strategically located outdoor receptacles which are controlled by an indoor switch.

Many people struggle with extension cords which have to be draped through windows or doors. These cords have to be plugged in and out each night. The indoor switch makes the job easier and safer. Extension cords are major sources of electrocution and fires. Avoid using them at any expense.

With a little extra effort, these outdoor receptacles can be wired in such a fashion that one socket is hot all of the time. In other words, it operates independently of the switch.

This is often referred to as a split receptacle. This way, if you want to plug in a hedge trimmer, or any other electrical appliance when the lights are not in use, you will not have to go indoors to turn on the switch. It is easy to do. It just takes a little preplanning.

Lightning Arrestors

Consider installing a lightening arrestor in your main electrical panel. These devices have the ability to capture massive voltage surges that enter your service entrance cables which power your entire house.

The devices, when installed with a first class grounding system, bleed the voltage surge to the ground. These devices must be used in conjunction with point of use surge protectors that are commonly sold with sensitive electronic equipment in order to provide the highest level of protection for electronic equipment.

These devices can be installed by a homeowner who is familiar with service panel wiring. Do not install these devices unless you are 100 percent positive you know what you are doing. If installed improperly, they are ineffective.

GFCI's (Ground Fault Circuit Interrupters)

These devices are highly sensitive circuit breakers which can protect you from electrocution hazards. They can sense extremely small current leakages across the circuit long before you would begin to be electrocuted.

The National Electric Code continues each year to expand the locations where these devices should be used. Generally speaking, any location where water is likely to be present with an electrical device is a candidate.

Bathrooms, kitchens, basements, garages, outdoor receptacles, swimming pools, etc. are examples. They are inexpensive and they work. Don't hesitate to install them in as many locations as you can afford.

These devices are manufactured so that you can protect several outlets that are downstream from the GFCI. This makes it possible to protect different locations with one device.

These devices can be installed by an amateur with success. Simply follow the directions carefully and all should go well. Consider installing them today, as they can be lifesavers!

CLICK HERE to get FREE & FAST BIDS from local electricians who can help you with any outdoor lighting projects or troubleshooting.

Related Terms: electricity literature, circuit breakers, more on circuit breakers

Column B48

Hydraulic Cement

hydraulic cement

This is just one brand of hydraulic cement. CLICK THE bucket to have this brand at your home in days.

"You'll also get the best bond if you slightly dampen the concrete that will be in contact with the fresh hydraulic cement."

Hydraulic Cement Checklist

  • Hydraulic cement expands as it hardens
  • Surfaces must be dust-free
  • Dampen surfaces that will contact the hydraulic cement for best bond
  • Sets very fast - mix only as much as you can use in a few minutes

Related Links

Concrete Crack Repair Tips

Repair Concrete Block Cracks FAST!

Does Portland Cement Shrink?

Many homeowners don't realize that ordinary Portland cement shrinks when it dries. The shrinkage is very little, however, it does shrink.

This means that if you patch a crack or a hole using normal Portland cement or bricklayer's mortar, a very tiny leak may form after the cement dries.

Does Hydraulic Cement Expand as it Hardens?

Hydraulic cement expands as it hardens.

It expands because the cement contains expansive clays such as bentonite and a few others.

Expansive clays start to puff up when in contact with water. The best analogy is adding yeast to flour to make bread. The dough starts to rise increasing its volume.

Free & Fast Bids

CLICK HERE to get FREE & FAST BIDS from local handymen who work with hydraulic cement on a regular basis.

Does Hydraulic Cement Stay Enlarged?

Yes, hydraulic cement retains its expanded size once it's hardened.

When the bread is baked, the larger size is permanently locked into place.

The same thing happens with the hydraulic cement. And it happens fast usually within minutes. The Portland cement sets up and the larger volume of the mixture is locked in place permanently.

Can You Slow the Setting Time?

Ice water will slow down the setting time of hydraulic cement. You can even freeze the hydraulic cement powder before mixing it to get a few more minutes working time.

Where Can I Use Hydraulic Cement?

In new construction I use hydraulic cement to

  • fill the void areas in foundations around water pipes
  • electric wire sleeves or conduits
  • foundation form holes
  • deep cracks in foundations
  • any hole in a foundation

CLICK HERE to get FREE & FAST BIDS from local handymen who work with hydraulic cement on a regular basis.

Is it Best to Remove Dust?

Get rid of all dust from the surfaces that will be in contact with the fresh cement. The dust will prevent a good bond between the old masonry surfaces and the fresh mixture.

Should I Dampen Existing Concrete or Masonry?

Dampen the concrete that will be in contact with the fresh hydraulic cement to get the absolute best bond. It doesn't need to be dripping wet, just spritz it so some water soaks into the dry concrete or masonry surfaces.


Author's Note: The following email comment was received from Art, a Cement Manufacturer's Representative in Southern California.

Hi Tim,

I hope you take this in the spirit in which it is intended and that is to just help your site be better. Your definition of a hydraulic cement is misleading. According to ASTM (American Society for Testing & Materials), a hydraulic cement is a cement that creates a chemical reaction when it comes in contact with water (hydration) and will cure under water.

Being a hydraulic cement in itself has nothing to do with expansion, although some hydraulic cements will shrink less than others, but this is due to them being a sulfoaluminate based cement, not a Portland cement and has nothing to do with them being a hydraulic cement. Being a sulfoaluminate cement is also the reason you have the shortened working times.

Thanks,
Art / Cement Mfg. Rep.

CLICK HERE to get FREE & FAST BIDS from local handymen who work with hydraulic cement on a regular basis.

Column B119

May 26, 2017 AsktheBuilder Newsletter

I've waited for this day for over eighteen months.

My Roofing Ripoff book is NOW AVAILABLE in paperback as a print-on-demand via CreateSpace.

CreateSpace is a cool company that Amazon.com owns. It allows authors to bypass the traditional publishing rat maze of getting a book printed and distributed.

Years ago if you were going to self-publish, that's what I'm doing, you'd have to go to a printer with a finished book design and they'd run off 5,000 or 10,000 copies.

You have no idea how complex it is to create a file for a printer to publish a book. Not to mention the cover design!

Then, the printer would print your book, put them in boxes, ship them to you and they end up in your garage for YOU to sell and distribute.

Many an author has dust-covered cardboard boxes of her/his book stacked up in their garage.

Technology was developed about ten years ago that allows CreateSpace to print one copy at a time much like you'd use a copy machine to make a copy of a letter.

But the QUALITY of the one copy is the same or BETTER than what a traditional printer would do printing 5,000 at a time.

Wait until you see the glossy COLOR photos in the book.

Wait until you see the full-color GLOSSY cover to the book.

Wait until you see the very cool COLOR graphic that's at the bottom of each page.

It was originally only going to be at the end of each chapter, but my book designer Sheridan Stancliff insisted it be at the bottom of each page of text. She was so right and I was so wrong!

CLICK HERE now to order your copy of my Roofing Ripoff book.

Want to read the first three chapters of Roofing Ripoff for FREE? CLICK HERE.

My Discovery

STOP AND READ THIS

Do you own a home or commercial building with an asphalt shingle roof?

If you answered YES, then keep reading.

While writing my Roofing Ripoff book, I was the FIRST PERSON in the world to make a discovery.

I discovered that copper ions prevent asphalt molecules in shingles from connecting to one another.

If too many asphalt molecules link together like a LONG freight train, then the shingles:

  • become brittle
  • they curl
  • they loose the ceramic colored granules

You don't want this to happen because it means you have to put a new roof on your house SOONER.

Introducing copper to your asphalt shingle roof can allow the shingles to last DECADES LONGER - like shingles USED TO LAST.

Here is what I saw when I made my discovery on December 26, 2015. You're looking at the roof of the old Tilton, NH post office below.

Unfortunately, I was unable to patent my discovery. You can't patent a *benefit*. You have to patent the thing that CREATES the benefit.

Copper sheets have been patented for years.

So I spend nine months trying to figure out the MOST AFFORDABLE copper to use, the easiest way to apply it and to set up a simple distribution model so you could get all you need at one place.

I wanted copper Made in the USA.

I wanted copper nails Made in the USA.

I wanted a USA distribution partner.

That's why it took so long to get the book out. I didn't want to publish the book and then have you all FRUSTRATED not being able to get the BEST copper.

You can BUY the copper from me right now.

CLICK HERE to see and ORDER IT.

You WILL NOT find a cheaper price anywhere for the copper AND the CORRECT NAILS you need to install it.

I GUARANTEE THAT.

You MUST USE solid copper nails, they must be ring-shanked and they must be 2.5 inches long.

You can use stainless-steel nails if you want, but wait until you see what those cost if you go out looking for them!

But if you're foolish and try to use galvanized roofing nails then the nails WILL CORRODE once they get wet.

Where Does The Copper Go Tim?

CLICK HERE to see where the copper goes.

It goes up on the top of your roof or along the hips.

Your asphalt shingle roof is going to FAIL MUCH SOONER than it should if you don't install my copper on it.

Okay, that's enough for today.

I explain EVERYTHING in my Roofing Ripoff book WHY your shingles are falling apart.

I explain how shingles USED TO BE MADE so they'd last for 30, 40 or more years.

I explain WHAT the manufacturers might be doing to pre-age the shingles.

Have a great weekend!

Tim Carter
Founder - www.AsktheBuilder.com

Do It Right, Not Over!

Flagpole Tips

The American Flag

Be patriotic. Display an American Flag at your home. CLICK THE PHOTO OF THE FLAG NOW AND HAVE ONE DELIVERED TO YOUR HOME IN DAYS.

Flagpole Tips

I wrote the column about flagpoles as a result of the tragic September 11, 2001, terrorist attacks on our country. Within days of the events, I was flooded with emails from people just like you who were flush with renewed patriotism.

I think it is wonderful and am so happy that so many people have decided to install a flag pole to fly Old Glory.

"Both Buildings Are Going to Collapse"

Firefighting happens to be a hobby of mine. The morning of the attack my wife frantically called down to my office and told me to come upstairs and look at the live TV coverage.

I knew that firefighters were rushing to the scene and I knew they were going into both buildings to rescue people and try to extinguish the fires. But I also knew something else.

I knew both Trade Center Buildings were going to collapse. I said that within a minute of seeing the rerun of the video of the second plane striking the second World Trade Center building.

The structural steel that supports the buildings was severely damaged. Load bearing columns were ripped out by the planes. Other columns had the fireproofing material scraped off. It was just a matter of time before the steel would soften and collapse under the weight of the floors above.

But yet, I knew that firefighters and police officers were climbing the stairs knowing the same thing. They were in a race trying to cool the steel before the collapse would happen. As we know, they lost both races. And we lost hundreds of heroes.

Free & Fast Bids

CLICK HERE to get FREE & FAST BIDS from local handymen who can install a flagpole for you in one day.

Some Flagpole Facts

The wind exerts a very strong force on flags. Simply hold up a flag on a windy day and you will see what I mean.

This means that poles need to be sized for the wind speed and for the size of the flag(s) to be flown on the pole. Tall poles need to be large diameter to offset the pull of the wind.

Be sure to match your flag to the size of the pole you buy or make. Most good flag pole manufacturers have sizing charts to help you do this.

telescoping flag pole

Here's a telescoping flag pole. It's perfect for most homes. CLICK THE PHOTO NOW TO HAVE THIS DELIVERED TO YOUR HOME IN DAYS.

In-Ground Pole Drainage

If you decide to do a ground-set pole be aware that the sleeve needs to be able to freely drain collected rain and ground water. If it can't do this, then the pole may rust away over time.

The danger is that the pole can weaken over time and blow over and hurt you or someone else. You can minimize corrosion by making sure the pole is not surrounded by water.

Cut slots in the bottom of any pole sleeve. Set the sleeve on a metal plate and have it welded if possible.

This sleeve sits on a poured concrete footer. Before you pour the concrete that holds the sleeve in place, pour three inches of washed gravel on top of the footer. This is done after the sleeve is in place.

Any water that goes down around the pole drains into the sleeve, exits the sleeve through the slots and then passes through the gravel to the soil. The concrete is simply poured on top of the gravel and it will not clog the gravel passageways. This drainage is very important. Don't overlook it as you build the foundation for your pole.

CLICK HERE to get FREE & FAST BIDS from local handymen who can install a flagpole for you in one day.

Homemade Flagpole Parts

If you are on a tight budget there is no reason why you can't make a pretty nice flagpole on your own. The most challenging parts to get are the truck (flagstaff cap) that sits on top of the pole and the sleeve that is placed in the ground. In reality, only the sleeve may present a problem for you.

Different Truck Designs

The truck I saw that works perfectly for a homemade flagpole was sold at a local flag shop in Cincinnati, OH called Flaggs U.S.A.

At this store, I held in my hand a cast aluminum truck that would fit perfectly over the end of a 2 inch diameter galvanized iron pipe.

The cost was about $20.00. If you decide to look at other truck assemblies, you must determine if they fit inside a tube or over the end of the tube.

It makes a big difference! The ones that fit inside a pipe or tube must fit very snugly or you will have all sorts of problems. The one that I saw has mounting bolts that you tighten around the outside of the flagpole pipe. Once tight, the truck will not move on top of the pole. The manufacturers listed below also sell truck parts.

The Sleeve

In the column about flagpoles, I tell you to make a sleeve with a steel plate base. This makes it easy to install the sleeve but the plate is not necessary.

You simply need a pipe sleeve that has an inner diameter slightly larger than the outer diameter of the flagpole pipe. This pipe can rest on the concrete footer at the bottom of the hole.

The challenge is to keep it plumb as you pour the concrete. One method is to tap a slightly oversize square peg into the end of the sleeve. This peg can stick up about a foot or so.

Then extend two pieces of wood over the hole in the shape of the letter X that are nailed to the square peg. Drive stakes into the ground and nail the X pieces to the stakes once the sleeve is plumb.

CLICK HERE to get FREE & FAST BIDS from local handymen who can install a flagpole for you in one day.

Column B381

May 23, 2017 AsktheBuilder Newsletter

Last Thursday my youngest daughter Kelly helped me finish installing the dock here at the lake. It lifts up and down like a castle drawbridge that crosses a moat.

You have to lift the dock out of the water in the fall so the lake ice doesn't destroy it. Cedar wood panels that create the walking surface need to be lifted out, carried up some steps and set on a patio for the winter. You reverse this process in the spring.

It was a HOT day, with the temperature pushing 92 F. Just five days earlier, on Mothers Day, it was 36 F and raining.

You gotta love New Hampshire WX! Today and tomorrow are going to be perfect diamond days with temperatures at 72 F and sunny skies.

My oldest daughter Meghan, just to the right - see her photo?, coined the phrase diamond day. When the sunlight reflects off the small waves in the lake, they look like thousands of twinkling diamonds.

My Trex Transcend Deck

Last summer was consumed with me rebuilding two massive decks and constructing a new giant deck that's slightly lower than my upper deck. Here's a photo I shot in the fall.


Today after sending out this newsletter to you, I'll be starting to finish the project. Cold WX set in and I couldn't finish the deck.

I have to build a very cool set of platforms and built-in bench between the two decks you see in the photo above.

I'll be shooting lots of photos of this aspect of the project as it might create some inspiration for you. I'm a huge fan of multi-level decks for a number of reasons.

In my case, I wanted the new deck to be lower so when you sit on the upper deck in the chairs with the yellow cushions you get an unobstructed view of the lake.

CLICK HERE to see how to best clean a wood or composite deck. You know I'm always trying to look out for you!

High-Quality LED Flashlight - LOW Price!

I published a review yesterday of a new Coast LED flashlight I had the chance to try out.

This is a very cool one because it's got a rechargeable lithium-ion battery as well as a conventional alkaline battery pack.


Do you need a laugh? Most people need more humor in their lives.

I BEG you to CLICK HERE and read the expanded captions under each photo in the review. By the time you get to the last photo, I'll bet I've put a grin on your face.

If not, I want you to email me and let me know.

Prevent a FIRE at Your House

There are over 100 electrical fires per week in the USA. Many of these fires can be prevented by you. People DIE in these fires.

To prevent many of these sinister fires, all you have to do is install a few special AFFORDABLE circuit breakers in your electrical panel.

Here's what one of them looks like:

These special circuit breakers can SENSE a SHORT CIRCUIT and arcing in a switch or outlet BEFORE it turns into a fire.

My friend Steve should have had these breakers in his home. If he had, he would have prevented the fire he had but CAUGHT IN TIME before it did lots of damage.

He and his wife might have died had this fire broke out when they were asleep. Thank God they were in the house and near the switch that melted.

CLICK HERE to see what happened to Steve's dimmer switch.

CLICK HERE to read more about circuit breakers and this special arc-fault breaker that will protect you and your family!!!

How would you like to get FREE & FAST BIDS from local electricians who can come over and install these breakers in your home in just MINUTES?

Yes, it takes about two minutes to remove an existing circuit breaker and install this new arc-fault breaker.

I'm serious. You can get FREE BIDS - no obligation at all.

CLICK HERE to get the Free Bids that could save your life.

Roofing Ripoff Book Update

Today I'm supposed to get my proof of the PRINTED paperback Roofing Ripoff book.

If the printing process recreated in atoms what I saw in the digital PROOF, and I feel it will happen, then I click a button at Amazon Create Space and the book is instantly available for purchase by you.

You're in for a treat because my book designer, Ms. Sheridan Stancliff, took a suggestion I offered up and made it so much better.

It's at the bottom of just about each page of the book. I've never seen this done before, and I have to tell you in color it's stunning.

I'll send out a SPECIAL announcement to let you know if you can finally purchase a paperback version of the book.

You can get a PDF or Kindle version NOW if you want.

CLICK HERE to get a digital copy RIGHT NOW.

BIG ANNOUNCEMENT - Pay Attention!!!

Here's the big announcement about the book you need to know about.

If the statistics I uncovered while researching the book are accurate, you may be one of the eight out of TEN subscribers to this newsletter that have an asphalt shingle roof.

Or maybe one is on the light commercial building you work in or own.

Are you one of the 8 in 10?

If so, you don't necessarily have to read the book but you DO NEED something up on top of your roof I'm now selling.

I'll share what you need when I tell you the paperback is available.

Watch for that imminent announcement.

Suffice it to say that each day you wait to install what I'm selling you're one day CLOSER to WASTING THOUSANDS of dollars.

Yes, your inaction is going to cost you THOUSANDS of dollars.

CLICK HERE if you want to get an idea of what Roofing Ripoff is all about and to download the first three chapter for FREE.

That's enough for today. I need to get outdoors on the deck.

Tim Carter
Founder - www.AsktheBuilder.com

Do It Right, Not Over!

Coast HP8R LED Flashlight Review

Coast HP8R LED Flashlight

Here it is. She's a beauty. If you misplace it, I guarantee you'll never get it back. CLICK THE PHOTO NOW TO HAVE ONE DELIVERED TO YOUR HOME NEXT WEEK.

Coast HP8R LED Flashlight

I've had more flashlights than I care to remember.

Thirty years ago, I remember the craze swirling around the aluminum Mag flashlights.

They were the belle of the ball in the early 1980s as it was introduced in 1979.

I owned several and I have to admit, they were a vast improvement over the unreliable flashlights of old.

Fast Forward

It's hard for products to stay at the top. Such is competition.

In my opinion, Coast has far surpassed Maglight. Yes, there are lots of LED flashlights out there, but when you hold a Coast flashlight in your hand, you'll admire every part of it.

They're very well made. I LOVE the ones I own.

Specifications

I don't waste my time copying and pasting all the specs for products. I concentrate on the subjective aspects of the tool and judge it against all that have come into my hands before it.

If you want the specs on the Coast HP8R flashlight, CLICK HERE.

Coast HP8R LED Flashlight

The barrel of the flashlight is the perfect diameter for me. It's got a handsome knurled finish grip. Great on wet nights when you're in the graveyard. CLICK THE IMAGE NOW TO MAKE ALL YOUR FRIENDS JEALOUS. YOU'LL HAVE THE BEST FLASHLIGHT AROUND.

Coast HP8R LED Flashlight

I didn't want to fully grasp it or I'd cover up the great logo. Believe me, it's going to fit in your hand, especially if you're a woman that wants lots of light but not a monster flashlight. Note it's got a slide focus for wide light or a tight beam. You can lock that function so it doesn't move. CLICK THE PHOTO NOW AND HAVE THIS FLASHLIGHT AT YOUR DOORSTEP IN JUST DAYS. LIGHT UP THE NIGHT AND CREEPY BASEMENTS SCARING AWAY ALL GOBLINS.

Coast HP8R LED Flashlight

This is a rechargeable flashlight!!! It comes with a wonderful lithium-ion battery pack as well as one that holds four AAA batteries as a backup in case you deplete the lithium-ion pack. Very handy! CLICK THIS PHOTO RIGHT NOW. ORDER IT AND WIPE THE GRIN OFF YOUR FACE.

Coast HP8R LED Flashlight

It's BRIGHT. Blinding bright. CLICK THE PHOTO NOW AND BE THE BRIGHTEST BOY OR BELLE ON YOUR BLOCK! IT WILL BE DELIVERED BY A SPECIAL COURIER.

Coast HP8R LED Flashlight

It's hard to take photos at night showing what it can light up. Your local airport might want to have you on a list of people to contact if they need you to replace the visual approach glidescope lights to help planes land in a power outage. CLICK THE PHOTO NOW. JUST BUY THE DARN FLASHLIGHT. RESISTANCE IS FUTILE.

Coast HP8R LED Flashlight

You get the charger that has a mini USB plug on it. This is the same plug that usually is for most Android cell phones and many other electronic items. CLICK THE PHOTO NOW. GET OUT YOUR CREDIT CARD.

Coast HP8R LED Flashlight

You use this case on your belt to transport the HP8R to its assigned duty. It's best to put the flashlight in the case with the lens facing the sky. Just do it that way and worry about other things. ARE YOU SERIOUS? IT TOOK YOU THIS LONG TO DECIDE TO BUY IT? CLICK NOW. QUANTITIES ARE LIMITED SERIOUSLY!!!!

CLICK HERE TO ORDER THIS MAGNIFICENT LED FLASHLIGHT.

Belt Sanding Tips Video

Belt Sanding Tips

Hi, I'm Tim Carter and I want to show you how to use a belt sander to take the finish off a piece of furniture or a piece of wood.

The problem I have right now is it is about 47 degrees outside. I wanted to use a chemical stripper, but the instructions say the working temperature should be between 60 and 80 degrees. Well, I have to get the job done, so I am going to treat this the same way you would refinish a hard wood floor.

All a contract does that sands hardwood floors is he just uses his sander with different grits of sandpaper. Let's get started.

Free & Fast Bids

CLICK HERE to get FREE & FAST BIDS from local painters that can do the sanding for you. You've got more important things to do!

Right now I have 60-grit sandpaper on the belt sander. It's pretty rough and it is going to really good job to make the initial cut through the finish.

Wait!! Before we get started, there is an important tip. If you don't know this, you will probably ruin the piece of furniture. You don't just put the sanding machine down on the surface and hold it in position.

Not only do I have to run the sander back and forth slowly, but I also have to move it in a circular motion. Doing this ensures that you don't cut a line or a pattern in the surface.

Let me show you. Well you can see that it does a great cutting into the finish. In just a matter of seconds, the finish has been removed and it is down to bare wood.

Common Belt Sander Uses:

  • sand peach fuzz from recently cleaned wood decks
  • sand small patches of hardwood flooring
  • sand flat slab doors and large baseboard
  • sand any larger flat surface

So now to finish the job, is to do the entire top with that first pass with the 60-grit sand paper. Then go back and do it over with different grit sandpapers - 80 grit, 120 grit, etc. - getting finer each time until the table top is as smooth as a piece of glass.

And that's how you can take a finish off a piece of furniture.

CLICK HERE to get FREE & FAST BIDS from local painters that can do the sanding for you. You've got more important things to do!

Referenced in the November 20, 2012 AsktheBuilder Newsletter.

How to Stain Wood

How to Stain Wood

Stain wood sample here. This piece of wood had a wood conditioner applied to the left side. An equal amount of stain was applied over the entire piece of wood and wiped off immediately. The conditioner saved the day and allowed the gorgeous grain to show through! Copyright 2018 Tim Carter

"I continued to ruin gorgeous pine trim because I did not understand that softwoods must be treated with the utmost care when they are stained."

How to Stain Soft Wood Checklist

DEAR TIM: I have to stain some white pine woodwork in my home. In the past, I have had nothing but problems when I stain wood.

The color is not even, the grain disappears and colors are much darker than in the sample brochures. I must be doing something wrong. How can I get professional results from start to finish when staining woodwork? Sandra B., Westland, MI

DEAR SANDRA: I see you have the softwood blues.

I Blotched Up Staining Pine Years Ago

I used to get into this same funk many years ago when I first started in the construction business. Imagine my customers' reaction when I transformed beautiful white pine woodwork into a blotchy mess.

My initial diagnosis was the wood had not been sanded well enough. But I still had problems when the wood was as smooth as glass.

I continued to ruin gorgeous pine trim because I did not understand that softwoods must be treated with the utmost care when they are stained. Staining pine is not easy to do, that is if you want it to look perfect.

Free & Fast Bids

CLICK HERE to get FREE & FAST BIDS from local painters who can apply a wood conditioner to your softwood.

What Kind of Cell Structure do Softwoods Have?

White pine, alder, spruce, and fir are softwoods that have a very open cell structure. They readily absorb massive amounts of stain, much more than you and I want them too.

Hardwoods such as oak, poplar, cherry, and walnut are much different. Their dense cellular structure makes them harder and because of this, there are simply fewer voids for the liquid stain to penetrate.

A suitable comparison might be comparing two different pieces of paper. A paper towel readily absorbs water drops while a drop of water may sit for minutes on the surface of glossy paper used in many decorative coffee tables books.

How Do Professionals Pre-Treat Softwoods Before Staining?

Professional painters and woodworkers use a clear wood conditioner to partially block many of the wood pores. These conditioners are easy to apply and dry rapidly.

Pre-Stain Wood Conditioner

Here's a very good clear wood conditioner. Always do a TEST on a scrap piece of wood to ensure you like the results. CLICK THE IMAGE TO ORDER SOME NOW.

Often you can brush them on the piece of wood and stain it within fifteen minutes. The liquid conditioners contain clear resins and solids that clog the pores of the softwoods.

By doing this, many of the stain pigment particles that create the actual color are not allowed to soak deeply into the wood. The conditioners also help to enhance the grain of the wood.

How Long Should the Conditioner Dry?

Read the label on the can of the wood conditioner. It will list the dry time. If it's humid, extend the drying time at least an hour, maybe two.

The wood conditioner needs to be completely dry for maximum performance.

Wood Conditioner Video

Watch this video to see how easy it is to apply a wood conditioner.


CLICK HERE to get FREE & FAST BIDS from local painters who can apply a wood conditioner to your softwood.

How Important is the Sanding Process?

Sanding is extremely important when staining wood. Roughly sanded wood exposes more surface area that allows too much stain to soak into the wood.

When you take the time to use progressively finer and finer grit sandpaper that eventually produces a glass-like surface, you minimize the surface area of the lumber. You may start out with 100-grit paper, then switch to 150-grit and finish with 220-grit. Aluminum oxide sandpaper self-sharpens as you work.

Be sure you have a scrap piece of the wood you intend to stain. Sand it just as you would your finish pieces of wood. You're going to condition and stain your test piece first.


Sandpaper

Here's an assorted pack of aluminum oxide sandpaper that will do a great job on softwood. CLICK THE IMAGE TO ORDER IT NOW.

Taking the time to fine sand until the wood surface is super smooth also is the foundation for achieving a silky surface after the final coats of finish are applied.

When Do You Apply the Wood Conditioner?

After you have sanded the wood and removed all dust, apply the clear conditioner. Pay attention to the instructions as they often instruct that any wood treated with the conditioner should be stained within two hours.

The conditioner usually has the consistency of water and it's very easy to apply. You'll see it soak into the soft wood.

Is It Best to Do a Stain Wood Practice Run?

Grab your test piece of wood and get ready to stain it. Do NOT be impatient and stain the finished pieces. If you make a mistake, it's hard to correct it.

Apply the stain and work it in well with a rag or brush. Wait perhaps 30 seconds and wipe off the excess stain. All too often people make a mistake by either rubbing too hard or they use a rag that is saturated with stain.

IMPORTANT TIP: The depth of color you see the moment the stain is wiped off is generally what the woodwork will look like after the clear finish is applied.

The key to successful wood staining lies in practice. Make sure the carpenter saves all wood scraps. Use these scraps for test samples. Not only will they allow you to select the correct stain color, but you can also use the scraps to see what happens if you leave the stain on for 10 seconds, 30 and even two minutes.

Always keep a wet edge when staining. Never stop staining a piece of wood halfway down its length. Work yourself into a corner if you must stop for lunch, a break or the end of the day.

Wood Stain Video

Watch this video to discover a little-known staining trick.

Be sure the stain dries before you proceed. Depending on the temperature and humidity, this could take 24 hours.

The stain is dry when you take a dry finger and rub it with medium pressure across the wood. If the wood is smooth, not tacky, and there's no color transfer to your finger, the stain is dry.

If you try to rush the job, the clear finish can lift stain from the wood and the result is a blotchy mess.

What's a Great Clear Finish?

Your choices for clear finish coats are many. Lately, I have become a huge fan of water-based clear urethanes.

They're easy to apply and dry rapidly. When I use these, it is not uncommon to apply two or even three coats of finish in the same day. That can be a huge time saver.

I prefer to use water-based urethane. I like it because it doesn't yellow over time when exposed to light.

polyurethane

I've had excellent results with this clear water-based urethane. It dries FAST. CLICK THE IMAGE TO ORDER SOME NOW.

When working with any clear finish, be sure to check the work as you apply the finish. If you apply too much clear finish, it may sag or run in spots.

After you apply the finish to a vertical surface you have a window of opportunity of perhaps five minutes when you can correct these errors with your brush instead of waiting for the finish to dry and then sand out the defects.

You'll get the best results doing a light sanding in between coats of the clear finish. Sand with 220-grit paper. You don't have to press hard.

CLICK HERE to get FREE & FAST BIDS from local painters who can apply a wood conditioner to your softwood.

Column 497


DIY Acrylic Shower Walls

acrylic shower walls

Installing do-it-yourself acrylic shower walls can be easy so long as you select the right acrylic shower set! (C) Copyright 2017 Tim Carter

DIY Acrylic Shower Walls TIPS

    • Many different models and types to choose from
    • Some acrylic showers have thin walls that need lots of work to install
    • Wall studs must be plumb and not bowed
    • Shower base must be level and installed in wet setting compound
    • CLICK HERE to Get Tim's FREE & FUNNY Newsletter!

    DEAR TIM: I’ve had it with ceramic tile in my shower. It’s hard to clean and I love the sleek look of some of the modern acrylic shower units.

    I want to do this job myself so the install needs to be DIY friendly. What’s been your experience with these easy-care shower units?

    Would you be kind enough to share some installation tips so I don’t goof this up? Alice W., Xenia, OH

    DEAR ALICE: I can hear you loud and clear about ceramic tile care.

    Stain Solver Cleans Tile

    Oxygen Bleach

    Stain Solver is MADE in the USA with USA ingredients that are food-grade quality. CLICK THE IMAGE to order some NOW.

    When I was younger I seemed to have plenty of energy to wrestle with cleaning tile and grout.

    I did discover years ago that using Stain Solver certified organic powdered oxygen bleach made the job easier and less smelly.

    You mix the Stain Solver with warm or hot water, stir until the powder is dissolved and put the solution into a spray bottle.

    I'd just spritz the dry tile and grout every 15 minutes and at the end of an hour I'd scrub. The Stain Solver has no odor like nasty toxic chlorine bleach.

    But I no longer have to deal with cleaning tile because I just switched out all the showers in my home to acrylic with the last install just days ago.

    I've Installed Many

    As you might expect, I’ve installed countless acrylic tub and shower units over the years as I’ve been a master plumber since before I was 30 years old. I’ve discovered much to say the least.

    The best news in my opinion is the overall quality and design of some units have come a very long way.

    Free & Fast Bids

    CLICK HERE to get FREE & FAST BIDS from local bathroom remodeling contractors who specialize in new shower surrounds.

    Old Hum Drum Acrylic Showers

    Years ago many of the units were tough to install and those made for remodeling were humdrum. Just last year I installed a stunning acrylic alcove shower in my basement bathroom that was 60 inches wide and had simulated ceramic tile patterning formed into the side panels. I loved the built-in molded shelves for soap, shampoo and razors. This unit was very easy to install.

    shower unit

    This is the shower unit I installed in my basement bathroom. It was very easy to do. Very DIY friendly!

    Many of the available acrylic units come with their own sleek shower doors that are built to fit perfectly if you follow all the instructions. Just last week I installed a frameless clear tempered glass shower door on a corner shower unit in my own master bathroom. You’d think it would be hard to work with glass panels, but it wasn’t at all.

    Read Install Instructions Before Buying

    There’s a big big difference between the actual acrylic shower systems in the marketplace. While they may all look the same or similar in the showroom, you need to compare the plastic materials and look behind the panels to tell the difference.

    The unit I installed last year in my basement bathroom featured a proprietary solid composite material made with resins, fiberglass and filler. It’s extremely durable and is much stiffer than the acrylic material I installed in the past two weeks in my master bathroom.

    Some Need More Studs

    My basement bath alcove shower unit didn’t require any extra wall studs because on the back of the composite fiberglass walls there were reinforcing fins that acted like miniature I-beams. Believe me, the walls are very rigid and don’t flex at all.

    On the other hand, the three-piece corner acrylic shower I just installed for my wife in our master bathroom was made with a thinner acrylic that had no fins and required quite a few strategically placed wall studs to support the walls. This unit also required you to use a special tub-surround adhesive to help hold the wall panels to the studs so they don’t flex back and forth like the bottom of an old oilcan.

    tub surround adhesive

    Here's the tub surround adhesive I had to use in my master bathroom. CLICK THE PHOTO NOW TO HAVE THIS DELIVERED TO YOUR HOME. NO TRAFFIC HASSLES!

    Avoid These Mistakes

    Here’s a list of the top things I feel you need to consider when working with acrylic shower units. You can’t afford to make a mistake at any stage. Some mistakes can cost you lots of extra money if you have to purchase new panels.

    Before you buy a shower unit, download and carefully read the written installation instructions. Judge for yourself if you possess the skills and tools to install that particular unit. Pay close attention to the requirements for wall framing and think about how you’ll ensure all the wall studs are where they need to be for the side nailing fins and faucet location.

    CLICK HERE to get FREE & FAST BIDS from local bathroom remodeling contractors who specialize in new shower surrounds.

    Shower Base Support

    Most DIYrs make a grave mistake installing the shower base. Pay extremely close attention to this part in the written instructions. Almost all units require that the base be set in some sort of wet plaster or mortar. What’s more, it’s absolutely mission critical the shower base be perfectly level in all directions if you’re installing the factory-provided shower door kits.

    The reason the bases must be set in a wet plaster is so the bottom of the shower doesn’t move when you stand in it. If the acrylic flexes at all it will eventually crack and you’ll get leaks. I’ve discovered over the years that I get the best results using a dry-setting joint compound that sets up in 90 minutes. I mix it so it’s the consistency of warm cake icing.

    dry setting joint compound

    This is the dry setting joint compound I prefer. It mixes easily with water. Use COLD water to slow set time. Mix until it's like warm cake icing. CLICK THE PHOTO NOW TO HAVE THIS DELIVERED TO YOUR HOME. NO NEED TO FIGHT TRAFFIC AND RUDE SHOPPERS.

    The wall studs on the edges where the shower doors are to be installed must be perfectly plumb. Don’t overlook this step because you’ll pay the price when you go to install the shower door at the end of the job. You can’t grind, trim or change the size of a piece of tempered glass!

    Rookies often ruin acrylic wall panels when cutting the hole for the shower faucet. The error may be based in poor measuring skills. Just remember that you can enlarge a hole but you can’t make one smaller.

    I’ve found that it’s best to cut the hole with a high-speed spiral saw. This is an affordable tool that drywall installers have used for decades to cut holes in drywall for electrical boxes.

    RotoZip tool

    This is an amazing tool invented decades ago. It cuts holes in drywall accurately and FAST. CLICK THE IMAGE NOW TO ORDER ONE. Get EXTRA spiral bits.

    The bits that come with these tools have cutting edges on the sides of the bit. You drill a small 1/4-inch hole in the acrylic panel, insert the bit, turn on the saw and slowly cut in a counterclockwise movement.

    Rain Head Shower Head

    I think another tip you should consider is using a rain head shower head. I installed one in each of my new showers and LOVE them. My wife loves it too. That's the best part.

    rainhead shower head

    This is just one type of rain head shower head. There are many models and diameters. You may have to pipe with 3/4-inch pipe if you get one 10 inches or more in diameter. CLICK THE PHOTO NOW TO HAVE ONE OF THESE BAD BOYS DELIVERED TO YOUR HOME BY NEXT WEEK. NO TRAFFIC HASSLE OR DEALING WITH RUDE AND SMELLY CUSTOMERS.

    In my basement shower, I actually hung it from the ceiling! So if your ceiling height in your shower is about 7-feet tall, consider having it come straight down instead of using the special shepherd's crook shower arm that comes out of the wall.

    CLICK HERE to get FREE & FAST BIDS from local bathroom remodeling contractors who specialize in new shower surrounds.

    Column 1197