Circuit Breakers Types

Circuit Breakers

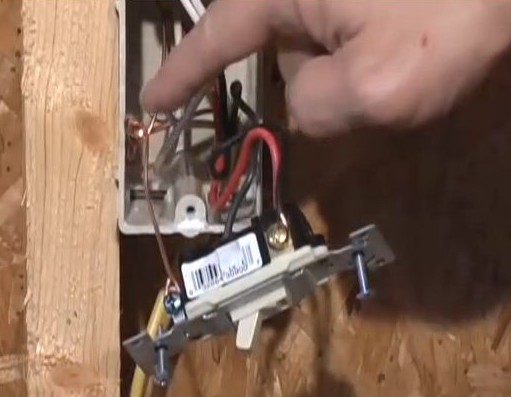
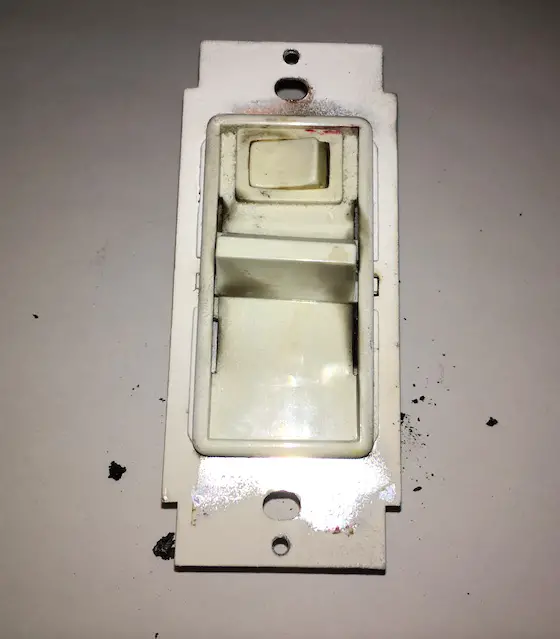
This switch looks somewhat normal, except for the soot around the edges. Too much electricity flowed through it, the switch MELTED and started to burn. CLICK THE PHOTO to read the story of what happened and HOW TO PREVENT IT. Wait until you see the back of the switch! (C) Copyright 2016 Tim Carter via anonymous friend contribution

Circuit Breakers Types TIPS

DEAR TIM: I'm getting ready to add some electrical wiring in my house. I know that I need to install some extra circuit breakers. What are the different types of circuit breakers?

How do circuit breakers work and just what do they protect? Second, will circuit breakers protect extension cords? Katie D., Traverse City, MI

DEAR K.D.: If you haven't worked with household electric that got 240 volts of power before, I want you to be careful.

It Will Bite You - Can Be Deadly

Standard residential electricity (120/240 volt) is dangerous. You must treat it with the utmost respect. People are killed on a daily basis by electrocution and fires which result from improperly installed wiring and electrical devices.

Also, as you progress with your work, be sure it is inspected by your local inspection authority.

Circuit Breaker Fire Prevention Video

The huge house fire in this video could have been prevented with a simple special circuit breaker. Don't let your house BURN!

What Are Circuit Breakers?

The conventional circuit breakers you're getting ready to install are wonderful devices. They're basically automatic switches that disrupt the flow of electrical current in the event of an overload.

Free & Fast Bids

CLICK HERE to get FREE & FAST BIDS from local electricians who will stick their hands in the panel to install breakers!

Meant To Protect Wires

The sole function of basic circuit breakers, believe it or not, is to protect the wiring that runs from the circuit breaker panel to the various switches, outlets and fixtures. Conventional circuit breakers will not protect you from electrocution, nor will they protect equipment from voltage surges.

More Current = More HEAT

The electrical wiring in your house can be easily damaged by having too much electricity flow through it too fast. As electricity flows through a wire it generates friction.

This friction, in turn, generates heat. It's possible to generate enough heat to melt the insulation on the wires.

Wires without insulation, when crossed, have a tendency to generate sparks. Sparks seem to have a tendency to cause fires.

Bi-Metal Strip For Heat

Virtually all residential circuit breakers have two independent methods which allow them to automatically switch off or trip. The heat, we just spoke of before, can trip a breaker.

When too much heat is generated, a small piece of bimetal inside the breaker begins to bend. This bending force causes the breaker to switch off.

This property works well to protect the wiring when electrical demand slowly builds.

Electric Short Circuits

However, wiring some times short circuits. These short circuits occur when two wires touch each other and generate sparks.

Short circuits like this allow massive amounts of electricity to flow through wiring very quickly.

Small electromagnets within the breakers sense this flow and instantaneously switch the breaker off before the insulation covering the wires begins to melt.

CLICK HERE to get FREE & FAST BIDS from local electricians who will stick their hands in the panel to install breakers!

Types Of Circuit Breakers

Here are samples and photos of the types of circuit breakers you'd find in a typical residential home like yours:

15-amp-circuit-breaker

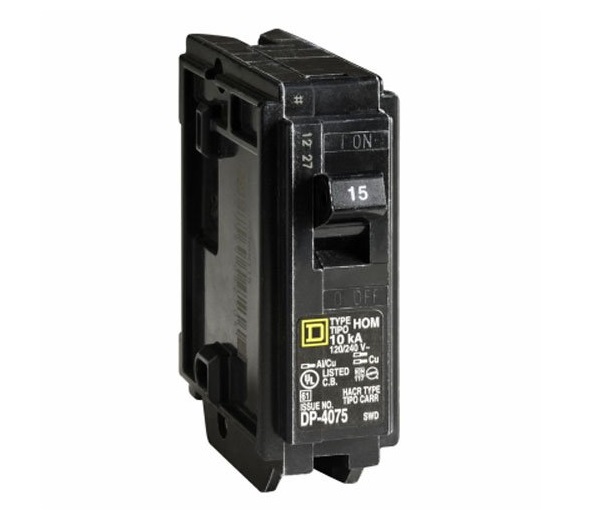
This is a standard single pole circuit breaker. It's 15 amps and they come in various amperage ratings. It's for a single 120-volt circuit in your home like controlling some wall outlets and maybe a few ceiling lights or a bath fan. CLICK THE PHOTO NOW TO SEE MORE BREAKERS AND TO HAVE THEM DELIVERED TO YOUR HOME NEXT WEEK.

double pole breaker

This is a double pole 30-amp breaker. Note it's double the width of the single pole breaker. It takes up two spaces in the electric panel. It's for a 240-volt circuit in your home. You'd find a breaker like this controlling the power to your electric clothes dryer. CLICK THE PHOTO NOW TO SEE MORE DOUBLE POLE BREAKERS AND TO HAVE THEM DELIVERED TO YOUR HOME.

20-amp-tandem-circuit-breaker

This is an unusual breaker. It's a tandem breaker that controls two different circuits but only takes up the space of a normal single breaker. You can use this breaker if you start to run out of space in your panel. CLICK THE PHOTO NOW TO SEE MORE TANDEM BREAKERS AND TO HAVE THEM DELIVERED TO YOUR HOUSE FASTER THAN YOU CAN SAY "SPARKS! RUN AWAY!"

GFCI-and-CAFCI-circuit-breaker

This is perhaps the MOST IMPORTANT circuit breaker you could have in your home. It's a combination GFCI and a CAFCI breaker. This is the type that CAN SAVE your life and PREVENT FIRES!! CLICK THE PHOTO NOW TO ORDER THESE LIFE-SAVING BREAKERS SO YOU DON'T BECOME A STATISTIC.


Extension Cord Issues

Electrical wiring, extension cords, and breakers are manufactured to withstand certain amounts of electrical current without damage. The standard by which they are measured is amperes or amps.

You probably have a few dangerous extension cords in your home that are made with 16-gauge wire. These can handle just 10 amps. Electrical currents passing through this wire in excess of 10 amps can cause catastrophic failure to the wire.

IMPORTANT TIP: What happens if you have this cord plugged into a 15-amp circuit?

If you are powering something that's calling for MORE THAN 10 amps, the cord insulation can MELT and catch FIRE. You need to use extension cords that have their own built-in breakers!

Extension Cord With Built-In Breakers

extension-cord-with-breaker

Here's an extension cord that's got a built-in breaker. If you try to overload it so it would OVERHEAT and catch on FIRE, the built-in breaker SAVES you. CLICK THE PHOTO NOW TO HAVE THIS SAFE CORD DELIVERED TO YOUR HOME.


CLICK HERE to get FREE & FAST BIDS from local electricians who will stick their hands in the panel to install breakers!

Related Terms: outdoor lighting, electricity literature, circuit breakers

Concrete Laundry Tub

Concrete Laundry Tub

This is a great photo of the underside of a concrete laundry tub. This drain assembly just needs to be cleaned of the rust and painted with a rust-inhibitive paint. Copyright 2017 Tim Carter

"I believe the reason they're so strong is that the manufacturers decided to make the concrete mix quite rich adding a small amount of extra Portland cement."

Concrete Laundry Tub Checklist

  • Concrete laundry tub is fantastic. Do not get rid of yours! Valuable!!
  • Contain high amounts of Portland cement and wire mesh reinforcing
  • WATCH concrete epoxy video below
  • Use Stain Solver oxygen bleach to deep clean concrete
  • CLICK HERE to Get Tim's FREE & FUNNY Newsletter!

DEAR TIM: I have a 1938 Cape Cod stone house with a behemoth laundry sink in the basement. It appears to be made of concrete, soap stone or something similar and has two giant tubs.

It's supported by a steel stand that's in pretty good shape with some minor rust. Can you identify it?

How long have these sinks been around? How can I clean and restore it?

Also, the faucet holes aren't standard size or distance can I fill and drill new ones? Chris R., Lexington, KY

DEAR CHRIS: You bet I can identify it.

Among other things, I'm a master plumber and I've owned and moved several of these monster sinks. Believe it or not, you're the proud owner of a collector's item. You've got a marvelous precast concrete laundry tub that's nearly indestructible.

When Were Concrete Laundry Tubs Invented?

Concrete laundry tubs were invented and displayed for the world to see at the 1867 Paris Exposition.

Who Invented Concrete Laundry Tubs?

A man by the name of Joseph Monier invented concrete laundry tubs. He was a gardener who started making steel-reinforced concrete tubs and pots because he was dissatisfied with clay and wood pots that would fall apart.

concrete laundry tub

This is a magnificent concrete laundry tub that’s stood the test of time and can serve many future generations once cleaned up. Copyright 2017 Tim Carter

Free & Fast Bids

CLICK HERE to get FREE & FAST BIDS from local handymen who can restore your sink if you can't handle it.

Is Concrete Strong?

Concrete is strong when you try to compress it, but if you try to stretch or bend it, it's weak. Steel is exceptionally strong if you try to stretch it.

You can make beams, columns, suspended slabs, bridges, boats, and even laundry tubs when you combine the concrete and steel in the right configuration!

Have you Used These Sinks?

The house I lived in from age 2 until 22 had a double-basin concrete sink. This concrete laundry tub was just on the other side of the wall from where I slept.

I was lucky enough to have concrete laundry tubs in the first two houses I owned. As you might imagine, they came in different models with one, two or three sink basins. The sinks weigh hundreds and hundreds of pounds.

Why Are the Concrete Sinks So Durable?

I believe the reason they're so durable is that the manufacturers decided to make the concrete mix quite rich adding a small amount of extra Portland cement.

They added enough Portland cement so the concrete probably tested out at 6,000 pounds per square inch or higher compressive strength.

Years ago when the sinks were made this extra cement, probably only cost the manufacturers a nickel since there's not that much cement volume in each sink. What a wise decision it was!

concrete laundry tub

Here's a closeup shot of the underside of the tub's drain. Remove the rust, paint it, install a PVC tailpiece with a flange and a disposal washer and you're good to go! Copyright 2017 Tim Carter

What Is the Top Lip Material?

It's important to realize the top lip of these sinks is made from steel so the edge won't chip. The workmanship that went into creating each of these sinks is of the highest quality. I've seen hundreds of these sinks in my career and all of them are impressive.

How Do You Repair Cracks and Crumbles?

I feel it's best to repair cracks and crumbled areas with modern concrete epoxy.

A point often overlooked is the best method to restore the sink surfaces.  Use the best concrete-repair epoxy I've ever used, if you want to repair a crack in one of these grand sinks, or fill in a crumbling area.

What is the Best Epoxy to Use?

I've had the best success with the PC-Products Epoxy in a tube. See it just below in the photo? CLICK HERE to have it delivered to your home in days.

pc-concrete-tube

This is a wonderful DIY foundation repair epoxy. I've used it with great results. CLICK THE IMAGE TO ORDER IT NOW.

CLICK HERE to get FREE & FAST BIDS from local handymen who can restore your sink if you can't handle it.

Concrete Epoxy Repair Video

Watch this video to see how to repair cracks in concrete.

How Do You Restore The Steel Stand?

I'd start the steel stand restoration process by removing any rust. If you need a new stand, see below where I talk about hiring a local welder.

CLICK HERE if you want to get FREE BIDS from local welders who'll make a new stand for you.

Use a high-quality paint made to paint steel after the stand is sanded and ready for primer and paint.

spray paint

This is a fantastic spray paint for steel. You can also get it in small cans if you want to brush it on. CLICK THE PHOTO NOW AND HAVE THIS PAINT DELIVERED TO YOUR HOME.

The stand probably was painted black when the sink was new. It could have been a dark gray as well.

How Do You Strip Paint From Concrete?

Use regular paint stripper to strip paint from the concrete surfaces.

Start to remove any paint from the inside of the sink basin walls after you have the steel stand repainted. Remove paint with common paste paint strippers. Follow the directions on the label and be sure the space is well ventilated if you're using a stripper that contains methylene chloride.

What's the Best Cleaner?

I feel the best cleaner for the sink is a low-grade abrasive cleaner.

I would then try to scrub the sides of the sink with Soft Scrub abrasive cleaner. While it's available at most grocery stores, you can CLICK HERE and have it delivered to your home.

soft scrub

This is the infamous Soft Scrub. I've used it for years. It contains very fine silica sand or volcanic pumice as the abrasive. CLICK THE PHOTO NOW TO HAVE THIS DELIVERED TO YOUR DOORSTEP.

Just test it on a small area at first using a scrub brush with stiff nylon bristles. Do not use a wire brush of any type, especially one on a spinning power tool. That will damage the concrete surface in no time.

How Can You Remove Oil Stains?

Oxygen Bleach

Stain Solver is MADE in the USA with USA ingredients that are food-grade quality. CLICK THE IMAGE to order some NOW.

You'll have fantastic results removing oil stains and any organic stains using a powerful oxygen bleach solution. I prefer Stain Solver, a pure white powder you mix with warm or hot water.

It's certified organic, it's Made in the USA with USA ingredients, and it's got the highest percentage of active ingredient that I know of. Stain Solver is non-toxic and has no odor.

Just spritz the sides of the sink with the solution keeping the concrete wet for an hour or more. Don't let the solution dry.

Every fifteen minutes, scrub with the brush and see if you're making progress. If so, keep at it until you get the sink clean.

IMPORTANT TIP: Realize if you use muriatic acid to try to clean the sink, you'll damage the steel lip and you'll erode some of the cement paste that makes the inside of the sink basins so smooth. I'd not recommend using acid at all.

Can You Drill New Holes in a Concrete Sink?

You can drill new holes in a concrete sink that will work for a modern faucet. It's best to create the holes with a diamond hole-cutting saw. Realize you'll have to make certain the blade can cut through tiny steel wire that you're sure to encounter in the concrete matrix.

Diamond hole saws

Diamond hole saws are affordable and there are many to choose from. Always read the reviews and invest wisely. CLICK THE PHOTO NOW TO HAVE THE HOLE SAWS DELIVERED TO YOUR HOME.

Where Can I Locate a Faucet That Uses Existing Holes?

Before you do this radical modification to the sink, please consider taking the time to visit plumbing supply houses where plumbers purchase most of their products. These unique businesses can be found in just about every large or medium city. They rarely advertise, but believe me they exist.

There's a great chance these supply houses will have a faucet that will work using the existing holes in the sink.

Can A Local Welder Help?

If that doesn't work, I'd be inclined to work with a local welder who works in stainless steel. See if he can't fabricate a mount that has holes for modern faucets.

This mount would have small bolts that would allow you to use the existing holes to pull the mount tight to the sink and leave enough space for the water supply lines to feed the faucet.

If your sink needs a new steel base, this same welder can fabricate one in less than an hour using small 1/8-inch x 1-inch angle iron. Be sure there's plenty of cross bracing so the stand will not collapse.

CLICK HERE if you want to get FREE BIDS from local welders who'll make a new stand for you.

Column 1111

Extension Cord Size

This is a beefy 12-gauge extension cord. You can see the 12/3 number on the label. 12-gauge wire is normally rated for 20 amps and 2400 watts, but this one may be underrated because it's stranded wire in the cable. No matter, this cord can deliver lots of juice! CLICK THE PHOTO NOW TO HAVE THIS CORD DELIVERED TO YOUR HOME.

Extension Cord Size TIPS

  • Voltage drops when electric travels long distances
  • Use heavy 12-gauge cords to prevent damage and fires
  • Get cords with GFCI breakers built in
  • Some cords have circuit breakers to prevent FIRES
  • CLICK HERE to Get Tim's FREE & FUNNY Newsletter!

DEAR TIM: My electric hedge trimmer, chain saw and other tools seem to struggle when I use them outside. The size of my yard requires me to use a 100-foot extension cord.

The motor on one tool has already failed after just two years. What's causing this?

Are there new improvements in extension cords that can prevent electric tool failures and other electrical accidents? Susan, Clemson, SC

DEAR SUSAN: The electric motor sensor in your tool was probably caused by overheating.

Low Voltage Ruins Electric Motors

The excessive heat within the motor was very likely caused by low voltage. My best guess is that you are using an undersized extension cord.

Thousands of electric tools die each year prematurely because they are starved for voltage by thin, undersized extension cords. Your other electric tools suffer every time you plug them into that cord.

Free & Fast Bids

CLICK HERE to get FREE & FAST BIDS from local electricians who can help you select the SAFEST extension cord.

Different Wire Gauges

Not all extension cords are created equal. Within the outer insulation of an extension cord you'll find wires that contain different amounts of copper.

Wires that contain more copper can supply your tools with more power. Wire size is measured by the gauge or thickness of the wire.

Smaller Number = More Power / Confusing!

You will often see numbers like 16, 14 or 12 gauge on extension cord wrappers. Believe it or not, as the number gets smaller, the thickness of the copper wire gets bigger!

Thus, a 12 gauge wire can carry significantly more power than a 16-gauge wire. My guess is that your extension cord is a 16 gauge or possibly an inferior 18-gauge cord.

Long Wires = Voltage Drop

Long extension cords can cause excessive resistance and voltage drop. Voltage drop will damage tools.

You can minimize this damage by selecting the proper length cord for the job.

Use Shortest Cord Possible

The best advice is to always use the shortest extension cord possible when powering a tool or device. You may have to purchase cords of varying lengths to power tools. I happen to own cords that range in length from 25 feet up to 100 feet.

CLICK HERE to get FREE & FAST BIDS from local electricians who can help you select the SAFEST extension cord.

GFCI Breakers Built In

You can protect your tools and yourself with many of the new and exciting improvements in extension cords. One of my favorites are the new, short extension cords that contain ground fault circuit breakers.

This 12-gauge cord has a GFCI circuit breaker built into the end where you plug it into a wall outlet. This will protect you in WET situations. CLICK THE PHOTO NOW TO HAVE THIS CORD DELIVERED TO YOUR HOME.

These nifty cords allow you to work safely in damp grass or other locations where you are operating outdoor electrical equipment near water. The ultra-sensitive ground fault breakers, housed within the cord, can sense short circuits before you get shocked. These devices are a must if you work in wet locations.

Here's an extension cord that's got a built-in breaker. If you try to overload it so it would OVERHEAT and catch on FIRE, the built-in breaker SAVES you. CLICK THE PHOTO NOW TO HAVE THIS SAFE CORD DELIVERED TO YOUR HOME.

You can also purchase short extension cords that contain miniature circuit breakers. These cords sense voltage drops in long cords and will cut off the power to the tool before the motor can be damaged.

Soft & Supple In Cold WX

If you're frustrated by stiff extension cords that become unruly in cold temperatures, look for cords that contain rubber in the outer insulation covering. The rubber compounds allow the cords to stay flexible and supple even at temperatures well below 0 degrees F.

This cord has special insulation that allows it to be soft and supple in COLD weather. It also sports an LED in the female end telling you it's plugged in and ready to go! CLICK THE PHOTO NOW TO HAVE THIS WONDERFUL CORD IN YOUR HOME NEXT WEEK.

Have you ever plugged in a tool and had no power? Finding the source of the problem is now easy if you use a cord with a lighted end. A small night-light type bulb is permanently fused in the end of a clear plug end. The cord just above has this feature.

If there is power at the end of the cord, the light glows. You can purchase simple adapters that tell you the same thing if you wish to have this convenience for your existing extension cords.

CLICK HERE to get FREE & FAST BIDS from local electricians who can help you select the SAFEST extension cord.

Column 174

How To Paint Ceramic Tile

Paint Ceramic Tile

Want to know how to paint ceramic tile? As crazy as it sounds you can paint a ceramic tile floor like this. The key is using the right paint and covering the paint with clear urethane. © 2018 Tim Carter

"Apply floor tile paint after cleaning the tile with Stain Solver oxygen bleach. Use a urethane-based paint for best adhesion. Clear coat the paint to protect it."

Revised May 2018

Painting Ceramic Tile TIPS

DEAR TIM: Can you instruct me how to paint ceramic tile? Money is very tight now, and applying ceramic tile paint is the only thing I can afford. Can you paint tile, so it will not peel?

Is there a special ceramic-tile paint? What is an easy way to paint ceramic floor tile, and should I paint the grout? Leslie S., Belleville, IL

DEAR LESLIE: I'll gladly help you discover how to paint ceramic tile. If you've painted walls and even flooring before, you can do this job. The best part is you can really transform the look and feel of a room when you paint ceramic tile.

Can You Paint Tile?

Any ceramic tile can be painted no matter if it is old or new. The most important thing is to make sure the tile is perfectly clean.

Many people ignore the instructions on paint cans. If you take a few moments to read these instructions, you'll discover that they tell you to apply the paint to clean, dry surfaces that are free of grease, wax, dirt, and dust.

CLICK HERE to get FREE & FAST Bids from local painters to paint your ceramic tile.

How to Paint Ceramic Tile

Follow these easy steps to get the best results from ceramic tile paint:

  • deep clean the tile and grout
  • purchase urethane-resin water-based paint
  • add a small amount of flow-control additive to the paint
  • use a low-nap roller and high-quality brushes

What is the Best Tile Cleaner?

Oxygen Bleach

Stain Solver is MADE in the USA with USA ingredients that are food-grade quality. CLICK THE IMAGE to order some NOW.

You can clean ceramic tile with just about any soap, but the more powerful ones often give you a better job. The tile and grout need to be free of all dirt, oil, grease, etc. for the paint to have a chance to bond.

The best tile and grout cleaner I have ever used is Stain Solver certified organic oxygen bleach. It's Made in the USA with USA ingredients.

This is a powder that you mix with hot tap water. You apply a generous amount of the solution and let it soak into the grout.

Millions of oxygen bubbles attack the dirt.

The longer you allow the Stain Solver solution to work on its own, the less you have to scrub.

After a 10 to 15-minute wait, scrub the grout with the excess oxygen-bleach solution. You'll be stunned how much gunk comes out of the grout. After it dries, it should look like new. If you plan to also paint the grout, you must let the grout dry for at least 48 hours.

WATCH this video to see how easy it is to do.

What Floor Tile Paint Is The Best?

The best ceramic tile paint is one that has a urethane resin. The resin in the paint is what allows it to stick to things. Urethane is extremely sticky.

To ensure that the new paint will not peel, you need to use the right paint. In the past, I have had great success with oil-based paint. Pollution laws that address volatile organic compounds (VOCs) in paint make it harder and harder to find oil paints. It's important to realize urethane paint is the next best choice.

Many people also do not like the clean-up process that comes with oil-based paints. You need to use mineral spirits or paint thinner to clean the brushes, rollers and other tools.

Water-based paints that contain a urethane resin make a great ceramic tile paint.

Urethane-fortified paint

Here's a great urethane-fortified paint. That's why on the label it says it's for porches and floors! It's tough enough to walk on so you know it will perform really well on your vinyl siding where no one can walk except squirrels. CLICK THE IMAGE NOW TO have this paint delivered to your home.

Urethane is a very sticky glue, and after all, that is what paint really is - a liquid glue that contains color. You really need a sticky paint to adhere to the glossy surface of most ceramic tile.

Can I Paint Tub and Shower Tile?

Do not paint tub and shower tile. The constant exposure to water and the aggressive cleaning of these surfaces can cause damage to the paint.

There are places where I'd not apply paint to ceramic tile or other glazed surfaces. Don't apply it to ceramic tile that gets wet on a regular basis.

Examples of this are tile surfaces inside a tub or shower area. I'd also not paint the inside glazed surface of a toilet bowl.

You can successfully paint a ceramic-tile backsplash that gets occasional water on it. The ceramic-tile floor in a bathroom can also be painted so long as the water sports in the bathroom don't get totally out of control.

CLICK HERE to get FREE & FAST Bids from painters to paint your ceramic tile.

Should I Clear Coat the Paint?

Yes, it's best to apply a clear water-based urethane to the paint just as you'd apply urethane to a hardwood floor.

To keep the paint on the tile looking like new, you need to protect it. This is especially true if you decide to paint ceramic floor tile. Painted floors of any type work well, and proof of that is any basketball court. Painted basketball courts are created by painting the patterns on the floor, let the paint cure for two days and then coat the entire floor with several coats of clear floor finish.

I've found that the water-based urethanes stay clear for a long time, never yellowing. Price is almost always the best barometer of quality.

Look for a water-based urethane that costs the most money. I've had great success over the years with Varathane Diamond Coat urethane.

Polyurethane Paint

Use this heavy-duty polyurethane to protect the paint. The urethane works just like putting it on hardwood floors! CLICK IMAGE TO ORDER IT NOW.

Can You Paint Grout?

Yes, you can paint grout. The paint will stick very well to the rough grout texture.

As for painting the grout, that's a personal decision. There's no doubt it will make the job easier if you paint the grout the same color as the tile.

If you do want a contrast in color, then you'll be painstakingly taping off the grout lines with the special acrylic masking tape that will not stick to fresh paint.

If you want natural grout and need to regrout, do so before you paint. The regrouting process will damage the freshly-painted tile. Keeping paint out of grout requires great skill and patience.

What is the Best Paint Roller for Ceramic Tile?

I suggest a roller with a low nap to keep bubbles and texture to a minimum.

You can also add products to the paint that allow them to flow well and attain a finish as if they had been sprayed.

Paint Additive

This is a great paint additive you use to eliminate brush strokes. It reduces the surface tension in the paint. CLICK THE PHOTO NOW TO HAVE THIS DELIVERED TO YOUR HOME.

If you have a sprayer, you absolutely can spray the tile. Be sure to protect adjacent surfaces from overspray.

Make sure the urethane you use to protect the paint is applied to a clean dust-free surface. Read the paint-can label to see how soon you can apply the urethane. It is best to let the paint cure as long as possible so it gets nice and hard. This will make it more durable.

CLICK HERE to get FREE & FAST Bids from painters to paint your ceramic tile.

Author's Note: We've received other questions with similar problems or questions. Here's one from E.J. Vincent of California regarding her ceramic tile painting project.

"I want to paint my own design onto ceramic tile, like the ones you would buy at Home Depot. Is there a special ceramic tile paint and sealer I need to use? The ceramic tiles will be incorporated in with the same unpainted tiles on the kitchen cabinet top and backsplash."

Message from Tim: Years ago while researching a column about cleaning decks, I discovered the wonders of Stain Solver Oxygen Bleach. It is perhaps the 'greenest' cleaner I know of as it uses oxygen ions to break apart stains, dirt and odor molecules. There are no harsh chemicals, and it works on just about anything that is water washable.

I decided to create my own special blend using ingredients made in the USA. In fact, the raw materials in the active ingredient are food-grade quality registered with the FDA. I call my product Stain Solver. I urge you to use it to help with cleaning your tile grout. You will be amazed at the results!

Column 723

Connect Deck to House

This deck ledger board is bolted directly to the house. If water gets between the ledger board and the brick, or siding, or stucco, it may never dry out. What's more, imagine if water trickles through the bolt holes into the house! PHOTO CREDIT: Tim Carter

Connect Deck To House TIPS

  • Decks collapse each year and people die or are seriously injured
  • Poor deck building practices lead to ROTTING WOOD
  • WATCH deck collapse video below
  • Detach deck from house converting it into a table
  • CLICK HERE to Get Tim's FREE & FUNNY Newsletter!

DEAR TIM: The house I purchased five years ago has a very large treated lumber deck off the back. Just recently, I discovered spongy drywall inside my home where the deck connects to the house.

Upon further inspection of the exterior, serious wood rot was discovered. The cause appears to be no flashing where the deck ledger board connects to the house.

Does the deck have to be torn down so that I can do all of the needed repairs? What are my options, if any? Gates O., Pittsfield, MA

DEAR GATES: I realize you have problems, but believe me they could be much worse.

Deck Collapses Are Real

Imagine if you had not discovered the wood rot until after the deck collapsed? Each year, decks fall off houses and people are seriously injured or killed. The reasons for the collapses are many, but structural failures where the deck ledger board attaches to the house are commonly involved.

Watch people get seriously injured in this video:

Free & Fast Bids

CLICK HERE to get FREE & FAST BIDS from local deck carpenters who can make sure your deck is SAFE and will not collapse.

Deck Ledgers Are Beams

The deck ledger board acts as a primary support beam for most decks. The board is attached to a house and the deck joists are fastened to the ledger board with special structural metal joist hangers.

At the other end of the deck away from the house, the builder often places another beam under the joists or in the same plane of the deck joists. The deck ledger board at the house often carries 50 percent or slightly less of the combined weight of the deck structure, any furniture on the deck and any people who are standing, sitting or dancing on the deck.

The combined weight of all of these things is often measured in tons.

Retrofit Your Deck

The good news is I doubt your deck has to be torn down. As for your options, my guess is that if ten carpenters were asked the question, you would end up with ten different solutions.

Disconnect Deck From The House

But I wonder if any of the carpenters or remodelers you interview will come up with the fix I have in mind. I am tempted to permanently disconnect the deck from your home and make it freestanding. Once this separation is complete you would never know it when standing on the deck.

From below, you may see two new deck support posts several inches away from your house wall.


Building a deck? Make the best decisions with my helpful and thorough Deck Installation & Repair Checklist. I offer a 100% Money Back Guarantee.


Through Bolts & Flashings

I used to attach deck ledger boards directly to houses. I took all kinds of precautions and installed flashings and caulked the holes where through bolts passed into and through the side wall of the houses.

But I never felt entirely comfortable with the long-term performance of the caulk at the bolt holes. The caulk manufacturers would say the caulk lasts for 20 or even 50 years, but how does one know?

CLICK HERE to get FREE & FAST BIDS from local deck carpenters who can make sure your deck is SAFE and will not collapse.

Deck Becomes A Table

EB015 Cleaning & Sealing Deck CoverFreestanding decks offer enormous peace of mind. The builder knows there are never going to be any leaks and collapse due to rot is simply not going to happen.

The deck is constructed in a similar manner as a beach house is built on piers. In other words, the deck simply has four or more legs much like a table in your kitchen or dining room.

Special Connectors To Stop Sway

There are some very important structural aspects you must consider when you build a deck in this manner. The method of connecting the deck to the posts or columns is very critical.

Failure to do this in an approved manner can lead to the deck collapsing from racking or sway forces.

Back & Forth Motion

Racking can happen when dancing people start to get a deck moving back and forth sideways. It's a real and powerful force that has contributed to the collapse of many decks.

To prevent racking, residential structural engineers can recommend affordable metal connectors, special diagonal bracing under the deck and a simple yet sound design for how and where the deck posts connect to the deck beams and floor joists.


Wood deck surfaces need to be cleaned and sealed to keep them in good condition. The cleaner I recommend is oxygen bleach.


Deck Posts On Footings Or Piers

Your deck can possibly be retrofitted very easily if you choose to make your deck free standing. The additional support columns might be able to rest upon your existing house footer.

The new beam that will replace your deck ledger board only needs to be spaced 2 inches away from the existing exterior wall of the house. This spacing is more than adequate to allow water to drain between the house and beam.

New Treated Lumber High Copper Content

The extra lumber you buy to retrofit your deck may look like the treated lumber on your existing deck, but it might contain different chemicals that can be highly corrosive to certain nails and metal framing connectors. The leading structural framing connector manufacturers sell new connectors that have extra galvanizing treatment that resists the corrosive brew of treated lumber chemicals and rainwater.

Special Fasteners / Timber Screws

Just as important are the fasteners you use to connect the lumber together and to fasten the metal connectors to the lumber. These screws, bolts and nails must also be rated to resist corrosion when in contact with the new treated lumber.

This is a Simpson Strong-Tie Timber screw. I've used them on my own home. CLICK THE IMAGE NOW TO ORDER THEM.

You can't go wrong with stainless steel fasteners. Stainless steel will absolutely stand the test of time. The structural engineer you hire should specify the exact model number of all connectors, lumber type and the size and type of fasteners. CLICK HERE to read why these screws are IMPORTANT.

Read my article on Is Your Deck Safe? in the October 29, 2013 AsktheBuilder Newsletter.

CLICK HERE to get FREE & FAST BIDS from local deck carpenters who can make sure your deck is SAFE and will not collapse.

Portable Generator Tips

smaller portable generators

Here are two dandy smaller portable generators. I own the one on the left. It can put out 2,200 watts and is VERY QUIET. CLICK THE PHOTO NOW TO HAVE ONE OR BOTH OF THESE DELIVERED TO YOUR HOME.

Portable Generator TIPS

  • More power or watts means more noise and weight
  • Answer checklist questions to help get the right one
  • Start up power needs for large appliances can stall mid-sized generators
  • WATCH stand-by generator video
  • CLICK HERE to Get Tim's FREE & FUNNY Newsletter!

Decision To Write About Generators

Did you know that writers like me, magazines and other periodic publications often develop editorial calendars? These are simply a road map of what is going to be written when.

I decided on the topic of portable generators a few months ago. I felt it would be a ho-hum column and bulletin. Boy, was I wrong!

Loss Of Power Is Popular

Evidently hundreds of thousands of people, probably more like millions, out there have suffered just like myself and my family during storms. My suggestion to you is to consider buying stock in one of the top portable generator companies for your IRA or Keogh plan.

Free & Fast Bids

CLICK HERE to get FREE & FAST BIDS from local electricians who specialize in portable and stand-by generators. They can help you size one!

More Watts = More Noise

Portable electric generators are often powered by the same gasoline engines that deliver power to air compressors, lawn mowers and similar equipment. As you know, these engines produce lots of noise.

Some generators are quieter than others. It's something you should absolutely consider when purchasing a unit.

I can tell you from experience that the droning of a 5 or 8-hp gasoline engine for countless hours can drive you crazy. I used a gasoline-engine air compressor for years and by mid afternoon you wanted to throw a rock at it.

When you need electricity in an emergency, you'll already be stressed. You don't need some extra noise grating your nerves as well!

Countless Options / Variety

I'm astonished at the variety of sizes and types of portable electric generators. You're not going to have an easy time making up your mind!

Many are air cooled. However as you approach 5,000 watts or more of power you might start to run into a few liquid-cooled engines.

Stand-By Generator

If you want the ultimate generator, get a monster stand-by generator like I have. It comes on automatically and I don't have to switch out extension cords. It's connected directly to my breaker panel.

Watch this video of my generator.

CLICK HERE to get FREE & FAST BIDS from local electricians who specialize in portable and stand-by generators. They can help you size one!

Multiple Outlets / Levels Of Power

Some models offer multiple outlets of different power, AC & DC current capabilities, built in GFCI safety breakers, electric start, etc. It reminds me of buying a car! You will have a tough time keeping all of the options clear in your head.

The DC power created by most portable generators is very dirty. It's good enough to recharge a car battery, but don't even think about using it to operate a ham radio or other precision electronic device that needs a clean DC power stream.

portable electric generator

Here's a beefy portable electric generator that produces 5,500 watts. These are what you need to be reasonably comfortable for an extended power outage. CLICK THE PHOTO NOW TO HAVE THIS GENERATOR DELIVERED TO YOUR GARAGE.

Create A List Of Must-Haves

I suggest you make a list of "must haves" before you start shopping. Here's a list of questions that might help you narrow down what you need:

  • Where will you store the generator when not using it?
  • Where will the generator be when operating?
  • How will you move it into position?
  • Will moving it require wheels?
  • What are you going to connect to the generator?
  • How will you make the connections?
  • Do you have the correct-sized extension cords?

What things would you love to have if money was no object?

Calculating Power Needs

Don't go to Amazon.com just yet to order one! CLICK HERE if you can't wait and need a beefy portable generator.

You have to wander around your house and do a power study first. I want you to imagine that the power has just been cut off to your house. It's 20 degrees outside. What do you need electricity for, to keep you partially comfortable and your water lines from freezing?

A power study is simply a list of everything you MUST operate at some point during the power outage. While it would be nice to have everything operate at once, you'll discover it's not necessary to survive.

You may have to have your furnace on for an hour, then you can plug in the refrigerator. Different light circuits can be plugged in depending on the time of day.

Common Watt Requirements

Find the wattage of the electrical devices and write down this number. If you can't find watts on the appliance or motor, write down amps. We will convert amps to watts in a moment. (Refer to the Appliance Wattage column for common appliance wattages.)

  • cell phone battery charger - 25 watts
  • furnace fan blower - 700 watts
  • electric crock pot - 240 watts
  • microwave - 700 to 1,200 watts
  • video game device - 40 watts
  • refrigerator - 550 watts
  • water well pump - 575 watts
  • hand hair dryer - 1,200 watts
  • window air conditioner - 1,500 watts

Once you have this list, add up the total wattage. Don't forget to add lights that must be on.

Not every light mind you, just the ones that are a necessity.

Now, what things on the list MUST be on at the same time? Often you don't have to have the refrigerator, freezer and the furnace on together. Why? A winter emergency will require reduced refrigeration (the house temp may fall into the 50's and 60's). A summer emergency will require full power to the refrigerator and freezer but none to the furnace.

Once you have the list of the things that must be on at the same time, you can calculate the total wattage you must have as a minimum.

CLICK HERE to read a column about start up or reactive load for generators. It's very important when sizing one!

CLICK HERE to get FREE & FAST BIDS from local electricians who specialize in portable and stand-by generators. They can help you size one!

Column B178

Flagstone Mortar Mix

flagstone mortar mix

Flagstone mortar mix needs both of these bags. The bag on the left with the tiger is hydrated lime. The bag on the right is Portland cement. While the bags look almost identical, what's inside them are as different as cats and dogs. CLICK THE PHOTO to order hydrated lime. It's the best ingredient you can buy. (C) Copyright 2021 Tim Carter

"Flagstone mortar mix is made by mixing sand, hydrated lime, and Portland cement in precise quantities. The hydrated lime is often left out but it adds long-term strength and durability."

Flagstone Mortar Mix Checklist

DEAR TIM: I'm installing flagstone and some paving brick on top of a concrete patio. A book I read suggests mixing sand, cement, and hydrated lime in different proportions to make the mortar mix.

What is hydrated lime and is it necessary to add it?

Lastly, as cold weather is around the corner, when should I stop working so as to prevent freeze damage to fresh mortar? Rick A., Blacksburg, VA

DEAR RICK: Here is a subject near and dear to my own heart.

Flagstone & Brick On Concrete

The first thing to remember is I can't begin to tell you how many paving brick and pieces of flagstone I have set in cement mortar over the years.  It's been more than I care to remember. The great news is that each and every one is still solidly set and shows no sign of delaminating from the concrete base below.

flagstone mortar mix

This is a flagstone patio I installed. You can't see the hydrated lime in the mortar, but it's there. Copyright 2018 Tim Carter

It's important to realize that using basic and readily available building materials as you describe above, you can create a decorative patio surface that will last for many years.

What is Hydrated Lime? - Mythical Material

The hydrated lime you read about is a dry fluffy powder. It's an ultra-strong mortar that's been used for thousands of years and still performs well.

Lime is made by first taking limestone, a very durable rock, and heating it up in giant kilns. The rock is then crushed and is now chemically unstable.

Please watch this informative video about hydrated lime mortar.

How is Hydrated Lime Made?

To make the hydrated lime you'll buy in a bag, the manufacturers add a very specific amount of water to the crushed and cooked lime and mix the two in large mechanical mixing machines. The small amount of water activates the calcium oxide in the lime but does not turn it into a paste or putty.

Mortars that contained traditional lime were often subject to popping, pitting or disintegration if they were not carefully proportioned and mixed. Hydrated lime takes the guesswork out of mixing mortar and as such is very user-friendly.

hydrated lime

This is excellent hydrated lime. It's a fine white powder and it's going to look great on your home. CLICK THE IMAGE TO ORDER SOME RIGHT NOW.

Is Lime a Necessary Mortar Ingredient?

Hydrated lime is not a necessary mortar ingredient, but mortar made with hydrated lime is perhaps the best mortar you can make. You can make mortar with just Portland cement, sand, and water.

The mortar that I used to permanently attach the brick and stone to my patios did not contain any hydrated lime. But adding hydrated lime to the mortar mix can be very beneficial.

The plasticity or workability of the mix will improve. When hydrated lime is added to the mix, the sand and the cement do not separate. The final mortar is also more waterproof. Shrinkage cracking can often be eliminated or minimized when hydrated lime is added to the mixture.

Flagstone Mortar Mix Secret Recipe

Replacing 10 to 15% of the total volume of cement with hydrated lime usually produces optimum results. Keep in mind that the Portland cement is the glue that holds the flagstone and brick to the concrete patio.

Years ago many recipes I looked at suggested a ratio of three parts sand to one part cement for cement mortars. I altered that recipe and always mixed my ingredients 3 parts sand to 1.5 parts cement.

After surviving twenty-five years of brutal winter freezing temperatures, my patios look like the day they were finished. I'm convinced that my recipe is one that will work for you as well.

paver patio brick

I built this patio using true paver brick. The mortar between each brick is made with a rich recipe of fine sand and Portland cement. I wanted it to flow through a mortar grout bag. Hydrated lime would have been a good thing to add, but I didn't do it on this job. The mortar, after 30 years, looks like the day it was installed. (C) Copyright Tim Carter 2021

Hydrated Lime & Cement Recipe

If you decide to use the hydrated lime, you can use this recipe for the mortar:

  • three 5-gallon buckets of dry sand
  • 6.38 gallons of Portland cement
  • 1.12 gallons of hydrated lime

I'd use medium sand. It's available at local gravel pits or businesses that sell brick and concrete block.

Blend these ingredients together well before adding any water to the mix. Add water slowly until you get a mixture that resembles regular bricklayers mortar.

The consistency should be like a stiff applesauce, not runny applesauce.

IMPORTANT TIP: Only mix as much mortar as you can use in one hour or less. If it's hot, windy and sunny, only mix as much as you can use in 30 minutes. Do not add water to the mortar if it starts to get stiff.

Is Cool Weather Best To Install Flagstone?

Cool weather is your friend but cold weather is indeed your enemy as you attempt to finish this job. If the mortar had its choice of weather conditions, it would undoubtedly tell us to install it on days when the air temperature was in the mid-50sF with overcast skies.

A nighttime low temperature of 40F would be ideal. Believe it or not, sunny hot, dry or breezy weather are not great conditions for working with mortar and concrete.

Should I Avoid Freezing Temperatures?

I would not install any flagstone or brick if the air temperature is forecast to drop below 28F for 48 hours after you install them. You can help yourself immensely by preheating the materials you will be working with.

Should I Keep Flagstone Mortar Mix Materials Warm?

If at all possible, keep the sand, cement, and hydrated lime indoors at room temperature and only bring it outdoors to mix it. Use very warm or hot water to mix the mortar. Try to heat the brick or flagstone as well although this may be far more difficult to accomplish.

Can I Use Insulated Blankets If Freeze Danger?

After you lay the flagstone or brick, cover them as soon as possible with waterproof insulating blankets. These can be rented at tool rental businesses.

The mortar actually creates a small amount of heat as it cures and hardens, and if retained within the masonry instead of released to outer space, it helps the mortar get stronger faster. Keep the masonry covered with the blankets for at least 48 hours if possible.

Do Cold Temperatures SLOW the Chemical Hardening Reaction?

As the air temperature drops so does the temperature of materials stored outdoors and the actual concrete to which the flagstone and brick will be attached. These cold temps radically affect the chemical reaction of hydration that starts the moment water is added to the powdered cement and hydrated lime.

Hydration is the reaction that turns the powdered cement and lime into actual microscopic cement paste crystals that interlock the sand particles together.

Can I Trick The Temperature?

To resist the expansion forces of freezing temperatures, a certain amount of crystals need to form. The way to accomplish this is to fool the mortar into thinking it is 55F or higher. You do just that by preheating all of the ingredients and by storing all of that heat as you do each night when you sleep under blankets or a comforter.

Column 488

Wiring 3 and 4 Way Switches

3way switch - Tim's hand

4-way switch wiring requires you to also install two 3-way switches. This is a 3-way switch. Copyright 2018 Tim Carter

"The placement of the switches is critical. The 4-way switches must be in between the 3-way switches."

4 Way Switch Wiring TIPS

  • Connect the traveler wires to the right screws
  • 3-way switches must be used with one, or more, 4-way switches
  • WATCH the 3 and 4-way switch videos BELOW
  • 4-way switches go in between two 3-way switches
  • CLICK HERE to Get Tim's FREE & FUNNY Newsletter!

DEAR TIM: I need to know how to wire a 4-way switch. I have two interior hallway lights that are controlled by three separate electrical switches.

My husband tried to install new decorative switches and now the lights come on only part of the time. What in the world do you think he did wrong? I need an aspirin! - R.L.

DEAR R. L.: In all fairness, he may have done nothing wrong.

Related Links

4-Way Switch Wiring Diagram - Very Easy

Troubleshoot a 4-Way Switch Yourself - Save $$$$

4-Way Switch Wiring is Easy

You possibly have a defective switch. However, the smart money is on your husband. Sounds like another weekend warrior who was not prepared for battle.

The problem could be in the two 3-way switches that are part of the circuit. Watch this video first:

Your problem is a fairly common one. It involves what are known as 3-way and 4-way electrical switches. These simple devices create more problems than they deserve.

What Are The Traveler Wires?

There are special wires called travelers that pass between the two switches. These wires must connect to the bright brass screws on each 3-way switch and on to the bottom two, or top two, screws of a 4-way switch.

I know that seems confusing, that's why I created two videos for you to watch below. Watch the 3-way switch video first.

What is the Continuous Hot Wire?

The continuous hot wire is the line wire from the electric panel and as long as the circuit breaker is on, there is always power in this wire.

This continuous hot wire connects to a special black screw on a 3-way switch. You'll see it in the video below.

Free & Fast Bids

CLICK HERE to get FREE & FAST BIDS from local electricians who can correct your husband's mistake if he can't figure it out.

Common Single Pole Switch Video

Watch this video about a standard single-pole switch. This is the most common switch in any home. A single-pole switch is a switch that turns on an overhead light, possibly controls a table lamp or causes a fan to operate.

I need you to understand how power passes through this basic switch before we move onto the 3-way and 4-way switches.

Watch this video first.

3-Way Switch Video

Now that you understand how current is controlled by a simple switch, let's look at the 3-way switch.

Why Use A 3-Way Switch?

You use a 3-way switch to control one, or more, lights from two different locations.

Common locations where you'd find a 3-way switch useful are:

  • hallways
  • staircases
  • large rooms with two entry/exit doors


4-Way Switch Video

Watch this video to see how to properly install a 4-way switch. Here's what's fascinating. You can install one, or more, 4-way switches between two 3-way switches!

4-way switch wiring is used to control lights, fans, or other electrical fixtures from three, or more, points.

CLICK HERE to get FREE & FAST BIDS from local electricians who can correct your husband's mistake if he can't figure it out.

Where Does a 4-Way Switch Go?

The 4-way switches must be in between the 3-way switches.

In other words, the power from your circuit panel must first enter the 3-way switch before it goes to the 4-way switch. From that 4-way switch, it then travels to an additional 4-way switch or, in your case, to the final 3-way switch.

The path that the electricity follows as it passes between the switches is not unlike a railroad switching yard.

Three-way and 4 way switches are easy to distinguish.

A 3-way switch has three screws plus the green grounding screw. Remember, the one screw will be painted BLACK. Go back and watch the video to see what wires go to what screws.

A 4-way switch will have four screws plus the green grounding screw. Just watch the 4-way switch video once more to see how easy it is to connect the wires to the correct screws.

Your lights will work perfectly in just a few minutes.

hidden

Wattage for Household Appliances

Wattage for Household Appliances TIPS

    • Look on label of appliance for watts
    • Small things can draw LOTS of watts - e.g. hair dryer
    • Microwaves need more power than refrigerators

Watts - Measurement Of Power

Watts are a unit of power. You probably studied that in high school physics class.

Remember James Watt?

I'm sure you've seen the wattage rating on a light bulb. Most older incandescent bulbs have a rating from 60 to 100 watts.

LED light bulbs can produce the same amount of light but require far fewer watts.

Appliances Need More

If you want to operate a refrigerator, a microwave oven, a hand-held hair dryer, a vacuum cleaner or even a cell-phone charger, you're going to need lots of watts at the same time.

A double oven that operates on 240 volts in your home is perhaps the biggest energy glutton. It consumes thousands of watts per hour.

Free & Fast Bids

CLICK HERE to get FREE & FAST BIDS from local electricians who can help you compute total watts you need for a generator.

Typical Watts For Appliances

  • cell phone battery charger - 25 watts
  • furnace fan blower - 700 watts
  • electric crock pot - 240 watts
  • microwave - 700 to 1,200 watts
  • video game device - 40 watts
  • refrigerator - 550 watts
  • water well pump - 575 watts
  • hand hair dryer - 1,200 watts
  • window air conditioner - 1,500 watts

Lights That Go Dim in the Night

Have you ever noticed your living or family room lights dim for just a second or so when your refrigerator, AC or washing machine turns on?

The dimming of the lights is caused by the reactive load of the major appliance that was starting up.

Have you ever had to push a car? It takes a tremendous force to start it rolling. However, once it is rolling, the effort to keep it rolling is reduced.

Electric motors and refrigeration compressors are no different.

Start Up Load Can Be Double!

The reactive loads can be double the running load! Wattage demand can soar!

Unfortunately, you must account for this when sizing a generator.

You'll find out very quickly that if your power is interrupted, and you depend on a portable generator, the experience will remind you of a backpacking trip.

You'll have some fun, but for the most part your life will be miserable until the power is restored.

Right-Sized Portable Generator
Portable electric generators are very nice. When I lost power for three days in a winter storm, my kids had fun for the first eight hours.

You don't realize how much you depend on light bulbs, TV and even the toaster each day. I didn't have a generator, but wish now I had this one:

beefy portable electric generator

Here's a beefy portable electric generator that produces 5,500 watts. These are what you need to be reasonably comfortable for an extended power outage. CLICK THE PHOTO NOW TO HAVE THIS GENERATOR DELIVERED TO YOUR GARAGE.

It's also very depressing to go to bed at 7:30 p.m. when the sun goes down. Flashlights are no substitute for a table lamp. Buy as much generator as you can afford. You will never ever regret it!

CLICK HERE to get FREE & FAST BIDS from local electricians who can help you compute total watts you need for a generator.


Column B178

Portable Electric Generators

Here are two dandy smaller portable generators. I own the one on the left. It can put out 2,200 watts and is VERY QUIET. CLICK THE PHOTO NOW TO HAVE ONE OR BOTH OF THESE DELIVERED TO YOUR HOME.

Portable Electric Generator TIPS

  • Allow you to have heat and cooling in power outages
  • Small ones, 2,000 watts, are for minimal power requirements
  • 5,500 watts is more realistic for output
  • WATCH video below of automatic stand-by generator
  • CLICK HERE to Get Tim's FREE & FUNNY Newsletter!

DEAR TIM: Last year, we lost electric power to our home three times. One of the outages cost us approximately $400 in spoiled food.

Will a portable generator solve this problem? How do you size a generator?

Can they be safely connected to the electric panel, or do you have to use extension cords to power separate items?

Will these generators supply sufficient power to run sensitive electronic equipment such as my computer? Doug Turner, Oregon

DEAR DOUG: Two years ago, the exact same thing happened to me.

My Own Outages

A few years back, a summer storm left my family and I without power for 36 hours. Then a freak fall snow storm knocked out my power for three days.

A portable electric generator would have allowed me to run my refrigerator and freezer just enough to save my food.

Plenty Of Natural Gas - But NO HEAT

I could have also powered my furnace for 10 minutes an hour to keep the pipes, my wife and kids from freezing. October is normally a balmy month but this storm brought in a bubble of cold air that made it feel like December.

I had an unlimited supply of natural gas coming into my home, but my furnace was ice-cold because there was no electricity to power the thermostats and giant fan that blew hot air to all the rooms.

Sleeping in the family room in front of the fire made us feel like we were in a log cabin.

All because I didn't own a simple portable generator that would have allowed us to not go back in time 100 years!

Free & Fast Bids

CLICK HERE to get FREE & FAST BIDS from local electricians who specialize in sizing and CONNECTING portable generators. Think SAFETY!

Great Machines & Reliability

Portable electric generators come in all sizes and levels of quality. They can provide you with emergency power to run virtually any electric appliance in your home.

They can also provide electric power for picnics, camping and construction needs.

Portable Generators For Smaller Loads

However, if you plan to power a whole house air conditioner or heat pump, you are dreaming. These large electrical devices will overwhelm an average or large size portable generator.

Sized In Watts

Portable electrical generators are sized by the amount of watts they will produce when operating. A 2,500 watt generator will supply enough electricity to power twenty-five 100 watt light bulbs for 30 minutes.

After that, you should reduce the load by 10 percent to avoid overheating the generator.

The total capacity of a generator cannot always be delivered to a single appliance. The power you can deliver to any one appliance is determined by the size of the outlets on the side of the generator.

Add Up Watts To Size One

Sizing a generator for your household emergency needs can be a bit complicated. You need to calculate the total amount of watts (electrical load) you might have connected to the generator at any one time.

Appliances and motors have labels that tell you how many watts the appliance requires while operating. You'll discover quickly that if you want to power several things at once, plus have a few lights burning, you'll need at least 4,500 watts, maybe even 5,500 watts.

Typically you'll discover even with a larger generator you'll have to switch out what things get power.

In other words, you may let the furnace run for an hour, then switch that power cord to the refrigerator. Not all things can have constant power unless you get a massive generator.

beefy portable electric generator

Here's a beefy portable electric generator that produces 5,500 watts. These are what you need to be reasonably comfortable for an extended power outage. CLICK THE PHOTO NOW TO HAVE THIS GENERATOR DELIVERED TO YOUR GARAGE.

Giant Generators - In Case You Must Have One

Watch this video to see my automatic stand-by generator at my own home. It comes on automatically if the main power is out for ten seconds.

This generator can produce 17,000 watts. That may seem like a vast amount of electricity, but it's not enough to power a 240-volt large oven.

CLICK HERE to get FREE & FAST BIDS from local electricians who specialize in sizing and CONNECTING portable generators. Think SAFETY!

Typical Watts For Appliances

  • cell phone battery charger - 25 watts
  • furnace fan blower - 700 watts
  • electric crock pot - 240 watts
  • microwave - 700 to 1,200 watts
  • video game device - 40 watts
  • refrigerator - 550 watts
  • water well pump - 575 watts
  • hand hair dryer - 1,200 watts
  • window air conditioner - 1,500 watts

Start Up Draw

In addition, certain appliances require significantly more power at start-up than while actually running. It takes a big initial surge of power to get the core of the electric motor spinning.

Refrigerators, furnace blower motors, freezers, washing machines, etc. are examples of these appliances.

If you've ever seen your lights temporarily dim while your refrigerator starts up you know what I am talking about.

This is called reactive load and it can be as high as double the running load of an appliance. You need to keep this in mind when sizing a generator.

Well pumps, larger AC units, etc. can have crippling reactive loads and stall out a generator that's too small.

Transfer Switch Is Complicated

Connecting a portable generator to your main electric service panel where the circuit breakers are located is accomplished using a transfer switch. These switches completely take your house off line while the generator is operating.

If you don't use a transfer switch and simply feed power to the electric panel, you could kill a utility company linesman who is attempting to restore power to your neighborhood. These switches also protect the generator when power is restored by the utility company. Make sure a qualified electrician installs your transfer switch. It must be inspected by your local electrical inspectors and/or the utility company.

Generators & Extension Cords

Almost all portable generators come with electrical outlets. You plug in an extension cord into these outlets.

Extension cords are inherently dangerous because all too often they're under sized. This means if you try to put lots of electricity through them they can overheat and cause a fire.

If you choose to use them, be sure they are sized adequately to handle the flow of electricity. An undersized cord can overheat, short out and cause a fire.

CLICK HERE to read my past column about Sizing Extension Cords.

Modern Generators SAFE For Electronics

To power sensitive electronic equipment, you need to purchase the highest quality portable generator you can afford. The quality of electricity produced by different generators can vary.

The gasoline engine and the generator must provide consistent, smooth power. Inexpensive motor or generator components can adversely affect electrical power production.

Consider purchasing an engine that has an automatic shut off that can detect low engine oil levels. This simple feature will protect your engine from failure. Remember, higher quality usually means higher initial cost. The most economical generator may not be the best long term investment.

CLICK HERE to get FREE & FAST BIDS from local electricians who specialize in sizing and CONNECTING portable generators. Think SAFETY!

Column 178