Treated Wood Rot

treated wood rot

This is a close-up shot of the top of a 2x10 treated wood deck joist. You can clearly see the rot happening around the corroding screw. (C) Copyright 2017 Tim Carter

Treated Wood Rot

DEAR TIM: I’m starting to have some rot issues with my ten-year-old deck. Not only are some of the treated wood decking boards having rot issues, but I’m also noticing that the tops of some of the joists are showing severe rot where the decking screws pass into the tops of the joists. The rot is 2 inches deep in a few of the joists! Is the lumber defective? Are the chemicals in the wood so strong as to cause the rot? What’s going on and is there anything that can be done to prevent it? Lawrence B., Concord, NC

DEAR LAWRENCE: I’ve experienced similar rot with treated lumber I’ve owned. Years ago, I built a treated wood play set for my kids. After fifteen years I got rid of it to build a garden shed for my wife.

I was shocked when I pulled the buried posts from the ground. Even though the lumber was rated for burial and direct contact with the soil, termites had consumed quite a bit of several posts.

Last year, I visited the home of a childhood friend and her treated lumber deck posts had severe rot where the end grain at the top of the posts was exposed to the weather and rain. A month after seeing this rot, I encountered some rot on my own treated lumber deck that I was rebuilding.

About twenty years ago, I was in the center of the vortex of a massive lawsuit between two giant corporations. I had Marvin Windows in my home that were treated with a defective clear wood preservative. While the windows were not made with the same species of wood as your deck, I have first-hand experience in knowing that treatment chemicals can be defective. Suffice it to say, treated wood does rot.

There are many reasons why it can happen. A defective pressure gauge at a treatment plant might be the culprit. The manufacturer of the chemical brew might have made a mistake in its testing procedures and the chemical may not perform as expected. Scientists in labs can and do make mistakes even though they try everything to prevent them. The list of possibilities is endless.

There’s a secondary issue that could be in play. When your deck was built, the carpenter could have unintentionally helped accelerate the rot. Base on the photo you sent to me, it’s quite obvious the top of the joist has a crack in it that extends back to the corroding screw.

This crack no doubt originated when the carpenter drove the screw through the decking into the top of the joist. Without drilling a pilot hole, the twisting screw produces enormous amounts of tension in the lumber as the mass of the screw pushes aside wood fibers.

I’ve never taken the time myself to drill pilot holes and I’ve never heard of a carpenter doing it as it’s so time intensive. I don’t want you to think it was his fault.

The crack may have been very small at the time the deck was built but over time the crack enlarged. This happens when water enters the crack and causes the wood to expand. When the wood dries out, the wood contracts. This back and forth movement can cause the crack to widen. As the crack gets bigger, the water drives deeper into the wood causing even more stress.

If the preservative chemicals didn’t penetrate deeply into the wood, then it stands to reason that the water entering around the screw in your photo can cause the wood to begin to rot.

Treated wood rot has spawned a new category of products to help protect your investment in the treated lumber and all the work to build a deck frame. You need three things to have wood rot: wood, water and fungi that eats the wood. If you take any of the three things away, you stop the rot.

Water is much easier to stop that trying to keep fungi away. Any number of products are available to stop water from entering the treated wood. Last year as part of my deck reconstruction project I applied a special tape on top of my wood joists before I installed the decking. This tape had a butyl rubber adhesive and is designed to seal around the shaft of the screws I used to attach the hidden fasteners for my decking.

You can also purchase rolls of ultra-thin stainless steel that also has the sticky butyl adhesive. Stainless steel is an excellent product to use to cover the tops and end grain of wood joists so that water can’t enter. It’s easy to cut the stainless steel with regular scissors and applying it is no different than using any other tape.

My advice to you is to replace any rotted pieces of treated lumber and then protect the top edge and any hidden end grain of the joists where they may get covered by a band board or butt up against a beam. Do this and you might end up with a deck frame that can last for many decades.

Column 1203

Blacktop Driveway Types

blacktop driveway

This blacktop is seventeen years old and in very good condition. It’s got larger pieces of stone about the size of large grapes. That’s one reason it’s doing so well. (C) Copyright 2017 Tim Carter

Types of Blacktop Driveways

DEAR TIM: We need to have a new blacktop driveway installed and I thought it was going to be a simple process of comparing quotes. It turns out it’s somewhat confusing. I didn’t know there were different types of blacktop. What’s more, the contractors don’t seem to agree on the best way to prevent cracks along the edge of the driveway. Can you explain why there are different types of blacktop and what might be the best for my situation? Do you have a blacktop drive and what’s it like? Maddie H., Baltimore, MD

DEAR MADDIE: I do have a blacktop driveway at my current home. Prior to that I had a very unique driveway that was the first cousin to blacktop. It was a driveway made with just the liquid asphalt cement and small stone chips. Some call it seal chip and others call it tar and chip. Blacktop is almost always an asphaltic concrete made from liquid asphalt cement, sand and gravel.

If you know much about sand and gravel, then you can start to get your head around how there can be different types of blacktop. The reason there are different blacktop types is because there’s an infinite amount of possible combinations when you consider the different sizes and shapes and colors of sand and gravel.

Highway engineers have a much better handle on this than folks like you and me because they have to construct roadways from asphalt that support heavy trucks. The blacktop mixtures used on an Interstate highway may be just fine for some residential driveways but you’d have to take a number of things into consideration.

For example, let’s talk about my driveway. I live in central New Hampshire and we get lots of snow and ice in the winter. Many driveways here where are not flat. You need excellent traction in both wet and snowy weather.

Fortunately the contractor who installed my driveway before I bought this home used a special mix that has smaller and larger pieces of crushed granite in the mix. The majority of the largest pieces of stone in my driveway are about the size of a large grape. There is an occasional piece of stone that’s about the size of my big toe!

These stones in the mix are by no means smooth. The roughest edges are knocked down, but the stones have a marvelous gripping texture. Over time the smaller pieces of sand and asphalt have eroded between the stones a slight amount. This produces a rougher surface that provides exceptional traction in wet or snowy weather.

But you may want a satin smooth blacktop drive for your mild climate. Many homeowners love smooth-as-silk blacktop. If you’re installing a new driveway and you intend to be at the house for many years, you may want to consider talking to your contractor about installing two separate layers of blacktop to create a driveway that could last decades and decades.

Keep in mind that the gravel base under the blacktop is where the drive gets almost all its strength. You want at least 8 inches of crushed compacted gravel under the blacktop.

You have the option to install one 2-inch layer of blacktop like I have on top of the gravel base. He then would order a different batch of blacktop that only had small stones in it no larger than 3/8 inch in size. He’d put a 1-inch layer of this on top of the first 2 inches. When these smaller stones are combined with medium and some coarse sand in the mix, the final surface after it’s rolled is just about as smooth as you could imagine.

It’s very important for you to see the different types of blacktop that your contractors are proposing. Have them give you addresses of jobs you can go visit. Walk around and look at the finish and the size of the stones you can see in the mix. Decide which one you like best and be sure to have the contractor match it.

To prevent cracking of the blacktop on the edges of the drive, you need to do something most residential contractors never do. The crushed gravel rock base under the driveway needs to be at least 1 foot wider than the actual finished driveway if you want to eliminate cracks.

Most driveway contractors install the gravel base, compact it and then put the blacktop all the way to the edges the gravel. The soil on the sides of the driveway that’s added after the job is done offers no structural strength to a sideways movement. When a heavy vehicle tire is right at the edge of the driveway, the force not only goes down but some of the force also goes sideways.

When the soil can’t oppose this force, the blacktop cracks away. A wider compacted gravel base will provide all the needed support. Roads out in the country have this extended base. You’ll often see wide gravel shoulders on country roads. These are there to keep the pavement in great shape.

To have the best protection against edge cracks the gravel base or shoulder should extend to the same height as the asphalt. Most homeowners would never put up with this look as they want the grass to touch the blacktop. You can put in an attractive edging stone as a compromise. Talk to your contractor and see what thoughts he has.

June 20, 2017 AsktheBuilder Newsletter

In just a few days, I leave on the Norwegian Cruise Lines (NCL) Dawn ship for a one-week cruise to Bermuda.

WOOT! I've never been on a cruise before. I've been in contact with the NCL public relations department and they're working with me trying to get me into non-public areas of the ship so I can write a very interesting story for you.

I'm hoping it all works out and I'm allowed to take some fantastic photos. As Kenny Chesney said in his hit song, "Only time will tell, but it ain't talkin'."

Montana Deck Collapse

Each week I'm convinced there are decks that collapse in the USA. Most don't make the national news. If you want to get the statistics, the best place would be insurance companies.

Most homeowners would file a claim with their insurance company in the event of a deck collapse.

Last week there was a fairly large deck collapse in Montana and some of the people on the deck were first responders!

CLICK HERE to read the story about what's known so far.

CLICK HERE to watch several deck collapse videos. Scroll down to see them.

What's this have to do with you? More than you can ever imagine. I can tell you after reading the following you're going to think about your safety when you stand or sit on a deck that's not yours.

Here's the short list of what you probably don't know about decks and treated lumber:

  • treated lumber ROTS - CLICK HERE to see it
  • treated lumber can corrode nails and bolts
  • inferior framing methods create DOOM - CLICK HERE

I could go on and on. I'm not trying to freak you out about getting on a deck, but you need to realize they can collapse.

SAFETY TIP: If you have an older deck, you may want to have it inspected.

I'd only trust a structural engineer that's got experience with outdoor decks. Calling in a regular contractor that builds decks is not the best idea.

This poor devil contractor may have been building decks wrong his entire career, so you don't want to get advice or an opinion from him.

CLICK HERE to get FREE & FAST BIDS from local structural engineers in your city or town who can inspect your deck.

Bermuda Next Week

I'll be on a cruise next week to Bermuda. There won't be a newsletter. I'm going to meet up with one of my subscribers who's there! I'll post a photo if she lets me.

Stain Solver 9-Pound Sale

It's time to make a new huge batch of Stain Solver.

The issue we have is we have to forecast the amount of each size that MIGHT sell moving into the future. It's hard to do it and we've never gotten it right.

To balance out existing inventory, we need to SELL more of the 9-pound size.

Here's a promo code for 10% off that will only work if you purchase a 9-pound or larger size:

Summer1710

This promo code is only good for the next TEN DAYS. It WILL EXPIRE.

In addition to the discount, you also get FREE SHIPPING to any location in the lower 48 contiguous states.

CLICK HERE to place your order. Remember, the promo code only works on the 9-pound size or larger.

New Revised Columns For You

Here are some excellent columns you should look at. Several have GREAT VIDEOS in them.

Change the Color of Your Concrete - Seriously!

Treated Lumber Rotting

Traditional Wood Porch Decking

Concrete Steps Leaking? No Way!!!!

Tool Of The Week

Here's the tool of the week I feel you should know about. I've been using this Bosch drill now for over a month and LOVE IT.

It's cordless and the 18-volt 6.3 amp/hour battery provides what seems like ENDLESS power!

CLICK HERE to discover more about this drill and to get a great price on a full kit.

This is a BEEFY drill and remember it will drill into CONCRETE, GRANITE, wood, and STEEL!

That's enough for today. I've got tons to do before I leave for the cruise on Friday.

I'll be back with more news in early July!

Tim Carter
Founder - www.AsktheBuilder.com
Author - www.RoofingRipoff.com

Do It Right, Not Over!

Treated Lumber Rotting

Treated Lumber Rotting

This is but one treated lumber deck post on the same deck that is rotting. Can you imagine the safety issues this poses? Copyright 2017 Tim Carter

Treated Lumber Rotting TIPS

  • Treated lumber does rot - it's a dirty little secret the industry keeps
  • Preservatives might not be formulated correctly
  • Products are available to minimize water infiltration into treated lumber
  • DECK COLLAPSE VIDEOS - watch them below
  • CLICK HERE to Get Tim's FREE & FUNNY Newsletter!

DEAR TIM: In just a few weeks, a builder will show up to completely rebuild my deck. The house is only twenty years old and the treated lumber used to build it is rotting away.

The centers of the deck railing posts are crumbling. I thought treated lumber was supposed to last forever. What is the problem?

I religiously applied sealer to the wood thinking that would help, but alas it was just cosmetic. Can you trust treated lumber? Is it possible my deck could have collapsed? Cathy B., Cincinnati, OH

DEAR CATHY: Your dilemma reminds me of past email exchanges I’ve had with builders and companies that swear treated lumber foundations are so much better than poured concrete.

Wonders Of The World = Stone

The go on and on about how the wood is so much more energy efficient. My reply to all these is that the great Wonders of the World are all built with rock and then I go on to mention that it’s possible things can go wrong in the treatment process that cause the wood to rot prematurely.

Preservatives Not Dependable

I’ll also add that I was part of a giant class-action lawsuit a few decades ago involving a major window and door manufacturer and a paint company. The paint company was supplying the window company with a clear wood preservative. The preservative was used to prevent the window and door frames and sashes from rotting.

It didn’t work and it took about eight years to discover the preservative formulation was defective. The dream house I built had these windows with the defective clear wood preservative. Fortunately I was able to negotiate a very fair settlement. The bottom line is that wood rots and many things can go wrong in the treatment process causing premature failure.

Free & Fast Bids

CLICK HERE to get FREE & FAST BIDS from local deck builders.

Play Set Treated Lumber Failure

I’ll finish with another personal story. About twenty-five years ago, I used treated lumber approved for burial to construct a play set for my kids. The chemical treatment guarantee mentioned that it was formulated to resist termites and other wood-destroying insects.

After about ten years, my kids no longer used the play set and I needed a place for an outdoor Queen Anne Victorian garden shed. When I pulled the 4x4 posts out of the ground, one third of the wood was gone and the termites were feasting away.

Treated Lumber Rotting

Lookie, lookie, Can you see the extensive termite damage on the right side of the post? Imagine my reaction when I pulled this post out of the ground. ©2017 Tim Carter

I could see the little white insects gorging themselves on the wood.

Treated Lumber Not Perfect

I’m telling you these stories to make a point. Treated lumber is a good product, but you need to realize there’s an element of risk when using it. As with a chain, treated lumber is only as rot proof as its weakest link. Here’s just a partial list of things that can go wrong in the treatment process:

The actual chemicals used in the process could be defective or the wrong concentration is made at the chemical factory. A lab technician doing quality control can make a mistake. If the chemicals are diluted at some point in the process, a human error could cause the solution to be too weak.

If the process involves pressure to drive the chemicals into the wood, the pressure gauge on the vessel could be defective. If the pressure treatment is to last for a specific amount of time, it’s possible the wood is removed too early from the treatment chamber. I could go on and on with other scenarios.

Deck Collapse Due To Rot

There’s no doubt that treated lumber rotting can lead to structural defects that cause decks to collapse. Sometimes these stories make it to the news, but my guess is you’d have to dig deep into insurance industry records to see the extent of treated lumber structural collapse incidents that are the result of rotting wood.

I’m currently rebuilding a large deck on my own home that’s made from treated lumber. Fortunately I’ve not encountered any severe rot in the treated lumber, although I have come across three minor areas where the wood has been compromised. What’s more, I just added a new treated lumber deck to my existing one, so I continue to use the product.

CLICK HERE to get FREE & FAST BIDS from local deck builders.

Deck Collapse Videos

There are quite a few videos out there capturing the moments decks collapse. There are many reasons why the decks fail, but just know you're at risk if you've not inspected the deck before you get on it. These collapses were covered in the June 20, 2017 AsktheBuilder Newsletter.


Joist Tape

I have faith in the product and have taken steps using modern new products to minimize water infiltration into both the new deck and the existing treated lumber. You can purchase new tape that is applied to the top of deck floor joists.

I prefer the tape that comes with the butyl adhesive rather than asphalt-based adhesive. This tape helps to keep the treated lumber dry where the decking lays on top of the joists.

Trex Rain Escape Membrane

You can also install special membrane systems over the entire deck structure before you install the decking. Not only does this system stop all water from touching the treated lumber joists and beams, but it also creates a dry living space under the deck in the event your deck is high enough to walk and sit under.

trex transcend decking

The Trex Transcend decking is being installed. Just as I say in the video, the Trex RainEscape sits BELOW the decking. Snow and ice don't collect on it, they sit on top of the decking. Photo credit: Tim Carter

I’m just finishing up now installing this membrane system on my large existing deck. The treated lumber will never get wet again and this deck should last for a very long time.

I think the only danger at this point is collapse from extreme snow load. But knowing this is a possibility, I added lots of special timber screws to help make the deck stronger.

Decorative Post Caps

You can also help prevent water from entering the end grain of deck posts and support columns. The open end of timber facing the sky invites water to penetrate deeply into the wood. Install decorative post caps that create a small roof over the tops of exposed deck railing posts. Use the special deck joist tape to cover the vertical exposed tops of any deck posts before you rest a beam on top of them.

deck post cap

Here's but one type of deck post cap. There are MANY styles, some with solar-powered lights in them for decorative night lighting. CLICK THE PHOTO NOW TO HAVE ANY OF THESE DELIVERED TO YOUR HOME NEXT WEEK.

Finally, do periodic inspections of any treated lumber using an ice pick. Poke beams and columns to ensure they’re not getting soft.

Click here to read other problems with  treated lumber when placed under a steel I-beam.

Column 1156

Porch Decking

Porch Decking

Porch Decking | This is real Douglas Fir porch decking. It’s tongue and groove allowing the nails to be hidden. Copyright 2017 Tim Carter

Porch Decking TIPS

  • Traditional wood porches had special wood
  • Wood was installed at a slant and shed water
  • Use borate chemicals to pre-treat wood before installation
  • Stain all wood on all sides and edges BEFORE installation
  • CLICK HERE to Get Tim's FREE & FUNNY Newsletter!

DEAR TIM: I’m restoring an older home that has a patio porch deck. It’s covered, so perhaps it’s just a deck porch.

The wood was painted, but is in bad shape due to neglect. What material would you install if you wanted to maintain the character of the house? I’ve seen composite porch decking, but I’m worried that I could have problems with it and that it just won’t look real.

Are there any great trade secrets you can share about decks and porches? Sara G., Mt. Orab, OH

DEAR SARA: I’m really familiar with porch decks, especially ones made from wood.

All My Houses Had Wood Porch Decks

Every house I’ve owned has had one, and some of the wood is over 100-years old and still in very good condition. There are several reasons why the wood has lasted that long, not the least of which is diligent care on the part of the homeowner.

Classic Look

Wood porch decking is absolutely a classic look. You’ll find it on many a covered porch in older homes out in the country as well as houses in the city. I know for a fact that there are thousands of houses in Cincinnati, OH, which is near you, that have original wood porch decks that are still in use. They may be painted, but it’s still wood.

Wood Porch Installation Tricks

If you study your porch, assuming it was installed correctly when your home was built, you’ll discover that it probably is not level front to back and that the wood strips are installed opposite of the way you might think they should be.

Carpenters well over 100 years ago discovered that even though porches like yours were covered, wind-driven rain would saturate the wood in fierce storms. The quicker that water got off the wood, the better. Installing the wood so that it has a fall of 1/8 inch per foot allowed for excellent drainage.

Free & Fast Bids

CLICK HERE to get FREE & FAST BIDS from local painters who can do all the necessary preparation you need on the wood material BEFORE you install it!

Tongue & Grooves = Drainage Channels

To ensure no water got trapped between the individual pieces of wood decking, the carpenters ran each individual strip of wood perpendicular to the front wall of the house. That way the seams between the pieces of wood acted as natural conduits for the water to drain to the end of the porch at the overhang.

Installing the wood parallel with the front wall of the house creates a dam between pieces of wood that traps the water.

Douglas Fir - Premium Porch Lumber

The wood that I prefer to use for these porch decks is vertical grain Douglas Fir. It can still be found at many traditional lumberyards. The wood that was installed on many of the old porches, and the ones I built, had a tongue and groove profile.

This unique profile is the same used when milling oak for interior hardwood floors. It allows for blind nailing of the strips of wood and adds significantly to the strength of the wood as each strip interlocks with the one on either side of it.

This minimizes or eliminates sag or bounce when you walk on the wood in between the floor joists that support the porch decking. It’s time-tested technology that works.

Generation One Composite #FAIL

EB015 Cleaning & Sealing Deck CoverI tested a composite porch decking that was made to mimic the wood material. It failed miserably.

Composite decking products contain high amounts of plastic. Plastic expands and contracts dramatically when heated. If you don't allow for the decking to move, it can bow, twist or uplift as the material grows in length.

The instructions said to make sure the decking was covered from the sun. That’s pretty impossible to do as the sun can often hit the edges of the decking early and late in the day and as the seasons change with the sun lower in the sky.

In my case, even though the decking was installed per the manufacturer’s specifications, it developed huge humps from the heat expansion of the plastic in the composite product.

CLICK HERE to get FREE & FAST BIDS from local painters who can do all the necessary preparation you need on the wood material BEFORE you install it!

Treat With Borate

If you want your new wood material to last for generations, you have to treat it with borate chemicals before it’s installed. Borate powder is easy to get and it dissolves in hot or warm water with ease.

borate powder

Here's a great borate powder for treating wood. There are many borate suppliers to choose from. CLICK THE PHOTO NOW TO HAVE SOME DELIVERED TO YOUR HOME IN DAYS.

Cut the pieces to the exact length you want and then soak each piece of wood in hot water that contains borate powder.

Let each piece soak under water in a trough for about two minutes. Stack the wood in a shaded area making sure to put wood spacers that resemble paint stirring sticks between layers so the wood can dry.

Wait Two Weeks

Once it’s dried for two weeks, then paint the wood on all edges and surfaces before it’s installed. You can use semi-transparent wood preservatives instead of paint if you want the natural look.

What is the Best Porch Paint?

In case you want to paint the porch, I recommend paints that are specially formulated for outdoor porches. They say so on the label.

urethane porch paint

Here's a great urethane-fortified paint. It comes in three different sheens. NOTE on the label it says it's for porches and floors! It's tough enough to walk on. CLICK THE IMAGE NOW TO have this paint delivered to your home.

Be sure to paint all the wood on all sides and edges, including the tongue and groove before you install the wood. Always paint any cut ends to stop water infiltration into the end grain.

What Primer Should I Use on the Wood?

Read the label of the finish paint you intend to use. They almost always tell you the best primer that's compatible with the finish paint. It's best to apply the finish paint as soon as the primer label says it's safe to recoat. You'll get a better bond between the two paints if you do it this way.

Stain All Sides And Edges

The key is to coat all the surfaces of the decking so that water will have a very difficult time entering the wood. If you don’t pretreat the wood before it’s installed, you’ll never be able to coat all the surfaces.

Hot-Dipped Galvanized Nails

Use double-dipped hot galvanized finish nails to install the wood. These will last for generations, especially if the wood is covered with a roof.

IMPORTANT TIP: If you have to cut a piece of wood that’s been treated or painted, be sure to coat the cut end with the borate solution and then the finish sealant or paint.

If you want to minimize any cupping or warping in the wood, consider installing a vapor barrier on the soil under the porch. This will slow water vapor from pouring into the underside of the wood, even though you’ve treated it.

The wood used on many of the old houses had another huge advantage over wood available today. It came from ancient trees whose growth rings were very small.

Porch Decking

New lumber is nothing like the lumber of old. Look at how wide the lighter-colored spring wood bands are in the timber to the left! (C) Copyright 2017 Tim Carter

As such there was often as much dense summer wood in the lumber as there was the lighter spring wood. Lumber today seems to have a much higher percentage of light spring wood than the dense dark summer wood. Spring wood, because of its open cellular structure, is much more susceptible to rot than the dense summer wood.

This is why it's so very important to treat modern lumber with the borate chemicals. They readily soak into the light-colored spring wood.

CLICK HERE to get FREE & FAST BIDS from local painters who can do all the necessary preparation you need on the wood material BEFORE you install it!

Column 839

Concrete Stain DIY

Concrete Stain around pool

Concrete Stain DIY | The concrete around this swimming pool is two different shades. There are several ways to make it look much better and change the color at the same time. (C) Copyright 2017 Tim Carter

Concrete Stain DIY TIPS

  • Multiple ways to change the color of existing concrete
  • Stains work best on steel-troweled smoother concrete and require diligence
  • Best DIY method is easy-to-use concrete resurfacer products - add pigment for color
  • Stenciling concrete with the resurfacers produces the most dramatic look
  • CLICK HERE to Get Tim's FREE & FUNNY Newsletter!

DEAR TIM: I’ve got an in-ground swimming pool at my home and my wife is not too happy about the concrete deck around the pool. The concrete was poured at different times and it’s cured to three different shades.

She’s asked me what can be done to make the color uniform. Are there any affordable options?

Is this something I can do myself? What are the pitfalls? Mike D., Cincinnati, OH

DEAR MIKE: What’s that old saying? A happy wife means a happy life.

Ground Control - Engage Happiness Machine

Guess what, I’m about to crank up the happiness machine for you and her at the same time. You’re going to have to do a little work, but the end result is going to be stunning and long lasting.

You've Got Options

You’ve got several options to transform your concrete’s appearance. The good news is one of the methods is very DIY friendly. This DIY method even allows you to drastically change the color of the concrete around your pool. My guess is your wife may not have thought about that, but it adds a dimension to the project that could make it the talk of the neighborhood.

Free & Fast Bids

CLICK HERE to get FREE & FAST BIDS from local pros who can resurface your concrete and add COLOR to it!

Concrete Absorbs Liquids

Depending on how concrete is finished, it can have different levels of porosity. Based on the photos you sent me, and because the concrete’s around your pool, you have a somewhat sandy finish that prevents slipping when the concrete is wet.

Sandy Concrete Texture Issues

This sandy texture will work to your benefit if you decide to go with the easiest DIY solution I’ll talk about in a moment.

Stain Concrete Like Wood

But first, let’s talk about staining your concrete. Believe it or not, you can purchase special color stains that are made to soak into concrete. I’ve walked on stained concrete that looks like leather. Any imaginable color is possible. The look and appearance is surreal when it’s done by pros.

Sandy Texture = Darker Colors

The issue with staining sandy porous concrete like you have is that the colors can become very deep and it’s harder to achieve a multi-toned appearance that you’d get with concrete that’s got a surface texture that’s more like glass.

I only mention this to you because you may discover that applying the colored stains solves the problem immediately.

Use Multiple Colors

Because you have distinct joints between the different slabs of concrete surrounding the pool, you can introduce different colors that compliment one another. For example, the inner ring of concrete that touches up against the edge of the pool may be a tropical green color and the outer ring you may want to do in a medium blue. You’re only limited by your imagination.

CLICK HERE to get FREE & FAST BIDS from local pros who can resurface your concrete and add COLOR to it!

Stains Are Not Easy

The concrete stains are tricky to work with and they require you to follow instructions to the letter. If you decide to try this, it’s imperative you do a test on some concrete in another location to see if you like the color. This may require you pouring a new small pad of concrete that has the same texture as what’s around your pool.

DIY Concrete Resurfacing

My guess is you’re going to love your second option. There are concrete resurfacing products you can buy that you mix with water. Once mixed they’re the consistency of applesauce. You simply spread the material on the existing concrete with a large squeegee and then apply a broom finish after waiting a few minutes.

This is an excellent concrete resurfacer. You can add colored dry pigments to change the color to just about anything. CLICK THE PHOTO OF THE BAG NOW TO HAVE THIS DELIVERED TO YOUR HOME IN DAYS.

These resurfacing products add a very thin layer of material onto the existing concrete, perhaps just one sixteenth of an inch. The best part is you can add dry pigments to the mix to create a new colored surface. Reds, browns, greens, blues, golds, oranges, etc. are all possible. You can even create patterns with different colored mixes.

Here are just a few of the many many pigments available. You can blend different pigments to get different shades that you don't see here! CLICK THE IMAGE TO BUY ANY WHITEWASH PIGMENT YOU WANT.

Make A Mural

If you have an artist in the family, this talented person can create a mural on the pool deck using the resurfacing products and multiple colors. The possibilities are endless.

Stenciled Concrete

Your third option is to combine these resurfacing products with stencils. Using stencils and colored pigments in the mix, it’s possible to transform your bland concrete pool deck into a red brick look or even granite cobblestone. You can even get stencils that would transform the pool deck into a rich brown and gold flagstone.

Stenciled and Resurfacing Concrete Videos

Watch these videos to see how to resurface and stencil concrete using the concrete resurfacing products. Wait until you see all the different ways you can make existing concrete look DIFFERENT. WOW!!!


Stenciling Is For Pros

Stenciled concrete is not DIY friendly, but the look is stunning. You may decide this is the best alternative for your pool area and it just requires you to locate a local professional that has lots of experience using stencils.

If you decide to go with the stenciled look, be sure to take the time to visit other jobs the professional has completed. Looking at photographs is not the same as seeing the finished job in person.

Pitfalls

You asked about the pitfalls of the job. If you decide to do the concrete resurfacing yourself, I want you to test this process on a concrete slab other than your pool. You want to get the hang of how to use the product to get perfect results.

Overcast Cooler Days Are Best

Don’t do the resurfacing on hot sunny breezy days. These are the worst possible conditions because the resurfacing compound dries too fast. It’s best to do this work on an overcast day with the temperatures around 60 F. This gives you plenty of time to work with the product and you’ll get the best bond to the existing concrete. Be sure to read all the instructions and follow them with great diligence.

CLICK HERE to get FREE & FAST BIDS from local pros who can resurface your concrete and add COLOR to it!

Column 1201

Concrete Steps Leaking

concrete steps

Concrete Steps Leaking | These concrete steps are leaking where they touch up against the wall. It’s possible to solve the problem, but it’s not easy. This was shared with my readers of the September 27, 2016 AsktheBuilder Newsletter. Copyright 2017 Tim Carter

Concrete Steps Leaking TIPS

DEAR TIM: I live on the upper floor of a converted villa. The access is by a stairway at the side of house.

There's a closed door for garden tools under the stairs. Water is coming in to the garden shed from above and the wall near the stair is damp for about two feet.

The owner below said he has damp internal walls consistent with water getting in from my stairs. I would like to prevent this happening. What can be done to stop the water infiltration, if anything? Isabel H., Glasgow, Scotland UK

DEAR ISABEL: Thanks for reaching out across the ocean for help with your problem. Water, gravity and physics are pretty much the same all around our planet and I’m fairly confident I can help you.

Concrete Is Water Resistant Not Waterproof

I believe the first place to start is to talk about the characteristics of masonry and concrete. Based on the enormous volume of email I receive from both homeowners and builders, I’ve come to believe that many feel that concrete, brick, stone, mortar and other similar materials are waterproof.

The truth is water can pass through many, if not all these materials, albeit at radically different speeds. It’s child’s play for water to pass through tiny hairline cracks and I see those in the amazing high-resolution photo you sent to me.

Free & Fast Bids

CLICK HERE to get FREE & FAST BIDS from local painters - yes painters - who can apply the special epoxy caulk that will solve this problem.

Your Steps Are A Roof

The steps that form the sloped roof for your garden shed are poured against the poured concrete foundation of the villa. This is a very common practice as it would be prohibitively expensive to cast the steps as part of the poured foundation. It’s possible to do this, but not practical.

Driving Rain Cascade

Think of the dynamics that are happening in a moderate to heavy rain storm that has wind as a component. Gallons of water are hitting the stone walls of the villa and cascading down the walls to the hairline cracks where the steps meet the foundation wall. Wind blowing against the wall and steps adds more energy forcing water into the tiniest of openings or cracks.

Since you can’t stop the rain and wind, you’ll need to do your best to stop the water from entering the cracks. It appears to me that someone has already made an attempt to do this by caulking the cracks on the flat stair treads. However, they did not caulk the cracks at the vertical interface where the stair risers touch the foundation walls.

Remove Old Caulk - Start Over

The repair job doesn’t look good to me and I would seriously consider chipping off the caulk and/or whatever material it is. I’d then clean the foundation wall and steps well using a pressure washer. Yes, this is also going to cause water to enter the garden shed, but hopefully it will be the last. You need the surfaces clean so the repair material bonds tenaciously.

Open Up Joint

I’d be very tempted to carefully chisel along the joint between the steps and foundation to open up the gap to at least 3mm or about 1/8 inch. This crack should be about 6 mm or 1/4-inch deep. Be sure to remove all loose material and dust. I’d then caulk it with a concrete epoxy that’s extremely strong and waterproof.

Concrete Epoxy Repair

I’ve used an epoxy with amazing results that’s made by a company called PC Products and it’s available on Amazon.com. CLICK HERE NOW to see and BUY this product.

PC Concrete Cartridge

This is the magic epoxy that fits into a regular caulk gun. I've used it with great success. CLICK THE PHOTO NOW TO HAVE IT DELIVERED TO YOUR HOME.

This epoxy comes many ways, but I prefer for jobs like this to use the caulk tube dispenser that automagically mixes the A and B components.

Masonery Epoxy

Here's the same epoxy but it comes in little jars in case you want to mix it and apply it with a putty knife. CLICK THE PHOTO NOW TO HAVE THIS EPOXY DELIVERED TO YOUR HOME.

Do A Test Application

Before you start to do this repair, I want you to do a test with the epoxy on some small concrete brick that you can buy. Place one against the other so one is taller recreating the relationship you have between the stair tread and foundation wall. The purpose of the test is to refine your caulking skills and to make the caulk match the existing concrete.

Concrete Epoxy Caulk Repair Video

Watch this video to see how to use the concrete epoxy products. Very clever stuff!


Study Sand Color And Size

It’s imperative you study the concrete steps and take a close-up photo. You need to look at the size, color and makeup of the exposed sand grains in the concrete. Your job is to visit a local gravel and sand supplier to find similar, if not exact, sand. When you look at the sand, and I can see it in the photo, you’ll notice black, orange, brown, white and other grains!

Pat Sand Into Fresh Epoxy

You’ll use this sand to hide the stark gray epoxy. The epoxy I prefer comes out somewhat wet and fresh sand will stick to it with no issues. You carefully apply a bead of epoxy and then cover it immediately and completely with the sand. Be careful not to tamp the sand into the epoxy because you could smear it.

Allow the epoxy to harden, this usually takes a few hours, and then sweep off the excess sand from your test bricks. See how it looks and hold it next to the existing steps. You may have to do several attempts to get the exact look and texture you want.

Apply Silane / Siloxane Water Repellent

Once you have all the cracks repaired where water is entering, then you need to apply a top quality silane / siloxane clear water repellent on the concrete steps, landing, foundation wall and the masonry walls of the villa above the garden shed.

penetrating sealer

This is a magnificent silane - siloxane water repellent that soaks into concrete. CLICK THIS IMAGE NOW TO ORDER IT.

This final step will really help stop water from rusting your shovels, rakes, hand tools and whatever else is is the storage area. Good luck to you and please report back your results.

CLICK HERE to get FREE & FAST BIDS from local painters - yes painters - who can apply the special epoxy caulk that will solve this problem.

Column 1163

This product is available from Amazon.com. CLICK HERE to purchase it.

This two-part Masonry Epoxy product is available from Amazon.com. CLICK on IMAGE to purchase it.


Matching Mortar

Matching Mortar

Matching Mortar | The color of the grains of sand makes a huge difference in mortar color once the actual cement paste wears away.

Matching Mortar Tips

DEAR TIM: The mortar between my brick needs to be repaired. I want the patchwork to blend as closely as possible with the existing mortar. Should I use regular pre-mixed mortars that I see on construction sites? What is the best way to assure a color match? Kate, Sarasota, FL

DEAR KATE: Matching mortar color and texture requires patience and persistence. Detective work combined with a little experimentation will yield excellent results. The key to success lies in taking your time. Do not rush into this task.

Believe it or not, the key to a successful color and texture match lies in matching the sand used when mixing the mortar. The sand in mortar accounts for well over 70 percent of the matrix that you see. Brand new brick joints often have a film of lime or cement produced by tooling the joint. This very thin film is eroded with time. Water, wind and pollution constantly work to expose the sand that was used to create the mortar. Take a close look at an older brick wall and you will see what I mean.

How to Determine the Color and Size of the Sand?

To determine the color and particle size of the sand used in your mortar you must do a little destructive work. Try to obtain a cubic inch of mortar from several of your brick joints which require repair. Use a piece of wood to gently grind the mortar pieces into a coarse dust. Avoid the use of a hammer. You do not want to pulverize any of the sand particles. Mix 1 ounce of muriatic acid with 10 ounces of water. Stir in your mortar dust. Within 2 days any and all lime or cement in the mix will have dissolved. The sand will be at the bottom of the container. Use white vinegar instead of acid if your mortar contains crushed sea shells. Do not add water to the vinegar. Use straight from the bottle.

Carefully pour off a majority of the acid bath into a toilet or laundry tub. Be careful not to loose any sand. Add water to your container to dilute the remaining acid. Pour the sand and water mixture slowly into several folded paper towels to capture the sand. Allow the sand to dry. Store it in a closed, clear glass jar.

Where Can I Find Dry Sand Samples?

Visit several gravel and sand pits until you find a sand that matches yours in color and particle size. Be sure to look at dry sand samples! Moisture changes the color of sand. If your house is older, try to ask old bricklayers where sand was purchased and/or mined in your area. Trust me, the older the house, the closer the source of sand. Once you have found a sand or a blend that is close in color and texture, you are ready for further experimentation.

brick mortar

You can clearly see the individual pieces of colored sand in the mortar. Remember, sand particles are just tiny pieces of actual rock. See the white, black, orange, pink and buff pieces of sand? Photo credit: Tim Carter

You can clearly see the colored sand grains in this high-resolution photo. Note how the mortar in this photo is a much darker gray than the white brick photo above. Photo credit: Richard K.

Older mortars often had a much greater amount of lime content than today's pre-mixed mortars. You need to locate a building supply house that sells lime, white cement and grey cement. You will need all three components. Old mortar (70 years older or more ) may require 6 measures of lime to one measure of cement. Lighter mortars probably require the use of white cement instead of grey cement. You may find that you have to blend both cements to get a perfect color match.


Need to repair your masonry? Find a good contractor and learn the secrets of the trade with my Masonry Repair (Chimneys, Stucco & Brickwork) Contractor Hiring Guide and Checklist. I offer a 100% Money Back Guarantee.


Furthermore, if your brick and mortar are old and dirty, you may want to wash the brick before you begin the repair job. If this is not feasible, you may have to age or stain the repair job after it dries to make it appear dirty. The trick to matching color while you are mixing is to get the existing mortar wet. If the wet mixture in your wheelbarrow looks close or identical to the wet old mortar in between the brick, you may have a perfect match when it dries. Do a test batch and let it dry for two weeks to see if your recipe is right. If not, keep trying.

If you are building a new home, save 2 or 3 five gallon buckets of the sand used to mix your mortar. In addition, save a bag of mortar if possible. Wrap and tape it tightly with 2 or 3 plastic garbage bags to seal out water vapor. This pack rat mentality will come in handy if a storm damages your chimney or someone bumps a wall with a car.

Referenced in the September 2, 2016 AsktheBuilder Newsletter.
Column 170

Septic Tank Maintenance

septic tank about to be pumped

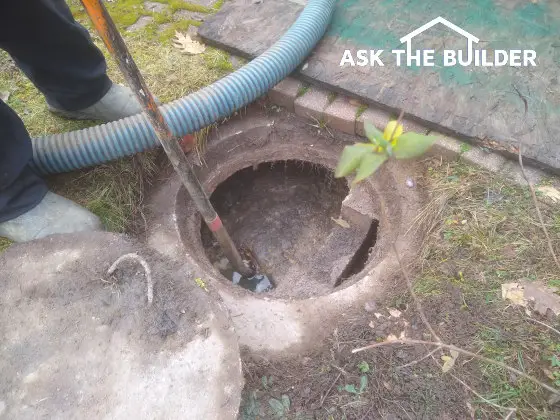
Septic Tank Maintenance - This is a septic tank about to be pumped. It’s a best practice to do this every two or three years. Copyright 2024 Tim Carter

Septic Tank Maintenance

This past Saturday, a very good friend of mine was at my house. I call him Yoda, as he is my computer guru. He was helping setup a new computer for me. At lunch, we were talking about a problem he had at work. Mind you, I didn't bring this subject up. An employee had flushed a toilet and water backed up into a floor drain on the warehouse floor. To make a long story short, the septic system had failed.

When the service company arrived, they asked where the septic tank was located. No one knew! The septic system had never been serviced. Oh well, there go this year's Holiday bonuses!

Septic Tanks are as Good as City Sewers

Septic systems suffer from an inferiority complex of sorts. City folk scorn them thinking that they are just one step removed from an outhouse. Nothing could be further from the truth. Septic systems which are designed, installed, and operated properly treat wastewater as well as any municipal sewage system. In fact, some septic systems do a much better job!

Septic systems also receive bad press in response to claims of groundwater pollution. Yes, it can happen. However, many of these instances can be traced to substandard maintenance on the part of the homeowner or bad initial design. The septic tank and drainage field can do its job, you simply need to be a part of the team!

High Upfront Cost - Forty Cents a Day to Maintain (2024 prices)

Septic systems are very cost-effective. Yes, there is a sizable upfront cost to install a complete system. However, once installed periodic inspections and pumping charges should be your only expense.

People who have public sewers pay for these systems. They are taxed monthly or quarterly. Here in Cincinnati, our sewage bills are directly related to our water bills. If you use lots of water, you pay a proportional upcharge for your monthly sewage use. There are no free rides. A simple analysis would show that many homeowners on public sewers might actually pay more on a monthly basis than septic users.

Well-Drained Soil is Key

Septic systems take advantage of the natural cleansing properties of soil. Soil and the microbes it contains can act as an extremely efficient biological eating machine. However, if the soil is waterlogged or has low permeability the wastewater can migrate to another location before it has been converted to a harmless state.

As such, a simple study needs to be completed to evaluate how well your soil drains. Virtually every county in every state has a Board of Health official who performs this task. If they don't perform it, they will direct you to the proper authority, such as the local plumbing inspector. Just about every home building site that has a large enough lot can be adapted for septic use. Hillsides, wetlands, rocky areas, etc. all can be modified for successful septic system installations. The Basic System

Septic systems are really simple when you think about it. Most systems consist of two major components: the septic tank and the drain field.

The tank is a large vessel buried underground. They come in different sizes. The size is directly related to the number of occupants in the house or structure. The tank does two very important jobs. It acts as a settling basin and starts the process of waste decomposition. When you send wastewater towards the tank through your plumbing drainage lines it almost always contains solid particles. These particles can be tiny pieces of dirt, grit, fabric fibers, hair, whiskers, food particles, etc. Some of these can break down naturally and others may never break down.

Septic Tank Video

Watch this video to see a septic tank and special leach field that goes under a roadway!


It is the job of the tank to make sure that these particles no matter how large or how small do not make it into the drain field.

Remember my friend? His company's septic tank was filled to the brim with cast iron shavings from their manufacturing process. Your septic tank might fill up with plastic army men, sand, or dirt if you have my son visit for a while. Get the picture?

Septic Drainfield or Leach Field

The drainfield is a system of perforated pipes that lie near the surface in sand or gravel filled trenches. If you have special site conditions, your drain field may consist of mounds or long interconnected trenches setup for hillsides. In any event, an equal amount of partially treated wastewater from the tank enters the drain field every time you send a slug of water from your house towards the tank.

The drain field must not accept solid particles. If it does, the perforations in the pipes, the sand, gravel, and eventually the soil will clog up. When this happens, the septic system dies. It can no longer function.

If your system is working properly, the partially treated wastewater from the tank slowly enters the ground. Once in the soil, tiny microorganisms and oxygen work to attack any waste particles, bacteria, viruses, etc. that are in the polluted water. As long as the soil is not waterlogged, the soil will purify the wastewater.

Septic systems are a great example of a simple system that works. As long as you understand how they work and keep the tanks free of debris, you will be in good shape. Don't underestimate their ability to safely treat wastewater

Oxygen Works Best

Municipal sewer plants break down sewage using air. They aerate the waste in any number of ways before dumping it in the nearby river or ocean.

You can get pumps with propellers that inject air into your septic tank. Think of this as a giant blender.

You can also just add powdered oxygen bleach to your septic system.

Oxygen bleach has been around for some time but only in the past 10 years has it started to be widely available to consumers like you and me. Previously, it was only used by large commercial and institutional organizations. Ads for oxygen bleach can be seen on cable TV infomercials. You may have noticed it in hardware stores or home centers where it is sold as a deck cleaner. One brand is Wolman's Deck Brightener. The problem with many of these products is they may contain up to 30% fillers that can harm septic systems.

Sizing Requirements for Septic Tanks

Septic tanks must be sized properly. If they are too small bad things will happen to your drain field. Wastewater will flow too quickly into your drain field. If this happens there is a good chance that suspended solid particles will not have had enough time to settle to the bottom of the tank. These particles will eventually clog the drain field.

Proper design of tanks and sizing will permit a two day holding period for wastewater. This is usually enough time for the solid particles to sink to the bottom of the tank.

Septic tank size is a direct function of the number of occupants in a home. This number is generally associated with the number of bedrooms in a house. However, this rule is not always accurate! A 3 bedroom house that has two adults and two kids will send much less water into the tank than a 3 bedroom house that has 2 adults and 6 kids(such households exist)! If you feel that you have or might have more occupants than average, you had better talk with your local board of health officials.

Accepted sizing recommendations usually spell out that you should multiply the number of bedrooms, or rooms used as bedrooms by 150 gallons. Then multiply this by 2. this will give you the minimum capacity for tank size.

Example:

4 bedrooms x 150 = 600 600 x 2 = 1,200 gallons

Standard tanks are usually available in 750; 1,000; 1,200; and 1,500 gallon capacities.

Septic System Do's & Don'ts

The long term health of your septic system is directly related to what you inject into it. If you abuse the system, you will have to have it pumped more frequently or worse yet, it may fail entirely (Remember, my friend!) If you follow some of these do's and don'ts, you should get many, many years of trouble free service from your septic system.

Do's

Determine the location of your septic tank and drain field. It is almost always down slope from your house. Look to see where the main plumbing drain leaves your house.

Have your tank inspected by a qualified service company annually. These inspections will tell you when the tank must be pumped clean of accumulated solid material. Keep the inspection portals and manhole covers at ground level.

If installing a new system, make an accurate map of the tank location and the shape, trench location, and extent of the drain field. Plan for future house expansion. In other words, do not put the tank or the drain field too close to the house. A future room addition may require you to move the tank!

Fix leaky faucets or toilets quickly. Excess water flowing into the system will send solid particles into the drain field! Excess water will flood the soil in the drain field!

Divert water from parking areas, downspouts, sumps, footing drains, etc. away from the drain field. Drain fields must be as dry as possible in order for the soil to naturally cleanse the wastewater.

Don'ts

Avoid introducing any unnecessary solid particle into your plumbing system. This includes things like coffee grinds, nut shells, dental floss, kitty litter, female hygiene products of any kind, cigarette butts, sand, gravel, etc. All of these things will fill the tank prematurely!

Do not plant trees anywhere near the drain field. the roots of trees will naturally migrate to the perforated pipes. These roots will completely clog the pipes! Natural grass cover is the best.

Click here to view Tim's video on Septic Systems.

Click here to view Tim's video on Septic Systems.


Do not park cars, drive over, or allow heavy trucks onto the drain field area. This will compact the soil and cut off the necessary oxygen required to help breakdown the wastewater.

Absolutely do not introduce paints (even latex!!!), solvents (gasoline, thinners, alcohol, etc.), varnishes, grease, cooking oil, pesticides, photographic chemicals, etc. into the septic system. These will kill the natural microbes that breakdown organic solid compounds in your tank!

Garbage disposers are fine but large food particles that pass through a sink strainer are bad. Disposers create a mush that the bacteria in septic tanks can handle. Large solid food particles can turn to sludge before they are broken down.

Avoid using septic tank additives. A healthy septic tank and drain field has everything it needs. The natural bacteria from our human waste gives the tank all the additives that are required. Extra oxygen is just about the only thing you can introduce that may help.

Don't pave over the drain field. Paving materials prevent natural evaporation of moisture. The grass cover mentioned above sucks water from the drain field.

Avoid trying to repair or modify your septic system by yourself. These systems must be designed and engineered by professionals.

!! ALERT ALERT ALERT ALERT !!

Never attempt to inspect a septic tank by yourself! Deadly gases are in the tank. You can pass out in a matter of moments. The person trying to rescue you will do the same. Only qualified septic service people should remove manhole covers. Don't lean over and stick your head in a tank!!!!!


Helpful Literature and Videos

The Small Flows Clearing House, located at West Virginia University, is command central for septic system information. They have an abundant supply of pamphlets, videos, and booklets that will help you design, construct, and maintain a septic system. They also publish a wonderful quarterly newsletter called Pipeline. I suggest you call them and ask them to send you as much free literature as possible. They will also send you an order form for their wonderful videos and books. You will not regret making this call! Tell them you heard it from me! 800-624-8301

Column B117

Attic Fan Installation

This attic fan looks impressive, but it moves less than 1,000 cubic feet of air per minute. It's a solar-powered fan. See the cable poking through the roof? It's connected to the solar panel you can't see. That small amount of air has not lowered my attic temperature. PHOTO CREDIT: Tim Carter
CLICK THE PHOTO TO HAVE TWO OR MORE POWERED ATTIC FANS DELIVERED TO YOUR HOME NEXT WEEK. THE FANS YOU NEED ARE POWERED BY 120 VOLTS AND RUN WHEN YOUR ROOF IS IN THE SHADE AND CONTINUE TO RUN UNTIL THE ATTIC IS COOLED. THEY MOVE FAR MORE AIR THAN A SILLY SOLAR FAN.

Attic Fan Installation Tips

DEAR TIM: I know I need an attic fan to cool my hot attic. But there are many different types of attic fans.

Should I consider a solar attic fan or some other attic exhaust fans? What type of attic fan do you use?

How much air do I need to move through my attic to make a significant difference in the temperature? How important are soffit vents in this system? Pam W., Green Bay, WI

DEAR PAM: Attic fans are an effective tool to use to help lower excessive attic temperatures. As you might imagine, I have used many different types of fans, and have formulated opinions based upon experience and some accurate data I have collected over the years.

Tens Of Thousands Of Feet Of Air

I believe the first thing to realize is that it takes massive amounts of air moving through an attic to create significant cooling. Farmers who raise chickens can attest to this as the buildings and barns that house chickens are usually equipped with massive fans that move tens of thousands of cubic feet per minute (CFM) of air.

Even then, it is almost impossible to drop the temperature to that of the air temperature outdoors.

Free & Fast Bids

CLICK HERE to get FREE & FAST BIDS from local contractors that specialize in installing attic fans.

Intense Infrared Rays

Flir camera roof photo

Here's an infrared camera photo I snapped of my own roof in July. The temperature was 155 F. That's blistering hot. Copyright 2018 Tim Carter

Think of the dynamics of what is happening on a blazing summer day when the sun is pounding relentlessly on your roof. The temperature of the shingles soars.

They can easily approach a temperature of 150 F or possibly more. This heat then transfers to the roof-framing materials.

The trusses, rafters and roof sheathing get very hot. All of these things radiate heat much like the coals of a fire or a hot radiator.

Stored Heat

This stored heat in the roof rafters, trusses, roof sheathing and shingles is released as infrared energy that passes through air and starts to heat up solid objects like the insulation and anything stored in the attic.

To cool these things down, the heat needs to be transferred to something else that can store the heat. The only thing available is the water in the air that is moving through the attic.

Solar Fans Are Useless

I'm currently testing a specific solar attic fan. I have two identical units installed in my attic. The solar panels get sunlight until mid-afternoon. After that point my entire roof is in the shade created by two massive trees.

IMPORTANT TIP: Unfortunately these two fans have not done anything to reduce the attic temperature. The day before I installed them it was a cloudless day and the attic temperature at Noon was 129 F.

When both fans are operating at Noon, the temperature has never been below 128 F. Each fan claims to move 800 CFM of air. The fan blades do spin rapidly, and I have good soffit intakes as well as windows in my attic that allow air to freely enter the attic space.

The fans are NOT MOVING ENOUGH AIR to make a difference.

No Sun = No Movement

The trouble with solar attic fans is they stop working as soon as a cloud blocks the sunlight. On partly-cloudy days, the temperature can be beastly hot, and the fan blades simply stand still for much of the time.

After the sun goes down, the attic can still be stifling hot from all the stored solar energy in the wood of your attic., and there's no hope of air movement since the sun is not powering the fans.

Regular Electricity Is Better

Powered attic fans that get a constant supply of household electric will move lots of air. But you need to have quite a few operating to feel a difference.

Many of these fans are equipped with thermostats so they will turn on and off automatically. This is a handy feature that saves energy.

CLICK HERE to get FREE & FAST BIDS from local contractors that specialize in installing attic fans.

Wind-Powered Turbine Vents

You can install wind-powered turbine vents as well. When the wind blows hard, these fans can exhaust lots of air. But since the performance is tied to the wind speed, you can't count on these to work at peak performance in the hottest part of the day.

This is a standard turbine vent. They come in different colors. Some have external braces. This one you see is Made in the USA. CLICK THE IMAGE TO ORDER ONE OF THESE GREAT TURBINE VENTS.

Great Soffit Vents

You need great soffit vents to supply the attic with all of the replacement air. Powerful fans that are exhausting air from your attic work best when they can get ample amounts of makeup or replacement air from outdoors.

The lack of soffit vents may cause the fans to draw air up from the inside of your home. If you're running air conditioning, this can cost you dearly as your air conditioner will work harder to keep your home comfortable.

Can't Have Too Much

I have come to the conclusion that it is impossible to have too much attic ventilation. But achieving this can be a challenge aesthetically. Many people do not want the surface of their roofs cluttered with fan housings, or twirling vents.

Those people who have experienced hurricanes will be the first to tell you that any hole in a roof is very problematic when the wind starts to howl relentlessly for hours.

No Silver Bullet

There is no silver-bullet solution when it comes to attic fans. There are models that work best in certain parts of the nation and this same fan may do a poor job in another geographic area. Your house may not be sited well for solar or wind-powered solutions.

Those fans that are powered by household electricity probably hold the best promise as they will move tremendous amounts of air and do so until the attic temperature has dropped significantly. Your challenge will be installing enough of them to keep your attic temperature just above the outdoor temperature on the hottest day of the season.

CLICK HERE to get FREE & FAST BIDS from local contractors that specialize in installing attic fans.

Column 734