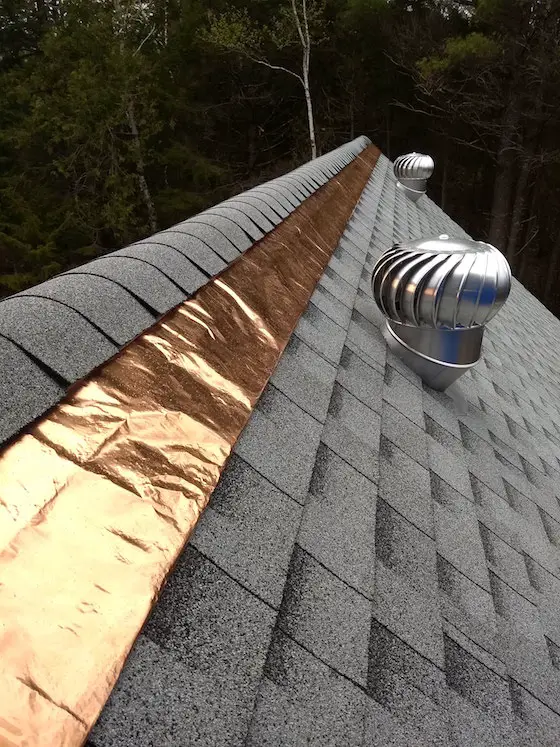
I was the first person in the world to identify that copper prevents the oxidation of asphalt molecules on asphalt shingles. See how easy it is to install this copper in a new-roof installation? CLICK the photo to order the copper strips.
"Roof moss can be stopped. Copper strips at the top of your roof will STOP moss growth forever. It's easy to install."
How to Stop Roof Moss
Are your shingles covered with moss? The shingles on this garage roof section are covered with green moss growing everywhere. Roof moss can cause the shingles to fail prematurely, besides looking gross.
What's the Best Way to Stop Roof Moss?
Roof moss can be stopped. Copper strips at the top of your roof will STOP moss growth forever. It's easy to install. Look at the photo just below how to do it.
How Does Copper Stop Roof Moss?
Copper is a natural biocide. It is a natural poison. Copper is used on the hull of sailing ships to stop barnacle growth that slows ships.
Will Copper Make my Roof Last Longer?
Yes. Copper will extend the life of your asphalt shingles. Copper washes onto your shingles and prevents the asphalt from oxidizing.
Read Tim Carter's Roofing Ripoff book where he explains how copper saves shingles.
Here's my Roofing Ripoff book. It's an easy one-hour read. You'll save $5,000 reading it. GUARANTEED.
But the roof just ten feet away is clear of any moss or algae! Why are these shingles clean and the others are not? Not because they have been cleaned by Tim. Mother Nature did it. For free!
Above the clean section of the roof, there is a copper cupola. It is this little bitty roof that is keeping the moss off the roof. Every time it rains, a little of the copper washes off the cupola and onto the shingles. That copper creates a poison so that the moss and algae will not grow, must like a weed killer who use on your lawn.
If you do not want moss growing on your roof, you can put copper on your roof. Just place copper strips underneath the cap shingles on your roof. Leave 2 - 3 inches of copper exposed so the rain can wash copper particles down over the shingles.
Or if you are buying a new home or having a roof replaced, there are shingles with copper embedded right in the shingle.
Using a little copper on your roof can prevent moss and algae from growing. It is just that simple.
Low water pressure in shower head: See that orange disc with the slits in it? That's blocking water flow. It has small holes that can readily clog with sediment. When this happens, the water flow can be reduced to a trickle. Copyright 2018 Tim Carter
"If the shower head worked fine and the flow became reduced over time, pieces of sediment or debris from the city water system or your well could have clogged the restrictor."
Low Water Pressure in Shower TIPS
Debris clogs flow restrictor in the shower head
Remove flow restrictor and clean
People with own water source don't need flow restrictors
Unequal water flow in shower head points to the clogged valve cartridge
DEAR TIM:I have a low water pressure shower head. The flow of water that comes from my shower is miserable. It's so weak it takes forever to wash my hair.
The water flow out of the tub spout is fine as is the flow at the bathroom sink. I've been told there is a flow restrictor in the shower head that's the culprit.
Can I remove it or modify it so I can take a reasonable shower? Is there another possible problem? Pamela F., Lakeland, FL
DEAR PAMELA: If there is not a flow restrictor in the shower head itself, there may be one in the body of the shower faucet.
Does a Flow Restrictor Cause a Low Pressure Shower Head?
Yes, a flow restrictor is the most common root cause of low water pressure in a shower.
A small disc in the shower head blocks the full flow of water from the shower faucet. There are strict laws in place that force manufacturers to limit the amount of water that a faucet and/or showerhead can deliver in a given amount of time.
I don't feel these laws should affect everyone.
Here's why. For starters, I'm a college-trained geologist and studied hydrogeology - the study of groundwater.
I live in a rural area and get my water from a well. I'm also on a septic system. For each gallon of water, I extract from my well another equal gallon of water goes back into the soil via my septic system.
But if you live in a city or area that gets its water from reservoirs that may not be filled every wet season, then it might be a good law for you in that it helps to conserve precious natural resources.
Even if you do live in an area where you don't have abundant fresh water like I do, you can simply take a US Navy shower in that you only have the water on to get wet and rinse off. As you clean your body with soap and shampoo, leave the water OFF to save water.
But most people are LAZY and won't do this simple thing to conserve water.
How Fast Can I Fix My Low Pressure Shower Head?
It's possible that within 30 minutes you can make this shower head perform like a champion.
I'm quite certain that with a little work the shower head will perform as designed and give you the desired strong stream of water you deserve and so desperately desire.
What Causes Low Water Pressure in a Shower?
Small pieces of solder, copper shavings, wood dust, wood chips, globs of soldering flux, pieces of plastic, etc. can get into the water lines when they're installed by plumbers. This small debris clogs the flow restrictors and spray outlets on the shower head.
If this is a new home and the problem has been a chronic one since the day you moved in, there's a good chance the problem can be traced to a workmanship error.
Small sediment from rural water wells, city water mains, and your own plumbing pipes can clog the small holes in the flow restrictors.
Who Should Flush Lines BEFORE Connecting Shower Heads?
It's the responsibility of the plumber to flush out the water supply lines before any shower heads are installed.
Flushing the water lines can happen at most fixtures just after the water shut-off valves have been installed but before the flexible supply lines have been connected from these valves to the faucets or fixtures.
But the shower and tub valves are just a little more challenging. These valves are almost always installed before the interior of the house is finished and often before the water service from the street or pump has been connected to the interior plumbing lines.
How Do You Flush a Water Line?
You just need to have a few empty buckets, a wrench, and ten minutes to flush a water line.
The plumber just needs to have a helper to turn on and off the main water supply valve as he has the shower valve cartridge removed. This allows the water supply pipes to be flushed so the valve cartridge doesn't get clogged.
He then attaches an extended nipple or the actual shower arm to the threaded lug inside the wall where the shower water comes from. He leaves the shower head OFF the end of the shower arm.
When water is then turned on through the valve, any debris in the riser pipe is flushed out. The shower head can be installed once the water runs clear.
An expensive decorative rain-head shower head can get clogged to. (C) Copyright 2018 Tim Carter
What Flushes the Water Line?
The rapid flow of water carries a mixture of water and debris into the shower head. This large volume of fresh water flushes the water line and puts the debris into the buckets. The extremely small holes in the flow restrictor can become clogged or partially clogged in an instant.
Can City Water Mains Cause Low Water Pressure in a Shower?
Pieces of sediment or debris from the city water system or your well can cause low water pressure in a shower.
This is a very common occurrence, especially if you live in an area with older city water mains. If a city water main is serviced, pieces of sediment are often dislodged in the main water main as the water flows through the giant mains toward your house.
Remove the shower head from the angled pipe that projects out from the wall to check the flow restrictor for clogs. Once the shower head is off, turn on the shower faucet to see if you get a respectable amount of water flowing from the one-half inch diameter pipe that connected to the shower head.
If lots of water comes out of the bent shower arm pipe, the problem must be in the shower head.
Where is the Shower Head Flow Restrictor?
The shower head flow restrictor is at the base of the female threads where you connect it to the water line. Look inside the end of the shower head where the water line connected to it. You should be able to see a small plastic disk.
Use a very thin pointed piece of metal to get a purchase under one edge of the disk. Try to pry the disk out of the shower head.
Work slowly and pay attention to which side of the small disk faces out towards the water supply pipe. When you go to reinstall the disk, it must be installed the same way it was at the factory.
How Do you Unclog a Shower Head Flow Restrictor?
Use a small straight pin or another object to clean out the small holes in a showerhead flow restrictor.
Use plenty of fresh water to help rinse away any debris. Place the disk near a bright light so you can ensure each of the holes is perfectly clean.
Be sure you rinse the shower head at the same time to ensure no debris made it past the flow restrictor.
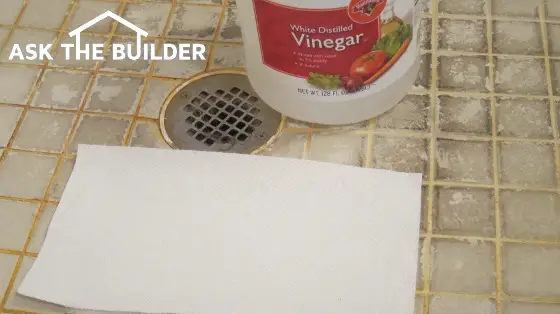
How Do You Dissolve Hard Water Deposits?
Allow the shower head soak in some warm white vinegar for twenty-four hours to remove hard water deposits. The vinegar will often remove or soften the hard water deposits.
After soaking, use a toothbrush to remove any residual deposits and rinse with clear water. Install the small plastic flow restrictor disk and reattach the shower head to the water pipe.
You may have to buy a new shower head. Not all showerheads are designed the same and after removing one from the water supply pipe at the wall you may not see a plastic disk. If this happens and the flow of water from the supply pipe is adequate, just go buy a new shower head.
Shower heads are readily accessible and they are a common replacement part. In fact, you may find one that produces a better stream of water than what you had before.
Remember to use pipe thread compound on the water supply pipe that connects to the shower head. This prevents leaks where the shower head connects to the water supply pipe.
What Does Unequal Pressure at the Shower Head Mean?
Unequal pressure between hot and cold water at the showerhead means the clog is in the valve, not the shower head.
If your shower water delivers great pressure when you have the valve handle turned to all hot or all cold and then you turn it the other way and the volume decreases, this tells you the issue is in the VALVE.
One of the small ports or openings in the valve is clogged with a piece of sediment that's blocking the flow of the hot or cold water.
Clean out the cartridge or install a new one to get full flow again.
DEAR TIM: I've read your past columns about gutter guards. You seem to have tested many but are still not satisfied.
I have the same problems you have with year-round debris from my trees, and spring is indeed the worst time. What's the best gutter cover? The mesh-type gutter guard seems like it has the most promise.
Do you agree? Jackie B., Royal Oak, MI
DEAR JACKIE: Millions of homeowners suffer like you and me.
Consider purchasing a micromesh product from Amazon.com and having your local handyman install them for you. CLICK the photo below for just one of the micromesh products I discovered on Amazon:
There are many micromesh gutter guard products. You can save LOTS of money putting them on yourself. CLICK ON THE IMAGE to see how low-cost they can be.
Cleaning Gutters Dangerous
Gutter cleaning is a maintenance issue that is both a hassle and can be dangerous. In fact, I know of a person who died falling from a ladder while performing gutter cleaning.
In fact, before I installed gutter guards I almost fell from my own roof twice as I was rushing to unclog gutters during a heavy rainstorm as my gutter guards did their best impersonation of Niagara Falls.
Why tempt Mother Nature's law of gravity when some product can be installed that would eliminate the need to get up and clean gutters?
Years Of Testing = Clogs & Goo
As you pointed out, for years I've been testing many different gutter guards. Some have done well, others not so well and quite a few have failed miserably.
The common problem is the gutter guard products get choked by small debris like tree blossoms, seed pods, pine needles, twigs and pieces of bark. If the gutter covers don't get clogged, then certain designs allow much of this debris to get carried into the gutter where it turns into layer after layer of organic muck.
Watch this video showing different gutter guard designs that CLOG.
Battle The Inventors & Sellers
Over the years, I've waged email, phone and traditional mail battles with inventors of gutter protection products. They bristle at my facts about how many of the manufacturers of gutter guards make "No Maintenance" claims.
False Claims
In other words, many people who sell these products tell homeowners that once installed, the homeowner will never have to clean the gutters, get up on their roofs, etc. That claim is 100 percent false in my opinion.
My nearly ten years of testing gutter guards have produced copious amounts of data to support my claim. I often get letters and emails from gutter cleaning companies that further substantiate my claims.
Maintenance Required
The bottom line is that no matter what gutter guard you install, you'll have to maintain it. The hardest part of the job is cleaning the organic muck out of the gutter.
This means you either have to completely stop the small organic debris from getting into the gutter or you must install a gutter protection product that allows you easy access to the inside of the gutter.
My First Love
For years, I was a fan of an inexpensive plastic gutter guard that had small diamond knockout holes in it. This design was not bad, but it did allow some debris to enter the gutter.
One other issue was the fact that it allowed maple-tree seed pods to get stuck in the holes. The seed would drop through the guard, but the wing stuck straight up in the air. It was a nightmare cleaning thousands of these out of the gutter guard.
Water Cleans Goo
But the holes did allow me to spray water into the gutter to get rid of the muck. Keep in mind though, this had to be done standing on the roof or from a ladder. There are tools that spray water into gutters from the ground, but you do so blind not knowing if the gutter is really clean.
Removable Plastic
Then I tested the large plastic-mesh gutter guards. These were easy to remove, but they required too much work to remove, flush the gutter and then reinstall. Once again, I was on the roof or a ladder doing this maintenance.
Here's a video of this removable plastic gutter guard that CLOGS.
Strange Beefy Design
I had just about given up hope when last year a company contacted me saying they had the solution. If I had a dollar for every time I have heard that line, I could take my family out to a very nice dinner.
Once I was sent a sample, their product was a unique gutter guard I had ever seen. It is made from one-eighth-thick extruded aluminum that has a stainless-steel micro-mesh screen on top of it. The gutter guard is practically indestructible. This is the Gutter Glove product.
No Debris Gets In
What I like most about this newer gutter guard is that absolutely no organic debris can get into the gutter as the micro mesh has openings that are smaller than the tip of a needle. Even though the openings are so small, the mesh easily permits large amounts of water to flow through it into the gutter.
Pro Installation
The manufacturer, Gutter Glove, had one of their professional dealers install this gutter guard product on one side of my garage just after all the leaves had fallen last autumn. Before he arrived, I got up on my roof and washed out the gutter of all debris with a garden hose.
This garage is under a huge maple tree that drops organic debris onto the roof every month no matter what the weather is.
After nine months, the gutter was still perfectly clean. The gutter guard did a fantastic job.
But, There's Always A But
The best part is the manufacturer actually tells the truth. He told me I'd have to periodically clean dried organic debris from the top of the gutter guard.
The reason for this is because his gutter guard laid somewhat flat across the gutter creating a platform for debris to collect and rest on.
A scrub brush on the end of an extendable fiberglass or aluminum pole allows you to do this from the ground without having to get on a ladder.
This new gutter guard is usually installed by a professional dealer. The guard slides up under the first row of shingles and the front edge is screwed to the front lip of the gutter. It's just about invisible from the ground.
Photos Tell the Tale
I took monthly photographs of the organic debris that started to pile up on the gutter cover. In many areas, the debris got worse and worse.
But every now and then a strong wind would blow a small amount of it off the gutter cover. My best estimate is that 80 percent of the debris that dropped onto the roof and gutter guard since it was installed is still there.
But even with this debris on the cover, rainwater flows under it, through the mesh and into the gutter. For testing purposes, I did not brush off the debris from the ground, although I could have at any time.
Author's Note:
Months after writing and publishing this column I heard from another company that makes a micro-mesh gutter guard. In fact, this company - Mastershield - was the inventor of the technology.
It turns out that the company that sent me the beefy gutter guard and sent one of their pro dealers to my house to put the guard on my garage USED TO BE a Mastershield dealer. The story is once he saw how well the micro mesh worked, he wanted to create his own knockoff product so he could become rich.
The Mastershield people came and installed their product on the other side of my garage roof so we could test the two products side-by-side.
IMPORTANT AUTHOR'S NOTE:April 2018 -Both of these companies sell through a dealer network. I've received numerous complaints from homeowners like you about high-pressure sales tactics, out-of-this-world estimates in the thousands of dollars, and very unprofessional salespeople coming to homes.
Because of this, I can no longer afford to tarnish my good name and reputation telling you which guard I used. I don't want you to have a bad encounter or pay more than you have to.
I'm currently investigating other brands of stainless steel micro mesh gutter guards that you can install yourself or pay a local handyman to do for you saving you a vast amount of money.
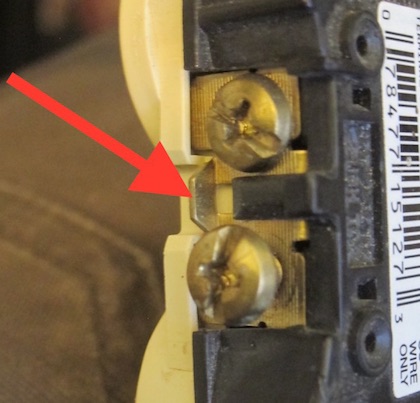
The arc-fault breakers have a very important pigtail wire that gets connected to the neutral / ground bar in the panel. The white neutral wire of the circuit actually connects to a screw on the breaker. Tighten the screws tight or you can have electrical panel arcing that can cause a fire!
Arc Fault Circuit Breaker TIPS
Special circuit breakers designed to prevent fires
Arc faults are different from ground faults - don't confuse them
DEAR TIM:There was a house fire on our street last week. The fire investigators traced the cause to a short in an electrical wire.
I'm terrified that a fire can start in my own home without warning. Why didn't the person's circuit breaker trip as soon as the wire shorted?
Is there a way to prevent fires caused by short circuits in electrical wiring? Laura M., Bellevue, PA
DEAR LAURA: Your neighbor's fire was just one of the 100-plus electrical fires that happen each day in the USA.
Electrical Fires Are Evil
These fires cause hundreds of millions of dollars in damage, injure thousands of people and are responsible for the deaths of hundreds of people each year. I can see why you're terrified.
Don't Discriminate
Ask any firefighter and he will tell you that electrical fires are non-discriminatory. They can strike anywhere and at any time.
Electrical fires happen in cheap housing and in mansions of the wealthy. These fires don't care who they affect and they love striking in the middle of the night when all are asleep.
Electrical House Fire VIDEO
The house just up the street from mine caught fire in the middle of the night. It was caused by an electrical arc. A simple circuit breaker designed to sense arcs could have PREVENTED THE FIRE. WATCH this video:
The electrical shorts that cause these fires produce arcs. These miniature fireworks create sparks and temperatures that approach 10,000 F.
This intense heat can rapidly ignite plastic insulation, wood, carpeting or any other combustible material in the vicinity of the arcing wires.
Brittle Insulation & Extension Cords
Arcs happen frequently in appliance electrical cords where insulation has become brittle or is cracked. Hidden wires behind walls nicked by nails or pinched by fasteners can also be sources of sinister arcing.
Loose Connections
Loose connections where wires are attached to switches and outlets are often arc hot spots. Wires can come loose on outlet screws by themselves from repeated heating and cooling.
Appliances that use lots of electricity should be checked for loose connections on a regular basis.
Not All Breakers Sense Arcs
The traditional circuit breakers in your neighbor's house didn't prevent the fire for a simple reason. They're not designed to sense arc faults.
Traditional circuit breakers are actually designed to protect just the wire behind the walls and the switches and outlets that they're connected to.
Regular circuit breakers are designed to trip when they sense a short that causes a massive surge of electricity coursing through a circuit. They'll also trip when too much electricity passes through the circuit. The more electricity that passes back and forth creates friction along the wire and causes a heat buildup within the breaker.
Thin Extension Cords
Traditional breakers are not designed to protect lightweight appliance wires and extension cords that are plugged into wall outlets. These extension cords are a lighter gauge wire and will heat up long before the circuit breaker senses there's an issue.
This is why extension cords are the bane of firefighters. Talk to seasoned firefighters and most will tell you extension cords should be outlawed.
Fire-producing arcs can occur in wiring before traditional breakers react. Electrical manufacturers recognized this problem and decided to attempt to stop as many of these electrical fires as possible.
Arc fault breakers are readily available. Match the size to the wire gauge. CLICK THE IMAGE TO ORDER ARC FAULT BREAKERS FOR YOUR HOME.
The result of the hard work of many is a new arc-fault circuit interrupter breaker. These devices work and act like a traditional circuit breaker except that they are smarter.
Many of these new devices contain small filters and logic devices that allow them to sense an arc just as it is about to produce the sparks and intense heat. If arcing conditions are present, then the breaker trips instantaneously.
Arc Fault Is Different From Ground Fault
Don't confuse these devices with the personal protection ground fault circuit interrupters (GFCI) that have been around since the 1970s. The GFCI circuit breakers, at the present time, don't have the capability to sense arcs.
New In 1999
The new arc fault circuit breakers are identified in section 210-12 of the 1999 edition of the National Electric Code. Beginning January 1, 2002, they were required to protect branch circuits that serve residential bedrooms.
These areas of the house have been identified as the source of many electrical arc-related fires.
State & Local Requirements
The state of Vermont decided to take a slightly more aggressive stance when the arc-fault breakers became available. They required that these new life saving circuit breakers be used in all circuits that feed residential living areas. Their regulation went into effect on January 1, 2001.
Available Everywhere
These new arc fault breakers can be purchased now in every state in the USA. The new arc fault breakers cost about $25 - $50 each depending upon manufacturer, but it is a very small price to pay for peace of mind. An experienced electrician can install a new arc fault breaker in a matter of minutes. It actually takes longer to remove and replace the cover to the circuit breaker panel than it does to switch out the breaker.
DEAR TIM:I'm getting ready to tackle some electrical projects around my home. After watching different home improvement television shows, it appears really easy.
What are some of the most common mistakes a homeowner makes when working with 120 and 240-volt wiring around the house?
Am I starting this project with a false sense of security/safety? Kristin N., Ft. Lauderdale, FL
DEAR KRISTIN: Often I have to get up out of my chair and walk out of the room when I watch many of the home improvement shows on television.
Cable TV Shows Are For Entertainment - Not Teaching
I get so aggravated that I simply can't continue to view the program. Important information is often either left out of the broadcast show or it is simplified to the extent that the average person thinks they can successfully complete a project.
If you're a rookie or newbie electrician who is starting an electrical project with little or no experience, I urge you to reconsider. Household electricity can be very dangerous.
Fires Are The Danger - Not So Much Electrocution
Every day in the USA there are over 100 house fires that are caused by electrical malfunctions or mistakes. Many people die in these fires and survivors can be seriously burned.
While people get shocked each day from touching live wires, my guess is there aren't too many deaths caused by this error. A lurking fire that starts in the middle of the night with no warning is the far greater possibility.
In comparison, I rarely have heard of a person drowning in their own home because of a plumbing leak or burst pipe. Electricity must be treated with the utmost respect.
Steve's Dimmer Switch Fire
My close friend Steve and his wife Karin had a fire start in a wall switch. It was a dimmer switch that started to melt because it overheated.
This switch looks somewhat normal, except for the soot around the edges. Wait until you see the back. (C) Copyright 2016 Tim Carter via anonymous friend contribution
Once you know what you are doing and can fulfill all of the requirements in the National Electric Code (NEC) with respect to wiring in your home, electrical projects can be completed with relative ease. The issue is the NEC is complex and it's an extensive list of requirements.
Most of the language and terms used in it would sound like a foreign language to a non-electrician like you.
The trouble is, a rookie can create hidden problems that may manifest themselves in the form of a short circuit or shock hazard. Since electricity is invisible, these hazards can't readily be seen.
Here's a simple list of possible mistakes you might make:
mixing wire gauges in a circuit
installing too big a circuit breaker for wire size
nailing cable staples too tight
installing the wrong-sized electrical boxes
reversing polarity on outlets
etc.
I could go on and on and on with other possible mistakes you might make.
Missing Ground Wire
Some older homes do not have ground wires at switch and outlet locations. It is very tempting for a homeowner to install a grounded outlet receptacle in place of the old fashioned two prong outlet. This is a huge mistake.
Keep in mind that it's a code violation to install metal cover plates on ungrounded receptacles or over ungrounded boxes. In the event of a short circuit, the cover plate can become energized and deadly.
Popular Switch Videos
Watch these three videos to get a feel of how to wire a single-pole, a 3-way and a 4-way switch.
Electrical boxes that aren't flush with combustible interior wall surfaces can sometimes cause problems. If a homeowner adds wood paneling to a room, the recessed electrical box may be in violation of the code.
Special extension rings can solve this problem but you need to know about it before you get too far into the project.
No Floaters
Switches and regular outlets aren't allowed to float near the surface of the finished wall.
This can happen if the electrical box is not nailed to the wall studs so it's flush with the finished wall material. If the electrical box is slightly recessed, then the finished wall material must be solid and filled in so the small metal tabs of electrical outlets and switches touch the wall when the mounting screws are tightened.
Watch this video to see exactly how to handle this situation.
Often a rookie electrician will not screw them tightly to a recessed box because the cover plate will not look right. This is a very dangerous situation as the wires connected to the switch and outlet can flex and wear each time the device is used.
Secure Cables
The plastic coated wire that runs between outlets, switches and your electrical panel is actually called a cable by those in the electrical trade. These cables need to be securely attached to wall studs or beams.
But a rookie can get into trouble if the staples that attach the cable are driven too tightly or at an angle. The wires within the cable can be damaged or nicked.
Use Right Gauge
One of the biggest dangers is using the wrong sized wire for a circuit. Electrical wire comes in different gauges or thicknesses.
The common gauges of wire used in residential USA wiring is 14, 12 and 10-gauge wire.
I know it doesn't make sense, but the smaller the number the thicker the wire is. Here's the amperage capacity of each of the common sizes:
14 gauge = 15 amps
12 gauge = 20 amps
10 gauge = 30 amps
The thicker the wire, the more electrical current it can safely handle. If you use too small a wire on a given circuit, the wire can overheat and short out before the fuse of circuit breaker trips or activates.
Circuit Breakers Protect Wire - Not You
Keep in mind that circuit breakers and fuses are meant to protect the wires in the circuit, not you. You must match wire sizes with the fuse or the circuit breakers.
Strip Small Amounts
The electrical code is also very specific about the length of the stripped wires that are attached to switches and outlets. Too much stripped wire extending from the inside of an electrical box causes big problems as you push the outlet or switch towards and into the electrical box.
Complex - Hire A Pro
Are you starting to get the picture? Working with electricity requires lots of knowledge and a firm grasp of the National Electrical Code. There are also many good books that explain and illustrate many common household electrical projects. I urge you to read those before you proceed with your projects.
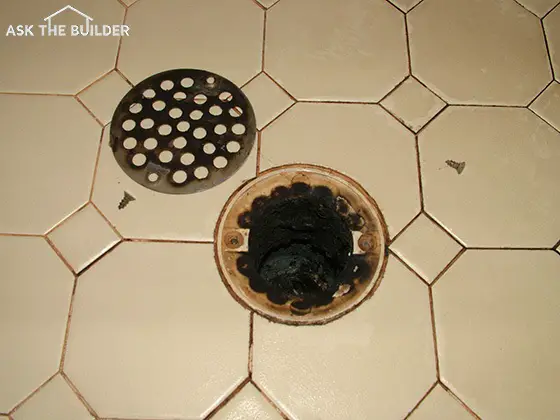
DEAR TIM:We have a horrible odor coming from the shower drain in our acrylic shower. Five different plumbers have not been able to solve the problem.
The first and fourth plumbers said nothing could be done, the second and third plumbers thought the problem was caused by a rocking toilet so they replaced the toilet's wax ring.
The fifth plumber said he thought the plumbing drain lines were installed improperly and that the odor was caused each time the toilet flushed.
The problem is, the odor just started and all was fine several months ago. I have poured every imaginable cleaning solution into the shower drain and the odor persists.
What could be the problem? Shari W., Rancho Palos Verdes, CA
DEAR SHARI: You might be eligible for a place in the record books for having called in that many plumbers for one problem.
Sewer Gas Odor Impostor
Most foul odors in bathrooms can be traced to sewer gas leaving the drain and vent pipe system of homes. There are many reasons why this happened and the plumbers you hired were trying their best to chase down the typical sources of sewer gas.
Watch this video to see how complex the piping system is in the walls and ceilings of your home. Imagine if one of these pipes is cracked or was never sealed properly.
I've been a master plumber since age 28 and routinely do phone consults helping people solve their sewer gas problems over the phone. You'd be shocked as to what I discover by asking some simple questions.
The issue is there's another possibility the plumbers have overlooked. Remember, the power is always in the question or questions. I don't know if they've been asking you the right ones.
Source Could Be Above The Trap
It is amazing that you have not made any progress on solving the problem. That tells me the source of the odor might not be related to actual sewer gas leaking from your system, even though it smells like sewer gas.
But to determine this, I am afraid you might have to perform a little exploratory surgery on a wall that's adjacent to the shower.
Odors coming from drains are a common problem in many homes. Some people only have the problem when they run water in a sink or a bathtub.
The source of the odor in almost all of these instances is a buildup of biofilm on the sides of the pipes that connect the sink or fixture to the actual P-shaped trap under the fixture. This vertical tailpiece pipe can accumulate a seething bacteria-filled organic layer of slime over time.
When water rushes past the slime, it can dislodge some of the molecules into the air and they waft up out of the sink and into your nose.
Stain Solver Cleaner
Stain Solver is MADE in the USA with USA ingredients that are food-grade quality. CLICK THE IMAGE to order some NOW.
To eliminate biofilm as the source of the odor, take the chrome or brass strainer cover off the shower drain so you can see into the drain pipe.
Use Stain Solver oxygen bleach solution and a larger-diameter bottle brush to thoroughly clean the underside of the strainer, the bowl-shaped drain assembly under the strainer as well as the sides of the vertical drain pipe that extends downward into the p-trap.
Stain Solver is a pure powder you mix with hot tap water. It's non-toxic. It's Made in the USA with USA ingredients.
There's no offensive odor like you get with chlorine bleach.
Rinse thoroughly with clean water until the entire drain is perfectly clean. If the odor still persists, it is time to move on.
Mold May Be The Issue
Check for mold in the shower and areas near the shower. Active mold growth produces odor. That musty odor you smell when around mold is actually a puff of gas that ejects the mold spore from the mold organism.
Imagine if hundreds, thousands or tens of thousands of small mold spores are being ejected each day in your shower. This could easily produce enough gas for you to smell.
Remember, this mold could be behind the shower tile or walls and hard to discover. A recent leak that is still invisible could be the source of water that is fueling the mold growth.
These are typical bottle brushes. You want one that has a diameter of at least 1 and 1/4 inches. A 2-inch diameter one is great for shower drains. CLICK THE IMAGE TO BUY THESE NOW.
Critter Cause?
A dead animal that somehow found its way into the wall space next to the shower or under the shower assembly could be the source of the odor. This is a remote possibility and the stench of a decaying animal is very distinctive and quite unlike the odor produced by sewer gas or biofilm from a drain assembly.
If this shower shares a common wall with a closet or some other wall surface that can be sacrificed, it is time to cut into the wall(s) to see behind and under the acrylic shower assembly. The first holes can be down low towards the floor so that you can see under the shower pan.
Purchase an inexpensive makeup compact mirror and attach it to a stick so you can see around any corners or obstructions under the shower pan. Use a flashlight with the mirror to look up the wall cavities as much as possible to see signs of mold growth.
Odors from drains are voices telling you something is wrong. Think of them as low-powered smoke detectors. This is especially true if the source of the odor is some form of mold. It is not uncommon for a water leak to remain invisible for weeks or months and cause mold to bloom in a hidden location.
Add to this the power of the average human's sense of smell. You would be shocked at how few odor molecules it takes to trigger a response. Natural gas is a great example of this. In its pure state, natural gas is odorless.
Rare Natural Gas Leak?
Gas companies add mercaptan chemicals to the gas so we can smell it if there is a dangerous gas leak. Believe it or not, you can easily smell mercaptans at a concentration level of one-half one part mercaptan to 1,000,000 parts of air!
Investigate the source of all odors. Enlist the help of friends if possible, especially those who might have a better sense of smell. Small holes drilled into walls can be very helpful to help track down the source of an odor.
Insert a small clear plastic tube into the hole and determine if the odor is stronger or weaker in that particular location.
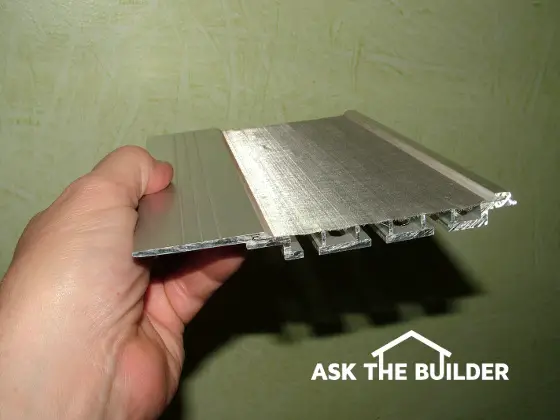
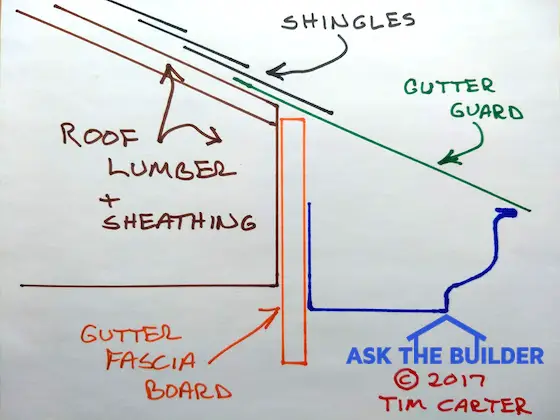
Gutter Guard Truth | Here's a quick cross-section showing how the gutter guard - in green - is in the same plane as the roofing material. The drawing is not to scale. I used to make drawings like this sitting at customers' kitchen tables. CLICK or TAP HERE to purchase an affordable MICROMESH gutter guard I'd put on my house. Copyright 2018 Tim Carter
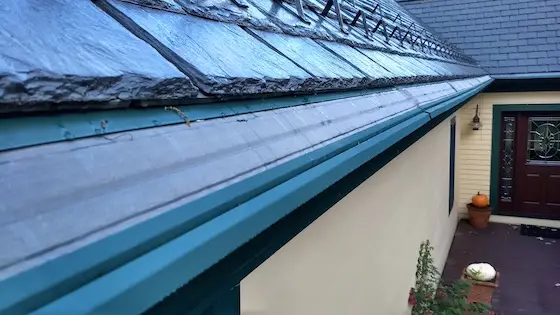
Important Author’s Note Update: Since this column was written, I've discovered a gutter guard that actually WORKS! It worked so well in my testing that I installed it on my own home.
It's a stainless-steel micro-mesh gutter guard that doesn't allow ANY organic debris into a gutter but allows water to flow into the gutter even in torrential downpours.
This is the best gutter guard I've ever tested. A stainless-steel micro-mesh prevents any debris from getting into the gutter. You're looking at the front door on my NH home. CLICK on the photo to purchase DIY stainless-steel gutter guards that will save you thousands of dollars. Copyright 2018 Tim Carter
! IMPORTANT - Read Author's Notes at the End of This Column # # # Watch Videos Below!
Dealer-Installed Gutter Guards are Outrageous
Not too long ago, I was talking with a salesman who worked for a gutter guard company on the Eastern seaboard. He was astonished that people actually paid the prices he quoted them.
When he told me he was routinely getting $20 per linear foot for installed gutter guards, I almost fell out of my chair. It's imperative that you sit down and do some calculations before you decide to sign a contract for gutter guards. Some people have paid as much as $30 a linear foot.
DO NOT PAY THESE INSANE PRICES.Purchase gutter guards from Amazon.com and have a local handyman install them. CLICK HERE to order.
Consider purchasing a micro-mesh product from Amazon.com and having your local handyman install them for you. CLICK the photo below for just one of the micro-mesh products I discovered on Amazon:
There are many micromesh gutter guard products. You can save LOTS of money putting them on yourself. CLICK ON THE IMAGE to see how low-cost they can be.
DEAR TIM: Every fall, I get deluged with both leaves in my gutters and advertisements from companies selling gutter guard products that promise me I will never have to clean my gutters again.
The few estimates I have requested have taken my breath away because of the high price. First, do these products fulfill their claims?
If not, why? Is one better than the other? What is the most cost-effective way to keep my gutters free of leaves and debris? Stephanie W., Cranberry, PA
DEAR STEPHANIE: I'm not surprised at all by your comments but wonder why you only mentioned half of your problem.
Spring Is The Biggest Gutter Problem
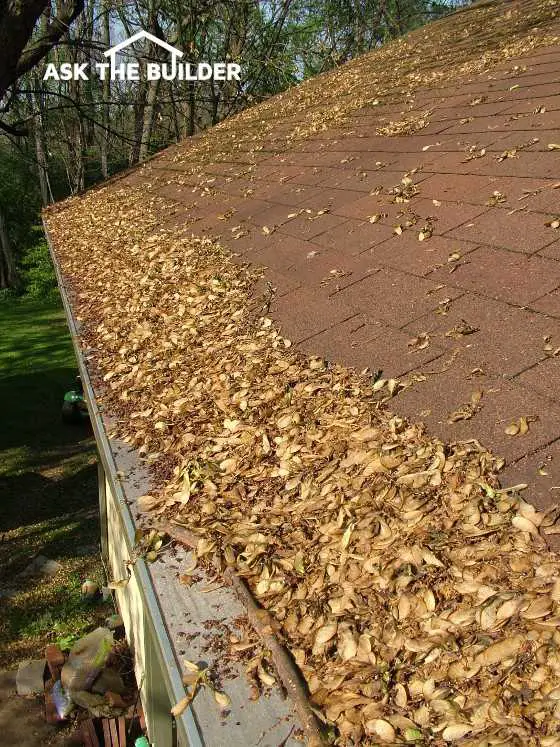
If you have deciduous trees, that drop leaves onto your home, then you undoubtedly suffer in the spring as well as the fall.
All deciduous trees produce organic litter in the form of buds, flowers, seeds, small bits of bark, twigs and leaves on a never-ending annual cycle until they die and then fall over. Evergreen trees are just as guilty as they shed needles and other bits of debris throughout the year.
This simple gutter guard is working well now but wait until spring. Those knock-out holes you see will be clogged with twigs, flowers, bark, seeds, flower buds, etc.
Stratospheric Prices
The prices you speak of for these gutter guard systems not only take my breath away, but they knock me back on my heels. I'm convinced the pricing is based solely on emotion.
The companies that sell these products play upon the frustration the average homeowner experiences when faced with the periodic cleaning one has to do several times a year to keep gutters clean.
It's not uncommon for a homeowner to get a price of $2,000 to $3,000 to install gutter guards on the average home. The pricing varies from region to region, and the type of system being installed.
There are do-it-yourself products you can get that will cost less than $200 for the average house so you can see there is a vast array of choices.
Consider purchasing a micro-mesh product from Amazon.com and having your local handyman install them for you. CLICK the photo below for just one of the micro-mesh products I discovered on Amazon:
There are many micromesh gutter guard products. You can save LOTS of money putting them on yourself. CLICK ON THE IMAGE to see how low-cost they can be.
To put the final retail price in perspective as to how high it is, you just need to look at the manufacturing cost. Doing some research I've come to the conclusion that the price ranges from ten or twenty cents per linear foot up to two dollars for the most complex micro-mesh guard. These are 2017 prices, so adjust for inflation.
Invest Your Money? Maybe!
But for the moment, let's consider the system installed by a professional roofing company. For the sake of discussion, I'd like to assume an installed price of $2,500.00.
I'd also like to assume that you could invest this same money in a conservative stock that might go up in value just 7 percent per year. If you let the stock just grow in price, at the end of ten years its value would be nearly double having risen in value to $4,917.82. This means you still have your original money plus a gain of $2,417.82.
Annual Cost to Clean Gutters
If you paid a roofing company or handyman just $125 per visit to clean your existing gutters three times per year, you would have paid out $3,750.00 over the same time period. Granted, you need to factor in inflation as the price of the labor will undoubtedly rise.
But you don't need a Ph.D. in Mathematics to see that at the end of ten years you'll have clean gutters and over $1,100 still in your account if you simply pay a roofer to periodically clean your gutters.
Maybe it's a better idea to not put on gutter guards, especially if you plan to move within five years.
Almost All Gutter Products #FAIL
The real truth is that all of the gutter guard products I have tested for years at my own home fail in one way or the other. As soon as new designs become available, the manufacturers tend to discover me and ask me to test the new products.
All gutter guards do stop large leaves from entering gutters, but most of the designs allow small organic debris to enter the gutter system or this debris clogs the gutter guards causing water to cascade off the roof!
Gutter Guard Videos
Watch all these gutter guard videos of mine. You'll see WHY most fail and you'll see the one I put on my own home!
Layer Of Muck And Goo
If this organic debris that does enter the gutter is not cleaned out on a regular basis, you end up with a layer of goo and muck in your gutters.
If you must install gutter guards, then absolutely make sure you buy ones that allow you to easily see through them to the bottom of the entire gutter.
Avoid Solid-Topped Guards
Avoid gutter guards that have solid tops and small slits near the front edge. Look for gutter guards that have a larger mesh-type open structure that resembles a fishnet or even a chainlink fence. These systems allow you to aim a garden hose nozzle through the guard so that water can easily flush away the organic goo that will collect in the gutter. Remember, you'll have to clean your gutters or the gutter guards themselves UNLESS YOU GET A GUTTER GUARD THAT STOPS ALL DEBRIS BUT ALLOWS WATER INTO THE GUTTER.
I've tested no less than twenty different gutter guard products over the past eight years. Each year, I get to look at ones that offer new hope or more of the same.
Some of the gutter guards get horribly fouled with the spring-time debris that falls from the trees onto my roof. My pin oak trees create flower blossoms that resemble miniature lace. This mass of organic debris has terrorized each and every gutter guard. When my maple tree is not hit with a spring frost that kills the flower buds, the gutter guards are clogged within days with hundreds of thousands of maple seed helicopters.
Half-Truths By Salespeople
Beware of salesmen who tell you all of the organic debris is washed away by rain or blown away by the wind. It's not true if the organic debris can get trapped in the openings of the gutter guard.
Home & Garden Show Test
You can test it yourself the next time you visit a home and garden show that has a small gutter guard setup with water cascading down a little roof, across the guard and into a gutter. Tear off a small piece of paper about the size of a postage stamp or your thumbnail and drop it onto the running water. I guarantee that it will be carried into the gutter or it will clog the guard. It will not fall onto the floor of the convention center.
As you might imagine, columns written as the one above have the potential to ignite a firestorm of controversy. Manufacturers of gutter guard products that do fail and the distributors who sell them are immediately cast in a deep shadow of doubt.
But imagine how I felt when I received the following email from Ms. Ann Pattison on November 7, 2004 the day the above column ran in The Toledo Blade:
"Hello, Tim,
My name is Ann Pattison, I am the proud owner of A -1 Gutter Cleaning based in Toledo, Ohio. I am writing to you regarding your article in The Toledo Blade that appeared on November 7, 2004, about gutter guards. I absolutely agree with your article.
For years I have been telling customers the same things you mentioned in your article. It is the truth. I have been in business for 15 years and have been cleaning gutters for 20. I will install a screening if a customer really wants some type of cover. However, I also still go out yearly to maintain this screening. Each year I have to clean off the screen I installed and then I must flush out the gutters.
I also take a lot of screening off because it was never maintained properly. If you install a cover, you cannot find a clog unless you take everything off. This is very time-consuming. There is lots of labor involved. Gutter guards that allow you to see the bottom of the gutters do work best just as you say. But if you use a cheap roll out screening, it will be pushed right into the gutter as soon as leaves fall on it. So you must check out the material you are having installed. That also makes a big difference.
I just wanted to write you and thank you for your article. You are absolutely right on everything you said especially on the pricing. It is ridiculous. I do install a good screening cover that is a very thick gauge and works very well with proper maintenance for less than $3.00 a foot. If I can be of any service to you, please let me know. You can reach me at 419-865-1941 or 888-888-0842.
Ms. Ann M. Pattison A-1 GUTTER CLEANING"
Several days later, I received a letter from a homeowner who lives in Bensalem, PA with comments of his own. Thanks Louis! You really proved my point.
November 11, 2004
"Dear Mr. Carter:
Thank you - Thank you - Thank you. Your article on Guarded Gutters hit the nail on the head. Every time I see a full page ad in The Courier-Times or other papers or on TV I get so angry. The guys who installed my gutters were called "Gutter Solutions." They came out once to clean the gutters, then when they clogged up again I called them back. They said the guy who signed my contract no longer worked there. I was out of luck.
I paid a lot for these gutters - so-called Clog-Free. What a joke! Sure, big leaves don't get in, but the other stuff which is even worse than leaves really clogs things up. My gutters overflow during a heavy rain like Niagara Falls.
If a gutter company says they will come out and clean your gutters for free if they clog. . . Get it in writing!!! Their bill even said: Guaranteed not to clog. It's a bunch of baloney.
Years ago I had seamless gutters installed. They added 3-foot screen covers, and they put them on upside down. Yes, Mr. Carter. Upside down. It took lots of phone calls to get them to come back out and fix things.
Thanks for listening to me, Mr. Carter.
Yours truly,
Louis Cesarone, Jr. (Senior Citizen)"
Tim,
I've read your article about gutter covers and agree completely. Yesterday, I spent 2 hours cleaning out this foul muck in the bottom of my gutters that had clogged them up. I ripped off my gutter covers and threw them in the trash.
While looking for solutions to my being lazy and not wanting to clean out my gutters EVER again, I came across _ _ _ _ _ . (Named Removed by Tim Carter to Protect the Guilty) Have you tried these? Do they work or am I just hoping that I never have to be covered with muck and mosquito bites again anytime soon.
Thanks!
Amiee Staggs
Bloomington, IN
This email just arrived today, August 29, 2005.
Loved your discussion of gutter guards. I bought into the "never clean" line and purchased a system that had a solid cover over the gutter. Clogged up within 6 months! The company did come out and clean them, but after we had a major overflow and basement flooding. The company knows its product is not clog free -- they even had the gall to give me a special hose adapter so I could flush out their "clog free" gutters.
My wife never liked the imitation six panel hollow core interior doors I used when I built our house 15 years ago. At the time, it was all I could afford, as I was near the end of the project and money was running short - the money actually ran out.
Recently, I started to do some interior remodeling and it was a perfect opportunity to change out the doors. I did some research and lucked out to find this medium sized Canadian company - Byron Wood Products - that had exactly what we wanted.
You have to be careful when shopping for wood doors. They may look the same, but there can be vast differences.
For example, some doors say they are solid wood, but they are actually a solid wood core with a veneer skin. I am not saying this is bad, as it would indeed be a solid wood door.
But if you want wood interior doors the way they were made 100 years ago, there are but a handful of companies that still make them. Fortunately, they are easy to contact and work with. Often companies like this just wish to deal with lumber companies and not the general public.
When you go shopping for doors, pay attention to how they are made. Be sure you are comparing similar doors.
Mixing Old and New
My interior doors combine new technology with old world craftsmanship and techniques. I am painting my doors. The raised panels in older doors usually gave painters headaches.
The actual raised panel floats between the thick stiles and rails of the door. This is a necessary design feature.
The solid wood raised panels expand and contract with changes in humidity. This would crack the paint where the panels connect to the stiles and rails. Byrcon solved this problem by using medium density fiberboard (MDF) for the raised panel. Since the door will be painted, you will not see the particle board. The MDF is very stable and does not shrink and swell like solid wood. If you want stain quality raised panels, Byrcon makes those, so don't despair!
Hardware
Buying period door hardware is a little bit more troublesome. You have to be on the lookout for low quality reproduction hardware.
Believe me, it is out there! If you have ever had the pleasure of taking apart 50 or 75 year old well made mortise locksets, you will know what a quality lockset feels and looks like.
I was able to locate a company in Texas that makes really good reproduction hardware. They are Nostalgic Warehouse. They have about 8 primary styles that range from early Victorian up through and including Art Deco. They even sell those classic crystal door handles.
Look for differences in the backplates of some companies. Some are thin pressed metal.
The ones I got from Nostalgic are forged solid brass. The forged process allows for very crisp detail. I also especially like the mortise lockset that I bought. It is made in England and is a true piece of craftsmanship. The remarkable thing is that the retail price for this lockset is not hundreds of dollars, it was less than $100! Yes, that may seem like a lot of money compared with a $15 brass plated tubular lockset from a home center, but the difference is night and day.
Hinges Are Important
Go the extra mile and use period hinges. You can get fancy design ones, but I went with precision solid brass smooth hinges from Stanley - the same company that makes all of those great tape measures and hand tools.
Stanley offers kits to dress up then hinges. You can get the old fashioned ball tips for the hinges or you can get the Victorian chimney caps.
These little pieces make a huge difference. As for mortising the hinges, the folks at Byrcon did it for me with no questions asked. My hinges fit perfectly when I got the doors!
Welcome if you're a new subscriber! This is going to be a fun issue.
What better way to start the day listening to the entire soundtrack of The Hobbit? Yesterday was The Outfield. Their songs Your Love and Banging on My Heart are fantastic.
I'm about to make a big change and am pretty excited about it. It's been at least fifteen years since I've had a new eyeglass frame.
My youngest daughter is helping me get more in tune with the times. We ordered five sample frames online and they should arrive in the next few days to try on.
You wouldn't think one would get amped up about new eyeglass frames!
This afternoon, I'll be along the coast of Maine and intend to do some outdoor amateur radio if the WX cooperates. We've been locked into a week of rainy, cool weather here and there's not much hope it's going to end soon.
Roofing Ripoff Paperback News
Three weeks ago, I did a soft launch of my new expose' book Roofing Ripoff. It's all about the unethical practices I uncovered that appear to be rampant in the US asphalt shingle market.
But the BEST PART of the book is I also discovered how you can use copper to make your new, newer or existing good-condition asphalt roof LAST FOR ADDITIONAL DECADES.
Yes, for a few hundred dollars you can extend the life of your roof for many, many years.
Did that sink in or do you have UNLIMITED MONEY and you don't care if you put on a new roof every ten years?
After I click the SEND button so you're able to read this, I'll sit down and go over the FINAL design draft from my book designer Sheridan.
She's done a magnificent job with the layout of the book. You have no idea how complex it is to do this. Sheridan's a real pro.
The bottom line is I'm now so very close to getting a true copy of the book into your hands. Hang in there.
If you'd rather have a PDF version or one for you Kindle, you can buy it NOW.
If you already purchased a copy of Roofing Ripoff in either format, I sure could use a favor!
If you went to Amazon and bought a Kindle version, can you go back and leave a review?
If you purchased a PDF version from me, can you email me a short review I can post on the RoofingRipoff.com website?
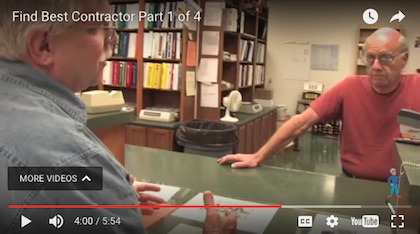
Finding the Real Pro
Every week, I get emails from homeowners who've gotten SCREWED by a contractor.
Just a few days ago here in NH, there was a news story about a contractor that took nearly $50,000 in deposits from homeowners and then never showed up to work.
Years ago, I taped a series of four simple videos that show you how to locate the BEST CONTRACTOR in your city or town and how to PROTECT YOUR MONEY and HOME.
Don't ask me why, but I just finally uploaded them to YouTube this past weekend.
I URGE you to watch the four videos now. Video number one takes you through the simple steps of finding the pro.
In video number 2, I share some vital secrets about contracts. You MUST WATCH this one.
Video number 3 is super important. I share with you how to PAY the contractor so you don't get left holding the bag.
Video number 4 is about change orders. These are Death on a Stick. In this video I show you how to avoid them.
If you want the EASY BUTTON approach and don't have time to watch all the videos, then CLICK HERE NOW to get FREE & FAST BIDS from local contractors in your city or town.
Pergola Ideas for Your Patio
The latest column I wrote for all my newspaper clients - yes, I still write the weekly Ask the Builder column that appears in about 70 newspapers nationwide - is about a very gorgeous pergola.
About six weeks ago, I did a phone consult with the man that built what you see in the photo above. He wanted me to share some tips about how to make it safe and I obliged over the phone.
Want me to call you on the phone to give you advice?
Suffice it to say, Joel did a spectacular job after talking with me.
CLICK HERE to see more photos of the pergola and read the column to absorb all the tips and inspiration so you can have a similar pergola at your home.
IMPORTANT TIP: There are links in the pergola column that allow you to get FREE BIDS from local carpenters that can build the EXACT pergola you see in the photos!!
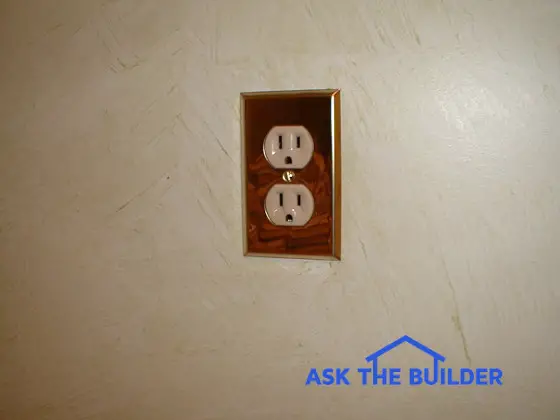
The Mystery Tab
Have you ever wondered how in the world that one wall outlet in your home is controlled by a wall switch but the outlet just above or below it is always hot or has power?
What's the magic to make that happen?
It's pretty simple sorcery believe it or not.
If you're a new subscriber, I'm working on revising all of the content at AsktheBuilder.com. It's a massive months-long project and there's still much to do.
Here's a list of my latest revisions. There's some very helpful tips in these columns!
DEAR TIM: I purchased some building cost software to try to help me calculate the cost of a house I want to build. However, the costs I’m getting back don’t seem to be accurate.
Is there a simple and foolproof way to go about estimating home building costs? I’m trying to do this before I spend lots of money on blueprints only to discover what I want is out of reach for my budget.
Surely others struggle trying to estimate house building costs. Connie L., Chicago, IL
DEAR CONNIE: The building cost estimator you’re using may not be adjusting correctly for your market conditions.
Many Variables = Apples & Onions
There also may be some settings that you overlooked that have you comparing apples to onions. There are so many variables that come into play when estimating building and remodeling costs, it’s a miracle that any of that software works.
Costs Vary By Region
The first challenge you have to consider is that building cost data is different for varying cities and regions. Usually there are settings in software that track the costs in many cities and states.
But these can be inaccurate depending upon the level of fit and finish you’re looking to achieve.
Options Blow Budget
Think about new cars for a second. Most have four wheels, an engine, transmission, doors, varying sizes, etc., but they can have vastly different prices.
A Mercedes Benz is going to cost you much more than a Kia, although they will both transport you from point A to point B. This is true in houses.
Tour New Market Homes
To get a pretty close approximation of the current construction building cost in your city or town, you just have to go on a tour of new homes for sale. Be sure to visit ones that have been recently constructed.
I'd look at ones in all different price ranges so that you can get an idea of the level of quality of each home. Some will have standard appliances and finishes. Others might have premium and top-quality appointments. Take great notes.
Length Of Time On Market
One thing you have to consider is the length of time each house has been on the market and if there have been price reductions. The state of the current economy might cause a certain amount of deflation as sales prices are lowered to get houses sold. This means that a house might currently sell for less than what it actually cost to build. Be careful and ask lots of questions to see if this is the case in your area.
Inflation can cause jumps in building costs per square foot on a monthly basis. Material shortages can also cause price increases.
Back Calculate
Assuming that the marketplace is fairly stable, here’s a method of generating home building cost estimates that should get you fairly close to the number you’re looking for. I generate new home building costs by trying to back calculate the cost to build the house per square foot.
Once you know this number, you multiply it by the projected size of your new home to get close to the actual cost.
Locate A Close Match
Start this process by finding one or two homes that have lots the size you expect to have and the houses are close in size, style, and finish level that you desire. It’s very important all these things match.
Even better, make sure the houses you’re looking at are in the same neighborhood if possible. Prices of the same house can vary depending on the community they’re in.
Back Out Commission & Lot Price
To determine the approximate construction building cost, you need to back out the cost of the lot and any sales commission. I would estimate the sales commission at six percent.
To determine the cost of the building lot, you’ll have to look for lots for sale that are similar. I'd talk with knowledgeable Realtors.
Don’t forget to account for utility connections. In other words, the new houses you tour may be connected to city sewer and water and you’re looking at lots that need a well and septic system. It can be very complicated.
Once you subtract the sales commission and lot cost from the asking price of the new home, you then calculate the actual square footage of finished living space. Leave out garages and unfinished basements from this calculation.
Software Estimator
I developed a cool software tool that can help you calculate the cost of your new home. You just need to enter in the cost of one aspect of the house and the software does the rest.
It's a ROUGH estimating tool because it averages regional costs. The software uses mortgage industry percentages so lenders don't give out too much money on each draw as a new home is built. Here's a tiny screenshot of the cool spreadsheet:
This is a very cool software spreadsheet that can help you calculate the cost of your new home. Divide the square footage of the home by the cost to get cost per square foot. CLICK THE IMAGE ABOVE TO DOWNLOAD THE SOFTWARE.
Exterior Wall Footprint
I prefer to always calculate this using the dimensions of the outline of the exterior walls. Don’t fall into the trap of using room sizes. Get the overall square footage.
Divide this square footage into the cost of the home less the sales commission and lot cost to arrive at the cost-per-square-foot of that house.
Not Foolproof - But Close
This method of determining home building cost estimates is not foolproof, but it will get you close. The key is to make sure the houses you’re using as your benchmark match what you want as closely as possible. If you don’t match this up, you can easily be off by a factor of 25-40 percent!
Cost Of Plans
If you’re planning a custom home, you then need to add in the cost of the plans. They might easily run 5 to 6 percent of the cost of the home. You can get plan estimates from architects that draw custom homes.
Meet Custom Builders
You can also talk to custom home builders to get a range of building costs per square foot. Be sure to talk to several builders and go look at recent houses they’ve built to see if you’re looking at houses that match what you want.
Column 836
Expert Advice For Your Home
Subscribe to the FREE Ask the Builder newsletter to receive professional advice for your home. Complete the form below and each week you'll get:
DIY Tips
Tool Reviews
Project Guides
Product Discounts, Giveaways & more.
Unsubscribe at any time. We respect your email privacy.