Watts are a unit of power. You probably studied that in high school physics class.
Remember James Watt?
I'm sure you've seen the wattage rating on a light bulb. Most older incandescent bulbs have a rating from 60 to 100 watts.
LED light bulbs can produce the same amount of light but require far fewer watts.
Appliances Need More
If you want to operate a refrigerator, a microwave oven, a hand-held hair dryer, a vacuum cleaner or even a cell-phone charger, you're going to need lots of watts at the same time.
A double oven that operates on 240 volts in your home is perhaps the biggest energy glutton. It consumes thousands of watts per hour.
Have you ever noticed your living or family room lights dim for just a second or so when your refrigerator, AC or washing machine turns on?
The dimming of the lights is caused by the reactive load of the major appliance that was starting up.
Have you ever had to push a car? It takes a tremendous force to start it rolling. However, once it is rolling, the effort to keep it rolling is reduced.
Electric motors and refrigeration compressors are no different.
Start Up Load Can Be Double!
The reactive loads can be double the running load! Wattage demand can soar!
Unfortunately, you must account for this when sizing a generator.
You'll find out very quickly that if your power is interrupted, and you depend on a portable generator, the experience will remind you of a backpacking trip.
You'll have some fun, but for the most part your life will be miserable until the power is restored.
Right-Sized Portable Generator Portable electric generators are very nice. When I lost power for three days in a winter storm, my kids had fun for the first eight hours.
You don't realize how much you depend on light bulbs, TV and even the toaster each day. I didn't have a generator, but wish now I had this one:
Here's a beefy portable electric generator that produces 5,500 watts. These are what you need to be reasonably comfortable for an extended power outage. CLICK THE PHOTO NOW TO HAVE THIS GENERATOR DELIVERED TO YOUR GARAGE.
It's also very depressing to go to bed at 7:30 p.m. when the sun goes down. Flashlights are no substitute for a table lamp. Buy as much generator as you can afford. You will never ever regret it!
Here are two dandy smaller portable generators. I own the one on the left. It can put out 2,200 watts and is VERY QUIET. CLICK THE PHOTO NOW TO HAVE ONE OR BOTH OF THESE DELIVERED TO YOUR HOME.
Portable Electric Generator TIPS
Allow you to have heat and cooling in power outages
Small ones, 2,000 watts, are for minimal power requirements
DEAR TIM:Last year, we lost electric power to our home three times. One of the outages cost us approximately $400 in spoiled food.
Will a portable generator solve this problem? How do you size a generator?
Can they be safely connected to the electric panel, or do you have to use extension cords to power separate items?
Will these generators supply sufficient power to run sensitive electronic equipment such as my computer? Doug Turner, Oregon
DEAR DOUG: Two years ago, the exact same thing happened to me.
My Own Outages
A few years back, a summer storm left my family and I without power for 36 hours. Then a freak fall snow storm knocked out my power for three days.
A portable electric generator would have allowed me to run my refrigerator and freezer just enough to save my food.
Plenty Of Natural Gas - But NO HEAT
I could have also powered my furnace for 10 minutes an hour to keep the pipes, my wife and kids from freezing. October is normally a balmy month but this storm brought in a bubble of cold air that made it feel like December.
I had an unlimited supply of natural gas coming into my home, but my furnace was ice-cold because there was no electricity to power the thermostats and giant fan that blew hot air to all the rooms.
Sleeping in the family room in front of the fire made us feel like we were in a log cabin.
All because I didn't own a simple portable generator that would have allowed us to not go back in time 100 years!
Portable electric generators come in all sizes and levels of quality. They can provide you with emergency power to run virtually any electric appliance in your home.
They can also provide electric power for picnics, camping and construction needs.
Portable Generators For Smaller Loads
However, if you plan to power a whole house air conditioner or heat pump, you are dreaming. These large electrical devices will overwhelm an average or large size portable generator.
Sized In Watts
Portable electrical generators are sized by the amount of watts they will produce when operating. A 2,500 watt generator will supply enough electricity to power twenty-five 100 watt light bulbs for 30 minutes.
After that, you should reduce the load by 10 percent to avoid overheating the generator.
The total capacity of a generator cannot always be delivered to a single appliance. The power you can deliver to any one appliance is determined by the size of the outlets on the side of the generator.
Add Up Watts To Size One
Sizing a generator for your household emergency needs can be a bit complicated. You need to calculate the total amount of watts (electrical load) you might have connected to the generator at any one time.
Appliances and motors have labels that tell you how many watts the appliance requires while operating. You'll discover quickly that if you want to power several things at once, plus have a few lights burning, you'll need at least 4,500 watts, maybe even 5,500 watts.
Typically you'll discover even with a larger generator you'll have to switch out what things get power.
In other words, you may let the furnace run for an hour, then switch that power cord to the refrigerator. Not all things can have constant power unless you get a massive generator.
Here's a beefy portable electric generator that produces 5,500 watts. These are what you need to be reasonably comfortable for an extended power outage. CLICK THE PHOTO NOW TO HAVE THIS GENERATOR DELIVERED TO YOUR GARAGE.
Giant Generators - In Case You Must Have One
Watch this video to see my automatic stand-by generator at my own home. It comes on automatically if the main power is out for ten seconds.
This generator can produce 17,000 watts. That may seem like a vast amount of electricity, but it's not enough to power a 240-volt large oven.
In addition, certain appliances require significantly more power at start-up than while actually running. It takes a big initial surge of power to get the core of the electric motor spinning.
Refrigerators, furnace blower motors, freezers, washing machines, etc. are examples of these appliances.
If you've ever seen your lights temporarily dim while your refrigerator starts up you know what I am talking about.
This is called reactive load and it can be as high as double the running load of an appliance. You need to keep this in mind when sizing a generator.
Well pumps, larger AC units, etc. can have crippling reactive loads and stall out a generator that's too small.
Transfer Switch Is Complicated
Connecting a portable generator to your main electric service panel where the circuit breakers are located is accomplished using a transfer switch. These switches completely take your house off line while the generator is operating.
If you don't use a transfer switch and simply feed power to the electric panel, you could kill a utility company linesman who is attempting to restore power to your neighborhood. These switches also protect the generator when power is restored by the utility company. Make sure a qualified electrician installs your transfer switch. It must be inspected by your local electrical inspectors and/or the utility company.
Generators & Extension Cords
Almost all portable generators come with electrical outlets. You plug in an extension cord into these outlets.
Extension cords are inherently dangerous because all too often they're under sized. This means if you try to put lots of electricity through them they can overheat and cause a fire.
If you choose to use them, be sure they are sized adequately to handle the flow of electricity. An undersized cord can overheat, short out and cause a fire.
To power sensitive electronic equipment, you need to purchase the highest quality portable generator you can afford. The quality of electricity produced by different generators can vary.
The gasoline engine and the generator must provide consistent, smooth power. Inexpensive motor or generator components can adversely affect electrical power production.
Consider purchasing an engine that has an automatic shut off that can detect low engine oil levels. This simple feature will protect your engine from failure. Remember, higher quality usually means higher initial cost. The most economical generator may not be the best long term investment.
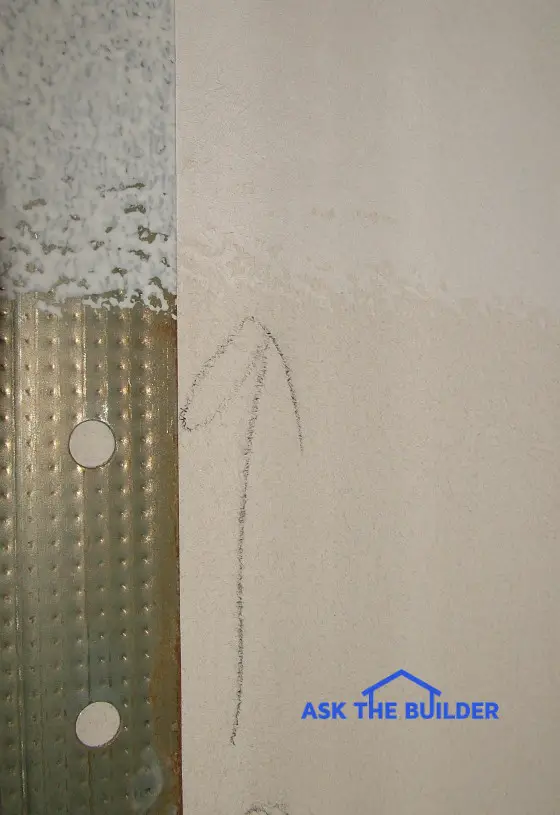
DEAR TIM: Paperless drywall is causing me some consternation. Is it as easy to cut, install and finish as traditional drywall that has a paper facing?
Why would I want to use paperless drywall? The texture of the paperless drywall is definitely rougher, and I am worried the walls and ceilings in my house will not be smooth.
Would you use this paperless product in your own home? Joy B., Olive Branch, MS
DEAR JOY: The paperless drywall is a fascinating product.
Great For Wet Locations
To me it is one of those, why-didn't-I-think-of-that products. While traditional drywall with paper facing is fine in many instances and I have it on virtually every surface of my own home, the paperless drywall solves a few pesky problems the paper-faced drywall has had for years.
Paper Sandwich
Traditional drywall has a firm gypsum core that is wrapped with special paper both front and back. Not all drywall has the same paper facing.
Some drywall products have colored paper facing (blue or green) that inhibits the absorption of water that might otherwise soften the gypsum core.
The paperless drywall is covered both front and back with fiberglass which is naturally highly water resistant. It also comes with a moisture-resistant gypsum core. Not all traditional drywall has this type of core.
Slows Mold
First and foremost, the paperless drywall was created to help minimize the spread of mold in homes.
Is it mold-proof? Absolutely not. It's mold resistant simply because the fiberglass mat that replaces the paper is not a known food source for many common molds.
Some molds actually feed on the paper facing of traditional drywall if the drywall becomes wet or damp and stays moist.
I Loved It
I have used this paperless drywall on two recent projects in my own home. Aside from the slightly rougher surface when handling it, I could tell no other difference when cutting the paperless drywall with a traditional razor knife.
Drywall screws and nails penetrate the paperless drywall just like traditional drywall.
View From A Distance
When viewed in daylight at a distance over six feet away, the surface of the paperless drywall appears nearly identical to that of traditional paper-faced drywall. But when you get closer and look at the surface of the paperless drywall, you can see and feel the fine fiberglass matting.
At night when light washes down a wall from above at a low angle, the texture of the fiberglass matting is very apparent.
Finishing Fills Texture
If a rookie drywall finisher and painter work on the paperless drywall, you might see smooth polka dots where the screws and nails are covered with finishing compound in the drywall.
Smooth racing strips might also be visible at corners and flat seams where joint compound and tape was used to finish the unsightly seams where two pieces of drywall touch one another.
The smooth areas are created when the creamy joint compound fills the small voids in the fiberglass matting. The filled glass matt has a very different texture than unfinished paperless drywall.
This problem is easily solved if the entire surface of the paperless drywall is skim coated with drywall topping compound. There are many different methods of skim coating as well as large tools to make the job go faster.
One method, that has worked well for me, is to add some water to drywall topping compound transforming it into a thick paint. Apply the topping compound to the paperless drywall with a thick-napped paint roller, and then immediately remove it with a wide flat knife. If the humidity is low, the skim coat dries very rapidly.
Skimming Last Step
It's best to skim coat the paperless drywall after it has been sanded. The skim coat offers a secondary benefit of fixing minor imperfections that might appear in the drywall finish.
Use In High Humidity Locations
The paperless drywall can be used in bathroom areas where you might expect high humidity, but not necessarily water contact. An example of this would be exposed wall surfaces above ceramic tile in tubs and showers, around vanities and toilets, etc.
The paperless drywall can be used in any other part of the home where you might otherwise use traditional drywall. It has one slight disadvantage. The drying time of finishing compounds is slightly slower.
This stems from the fact that the fiberglass matt facing allows little or no water to penetrate in towards the gypsum core. When using traditional paper-faced drywall, the water found in finishing compounds can soak into the paper allowing for more-rapid drying times.
DEAR TIM: When my wife and I sit on our back patio, we can't hear the door chime. I was thinking of adding a doorbell extension adjacent to the patio door.
This way both door chimes would work when the front door button is pushed. Is it possible to do this?
If so, what do I have to do? I'm not an electric wizard.
In case the wiring process is too difficult, is there an alternative solution? Dale M., Arlington, TX
DEAR DALE: You bet you can hook up an additional door chime.
Multiple Doorbells Are Easy
In fact, it is possible to install up to 3 standard door chimes that are activated by front, back, or side door buttons. This is handy for people who find themselves working in a basement or up on a second floor area away from the primary door chime.
Easy Install
The electrical wiring process is not too difficult. There are wireless kits now available that can install in minutes.
You just need to install a small radio transmitter to your existing wired door chime.
Here's a simple doorbell extender kit. Easy install. CLICK THE PHOTO NOW TO HAVE IT DELIVERED TO YOUR HOME.
Hard-Wired Solution
You might have to install a new transformer if you choose to add a second traditional doorbell. Single door chimes work best with 16 volt, 10 watt transformers.
To power your additional chime, you will need to install a 16 volt, 30 watt transformer. The voltage and wattage of transformers is stamped or printed on the body of the transformer. When you install the 30 watt transformer, it can go in the same location as your existing transformer.
Before you begin to install the new transformer or modify any of the low voltage wiring from the transformer, you need to disconnect the high voltage power to the transformer. If you don't do this, you can easily cause an electrical short that will harm the transformer, the door chimes, and/or yourself.
Light-Gauge Wire
The wiring of the second chime is not too difficult. You need to make sure that you use the proper wire. Purchase 18 or 20 gauge wire that's UL approved.
Make sure the wire is the solid type, not stranded. Purchase a large spool containing several hundred feet. You will be surprised at how much wire you'll use. The existing wires in your walls do not require upgrading.
Remove Covers
Next, remove the covers from your door chimes. You will probably see four screws. Three of these screws are used to connect to the door buttons.
They're usually clearly marked: Front, Rear, and Side. The other screw is marked Transformer.
Your challenge will be to run four separate wires between the two door chimes. All you have to do is hook each individual wire to the same screw on each chime.
For example, the first wire you run should attach to the screw marked Transformer on each chime. Be sure to leave the existing wires in place on the original door chime.
Once you have made all of the connections, re-energize the new transformer. As long as you installed a standard 2 note chime (Ding - Dong) to match your existing chime, both chimes should activate when someone pushes the front door button.
Don't make the mistake of trying to install a fancy four or eight note chime if you have a traditional two note door chime. These fancy door chimes require a fifth wire to be run between the door chime and the door buttons. That can get complicated.
Wireless Is The Way
If you wish to avoid all of the wiring hassles, you can solve your problem by installing a new separate wireless door chime. These are very clever devices.
They require no wires at all. The door chimes themselves are very attractive.
Many have up to a 100-300 foot operating range. You can even get one that has a fancy eight note chime.
Because the wireless models come with over 50 different codes, your TV remote and garage door operators will not cause the door chime to activate.
Video Too!
You can now get a doorbell that has video with it so you can see who's at your door no matter where you are. Even if you're not home, you can answer the doorbell, see and TALK with the person at the door! You do all this using an app on your smart phone.
Video doorbell. You gotta love technology. CLICK THE PHOTO NOW TO SEE ALL THE VIDEO DOORBELLS. YOU CAN HAVE ONE DELIVERED TO YOUR HOME NOW.
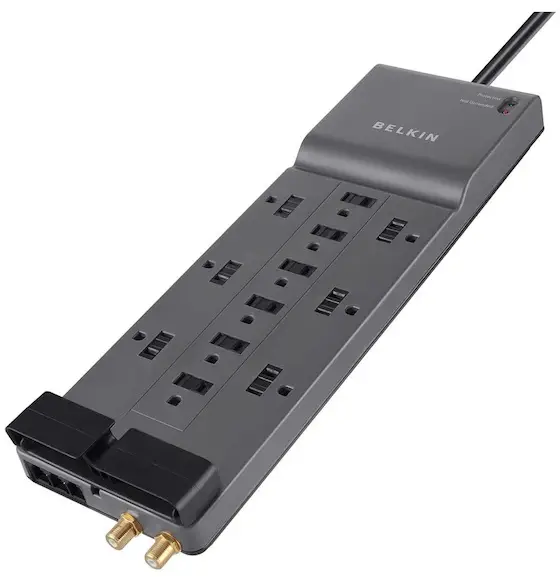
Surge protector | These come in all sorts of configurations. IMPORTANT: They wear out and when they do they can become FIRE HAZARDS. CLICK or TAP HERE to see the different ones.
Read in my August 16, 2020 Newsletter how my mistake of not calling the power company, lead to Elaine getting back to me about surge protectors.
DEAR TIM:I'm getting ready to build a new home. I'm aware that many of my new electronic devices including my computer and stereo equipment can be harmed by invisible power surges in the electric lines.
I thought only lightning could destroy my stuff. Are there other power surges besides lightning? If this is so, what's the best way to protect all of my electronic equipment?
Do those inexpensive surge suppressors really work? Alan O., Clanton, AL
DEAR ALAN: Invisible disruptions in electrical power are real and they are becoming more of a threat to electronic equipment regardless of whether or not you live in a new home.
What Causes Electrical Surges?
A voltage surge or spike caused by a blown transformer, downed power lines, lightning, electric power grid switching, etc. doesn't discriminate between old and new houses. What's more, surges travel down telephone, cable, and TV antennae wires as well.
That innocent telephone line connected to the back of your TV or computer can be the source of destruction in the blink of an eye.
Well over 50 percent of the power surges your equipment will experience are created within your own home when appliances with large motors (air conditioners, refrigerators, freezers, washing machines, etc.) turn on and off.
What's more, just about every electronic device manufactured today contains smaller and smaller micro-processing chips that are more sensitive to voltage spikes than ever before. You need surge protection and lots of it if you want to protect your computers, printers, fax machines, garage door openers, stereos, etc.
What are the Two Types Of Surge Protectors?
There are two basic types of residential or light commercial surge suppressors. One type connects to your electric panel where your circuit breakers or fuses are located. These devices are designed to stop harmful surges before they can travel towards the electronic equipment in your home.
This is a surge protector that you install at your electric panel where the circuit breakers are. It's HEAVY DUTY. CLICK or TAP HERE or THE PHOTO NOW TO HAVE IT DELIVERED TO YOUR HOME.
They're not DIY friendly. A professional, licensed electrician should install a whole house suppressor.
A good electrician can complete the task in less than one half hour in almost all cases. The whole house surge suppressors are affordable. You can find several in the $200 range. Watch this video to see how to install one:
Most people are familiar with the point of use surge suppressor. These are the ones that contain multiple electrical outlets for your computer, printer, scanner, stereo receiver, CD player, etc. and often connection points for telephone and cable TV wires.
This is a pretty decent point of use surge protector. It's all about how many joules they have. This one is close to 5000! CLICK THE PHOTO NOW TO HAVE THIS DELIVERED TO YOUR HOME IN DAYS.
These surge protection devices come in varying levels of quality and protection. If you purchase the wrong one, your brand new computer or stereo can become toast in less than a second.
Do Surge Protectors Wear Out?
Surge suppressors wear out. They're like car brake disc pads. Each surge they capture takes a toll on the protection circuits inside the surge protector. When they wear out, they can become fire hazards.
Inside most suppressors you will find metal oxide varistors (MOVs). These electrical components are sacrificial.
Small surges that enter your house slowly destroy the MOVs. A large surge can cause instantaneous destruction of all of the MOVs in an instant.
The MOVs ability to block surges is measured in joules. Buy a surge suppressor that has a high joule rating. Look for ones that offer joule ratings of 1,900 or more if possible.
What is Clamping Voltage?
Clamping voltage is the lowest voltage where the protector will spring into action to save your electronic devices. You want a protector that has a low clamping voltage.
Pay attention to clamping voltage as well. This rating tells you when the surge suppressor will react. High quality suppressors have low clamping voltages.
If the equipment you're trying to protect contains micro-processing or computer chips, purchase a suppressor with a clamping voltage of 330 volts or LESS.
Look for the Underwriters Laboratory (UL) UL-1449 voltage rating on the suppressor's packaging. This is the true measure of clamping voltage.
Should I Replace Old Surge Protectors?
Yes, you should replace old surge protectors.
Because surge suppressors wear out, your older surge suppressor might be an open gateway for destructive electrical surges. Newer high quality suppressors come with lights and audible alarms that tell you when the MOVs have given up the ghost.
Both the whole house and point of use surge suppressors are available with this convenient feature. Look for suppressors that come with connected equipment and total replacement warranties.
Can I Get a Free Replacement Protector?
Numerous manufacturers will send you a free replacement suppressor when and if yours fails. In addition, some will even pay up to $100 towards the electrician's repair bill when your whole house suppressor needs to be replaced.
Do you Know of Great Electrical Books?
Yes, I've wired houses for years and know of a few great electrical books.
A spectacular book for learning all about residential electricity is Wiring a House. With its wealth of practical know how this book, written by a master electrician, is sure to become an indispensable reference for anyone who wants a common sense guide to residential electricity.
This is a superb book that will give you the skills you need to tackle installing a surge protector. CLICK THE PHOTO NOW TO HAVE THIS BOOK DELIVERED TO YOU KINDLE OR YOUR HOME.
The photos and illustrations featured in this book are clear, crisp and easy to understand. You must buy a copy of Wiring a House, a great hardback book published by Taunton Press.
Here's a complete, full-color guide to all aspects of residential wiring and how to apply them to the wiring of a typical house. Electrical Wiring Residential is another must have book.
This is a fantastic book. You should have it in your library. CLICK THE PHOTO NOW TO HAVE THE BOOK DELIVERED TO YOU FAST.
It's everything anyone could need to know, from wiring a lighting branch circuit, to installing a service entrance or swimming pool.
Loaded with examples, wiring diagrams, spectacular photos and illustrations explaining all the new NEC requirements throughly. This book is easy to read and understand, yet has all the instructions and details needed to perform virtually any residential wiring job properly.
If you are looking for a book with invaluable information on tools and materials, detailed instructions for how to repair or replace wiring in old buildings and bring them up to code then you need a copy of Old Electrical Wiring.
If you have an older home, this is a must-have book. CLICK THE PHOTO NOW TO HAVE THIS BOOK DELIVERED TO YOU BY SPECIAL COURIER.
This 400-plus-page book tells you everything you could ever imagine about switch layouts, troubleshooting, and design change.
It also has an extensive glossary of old wiring terms and slang. Packed with drawings and illustrations, including pictures of old devices, this practical book will tell you whether an old electrical system should be torn out or repaired. This book will really help you.
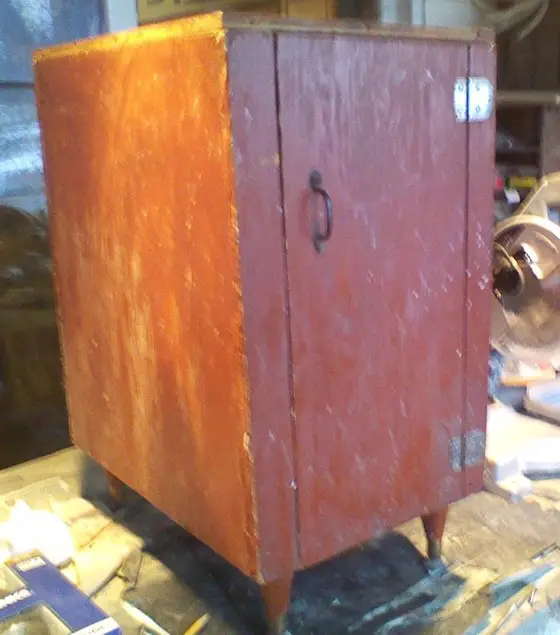
Here's the nightstand before Joy started working on it. It's seen better days! Copyright 2017 Tim Carter
Night Stand Makeover
Joy Davis had an old night stand that wasn't quite right. So she decided to restore and refinish it. Here's her story.
If you pay attention during her story you're going to be inspired.
Why?
With a little work and effort, she transformed something with little utility to something that works quite well.
Here's Joy's story:
The Ugly Duckling Night Stand
"I had an old, not pretty, night stand. I used it for many years. It was ugly so I kept it covered.
It had a shelf inside the door and was deep so it was inconvenient to get to the stuff in the back, and I had to get on my knees to see back there. So recently, I decided to redo the night stand.
Major Surgery
I took it all apart and sanded it down and put it back together without the shelf, and added an old drawer that was laying around.
I had to shorten the drawer but it worked. I added trim left over from other projects.
New Legs
The only thing I bought was a set of new legs. The old ones were fine but I wanted the stand to be a little taller, so I got legs that were 2-inches taller.
The newly remodeled night stand. Copyright 2017 Tim Carter
My husband loves it now."
Joy Davis
You Can Do It
My guess is Joy didn't have lots of expensive power tools. She just thought it through and did it.
After all, what's the loss if something didn't go right?
All she had to do was look at other furniture and COPY what that builder did to make what she wanted.
If you want to submit pictures and the story behind your project, CLICK HERE to go to the Before & After Submission Page.
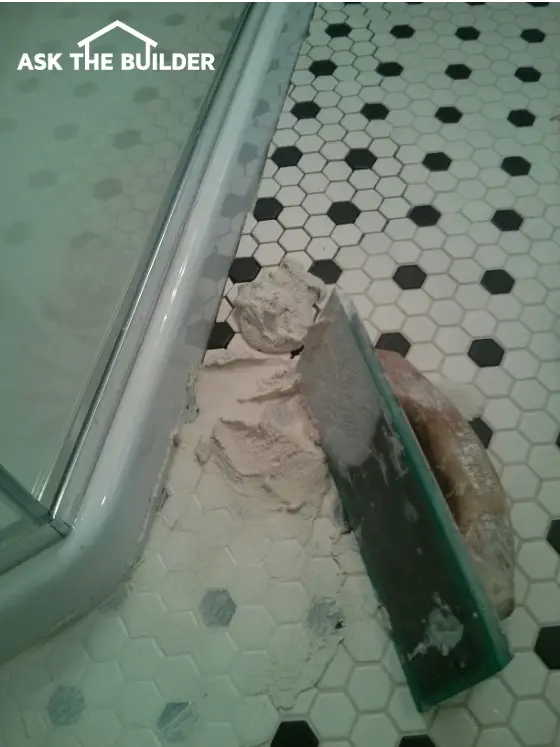
Match Grout Color | It’s not too hard to match grout color if you invest a little time and effort. DIY floor grout color problems can happen FAST if you don't know what you're doing. Keep reading to see how to get perfect grout color matches. (C) Copyright 2017 Tim Carter
Match Grout Color TIPS
Requires patience, diligence, and discipline. Luck helps too
Deep clean existing grout first using Stain Solver oxygen bleach
Dry grout out of the bag is what it looks like once installed and cured
DEAR TIM:I’m about to remodel a bathroom. I’ll be switching out a shower stall and know my tile floor will have to be patched.
Fortunately, the previous owner left behind lots of tile for me, but there’s no grout. I’m afraid if the grout doesn’t match, the repair will stand out like a sore thumb.
What’s worked best for you when you have to match grout on your jobs? Are there a few secret tips you can share? Karen J., Marblehead, MA
DEAR KAREN: You should locate that past homeowner and give her/him a huge hug.
Should I Always Save Leftover Unmixed Grout?
It was quite thoughtful to leave behind some of the extra building materials. I did that with my last home whenever I could. In my case, I used an oversized brick to construct my chimneys. Knowing it would be almost impossible to locate in the future, I saved about fifty for a future homeowner should they need them for any reason.
Matching interior grout can be a challenge, but it’s not impossible. As with most things if you want perfection you need to invest some time and effort. I agree with you about how important it is to match both the grout color and texture. No matter how wide the grout lines are, if they don’t match you can see it right away.
Should I Deep Clean Existing Grout?
The matching process starts by deep cleaning the grout. I’ve had the best success doing this with Stain Solver certified organic oxygen bleach. This is a powder you mix with hot tap water.
Once all the powder is dissolved, you pour the solution onto dry grout allowing it to soak and bubble for about 15 minutes.
Stain Solver is MADE in the USA with USA ingredients that are food-grade quality. CLICK THE IMAGE to order some NOW.
At the end of the wait period, you scrub the grout vigorously with a stiff nylon scrub brush. Be sure the brush bristles touch the grout. Don’t use a flimsy toothbrush.
You want to really scrub. The longer you allow the oxygen bleach solution to soak, even up to an hour or more, the less you have to work.
If the solution soaks into the grout while you wait to scrub, add more so a film of solution is on top of the grout.
Rinse Well
Rinse the floor after cleaning to ensure all the dirt is up. Allow the grout to dry overnight. You can usually tell if you got the grout clean by looking at the edges of the floor where no foot traffic has touched it.
The grout along walls and in corners usually is much cleaner than where you walk. If all the grout looks the same color at this time, you can start the matching process.
What is the Difference Between Sanded Or Unsanded Grout?
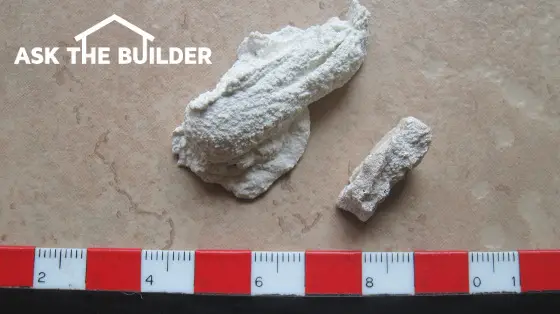
Sanded grout contains fine silica sand and Portland cement. Unsanded grout is just Portland cement. Dry pigments are added to both types to create the colors you see.
Sanded grout is easy to spot because you can see the tiny bumps of sand in the texture of the grout. Unsanded grout is very smooth.
The larger blob of this is a test batch of sanded grout. You can see the small bumps of fine silica sand in the texture. The small chunk to the right was salvaged under a piece of baseboard at the edge of the floor. I soaked the small chunk in Stain Solver oxygen bleach for hours to make sure it was clean. You can see the new and old grout are almost a perfect match. The ruler is metric with millimeter markings. Copyright 2017 Tim Carter
When is the Best Time to Match Grout Color?
The time of day to match grout color is midday. If you try to match grout color at night the color temperature of the light bulbs in the bathroom can interfere with your ability to get a perfect match.
Some incandescent bulbs are available that render a color temperature close to the natural sunlight towards the middle of the day. Consider using those if you have to match when the stars are shining.
Should I Start With Color Charts Or Sample Sticks?
The first place to start is to get samples or a color chart of new grout and hold it next to your existing grout. If you can salvage a chunk of existing grout from under a baseboard next to a wall, this is the best way to start the matching process.
The original tile setter undoubtedly put grout at the edges of the floor before the wall trim was installed. Pry off a piece of baseboard and see if you can get a chunk of the grout.
Is it Best to Use Dry Grout To Match Color?
The color of the grout out of the bag before you add water to it is the color it’s going to be once dry. You can prove this by mixing up some new grout and allow it to dry. Add just enough water to the dry grout to make it the consistency of stiff applesauce.
I used the amazing Laticrete Permacolor system to get a perfect match. The powdered grout to the right of the wide metal knife was the first attempt. I then added one more measure of the darker pigment and the perfect match is on the knife blade. Look how the color matches the clean dried grout in between the tiles! Copyright 2017 Tim Carter
Can You Blend Different Grout Colors?
Yes, you can blend different grout colors to obtain a perfect match.
Often you can’t get a perfect match from one bag of grout or one brand. You may be forced to do some creative mixing and blending of different colors of grout to get a match. This requires great discipline and diligence as you need to be very exact in your measuring, blending and mixing as you create test batches. Record keeping is everything in this exercise.
What is the Laticrete Permacolor System?
The easy way to get perfect color matches is to use the Laticrete Permacolor dry-pigment method. I did this in southern California in November of 2017 to get a perfect match for some outdoor Mexican tile.
The grout comes in bags and it's pure white. You then buy small bags as you can see in the photo above of dry pigments. You then make small batches of dried grout blending one, or more, pigments until you get a perfect match.
Just keep track of what you mix and measure all quantities very carefully.
Does Wet Grout Show Up as a Deeper Color?
Wet grout shows up as a deeper color than when it will be dry. When you add water to the dry grout, the color gets deeper and it can be frightening. This is why you need to mix up a test batch and allow it to dry before you commit to the actual grouting of your new tile.
Is Water My Enemy When Grouting?
Yes, water is your enemy when grouting.
If you’ve never grouted before realize that water is both your friend and foe. You need water to mix and clean up the mess on the tile. But too much water will ruin the new grout.
Water in excess during the mixing process or as you clean and strike the joints will dilute the amount of Portland cement in the mix. If you allow this to happen, the grout will crumble and crack over time.
Do You Have DIY Grouting Videos?
Watch these four videos to see how to properly install sanded floor grout. Yes, I should have used knee pads.
Properly mixed unsanded grout is the consistency of slightly warm cake icing. As mentioned earlier, you want sanded grout to be the consistency of stiff applesauce. When you wipe off excess grout from the tile surface, the grout needs to be somewhat stiff in the joints.
If you touch the fresh grout too soon, the sponge will remove grout creating a depressed grout line. Squeeze out all the water you can from the rounded grout sponge before you allow the sponge to touch the tile!
This is a four-part series I created showing how I achieve success when grouting ceramic floor tile. Talk to three other tile setters and they may have different suggestions.
All I can tell you is I've installed thousands of square feet of grout the way you'll see below and none of it has ever crumbled or cracked.
You use the same skills and techniques when grouting wall tile, but you need to use unsanded grout for grout lines less than 1/8-inch in width.
Remember that water is your friend and foe.
Too much water will RUIN your new grout.
If you're a rookie, I BEG you to buy one piece of cement board and lay it on your garage floor. Install some cheap tile on it that's similar to what you're using in your home.
Practice grouting this test panel before you advance to the real floor in your home.
If you're a newer subscriber, hello again! If you're one of my original subscribers from back in the 1990's, well, it's great you're still here!
Happy Mothers Day if you're a mom.
My guess is my mom is up in Heaven having a blast. She's probably got a hot game of poker going on with Aunts Margaret, Juanita, Edna Mae, Thelma and Clara.
This is going to be a fast newsletter for a number of reasons.
Newspaper Editors Change Things
I've got a Google Alert set up on my brand: Ask the Builder
When that string of words appears in a new webpage, I get an email. This morning I got an alert about a column I wrote about three weeks ago.
My Ask the Builder syndicated newspaper column still runs in about seventy papers nationwide. One of them is the Columbus Dispatch. It's a great paper.
A few hours ago, I got an email about my column in their paper. Usually, I never click through to look at it. After all, I already know what's on the page.
But today was different. I decided to look.
WOW!!! What a great lesson in spin, bias and slant.
I've been a syndicated columnist for going on twenty-five years now. I've talked to many of my paper editors and know that sometimes they have space constraints.
Here's what you might not know about how newspapers and magazines are created. The ad departments create the product FIRST.
In other words, the newspaper is laid out with all the ads in it and there are EMPTY HOLES where the words go for stories.
The pages are then delivered to the paper editors and they have but a few hours to FILL THE HOLES. Magazine editors have a few days, maybe a week.
If the space for where my column goes is small for some reason, the editors then start to ELIMINATE words that I've written. Years ago in The Cincinnati Enquirer my editor would, on occasion, leave out about 70 percent of my column.
Important things can be left out that affect you.
But in today's world where there are NO SPACE CONSTRAINTS on a website page, one needs to wonder why an editor would remove lots of content.
I realize the column that appears in the print version is just copied and pasted into the online version, but perhaps that's a mistake for those subscribers who just read their paper ONLINE never seeing the print version.
That's an INCREASING TREND.
I'm telling all this to you because you need to be aware that in certain cases you're only getting PART OF THE STORY.
Want to see an example of this? It's actually somewhat sobering.
CLICK HERE to read the Columbus Dispatch editor's version of my column.
Then CLICK HERE to see the ORIGINAL column as I submitted it to them.
You'll see the difference IMMEDIATELY as you start to read my answer to Shirley.
If you're a subscriber to a local paper, you may want to let the editor know you'd like to see the unfiltered version of syndicated content.
I'm just about done with my master bathroom remodel job.
Yesterday, I was on my hands and knees for hours doing very tedious ceramic tile work patching in the floor against the new American Standard shower base.
Fortunately for me, the previous owner of my house SAVED all the extra tile that was used throughout the house.
There was enough tile to patch the floor. I also was able to salvage some large chunks of sanded grout when I did the demolition.
I soaked these chunks of grout in some Stain Solversolution overnight so they'd be perfectly clean. I allowed them to dry and I took them to get a perfect match of the new grout I need.
I did this because I wanted the existing grout to be super clean so the new grout that touches the existing grout will not stand out looking like I patched the floor.
I'll deep clean the rest of the floor just after finishing the job and when I'm done walking over it. I put down tarps each day while working, but the floor still gets a little dirty.
I also put together two days ago the frameless shower door. Included with the parts were all the different allen hex wrenches one needs to assemble the door.
Guess what? I SAVED all those as well as the installation instructions.
You know where they are? I put them in a zip-lock food storage bag, sealed it and TAPED it to the inside wall of the new vanity that's going in.
I'll also create another zip-lock bag that has the small wrench needed for the shower handle faucet, the shower valve install instructions as well as the new vanity faucet.
Why is this important? Have you ever wanted to replace a valve faucet cartridge or part and WONDERED what model it was???
BOOM, a future owner is going to be thanking me!!!
You should do the same so future homeowners send good karma to you.
Other instructions, photos of important things, manuals, etc. should be put in plastic bags down near your main circuit breaker panel. It's a GREAT place to store helpful things for a future homeowner.
You might even buy a cheap wall-mount mailbox and put everything in there.
But for faucets I always prefer to put the manuals on the inside of a kitchen sink base or the vanity cabinet.
Latest Revised Columns
Here's a list of columns I've revised in the past week or so. There's MORE. I didn't list all of them.
If you want to see ALL REVISED COLUMNS, always click the Q & A icon at the top of any page at AsktheBuilder.com.
Roof moss removal usually requires a broom or heavy stream of water. Moss is a thick organic growth. Algae is just a thin film of organic growth that can be removed by washing the roof with certified organic oxygen bleach. Copper strips prevent the growth of moss and algae.
DEAR TIM:Part of my roof gets very little direct sun and is shaded. Both moss and green and black algae grow on the shingles. Are these organisms causing damage to my roof?
What's the best way to remove them? I'm very hesitant to use chlorine bleach as it may damage the roofing material. Once clean, is there a way to permanently keep the roof free of the moss and algae? Scott W., Toledo, OH
DEAR SCOTT: People who live in all parts of the nation and have roofs made from all sorts of materials, wood, metal, asphalt, clay or concrete tiles, etc. can have moss and algae accumulate on their roofs.
Those places that receive more rainfall and have sustained high levels of humidity have more moss and algae growth as the moss and algae need water to grow and multiply.
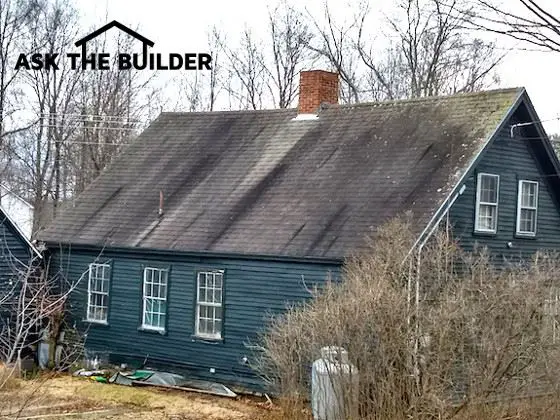
This roof is covered with different species of roof algae. You can see where the lead is helping to keep the roof clean. If there was a copper strip along the entire roof ridge, the roof would be perfectly clean.
Why Does Roof Moss Grow on the North Side?
The growth is often more pronounced on the north-facing portions of roofs since they tend to stay wetter longer and are in the shade.
Large trees that produce lots of shade on a roof can also foster the growth of moss and algae as evidenced by my own west-facing roof. It used to get covered with moss and algae. Morning dew and rainfall tend to evaporate slower on these surfaces because of the minimal amount of direct sunlight these roof surfaces receive.
Can Roof Moss Shorten a Roof's Lifespan?
Yes, roof moss can shorten the lifespan of untreated wood and asphalt roofing materials.
The thick moss growth with its shallow root system keeps the roofing materials damp for extended periods of time and this moisture promotes wood rot and can and does erode the asphalt in shingles.
Is it Dangerous Up on a Moss-Covered Roof?
Yes, it can be very dangerous standing on a moss-covered roof.
It's important to realize that a roof covered with moss or algae that is wet is as slippery as wet glare ice. You can slip without warning and tumble to the ground.
You may not feel comfortable getting up on a roof. I know many people who are terrified walking on a low-slope roof much less a steep one.
Fortunately, God gave me the no-fear factor with respect to walking on roofs. You must respect them, but it's safe if you know what you're doing.
Shingles can be loose, break loose and slide as you step on them.
Walk leaning into the roof and keep a low profile. If you start to slip, LAY FLAT trying to create as much surface area as possible to slow or stop your slide.
Moss is quite easy to remove from a roof. Use a standard bristle scrub brush on a pole and push the brush down the roof to tear the moss's shallow root system from the shingles.
Do not brush up the roof as you might break the bond between shingle layers.
Note how the moss typically starts to grow at the top of the vertical slots between shingles. These areas of asphalt shingles are the last place water evaporates from a roof. Once the moss is removed, inspect these slots to ensure the colored ceramic granules are still in place. If the granules are gone and you see just the interior fiberglass mat of the shingle, your roof is well on its way to being replaced.
The green and black algae, in my opinion, are not harmful to the actual roofing material because they do not develop roots. They are more of an aesthetic issue since they make the roof look horrible. Both of these algae can be cleaned from the roof, however, the green algae is far easier to remove than the black algae.
Should I Avoid Chlorine Bleach?
It is wise to avoid chlorine bleach as a roof cleaner. Chlorine bleach can remove the natural color from wood roofing shakes.
Chlorine bleach, even diluted with water, WILL KILL vegetation on the ground if it runs onto the ground as it is rinsed from the roof. My one neighbor systematically murdered two specimen maple trees next to her patio because she used chlorine bleach to remove the algae from her patio each spring. I WARNED her to stop and she thought I was an idiot.
Chlorine bleach can accelerate corrosion of metal gutter and downspout systems. If it drips down on a wood deck below your roof, it will also cause accelerated corrosion of the joist hangers, nails, screws and any other metal structural connector.
What is the Best Certified Organic Roof Cleaner?
Stain Solver is MADE in the USA with USA ingredients that are food-grade quality. CLICK THE IMAGE to order some NOW.
The best roof cleaner, in my opinion, is non-toxic Stain Solver oxygen bleach. Stain Solver is certified organic and is a powder you mix with hot tap water.
It's best to apply the Stain Solver solution to a cool roof surface, preferably on an overcast day. If you keep the roof surface wet with the solution for just 20 minutes, and then lightly scrub the roof surface, the algae will come off with no issues.
Severely stained roofs may require multiple applications of the Stain Solver solution. The solution also helps to loosen the grip of the shallow moss roots.
Roof-Cleaning VIDEO
Do Copper Strips Stop Moss and Algae Growth?
Yes, copper strips stop moss and algae growth. Copper is a natural biocide and it's safe. Copper is a naturally occurring element.
Once the roof is clean you can hinder moss and algae growth by introducing copper onto the roof surface.
Thicker copper can be very expensive. I discovered that copper strips that only weigh 3 ounces per square foot do an excellent job.
You MUST USE solid copper or stainless-steel nails when installing copper or you'll get a galvanic reaction and the other nails will corrode.
Copper STOPS Moss and Algae - VIDEO:
Place copper at the top of the roof. If the distance from the top of the ridge to the gutter or eave line is 25 feet or less, then just put a 12-inch-wide strip of copper over the top of the ridge.
Realize you MUST USE solid copper or stainless-steel nails or a galvanic reaction will CORRODE any other nail.
I include the 2.5-inch ring-shank copper nails you need to secure the copper.
If you install copper strips like this on your ridge and hips the roof algae and moss will disappear if you get periodic rain.
How Does the Copper Work?
Each time it rains some copper ions wash down onto the roof and create a poisoned environment that both the moss and algae dislike. The ions are dislodged from the copper strip by ultraviolet light (UV). Five percent of the sun's UV light contains powerful photons that blast apart just about anything they hit.
Be patient as the copper eventually will turn a distinctive dark nut brown and then the classic green color. If you're getting ready to install a new asphalt shingle roof, you want to install this copper to extend the life of the shingles dramatically.
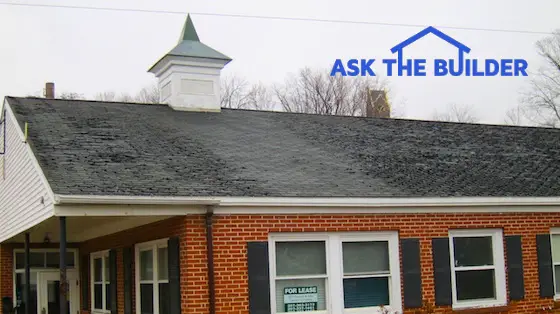
I was the first person in the world to discover that copper extends the life of asphalt shingles by DECADES. Look at this photo of definitive proof:
Look at how the 8-foot-wide strip of asphalt shingles look nearly perfect. The other shingles on either side have lost their granules and are curled as can be. The copper ions washing off the cupola roof STOP the oxidation of the asphalt. When asphalt oxidizes, the molecules cross link and become brittle.
I made this discovery while researching my Roofing Ripoffbook. Based on the evidence I provide in the book, it appears some shingle manufacturers are pre-aging their shingles so they fail much sooner than they should. Copper will extend the useful life of asphalt shingles by decades.
This is the cover of my Roofing Ripoff book. CLICK THE IMAGE NOW TO ORDER IT.
Does Zinc Stop Moss and Algae Growth?
Zinc works as well to stop the growth of algae and moss, but it's not as effective as copper.
The copper material works far better to poison roofs than zinc. Zinc is indeed effective, but copper tends to do a better job for a longer period of time. The copper strips are easy to install and they tend to blend into the roof once the shiny copper begins to oxidize and turn the distinctive dark brown.
Should I Hire a Professional Roof Cleaner?
Yes, you should consider hiring a pro. Cleaning roofs can be dangerous work.
Remember what I said above about how algae that becomes wet is often as slippery as wet ice?
If you're going to try to do this yourself, work on dry parts of the roof and reach sideways to scrub and clean those parts of the roof that are wet with cleaning solutions. Once a roof is clean, they often are not too slippery if they are wet. Wear shoes that have excellent traction. Sitting and working on the roof instead of standing lowers your center of gravity and minimizes your chances of falling from the roof.
No, copper pennies will not work to stop algae and moss growth. You need to put many many pennies on to get enough copper to wash onto the shingles.
I get email all the time from readers of my column and visitors to my website. Here's one from Lee:
Dear Tim,
Instead of putting copper or zinc strips on a roof to inhibit moss growth, wouldn't it be cheaper to use pennies? Use two or three per linear foot, slipped under the edge of shingles near the top or the roof, or stuck in place with a dab of silicone caulk. It's more time consuming, but easier for someone who doesn't have the cutting or bending tools. - Lee R., Portland, OR
Dear Lee,
Copper pennies would work so long as you install *enough* pennies. You need to have the square inch area similar to the exposed copper strip. However, realize that modern pennies have a small amount of copper in them. Before 1982, all pennies, except during WW II when they were made of steel, had a 95 percent copper content and 5 percent zinc. After 1982 the ratio became 97.5 percent zinc and 2.5 percent copper . The thin copper coating will wear off in no time up on the roof and zinc doesn't provide as much protection as copper.
It's better to put on a thin strip of copper. Make sure you have at least 6 inches exposed for every 25 feet of roof below the copper.
Years ago while researching a column about cleaning decks, I discovered the wonders of Oxygen Bleach. It is perhaps the 'greenest' cleaner I know of as it uses oxygen ions to break apart stains, dirt and odor molecules. There are no harsh chemicals, and it works on just about anything that is water washable.
I decided to create my own special blend using ingredients made in the USA. In fact, the raw materials in the active ingredient are food-grade quality registered with the FDA. I call my product Stain Solver. I urge you to use it to help with cleaning your roof moss and algae. You will be amazed at the results!