House Plan Tips

House Plan TIPS

  • Blueprints and plans must be very complete - will save you heartache
  • Change orders happen when plans are bad
  • Architect must be experienced in type of job you want to do
  • Spreadsheets on plans are schedules - SEE BELOW
  • CLICK HERE to Get Tim's FREE & FUNNY Newsletter!

Blueprints & Plans

Home or construction plans are the heart and sole of any project I have ever done. This is especially true of large scale room addition work or new home construction.

Without detailed plans, a project is doomed to failure. Mistakes will happen.

Cost overruns will almost always occur. Change orders will be a weekly event.

All of these things take the fun out of construction for both the homeowner and the contractor.

Change Orders - Death On A Stick

Take change orders for instance. I hated change orders! I never made any money on change orders.

They disrupted the flow of the job. It seems that you can never recapture the cost of the time spent discussing the change, calculating the change and administering the change. They were nightmares as far as I was concerned.

Free & Fast Bids

CLICK HERE to get FREE & FAST BIDS from local architects, home designers and builders for your new home!

Great Plans Are A Must

If you're getting ready to start a project, shop around for a good set of plans. Now, how might that be done?

There are a couple of ways. 

For starters, I've sold a fantastic set of plans to show you ALL THE THINGS and PAGES that should be on your new home or major-remodel plans.

CLICK HERE to DOWNLOAD the plans now.

Blueprints & Plans Video

Watch this video to see a great set of plans for a room addition. Wait until you see the interior elevations that show light switch locations!

Lumber Yards Know Best

Here's another trick for you. Most lumber yards have salesmen that call on builders.

Some of these same companies may be large enough to have an in-house estimator. I used to deal with a lumber company like this.

I'd take plans that I was bidding to this individual. He'd do a complete computerized lumber takeoff. It was wonderful!

Well, as you might imagine, this estimator or salesperson would see plan after plan. He knows who draws a complete set of plans and who doesn't.

So, why not talk with this individual? Ask him/her which architect seems to consistently draw the clearest, most complete set of drawings.

Hopefully you will walk away with the names of 2 - 3 architects whom you can interview. Not many people know of this approach.

Selecting an Architect

Remember, you are looking for an architect who specializes in residential construction. You want one who can show you various completed projects.

Discuss how mistakes will be handled. Everyone makes mistakes. If the architect goofs somehow, ask how this mistake will be paid for.

As a general rule of thumb, most mistakes come to the surface after all of the rough framing is completed. Suggest that a portion of the fee is withheld until the rough framing is complete. Simply develop a plan to deal with this circumstance.

CLICK HERE to get FREE & FAST BIDS from local architects, home designers and builders for your new home!

Written Specifications

Ask about written specifications. Generally, most architects who have computerized have these written project guidelines already sitting in their word processors.

Written specifications are an important part of a project. They're similar to assembly instructions you might receive with a bicycle.

They tell the builder what things to use where and how to put certain things together. These specifications can prevent substitutions of products.

In other words, if the plan calls for baseboard in a room, just what type does that mean? You might think a nice tall baseboard. Your builder might think it means a piece of #3 pine! Specifications can clear up problems like this.

I've sold a set of decent new home specifications that cover lots of items you'd probably forget to think about. Just ONE thing in my set could save you thousands of dollars.

CLICK HERE to DOWNLOAD my Specifications.

Spreadsheet Schedules

Look for schedules on plans. Schedules are simple spreadsheets of information. For example, good plans come with Door and Window Schedules.

This is usually a table which lists each opening, what type of window or door goes there, the make, model, options, rough opening size, size of structural header, type of interior and exterior finish, etc.

These schedules are loaded with valuable information that is useful to everyone involved in the project. They leave nothing to speculation.

Types Of Schedule Spreadsheets

Your plans MUST HAVE a schedule for:

  • appliances
  • plumbing fixtures
  • lighting fixtures
  • room finish
  • cabinets

Elevations

Great plans also have lots of exterior and interior elevations. This is a two-dimensional drawing of what a finished wall will look like.

These are invaluable in kitchens and bathrooms as they show the exact location of electrical outlets, fixtures, toilet-paper holders, towel bars, etc. There's no guessing where something goes!

CLICK HERE to get FREE & FAST BIDS from local architects, home designers and builders for your new home!

Column B106

Sue Contractor For Unfinished Work

unfinished work

Sue Contractor For Unfinished Work TIPS

DEAR TIM: Recently, I received a summons to appear in civil court. The contractor who walked off my job is suing me for the remainder of the unpaid money stated in the contract.

Because he avoided repeated calls and letters, I hired other workers to finish the job. What do you think is the best evidence I can produce to prove to the court system that I was a victim?

In my opinion he deserves no money. Sue D., Sedona, AZ

DEAR SUE: Let me begin by telling you that I am not an attorney and can offer no legal advice.

Documents Win The Day

I can tell you, based upon my many years of being involved in differences of opinion with homeowners, what has saved me from having to work for free. The items that eventually become supporting evidence can be a thorn in one's side as the job progresses, but they'e worth their weight in gold if a dispute arises at a later date. Hopefully you have many of the following things.

Free & Fast BIDS

CLICK HERE to get FREE & FAST BIDS from contractors who'll come in and FINISH THE WORK the loser contractor has not done.

Excellent Plans & Specs

Perhaps the most powerful weapon a homeowner can possess when the going gets rough is an excellent set of plans and specifications. All too often standard plans have far too little detail.

Too much is left to interpretation. For example, if the plans say you are to get crown molding, does this mean a small thin piece of molding or a large combination crown molding? Detailed plans and specifications make these issues black and white not various shades of gray.

Written Notes & Follow-Up Letters

Almost every job requires multiple face-to-face meetings where many issues are discussed. It can be hard to take notes during these meetings, but this written record of the discussions can help jog the memory of a participant when the wrong light fixtures or floor tile are delivered or installed.

These notes become iron clad if you write a letter summarizing the key points and send a copy to all who participated in the meeting. To make the notes armor plated, consider including a sentence stating that if a participant disagrees with anything in the letter they must respond in writing in a timely manner.

Digital Voice Recorders

Technology has advanced that it's now possible to record what's said at meetings. I'd absolutely record each planning meeting or any discussion where you and the contractor are making decisions and agreeing to something. Be sure you ask the permission of everyone who's attending the meeting and get them saying "Yes, it's okay to record" on the digital recorder. CLICK HERE to see a best-selling digital voice recorder.

Some states require this for the recording to be used in a future legal proceeding.

Here's a best selling affordable digital voice recorder. One saved conversation may save you THOUSANDS of dollars. CLICK THE IMAGE NOW TO HAVE THIS DELIVERED TO YOUR HOME NEXT WEEK.

Photos & Video

Photograph or video tape the progression of the job. Be sure the camera is set to record the date and time the photo is taken. This is automatic on most digital cameras today, but it requires that you be sure the date and time is set correctly in the camera.

Take a few test photos and look at the info settings on the digital file to ensure you have the date and time set correctly.

Hundreds, No Thousands, Of Photos

Take many photographs, including close up photos, of things that will be hidden at a later date. Photos of structural connections where things are nailed or bolted together are often critical.

Try to photograph concrete forms just before the concrete is poured. Imagine how difficult it is to guess the thickness of a concrete slab without doing destructive testing or using an expensive diagnostic device. A digital photograph may come to your rescue.

CLICK HERE to get FREE & FAST BIDS from contractors who'll come in and FINISH THE WORK the loser contractor has not done.

Keep A Journal Or Diary

A detailed diary of the events that happened each day can be very helpful. Long delays or periods of time when no one showed up to work are cast in stone with written daily notes kept in a journal.

It's very hard to reconstruct events if they are taken from memories that are six or nine months old. Write down who showed up and what was accomplished. Photographs can be added to the diary that show daily progress.

Will a pro build your new home? You can make it happen with my New Home Checklist.

Weather Almanacs

In certain instances weather data may help support your arguments. If you're not a trained meteorologist, data that you keep may not be considered accurate or true. Fortunately you can obtain vast amounts of weather data at little or no cost from your local National Weather Service office.

They keep hourly logs of temperature, humidity, precipitation etc. On more than one occasion this precise data has won a court case for me. Many websites track and curate historical weather data for every city and town, including wind speeds for each hour!

Change Orders In Writing - NO Exceptions!

Almost all jobs have changes as the work progresses. These change orders must always be in writing.

In addition to the description of what's changing and the cost of the change, each change order must contain a section that states how much extra time the change will add or detract from the job. You can see the value of this added feature when it is used in conjunction with the start and completion dates that are contained in the original contract.

Written Communication Is The Best

Finally, if all communications break down, then all contact with the contractor must be in writing. All letters must be sent certified mail with a signed receipt request. You want to be able to prove that you tried your best to keep the lines of communication open at all times.


How would you like me to build your new home? It's probably impossible for me to fit your job into my schedule, but I will gladly share hundreds of my tricks and building secrets with you and your builder. Check out my New House Specifications.

CLICK HERE to get FREE & FAST BIDS from contractors who'll come in and FINISH THE WORK the loser contractor has not done.

Column 340

Flat Roof Leak Solutions

Flat Roof Leak Solutions

  • Ignore TV commercials with spray-on miracle products
  • Stop flat roof leaks with a single-ply one-piece membrane over entire roof
  • EPDM membrane is perhaps the best flat roof leak solver
  • Not DIY friendly - Get FREE & FAST BIDS below
  • CLICK HERE to Get Tim's FREE & FUNNY Newsletter!

DEAR TIM: I have a nearly flat roof that is driving me crazy. The asphalt rolled roofing products I use only seem to last five years before they begin to leak.

What other alternatives do I have? There seem to be hundreds of commercial buildings near me that have similar roofs.

When I go into these businesses during a rainstorm I don't see leaks. Can I put a similar roof on my house? Mark G., Defiance, OH

DEAR MARK: Many homeowners share your frustration.

Flat Roofs Are Common & Problematic

There are literally thousands of houses in my own city that have low pitched or flat roofs. Traditional asphalt roofing materials are susceptible to failure because of the method of application and material quality issues.

The roofing industry has known about this problem for many years. During the 1950's and 1960's, new membrane roofing materials started to appear that solved many of the asphalt roofing problems.

Miracle TV Spray-On Leak Fix Products

Forget about the miracle spray-on leak products you may see in the cheesy TV commercials. These almost always fail in a short amount of time.

Flashings are the most common source of leaks and they require more than a spray to solve the problem.

Free & Fast BIDS

CLICK HERE to get FREE & FAST BIDS from local roofing contractors that can install EPDM or other great membranes on your flat roof.

Shingles Do NOT Work

Traditional asphalt shingle systems do not work on flat or nearly flat roofs. Shingles work in conjunction with gravity to keep the inside of your house dry.

A roof needs, in my opinion, a 4:12 pitch MINIMUM for traditional shingles. Shingle manufacturers will tell you a lower slope will work, but don't do it.

Water runs down the roof and over the top of shingles. Strong wind and ice dams can defeat these gravity based systems.

Gravity Is Your Enemy

Flat roofs and extremely low slope roofs need a gravity-proof roofing solution. It appears that the new single-ply membrane roofing materials may be just the thing. The commercial buildings you mention very likely are covered with one of the many different types of single ply membrane roofs.

Single-Ply Membranes

The new single ply membranes are actually synthetic compounds that can be mechanically fastened or glued down to your roof deck. Some of the materials are synthetic rubbers while others are special PVC plastics.

Long Warranties

There are several other types as well. All seem to have very respectable life spans. Warranties of twenty or more years are not uncommon.

Minimal Seams

One distinct advantage these new membranes offer is the possibility of seam elimination. Seams in the traditional asphalt systems were usually the first place water might enter.

If your low-slope roof has no chimney or plumbing / heating vent pipe penetrations, it's possible to cover the roof with one giant piece of roofing material.

It is like "shrink-wrapping" your roof! Believe it or not, some of the membrane materials come in 50-foot widths. Twenty-foot-wide rolls are the most common size.

CLICK HERE to get FREE & FAST BIDS from local roofing contractors that can install EPDM or other great membranes on your flat roof.

Small Pieces for Residential Work

Smaller width pieces are often used for residential work. They're easier to handle and there are special adhesives, solvents, and tapes that assure leak-free performance at the seams.

These membrane roofing systems also permit you to upgrade your house insulation. You can install high performance insulations on the roof deck before the membranes are applied.

Often a thin one-half-inch thick fiberboard sheet is placed on the insulation or roof deck before the single ply membrane is attached. The fiber board helps to protect the underside of the membrane from defects in the roofing deck.


Avoid repairing roof leaks yourself! Find a professional using my Roofing Replacement / Repair Checklist. I offer a 100% Money Back Guarantee.


Favorable Cost

The cost of the single ply membranes is not too bad. A typical job that requires no removal of old roofing might cost hundreds of dollars per square.

One square of roofing equals 100 square feet of roofing area. This cost will vary depending upon how many obstacles are in or near your roof, whether you decide to upgrade your insulation, and the overall quality of the roofing membrane you choose to use. For sake of comparison, a standard asphalt-shingle roof on a house might cost 40 percent per square what a modern membrane will cost you.

Flat-Locked Copper

If you happen to play the lottery there is another time tested roofing material that works well on flat or nearly flat roofs. You can install a flat locked fully soldered seamed copper roof. These roofs are extremely labor intensive to install.

The use of hidden clips allows these roofs to float on the wood deck below. Copper roofs of this type will cost you approximately $2,000 for each square. If you could still find tin-coated steel, you can lower the cost to 75 percent of that of copper.

The issue is some idiots have worked to eliminate tin-coated steel for roofing products. It's a time-tested material that's worked well for almost 200 years.

A tin roof will require periodic painting. But heck, if you win the lottery, who's counting!

CLICK HERE to get FREE & FAST BIDS from local roofing contractors that can install EPDM or other great membranes on your flat roof.

Column 200

Flat Roof Materials

Flat Roof Materials

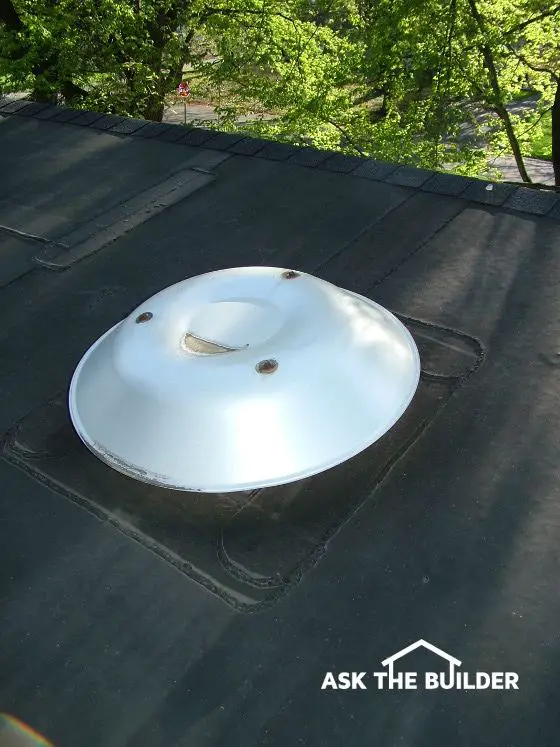
Flat roof materials like this keep rain out of your home. This is a traditional rubber roof material. Note how you can see the solvent welds at the seams where one piece of roofing overlaps another. Copyright 2018 Tim Carter

Flat Roof Materials Checklist

  • Hot-mopped asphalt is ancient technology and prone to leaks
  • STOP asphalt oxidation with copper on your roof
  • Synthetic rubber roof membranes like EPDM are best
  • Take photos of seams and flashings of new roof to help diagnose future leaks
  • CLICK HERE to Get Tim's FREE & FUNNY Newsletter!

Related Links

Flat Roof Leaks

Newer Rubber Roofs

Membrane Roofing Types

Membrane Roofing Manufacturers

What is Rock and Gravel on Flat Roofing Materials?

The gravel is used to hold down the roofing materials in high winds and it also protects the roofing material from ultraviolet (UV) light from the sun. UV rays will destroy any roofing material.

Free & Fast BIDS

CLICK HERE to get FREE & FAST BIDS from local roofers who can put on a EPDM membrane roof.

How Does UV Light Hurt a Roof?

The sun's UV rays break apart the molecules of the roofing material. This happens because about five percent of the sun's UV rays contain active photons.

Watch this video to understand why you need to protect your roofing materials from UV light:

What Happens When Photons Hit a Roof?

The photons break apart the roofing material molecules. The molecules then are unstable.

In the case of asphalt, it wants to get comfortable so it grabs oxygen out of the air.

This is called oxidation. When this happens, the asphalt molecules cross link. If too many molecules cross link, the asphalt gets stiff and hard.

You can significantly SLOW the oxidation of asphalt by introducing copper onto the roof. The copper ions go where the oxygen goes but it doesn't allow the asphalt to cross link.

Are Leaks Hard To Find?

If you have one of these roof systems and a leak(s), forget about locating them. It will be virtually impossible! The gravel does a fantastic job of hiding leak locations.

What are the Best Flat Roof Materials?

The best flat roof materials, in my opinion, are the vulcanized rubber roofing membranes. The rubber contains ingredients that make it quite resistant to UV damage.

Do You Need Gravel on All Flat Roofs?

No, you don't need gravel on all flat roofs. The use of synthetic membranes has just about eliminated the need for gravel on roofs.

Why?

Many of these new roof membranes are glued down to the roof sheathing. Not only that, the new membranes contain materials that resist UV degradation. If you can install a new flat roof without gravel, DO IT! It will make future leak finding much easier.

What Are the Benefits of the Rubber Flat Roof Materials?

The rubber membranes have many other benefits. Imagine being able to cover your house with just one giant piece of roofing material? No seams to worry about! It is possible if you find the right roofer and get the right membrane. Some of the membranes come in widths up to 50 feet!

Free & Fast BIDS

CLICK HERE to get FREE & FAST BIDS from local roofers who can put on a EPDM membrane roof.

How Are Seams Sealed?

Chemicals are used that soften the rubber membrane. When the two pieces are put together and rolled, the molecules weld themselves together as if the rubber were one piece.

Have you ever seen how a flat tire is fixed on a tubeless tire? The rubber patch is actually vulcanized to the tire's inner surface or wall with special solvents.

The patch and the tire basically become one in the same. This is how some of the new membranes work. As a roofer seams pieces together or makes cuts for flashings, they can actually weld pieces of material together.

Is Synthetic Rubber Roofing the Best?

Some of the top performing materials, in my opinion, are the synthetic rubber roofing compounds. These are commonly referred to as EPDM and CSPE materials.

I have installed these materials on many of my jobs where low-slope roofs have caused leak problems using conventional materials. These membranes work very well where old rolled asphalt materials, hot mopped asphalt, or even shingles were used before.

Are the Rubber Roofing Membranes DIY Friendly?

The rubber roofing membranes are not DIY friendly. In other words, you will probably need to locate a professional to install them.

You must remember that this technology is not really used much in residential work. Commercial roofers use these materials most frequently.

There are many residential roofers in large cities and small towns all over the USA that have experience with these materials. 

CLICK HERE to get FREE & FAST BIDS from local roofers who can put on a EPDM membrane roof.

Where Can You Use Membranes?

The membranes have many uses in residential work:

  • shed roofs
  • dormers on Cape Cod style homes
  • replace old low-slope tin roofs
  • chimney crickets
  • old-fashioned tin box gutters

Should I Do Periodic Inspections?

Yes, you should perform an annual inspection on a flat or low-slope roof. Since the roof is flat or nearly so, it will be easy to walk around.

Should I Take Photos BEFORE Leaks Happen?

I urge you to inspect the roof for the first time immediately after it is installed. Take photos of the roof and close up photos of all flashing locations and seams.

Keep these photos in a safe place and make sure they are clear. As you perform your annual inspection, you can refer to the photos to see if an area, seam, or flashing has begun to change. Photos are wonderful tools. As they say, "The lens doesn't lie."

Should I Mop on More Asphalt?

Don't be tempted by the lower price (possibly!) to do a quick mop over of your existing asphalt roof. Asphalt is simply old technology and is prone to failure.

The system is dependent upon expert workmanship for long-term high performance. Excellent workmanship is harder and harder to find these days.

Are There Great Membrane Warranties?

Yes, many of the rubber membrane roofs come with remarkable warranties.

You'll be surprised at the warranties you can get with the membrane materials. When you sit down and analyze the cost versus the benefits, you'll do well by upgrading to the membranes.

So far, every membrane roof I have installed has been leak free. Some have been on for more than twenty years. If I had a low-slope on my own house I can tell you that I would put an EPDM or CSPE membrane on it so fast your head would spin.

Leaks cause anxiety. Don't get cheap when it comes to your roof. Buy the best and relax.

CLICK HERE to get FREE & FAST BIDS from local roofers who can put on a EPDM membrane roof.

Column B200

Drainage Paving Stones

Drainage Paving Stones

Out in nature when it rains on soil, most of the water goes into the ground. Yeah, this column is about drainage paving stones, but you need to know something first.

I say this assuming:

  • it's not a downpour
  • the soil is not saturated from days of rain
  • the soil isn't frozen
  • or some other condition

DISCLAIMER: My college degree is in geology, so I can talk about this with a fair amount of authority. 😉

This rain water eventually might flow into the bedrock to help recharge and maintain the groundwater supply.

It can also flow across the top of a dense layer of deep-clay subsoil or where the bedrock comes close to the surface and then pop back out of the ground. This is how a natural spring works.

CLICK HERE to get FREE & FAST BIDS from local patio contractors who can install the drainage pavers at your home.

Hard Paving DISRUPTS Natural Process

Blacktop, concrete, old-style paving brick house roofs, etc. disrupt this natural process. These surfaces can cause rainwater to bypass the soil and travel directly to storm sewers.

When this happens, the ground water gets starved for moisture.

New Drainage Paving Stones

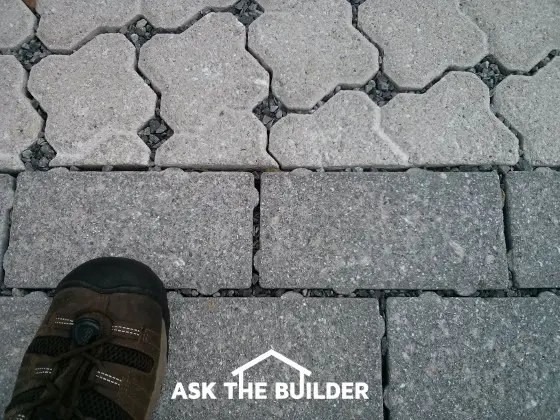
New style paving stones are now available that have gaps between the stones that allow water to get back into the soil. Brilliant!

The gaps are filled with tiny pieces of crushed or rounded gravel. Smart!

paving stones

I took this photo at the WW II museum in New Orleans in April, 2017. Look at how the water can get into the soil. CLICK THE PHOTO NOW TO GET FREE & FAST BIDS FROM LOCAL PATIO CONTRACTORS THAT CAN INSTALL THIS EARTH-FRIENDLY PAVING STONE AT YOUR HOME.

CLICK HERE to get FREE & FAST BIDS from local patio contractors who can install the drainage pavers at your home.

Gravity Hot Water System

gravity hot water system

Gravity hot water system | This is the top of a gas water heater. The hot water leaves the tank on the left side. The recirculating loop pipe re-enters the tank down at the drain valve below.

Gravity Hot Water System TIPS

  • Easy to install in ranch homes with a basement or crawl space
  • Works using the magic of convection - no electricity or pump needed
  • WATCH the alternative pump video below
  • Enjoy hot water instantly at all fixtures
  • CLICK HERE to Get Tim's FREE & FUNNY Newsletter!

Gravity Hot Water Recirculating System

"A gravity hot water system works because the heated water, which is lighter, rises through the loop. As the water cools at the end of the loop where the last part of the loop is not insulated, it is thermo-siphoned back into the hot water heater."

DEAR TIM: I am not a big fan of cold showers. I have to wait 15 - 20 seconds each morning for hot water to arrive in my shower.

It seems like a terrible waste of water and money. Is there a way to avoid this?

Can something be done to my ranch house? Is it possible for a DIY'r to accomplish the remedy? H. O.

DEAR H.O.: Brrrrrr! I know the feeling.

Cold Showers Not Acceptable

Cold showers are a bummer. Guess what? We can solve your problem with a simple gravity hot water recirculating loop. They're effective, inexpensive and easy to install.

Do You Waste Water?

First, however, I want to put into perspective the waste situation. Clean water is a natural resource and should not be wasted if you're getting it from a municipal water system.

Until your loop is operational, why not capture the shower water with a bucket? Use it to water plants or to fill your washing machine.

Free & Fast BIDS

What is the Actual Cost of Wasted Water?

The cost of the wasted water is minuscule. Let's assume you pay only 1.5 cents for each cubic foot of water (that was my rate when I wrote this column).

If you have 25 feet of 3/4 inch water pipe between your hot water heater and the shower, you waste .076 cubic feet of water each morning or $0.001178.

It would take 849 showers for you to waste $1.00 worth of water. Keep that in mind if you choose a fancy way to solve your problem.

Recirculating Pump Alternative

If you don't want to install the actual loop and want hot water at your plumbing fixtures instantly, you can install a nice pump that does what a gravity loop will do.

These pumps work on timers and move hot water through the system when you think you'll need it. They have a special valve that connects under a sink so there's NO WATER WASTE.

The cooled water in the hot water line is pumped back into the cold water line as soon as the pump fires up. When hot water reaches the special bypass valve the valve shuts off so hot water is not wasted.

hot water recirculating pump

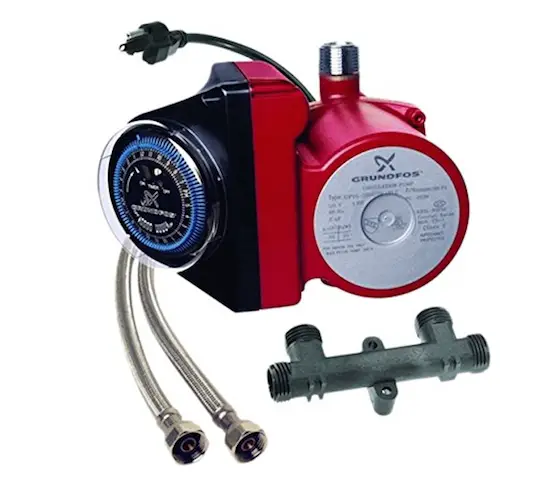
This is a reliable recirculating pump you can install on top of your water heater. The weird threaded fitting goes under the sink that's farthest away from the pump. CLICK THE IMAGE NOW TO ORDER THIS PUMP.

Recirculating Pump Video

Watch this short video to show where the pump is installed and the special bypass valve.


Customer Reviews About My Gravity Loop

"I phoned you about my gravity loop that I recently installed. You clearly indicated what I did wrong. I had the theory and connections right, but the wrong pipe size. I used 1/4 inch copper tubing for the return loop. As you know, it did not work. Per your information, I increased it to 3/4 inch pipe. You said 1/2 inch might work, but I didn't want to take the chance. Bingo! - It works beyond what I had hoped for - Instant Hot Water." Bob Chartier, Westland, MI

CLICK HERE to set up a phone call with master plumber and founder of AsktheBuilder.com - Tim Carter!

# # #

"I remodeled about a year ago and read this column on gravity loops. We installed the loop and it works fantastically. There is instant, well almost, hot water on the far end of the house. I would not have believed something so simple could work so well....." Paul Wiegert


Are Recirculating Loops a New Idea?

Hospitals, hotels, motels, and other large buildings have used hot water recirculating loops for years. Some of these loops use electrical recirculating pumps while others use gravity.

Based upon the fact that your water heater is in the basement of your home, Mother Nature is going to do the work for free!

How Does the Gravity Hot Water System Work?

A gravity hot water system works because the heated water, which is lighter, rises through the loop. As the water cools at the end of the loop where the last part of the loop is not insulated, it is thermo-siphoned back into the hot water heater.

The water enters the bottom of the heater at the drain valve inlet. This flow of water is slow but constant.

Where Must the Water Heater Be Located?

The water heater must be located at the bottom of the loop. Ranch houses and two-story houses with basements are perfect candidates. Houses built on slabs or that have hot water lines below the water heater must use a simple in-line recirculating pump.

Finish The Loop

All you need to complete your loop is a return water line from the far end of your hot water line. Locate the end of your existing hot water line.

Cut into the pipe at this location where the pipe in the basement turns up to go into the fixture on the first floor. Install a tee fitting in place of the 90-degree fitting.

One part of the tee will allow you to reconnect to the hot water line. The other portion of the tee fitting will be the start of the return loop back to the water heater.

IMPORTANT TIP: Do not decrease the size of the return loop pipe. The system will work best if you use 3/4-inch diameter pipe. One-half-inch tubing may work, but don't take the chance.

Drain Water Heater

Turn off your water heater's power supply before you start this project. This is especially true if you heat water with electricity. If a heating element is on and not surrounded by water in the tank, it immediately burns up.

Then turn off the water leading to the water heater. Drain the hot water heater and remove the drain valve by turning counterclockwise.

Remove Drain Valve - Install Tee and Boiler Drain

Install a dielectric union or insulating nipple in place of the valve. This will to reduce corrosion possibilities if you are working with copper or galvanized iron water lines.

The next step is to install a tee fitting at the base of the heater. The loop pipe connects to one part of the tee and you'll install a new boiler drain out of the other part so you can drain the heater in the future.

Insulate 98% Of The Loop

To save energy and have the loop function, you must insulate the loop as it leaves the top of the water heater. The insulation must start inches above where the hot water line leaves the water heater and must continue along the entire loop as it makes its way through the house and starts its trip back to the water heater.

In new construction, insulate all of the hot water supply pipe up to each fixture.

Last 15 Feet - NO INSULATION

Do not insulate the last 15 feet of pipe as it gets near the heater. This pipe must be uncovered so the water cools. This cooling of the water is what powers the gravity convection engine that makes the hot water flow slowly towards through the loop.

Foam insulation is available which will slide over the pipe as you install it. You can also choose to use pre-molded fiberglass with a protective coating. The foam insulation is much more user friendly. Remember, to ensure good performance leave insulation off of the last 15 feet of loop piping as it returns to the heater.

Flapper Check Valve

If the loop fails to work, water may be flowing backward through the system from the water heater. You can stop this with a check valve. Install a check valve in the uninsulated part of the loop about 5 feet away from the bottom of the water heater. 

You MUST use a flapper-type check valve, not a spring-loaded one. Spring-loaded check valves will not work and block the slow trickle of water through the loop.

Drill a 1/8-Inch Hole

Drill a 1/8 inch hole through the flapper so that a small amount of water can flow back to the heater to maintain circulation of the water within the loop. If the loop doesn't seem to work well, slowly increase the diameter of this hole but do not exceed 1/4 inch diameter. It's important to realize this hole must be drilled or there's a very good chance your loop line will rattle and clank. The rattle happens because the flapper starts to vibrate back and forth in response to the demand for hot water. The pressurized water in the loop is trying to flow backwards but the flapper springs shut. 

The small hole stops the chatter because water can flow both ways through the loop. However, the volume of water flowing backward through the loop is not enough to satisfy the demand called for by the open valve in the loop.

Modern Heater Heat Traps!

If you're installing a new water heater, you need to remove a pesky device installed to keep heat in a heater. Many modern heaters have a heat trap device at the top of the hot water outlet. These are small flapper check valves that stop hot water from drifting up the hot water line when the hot water is not being used. Remove the heat trap device to get the gravity loop to work.

Column 147

Brick Pavers Crumbling

paving bricks

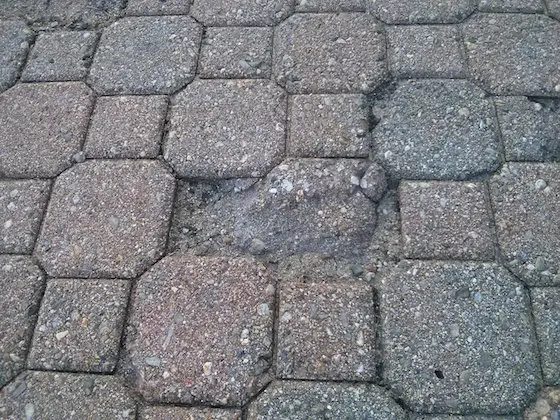
Crumbling Brick Pavers | Here's a concrete paving brick that's crumbling. It must have not had enough Portland cement in the mix to offset the freezing water that blasts apart the concrete. LOOK BELOW at the photograph showing the new paving brick that replaced the crumbling one. You'll then see why you don't want to use precast paving brick on your patio, driveway, or sidewalk. I have a better alternative below. Copyright 2022 Tim Carter

Crumbling Brick Pavers

Why Do Paving Brick Crumble?

The concrete paving brick crumble because the Portland cement used to hold together the sand and gravel loses its ability to hold together the sand and gravel used to create each brick. This happens most frequently in cold climates.

Water soaks into the concrete paving brick. When this water freezes, it expands in volume by 9 percent.

The ice crystals can blast apart the cement crystals. When this happens, the brick crumble.

The crumbling can also be caused by an inferior base and heavy concentrated loads on the brick. This is rare, but it's possible.

How Old Are Concrete Brick Pavers?

Colored brick pavers have been around since the late 1970s.

I remember when these interlocking colored concrete bricks were introduced. Homeowners were attracted to them like flies to picnic food.

When I first saw them, I knew there would be problems with them.

First, they were made from regular concrete. Small pieces of stone were used, but it's just concrete.

Traditional paving brick are made from clay and fired in a kiln. If the kiln temperature is hot and the brick are left in for a long time, the brick that come out are more like solid rock. The color of real paving brick is solid through the entire brick.

Free And Fast BIDS from LOCAL contractors

Get FREE & FAST BIDS from local patio contractors that can install traditional clay paving brick.

Why Do Paving Brick Fade?

The biggest issue with the paving brick is they start to fade and lose their original color.

When they're made, dry pigments that are the consistency of flour are added to the Portland cement. This slurry paste puts an ultra-thin colored coating on all the pieces of sand and gravel used in the brick pavers.

But weather, pressure washers, foot and car traffic rapidly wear this thin paste off.

What Creates the Color in Concrete Paving Brick?

Dry pigments are blended with the concrete used to make the paving brick. The issue, as stated earlier, is this cement paste is very thin and wears off over time only to expose the dull color of the sand and gravel used to make the brick. Here are some standard dry pigment colors:

whitewash brick pigments colors

Here are just a few of the many many pigments available. You can blend different pigments to get different shades that you don't see here! CLICK HERE or THE IMAGE TO BUY ANY WHITEWASH or CONCRETE PIGMENT YOU WANT.

Do Pressure Washers Harm Paving Brick?

Pressure washing concrete brick pavers causes great harm. The high-pressure water stream accelerates this color fade. It should come as no surprise that a 2,400 PSI stream of water will BLAST away the fine colored cement paste that gives the brick its original pleasant appearance.

Just be aware that the color is going to fade unless you live in a mild climate and the patio is in the shade.

brick pavers

Here's a great example of faded concrete paving brick next to brand new ones that have not yet lost the colored cement paste off the sand and gravel. Copyright 2022 Tim Carter

Color-Safe Paving Brick

If you want paving brick whose color will never fade, purchase traditional clay paving brick. The color of the clay is solid throughout each brick. Even if you chip one, the color is the same. Be sure to get brick rated SW - severe weathering.

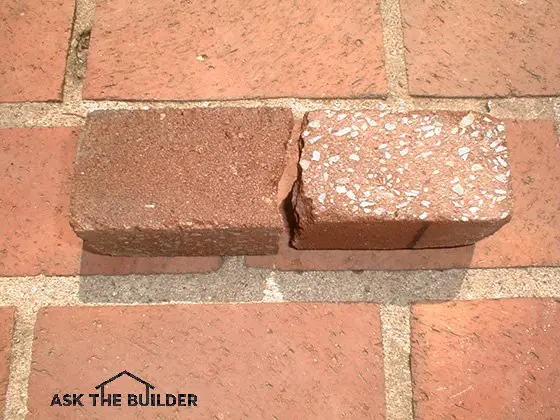
paving brick cracked in half - comparing aggregate color

I cracked the new precast CONCRETE paving brick in half. Look at how light-colored the aggregate is! Over time when the red cement paste wears off, the pavers will look different. My traditional clay paving brick patio just under the cracked brick will stay red forever, because the red clay is the same color throughout the entire brick. © 2022 Tim Carter

Composite Decking Mushrooms

Composite Decking Mushrooms

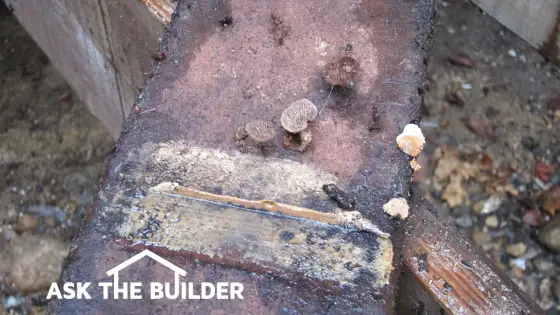
Composite Decking Mushroom | Mushrooms growing out of the bottom of Trex composite decking can’t possibly be a good thing. Decaying wood inside the Trex is fueling the mushroom growth. PHOTO CREDIT: Tim Carter

Composite Decking Mushrooms TIPS

  • Some composite decking materials are made with wood fibers
  • Many deck problems are caused by FAILURE of installer to follow instructions
  • Read updated author's notes at bottom of column
  • Ventilation is very important as is spacing between decking boards
  • CLICK HERE to Get Tim's FREE & FUNNY Newsletter!

DEAR TIM: I had to replace a damaged Trex decking board on my ground-level deck and was shocked at what I discovered. On the underside of the decking, mushrooms and fungus were growing out of the decking!

I thought that composite decking materials were problem-free. I thought the reason to purchase these products was so that you’d never have to replace them.

What’s going on? What can I do to stop the growth of the mushrooms? Patti L., Woodinville, WA

DEAR PATTI: Oh my goodness! I’m not really surprised by this, especially since I’ve had firsthand experience with this myself.

How Did You Discover the Mushrooms?

Recently, I had to repair a poorly designed front porch that was covered with Trex decking. It was important to salvage the decking material, and as I carefully removed each board, I was stunned to discover large patches of white fungus and different species of mushrooms growing on the underside of the decking.

IMPORTANT NOTE: The mushroom growth problem was caused by the home builder, not a defect in the Trex decking. I didn't build the house I currently live in.

The builder didn't:

  • provide any spacing between the decking boards
  • it was too close to the ground
  • it was enclosed on THREE SIDES

Because the deck was enclosed on the three sides, it was impossible to get air moving under the decking. You need air moving to evaporate any water that will fuel the growth of mold and mushrooms.

Free and Fast BIDS

Get FREE and FAST BIDS from local deck contractors who know how to follow instructions.

Author's Note: Would you like to see three High-Resolution photos of the mushrooms that were growing out of the Trex Decking? If so, click here.

Is Decking Spacing Important?

The first thing I did once I got inside and cleaned up was to go to the latest written installation instructions published by the manufacturer. I immediately discovered that part of the problem in my case was the boards had not been spaced properly to provide some ventilation.

How Big Should the Space Between Boards Be?

The current written instructions show that there should be a 1/4-inch gap between the boards to provide for both expansion and air circulation. However, I was shocked to discover there was no real minimum clearance distance referenced with respect to how close the bottom of the decking should be to moist and dark soil. These are the conditions that mushrooms, mold and fungus seem to thrive in.

Was the Marketing Message Misleading?

Clever marketing has for years set up an unrealistic expectation, in my opinion, that composite decks are maintenance-free. I can remember years ago that this absolutely was the case with Trex. After it was in the marketplace for several years and problems started to happen, it became clear you had to maintain the decks.

Can you Re-Stain Faded Composite Decking?

I was shocked to discover in the installation and maintenance instructions the manufacturer even talks about how to stain the deck to restore the decking to its original color. That communicates to me they know the decking is going to fade and will need to be cared for if you want it to look good for years to come. So much for maintenance-free.

What Do the Mushrooms Eat?

EB015 Cleaning & Sealing Deck Cover

The mushrooms are growing because they are feeding on the wood fibers inside the Trex decking. The literature from the manufacturer says the decking does absorb moisture.

I’m reasonably confident the wood fibers that are used in the decking are not treated to prevent wood rot or decay. I can’t find any information in the Trex literature that says they do treat the wood to prevent rot.

If this is the case, that the wood fibers are not treated, then it makes perfect sense why you, I and perhaps tens of thousands of others are experiencing hidden mushroom growth.

What Fuels the Mushroom Growth?

The wood fibers inside the decking are getting wet, rotting, and fueling the growth of mushrooms. That’s what happens to logs that fall in the forest and get wet. It makes sense rot could happen with composite decking that uses wood fibers or wood flour that’s not treated to prevent rot.

CLICK HERE to get FREE and FAST BIDS from local deck contractors who know how to follow instructions.

How Do You Prevent Mushrooms?

To prevent the growth of mushrooms, fungus and mold on the underside of your decking, you may want to consider implementing what I’m doing. The front porch I’m rebuilding is going to have new and vastly improved ventilation.

Not only will I be spacing the decking boards so that there is a minimum of 1/4 inch between the boards, I’m creating a minimum of a 1 and 1/2-inch gap around three sides of the decking where it used to connect directly to the house.

This air gap should be plenty to help keep the relative humidity on the underside of the decking to a point where the growth of the organisms will be stopped or significantly slowed.

Should I Regrade the Soil?

I’m also going to try to regrade the soil so there are at least 16 inches of air space between the soil and the underside of the decking. It helps that I have well-drained soil under the porch I’m working on.

If you have poor-draining soil, I suggest you take whatever measures are necessary to prevent the ponding of water under the decking.

Why is Airflow Under the Decking Important?

Airflow is perhaps the best way to ensure there’s no or minimal growth of mushrooms and fungus. The goal is to keep the moisture content of the wood fibers inside the Trex as dry as possible. Air movement absolutely accelerates drying.

Since the manufacturer admits the decking does absorb moisture, anyone with Trex decking needs it to dry as soon as possible when it gets wet. This does become problematic in areas that experience lots of rain over months of time.

In these locations, it’s probably best to avoid the use of composite decking materials that contain wood fibers that have not been treated with chemicals that prevent wood rot.

Author's UPDATE:

In the summer of 2016, I replaced all of the generation-one Trex decking at my home with Trex Transcend. The Transcend product has the same, or similar, core of wood fibers that are encapsulated by plastic.

deck over water

Here's my own Trex Transcend deck. There's lots of railing. It didn't take long to understand how to do it with professional results. Copyright 2021 Tim Carter

But the big difference is the top of each plank and the top third of each side is capped with a solid plastic that's embossed with wood grain. The capping material also has some extra coloration to simulate the real look of wood. My wife is a very tough critic of all things that are made to simulate wood. She feels this is the closest she's ever seen of any product to replicate real wood.

The small samples you get to hold in your hand look odd and unrealistic. But when the planks are down on the entire deck and you look out across it from a distance, it looks like real wood.

Here are some photos of my new Trex Transcend deck:

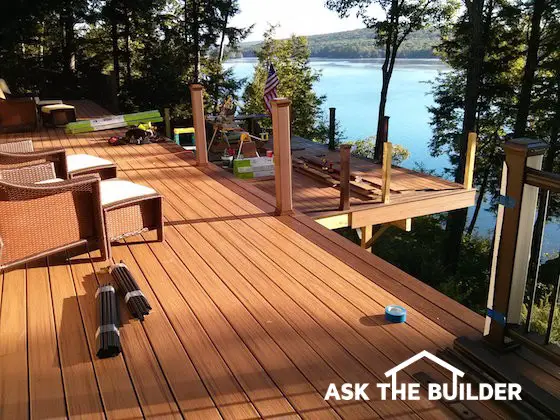
trex deck

This is a photo of the decks under construction. The long deck with the furniture on them is the original 10 x 60-foot deck. The lower deck is new and is 24 feet wide and extends out 16 feet from the original deck. Copyright 2017 Tim Carter

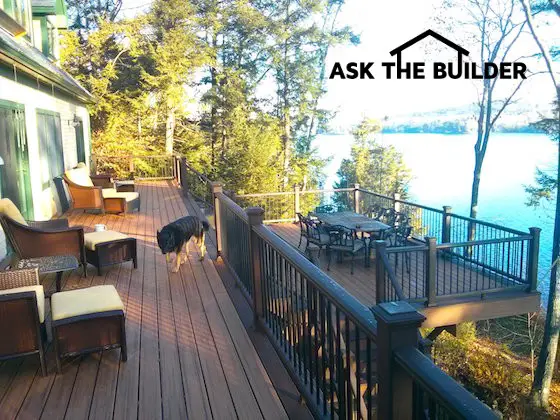
trex deck

The deck is complete with the Trex Transcend railing system. It was a pleasure working with this new material. It's engineered for easy installation and has all hidden fasteners for the decking and railing system. Lady the Dog loved laying on it. RIP Lady! Copyright 2017 Tim Carter


trek deck

You can get a feel of the coloration in the medium-brown colored decking. The deck has a picture frame of darker material - Lava Rock - and the main decking is Tiki Torch. Copyright 2017 Tim Carter

Get FREE and FAST BIDS from local deck contractors who know how to follow instructions.

Column 903

April 25, 2017 AsktheBuilder Newsletter

AsktheBuilder Newsletter

If you're a new subscriber, welcome to the family!

Spring is here in central New Hampshire. It's a long time coming to the Northeast for the most part.

When it finally decides to stick around, it makes up for lost time. Perhaps the best part is what I call the second fall.

CLICK HERE to see a bunch of fall color photos I took on the day of peak color last October.

In the spring, the deciduous trees treat us again with eye candy. There are multiple shades of green as the leaves mature.

I'm talking VIBRANT shades of green. Not one or two, but several. It's stunning and very hard to capture with a camera. The leaves will be in their spring glory in about three weeks.

Snow Be Gone WINNER!

A few months ago, I asked you to have some fun and play my Snow-Be-Gone 2017 Contest. You may have been one of the 200+ people who decided to see if you'd be the proud winner of a 4.5-pound container of my certified organic Stain Solver oxygen bleach.

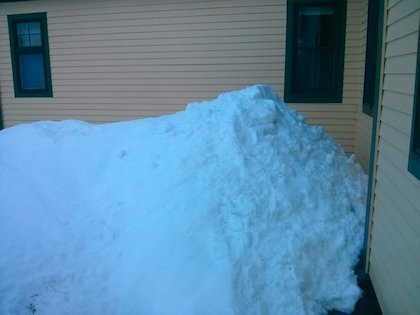
Here's what the snow pile looked like the last week of March, 2017.
snow be gone
That pile above is just under six-feet tall and the highest part of the pile was in the shade all the time.

We had some warm days in early April and quite a bit of rain.

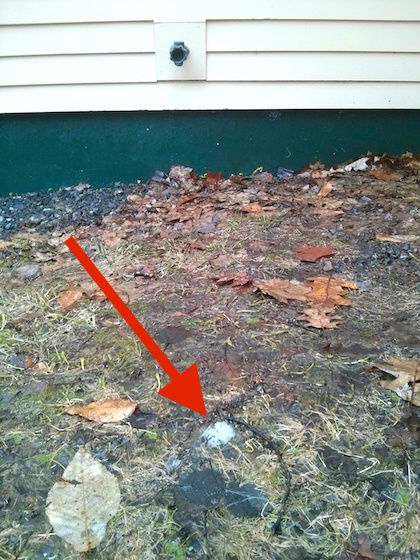
Last Friday night, April 21, 2017, I took the below photo. The red arrow points to the tiny spot of snow remaining. It was just starting to rain and by 9 p.m. it was all gone.
snow be gone
You may be one of the five contestants that picked April 21st. I used the random number generator at random.org to pick the winner.

Jay Kenty of nearby Wolfboro, NH is the winner! Congratulations Jay!

If you didn't win, don't fret. More games are coming your way and thank you for playing.

Coast FDX302 Knife Review

I just tested the Coast FDX302 pocketknife. It's a little dandy.

Are you sitting down? It costs LESS than $20!!!

This knife really surprised me.

I was convinced I'd have a ho-hum feeling about it.

CLICK HERE to see what I thought of this knife I'm quite sure will be in your pocket in about a week.

My Master Bath Remodel

On Saturday I started to remodel my own master bathroom.

The biggest part of the job is installing a new American Standard acrylic shower unit.

I ripped out the old ceramic tile corner shower over the weekend.

Today I'm installing the American Standard faucet and the shower base.

Today's Tip is about the shower base.

Frequently rookie DIYrs and bad contractors install the acrylic base units WRONG.

The instructions that come with most acrylic tubs and showers - not all of them! - clearly show that the units must be installed in a wet bed of a solid compound that will FILL THE VOID SPACE under the acrylic.

If you skip this important step, the bottom will flex and oil can when you stand in the shower. Eventually the bottom will crack and leak.

I happen to like to use dry-setting joint compound for this job. USG has one that sets up in 90 minutes and that's plenty of time to mix the material with water, set the base and have the material squish around under the unit filling all the void spaces.

CLICK HERE to see the Durabond 90.

Are you thinking of remodeling your bathroom? How would you like to get FREE & FAST BIDS from local bathroom remodeling contractors???

CLICK HERE to get the FREE & FAST BIDS now.

Roofing Ripoff Paperback Book

I believe I'm about two weeks away from having my Roofing Ripoff book ready as a paperback.

WOO HOO!

It's going to be GORGEOUS. Sheridan Stancliff is a professional book designer that's working on this aspect of my book. She's doing an amazing job on the interior of the book.

Mary Beth Wilker, the wife of my close friend Nick Motz, did the front and back cover. Mary Beth is also a close friend too!

CLICK HERE to see what the book is all about.

Over the past two weeks, the sales of the PDF and Kindle versions have been STRONG. CLICK HERE to order one of these versions NOW.

Less than two weeks ago, I shared a conversation I had with my wife Kathy and she asked me if I was happy with the sales of the book in the first 36 hours.

My response was, "Not really." Just because I wasn't happy didn't mean it wasn't selling well!!!

The number of sales required to make me happy may be much larger than what would make some other publisher happy. Get it? Insert smiley face.

You may have contacted me with great feedback. I received COUNTLESS emails about what I could do to boost sales of the book.

Guess what the common message was in each and every suggestion? I was taken aback.

"Tim, reading an entire book is HARD."

You may have been one that asked for a condensed version because you don't want to slog through my long-winded adventure.

It's too expensive to offer this condensed version in a paperback, so I'm only going to offer it as a PDF file you can download.

You may have emailed me saying you have NO INTEREST IN THE BOOK and you just want me to cut to the chase and tell you HOW TO SAVE your asphalt shingle roof.

Yes, I made a discovery how you can extend the life of your asphalt shingle roof by decades. It works for any new asphalt roof or one that's showing no curling or granule loss.

I'm going to do that too, but not just yet. Hang in there.

FREE Basic New Home Quality Control Checklist

CLICK HERE to see a very basic quality checklist if you're about to build a new home or do a major room addition.

That's enough for today.

Have questions? Ask me.

Tim Carter
Founder - www.AsktheBuilder.com

Do It Right, Not Over!

Coast FDX302 Knife Review

coast knife

Here it is. It's quite the knife. Each time I hold it, I like it more and more. CLICK THE PHOTO NOW TO HAVE THIS KNIFE DELIVERED TO YOUR HOME.

Coast FDX302 Knife

I've lost count of the pocket knives I've had in my lifetime.

Years ago I used to marvel at those with the carved and shaped wood handles. Go back sixty years and pocket knives were very basic - a blade, maybe two.

In the 1970s, the Swiss Army knife was the rage. As the fad exploded, so did the knife as some had so many gadgets you needed a backpack to carry the knife.

Forget about putting it in your pocket. Click here to see how nutso the Swiss knives are. 

Slim & Stainless

When I saw the Coast FDX302 in the hard-plastic packaging, I immediately had a negative thought.

I thought it would be heavy. I've come to really appreciate lightweight pocket knives. Just a month ago, I received a Klein electrician's pocketknife to review and it was HEAVY - too heavy.

The Coast FDX302 is light. It's sleek. It's handsome. It's stainless steel so it won't rust. I love that.

It may soon become one of my favorite knives.

I can tell you for sure it will accompany me on all my hiking and Summits on the Air adventures. I'm a ham radio buff and love to talk with other operators while on top of a mountain.

Quick Specs:

  • Stainless Steel
  • Blade: 3 inches
  • Closed Length: 4.375 inches
  • Belt Clip
  • Lanyard Hole
  • Guaranteed to Deliver Pride
  • Guaranteed to Produce Envy Among Close Friends
  • Life-saving Potential

CLICK HERE NOW TO HAVE ONE IN YOUR POCKET

Coast Knife

Here it is. It's quite the knife. Each time I hold it, I like it more and more. CLICK THE PHOTO NOW TO HAVE THIS KNIFE DELIVERED TO YOUR HOME.

Coast Knife

Here's the handle. You can see the belt clip and the tiny lanyard hole at the end. CLICK THE PHOTO NOW TO HAVE THIS KNIFE DELIVERED TO YOUR HOME.

Coast Knife

The round knurled knob is a secondary lock when the blade is open. It's a great safety feature. Note the lint on the knife from my pocket. CLICK THE PHOTO NOW TO HAVE THIS KNIFE IN YOUR POCKET IN JUST DAYS!


Coast Knife

It's not a huge knife. It fits my hand perfectly. I have a normal man-sized hand. Not a giant hand, a normal one. It's stainless steel and won't rust. CLICK THE PHOTO NOW TO OWN ONE. YOU CAN'T BELIEVE HOW AFFORDABLE THIS KNIFE IS!