Outdoor Fire Pit Ideas DIY

Outdoor Fire Pit

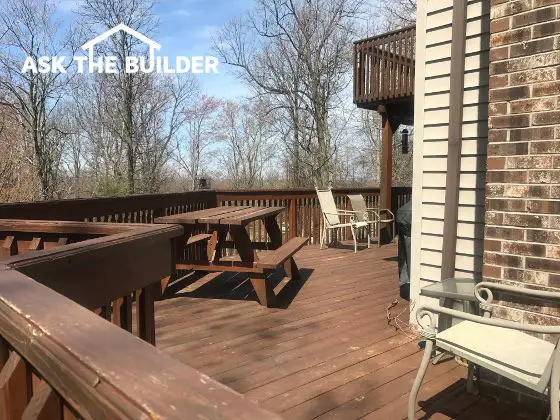
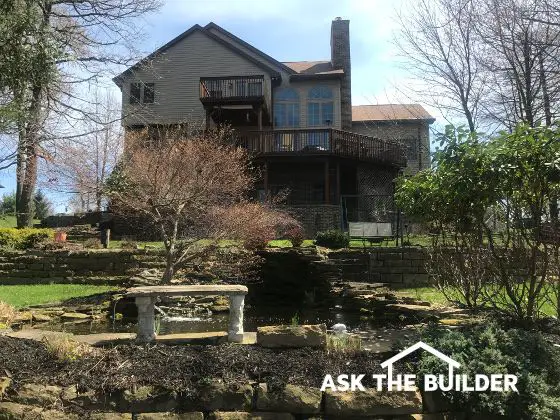
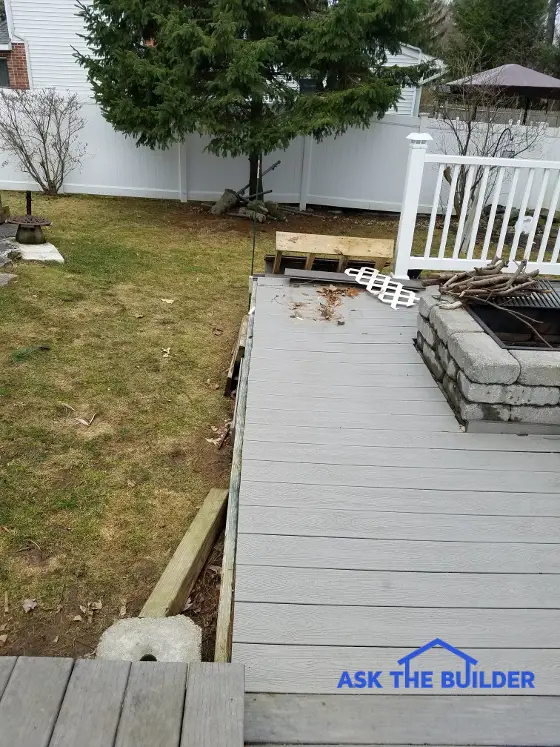
This outdoor deck and fire pit weren’t planned well. The owner is now forced to rebuild the fire pit and the deck. (C) Copyright 2017 Tim Carter

Outdoor Fire Pit Ideas DIY TIPS

  • Plan seating area to look at great view beyond fire pit
  • Be aware of wind direction - avoid smoke in your face
  • Large fires get hot - be sure seats are far enough away
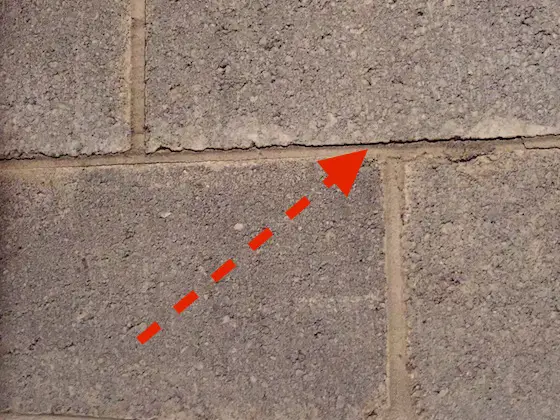
  • Embers can catch wood decks on fire
  • CLICK HERE to Get Tim's FREE & FUNNY Newsletter!

DEAR TIM: A neighbor of mine and his wife got into a big fight about their outdoor deck and fire pit. You couldn’t help but overhear.

The husband thought he was building the deck a good size with the fire pit in the center of the deck. The wife told him it was all wrong.

Long story short, the wife was right and now he’s tearing it all apart.

If you’re going to build an outdoor fire pit can you share some tips so everything goes smoothly? What are the top things to consider, especially if you’re building one that’s going to be part of a wood deck? Ron S., Seymour, IN

DEAR RON: I’ve heard some screaming matches like that in my last neighborhood. One day a nearby wife got so mad at her husband she took a baseball bat to the windshield of his favorite car. I don’t know what the fight was about, but it was uncomfortable to listen to across the street.

My Own Lack Of Foresight

I hate to say this, but I’ve been your neighbor but sans the scream fest. Here’s a true story.

Years ago, when I built the dream Queen Anne Victorian house for my wife, I insisted that my office be on the first floor so subcontractors could come into the house and just turn left into my office. In our previous home, they had to walk through the house.

CLICK HERE to get FREE & FAST BIDS from local patio contractors who can build a fire pit for you.

The issue is it made the room on the other side of the wall, our family room with a fireplace, too small. My wife drew the plans and she kept saying, “The family room is too small. Hardly any furniture will fit.”

When I objected after the third time she said, “Well, I can guarantee you one day you’ll be remodeling the two rooms and moving the fireplace to the outside wall.

Down Comes The Chimney

I heard those words replayed in my head when I was up on my roof taking the first swing of a 4-pound hammer to start to tear down a 35-foot tall chimney that had to be moved just seven feet sideways. Gentlemen, listen to your wives!

I Love Fire Pits

It just so happens fire pits are a minor hobby of mine. I’ve built several and sat around many.

I have one here at my own home, but I neither built the fire pit nor the home. The idiot who built my current fire pit must have been blind.

What Do You Look At?

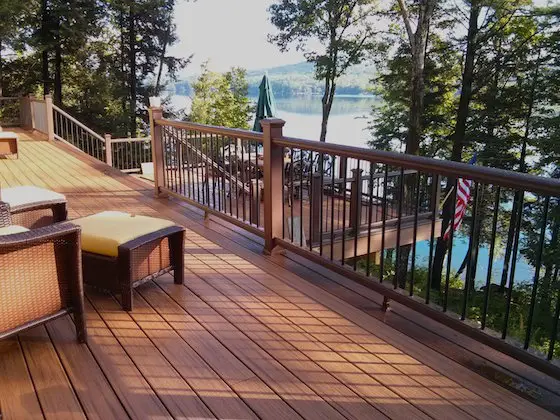
Here are a few must-have fir pit ideas you should consider. First and foremost, think about any view beyond the fire pit.

It’s not always going to be pitch dark when a fire is roaring and think about what are you looking at over and beyond the fire. Are you sitting there looking at the ugly brick wall of your garage or family room?

Make it something nice if possible. In my case, believe it or not, my back is turned to the third largest lake in New Hampshire when I sit at my own fire pit. The idiot who built my fire pit has you looking away from the lake.

Smoke In Your Face?

Second, it’s very important to consider any prevailing winds. Some backyards have a particular direction the wind blows. The wind may not blow that direction all the time, but frequently.

You don’t want the seating area around the fire pit to be downwind of the fire as everyone will be rubbing their eyes or getting flying embers into their clothes.

CLICK HERE to get FREE & FAST BIDS from local patio contractors who can build a fire pit for you.

Radiant Heat - Sit Back!

Think about how hot fires get. If you have a roaring fire, you often can’t be any closer than 4 or 5 feet to the edge of the fire or you roast.

This means that the seating area needs to be at least 10 feet deep from the edge of the fire pit so there’s enough room in front of any chairs and room to walk behind the chairs.

Embers Cause Unwanted Fires

I’ll bet if you talk with your local fire department captain she or he will tell you a story about a deck that caught on fire from an ember or leaves under a deck that ignited. It’s very bad when these fires erupt after everyone has left the deck and the fire is in the smoldering stage.

I’d create a masonry hearth around the fire pit that’s at least 18 inches deep. You want no wood or decking within 18 inches of the edge of the fire pit. Your local code may call for a greater distance, so refer to it for guidance.

Ring Of Safety

Think about leaf debris and anything else that’s combustible that could accumulate near or around the fire pit. Keep an 8-foot ring of safety and possibly more.

If you can afford it and are willing to do the work, I’d run a seasonal water line, even if it’s just a great garden hose in an underground large conduit pipe, so you have running water right next to the fire pit in case something goes wrong.

How nice would it be to just turn a valve and have a charged garden hose right there to put out an out-of-control fire.

Fire Pit Diameter

The diameter of the fire pit should be no less than 3 feet and 5 feet is more than enough. Ring it with stone or other fireproof material. The height of the stone should be about 1 foot above the ground level where you stack the wood that will make the fire.

Wood Storage

Plan a spot for wood storage so that it doesn’t take up valuable deck space where a chair might be. You want the wood close enough so it’s not a hassle to retrieve, but not so close that it could catch fire from a rogue ember that wanders from the fire pit.

Build A Test Fire

As crazy as this sounds, it’s always best to build a test fire where you think you’ll have the fire pit. Make the fire as large as you normally might have it.

See how close you can comfortably sit. Use string to outline how much space you want behind the chairs. This simple test will ensure you build the best fire pit and the perfect deck or patio that will surround it.

CLICK HERE to get FREE & FAST BIDS from local patio contractors who can build a fire pit for you.

Column 1192

April 13, 2017 AsktheBuilder Newsletter

Roofing Ripoff

Are you a new or newer subscriber? This is sort of a wacky open to my newsletter.

If you're a seasoned subscriber you know I try all the time to save you money. I do that by telling you about great products and about secret tips that can make sure work you do around your house LASTS a LONG TIME.

That said, late yesterday morning my wife Kathy and I had a brief conversation. What you need to know is that less than two days ago I released my huge expose' book Roofing Ripoff.

It's a saga about how asphalt shingles are falling apart on homes much faster than they're supposed to.

Your existing asphalt shingle roof could be DOOMED - but you can save it if it's still in good shape.

Anyway, here's the conversation:

Kathy: "Are you happy with how many people have purchased the book?"

Me: "Not really."

Kathy: "Why?"

Me: "I'm really confused. The statistics show that 80-percent of houses in the USA have asphalt shingle roofs. I would think that perhaps 80-percent of my subscribers would have an asphalt roof over their head and wanted to get the book.

Well, maybe less because Russell and Phil down in Australia don't have asphalt. Oh, and then there's Johan over in Europe, he's probably got slate. Ooops, I almost forgot LH in Indonesia, my guess is he's got a metal roof.

But probably 70 percent of my subscribers have asphalt shingle roofs! While many orders have come in, it's not even close to 70 percent of our subscribers."

Kathy: "It's got to be your fault. You know you often write too many words about stuff and maybe you're not being CLEAR about why people need the book.

Maybe you're guilty of what you accuse rookie writers of doing. Maybe you're leaving something SIMPLE out of your message."

Me: "I thought I was being pretty clear, but maybe I need to try something else. I just can't figure out why a person who has an asphalt shingle roof on their house right now wouldn't want to know how to make it last another 10, 20 or 25 years."

Kathy then walked down the steps to her office leaving me thinking about what I must be doing wrong.

Last night I had a dream. Here's what I saw in the dream:

Please answer these two questions:

If you have an existing asphalt shingle roof no matter its age and it’s in good condition, would you like to extend its useful life another 10 or 20 years?

Yes
No

If you’re about to install a new asphalt shingle roof, would you like to know how to make it last for 40 or 50 years?

Yes
No

If you answered YES to either question, you MUST READ my new book NOW.

That was the dream.

If you have an existing roof in good shape, my book can put off you spending THOUSANDS of DOLLARS on a replacement roof. In other words, instead of having to put on a new roof next year or two years from now, you may not have to do it for 10 or 15 years!

If you're going to install a NEW ROOF soon, then my book can save you MANY HUNDREDS of DOLLARS now and most certainly THOUSANDS of DOLLARS in the future.

Here's one more thing.

How about a 100% SATISFACTION GUARANTEE?

If you download the book now, and you feel you didn't get your money's worth or feel ripped offed - that's a pun on the book title - I'll give you your money back NO QUESTIONS ASKED.

If you're one who wants a paperback copy, I get it. I understand why you didn't order yet.

The paperback book is in production NOW and should be available in about three weeks.

But if you would like a PDF version or an Amazon Kindle version - both are electronic - then you can read Roofing Ripoff RIGHT NOW.

CLICK HERE to get the PDF version.

CLICK HERE to get the Amazon Kindle version.

New Cordless Hammer Drill

Today Brian, my UPS driver, is going to deliver this new Bosch hammer drill. They call it the Bulldog Brushless.

I told Andy, the Bosch public relations (PR) representative, that I was going to put it to the ultimate test.

"Tim, what's the ultimate test?" Andy asked.

"Hah, I'm going to use it to drill into the SOLID Meredith Porphyritic GRANITE LEDGE that towers above my driveway, that's what I'm going to do," I exclaimed.

So tomorrow, I'm going to do just that and will report back to you.

We'll see what kind of appetite the Bulldog has for GRANITE which is much harder than concrete!

Arrow Staplers

The good folks at Arrow Staplers want me to tape some useful videos showing how well the tools work and how EASY it is to do projects.

I've got a question:

Would YOU like to VOTE on what projects you'd like to see me do in the videos?

CLICK HERE and just answer the simple question.

My Clogged Main Drain

Remember on Tuesday when I told you I had to deal with a sewer clog in my own home?

CLICK HERE to read the story. I revised a column that was a PERFECT FIT.

That's enough for today.

Seriously, get a copy of Roofing Ripoff.

You have NOTHING TO RISK - well you really do.

If you DON'T buy a copy, you could LOSE THOUSANDS OF DOLLARS.

Tim Carter
Founder - www.AsktheBuilder.com

Do It Right, Not Over!

April 11, 2017 AsktheBuilder Newsletter

Roofing Ripoff Book

If you're a new subscriber to this newsletter in the past week, please understand this issue could be one of the most unusual I've ever sent.

I've been waiting for this day now for 15 months. Today you can purchase my Roofing Ripoff book.

It was ready yesterday, but a major building drain clog under my basement floor prevented me from uploading the book and getting this announcement to you. I'll share the story about the clog, how I fixed it, and what caused it, later this week.

A Serendipitous Moment

Yesterday morning, my sister texted me saying, "Did you realize if Dad were still alive, he'd be 100 today?"

Wow.

My Dad's 100th birthday the same day (this is before I found out about the sewer clog) as I release what I feel will become my legacy work.

I so wish he could be here to see it, as well as my Mom. We had to send both back to Heaven years ago.

I mention both my mom and dad in the book acknowledgements. The freedom I was granted early in life helped get me farther along faster.

Book Formats

There will be three formats for the book. Two are NOW AVAILABLE.

PDF format - electronic (Available NOW)
Amazon Kindle format (Available NOW)
Paperback - available on or before May 15, 2017, if all goes well

WHO NEEDS The Book?

If you answer YES to any of the following questions, you NEED to read Roofing Ripoff now:

  • Is your asphalt shingle roof ten or more years old and still in good shape?
  • Is your asphalt shingle roof ten or less years old and in very good shape?
  • Is your asphalt shingle roof new in the last three years?
  • Are you getting ready to install a new asphalt shingle roof?

Why?

Because in Chapter 11, I share with you a MAJOR DISCOVERY how you can extend the life of your asphalt shingles MANY YEARS.

Do you understand that?

If you have an EXISTING ROOF that's in GOOD SHAPE, you need to read about the discovery!!!!!

FREE CHAPTERS

CLICK HERE to read the first three chapters for FREE.

Price

Roofing Ripoff is going to save you thousands of dollars. There's no doubt about it.

The RETAIL price of the book, and price of the paperback, is $24.95.

The two electronic formats are on SALE NOW for $19.95.

I guarantee you that you'll feel it's worth every penny once you read what's going on and how you can EXTEND the LIFE of your new or existing roof.

CLICK HERE to order the PDF format.

CLICK HERE to order the Amazon Kindle version.

Questions / Confused?

Do you have QUESTIONS about the book? Are you unsure if you really need it?

JUST ASK ME.

That's enough for today.

I'm SO EXCITED to hear what you think of the book. Please write to me after you read it with your thoughts so I can share them.

IMPORTANT NOTE: If you purchase an Amazon Kindle version and feel the book is worthy of 5 STARS, please consider writing a review.

That's enough for today.

I'll have a regular newsletter for you on Friday, I hope!

I don't know if things are going to be very normal after today. When you read Roofing Ripoff, you'll understand why.

Tim Carter
Founder - www.AsktheBuilder.com

Do It Right, Not Over!

Wood Deck Resurfacing Ideas

Wood Deck Resurfacing

This deck in West Virginia gets punishing sunlight all day. Deck sealers are no match for the sun. Look at how this deck sealer is starting to peel. CLICK HERE to purchase my TEST RESULTS about the BEST DECK SEALER. (C) Copyright 2017 Tim Carter

Wood Deck Resurfacing Ideas and TIPS

  • Exotic hardwoods decking is hard to install and seal
  • Sun and water ruin traditional treated lumber
  • WATCH deck cleaning video below for non-toxic deck cleaner.
  • Composite decking and railing is what I now have
  • CLICK HERE to Get Tim's FREE & FUNNY Newsletter!

DEAR TIM: My wood deck sits in the sun all day with no shade. It’s now treated lumber and requires sealing every other year. I’ve tried lots of different sealers all with the same results.

I’m tired of all the work and I need some wood deck resurfacing ideas. I wonder if you have any experience with the exotic hardwoods like Tigerwood.

My husband and I are also thinking about composite decking, but it’s quite pricey. What has been your experience with wood decks and what would you do if you were me? Diane K., Morgantown, WV

DEAR DIANE: You’re in the same boat as many homeowners. In fact, I was in this boat up until a year ago. Allow me to share forty years of experience in just one thousand words. Keep in mind this column was written for newspapers and they impose a word limit on my work.

Hardwood Decks Are Hardest

I’ve built countless wood decks. They’ve been all sizes, shapes and I’ve used all sorts of different wood species.

The exotic hardwoods are some of the hardest to install because many of them are so hard and dense, you have to pre-drill all the fastener holes. Keep that in mind if you do decide to use that material. By all means get a sample piece and play with it to see how hard it is to install.

CLICK HERE to get FREE & FAST BIDS from local deck cleaning & sealing contractors if you're tired of doing all the work.

Treated Lumber Rots & Cracks

My guess is a vast majority of wood decks that are out there have treated wood decking and railing systems. Treated wood currently is the least expensive material to use.

The downside is that treated lumber may resist wood rot and insect infestation, but it can’t resist the punishing effects of the ultraviolet (UV) light of the sun. What’s more, wood is hygroscopic and it expands and contracts with respect to moisture content.

UV Light Destroys Treated Lumber

If you don’t seal treated lumber with some coating, the UV light will destroy the natural color pigments and the lignin that bonds the wood fibers together. Just as our skin needs sunscreen to prevent sunburn, so does wood.

Solid Color Stain = Cheap Paint & Peels

Paint is perhaps the best UV protector for treated lumber, but it peels easily. Paint is a film that lays on top of the wood. Many solid-color stains are really paint, so don’t fall for that marketing trick. If you’ve ever had a painted deck that’s peeled, you only make that mistake one time as it’s a nightmare to refinish and re-coat.

Semi-Transparent Sealers = Film Formers

Many deck sealers have the consistency of traditional penetrating wood stains and one would think they soak into the wood fibers. They do soak in, but I’ve discovered that many of them are also film formers.

Some of these stains leave a thin hard resin coating on the top of the wood and this thin layer tends to peel in two or three years. If you do stain, it’s best to get one with a medium colored pigment. The pigment particles sacrifice themselves to the UV light before it gets to the wood fibers.

I did my own independent test of major brand deck sealers. CLICK HERE to see Before and After photos of the test results.

wood deck resurfacing

This deck in West Virginia gets punishing sunlight all day. Moonlight hits it on some nights. (C) Copyright 2017 Tim Carter

Water Creates Cracks

Water also can destroy treated lumber over time. This is why you need to keep treated lumber sealed so water can’t penetrate into it. If water is allowed to soak into lumber, it causes the wood to swell. When the wood dries out the wood shrinks. This movement creates tiny checking cracks in the lumber.

The next time it rains, the water can soak in deeper using the cracks as a pathway. The expansion and contraction movement is amplified because more of the wood is expanding and contracting. The cracks get wider and deeper. Eventually the treated lumber starts to resemble a fifty-year-old fishing pier.

CLICK HERE to get FREE & FAST BIDS from local deck cleaning & sealing contractors if you're tired of doing all the work.

UV Light Destroys Sealers

The issue is even the best deck sealing products don’t hold up well against the harsh UV light. I did my own extensive testing of many major brands of deck sealers about four years ago. Some failed within ninety days. CLICK HERE to purchase my deck sealer test results.

The best one lasted two years before it finally started to peel a little bit. By the end of year three, the best performing sealer looked bad enough that it was time to strip it and start over. It’s a huge amount of work to strip or sand a wood deck and reseal it.

Deck Cleaning Video

NEVER pressure wash a wood deck. It DESTROYS the light-colored spring wood. Use Stain Solver - a certified organic oxygen bleach - to clean the wood. Watch this video about how to clean a wood deck.

I Switched To Composite

I believe this is why many homeowners have gravitated to the composite decking and railing systems. These materials have been around for almost two decades at this point. As with all materials, the first and second generations were not the best. Sometimes it takes a few attempts until you finally get it right.

I believe a few of the composite decking manufacturers have got it right. Last year I was tired of my decking and failing wood-railing system. It needed work and I had gotten to the point that I no longer wanted to deal with periodic sealing.

wood deck resurfacing

This deck in West Virginia gets punishing sunlight all day. (C) Copyright 2017 Tim Carter

I went with a major brand decking that offered a capped system. I know you'll ask the brand and it was Trex Transcend.

CLICK HERE to get FREE & FAST BIDS from local deck contractors who will REPLACE your wood deck with a COMPOSITE one like I have.

The core of my composite decking is a blend of wood fiber and plastic, but the top wear surface and the edges are capped with a virgin vinyl that’s both embossed and has coloration to simulate real wood graining.

My wife is a very harsh critic of anything synthetic in building products. She’s never liked any of the composite decking materials until she saw this one.

tim carter trex deck

This is the deck on my own home. The upper deck was original with the house and the lower deck I built the summer of 2016. The original upper deck had Generation 1 Trex on it that looked great for 15 years. Copyright 2017 Tim Carter

The samples in your hand or small mock-up decks at the lumberyards don’t look that appealing, but once the product is installed on the deck and you look across it, it really does look very realistic. My wife approves of the composite we have and loves to sit on our deck in the afternoon.

Composite Railings Easy To Install

My new railing system is also care-free and it was easy to install. I’d recommend that you take a serious look at all the top-of-the-line composite deck and railing products and see which one appeals to you.

You’ll not regret switching over. Be sure you select one that has a hidden fastening system. I don’t have any visible fastener holes anywhere on my deck or railing.

CLICK HERE to get FREE & FAST BIDS from local deck contractors who will REPLACE your wood deck with a COMPOSITE one like I have.

Column 1191

Paint Your Aluminum Siding

Painting Your Aluminum Siding

UPDATE:  New information regarding painting aluminum has been added to this column. Be sure to check the Author's Notes following the article.

The first room addition I ever built was on the west side of Cincinnati. It was a master bedroom expansion.

The existing house had aluminum siding. I was able to get the same siding, however the color didn't match the existing siding. The owner said it wasn't a problem. He suggested that I give him a bid to paint the entire house and the new addition.

I did some homework and found out that you could successfully paint aluminum siding. The job turned out just fine. Two things played an important role: choosing the right paint and getting the siding ready for paint.

Free & Fast Bids

CLICK HERE to get FREE & FAST BIDS from local painters who can paint your aluminum siding.

Metal + Paint = BINGO!

Metal is a wonderful surface to paint. Unlike wood, it moves very little. Think about all the metal things you've seen painted:

  • cars and truck
  • lawnmowers
  • wheelbarrows
  • tools
  • traffic signs

Rarely will you see paint peel from these things unless they're poorly maintained. Paint loves to stick to metal.

Wood Is Hygroscopic

Wood offers tremendous challenges. It can and does absorb water. It's hygroscopic meaning it expands and contracts in response to the amount of moisture in the wood.

The wood itself can change its size dramatically causing the paint film to detach. Metals, including aluminum, do not pose these problems. Metals don't absorb water and they don't expand and contract to the degree wood does. They are a perfect surface for paint.

Why Paint Fades

OK, OK, so the salesman lied. He told you the aluminum siding would be "...maintenance free. You'll never have to...."

Guess what? He was wrong! All paints fade over time.

Sunlight, acid rain, and air breakdown the clear resins that surround the pigment or color particles. This causes the finish to become dull. It also permits the soft pigment particles to be released from the film.

That is what is causing those white stains on your brick!

Not All Paints Equal

Some paints will fade before others. This fading is a function of the quality and quantity of resin in the paint.

The resin is the most important ingredient in paint. It's the glue that allows the paint to stick to things and itself.

There are different types of resin. Two of the most popular are vinyl acetate and acrylic. Acrylic resins cost twice as much as vinyl acetate. They also last longer and are more flexible.

Urethane The Best

In my opinion, the best exterior paints are those that contain urethane resins. You know how sticky urethane is if you've ever applied it to wood. It's almost impossible to remove.

The same urethane resin in paint makes the paint really hold onto anything it touches. CLICK HERE to get a great exterior paint that contains urethane resin.

Here's a great porch paint you can tint to any color you want. CLICK THE IMAGE TO BUY IT NOW.

CLICK HERE to get FREE & FAST BIDS from local painters who can paint your aluminum siding.

Companion Articles:  Aluminum Gutters Can Be Painted, Aluminum Siding Painting Tips, Aluminum Siding Paint Manufacturers, Aluminum Siding - Paint and Primer Tips

Author's Notes: The following updated information was received from the Paint Quality Institute.  Debbie Zimmer addresses ammonia in latex paints and the resulting bubbling.

"Hi Tim,

Thanks so much for your questions and comments.  Regarding ammonia in latex paints, it is so low today that the off gassing (resulting in bubbling) is really not a factor.
 
Here are a few detailed points to consider:
 
1. Bare Aluminum: forms a strong oxide layer which is easy to stick to and is relatively inert to ammonia. Some folks confuse ammonia with acid. Yes --- acid will generate some hydrogen gas but there should not be a reaction with ammonia.
 
2. All Aluminum Siding is coated. This again generally results in a surface that is easy to stick to but for all intents and purposes, relatively inert to water-based paints. Even under poor conditions, incidental exposure to Aluminum should not be a problem because of above (1).
 
Also, on occasion, we do speak about oxygen bleach but typically use the more common (common to homeowners) "bleach" term.  Perhaps we should use oxygen bleach more often.  We don't use brand names (in any of our materials), such as Clorox.
 
Tim, I'm really glad you asked the questions --- it helps us make our educational information stronger.
 
If you are ever in the Philadelphia, PA area, I would love to take you on a tour of our PQI facilities --- we have over 30,000 paint panels on exposure (a few dating back to the '50's) and 1000's with the most recent and forward looking technologies. In addition, our "farm" contains over 200 different surfaces and substrates (painted/not painted) on exposure as well.
 
Thanks again,"
Debbie Zimmer
PQI Director of Communications and Alliances
Dow Coating Materials, North America
The Dow Chemical Company

Updated: April - 2017

CLICK HERE to get FREE & FAST BIDS from local painters who can paint your aluminum siding.

Column B274

Clogged Drain Hack

clogged drain

Clogged Drain Hack TIPS

  • Some pro drain cleaning companies offer no-clog warranties
  • Older drain pipes can have ROUGH interior surfaces
  • Five gallons of water in a toilet bowl FAST can remove clog
  • Prevent clogs by putting lots of water through pipes fast
  • CLICK HERE to Get Tim's FREE & FUNNY Newsletter!

DEAR TIM: I love my plumber but I am getting sick and tired of paying him to unclog my drains. Do all household drain lines clog?

Do plungers really work that well? Are there things I can do to prevent clogs? Sandy R., Hoquiam, WA

DEAR SANDY: Calling a plumber or a drain cleaning company each time you get a clog can indeed be expensive.

Some Pros Offer Warranties!

But keep in mind that some plumbers and drain cleaning companies offer a limited warranty on their work. If a drain stops up again within a specific time period, you do not have to pay to have them come back out.

Get this warranty in writing if you do find that you need professional help in the future.

Free & Fast BIDS

CLICK HERE to get FREE & FAST BIDS from local drain clearing companies and plumbers. Be SURE to ask them about their written warranties!

Every drain line in every house is susceptible to clogging. Certain drain-pipe materials, plumbing codes and excellent plumbing practices can keep clogs to a minimum, but few homeowners ever have the opportunity to specify the piping material and possess the knowledge to determine if a plumbing drainage system has been installed to the highest levels of workmanship.

PVC Is Smooth

PVC plastic and copper drain lines have very smooth interior surfaces. These are least likely to clog. But they can and do clog!

Not too long ago I had to clear a clog in my own home. The building drain pipe under my basement floor is PVC. 

The source of the clog was a new low-flush toilet. I'm not a fan of these. This particular toilet only sends two quarts of water down the drain if you flip the flush handle.

To get the entire 1.6 gallons of water out of the toilet tank, you have to hold down the flush handle for five seconds. That's a very poor design because the average homeowner would never know to do that, nor want to stand there holding down the flush handle.

My son and wife were not doing that and about thirty feet away from the toilet, a giant buildup of toilet paper clogged the drain.

It took a while, about one year, for the drain line to completely get clogged with a mass of toilet paper and other solid you-know-what.

I was able to get it cleared with ease using a 50-foot hand-powered drain cleaning snake. Once I put the snake in the clean out opening I had the clog removed in about ten seconds.

Here's the exact simple drain cleaning snake I used to clear my clog. CLICK THE IMAGE NOW TO HAVE THIS DELIVERED TO YOUR HOME.

Galvanized & Cast Iron Rougher

Older homes often have drain pipes made with galvanized or cast iron pipe. Smaller diameter drain lines made with these materials are prone to blockages.

The galvanized and cast iron drain lines over time begin to corrode from the inside out. A scale of rust and corrosion creates a very rough inner surface that helps to grab hair, toothpaste, soap film, etc. Soon the inner diameter of the drain pipes begins to get smaller.

I have seen some 1.5 inch inner diameter drain lines packed solid with rust, scale and black organic goop and biofilm.

5-Gallon Bucket HACK

Many common toilet clogs can be removed with just a five-gallon bucket of water. Some clogs in toilets allow water to slowly get past the clog. You'll flush the toilet, the water will rise to the top of the bowl and either overflow - a HUGE MESS - or it will stop just in time.

Then ten minutes later you'll notice the water level in the bowl has magically dropped to the normal level. But don't be fooled, the clog could still be there because the water seeps past the toilet paper in the clog.

Force = Mass X Acceleration

Ninety percent of the time if you have a clog like this, you can free it with five gallons of water. Fill a bucket and hold it up about 18 inches from the toilet bowl.

Pour it as FAST AS POSSIBLE into the bowl and stop pouring just as the water rises to the rim of the bowl. The weight of the water falling that distance and lots of it at once put lots of pressure against the clog. In almost all cases, it's enough to unclog the toilet. No need for the messy plunger!

Plungers Work Well

Plungers do work very well if you use them properly. They should be the first tool one uses when a clog happens. It's important that the bottom of the plunger make full contact with the fixture so the pressure you create when plunging is forced down the pipe.

If the plunger seal is inadequate all the pressure will just be in the sink or toilet and wasted.

Remove Stopper From Tubs

When you are working on a tub or bathroom sink drain, you tend to get the best results if you remove the stopper mechanism from the drain inlet. To remove a sink stopper, you must remove the control rod that connects to the stopper and sticks out the back of the pipe that exits the bottom of the sink.

Reinstall the control rod and nut into the pipe after the stopper has been pulled up from the sink. Tub drain stoppers typically are attached to the lever on the overflow outlet. Remove the two screws at this location and pull up to remove the lever and the tub stopper.

Hair & Goop

Often hair and goop will be on the end of the control rod and the bottom of the stopper. This alone may be the source of the problem. If the drain is still clogged, take a wet wash rag and hold it over the drain overflow holes at the top front edge of the sink.

Run water so that you have about two inches of water in the sink, hold the rag tightly against the overflow holes and push hard down on the plunger two or three times. Remove the plunger to see if the clog was dislodged.

If you're lucky, you will experience instant improvement. Water will flow readily from the sink or tub. If plunging does no good, it may be time to try some of the off-the-shelf drain cleaners and/or call in a professional.

CLICK HERE to get FREE & FAST BIDS from local drain clearing companies and plumbers. Be SURE to ask them about their written warranties!

Clog Prevention

You can prevent clogged drains by performing some very simple tasks on a routine basis. Check the sink and tub stoppers on a quarterly basis for hair and biofim buildup.

It is easy to remove and replace these items. Once a week, fill each sink in your home to the brim and then pull up the stopper. The volume and weight of the water will fill the drain pipe completely with water. It will do a good job of flushing the drain line.

Once a week pour five gallons of water as fast as possible into a toilet to give the drain line a great clean out.

Three-Month Huge Flush

Once every three months fill every sink and tub in the house with water. With the help of friends or family members simultaneously pull all of the drain stoppers up and flush all toilets in the house. This large volume of water will help flush out the larger sized drain stacks and underground building drains.

Chlorine Bleach - Great Drain Cleaner

If your home is connected to a municipal sewage plant, you can really help your drain lines if you pour liquid chlorine bleach into the fixture traps once a month. Pour 12 ounces of bleach into each sink and tub before you go to bed.

Pour it carefully into the drain of stainless steel kitchen sinks. Chlorine bleach that lays on stainless steel can cause permanent stains. The chlorine bleach that sits in the trap and saturates partially clogged drain lines works to soften biofilm and debris overnight. When you use the fixtures the next day, water running through the drain lines carries the debris to the sewer.

CLICK HERE to get FREE & FAST BIDS from local drain clearing companies and plumbers. Be SURE to ask them about their written warranties!

Column 454

April 9, 2017 AsktheBuilder Newsletter

roofing ripoff

Roofing Ripoff Book

If you're a new subscriber in the past few days, this is a very unusual newsletter. Don't click the Unsubscribe link just yet!

I've been waiting for fifteen months to send this announcement.

During all that time, I've had a few days filled with fear and other days of elation. It's been a roller coaster ride to be sure.

I should have kept a journal, but I didn't.

My long-awaited Roofing Ripoff book is finished and within days you'll be able to get your hands on it.

Friday afternoon my top-drawer libel attorney gave it the green light. Believe me, his fee was well worth it because my book is about to take on the multi-billion dollar USA asphalt-shingle industry.

It's a disruptive book. Very disruptive.

If you're old enough to remember Ralph Nader's Unsafe at Any Speed book that made him a household name, then you'll appreciate the fury I'm about to encounter.

He took on the USA automotive industry and deep-sixed the Chevrolet Corvair made by the mighty and powerful General Motors.

His book brought the auto makers to their knees.

Billions of dollars are at stake here. Your dollars I might add.

You could be spending those dollars on something else or saving instead of buying more shingles.

You'll discover in Roofing Ripoff how to do an end-around on the entire asphalt shingle industry.

You'll not have to HOPE you can get a great product from them.

Never forget this. Hope is the emotion of last resort. You hope for things you can't control.

I show you how EASY it is to control the destiny and lifespan of your asphalt shingles!

You may be one who'll never ever again have to put on another roof. It's SO EXCITING to be able to share this with you!

"I'm All In"

When you decide to go up against giant companies that have unlimited legal resources with stories and facts they'd probably prefer stay buried, you have to be brave.

Kathy has supported me the entire way, and we both know the ultimate defense in a libel lawsuit are facts.

That's why were all in with everything we own in case we have to do battle with one or more of the shingle manufacturers.

Roofing Ripoff is filled with stories, facts and photographs that are going to both shock and awe you.

Believe me, there's going to be wailing and gnashing of teeth in quite a few big-company conference rooms in the next few days.

It's going to be fascinating to see how the asphalt shingle companies react. But as Kenny Chesney said in his hit song, "Only time will tell, but it ain't talkin'."

Free Sample Chapters!

How would you like to read the first three chapters for FREE?

Yeah, I thought you'd like that.

But before you do, here are the Roofing Ripoff FAQs:

When will the COMPLETE BOOK be available?

You should get an email from me on Tuesday. At that time you'll be able to purchase an INSTANT DOWNLOAD .pdf version that will look like the free chapters you can see below.

Will the book be available as an Amazon Kindle book?

Yes. I expect Amazon will have cleared it and made available by April 14, 2017.

Will the book be available as a paperback?

Yes. I hope to have all the professional formatting completed and uploaded to Amazon Create Space on or before April 30, 2017. Expect the paperback to be available by May 15, 2017.

CLICK HERE to get a FREE Instant Download of the first three chapters of Roofing Ripoff.

If the download is SLOW, it could be because TOO MANY PEOPLE are trying to get it at one time. Be patient and TRY MULTIPLE TIMES in a few hours.

That's enough for today.

I suggest you download the FREE three chapters, read them and ponder how the rest of the book will turn out.

Chapter Ten is going to infuriate you. I'll warn you now.

In Chapter Eleven, I share with you my HUGE DISCOVERY!!!

Look at its title in the Table of Contents.

You're going to be able to save your new, newer, or older asphalt single roof that's still in great shape!

WOO HOO!!!!

Tim Carter
Founder - www.AsktheBuilder.com

Do It Right, Not Over!

April 7, 2017 AsktheBuilder Newsletter

Happy Friday!

I've got a boatload of new tips to share and great news about my Roofing Ripoff book below.

I also need your input on a very important four-question survey.

The weather forecasters say Spring is going to show up here in New Hampshire. Sunny days and warm temperatures are supposed to start happening next Monday.

Not a day too soon!!!

Let's get into some good stuff, enough about snow, ice and chilly weather!

Roofing Ripoff Book News

Two hours ago, I sent the final copy of my book to my high-priced libel attorney for his final review.

Today all of the components you need to get to PROTECT your existing asphalt shingle roof, or the new one you're about to install, should be at the fulfillment center.

I've not been able to release the book until I had ready for you WHAT YOU NEED to protect your investment.

This means early next week you should be able to get the book in electronic format. It will be available in paperback, but that's a few weeks out.

If the attorney gives me a thumbs up today, and it's possible, I will have a few FREE sample chapters for you on Sunday.

I thought this day would never come, but it's been worth the wait.

If you're a new subscriber and wonder what this is all about, go to the official Roofing Ripoff website. CLICK HERE.

Cracked Concrete Block Foundation Repair

Do you know someone who has a concrete block foundation?

They often develop a horizontal crack about halfway up the wall.


Do you want to know what all the colored lines and ovals represent? I thought so!

CLICK HERE now and I'll bet you discover something new.

Guest Post Request

Yesterday afternoon I received an email from Ms. Sarah Walsh who works for a company I've never heard of - Web Talent Marketing. They say they're in Lancaster, PA.

I get an email like Sarah's about once or twice a month.

Sarah was probing to see if I accepted guest posts from companies.

A guest or sponsored post is one where the content is created by someone other than the owner of the website. In this case, Armstrong Flooring was going to create some column about flooring. They just wanted me to place it on my website HOPING that you'd see it.

Websites like AsktheBuilder.com often charge money to do this. Think of it as charging rent for space in a shopping mall.

MY POLICY at AsktheBuilder.com has always been that I DO NOT accept guest posts.

I entered into a back-and-forth discussion probing with Sarah as to what Armstrong was trying to accomplish.

Here was Sarah's reply about ninety minutes ago:

"I reach out to publications on behalf of Armstrong Flooring, but they create the guest content for publications like yours. As for a post buried deep in web search, our main goal of this relationship and post is to connect with your readers, not the entirety of the internet at once. Please let me know if you have additional questions!"

I responded back to Sarah telling her I felt that very few people have the time to just wander around to websites to see what's new.

What's more, I shared with Sarah that I felt folks like you discounted this content.

Let's see if I'm right. If not, I'll GLADLY admit my error.

Please take this SHORT four-question survey and let's see how you feel about surfing the web and this new trend of guest and sponsored posts at websites!

CLICK HERE to take the survey.

I'll SHARE THE RESULTS in a few days.

Window Seats

Have you ever wanted a window seat? They can be very comfortable and they add a very neat cool factor to most homes.

If you're building new, you should absolutely consider adding alcoves where you can put one or two in.

CLICK HERE to see a window seat I created here at my house in just TWO DAYS with a few simple tools.

The best part is I share HOW to create a window seat with virtually NO CARPENTRY SKILLS. You can buy the parts already preassembled!!!

DIY Wood Rot Treatment - Preventative Liquid!

How would you like to treat lumber to prevent wood rot?

You can't always get treated lumber like you want it.

Guess what? I share a magic liquid you can buy that will work really really well!!

CLUE: Cutty Sark and Thermopylae

CLICK HERE to see what it is.

Replacement Window Time?

Have you decided this is the year you're going to bite the bullet and get new windows?

If so, you REALLY can get taken by a salesperson.

Would you like to know what the BEST WINDOWS are? I thought so.

CLICK HERE to see what replacement windows I'd buy.

P.S. I give you links in the column so you can get FREE & FAST BIDS from local window companies that can get you the best windows!!

Maggie's Fireplace

Maggie is a long-time subscriber to this newsletter. I hope to meet her one day. She lives in North Carolina.

About two weeks ago, she reached out to me asking the best way to clean her interior fireplace.

She was sick of the way it looked and wanted to really brighten the room.

What do you think she was going to do?

Wait until you see the AMAZING PHOTOS she took of the before, during and after!!

CLICK HERE to see what Maggie did and then consider doing a project of your own.

I'd really appreciate it if you'd then SEND me your photos and comments!

That's enough for today.

Are you as excited as I am about the Roofing Ripoff book?

Tim Carter
Founder - www.AsktheBuilder.com

Do It Right, Not Over!

Cracked Block Foundation Repair

Block foundation repair is more common than most people realize. Concrete block foundations that are about 8-feet tall have a history of developing horizontal cracks about 4 feet up from the floor. You rarely see this happen in cast or poured concrete foundation walls.

Concrete Block = Hollow Walls

It's important to realize the reason the cracks develop. Rarely are concrete block walls filled solid. 

The average concrete block that measures 8 inches high, 8 inches thick and 16 inches long has two giant void spaces inside the block. There's a center web that connects the two flat faces you see on either side of the block. Two additional webs are at each end with ears that end up creating a narrow void space between two touching blocks.

block foundation repair

You can see the hollow cores of concrete block under the horizontal PVC drain pipe. It's a far cry from a poured concrete wall! Copyright 2017 Tim Carter

Another key point is the only thing holding the block together is a thin 3/8-inch mortar joint.

Mortar Has Strength Issues

While the concrete block may have been made well and is very strong if cured and there's enough Portland cement in the mix, you can't say the same thing for the mortar the block masons used.

The mortar could have these defects:

  • too much sand was used in the mix
  • mortar partially set up before being used
  • mortar was re-tempered by adding water weakening it
  • mortar froze before it cured

The bottom line is the mortar is the weakest link and you only have a narrow 1-inch strip of it to resist horizontal pressure from the soil pressing against the wall.

If you’re interested in learning more about cost estimates for foundation repair I have an article here.

Related Links

Concrete Block Basics

Repair Crumbling Concrete Block

Free & Fast Bids

CLICK HERE to get FREE & FAST BIDS from local concrete block contractors who can do the repair I show in this column.

Stronger Poured Walls

A cast or poured concrete foundation wall is solid. It's usually 8 inches thick. It takes far more horizontal pressure to crack or snap a wall like this.

To repair a hollow concrete block foundation, one of your options is to transform it into a solid wall every 24 inches on center.

block foundation repair

Here's a typical block foundation wall in the early stages of failure. The red arrow is pointing at a crack in the horizontal bed mortar joint between two courses of block. Pressure on the other side of the wall from the soil is pushing the wall inwards. The result is a bending force much as you'd snap a twig or thin saltine cracker in two. Copyright 2017 Tim Carter

Block Foundation Repair Using Peas

The easiest thing to do is to fill the void spaces with  concrete when a new block foundation is being built. In addition the concrete must contain small stones no bigger than a green pea.

This gravel is commonly called pea gravel for the obvious reason. It could have been called jaw breaker concrete too as that hard candy I remember as a kid was about the size of a larger green pea. But I digress.

It's easy to fill the voids and it doesn't take long if you can spot a ready mix concrete truck around the foundation. If you can do this building new, you want to fill all the void spaces with the pea gravel concrete.

Doing this, your concrete block wall now is as close as possible to a poured or cast concrete wall.

Steel Rebar In The Block Cores

Insert a 1/2-inch piece of rebar down into the wet concrete every 24 inches on center to get the strongest possible wall. It's best if this steel has a connection to the poured concrete footing. This would require steel rods being installed in the footing when it was poured.

It takes great skill to put these steel rods exactly where they'll end up in the center of the concrete block void spaces. The steel rods project up about 2 feet from the top of the footing. The rods that are installed in the block overlap these shorter rods.

CLICK HERE to get FREE & FAST BIDS from local concrete block contractors who can do the repair I show in this column.

Repairing an Existing Block Wall

Do the same thing to repair an existing concrete block wall. The problem is it's much harder to accomplish because the top of the block is covered by the house structure.

Block foundation repair starts on the outside. Every 24 inches you have to break into the concrete block to expose the void spaces between the webbing.

You then create some sort of funnel to pour the pea gravel concrete into this hole. It's not easy. You should also install the steel rod, but you may find it far easier to use a #3 bar that's only 3/8-inch in diameter. It will be easier to push down into the void spaces at an angle.


block foundation repair

There's lots going on in this photo. The red lines represent where you'll find the hollow cores in regular block. The blue ovals are where you'd break into the block on the outside so you can fill the voids with the pea-gravel concrete. I only put in two ovals. You'd need to crack into the block every 24 inches. The dashed yellow lines are the most common locations where you'd see the foundation start to fail - the horizontal bed mortar joints between 3 and 4-feet up from the basement floor. Copyright 2017 Tim Carter

Junior Steel Beams

There's another method engineers use to repair bowed block foundation walls. You can install vertical small I-beams that support the bowed block walls.

You need to break into the concrete slab in the basement to hold the bottom of the beam. The top of the beam is held in place by a small angle iron that's bolted to the underside of the floor joists.

Soil Anchors

A point often overlooked are giant steel plates inside the foundation. This system resembles a massive washer you might put behind the head of a bolt.

A giant steel rod passes through the wall and is buried in the soil outside. The end of the steel rod indoors has threads on it.

The long massive bolt connects to a massive steel anchor in the ground. Tighten the nut on the end of the rod to pull the block tighter against the soil outdoors

Watch this video to see how soil anchors are installed.


These work best if you excavate the soil outside the foundation wall and put in the anchors. There's less pressure against the anchors and plates if you do this.

If you go to all this work, you may as well clean off the block wall, put in excellent waterproofing like Tuf-n-Dri as well as a great foundation drain tile.

CLICK HERE to get FREE & FAST BIDS from local concrete block contractors who can do the repair I show in this column.

Low E Glass Benefits

Low-E Glass Benefits TIPS

DEAR TIM: My husband and I will be building a new home soon. Our windows are available with optional low-E glass. Just what is low E glass? Does it really work?

Are there different types? Will it block ultraviolet (UV) light? Is the argon gas necessary? Do you think it is worth the extra money? E. R.

DEAR E. R.: Window glass was revolutionized in the 1970's.

Single Became Double

Insulated glass (two or more pieces of glass with a dead air space between) made its debut in the early 70's. Prior to this almost all window glass was a single pane.

Low-E Glass Next In Line

Low E glass was introduced in 1979. The E stands for emissivity. Low E glass works by reflecting heat back to its source. It does this by utilizing an ultra thin metallic coating on or in the glass.

Among other things, sunlight contains visible light, UV light, and infrared (IR) light. Visible light enables us to see things. Ultraviolet light damages your skin, wood, fabrics, and causes colors to fade.

Free & Fast Bids

CLICK HERE to get FREE & FAST BIDS from local window companies that can install the BEST Low-E glass windows in your home.

IR = Infrared Bouncing Is Good

Infrared light is basically heat. Low E glass has the ability to allow visible light to pass while blocking certain amounts of UV light and IR light.

The infrared light in sunlight is powerful. When it strikes an object it heats it up. These objects can be your tile floors, furniture, sidewalks, patio furniture, etc. As these objects cool off, they emit a low powered form of IR light.

Cooler House In Summer / Warmer In Winter

Low E glass reflects this form of energy. In the summer this helps to keep your house cooler, as the heat from objects outside is kept outside. In the winter, all objects in your home are heated (by either the sun or your furnace). This heat is also bounced back into your house by the low E glass.

Hard & Soft Coat

There are two types of low E glass: hard coat and soft coat. Tin is applied directly to the molten glass to make hard coat low E glass. It is hard to scratch the tin off the glass. The soft coat process commonly involves the application of a thin layer of silver while the glass is in a vacuum.

This coating is delicate. Soft coat low E glass is always sandwiched with another piece of glass. It can also oxidize if exposed to air. Argon gas is sometimes used to prevent this oxidation. This gas also acts as an additional insulator.

CLICK HERE to get FREE & FAST BIDS from local window companies that can install the BEST Low-E glass windows in your home.

Low-E Glass Detector

If you need to test a window to see if it does have low-e glass, you're in luck. There are high-tech low-e glass detector tools that do this. Here's one:

Here's a low-e glass detector. CLICK THE IMAGE TO LEARN MORE OR BUY IT.

Helps Reduce Condensation

Low E glass helps to reduce condensation on glass. The inside surface temperature of the glass is warmer.

The differences can be dramatic. Imagine a cold night with an outside temperature of 0 degrees and a 15 mph wind.

The inside temperature of a single pane window would be approximately 26 degrees. Regular double pane glass might register 35 degrees. Hard coat low E glass would be very near 49 degrees. And weighing in at champ would be soft coat low E glass at 62 degrees.

Low-E Film

Some glass manufacturers have gone even farther. They have suspended thin, low E transparent films in between pieces of glass. This system has excellent performance characteristics. Some of these films can block 99.5 percent of UV light. Some boast an insulating value twice that of soft coat low E glass.

Low E glass is worth the price, especially since houses tend to lose 25 percent of their heat through windows. Purchase the highest quality low-E glass you can afford.

CLICK HERE to get FREE & FAST BIDS from local window companies that can install the BEST Low-E glass windows in your home.

Column 097