Roof Turbine Vents

roof vent

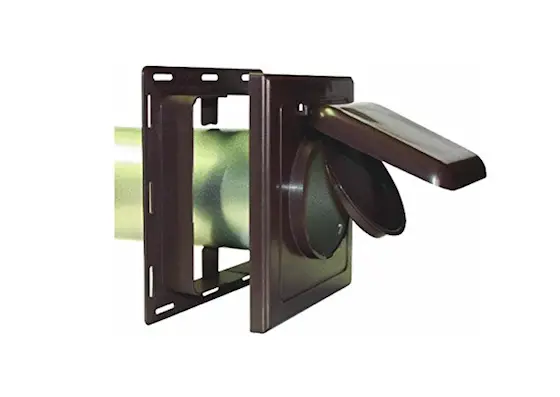
This is my favorite roof vent and my FAVORITE brand. It's Made in the USA! These are cave-man simple to install. Watch my video below. SAME procedure for this vent as the bath fan flashing. CLICK THE IMAGE NOW TO BUY THIS TURBINE VENT.

Roof Turbine Vent TIPS

DEAR TIM: My home has two spinning turbine vents. I have been told by several people that it is a good idea to stuff insulation in these during the winter months so that warm air is not sucked out of my attic space. Is this good advice? Are these turbine vents really effective? I don't see many of them on my neighbors' roofs so I wonder if I should remove them. Kevin M., Canal Winchester, OH

DEAR KEVIN: Don't touch those vents! They are splendid ventilation devices. In fact, I installed these same vents over 25 years ago on the second home I owned. They were hardworking devices that Mother Nature paid to operate. In fact, the same vents are still in place on the home and each time the slightest breeze blows, they do a great job of pulling air from the attic space.

Turbines Work For FREE

A turbine vent is a passive ventilation device. The popular ridge and soffit ventilation systems and the traditional metal pot vents are also passive ventilation systems.

A turbine vent spins with the slightest breeze. As soon as it starts to spin, it vacuums air out of your attic. The faster it spins, the more air it exhausts.


I'd put three or four on a roof to really have a good chance at cooling an attic on a hot summer day.

In contrast, an active ventilation device might be an electric-powered whole-house fan or a powered roof ventilator. Passive vents work for free and in almost all instances are silent.

Never Block Vent Holes

The last thing you want to do is stuff insulation in the vents. Ventilating attic spaces in winter months is often more important than venting them in summer.

Water vapor from the inside of a home drifts up and into an attic space. It does this 365/7/24. #HassleIfNotVented

Condensation HAZARD

If this water vapor is not quickly exhausted to the exterior atmosphere, it can often condense upon the cold roof framing members and the underside of the roof sheathing. It can get so bad that water can drip from the underside of the roof and when the temperature gets low enough, frost can actually form up inside the attic. Moisture conditions such as this can lead to wood rot and mold growth.

Thousands of CFM per Hour

Depending upon the diameter of the vents and the wind speed outdoors, the turbines can expel vast quantities of humid air before it becomes a problem. A small 12-inch-diameter turbine vent with a constant wind speed of 5 miles per hour (mph) can remove 347 cubic feet of air per minute (cfm) from the attic space.

A single 14-inch-diameter turbine vent that is subjected to 15 mph winds can expel up to 1,342 cfm of air! If the winds are still, the vents still allow air to drift up and out of the attic space, although not nearly as much.

Easy DIY Install

Watch my video below. The video shows a bathroom exhaust fan hood, not a turbine vent. But the method of installing a turbine vent is IDENTICAL.

If your roof is low slope and you can get up on it with ease, you can do the installation and save HUNDREDS of dollars.

Don't Steal Heat

It is also a myth that turbine vents remove warm air from attic spaces in winter months. If the air temperature in your attic space is very warm while it is cold outdoors, I maintain that you might have inadequate insulation and/or you are up in your attic on a bright sunny day where the radiant energy of the sun is heating the attic space.

It's best to check attic temperatures at night after the sun has gone down.  If your attic is well insulated, the actual temperature of the air inside your attic should be very close to the actual outdoor temperature.

AC Leaks

However, it's possible for turbine vents to pull conditioned air from the inside of your home. Modern building principles and most model building codes mandate that you have soffit ventilation vents that act as intake air locations.

As air is pulled from the attic space by the turbine vent, ridge vent, or even an electric-powered fan, the same amount of air must be allowed to flow into the attic space where the roof passes over the exterior walls of the home.

If there is not enough soffit air coming in, then the vents may create a partial vacuum in the attic space. To relieve this pressure, the vacuum may pull air from the inside of your home. This is not a good idea.

Aluminum = No Rust

If you decide to add more turbine vents to your roof, be sure to buy ones that are aluminum. These will not rust. In addition, pay attention to the maximum roof pitch that will work with the turbines.

The turbines are adjustable so that the spinning part is level even though the roof is slanted. Not all turbines will fit all roof pitches. The maximum roof pitch is almost always printed on the box label.

Lubricate the Bearings

Finally, be sure the ball bearings are permanently lubricated and sealed. Nothing is more bothersome in the middle of a windy night than a squeaky roof turbine!

Column 442

Installing Downspout Drain Lines

Install Downspout Drain Lines | Splash blocks don't do much to channel water away from the foundation. © 2022 Tim Carter

Install Downspout Drain Line TIPS

Ethel had a flooding disaster similar to Rich's issues. Check out the May 21, 2020 Newsletter to read her story.

DEAR TIM: I need to bury downspout drainage pipes in my yard before the yard is seeded. Where is the best place to put them and how deep should they be buried? What type of pipe do you like? How far away from the house should the pipes extend? A friend suggested using pop-up valves to help water the lawn and plants. Are those a good idea? Rich T., Jackson, MS

DEAR RICH: Stormwater drainage from roofs is a topic sometimes ignored by builders and homeowners alike. I can't tell you how many houses I see where the downspouts empty onto a splash block at the base of the foundation.

CLICK HERE to get FREE & FAST BIDS from local landscapers who can install downspout drain lines.

Often these homeowners are plagued with water seepage into basements or crawlspaces and it's no wonder. Heavy rainfall on an average-sized roof can produce hundreds and thousands of gallons of water that spew from the different downspouts located around the house.

Read another column of mine about downspout drain lines that shows you how much water can come off a roof in as moderate rainfall. You'll be AMAZED!

Harvest Rainwater

I regularly visit the Southwestern part of our great nation and am somewhat astonished that stormwater is not collected and stored by homeowners that live in this arid area. Laws passed decades ago often prevent homeowners from harvesting and storing water that falls on their land. River systems that feed into the Colorado River are affected by this because the water in this drainage basin eventually flows to and through the Hoover Dam.

The water held back by this dam is used to irrigate crops grown for many people in the USA. The water also makes electricity that's sent to tens of millions in southern California and other parts of the Southwest. It's a complex situation.

If you're permitted to collect and store rainwater, this water can be easily collected and piped to above or below ground plastic barrels or tanks. If the storage is above-ground and placed at the highest part of the lot, drip irrigation piping can be extended from the water storage.

The stored rainwater can then be used to help irrigate plants that otherwise would have enjoyed the drink before the house was built.

A simple phone call to your local town office will allow you to discover if you're permitted to harvest rainwater.

Why No Harvesting

The issue with harvesting rainwater is that it lowers the cubic-feet-per-minute of flow in the major rivers. If you collect the rainwater and then use it to water plants, drink and then put back into the earth via your septic system, that water never makes it into the river and then down to the large dams.

Contracts negotiated decades ago count on the water making it to the dams. The entire water-rights issue on private land in the Western USA is very complex. It's far beyond the scope of this column.

Urban Storm Sewers

Before you proceed with any work, you should check with your local government to see if they have special stormwater rules and regulations. Sometimes you have to pipe this water to special underground storm sewers or above-ground channels. Some local governments or agencies have no rules or regulations.

Trenching Tools

I usually dig a trench about 12 to 14 inches deep for downspout drain lines. The fastest way is to rent a trenching machine from a local tool rental.

If you have hard clay soil, or rocky soil, you can use an electric hand-held demolition hammer tool to dig a trench.

This is a great demolition hammer tool to chip out rotten concrete. If you've got a bigger job that's going to last a few days, you should BUY one, keep it in good shape and then SELL it on Craigslist once done. This will be cheaper than renting one. BUY THIS GREAT POWER TOOL right here. I own one just like it.

These electric demolition tools can be outfitted with chisel tips to crack larger rocks or clay spade shovel tips to carve through dry or damp clay soil.

This is a miniature shovel that fits on the end of the Bosch demolition hammer. It carves through clay soil like a hot knife through cold butter. BUY THIS FANTASTIC ACCESSORY right here.

If the lot is fairly flat, the pipes will get deeper the farther they extend as you should create 1/8 inch of fall for every foot the pipes run. The pipes should never be buried running parallel in the non-compacted fill dirt that is placed against the foundation.

CLICK HERE to get FREE & FAST BIDS from local landscapers who can install downspout drain lines.

Over time this dirt or soil settles and it can cause piping to break, kink or develop reverse, or backwards, slope.

Downspout piping can cross the un-compacted fill at a 90-degree angle so that it is placed in undisturbed soil. But as the soil adjacent to the house settles over time, this small length of piping needs to be checked and lifted to ensure it drains.

The pipe in the lower left of the photo is crossing an un-compacted fill around the basement of my house. I allowed the fill to settle for months and watered it before installing the downspout drain lines. The pipe is 4-inch SDR-35 and it intersects the other pipe farther in the yard using a standard wye fitting. (C) Copyright 2017 Tim Carter

SDR-35 Pipe And Fittings

A smooth 4-inch-diameter plastic SDR-35 sewer pipe is the material I prefer to use. This pipe has a smooth interior and closely resembles the thick-walled plastic piping used for interior house drain and vent piping.

Fittings can be permanently welded to the pipe with PVC cement. These fittings come in all types including the all-important Wye fitting where one pipe connects to another.

standard wye fitting

This is a standard Wye fitting. Note the red arrows that show you the direction of water flow through the fitting. BUY THIS WYE FITTING HERE NOW.

If you don't want to use glue, you can buy rubber-gasketed fittings. These fittings have a rubber o-ring incorporated into each end of the fitting.

gasketed 45-degree SDR-35 fitting

This is a gasketed 45-degree SDR-35 fitting. Note the black gasket. You use lots of these. All underground bends need to be 45 degrees. If you need to make a 90-degree bend underground, you should use two 45 bends and put a 1-foot piece of pipe in between them. You do this so it's easier to get a drain-cleaning snake through the pipe if it ever gets clogged. BUY THIS FITTING HERE now.

You need to keep the pipe clean of all sand and dirt when you work with gasketed fittings. You also need to use a coarse file to taper the cut ends of any pipe. If you don't file the ends, you'll never slide the pipe into the rubber gasket. You also lubricate the pipe and gasket with liquid dish soap.

If you install either type as directed, tree roots that create clog nightmares will never be able to enter the piping system. I am not a huge fan of the corrugated flexible black piping for downspouts. It can crush easily and it is nearly impossible to clean with professional drain cleaning equipment.

All underground bends in downspout piping should be made with 45 degree or smaller angle fittings. Ninety-degree angles underground become obstacles in the event the piping has to be cleared by a professional drain cleaning company.

The downspout drain line had to make a bend. In the lower part of the photo, the pipe you see connects to a 45-degree fitting. - © 2017 Tim Carter

You can use a 90-degree angle at the base of the downspout where the underground piping begins, as a drain cleaner can usually insert his metal snake here with no difficulty.

Pipe Away From House

If you are allowed to drain your stormwater on your own lot, do so as far away from your home as possible. Try to pipe all water to a low point away from your home.

Don't drain more water to a point on your lot than would have ended up there naturally before your home was built. Simply keep in mind where the water is falling on the roof and where that water would drain if your house had never been built. If you pipe the water where it used to go, you should not harm any of your surrounding neighbors.

Pile Up Rocks

Where the downspout drain line terminates above ground, it's going to cause erosion because you're concentrating lots of water from your roof at this point. Create a large area of softball-sized rocks that the water will flow onto. This absorbs some of the energy and spreads out the water.

Inline popup valves do a good job of allowing rainwater to discharge onto your property, so long as you are allowed to drain the stormwater on your property. Try to strategically place them where they will do the most good for your vegetation.

Photographs & Videos

An invaluable tool that will come in handy in future years is a collection of photos and videos that are shot as the downspout piping is being installed. Videos are best because you can talk and describe what the camera is seeing. Upload these to cloud storage and pass them onto the future buyer of your home.

If you stand back and include parts of the house in the photos and place shovels or other objects in the photos for scale, these prints will help you locate the pipes in the future. Over time it is very easy to forget where hidden pipes pass in the ground.

My own photos saved me lots of work in the past. I had to install a small field drain in a side yard. The photos I had taken years before allowed me to locate within five minutes the drainpipe to which the new drain was to be connected. I could have dug for an hour and missed the pipe by inches without the aid of the photographs.

CLICK HERE to get FREE & FAST BIDS from local landscapers who can install downspout drain lines.

Column 517

Water Heaters – Expansion Tanks

Water Heater Expansion Tank TIPS:

This column was so popular, Tim shared it with all of his Newsletter Readers in the November 1, 2015 Newsletter.

Virtually, every modern plumbing code requires the installation of an expansion tank on hot water heater installations. The reason is simple.

Water expands when heated. This extra volume of water needs to go somewhere.

Back Out To The Main

Before the widespread usage of back flow preventers, check valves and pressure reducing valves, this expanded water simply pushed the cold water back into the city water main.

If your house has one of the above mentioned devices, you could have problems. These devices prohibit the flow of water from your house back into the public water system.

Without an expansion tank, the expanding water can cause your hot water heater to possibly fail because of the increased pressure. This pressure can cause serious life threatening problems as well, if you heat your water with natural gas or propane.

The water heater tank can collapse around the internal flue and cause carbon monoxide to enter your home. It's serious business.

CLICK HERE to get FREE & FAST BIDS from local plumbers who can install an expansion tank.

Expansion Tanks

Expansion tanks are really simple devices. They contain compressed air and a special rubber bladder.

When your water heater turns on, the water within your piping system begins to expand. This expanding water enters the expansion tank. Eventually, hot water is drawn from the system thru a faucet and the expansion tank releases the extra water into the piping system.

Different Sizes

Expansion tanks come in various sizes. The size you need depends upon two very important variables:

  • water heater capacity in gallons
  • water pressure of your water supply system

The capacity of your hot water heater is stamped on a label or a plate on the side of your hot water heater.

Water pressures within municipal water systems vary widely. I used to live in Cincinnati, Ohio. There the water main pressures could vary from 50 pounds per square inch (PSI) to over 200 PSI within a distance of a mile!

This same thing may be true in your city.

Well Water Pressure

People with cisterns or wells control their own system pressure thru the use of electric pumps. I now live in a rural area with a water well.

My well pump delivers 50 PSI. You can purchase booster pump systems to get the pressure higher. I'd not recommend an internal water pressure in a residential home above 75 PSI.

DIY Pressure Testing

It is easy to determine your incoming water pressure. CLICK HERE to buy  a little gauge that attaches to any faucet which has garden hose threads.

pressure gauge water heater

You can use this inexpensive pressure gauge at your own home. It attaches to any hose bib or a laundry sink faucet with hose threads. CLICK THE IMAGE NOW TO ORDER ONE.

Or if you like, you can call your local water department. They will possibly send a technician to your house. This person has very accurate gauges which will do the same thing.

Buying a Tank

CLICK HERE NOW to purchase with the proper sized expansion tank to suit your needs.

potable water expansion tank

This is a good expansion tank. You can see how they connect at the top to the plumbing water pipe. CLICK THE IMAGE NOW TO ORDER ONE.

Be sure to follow the directions that are packaged with the expansion tank. It only takes a few moments to read them. This will insure that your tank will function properly.

If you install a pressure reducing valve to control water hammer, be sure to buy one with a bypass feature. Without this, your water heater will begin to malfunction. You will see water dribble out of the pressure/temperature safety valve without a doubt.

The reason lies in the fact that heated water expands. Without a pressure reducing valve, this expanded water can easily go right back outside to the water main. Low quality or malfunctioning pressure reducing valves block this backwards flow of expanding water.

An inexpensive expansion tank installed on the cold water side of your hot water heater will solve this problem. The tank absorbs the expanding water and then releases it once hot water is drawn from the hot water heater. They are simple yet effective devices.

CLICK HERE to get FREE & FAST BIDS from local plumbers who can install an expansion tank.

Installing an Expansion Tank

The first thing you need to do is to size the expansion tank according to the size of your hot water heater. The tank manufacturers make this easy. All you have to do is to determine the capacity of your hot water heater.

This is always stamped on the side label of the hot water heater. You may have a 50 gallon or 80 gallon or whatever size hot water heater. Take this information to your plumbing supply house to get the right sized expansion tank.

A Simple Tee Fitting

The expansion tank installation requires you to install a simple tee fitting in your cold water supply line. I like to install the tee, when possible, on a horizontal run of pipe, not a vertical piece.

Out of this tee fitting you should extend a piece of pipe towards the floor. Many plumbers will just try to hang the tank up in the air.

This causes all sorts of stress on the pipe and fittings. Imagine holding out your arm with a half-filled two-liter bottle of soda. Your arm gets fatigued and so will the pipe.

It's better, in my opinion, to install the tank on the ground with a ball valve shutoff valve about a foot above the tank. Place the tank on some wood blocks.

b192 tank water heater expansion

You can see the yellow handle of the shutoff valve above the tank. Note the wood blocks. - © 2017 Tim Carter

Doing it this way allows you to easily change out the tank without cutting off the water supply to the rest of the house. At some point, you'll have to install a new tank as they can get waterlogged.

Be sure to ALWAYS read the instructions provided by the manufacturer.

The tanks simply have a threaded connection. You will install the opposite type threaded adapter to your tee fitting. Apply Teflon tape or pipe dope to the male threads and screw the tank onto the fitting. To get a tight fit, you may have to use a pipe wrench or a leather belt around the tank. Most tanks come with a place to attach a tightening wrench. Follow the instructions and this can be done in 1/2 hour or less!

CLICK HERE to get FREE & FAST BIDS from local plumbers who can install an expansion tank.

Column B192

Retaining Wall Repair Cost

crumbling retaining wall

Here's Lynn's 100-year-old wall. It looks very bad, but it can be repaired. The key is that it's not leaning. This story was covered in my January 22, 2017 AsktheBuilder Newsletter. © 2017 Tim Carter

Retaining Wall Repair Cost TIPS

DEAR TIM: The retaining wall at my older home is in sad shape. A contractor told me that if I don’t tear it down immediately and replace it, my house foundation that’s 6 feet away will collapse along with the retaining wall. I don’t know what to do and the repair cost I was quoted is many many thousands of dollars. Can my retaining wall be repaired and how much do you think the cost might be? How would you repair it if you feel it can be saved? Lynn C., Lexington, KY

DEAR LYNN: I’m so very glad you sent me multiple photos of the retaining wall. Based on your photos, I’m happy to tell you that there’s no danger to your home. It’s my feeling the contractor was trying to take advantage of you.

CLICK HERE to get FREE & FAST BIDS from local structural engineers

No Lean? Then Repair

While the wall looks to be in fairly bad shape, it’s still doing a great job of holding back the soil behind it. The first thing I noticed in your photos is the wall is not leaning at all towards your neighbor’s driveway. This is a good thing keeping in mind the wall is as old as your home putting it close to 100 years old!

Before we talk about how you’re going to repair the wall, let’s spend a moment discussing the contractor’s unethical conduct. By painting a picture in your mind of how you’ll have to repair your house foundation as well as the retaining wall, he was making you feel your savings account money would soon be scarce. I loathe contractors that try to scare homeowners.

Structural Engineer Consult

To verify if a contractor is telling the truth about retaining walls, foundation walls, bearing walls or other structural things in your home that terrify you, consult with a residential structural engineer.

An engineer doesn’t have a dog in the fight. This professional will come visit your home and render an opinion as to the structural soundness of whatever you ask him to look at. If a repair is needed, most engineers will develop a plan you can use to get competitive bids from contractors. What’s more, most engineers have a list of honest contractors they recommend.

Repair Specs

Here’s how I’d go about adding another thirty or forty years of useful life to your retaining wall for about $100 worth of material. It’s a pretty simple two-day job for two men. Since I’m not familiar with labor rates in your city, I can’t quote you what it might cost, but it’s not going to be much at all. If you have moderate DIY skills, you can do this job yourself.

All you need to make the repair is a bag or two of Portland cement, a bag of hydrated mason’s lime, some medium sand and rounded pea gravel. You’ll also need a few 6 and 9-inch pieces of 1/2-inch steel rebar, a hammer drill with a 1/2-inch bit and a 4-pound hammer.

hydrated lime

This is excellent hydrated lime. It's a fine white powder and it's going to look great on your home. CLICK THE IMAGE TO ORDER SOME RIGHT NOW.

Clean Wall First

Oxygen Bleach

Stain Solver is MADE in the USA with USA ingredients that are food-grade quality. CLICK THE IMAGE to order some NOW.

The first thing to do is clean the wall. Based on your photos, the wall is covered with algae and black mildew. You can pressure wash it or you can use a solution of Stain Solver oxygen bleach. The wall needs to be clean because the last step of the repair will be a thin coat of stucco that will really dress up the wall.

Stain Solver is non-toxic. Do not use chlorine bleach as it will kill all vegetation next to the wall.

Stain Solver is Made in the USA with USA ingredients. You mix the pure powder with hot tap water, stir until dissolved and then place it in a garden hand-pump sprayer.

Saturate the wall with the solution keeping it wet with the Stain Solver for 30 minutes. At the end of the wait period, just scrub it with additional water, rinse and let dry.

Once the wall is clean, remove any loose material in the deep holes. Just scrape away and try to get anything out that will move with hand pressure. The next step is to install the short pieces of steel in the deep holes to help bond the repair concrete to the old holding it in place.

CLICK HERE to get FREE & FAST BIDS from local handymen who can do a simple repair like this.

Install Pins

Using the hammer drill, you’ll drill down at an angle into the old concrete. Drill the holes at least 4 inches deep. Hammer in the short pieces of steel rebar so the end of each piece is at least 3/4 inch inside the outer face of the wall.

The large holes are filled with a stiff mix of pea-gravel concrete. I’d mix 3 measures of pea gravel, 2 measures of medium sand, 1.5 measure of Portland cement and 0.5 measure of the hydrated lime. The lime helps to make the mix very sticky and it also is a magic material that continues to grow crystals for years after it’s installed. Add just enough water so the mix resembles mashed potatoes.

Magic Cement Paint

Before you add the concrete mix to the deep holes, you need to mix up a batch of cement paint. Blend three measures of Portland cement to one measure of the lime. Add enough water until it resembles paint. Spritz the holes that need to be repaired with some water and immediately brush on the cement/lime paint mixture. Immediately cover this paint with the pea grave concrete so it’s flush with the existing face of the wall.

Stucco Coat

The last step is to put a thin 3/8-inch coat of stucco over the wall. Mix up a fresh batch of cement/lime paint. The stucco mix will be 5 measures of sand, 2 measures of Portland cement and 0.5 measure of the lime. Add just enough water so the mixed stucco resembles a moist applesauce.

Slightly dampen the wall, paint on the cement/lime paint and cover it with the stucco. Don’t let the cement/lime paint dry. You must cover it with the stucco within minutes of brushing it on. Use a wood float to give the stucco a nice swirl finish and sit back and enjoy your labors, or that of the contractor you hire.

IMPORTANT NOTE: In the photo above, the existing stucco coating has many hairline cracks. These cracks, and the other larger ones, will telegraph through the new stucco finish. But the cement/lime paint mixture will ensure the new cracks will be very tiny.

CLICK HERE to get FREE & FAST BIDS from local handymen who can do a simple repair like this.

January 22, 2017 AsktheBuilder Newsletter

My website revision project is moving along quite well.

Yesterday, I spent the entire day going back through all of the columns I've revised in the past two weeks and made some subtle formatting changes.

The changes were for the better! It'll be interesting to see if you can tell what I did.

I was going to send out an email to you this past Friday, but with the buzz going on about the Presidential Inauguration, I decided not to compete with the excitement or angst.

The downside to that is you've got a pretty big list to go through today.

Kathy and I met a good friend for lunch yesterday and while driving back home we were talking about the project.

I told her how it's pretty cool to be able to add all the great links to the new products and tools that will help you.

What's more, I mentioned it's fun to see how my writing style has changed over the past twenty-two years. Add to that I've forgotten about some of the things I've written about!

There are topics I've not revisited in that long.

Bottom Line: You're going to be the big benefactor!

Lynn's Retaining Wall

I had one of my 15-Minute phone consult calls this past week with a nice woman who lives in Kentucky.

It turned out to be one of the most fulfilling phone calls I've ever done because I saved Lynn from the jaws of financial death.

When I told her that there was no need to do what the contractor said, her relieved voice was like Aglamesis dark chocolate pecandes dropping into my ears. It just felt good.

You can also get pecandes in milk chocolate, but I digress.....

She was being pressured to tear down a retaining wall next to her home and have it replaced.

The contractor told her that if she didn't do it right away her house would collapse.

He's either a LIAR or the most ill-informed contractor in Kentucky. If I were a betting man, I'd put my money on that he speaks with a forked tongue.

The bottom line is I shared with Lynn a column that I had just finished revising. You'll see it below. I put in a photo of Lynn's wall in the column after I finished the call.

It turns out she only needs about $50 worth of material and it would take two men maybe two days to make the retaining wall look like new.

The wall is about 110 years old, it's not leaning and even if it did fall over, it would be no danger to her home. It would just inconvenience her neighbor.

Your takeaway: Get a second, or third opinion if you feel high pressure from a contractor. Don't fall victim to high pressure. Use some common sense.

In situations like this, after the contractor would have left the first person I would have called would've been a structural engineer.

The engineer doesn't have a dog in the fight. This professional would just tell you what's really going to happen to the wall and when it's going to happen.

The contractor Lynn was talking to was using the most powerful psychological trigger of all - scarcity.

He was painting a picture in Lynn's head how her MONEY would become SCARCE because a collapsed house foundation wall would cost her TENS OF THOUSANDS OF DOLLARS on top of having to replace the outside retaining wall!

Here's all you need to know. My 15-Minute Consult calls come with a full money-back guarantee. If you feel the call's not helpful, it's free.

I'm not trying to SELL YOU on doing a call. I'm trying to SAVE you thousands of dollars like I saved Lynn.

AsktheBuilder.com Gibberish on Mobile and Tablets

In the past two weeks, I've received a few complaints about how certain pages at AsktheBuilder.com come back with strange characters and gibberish when viewed on smart phones, tablets, etc.

Guess what? There's an issue. As best as I can tell, it's with a plugin that formats the content for mobile devices.

When it first happened, I wasn't having an issue on my phone or my tablet, so I may have told you the issue was at your end.

Looks like I was wrong and I apologize.

If all goes well, everything should look MUCH BETTER by Wednesday.

Thank you if you reached out to me to alert me. Let me know if you STILL SEE gibberish after next Wednesday.

Latest Revised Columns

There are some amazing columns below if I don't say so myself.

I had a blast adding links to some outstanding products that are going to save you a ton of money and time.

I BEG you to open each column and scan it even if you don't have the problem right now.

Why?

I'm hoping that each one might make a mental imprint so that when you DO HAVE THE PROBLEM, you remember I've got exactly what you need to solve it.

One of the columns below I COMPLETELY forgot I had written.

The issue in the column is happening right now in my own home!!!!!

I'm taping a video about it in the next two days showing how to use the product that will solve the problem.

This product and video will save you a MINIMUM of $200.

I'll add the video to the column and then share it with you.

But for now, I want to see if you can deduce what the problem is I'm having! Good Luck!

Granite Countertop Supports

2x4 vs 2x6 Exterior Walls - Not So Fast!

Getting a New Hardwood Floor Level

How to Repair Stucco and Crumbling Concrete Block

Attic Trusses - Create a HUGE ROOM for Cheap

Black Spots on Trex Decking

Ice and Water Shield - FOUR VIDEOS!

Fresh-Air Intake Vents - GREAT VIDEO!

DIY Drain Cleaning - You Can Do It!

Removing Wood Stains - Indoor and Outdoor

Rust Removal SECRETS from Brick or Concrete

Klare Küchenabläufe machen für ein glückliches
Leben und Frau.

I'll be back on Tuesday or Wednesday.

Tim Carter
Founder - www.AsktheBuilder.com

Do It Right, Not Over!

Rust Removal from Concrete Pavers

paving brick

I cracked the new paving brick in half. Look at how light-colored the aggregate is! Over time when the red cement paste wears off, the pavers will look different. My traditional clay paving brick patio will stay red forever, because the red clay is the same color throughout the entire brick. © 2017 Tim Carter

Rust Removal TIPS:

DEAR TIM: Last fall, we had two new colored interlocking concrete paving brick patios installed. This spring we noticed the color of the patios is not the same and some of our patio furniture has left some rust stains. To make matters worse, something fell on one of the brick and took a large chunk out of it exposing a different colored core. What is causing the color fade? Is it possible to remove the rust stains? Can the damaged brick be easily repaired to match the existing colored paving brick? Vicki L., Villa Hills, KY

DEAR VICKI: Congratulations on the new patios! My wife and I love our regular red clay paving brick patios. They differ from yours in that my patio will always stay the same color because the clay used to make the brick is the same color throughout the entire brick.

CLICK HERE to get FREE & FAST BIDS from local handymen who can remove rust for you.

Fading and Rust

The fading you are witnessing is a small, but pesky, problem with your concrete paving brick. Unfortunately, the color fade will continue to get worse over time.

Concrete paving brick surfaces look stunning when new because all of the sand and small gravel aggregate in the brick are covered with the pigmented cement paste. The same thing happens with new blacktop or asphalt roadways and regular brick mortar in a brick home.

A freshly laid roadway looks as black as night when new because the deep-black asphalt cement coats all of the sand and gravel in the asphalt. But over time, the roadways start to turn gray as the black asphalt cement is worn off the gray stones and sand by traffic and weathering.

Look at a new brick job and the mortar joints are one color. But look closely at 30 or 40 year-old brick homes and you will notice that you can see the actual colored grains of sand as the thin cement paste has worn away exposing the sand particles.

Remove Rust with Oxalic Acid

paver stone stains

This rust can be removed with oxalic acid. © 2017 Tim Carter

The rust stains are somewhat easy to remove. The first thing to do is to remove the offending furniture from the surfaces and repaint them so there is no exposed metal. I love to use special metal primers that contain zinc or zinc-chromate pigments.

These are often hard to find because the metals are considered to be toxic. If these primers are unavailable, go to a real paint store and ask them for their best rust-preventative metal primer.

I happen to like a wonderful spray paint that's got both the primer and finish paint in one. I've seen the actual lab samples where the paint is exposed to accelerated salt-fog testing and it outperforms all other consumer paints.

It's X-O Rust Professional spray paint.

X-O Rust Paint and Primer spray can

Here's a spray paint that's great for steel beams and columns. It contains a metal primer. This brand also is available in quart or gallon cans if you have LOTS of steel to paint. CLICK THE IMAGE TO ORDER IT NOW.

Follow the directions on the paint can label and then apply the paint as directed.

If you use a traditional primer, always apply the finish paint the instant the primer says it can be recoated. Doing this allows the primer and the finish paint to interlock chemically and mechanically for an excellent bond.

CLICK HERE to get FREE & FAST BIDS from local handymen who can remove rust for you.

Buy Oxalic Acid!

You need to buy some oxalic acid to remove the rust stains. It is a crystalline toxic organic compound that is mixed with water.

oxalic acid

This is a bag of oxalic acid magic crystals. It's great for removing extractive chemical stains, especially on redwood. CLICK THE IMAGE NOW TO ORDER IT.

Commercial laundries often use oxalic acid to remove rust stains from fabrics and it will really work well as it chemically reacts with the iron oxide in the concrete. The iron oxide is put into solution with the acid and then simply rinses away.

Be careful using this acid and follow all instructions on the product label. It is a good idea to capture the runoff from the process as otherwise it may kill nearby plants and trees.

Repair Damaged Brick

different colored aggregate

The hole in the brick reveals the different colored aggregate. © 2017 Tim Carter

The damaged brick can be repaired by using a coarse sand, Portland cement and a colored pigment powder that will colorize the patching material to match your existing brick. These colored pigments that are added to the sand and cement can often be purchased at brick yards. Brick masons use these same pigments to color mortar.

You'll probably have to mix several different batches and make test samples to get a perfect color match. The mixture always dries lighter than when it is wet, so don't fret once you have mixed the material. It can take up to 30 or even 45 days for the samples to cure to a finished color.

Replace Paving Brick

The best way to repair damaged concrete paving brick is to simply replace the damaged brick with a stored one. I hope that your installer left behind extra paving brick of all the sizes and colors within your patios. Better yet, these brick should be stored outdoors in an out-of-the-way location where they weather at the same rate as the patio brick. This way when it is time to replace a brick, it is an exact match.

If you are forced to buy new brick that do not match in color, you can accelerate the weathering process to make them match your existing pavers. Simply mix some muriatic acid with water - one part acid to ten parts water - and start to dissolve the colored cement paste from the top surface of the brick. Do this carefully and make sure the brick completely dries so you see how much cement paste you have etched away with the acid solution.

Work Like a Dentist

The key to long-lasting repairs in the brick is to ensure the patch is keyed into the brick. Typically most holes that occur are smaller at the bottom of the hole than the top area or outline of the hole. The resulting hole is similar in shape to an ice cream cone. If you simply install patching compound, frost action can pop the patching material out of the hole with ease.

If you carefully chisel the sides of the hole so that the bottom is larger than the top, the patching material will not pop out. This is how dentists put a filling in a tooth.

You can also achieve the same results by using a small rotary hammer drill bit to drill angled holes at the base of the defect. These holes should mimic tree roots that angle out away from the base of a tree. When the patching compound is packed into the hole, it enters these small tubes and permanently roots the patching compound to the brick!

CLICK HERE to get FREE & FAST BIDS from local handymen who can remove rust for you.

Column 527

Removing Wood Stains

remove wood stain

You can remove wood stain from these cabinets or the hardwood floor. It's hard to get out all the stain. Copyright 2018 Tim Carter

"To remove all oil stain from a piece of stained woodwork, you usually have to sand it. Oil stains penetrate into the grain of the wood and some of it just can't be pulled out by a chemical stripper."

Removing Wood Stains Checklist

Is it Hard to Remove Wood Stain?

It's not too hard to remove wood stain. A good wood stain remover is regular paint stripper.

You may want to return stained wood that's indoors to the wood's natural color. It could be too dark for your tastes.

How Much Stain Will the Stripper Remove?

Paint stripper can remove about fifty percent of the wood stain.

paint urethane stripper

This is a great paint stripper to try first to remove oil wood stain from natural wood. It's pretty much non-toxic. Always TEST it on an out-of-the-way area of the wood to see how it does. CLICK THE IMAGE NOW TO ORDER SOME.

To remove all oil stain from a piece of stained woodwork, you usually have to sand it. Oil stains penetrate into the grain of the wood and some of it just can't be pulled out by a chemical stripper.

CLICK HERE to get FREE & FAST BIDS from local painters who can chemically strip your wood.

Do Mildew & Algae Harm Wood?

Mildew and algae do not hurt wood. They are surface defects and usually feed off the wood finish or food that collects on the wood.

Mildew is a fungus that grows on the surface of wood or wood finishes. It does not hurt the structure of wood, however, its grey and sometimes black appearance is unsightly. High humidity levels promote the growth of mildew.

Oxygen Bleach

Stain Solver is MADE in the USA with USA ingredients that are food-grade quality. CLICK THE IMAGE to order some NOW.

To test for mildew, simply put a drop of oxygen bleach solution on a suspected spot. Do this in an out of the way location. If it is mildew, the oxygen bleach will begin to create micro bubbles and usually the mildew will disappear in a matter of minutes.

I happen to prefer Stain Solver certified organic oxygen bleach. It's Made in the USA with USA ingredients. You just mix the pure powder with hot tap water, stir a minute or two and you're ready to use it.

Stain Solver has no odor like chlorine bleach. It's non-toxic. Chlorine bleach is highly toxic and will kill all surrounding vegetation, even trees if you expose them long enough to chlorine bleach.

Stain Solver will not remove the natural color of the wood, nor will it damage the lignin that binds the wood fibers together. It's the safest bleach you can use on outdoor wood.

To remove the rest of the mildew, scrub the area with detergent mixed with the oxygen bleach.

Can I Mix Bleach With Ammonia?

IMPORTANT TIP: NEVER mix bleach with ammonia or detergents or soaps that contain ammonia. The combination of bleach and ammonia produces toxic gases which can be FATAL, especially in unventilated areas! After cleaning, rinse the washed area with a solution of bleach and water to kill any remaining mildew spores.

Watch the video below to show you how easy it is to remove stains from outdoor wood using Stain Solver oxygen bleach. Yes, the open of the video is a little corny, but the local ABC-TV affiliate always wanted me to have some fun with my segments that appeared on local TV in Cincinnati, OH.

How Do I Remove the Dark Stains from Cedar?

Use certified organic oxygen bleach to remove dark wood stains from cedar.

If you are a victim of extractive stains, they can be removed. All you need to do is to mix a solution of Stain Solver oxygen bleach. Mix one cup of Stain Solver powder to one gallon of hot tap water.

Use this solution to wash the stained area. Rinse well.

How Do I Remove Dark Redwood Stains?

Use oxalic acid to clean redwood and remove dark wood stains.

Then, find a plastic bucket or pail. Now, mix four ounces of oxalic acid crystals with one gallon of warm water.

oxalic acid crystals bag

This is a bag of oxalic acid magic crystals. It's great for removing extractive chemical stains, especially on redwood. CLICK THE IMAGE NOW TO ORDER IT.

Note, do NOT use a metal bucket for this solution! The oxalic acid will react with the metal and cause massive problems!!!

Wash the stained area with this solution and simply let it dry. Do not rinse it off until the solution is dry. Any remaining stains should come off when you rinse off the dried oxalic acid. Be sure to use goggles and gloves when using oxalic acid. It can hurt your skin and eyes. It can also hurt plants, so spread some plastic over them.

CLICK HERE to get FREE & FAST BIDS from local deck cleaning companies.

Can Cement & Mortar Stain Redwood?

Yes, cement and mortar can create dark stains on redwood.

The lime which is a part of virtually every concrete and mortar mix can cause stains on redwood which cannot be removed. Redwood which is splattered with these compounds develops black stains which are impossible to remove. Take whatever precautionary measures necessary to prevent splatter.

Column B66

Attic Trusses – Room Size

Attic trusses created this room. This is my cluttered man cave and ham-radio shack. This room is over the garage of my New Hampshire home and it was created using attic trusses. The room is 12-feet wide, the vertical wall to the right is 4-feet tall, the ceiling above is 8-feet tall. The wider the structure is, the BIGGER the room can be. The steeper the roof pitch, the HIGHER the ceiling can be in the room - within certain limits! - © 2018 Tim Carter

Attic Trusses Checklist

Best Way To Frame - The SBCA - The Authority on All Things Trusses

You can get the best information about attic trusses, and all other structural building components, by visiting the Structural Building Components website that was built just for you.

Attic Trusses - Create a Free Room or Rooms

My friend, Loren Power, will be the first to tell you that I made a mistake on his house. He trusted me to build his home and it was one of the first I had ever done.

He was the one who pointed up into the vast attic space of his home and said, "What a huge waste of space. Why didn't we make some sort of room up there?" Of course this was after the entire roof was constructed and it was too late to turn back.

CLICK HERE to get FREE & FAST BIDS from local carpenters who can install any trusses for you.

Loren's comments years ago quickly put me in my place. It was obvious that I still had lots to learn about offering options to homeowners.

Do Steeper Trusses Create Bigger Rooms?

The steeper the roof pitch, the bigger the rooms will be. My daughter's house has attic trusses. The house is only 28 feet wide with a 10/12 pitch and she has a giant room that's 18-feet wide with a ceiling height of 9 feet eight inches!

If your new house will have a steeply pitched roof - say 10 inches of rise for every 12 inches of run (10/12 pitch) or more - then you can gain some very serious room if you upgrade to an attic truss.

For example, if your house is a 50-foot-long by 38-feet-wide structure, you can get an attic truss that will allow you to create a full height room (8 foot ceiling) that is 16 feet wide by 50 feet long!

That's 800 extra square feet. Think of how you could slice and dice up that space into different rooms.

How Much Extra Money Do Attic Trusses Cost?

My guess is that the national average for an attic truss that will create the space we just described will cost you about $100 more than a regular common truss. These prices change with the demand for lumber. 

For the 50-foot-long room, you'll need about 24 trusses. This is $2,400 plus the cost of the plywood subfloor. Let's say plywood costs $20 per sheet for 3/4 inch tongue-and-groove yellow pine. We'll need 25 sheets to cover our 800 square foot space. This will add an additional $500 to our material cost. We are now at $2,900 plus tax. Let's just say it will be $3,100.

Get out the calculator. $3,100 divided by 800 square feet equals just $3.88 per square foot rough construction cost!

That's a HUGE bargain, especially when you compare that to the overall cost of your house.

Not only that, this cost is almost purely material cost. The labor to set the trusses is no different than had you not included the room. You would be a fool not to create this space or at least a partial space up in the trusses.

Can You Store Things in Regular Trusses?

No, regular trusses are not designed to act as storage or attic trusses.

I received an e-mail from an individual. He had discovered a hidden storage space up in his attic.

His dilemma was whether or not the floor of the space could support the weight of storage boxes. Had the builder installed attic trusses or their step-sister storage trusses, I doubt I would have received the e-mail.

My advice was him to get a FREE & FAST BID from a local structural engineer who'd come out and tell him what he can store up there. NEVER take a chance. Get a bid.


Can You Create a DIY Truss?

Yes, you can build your own truss or trusses. The issue is how you make your connections and if you've done all your calculations correctly.

How well did you do in high school geometry? If you did fairly well, then cutting roof rafters will be a piece of cake.

All you have to keep in mind is the fact that there are primarily two cuts in rafters. The ones that are straight up and down (plumb cuts) just like a plumb line and level cuts (heel cuts). Rafters simply have a series of cuts in them, all of which are either parallel with one another or oriented at 90 degrees to one another.

Watch my Framing Square VIDEOS to see how this is done:

How Do You Make Angled Rafter Cuts?

To cut a rafter you need to know the pitch of the roof. This is the rise and the run relationship. By convention, we call it out as the number of inches a roof slope climbs as you proceed 12 inches horizontally across the roof. An example would be a 4/12 pitch roof. The roof "rises" 4 inches in height for every 12 inches it "runs" horizontally.

A framing square will create the series of parallel lines and perpendicular lines if you simply slide it along one of the edges of the rafter. Note that a framing square has two legs. The narrow one that is 16-inches long is the tongue.

The fatter one that is 2-feet long is the body. The are oriented at 90 degrees to one another.....now isn't that a coincidence.....?

Note that there are markings - in inches - on both the inside and outside edges of the square. The starting point of the markings is at the corner where the two legs meet. This is important. You must decide to use either the markings on the outside edges or inside. I happen to like using the outside edges of the framing square.

Get some scrap pieces of 2 x 4 and practice making these two cuts.

CLICK HERE to get FREE & FAST BIDS from local carpenters who can install any trusses for you.

How Do You Make 4/12 Rafter Cuts?

Let's say we are doing a 4/12 pitch roof. Find the 4 inch mark on the outside edge of the tongue. Locate the 12 inch mark on the outside edge of the body. Position the square so these two marks are touching the same edge of the rafter your are going to mark.

Watch the videos above to see this done.

Note how the square is oriented at an angle across the rafter. The tongue of the square is creating your plumb cut where the rafter will rest against the ridge board. The body is creating the heel cut where the rafter will sit on top of the wall. We could mark and cut right now if our span was just one foot. But we aren't building a cat house!

How Do You Calculate Rafter Length?

Let's go back to geometry. The rafter square makes two sides of a right triangle. The sloping rafter makes the third component - that being the hypotenuse.

The length of the hypotenuse is what goofs everyone up. How do you figure out the length of the rafter? It is simple mathematics. It has already been done for you if you buy a quality framing square. There are tables on the body of the square that tell you how long the rafter is for the different pitches for each foot of horizontal run.

You can also purchase books, booklets, or fancy construction calculators that will instantly tell you the rafter length as long as you plug in the rise, run and span values. Once you grasp how to orient the square, this is your only other challenge.

How Do You Do Ridge, Tail, and Seat Cuts?

If you do the pure math to figure out rafter length, you will always be a little long. Why? Just about everyone uses a ridge board.

You need to shorten the rafter for half the thickness of the ridge. This often means slicing off an extra 3/4 inch off the plumb cut at the one end.

The seat cut is the notch where the rafter sits on the wall. Don't make this too deep. Never cut out more than 1/3 the plumb cut distance into the rafter.

The rafter tail cuts where the roof ends are best made - in my opinion - after the roof is framed. If your wall is not perfectly straight - most aren't - your gutter board will mimic the curved line of the wall if you cut the tails at the same time you make all your other cuts. It is more work to do it in the air, but it is well worth it.


How Do You Install Trusses?

Trusses can be installed using just man or woman power or you can get help from a crane or any other machine that can safely lift the truss and set it into position.

Every year many construction workers get killed or seriously injured from truss assemblies that collapse suddenly during construction. The most common problem is that the trusses were not braced properly and sufficiently during the erection process.

Attic trusses almost always need to be set by a crane. They're extremely heavy.

All truss manufacturers will gladly supply you with a booklet showing how to brace trusses as you set them on top of the walls. A simple 2x4 or series of parallel 2x4's providing the 16 or 24-inch spacing isn't enough! You need additional diagonal braces that make X's on the top chord of the trusses.

Larger trusses often need similar diagonal bracing on the vertical center post web member too. the larger the truss (both height and span) the more complicated the bracing. Gravity, wind, the motion of workers, and an unexpected bump by the crane can easily topple a truss roof during construction.

Don't try to ever set attic trusses if you've never done it before. Have a seasoned crew of carpenters there to assist you. 

CLICK HERE to get FREE & FAST BIDS from local carpenters who can install any trusses for you.

How Do You Install Complicated Trusses?

If you're setting a hip roof made from trusses, you will probably have girder trusses, special hips, etc. There's a certain order in which the components must be set. Not only that, you work from the two long ends of the roof towards the middle.

The truss manufacturer will almost always provide you with a set of erection instructions to help you. If you're a rookie, I wouldn't think of trying this without some experienced help.

CLICK HERE to get FREE & FAST BIDS from local carpenters who can install hip trusses for you.

Column B203

How to Reinforce Concrete Block

The concrete block pier at this job site toppled over because the contractor failed to properly reinforce it with steel bars surrounded by pea-gravel concrete in the hollow cores. Note the other obvious defect: No pre-cast concrete lintel over the window openings. This photo was sent in by a homeowner worried that the workmanship on his job was poor. I assured him that the primates on the Career Builder TV commercial could have done a better job. This is NOT one of my AsktheBuilder jobs, that's a fact. Photo Credit: Alan Todryk

Reinforce Concrete Block TIPS:

  • Mortar is strong in compression - weak in tension
  • Concrete block needs steel reinforcement
  • Concrete block should be attached to concrete footer
  • WATCH steel & concrete block video below
  • CLICK HERE for Tim's FREE & FUNNY Newsletter

DEAR TIM: I'm building a new home and two concrete block piers toppled over when a ladder was leaned against one. The one pier crashed into the second one. Why did this happen and what could have prevented it? I thought concrete block was the smart product to use for my foundation and home, but now wonder if I made a big mistake. Have you built with concrete block successfully? What did you do? Alan T., Charleston, SC

DEAR ALAN: Let's start out by reassuring you that concrete block is a great building material. It's strong, it can be used in any number of ways, and it is used in all sorts of residential, commercial and industrial applications. Stop second guessing yourself. You need to direct that attention to the contractor on your job and any written specifications that were part of your blueprints and plans.

Tension & Compression

The block piers toppled over because the connection between the mortar and the concrete block is not able to resist the force of being pulled apart. The ladder placed against the top of the pier converted the pier to a lever. The seemingly minimal force at the top of the ladder was multiplied at the base of the pier where it fractured.

The mortar in between each course of block is strong if you try to squeeze, or compress it. But if you try to bend or stretch it, that's tension, it's very weak. Most masonry products, including concrete, only have 10% of the strength in tension as they have in compression.

CLICK HERE for FREE & FAST BIDS from local brick and block masons.

Fill Hollow Cores

The vast majority of concrete block are hollow. When laid on their side and stacked in an offset manner they resemble, to a degree, a honeycomb made by a hive of bees. Bees fill the void spaces of the honeycomb with honey. Your contractor should have filled the hollow spaces in the block with pea gravel concrete and steel bars.

Realize he may have been getting ready to do this just before the accident occurred. Someone may have goofed up and put sideways pressure on the pier before the concrete and steel could be added. Not all contractors work 24/7/365. I only did it on rare occasions myself to hit a mission-critical deadline.

Concrete, mortar, and almost all rock are very strong when you compress them, but these materials usually only have one tenth the strength when you try to bend or stretch them. Engineers and technical folk call those bending or stretching forces tension. You commonly hear them talk about the tensile strength of a building material.

Steel Is The Answer

Steel, on the other hand, has fantastic tensile strength. For example, common one-half-inch reinforcing steel on a residential job site may be rated at 40,000 pounds of tensile strength. That means it fails or tears apart once you apply 40,000 pounds of pulling force to it. WOW!

CLICK HERE for FREE & FAST BIDS from local brick and block masons.

Steel in Concrete Block Video

The first 20 seconds of this video show you how steel needs to be in the CENTER of the voids of concrete block. Then watch at 1:10 to see how they got the vertical steel in the PERFECT location. You'll see a flat 2x4 up in the air in a straight line. This face of the 2x4 was carefully staked out and represents the CENTER of the wall.

Pea-Gravel Concrete

Once your contractor mixes up small pea gravel concrete, not the sandy mortar he used to lay the block, and pours it into the block voids along with the long steel rods, the concrete block then starts to resemble reinforced poured concrete.

Pin Block to Footing / Footer

It's a best practice to use this same reinforcing steel to connect the concrete block walls to the poured concrete footer. I did this on all my jobs making sure the steel rods protruded up from the concrete footer about 2 feet. I then dropped the long steel bars from above down to the top of the footer so the steel pieces overlapped.

The reason you want to use the pea gravel concrete instead of mortar is it's stronger. The rocks used in concrete mixes are responsible for much of the strength concrete achieves once it's cured. You want to use smaller pea gravel because the void spaces in the concrete block wall are not too large once mortar oozes in between the block and the steel is in place.

Center Steel

It's important the steel bars in the block are centered in the void spaces to ensure they're surrounded by concrete. In a retaining wall situation, it's important to place the steel so it's closer to the wall face that's not touching the earth. It's very important to have a structural engineer specify what needs to be done in these situations. Follow her or his recommendations closely.

You can also used thin wire reinforcing for concrete block walls. This unique product is placed on top of a row of block in the horizontal mortar joints. This thin steel, once embedded in the mortar, adds significant strength to long concrete block walls.

Pilasters

Pilasters or wide piers can also be incorporated into long and tall concrete block walls to add more strength. Once again, it's best to have a structural engineer specify where and how these elements should incorporated into your design. The money you spend on getting the advice of a structural engineer is often the best spent money on a job.

Here's all you need to know about concrete block and reinforcing steel: It's a great combination, it's affordable, it doesn't require lots of skill to combine them and you end up with a foundation that's as strong or stronger than a poured concrete foundation.

One of the things I really like about concrete block is the average person can build with them. It takes some skill to lay them plumb and level, but it's a skill that can be achieved with modest practice. You can used decorative concrete block around your home for all sorts of projects, just be sure you reinforce them if you want them to stand the test of time.

CLICK HERE for FREE & FAST BIDS from local brick and block masons.

Column 1016

Clothes Dryer Venting

clothes dryer vent

Massive amounts of water vapor are belched into the air each minute a clothes dryer is working. © 2017 Tim Carter

Clothes Dryer Venting TIPS

  • Exhaust air must go outdoors
  • Use smooth galvanized 4-inch pipe
  • NEVER exhaust in attic or roof overhang - SEE BELOW
  • Roof vent hoods for no-snow areas
  • CLICK HERE for Tim's FREE Newsletter - It's funny!

DEAR TIM: My husband wants to vent our clothes dryer directly into our garage in an attempt to keep our cars warmer in the winter months. I think dryer vents should be directed outdoors. Can you settle this clothes-dryer-vent debate? Where would you vent the dryer and what are the top things you would avoid when installing a clothes-dryer vent? Cindy R., Redondo Beach, CA

DEAR CINDY: I get asked so often to referee these marital debates, I am thinking of buying a white-and-black striped shirt. Your husband should be congratulated for thinking of a way to use the waste heat from the clothes dryer, but his proposed method will cause some secondary effects that could end up costing you time, trouble and money.

This may also be a building-code violation in your area, as it is not a good practice to have penetrations in the wall between a house and the garage.

CLICK HERE to get FREE & FAST BIDS from local dryer vent installers.

Water Vapor Bad

Along with all of the heat that would pour into your garage, you also get scads of water vapor. If you have ever seen a clothes-dryer vent belching out a plume of water vapor on a cold winter day, you know this might be problematic.

All of the liquid water that was in the clothes will get sent into the garage, if your husband implements his idea. This water will undoubtedly condense on all of the cool surfaces in the garage causing rust and corrosion on any unprotected steel tools or parts.

Condensation and Lint

But the water vapor will also condense in places you can't see. You may end up with water and mold issues inside of your garage walls and in an attic space above the garage. Wood rot is a distinct possibility if this water vapor discharges into the garage for any length of time. Lint will be everywhere in the garage as well.

Dryer vents, and the importance of doing it right, are a very misunderstood aspect of home building and remodeling. Many people underestimate the thousands of cubic feet of air that are expelled by a clothes dryer each time it dries just one load of clothes.

Vent Outside

This air must be exhausted outdoors as your intuition told you. But this doesn't mean you can't capture some of the heat before you exhaust the air.

I've found that it is often best to vent fans and dryers through the roof if you live in an area with little, or no, snow.

I urge you to watch this video of mine to see how easy it is to install the correct vent-cap flashing on a roof. Have no fear - if done right you will have no leaks.

Side Wall Best

I always say to vent clothes dryer exhaust outdoors. You can do this sideways through a wall or up through a roof as hot air rises with ease. The most important thing to do is read all of the written instructions that come with a clothes dryer and follow them to the letter. The instructions often describe in great detail the preferred pipe to use and the configuration of the pipe as it makes its way from the back of the dryer to the outdoors.

CLICK HERE to get FREE & FAST BIDS from local dryer vent installers.

Smooth Metal Pipe

Almost every clothes-dryer manufacturer will tell you to use smooth metal pipe as the venting material. This pipe should be 4 inches in diameter and extend some maximum distance. Each manufacturer will state how long the vent pipe can be. You need to do some math, as 90-degree fittings that allow you to turn corners must be accounted for in the calculation. A single 90-degree fitting usually equals 10 feet of straight pipe.

If you live in a cold climate, you may want to think about how to reclaim heat from your dryer. This will save you some money on your heating bills. The way to do this is to use metal pipe inside your home and allow it to act like a radiant heater or a car radiator in reverse.

Harvest Heat!

To extract heat  from a simple clothes-dryer vent, try to install the metal vent pipe so it is near or at its maximum length indoors. If you have the luxury of an unfinished basement, you may be able to run the metal vent pipe at a slope from the dryer to a window that is perhaps 20 feet away. The hot pipe radiates the heat directly into your basement along its entire length.

You may be able to fabricate a crude heat exchanger using some scrap sheet metal. But if you do this, be sure it is made with a door that allows you to open it to check for lint buildup. Fires that feed on clothes-dryer lint are a reality, and you must always make sure your clothes-dryer vent is free of lint buildup.

Insulate Pipe in Cold Space

It's very important that the clothes-dryer vent is well insulated if it passes through a cool or cold space like a crawl space or attic on its way to the exterior.

If the pipe is not insulated, water can condense on the inside of the vent causing leaks or poor dryer performance if the pipe becomes filled with water. This water can leak and drip down onto ceilings or soffits.

Best Vent Hood

The best dryer vent hoods in my opinion are the ones with double doors. I have two at my own home, one that's used for a bathroom exhaust fan so it stops cold air from backdrafting into my home. The image below is the one I used. CLICK THE IMAGE or CLICK HERE to order one right now.

clothes dryer vent double door

Look at the double doors. This keeps pests out and prevents cold air from backdrafting into your home. CLICK THE IMAGE to order it now.

Beware Soffits & Overhangs!

Avoid installing the dryer-vent termination cap in a soffit overhang under a roof. The clouds of water vapor can easily find their way into the attic through soffit vents, cracks or any other small opening. This water vapor will condense on the cold lumber in the attic. I have seen photos of frost one-half-inch thick that has coated large areas of an attic. Other photos have shown a plume of black mold on the underside of the roof just above the soffit where the dryer vent exits the house.

You can readily purchase dryer-vent roof caps that connect to the 4-inch smooth metal pipe. These caps have a damper that keeps animals out of the pipe. They do require periodic maintenance to ensure lint does not clog the damper leaving it partially open.

No Indoor Vents!

Beware of the dryer-vent kits that say you can exhaust the air inside your home. For them to convert all of the water vapor to liquid water, they would have to be equipped with a very large refrigerated coil as part of the system. Without this coil, vast amounts of water vapor invade your home.

Cleaning Dryer Vents

Lint can build up in a dryer vent pipe. I once had to move a vent pipe for a single mom and the entire pipe was choked with lint.

The dryer will not function properly if the vent gets reduced in size by lint buildup.

Use the following great brush to remove lint from your dryer vent pipe.

dryer vent brush

This is a fantastic product to clean out your dryer vent. CLICK the photo to have it delivered to your home in days.

CLICK HERE to get FREE & FAST BIDS from local dryer vent installers.

Related Column: Your Pesky Dryer Vent Pipe

This column was featured in the January 22, 2013 AsktheBuilder Newsletter.

Column 714