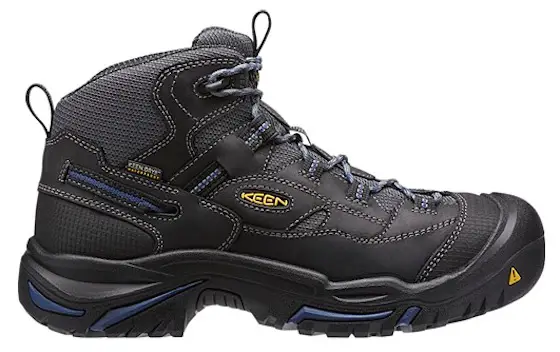
KEEN Utility Braddock Mid Waterproof Review

work boot

This is the most comfortable and attractive work boot I've ever worn. It's also perfect for HIKING. CLICK THE IMAGE to BUY it.

I'm almost embarrassed to say how long I've worn work boots, but thinking about it I feel it adds enormous value to this review.

Who better to review work boots other than a person who's worn countless pairs for over forty years.

I think it's fair to say that I was wearing work boots when I started renovating houses in 1973 as a part-time job in college.

Here's what you need to know right now before you read anything else. The KEEN Utility Braddock Mid Waterproof boot I tested was the most comfortable and best work boot I've ever worn.

One of the most important aspects of these work boots, in my opinion, is they are Made in the USA. The factory is in Portland, Oregon. (See my July 13, 2017 AsktheBuilder Newsletter when I asked for Car Rental Experts.)

Here are the features of this boot:

  • American Built with materials from around the world.
  • Direct attach PU mid-sole
  • Integrated heel cushion
  • KEEN.Dry waterproof breathable membrane
  • Lining with hydrophobic/hydrophilic 2-zone comfort technology
  • Meets or exceeds ASTM F1677-96 Mark II non-slip testing standards
  • Meets or exceeds ASTM F2892-11 EH Standards
  • Not compatible with aftermarket insoles or orthotics

Here's what I LOVED about this pair of work boots:

  • Styling - it's the most attractive work boot I've ever owned
  • Support - the boot is stiff on the upper half, but not so much it restricts movement
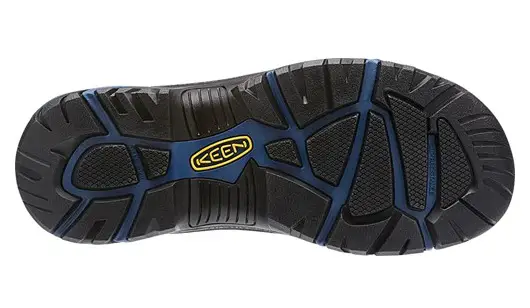
  • Super-Grip Sole - Prevented me from falling on my steep icy drive
  • Amazing Laces - seem to be non-slip so they stay tied
  • WATERPROOF! Need I say more?

Here are some other images. CLICK HERE TO BUY a pair now.

Keen hiking boot sole

This is one great sole. CLICK THE IMAGE to BUY the boots.


keen hiking boot heel

The boots are easy to put on. CLICK THE IMAGE TO BUY.

Cold Air Bathroom Exhaust Fan

Cold Air Bath Exhaust Fan TIPS

David Teal lives in Woodville, Ohio.

He has a problem that many people have. Let him tell you:

"A few weeks ago you had a article that discussed sealing and insulating a house. You failed to mention holes in the ceiling. I have five holes in my ceiling for vent fans. 

The flaps inside the fans don't work well at all. When the wind blows the bathrooms are freezing!  Is there something I can do besides taping over the vent holes?"

CLICK HERE to get FREE & FAST BIDS from local handymen that can install the vent hood and foam the pipe.

Here's my answer to David:

Thanks for reading my syndicated newspaper column. As you might suspect, the newspapers limit the number of words I can put in a column. As such, it becomes impossible to discuss each and every aspect of a problem. I usually have to deal with a thin slice of the problem.

The dampers in just about every exhaust fan I've seen are virtually worthless. I believe they're meant to stop animals from getting back into the rooms of homes, not air.

I'd recommend you install a flapper cap that has a double seal.

CLICK HERE to get FREE & FAST BIDS from local handymen that can install the vent hood and foam the pipe.

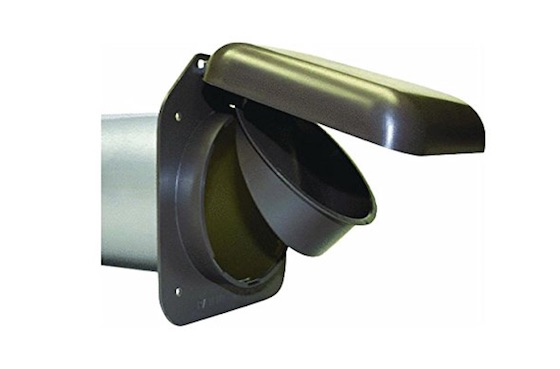
NoPest Vent

This is the vent cap that goes on the outside wall of your home to STOP all cold air from getting into your bathroom exhaust fan. CLICK THE IMAGE to order it now.

I used the product below at my own home last year and love how well they seal. I've completely stopped all the cold air from coming into my bathroom using this product. CLICK HERE to buy it.

Seal the Pipe

You also need to make sure the seams on the smooth metal exhaust pipe are sealed AND the pipe is insulated. The best way I've found to do this is spray the outside of the pipe with spray-foam insulation. Clean the mill oil off the pipe first with soap and water. Use this foam:


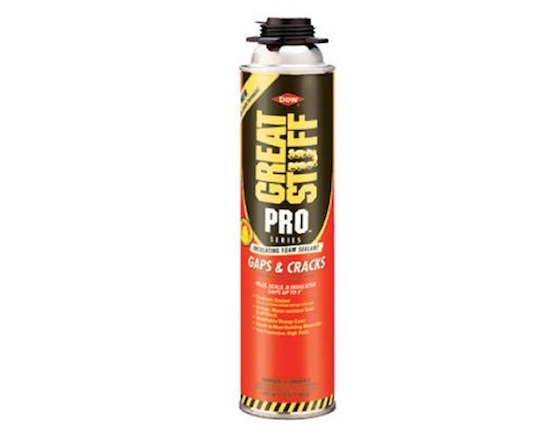
Great Stuff Pro Spray Foam Insulation

I've used this product for years. It's got the right name, that's for sure. Wear old clothes when using it. CLICK THE IMAGE NOW TO ORDER IT.


CLICK HERE to get FREE & FAST BIDS from local handymen that can install the vent hood and foam the pipe.

Bathtub Peeling Around Drain

Judy H. lives in OH. She had a great question.

"Hi, Tim.  Hope you can advise me.  We have an original porcelain bathtub (57 years old).  In 1990, we had it glazed by BathCrest, who are no longer in business.

The glaze has now started to peel around the drain.  I'd like to keep the tub as it would be difficult to remove from our small bathroom. 

I've checked online and Rustoleum has  a product that it claims can be used for repairing the tub. Are you familiar with this; it's called Rustoleum Specialty  and if so what's your opinion?

Aside from having an insert installed, do you have any suggestions or advice?    Thank you so very much for any help you can send.   Happy New Year!!"

Here's my answer to Judy:

Judy, HNY to you too. That's how we shorten it in Morse. I'm an amateur radio operator - W3ATB.

For starters, you didn't have your nice tub *glazed* by BathCrest. You had them come in and paint it. They may have used an epoxy paint.

To have a tub re-glazed, you need to send it back to the factory where it's put in the kiln and new clear silica is fused to the tub. That's what glaze is.

All paints are film formers and eventually will peel. No matter what paint you decide to use, and I've not used the Rustoleum Specialty paint - nor would I EVER use it where it would stay wet like near a tub drain - the paint WILL PEEL.

If you want perfection, then you put in a new tub and use the proper non-abrasive cleaners so it always maintains its gloss.

Good luck in your decision.

Built-In Bookcase Designs

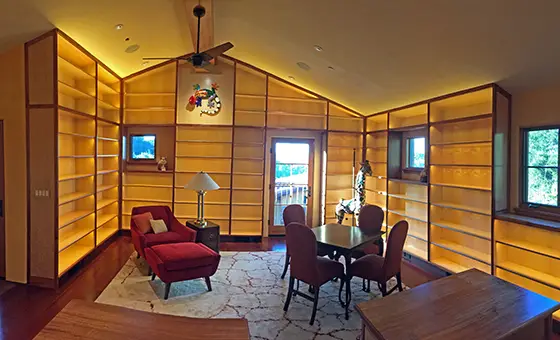
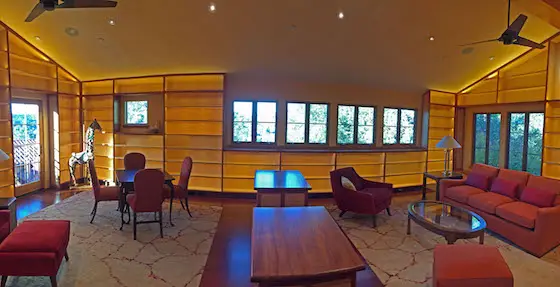
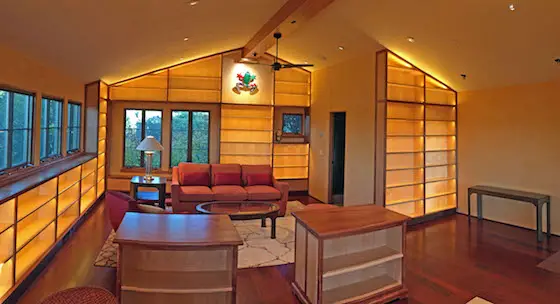
This is a modular built-in bookcase installation made with different hardwoods and special indirect lighting. © 2017 Jay Helms

Built-In Bookcase Design TIPS

DEAR TIM: I live in a 100-year-old wooden house and am doing all the refurbishing and maintenance myself that the laws of my country allow. I’m making floor-to-ceiling built-in bookcases for one of my living rooms and would love some tips. One of my challenges is the bookcase needs to span about 6 feet over a piano. What would you do to support those shelves so there’s no sag from the weight of the books? Any information you can share that would make this project look magnificent and be trouble-free would be appreciated. Harald Skaarn, Tønsberg, Norway

DEAR HARALD: I’ve cut my teeth as a builder / remodeler working on old homes such as yours. I discovered many things during that journey, including that the level of quality, as well as the materials, in these older homes varied to a large degree.

It didn’t take long for me to observe that the pride of workmanship in many of the older homes I worked on was far superior to the level of much of the work I see today. I wonder if it’s the same in your country.

Built-in bookcases are a wonderful project to tackle. I’m assuming you have the needed power tools to make your job easy with respect to cutting and assembling the wood. I’ll also assume you have moderate skills with respect to installation.

CLICK HERE to get FREE & FAST BIDS from local companies that can build custom bookcases.

If you plan out this project carefully, you can build the bookcases in modular sections that interconnect with one another. But when complete, it will appear as if the bookcases were carved out of a solid block of wood or the wall!

STOP - Draw a Plan

You probably already know this, but you need to draw a detailed scale plan of what you want. This plan would show the actual front view of what the finished shelves would look like complete but with no books in them. Think about creating larger areas within the shelves to display art or other things you own that aren’t books but would look fantastic on the shelves.

The plan needs to be larger scale. Draw one section at 1/2-inch per foot to start and see if it has enough detail for you. You want to draw each wall that's going to have bookcases. The plan has to show all the details you can see in your head. If you need to bump up the scale of the plan to 3/4-inch per foot to show what you want, then do it.

Build a Prototype

My first tip may surprise you. I suggest that you start very small. I’d build a prototype small stand-alone bookcase that includes everything you think you want. You’ll want to think about the color of the wood that comprises the sides, back and underside of the shelves. Perhaps you want the bookcases to have two, and maybe three, species of wood for contrast.

CLICK HERE to get FREE & FAST BIDS from local companies that can build custom bookcases.

When you plan to build this prototype, think about how you could make several and butt them against one another to cover an entire wall. It goes without saying that you need to carefully consider the height of the shelves so they’re tall enough for all your books, but not so tall as to waste space. Look at existing bookshelves to determine the sweet spot for the space above the top of books and the bottom of the next shelf above.

This is a side view of the room. These bookcases should give you plenty of inspiration. © 2017 Jay Helms

Indirect Lighting - Add the WOW! Factor

One thing I’d incorporate for sure would be low-voltage indirect lighting to showcase the books and provide softer lighting in the room. You may discover if you use a lighter-colored wood for most of the bookcases that the reflected light provides ample background lighting for the entire room.

CLICK HERE and wander through all sorts of low-voltage LED lights you can use for built-in bookcases.

The use of low-voltage lighting can help you solve your issue with respect to the wide shelves that have to span over the piano. There are many ways to make those shelves stiff and sag-free, with my choice being to incorporate a small beam under the front edge of the shelf.

Small Beams - Big Strength

This beam would be made from a very stiff hardwood species and be about 40mm (1.5 inches) high. When this piece of wood is glued and mortised into the horizontal shelf, that shelf will be very strong.

At the very least I'd build one prototype shelf and test it with what you expect to put on it. It can just be one shelf supported at each end by wood blocking. You don't need to build an entire case to test how strong one shelf it. See if it deflects after you load it and keep it loaded for a few days.

You’ll discover that this vertical piece of wood is an excellent place to put a thin strip of low-voltage lighting that’s aimed down and towards the back of the shelves. Your biggest challenge I believe, should you decide to incorporate the lighting, will be to get the right balance of light. You don’t want too much and you don’t want the lighting to be weak. Your small prototype shelves will help you solve this problem.

This photo is the other end of the room. I can't begin to describe how magnificent these bookcases are. I hope you enjoy these photos. © 2017 Jay Helms

Be sure you take into consideration how you’ll deal with electrical outlets. I don’t know the codes in your country, but see if you can’t put electrical outlets in the toe kick space down by the floor. You may have existing wall outlets in your walls that might have to be moved so they don’t fall right at the same height as a horizontal shelf.

Add Side Scribes

The odds are the walls to your house are not perfectly plumb or in the same plane. This means that the back of the bookshelves should be designed so their’s an airspace between the wood and the plaster. The vertical sides of your shelves would be made deep enough so they can be scribed to the uneven wall surfaces.

Before you start to draw your plans for this project, I’d take lots of time to look at photographs of built-in bookcases. If you live near a large library or older buildings that might have built-in bookcases, go visit them for inspiration. You may see subtle pieces of trim that create a unique look you had not thought of.

Note how the bookcases terminate at the floor and along walls near a doorway where you might need to have a finished side of a bookcase. Pay close attention to each and every detail including how the shelves are supported.

CLICK HERE to get FREE & FAST BIDS from local companies that can build custom bookcases.

Column 1177

Decorative Patio Stones

Decorative Patio Stones

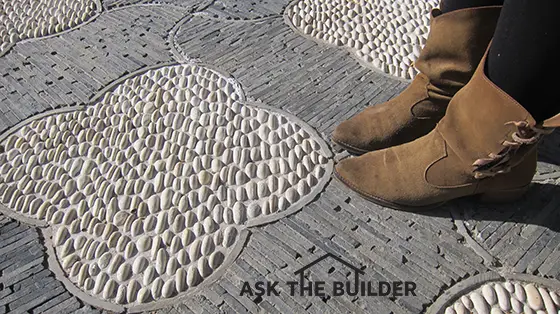
Decorative Patio Stones | Here’s just a small section of a massive patio and sidewalks constructed with decorative stones at the Huntington Gardens in Pasadena, CA. © 2016 Tim Carter Builder

DEAR TIM: I was on vacation before Christmas visiting relatives in southern California. I love outdoor plants so we visited a place called Huntington Gardens in Pasadena. There I saw the most unusual patio and sidewalk paving. Never before had I seen such beauty and thought it was fake. Different small stones that were different colors and shapes were combined to create a gorgeous pattern. How can I duplicate this or at least get close to what I saw? I intend to do this myself. What needs to be done to ensure all the hard work doesn’t fall apart, crack or otherwise deteriorate. I live where we get freezing weather unlike sunny southern California. Mary S., St. Paul, MN

DEAR MARY: I’ve built lots of patios in my life and many years ago built a medium-sized decorative stone-encrusted fishpond for my wife at our second home. What’s more, I’ve walked on that patio you saw in Pasadena. In fact, I photographed it for my own records because it was so unique. I believe I know exactly how the master stone masons built that patio and the connecting sidewalks. While there, I knelt down and studied it.

How hard would it be to recreate the same patio?

If you intend to duplicate exactly what you saw, you’re going to spend quite a bit of money to make the curved pieces of stone that create the border around the rounded white stones you saw. I can only imagine what the price of that might be. If it’s out of your budget, think about going with a pattern that can be done with straight pieces of stone you cut to fit. I agree that the curved border and curved pieces of border that connected the emblems are part of the overall beauty of what we saw.

You’ll also have to source all of the materials you saw in that patio. Besides the curved stone border sections, you just need to locate the smooth white stones and the thin gray rock that was installed on edge in between the white pebble emblems.

It could be very difficult to source these near your home and you may have to substitute other material that looks similar. In fact, you may discover that you can find other stone that has colors that look even better than what you saw. Be sure the stone retailer can prove to you that the stone you choose can withstand freezing temperatures in a horizontal position in the ground. Not all stone can survive these conditions.

Create a Scale Drawing of the Stones

The first thing you need to do is create a scale drawing of what you have in mind. This drawing will help you estimate the number of curved pieces of cut stone for the borders. Be sure you order no less than 20 percent more than you think you’ll need. Some may get broken in transit and you simply can’t afford to run short of this special material.

Based on what I saw at that patio and without doing any forensic snooping which would be very unprofessional since it’s not my patio, I estimate the finished patio covering was about 1.5 inches thick. Both the curved border pieces and the thin stone on edge would be the same height. This makes it somewhat simple to install most of the finished stone.

Beneath the decorative stone you and I saw I’m sure there’s a poured concrete sub-base patio. This is how I built all of my past decorative brick patios. The brick I used happened to be 1.5 inches thick and I set them in about a half inch of cement mortar.

I’d pour the concrete slab 5 inches thick and I’d have one-half-inch steel reinforcing bars in the middle of the concrete in a grid pattern much like common graph paper. The steel should be no more than 2 feet on center in both directions. This steel prevents the concrete from developing wide cracks and it helps keep the concrete all in the same plane over time. It’s important the concrete is poured on well drained compacted soil.

The concrete slab needs to be finished with a sandy or broom-finish and it must be in the same plane. Be sure it has some tilt to it so water drains off the slab and doesn’t puddle. Any water that falls on the patio needs to be able to drain away.

Should the patio have drainage?

Because you live where it freezes, I’d design your patio so it drains water away from the underside of the decorative stone. I’d want the decorative stone to sit on top of small rounded pea gravel that’s about 1 inch thick on top of the concrete. Water that falls on the patio will pass down to the pea gravel stone and then gravity will pull it to the sides of the patio. Be sure the low side of the patio allows this water to drain away through a buried pipe system on the outside edge of the patio. This prevents water from collecting under the decorative stone which will freeze in winter and cause havoc.

The center of the emblems would be installed using pigmented Portland cement mortar and fine sand. I’m sure the masons at Huntington Gardens used pure silica sand and white Portland cement based on my inspection. Silica sand is a great material because it’s a uniform color and quartz is such a durable mineral. You can easily get bags of silica sand where you live.

The rounded stone were set in fresh mortar to hold them in place. I’d make a strong mix of 2.5 parts sand to 1 part Portland cement. It will require some practice to get the mortar so it lays flat in between each rounded stone. I’m sure you’ll have to use a small stick or tool to tap the wet mortar to get it to the required height.

To achieve perfect results, I’d build a small patio first. You can test out your skills there to ensure the materials will all work well together. Don’t underestimate what water will do to the patio system in the winter months. You must engineer a way for rain water to rapidly flow off the top of the decorative stone and from beneath them.

Knee Pads - Get them - Use Them

Be sure to purchase some excellent knee pads as you’ll need them. You’ll spend countless hours on your knees building this patio, but it will be worth it.

Column 1176

December 23, 2016 AsktheBuilder Christmas Message

It's a glorious bluebird day here in central NH. The sun has been up for about 30 minutes or so.

Two days ago, the Winter Solstice happened about ninety minutes before sunrise. It's my favorite day of the year because after that point, there's more daylight each day if you live north of the Equator.

I want to first wish you a very Merry Christmas. It's going to be a good one here at the Carter house.

This past week Kathy has been baking all of her traditional cookies and other delicacies and I've been loitering around the kitchen telling her that we should "test" everything to ensure there's no poison in anything.

After forty-two years of marriage, she wasn't buying what I was selling. Every now and then she'd relent and allow me to have a warm and moist cookie or pastry fresh out of the oven.

One of my absolute favorite pastries she makes is a date bar recipe that's to die for.

Then there's the ginger cookies and the buckeyes. This year I suggested that we double dip the buckeyes and even make little rolls or peanut butter cylinders instead of round balls.

That went over like a lead balloon. I'm going to try making a batch myself.

Next week I'm going to take a day off and drive down to Mordor. That's what we call Boston around here. If you've driven around Boston, then you might understand why that name is appropriate.

I'm going to do a day of amateur radio *activating*, hopefully, at least four - if not five - National Park properties in and around Boston. I'm participating in the National Parks on the Air event. Click that link to understand what an *activator* does.

Right now, I'm the top activator in New Hampshire with a slim lead of just one! I've activated seventeen National Park units and the #2 radio operator has done sixteen. I want to make sure I end up on top as the event ends next Saturday at 6:59 pm Eastern Time.

If you live in and around Boston and want to try to do a fast meet up, let me know and I'll see if we can pull it off. I'm thinking that I'm going to come down next Thursday or Friday.

What's Happening in 2017?

Next week I'll spend a few days doing lots of planning for 2017.

Here's the first order of business:

Publish my Roofing Ripoff expose' book. I should have that ready for you no later than the third week of February.

If you've got a newer, say less than three-year-old asphalt shingle roof, then you absolutely need this book. Your asphalt roof is falling apart before your eyes - see all those granules tumbling off the roof? - and I have a magic thing you can do to make your roof last for decades instead of the six or seven more years you'll maybe get out of it.

If you're going to be installing a new roof in the spring, you NEED this book. You want to get the best shingles and you also need my magic discovery.

It will be available as a .pdf download, on Amazon Kindle and as a paperback.

I'm also going back into the small eBook publishing business. I need your help and you'll see a survey just after January 1st. The survey will allow you to take partial ownership of this new project.

I want YOU to tell ME what you want me to help you with.

I've decided that you, and especially the millennials, might need small picture and video eBooks showing you how to do simple and intermediate repair jobs around your home.

Do you agree? I'm going to do ten free ones to start. I'll want your feedback on the first few to get the format just right.

The next big thing for 2017 is a huge deal that's just starting to come to fruition. I can't tell you much about it at this point, but here's what you need to know.

If this deal happens, you're going to see LOTS more of me and the deal will provide the much-needed resources I've wanted for about the past fifteen years to EXTRACT much of the accumulated knowledge in my brain so it can be used by you to save time and money.

That's confusing and cryptic isn't it? But hang with me.

You're going to be able to HELP me make this deal come true.

How?

Just after the first of the year, I'm going to ask you to go to a local store in your city or town and purchase something. It's an astounding product and it's not expensive. I guarantee you it's something you can use around your home.

I'm also going to ask you to take the time to find the store manager or the owner and tell her / him something.

If you do these two things, then you'll set the wheels in motion to make the deal happen that much faster.

Stay tuned for all these exciting things!

2017 could quite possible be the best year for both you and me.

Let's make it happen together!

Please have a great Christmas with your friends and family. I know I'm going to do that.

MERRY CHRISTMAS to you and once again I ask that you watch the following video (click the link just below) and listen oh so closely to what Old Rose says to the explorer after he lets the Heart of the Ocean necklace slip through his fingers.

The words Old Rose speaks should be your touchstone for this Christmas and the rest of your life.

CLICK HERE.

Once again, have a MERRY CHRISTMAS!

I'll be back next week with more news and home improvement tips!

Tim Carter
Founder - www.AsktheBuilder.com

HO HO HO!

Do It Right, Not Over!

Majestic Fireplace Customer Service

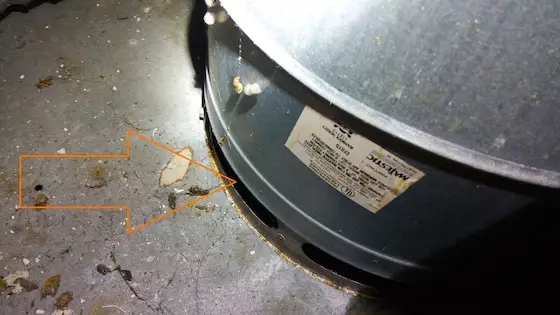
Majestic Fireplace Customer Service | The orange arrow points to the gaps that Davey is talking about. NEVER do a modified change or install with fireplaces. ALWAYS contact the manufacturer to see about how the device should be installed. DON'T guess or HOPE you're doing things right. © 2016 Tim Carter via Davey's perpetual permission to use his photo

Majestic Fireplace Customer Service

Davey lives in Baltimore, Maryland. Yesterday, he wrote me the following:

"I have a small townhouse with a corner fireplace (zero clearance) in the basement that was built 33-years-ago.

The seven years we've lived here we've always known there's cold air coming in from behind the fireplace.  Finally, I cut open the drywall and found where the cold air is coming in.

I have a Majestic MBC36 fireplace and where the chute (part CF815) meets the top of the fireplace is where the cold air comes in.  There are several long oval shaped holes between the chute and the fireplace, they are inside the chute but exposed where I can see them.

Is this an installation fail?  Somehow it feels like the chute is short by an inch and half that's why the holes are exposed.  Should I seal the "holes" with foil duct tape or do I need a gasket type of seal?

I get so much cold air it spills into the living space above and also make the flooring above really cold!

I have searched just about all your fireplace articles to make sure I didn't ask a duplicate question.

Thank you very much!"

I immediately responded that he should NOT apply flammable duct tape and that he should reach out and contact Majestic to see about talking with one of their engineers.

When dealing with fireplaces like this is necessary to always install them according to all written installation instructions. Davey might be able to find the old installation manual online at the Majestic Fireplace website.

If not, he - and you - need to CONTACT the manufacturer directly. Don't trust a third party in situations like this.

Davey got back with me the next day. Here's what he sent:

"Hi Tim,

Thanks for the prompt reply! I was pleasantly shocked!

Yes, I have actually tried to contact Majestic but they are so mysterious!  There's is no address or phone number or email on their website!  In fact, they openly say they don't deal with end users and that we should contact an authorized dealer. 

So that's what I will do.  This will be added to the list of things that were done wrong since day one (33 yrs) most likely by the lowest bidder. 

Thanks again!"

I run into the same problem Davey does on an increasingly frequent basis. Companies don't want to be contacted.

I'm sure there are numerous reasons, but no doubt they all are related to money and extra cost. Instead of running away from problems, I feel companies should SPRINT towards them. This is true with products that are directly or indirectly related to life safety.

Imagine if Davey had not reached out to me, Majestic ignores him or a low-paid employee at a Majestic dealer tells Davey, "Sure, tape over that gap." What happens if somehow that tape catches on fire and burns down Davey's house killing him, his family and his pets?

Are you a manufacturer? It's time you figure out a way to have stellar customer service and answer questions like Davey's without even thinking twice about it.

Slab vs Crawl Space Cost

Quick Summary:

  • Compare slab to crawl space wood floor cost
  • Pros and Cons of slab
  • Pros and Cons of crawl space wood floor

Karen lives in Saint Cloud, Florida. She emailed me the following:

"I would like to build a home that is about 600 sq ft with 1000 sq ft roof to cover the front patio and side carport. Would it be less expensive to pour a concrete slab or a crawl space foundation?"

She's like many consumers and wants to know what different things cost for any number of reasons. In this case she wants to know the difference between a slab foundation and a home that has a crawl space with a wood subfloor.

Without definitive specifications, it's almost impossible to quote a price. For example, will the slab have reinforcing steel in it or not? It should so all shrinkage cracks stay hairline and don't spread.

What type of wood joists would be used? Regular dimensional lumber, engineered floor joists? Would the lumber be treated to be less appetizing for termites that congregate in the moist sub-tropical Florida environment? 

Does the lot slope and would a slab require lots of fill that costs money?

But before you get frustrated and stop reading, you can do some quick calculations to see how the chips may fall.

Here's the quick list of the major material items you need to calculate for a slab:

  • site preparation and fill
  • termite pretreatment
  • vapor barrier
  • type and amount of steel reinforcing
  • cubic yards of concrete - don't forget to check with local code officials to see if the edges of the slab need to be thickened for frost protection and bearing wall requirements

Here's the quick material list for a crawl space wood floor system:

  • site preparation for footer trenches
  • concrete for footer
  • reinforcing steel for footer
  • concrete block or poured concrete for crawl space walls
  • steel i-beam for floor joist support
  • wood joists and sill plates
  • wood subfloor
  • termite pretreatment
  • high-performance vapor barrier

You'll probably discover the crawl space wood floor system materials cost more than the slab foundation. The amount of concrete or masonry involved in the crawl space starts to approach the total cubic yards of concrete required for a slab foundation, especially if you do the right thing and fill the voids in the block walls with pea gravel concrete.

But wait, there's more - as is often said in an infomercial on late-night TV!

What are the benefits of a slab versus a crawl space wood floor system?

Slab Pros and Cons:

  • Cooler floor surface on hot days
  • Great solid surface for tile installation
  • Plumbing drain pipes inaccessible in future
  • Slab failure / settlement expensive to fix

Crawl Space Wood Floor Pros and Cons:

  • Termites will eventually eat the wood
  • Ceramic Tile requires special underlayments and FLAT floors
  • Cool floor if covered with tile
  • Complete access to all plumbing and any other mechanical systems in crawl space

You can see it's not an easy decision and there's a reason why many many floor systems in Florida and the South are concrete slabs.

December 20, 2016 AsktheBuilder Newsletter

I'm back. I've got a BUNCH of new home improvement tips below, but first you may want to know about a recent trip of mine.

First, if you're COLD and your furnace or boiler is not working right, CLICK HERE to get FREE BIDS from heating contractors to discover what in the heck is wrong with your system. HURRY before they get swamped on Christmas Eve!

I was in central and southern California for about eight days spending quality time with my oldest and youngest daughter, my son-in-law, and several very good friends.

Although I had time to do one of my acclaimed meet ups, I decided against it this trip because I didn't want to waste one moment with my youngest daughter.

The alternative ending from the movie Titanic is burned into my brain and I think about it each time I'm with my family. If you've not seen this ending, CLICK HERE.

Pay very close attention to what Old Rose says to the explorer, Mr. Lovett, after he lets go of the Heart of the Ocean necklace.

The next time I come to the Left Coast sans my daughter, I promise you we'll do a meet up.

The Hearst Castle and Zip Lines!

The first two days out in California I got to do two very fun things: a canopy zip-line tour high among the redwood trees and we went to the Hearst Castle. Here's a photo of Kelly and me walking across a slippery bridge suspended between two giant redwood trees. It's a long way down, believe me.

In the photo below, I'm in my bright blue Helly Hansen rain jacket zipping between two trees. It kept me dry and warm on this chilly rainy central California day! CLICK HERE to see more Helly Hansen rain gear!

The canopy tour was spectacular. It was raining and Kelly and I were the only ones crazy enough to go out. Well, our two guides - Josh and April - were with us too.

It was surreal to have the forest to ourselves as normally there could be six other tourists with you up on the tiny platforms well over 100 feet in the air that circle the redwood trees.

I highly recommend doing this canopy tour at Mt. Hermon Adventures near Santa Cruz, CA. They'll keep you safe as you float down the zip lines!

The day after enjoying the redwoods, Kelly and I drove from Morgan Hill, CA to the Hearst Castle in San Simeon, CA.

It was very gray and foggy. Read about our amazing tour guide Shawn Harris. CLICK HERE to see the Castle, elephant seals and a stunning ceiling Shawn showed us. Then tell me in the comments below the column if you've met Shawn before while you were at the Castle.

If you want some great information about the Hearst Castle and William Randolph Hearst the business titan that built it, CLICK HERE and scroll to the bottom to see all the fantastic books you can get.

CLICK HERE or the following image for GREAT Power Tools!
Extension Cord and Dimmer Switch SAFETY

I have two new columns I want you to read about electrical fires.

A close friend of mine who lives in southern California and his wife almost died from an electrical fire. They were lucky because they were in the room when the fire erupted in the electric switch box. If you were to talk to him, he just brushes it off. But I know better.

Many are not so lucky.

CLICK HERE to read about my lucky friend and his gorgeous wife who survived an electrical fire to talk about it. Wait until you see the PHOTOS of the dimmer switch that caught on fire.

Why do you think the dimmer switch overheated???? Click the above link to see if you're making the SAME MISTAKE!!!!

Do you scratch your head wondering if a certain extension cord is SAFE to use?

CLICK HERE and perhaps I can help you understand how to pick the correct one.

Preventing CRACKED Granite Countertops

Granite is very strong rock. I should know as I'm a college-trained geologist and granite is my favorite rock of all time!

But Linda sent me some photos of an insane granite top installation and she needed some advice.

CLICK HERE and see if you would have done what Linda's contractor did!

Cast Iron Plumbing Drain Pipes - Remove or Keep???

Did you know I'm a master plumber? I've been one for about 35 years. I held a City of Cincinnati Master Plumbers license for quite some time.

I LOVE installing plumbing pipes of all types, even threading black iron pipe.

Lanny came to me with an interesting question concerning a bathroom remodel job.

CLICK HERE to discover something I'll bet you didn't know about cast iron pipe!

CLICK HERE to watch a video of PVC drain and vent pipes I installed in a new home just a few months back.

That's quite enough for today wouldn't you say?

I'm sure you're busy with Christmas right around the corner.

CLICK HERE to shop at Amazon if you need LAST-MINUTE gifts!

I'll have a SPECIAL Christmas message for you on Friday.

Watch for it.

MERRY CHRISTMAS to you early in case you miss my Friday message.

If you don't celebrate Christmas, then I'm sure you understand that I'm trying to wish you well this time of year.

I refuse to allow the Spandex one-size-fit-all Christmas greeting to pass through my lips or fingertips.

Tim Carter
Founder - www.AsktheBuilder.com

Do It Right, Not Over!