You can PREVENT this from happening by just installing two lag bolts through the back of the dresser into wall studs. Here are the easy step-by-step instructions:
Use a stud finder to locate the wall studs behind the dresser.
Trace a faint line on the wall across the top of the dresser using a pencil you can erase with ease or wash off with soap and water.
Slide the dresser out of the way for a moment.
Mark the center of the studs on the wall with a pencil about two inches LOWER than the top of the dresser and extend these lines up the wall so they're just above the top of the dresser.
Slide the dresser against the wall where you want it.
Transfer the pencil marks that are the center of the studs to the top of the dresser using a faint pencil mark.
Slide the dresser away from the wall and use a small torpedo level to make lines down the back of the dresser that represent the center of the wall studs.
Remove the top drawer(s) from the dresser.
Use a 5/16-inch drill bit and drill two holes through the back of the dresser about 2 inches down from the top. Drill from the back of the dresser. Don't put the drill inside the dresser trying to guess where the holes should be, that's way too hard.
Slide the dresser back into position on the wall making sure the pencil lines on top line up with those on the wall!!!
Put your arm inside the dresser and insert a pencil into the holes in the back of the dresser to make two small dots or circles ON THE PENCIL LINES that are on the wall.
Use a 3/16-inch drill bit to drill into the wall at the two marks making sure you hit solid wood. Drill the holes 2 inches deep.
Get two 1/4-inch lag bolts that are 2.5 inches long as well as flat washers. Insert them from the inside of the dresser so they poke out the back.
Line the bolts up with the holes you drilled into the wall and start to spin them clockwise.
Use a socket wrench to tighten the bolts into the pre-drilled holes in the wall and tighten so the dresser will not move.
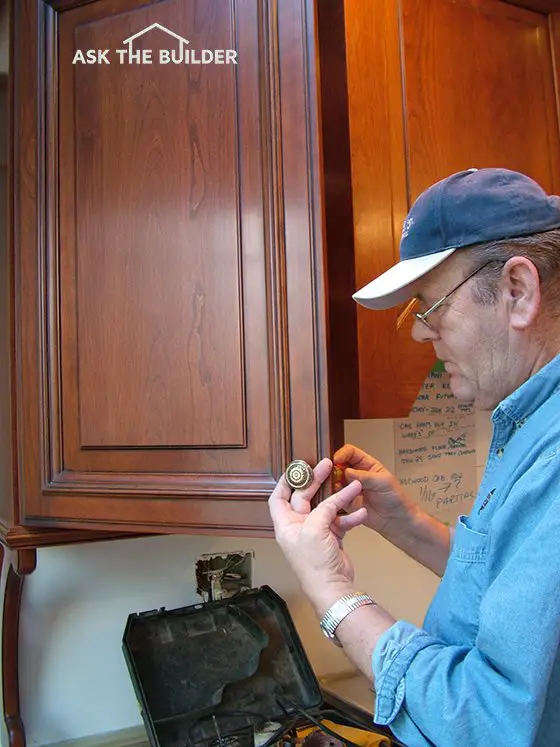
DEAR TIM: I am struggling with cabinet knobs on my new kitchen cabinets. The cabinet knob placement has me scratching my head. How do you know where to place kitchen cabinet knobs and pulls? Should I use cabinet knob backplates? Can you tell me the proper way how to position cabinet knobs? Lois M., Canton, GA
DEAR LOIS: You are by no means the first person to struggle with cabinet knobs. I have seen knobs placed in all sort of places on cabinet doors, but there is a standard many carpenters seem to follow that has worked well for me and many of my customers over the years.
Cabinet knobs are a great example of a utilitarian item found in just about every home that is a crossover between function and form. The knob performs a very important job by allowing you to easily open a cabinet door. But at the same time, the knob needs to look good , and more importantly, its placement on the door must look right.
I am a huge proponent of function being more important than form. When you think about cabinet knob placement, you want the knobs at a height where they are comfortable to reach, and they provide the greatest amount of physical advantage or leverage when opening the door.
Easy Open
The farther away the knob is from the hinge, the less effort you need to open the door. You can prove this easily by placing a knob on an old cabinet door. Put the knob in the center of the door and you will quickly see it takes far more effort to open the door than if the knob is on the outer edge of the cabinet door frame away from the hinge.
Small Target
The cabinet knobs for kitchen wall cabinets seem to work very well when they are placed somewhere between 2.5 and 3 inches up from the lower corner of the cabinet door opposite the hinge side of the door. Since many cabinet doors have frames that surround a raised decorative panel, center the knob on the frame or flat area of the frame. Many cabinet door designs are different, so carefully look at the knob on the door before you make the final decision.
The cabinet knobs for kitchen base cabinets are placed somewhere between 2.5 and 3 inches down from the upper corner opposite the hinge side of the door. When knobs are placed in these locations, you will discover that your hand comfortably can grab them without your arm stretching.
This is a set for both doors and drawers. CLICK THE IMAGE to BUY IT NOW.
Backplates
Cabinet knob backplates can be very useful. They often prevent dirt and grease from fouling the cabinet door finish. Some people do not like the look of backplates, as they can make the cabinet door look hardware heavy. I would suggest testing one to see how it looks on your cabinet door. Install a knob with a backplate on one door and then a knob on another door nearby and see which one makes you feel better.
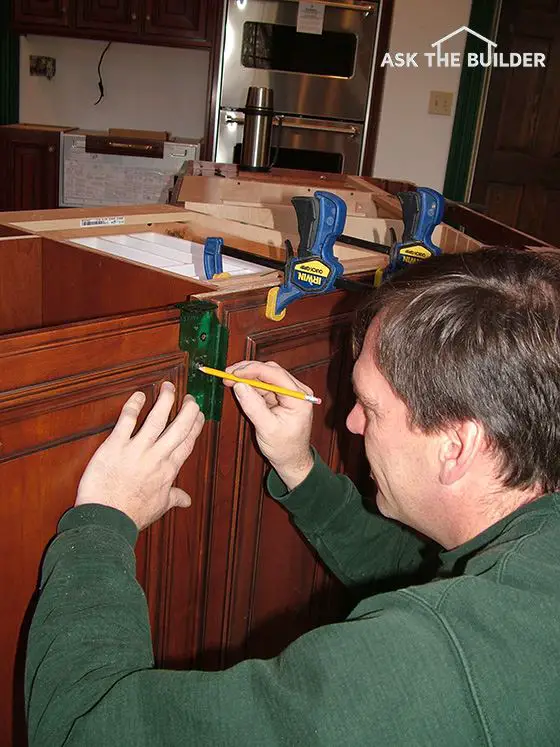
You can use a tape measure and a pencil to make a mark on the cabinet door showing you where to drill the hole for the screw that holds the knob in place. But let my voice of experience tell you that this can be dangerous.
Templates
If you are tired, distracted or just make a mistake, a knob will end up in the wrong place. It is better to use a template that fits over the corner of the door. The face of the template has a hole in it at the precise location where the knob will be. You then trace the outline of the hole with a pencil and drill a perfectly-located hole each time.
Plastic templates can be purchased at many hardware stores, home centers or fine hardware stores where you can buy premium cabinet knobs. The plastic templates are inexpensive and allow you to drill holes in the template for different locations to match your final decision on cabinet knob placement. I prefer to place masking tape over any extra holes so that only the hole I want to use is open. This prevents errors.
Be sure to use the proper length screws for cabinet knobs. The fastener must penetrate into the knob a minimum of 1/4 inch. Be careful when tightening the screws. Use screwdrivers that fit into the screw slot tightly. If the screw driver slips as you twist that final partial turn, the screwdriver can slip off the screw and scratch the inside of the cabinet door.
IMPORTANT TIP: Drilling the hole for the knob should be done very carefully. The drill bit should be the same diameter of the screw or possibly larger by only 1/64th an inch.
Drill from the front of the cabinet door to the back, but apply minimal pressure as you complete the hole. If you push too hard as you drill, the drill bit will explode out the back of the cabinet door leaving an ugly mess of splinters and chips of wood. Often the screw head will not cover the damage.
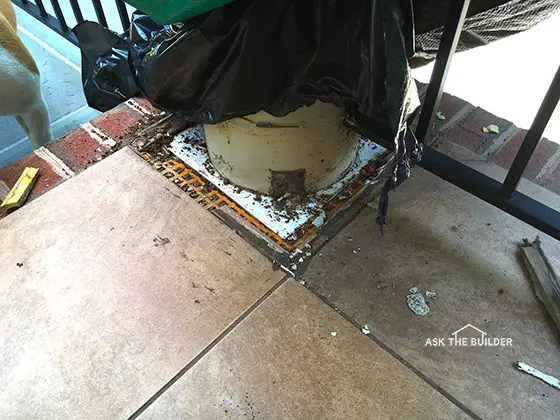
DEAR TIM:I’ve got water leaking and infiltrating the underside of my front porch. My house is about ten years old. The porch has a roof over it with a decent overhang, but the floor system is regular wood joists covered with plywood. The contractor installed a waterproof layer over the plywood, then ceramic tile filled with urethane grout. The ceramic tile overlaps row-lock brick at the edges of the porch. What could have possibly gone wrong and how can it be fixed? How would you have built this porch if you were the builder? Steve G., Ellicott City, MD
DEAR STEVE: I’m really sorry you’re having these water leak issues with your front porch. You’ve got a real mess on your hands and I’m afraid I’ve got distressing news from you based on all the photos you sent me. You’re going to have to demolish everything and start over.
I’m fortunate to be old enough to have worked on many older homes that had wood front porches that stood the test of time and were built somewhat similar to yours. The big difference was the materials used and the method of construction. In fact, the second home I owned had a wood front porch. This house was about eighty years old when I purchased it and the porch had virtually no rot even though it was open on three sides and had a roof overhang similar to yours.
The reason why my porch lumber didn’t rot was because the wood for the porch decking was tongue and groove vertical grain wood that not only sloped away from the house, but the individual boards were also installed so the interlocking tongues and grooves pointed away from the house. These decking boards overhung the porch fascia and framing by about 3 inches.
The wood joists under the porch and the tongue and groove decking were old-growth timber that had about a 50-50 ratio of summer wood to spring wood. This high concentration of dense dark-grained summer wood made the wood very rot resistant. The wood decking was also painted and the paint was always kept in good shape.
The wood used to build your home and front porch deck has been hybridized so it grows fast. As such it has a much higher concentration of the lighter-colored spring wood in the annual growth bands. This spring wood is very susceptible to wood rot because it’s not nearly as dense as the dark summer wood. The darker bands of summer wood are so dense they have a hard time absorbing water.
I feel the contractor who built your porch didn’t have a full understanding of how water migrates through and around building materials. At the very least, the plywood deck should have been covered with the best ice and water shield product that seals to itself and just about anything it touches once it heats up. This membrane needed to lap up on the walls of the house next to the porch and then lap over the finished exterior wall surfaces below the porch. Properly installed this membrane would have created a waterproof barrier over the wood framing system.
So long as the wood-framed porch had a slope built into it allowing it to shed water to the outside of the building, any water that penetrated through the tile floor, around the waterproof substrate under the tile and around the large corner support column would have just eventually made it to the outside and never touched the wood. But don’t underestimate how hard it is to install a membrane like this and have it work.
You also were inviting all sorts of issues with any connections between porch railing supports and the porch floor. Each one of these is a possible entry point for water.
While it’s impossible in this small amount of space to share all construction details, had I been the builder on the job I would have tried to convince you to install a properly flashed poured concrete porch floor that rested on masonry foundation walls on all sides of the porch. The technology to do this and prevent water infiltration into the storage space below has been known for decades. The house I grew up in had a poured concrete porch with a roof over it. It was exposed on three sides and the storage room below never had a drop of water in it.
If you resisted using concrete, then I would have insisted that the entire wood system that was installed be all treated lumber, including the plywood decking. As you know, treated lumber can resist wood rot quite well. Many people are unaware that you can purchase sheets of treated plywood. It’s readily available at traditional lumber yards near you.
The porch would have had a slope to it so any water that hits the plywood drains away from the house. I would have made sure the waterproof membrane that was applied to the plywood overlapped another waterproof membrane that was on any wood-framed walls that might support the porch floor. Picture how a traditional asphalt shingle roof works where one shingle overlaps another and works with gravity to keep a house dry. You need to do the same thing to waterproof any wood-framed structure including walls and floors.
The final finished flooring of the porch would have been installed and it would have overlapped the exterior lower section of the porch by 3 inches. I would have made sure there was a drip kerf in the underside of the overhanging material so water would not run back to the vertical walls.
I've got some great news for you. In fact, I'd love your input.
A month ago, I was in California and had a meeting with a friendly competitor of mine, Don Vandervort and his son Kit. Don owns the website hometips.com.
We were talking about how we could help one another, and Don suggested something that my oldest daughter Meghan had talked to me about, are you sitting down? Seven years ago.
Meghan and Don suggested that I go back into each old page at my website and refresh the content and add a small bullet-point list at the top of each page telling you the most important stuff.
It's a daunting project. You're talking about thousands of pages of content. This is one reason I shirked away from the task.
I started doing that two days ago and made some good progress. It's going to take months of work chipping away at it about two hours a day, but I've decided to do it.
How is this going to help you?
I've been astonished at some of the content I wrote twenty years ago that I've not looked at but is very relevant to saving you TIME and MONEY today.
As you might expect, there's new information to be added to quite a few columns because I've been exposed to more data, new products and more life experience of my own.
For example, I used to feel really great about asphalt shingles. In the past 16 months, I've discovered some very shielded information about these products and my opinion has changed 180 degrees.
That's why I wrote my Roofing Ripoffbook that should be ready for you in about seven weeks.
Here's what I'm going to do now each issue of the newsletter.
I'm going to publish the headline of each page and make it a link. You'll see the first list below.
I recommend that you open each page and scan the bullet-point list. But realize there's MUCH MORE goodness below the list!
I GUARANTEE you that you'll save a boatload of money and time doing this. Plus, I've included all sorts of new links in these revised columns to new products and tools I love that will help you.
For example, are you getting ready to remodel a bathroom or kitchen or some other place where you don't want the drywall to get ruined by water or water vapor?
Then CLICK HERE to read about a SECRET TRICK I discovered that can make drywall almost completely immune from water damage caused by splashing or direct contact, not flooding mind you!
Asphalt Shingle Warranty Survey
This coming week I'll put in the latest information into my Roofing Ripoff book and it will be done as far as I'm concerned.
But I need one last thing from you. It's very important.
Please CLICK HERE and take a survey. You'll be able to see how your answers compare to everyone else's once you click the Submit button.
CLICK IMAGE BELOW to get SWEET DEALS on Power Tools! Five Contractor Hiring HACKS
A month ago I created a new page at my website for your benefit.
The inspiration for it comes from the daily avalanche of emails I get from people who get burned during a construction project.
The most common root cause is: HOPE
You, almost always, HOPE that everything is going to go well and you HOPE the contractor will treat you like you treat others.
Hope is the emotion of last resort.
You hope for things you can't control like the weather and if you might get rescued from a deserted island.
You CAN CONTROL your destiny when it comes to working with a contractor.
CLICK HERE, read the five simple hacks and you'll have a huge advantage next time you hire a contractor.
BTW, a contractor friend of mine here in New Hampshire saw this list and really objected to Hack #4. Go look to see what it covers. I guarantee you'll discover something new there.
REVISED Columns at AsktheBuilder.com
Okay, here's a list for you of some of the columns I've revised.
I'm serious when I say you should CLICK EACH ONE if for no other reason to see the bullet-point list. Have fun!
Pete lives near the seacoast in southeastern New Hampshire.
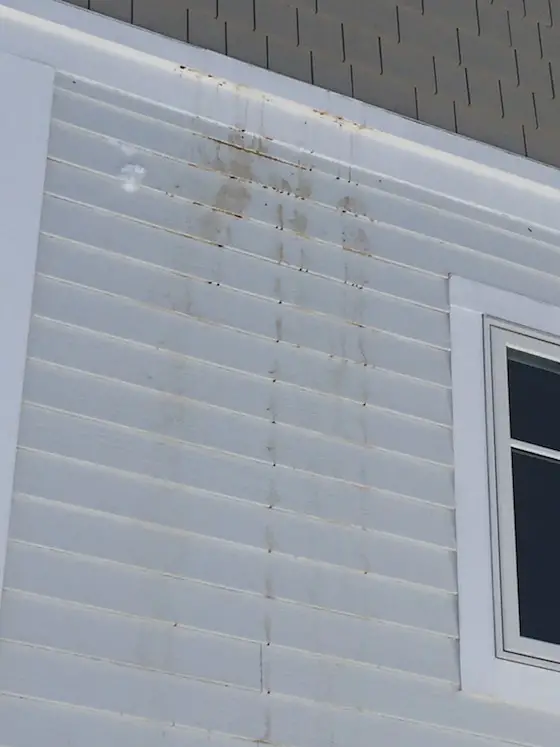
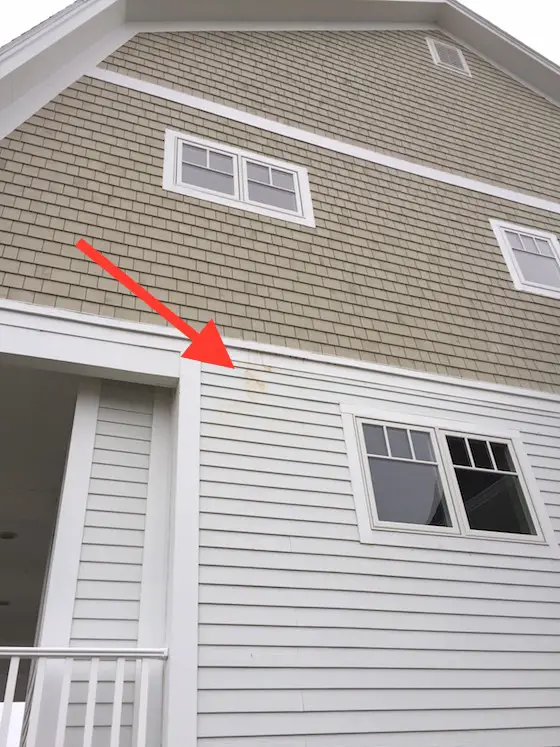
He emailed me the following photos on January 8, 2017, showing brown stains on the side of his house. This date provides a very important clue as to the problem. Here's what he had to say:
"My family and I built our new home (we general contracted it) and we moved into it in November of 2015. Since then there haven't been any issues with the siding, however a week ago I noticed a bunch of brown streaks/stains on the east side of the house. I thought it was bird droppings at first so I power washed it off. Fast forward a week later and the stains have reappeared in the same spot. After further research, it looks like I likely have water getting behind the cedar shingles, and from there it is going down the OSB (ZIP System) until it hits a horizontal trim piece which you can see from the pictures. From there, the water is flowing out over the trim piece and down the white James Hardie board siding.
There is a window directly above where the stains are occurring so I'm wondering if somehow water is getting in from above or directly below the window. I haven't had a chance to get a ladder out and take a closer look yet. I don't think the water is getting behind the cedar from way up above the window because you can see a horizontal trim piece above the window and there is no staining on it. If the water was getting in above that point, I expect the water would flow out once it got down to this trim piece and cause some staining up there.
It also looks like there is some very minor staining elsewhere at the corner of the house about 15 feet away from the main staining under a gutter. I'm thinking these may not be related but I'm not sure. What does everyone think is causing the staining and where is the water getting in if you had to make an educated guess?
Also, I didn't mention that the walls are insulated with closed cell spray foam and under the cedar is Benjamin Obdyke Hyrdrogap wrapping and Zip System OSB with taped seams."
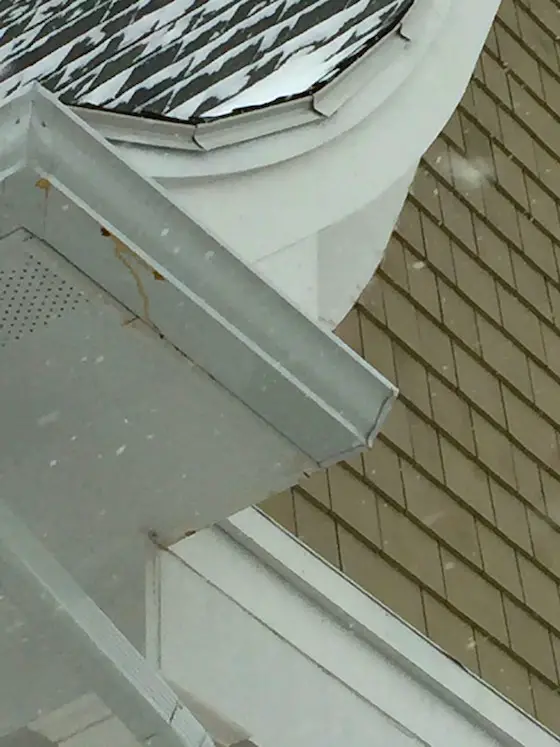
Here are the photos Pete sent. Below them I'll address the possible issues and what I think is going on.
The previous year in New Hampshire was very dry and extreme drought conditions were happening where this house is located
The stains first appeared after one year
The stains appeared in cold weather, although there has been some rain in southeastern NH in the past month
The z-flashing above the top white horizontal fascia board that goes behind the siding extends over to the soffit adjacent to the gutter
Cedar and redwood contain natural chemical preservatives that dissolve in water. The technical name for the stains on Pete's house are extractive chemical stains. Because they dissolve in water, that's why Pete was able to wash them off the first time.
I'm at a disadvantage because I've not been on a ladder to inspect the problem closely, but my first suspicion is improperly installed z-flashing above the topmost white horizontal fascia board.
The carpenters could have installed this flat with hard 90-degree bends instead of making the part on top of the flat edge of the white trim slope towards the outer bend. By making the bend in the metal flashing more than 90 degrees, it creates a tilted profile so water rapidly drains off.
The z-flashing also has another obvious defect. The front edge that's visible should have come down across the face of the horizontal white fascia board about 3/8 inch and then had a 30-degree bend on the last 3/8 inch of material so the bottom edge of the metal in no way touches the white board.
Allowing the metal to touch the board creates a capillary attraction issue for the water that comes to the bottom tip of the z-flashing. This water can be drawn back up underneath the metal because of the natural surface tension in water.
My guess is the carpenters didn't work with the painters on the project. the cedar siding should have been pre-painted on all sides and edges two coats before it's installed. This would prevent water from soaking into the wood and dissolving the extractive preservatives.
I'm also quite certain the carpenters probably placed the starter row of cedar shingles/shakes in contact with the z-flashing. This is a critical mistake. They should have been held up off the back bend of the metal at least 3/8 inch. If the shingles/shakes are in contact with the 90-degree metal the unpainted bottom of the shingles/shakes readily absorbs the rainwater that collects on this ledge.
The stained water on the flashing is then running over to the end corner of the house and running down to the soffit and getting onto the gutter.
Finally, my guess is the z-flashing has simple overlapping joints. I'm guessing it's also made from aluminum coil stock. You can't solder aluminum. Any lap joints should have been made with interlocking hammered flat seam joints to prevent water infiltration.
Size water line - The red arrows point to a large-diameter 1-inch feed line for all the hot water in a home. Behind it on the wall are smaller-diameter 5/8-inch supply lines to each fixture. Copyright 2021 Tim Carter
"Waterline size determines the amount of water flowing from a pipe. Bigger is better if you want lots of water in a short time."
Revised February 2021
Size Water Line TIPS
Larger diameter water lines create less friction
1-inch pipe less than 100 feet to a house is good
Size Water Line Videos BELOW
8-inch-diameter water main supplies hundreds of homes
Want to listen to this column? Use the following audio player:
My guess is that most people don't think twice about the water that will flow from the faucets in their new homes. You may not even give a second thought to the noise water makes when rushing through water lines.
Because you are moving into a new home, my guess is you might assume a waterfall of water will cascade from each faucet and hose bib.
Don't count on it. Your builder or plumber may have made a few mistakes that can restrict the amount of water that flows from faucets. These same mistakes can also cause significant water pipe noise that drowns out conversation and other pleasant sounds around your home.
If you are in the planning stages of building, you can correct these problems before they happen. A water supply pipe of a given size can only supply a given quantity of water at a given pressure and a given hydrostatic head. Hydrostatic head commonly refers to the vertical distance a water line extends.
Size Water Line Video
This short video is fantastic. Pay attention to the first two numbers he quotes!!! HUGE difference in volume for just a tiny increase in pipe diameter!
If you live near a water tower, you want to be as far downhill from it as possible. Usually, these towers are placed at high points in the landscape. To have the best water pressure, you want to be in a valley with as much vertical distance as possible between you and the bottom of the tank. The greater this distance, the greater the hydrostatic pressure.
High Water Pressure From Elevation
In Cincinnati, Ohio for example, if you have a home in the Mill Creek valley below all the hills above you where the water tanks are, your water pressure could easily be in excess of 200 pounds per square inch (PSI). The land above the valley is 400 feet higher in elevation. The weight of the water in the pipes between the valley and the hills above presses down and creates very high pressure.
If you are trying to push water up a pipe from a basement to a second floor, gravity is doing its best to exert an opposite force against the water pressure. Gravity becomes your friend and increases water pressure if you store your water up on your roof, but how many people do you know have 5,000-gallon storage tanks in their attics?
This is what you'll find in large office towers, hotels, hospitals and other buildings where lots of people could be using the plumbing system at the same time.
3/4 Inch Is Okay | 1 Inch Is Better
You need to have lots of water capacity coming into your home, even if you don't need it all the time. For most homes in most cities, a 3/4-inch line might be sufficient, but if you have the opportunity to specify the pipe size, put in a 1-inch line. I'm a master plumber and believe me, you'll never regret doing it.
Plumbers and builders know that people rarely turn on more than three or four plumbing faucets at the same time. But it can happen.
If you want a plentiful supply of water to flow from each faucet, you must be certain that the main water line entering the house and the main feed line within the house is at least three-quarter inch in diameter or possibly one-inch in diameter. This larger sized pipe can carry a significant amount of water.
Size Water Line Software
Watch this short video to see computer software that will help you SIZE your water lines. It's from Australia, but the principals are the same all over the world.
Be sure your well digger puts in a 1 and 1/4-inch plastic line from the well to the inside of your home. Usually, it's a short distance and you'll never regret the larger pipe. Remember, it's easy to put in the right size pipe when the trench is open. If you try to do it later, it's an enormous, expensive, job.
If your home is far away from the water main, up a hill and it's a monster job to install a water line, you can't make a mistake. It's well worth a $500 fee, even $750, to pay a mechanical engineer to size the water line you need. It's very possible you may need a 2 or 2.5-inch diameter water line if your home is 500, or 1,000, feet from the city water main. Do NOT GUESS. You'll regret it.
Install Large Pipes to ALL Bathrooms!
All too often, a rookie plumber might start to prematurely reduce the size of the water lines in a home. If you see one-half inch diameter water lines that serve two or more fixtures, trouble may be just around the corner. If your new home has three or more bathrooms, consider keeping the cold water pipe size one inch until it has served the water heater, the first bathroom group and possibly one or two outdoor hose bibs.
The main water line can then be reduced to three-quarter inch diameter to serve the remaining bathrooms, laundry room, hose bibs, etc. One-half inch diameter pipes can branch off the three-quarter inch line to serve individual fixtures. Extend the three-quarter inch line until you get to the final two or three fixtures in the house.
This is very important if you want great pressure and volume in all bathrooms.
Large-Diameter Pipes are Quieter
Pipe noise is also a function of pipe size. Larger diameter pipes create less noise because the velocity of the water moving through the pipe towards the fixture is lower. You can also minimize pipe noise by specifying a thicker pipe size.
If you are using copper tubing in your new home, it is very likely that type M copper will be used indoors. This is the thinnest pipe allowed by most plumbing codes. Thin pipes transmit noise more readily than thicker-walled pipes.
Use Thicker Pipes Too
The next thicker pipe type is L copper. Look at a piece of L vs. M copper and you will not see any difference. But pick up a 10-foot long piece of each and you will immediately realize the type L copper weighs more. This extra copper absorbs sound.
The fantastic news is that the cost upgrade for type L copper in a typical residential home is less than $275.00. (2017 prices) This is a one-time fee that allows you to have quiet water supply piping for the life of the home. It is a very small price to pay for peace and quiet.
Drill Large Pass-Through Holes
Finally, be sure the pipes are not in a bind as they pass through wall studs, wall plates and floor joists. The holes need to be slightly oversized so the water pipes can expand and contract freely.
Pieces of rubber that absorb vibration can also be installed between the pipes and any wood framing. Installing the strips of rubber can be a hassle, but any acoustical engineer will tell you it helps to stop noise transmission.
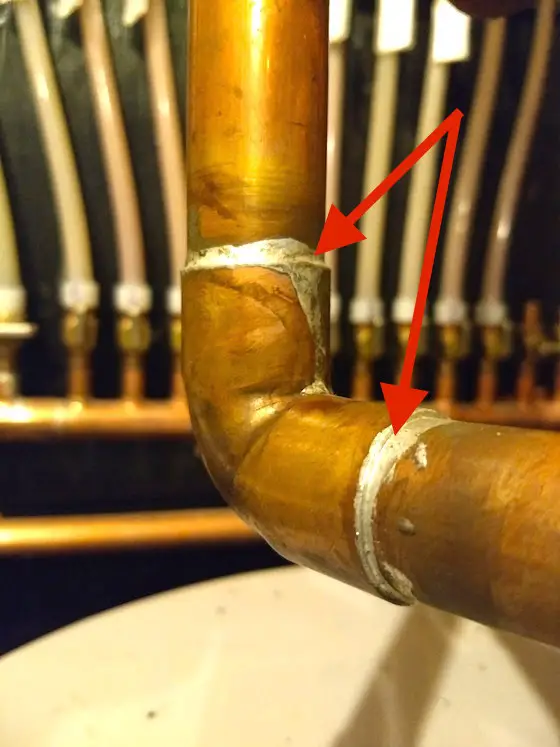
I'm a master plumber, albeit not a PhD metallurgist, and am here to tell you that if you try to unsolder a fitting from a copper pipe that's filled with water, you'll get nowhere fast.
The water sucks all the heat out of the copper never allowing it to get to the several-hundred-degree temperature needed to melt the solder.
So think now about the HMS Titanic. Put on your high school physics hat.
A large fire in the coal bunker would create all sorts of horrible smoke. Were there any historical mentions of this smoke?
If the fire was immediately next to the steel hull, the ship passing through icy water the entire journey would not have seen the steel temperature get very hot at all. The ship moving through the water provided constant cooling to the steel, quite unlike an acetylene torch aimed at a tiny copper pipe filled with a small amount of water.
In other words, the steel hull was being cooled constantly much like you see water flowing over a spinning wet-diamond cutting blade. I'll mention the water used to cool these blades is rarely at 34 F.
Whenever you read sensational stories about things like this, stop and use some common sense.
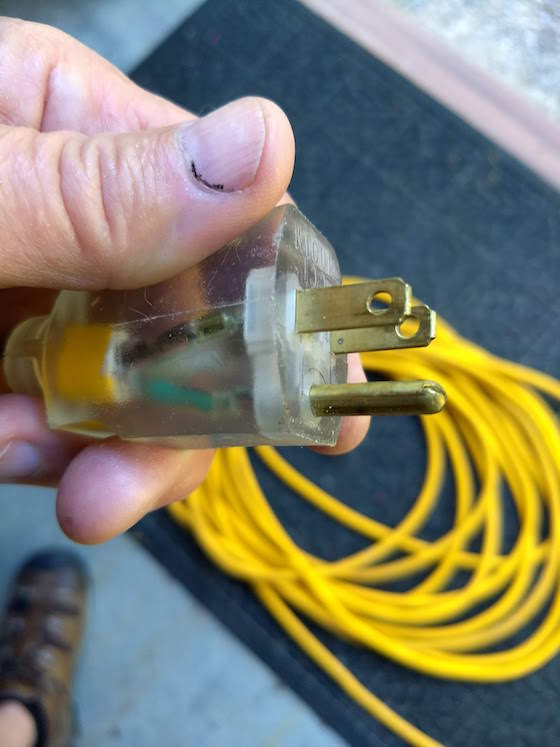
Extension cord sizing is not a guessing game. This is a beefy 12-gauge extension cord. This is the male end in my hand and the female end has a small glowing light in it when energized. Copyright 2018 Tim Carter
"Electricity encounters friction as it travels through electrical wires. Knowing this, use only as much extension cord as you really need. I can call you on the phone to answer your extension cord questions so you don't get KILLED or BURN DOWN YOUR HOME. The call is FREE if you're not satisfied with my answers.CLICK HERE to set up the call."
Extension Cord Sizing Checklist
Determine the amperage of the tool/appliance
Calculate cord length - use the shortest possible cord.
Wire gauge determines amperage load
Watts = Amps X Volts Example: 2,400 watts = 20 amps X 120 volts
The size of your extension cord is very important. If you under-size one, you can start a fire or ruin an expensive tool.
CLICK on my face to ensure you get the CORRECT extension cord so you or your family doesn't DIE IN A FIRE.
Fortunately, many common small hand-held electrical tools can operate without danger of motor damage when powered by a 16 gauge cord that is 100 feet long. To make sure you're properly protected, use the following sizing guidelines below.
How Do You Start to Size an Extension Cord?
You start to size an extension cord by obtaining the motor amperage from the plate on the tool. You'll find this information on the small metal plate where the serial number and model number is listed.
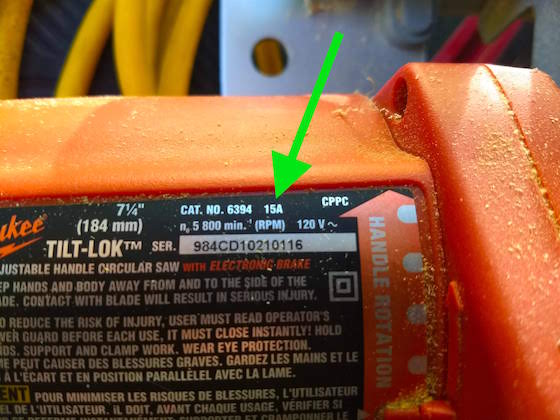
The green arrow points to the amperage of this professional circular saw. It shows 15A. That means 15 amps. Copyright 2018 Tim Carter
Usually, you will see an amperage rating. A tool may say it's rated for 8 amps. That's amperage.
What is Ohms Law?
Ohm's law is a physics principle that helps keep you safe with electricity. In its simplest form Ohm's law is:
Volts X Amps = Watts
This simple formula helps you to understand the sizing of extension cords because you may be required to convert an amp rating on a tool or appliance to watts.
Think about a light bulb. They're often sized by watts. The voltage in most circuits in USA homes is 120 volts. You may have a circuit breaker panel in your garage that has 15 or 20-amp breakers. All of these things concern Ohm's Law.
If for some odd reason, you see watts listed instead of amps, you can convert watts to amps easily!
Here is how you do that: The formula for the conversion is:
Voltage x Amps = Watts
120 x 20 = 2,400
120 x 15 = 1,800
Because we use 120 volts as an electrical standard here in the USA, that means that every 600 watts equal 5 amps (120 x 5 = 600).
What is Voltage Drop?
Voltage drop is the loss of voltage as it travels down a long wire.
Voltage drop is real. Electricity encounters resistance as it travels through electrical wires. Knowing this, use only as much extension cord as you really need. Resistance in the real world often creates friction which in turn almost always creates heat.
You can do your own simple experiment to demonstrate somewhat how this works. Use your one hand to rub your forearm back and forth. Go slowly at first and you may not feel much. Increase the speed of going back and forth and press down harder as you rub. That increased resistance will make your skin feel HOT for sure!
In other words, don't use a 100-foot cord for a project that is only 20 feet away. Purchase and maintain an assortment of different length cords.
Can I Have Multiple Tools On 1 Cord?
Yes, you can have multiple tools operating on one extension cord. You just have to be sure the cord is large enough to handle the loads.
I was guilty of this infraction many years ago before I fully understood all that was involved.
On construction sites, we'd commonly feed multiple saws and drills from one cord. If the circuit breaker at the panel is working fine, then you'll pop the breaker if there's a current overload.
But, if you've got a smaller-gauge extension cord, it's possible to overheat the cord and melt the insulation before the circuit breaker would trip!
However, if the breaker is bad you can either burn up the cord or damage tools from voltage drops. Use common sense.
How Do You Size an Extension Cord?
You size an extension cord by first determining the appliance or tool that will be plugged into the cord.
Determine the amperage of the tool(s) being used. Here is a handy list of some common electric power tools. The average amperage is listed below the tool. Always check on your tool label for its specific amperage.
Here are some COMMON amperage ratings of tools around your home:
Circular saw: 12-15 amps
Power drill: 3-7 amps
Hedge Trimmer: 2-3 amps
Weed Wacker: 2-4 amps
Electric Chain Saw: 7-12 amps
Leaf Blower: 6-12 amps
Electric Lawn Mower: 6-12 amps
Table Saw: 14-20 amps!
Reciprocating Saw: 6-8 amps
Router: 4-6 amps
Is the Length of the Cord Important?
Yes, the longer the cord is the greater the voltage drop will be. If you must go a distance greater than 100 feet, then upsize the extension cord.
Calculate the length of the cord you will need. Of course, you want to determine the maximum distance you think you will be from a permanent electrical outlet.
What Does Wire Gauge Mean?
Wire gauge is the measure of the diameter of the metal conductors in the extension cord. Common extension cord wire gauges are:
18
16
14
12
10
Use the following list to select the proper gauge extension cord. Remember, wire gauge refers to the thickness of the actual copper wire. As a wire gets thicker it can carry more electricity (amps). To confuse us, some idiot decided that as a wire gets thicker (bigger) the gauge number should get smaller!
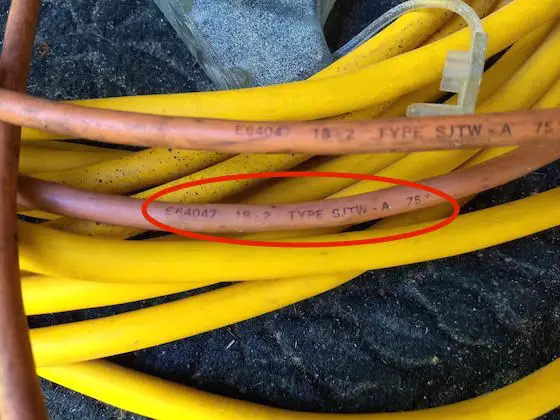
The orange cord is only 18 gauge. Look how thin it is compared to the yellow cord that's 12-gauge. NOTE the 18-2 before the word TYPE in the red oval. That's how you know it's 18-gauge wire. Copyright 2018 Tim Carter
Here's what I mean. A 14-gauge wire can handle LESS current than a 12-gauge wire. The number 14 is bigger than 12. Confused? You should be!
What Load Can Each Gauge Wire Handle?
16-Gauge Cords: Any 16-gauge cord between 0 and 100 feet long will adequately handle tool loads up to 10 amps.
14-Gauge Cords: Any 14-gauge cord between 0 and 50 feet long will adequately handle loads between 10 and 15 amps.
12-Gauge Cords: If your tool load is between 10 and 15 amps and the length of the cord is 50 to 100 feet, you need a 12-gauge cord to safely power any tool.
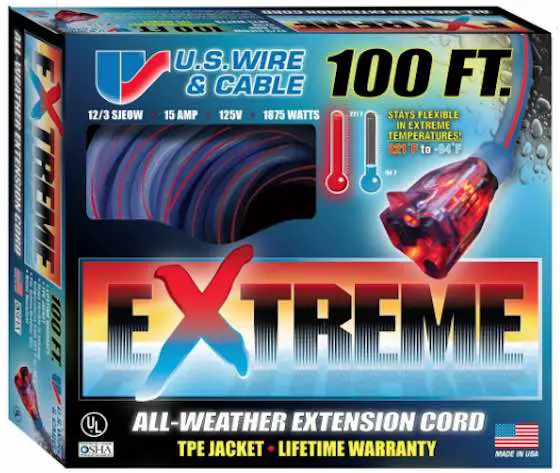
This is a great extension cord for many purposes. CLICK THE IMAGE NOW to have it delivered to your home.
Why Does my Circuit Breaker Trip With the Right Cord?
Your circuit breaker may trip because the tool you're trying to power draws too much current. This is very common if you're trying to operate a large table saw cutting thick wood.
CAUTION: Most circuits in ordinary houses are wired with 14-gauge solid copper wire. This means you'll see a 15-amp breaker on the circuit breaker panel.
You may purchase a 12-gauge extension cord thinking that you'll be able to operate a powerful table saw but the breaker will probably trip when you load the saw. Remember, the circuit is rated for the SMALLEST SIZED cable or wire in the circuit.
Do Other Things on a Circuit Add to the Load?
Yes, other things, like a garage light or some other appliance, could be on the same circuit you've plugged the extension cord into. This adds to the total load on the circuit! You may think you have 15 amps available going to your extension cord, but several of those amps might be in use from something else.
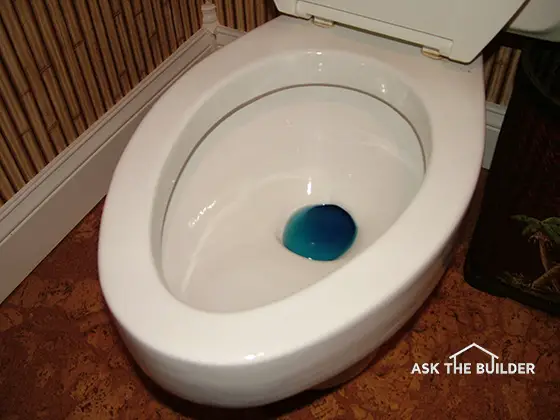
Sewer gas smell often comes from a floor drain like this one. Sewer gas smell can also come from a rooftop vent pipe and I show HOW TO SOLVE the problem on this page. This is a floor drain inside a Men's Room at a hotel. Under the metal grate is a water seal you can't see. Water evaporates allowing the gas to enter the room. Custodians and cleaning personnel need to pour a gallon of water into floor drains like this at least once a week. Copyright 2018 Tim Carter
Sewer gas smell is caused by invisible gas that enters your home from your plumbing pipes. The most common source is dry floor drains. The second-most common source is a bad wax seal under a toilet.
Sewer Gas Smell Tips
Source of the odor is usually where it's strongest
What happened just before you started smelling the odor?
Did you get a new washing machine or have a drain cleaned?
Does something happen just before you smell the odor?
Want to listen to this column? Use the following audio player:
DEAR TIM:My daughter's house has a chronic sewer gas smell problem. The odor is strong when it rains and the furnace or air conditioner is operating.
The odor gets so bad my daughter and her family evacuate the house. Three plumbers have not been able to solve the problem and we have checked all plumbing fixture traps, caulked where the basement floor meets the foundation, etc.
My daughter is ready to sell the house for a loss. Can you help? Dave S., Shelby Township., MI
DEAR DAVE: Sewer gas can be a vexing problem to solve, but it is by no means impossible. As much as I hate to say it, the three plumbers that were consulted are either inexperienced or they do not keep up with technology.
The good news is I doubt your daughter has to move and take a loss. It is my guess the source of the odor can be found and repaired for less than what a moving company would charge just to move your daughter and her family.
Before you read more of my answer, I can SOLVE your sewer gas problem on the phone in less than 15 minutes. I've been a master plumber since age 29 and have solved hundreds and hundreds of sewer gas problems.
I've helped HUNDREDS of suffering homeowners just like you and the odor goes away in hours.
Sewer gas is created by the decomposition of waste materials that are found in public and private sewer systems and private septic systems. The characteristic odor can be overpowering and it is toxic. To add further insult to injury, the gas is explosive as it often has a methane component.
Are Plumbing Pipes Designed to Prevent Smell?
Plumbing drainage systems are designed to keep this sewer gas inside the pipes and any that does exit to the atmosphere happens outside the home through the vent pipes that poke up through the roofs of houses.
Are Roof Vent Pipes Sewer Gas Exhaust Pipes?
No. Vent pipes on the roof are intake vents, not exhaust vents as most people believe.
When a large volume of water enters a plumbing drain pipe it pushes air in front of it towards the sewer or septic tank. This air must be replaced and it is sucked into the plumbing system through the roof vents.
Can a Dry Trap Cause Sewer Gas Smell?
Yes, a p trap under a fixture that has dried out and lost its water seal will cause sewer gas to enter your home.
The source of the sewer gas can be plumbing fixtures whose traps have gone dry or have lost enough water that the water seal within the trap has broken.
How Fast Can Water Evaporate From A Trap?
Water can evaporate very fast from a trap depending on the temperature and humidity in the house. In the arid Southwest, a trap could dry out in less than a week.
You'd be surprised to discover that water can rapidly evaporate from toilets and the traps below tubs, floor drains and just about any fixture within a few weeks or months in most cases. In fact, when my daughter is away at college I have to flush the toilet in her bathroom every three weeks to keep the bowl filled with water.
If I don't keep the toilet seat down, I have to flush the toilet weekly as some household pets seem to love to drink water from clean toilet bowls.
Is the Wax Gasket Under Toilets a Source of Sewer Gas Smell?
A common source of sewer gas smell is a failed wax gasket seal under a toilet. The wax gasket, when installed correctly, forms both a water and gas-tight seal between the toilet and the plumbing drainpipe system.
Sewer gas smell can leak into your home if this wax gasket has detached from the underside of your toilet. Copyright 2018 Tim Carter
A toilet that rocks back and forth as you sit on it is a clue the sewer gas is leaking past a failed wax gasket. Toilets should never move and should have tile grout between them and the floor. Caulk is an inferior sealant because it's flexible.
Can Cracks in Pipes Cause Sewer Gas Odor?
Cracks in either plumbing drain lines or vents pipes are the other source of sewer gas leaks. If the crack is in a drain line, you often see an associated water leak.
But vent pipe cracks are far more elusive. They can leak vast amounts of sewer gas and you might not be able to locate the source easily without a special machine.
Can an AC Drain Pipe Cause Sewer Gas Smell?
Yes, an AC condensate drain pipe can create a foul sewer gas smell. A rancid biofilm can form on the inside of the pipe.
The furnace and air conditioner clue tell me the leak might be in a vent pipe that is close to a return air duct. The leaking sewer gas is being sucked into the return air system and then broadcast throughout the entire house by the air handler in the furnace.
STOP!
Before you read more of my answer, understand now I can SOLVE your sewer gas problem on the phone in less than 15 minutes.
I've helped HUNDREDS of suffering homeowners just like you and the odor goes away in hours.
Tim Carter, Master Plumber and Founder of AsktheBuilder.com
Can a Smoke Test Find the Sewer Gas Leak?
Yes, sewer gas leaks can be quickly discovered by a plumber who owns a very cool machine that generates artificial smoke. The smoke is simply visual and does not create a lasting odor nor does it stain any surfaces in a house.
The plumber connects the smoke generation machine to the plumbing drain system and then blocks off the drain pipe leading to the sewer and caps off all roof vent pipes.
Once the smoke machine starts, it begins to slightly pressurize the plumbing system. If there is a cracked pipe or a fitting joint that is loose, the smoke readily exits at that point before it would bubble up through a fixture trap filled with water. Usually, the source of the sewer gas leak can be discovered in less than one hour.
Yes, sewer gas problems can also be caused by plumbing vent pipes that are clogged. This can happen in old homes where a cast iron vent pipe gets clogged by years of rust scale that falls off the inside of the pipe and clogs a 90-degree bend in the pipe.
Tennis balls, leaves, and all sorts of other debris can clog plumbing vent pipes. When a vent pipe is clogged, the replacement air needed by the system will get sucked into the pipes through a fixture inside the house.
When a large amount of water is placed into the drain pipes by a toilet or a powerful washing machine pump, it can readily suck the water out of a nearby bathtub trap or even a kitchen sink trap. Once this happens, sewer gas immediately enters the room through the dry fixture trap.
What Can Be Used to Slow Evaporation in a Trap?
Mineral oil can be used to slow evaporation in traps.
Fill them with water and then slowly pour four ounces of mineral oil into the fixture or floor drain. This mineral oil will evaporate far more slowly than water and the trap will remain wet for many months.
I received these emails after my column was printed.
"Tim:
In regard to the sewer odor problem in Shelby township Michigan: If they have a sump pump in the basement and have a french drain around the perimeter of the house, there could very easily be a broken sewer pipe right outside the basement wall. When it rains, tainted water gets in the drain, goes to the sump, odor is in basement, return air to the furnace distributes odor throughout house.
Enjoy your column in the Telegraph Herald."
Dave B., Dyersville
"Hi Tim:
My name is Gary Whiteman of Whiteman Land Service, Curtice, OH. We do pond construction and new home site development.
I read your article in the Toledo Blade, Dec. 18 and noticed that there was no mention of possible sewer gas from homes that have a leach field system. We have had many people complain of sewer gases from their basements. We have found that the cause was due to other contractors who did not remove previous farm drainage tile from under the leach field area and to the home foundation or basement.
Thus, the waste water travels through the farm tile under the leach bed to the drainage tile around the footer and into the sump crock inside the basement. To solve this would be to remove the farm tile between the leachfield and home.
Contractors excavating for the basement or foundation, and also the leach field, should remove these tiles at least twenty-five to thirty feet away from the home area. I hope this info will be helpful.
Regards,"
Gary
"Dear Tim,
We had a perplexing sewer gas odor in our home. After spending over $3,000 in fees with plumbers, locators and other experts, we still had no answer.
Finally a very knowledgeable plumber discovered an illegal connection in our drain system. The person who installed the condensate drain line from our air conditioner installed it without a vent line. Each time our washing machine would pump water into the drain system, the rush of water would siphon out the water in the small trap of the condensate line.
The sewer gas from the main sewer line would then travel up through the condensate line and into the actual air conditioning air handler. When the air conditioner would run, the moving air would suck vast amounts of sewer gas into the ducts and broadcast it through all of the air vents in our home.
Once the condensate line was disconnected from the drain line and piped directly outdoors, our sewer odor disappeared immediately."
Sandra Farmer, Paradise Valley, AZ
Column 599
Expert Advice For Your Home
Subscribe to the FREE Ask the Builder newsletter to receive professional advice for your home. Complete the form below and each week you'll get:
DIY Tips
Tool Reviews
Project Guides
Product Discounts, Giveaways & more.
Unsubscribe at any time. We respect your email privacy.